
How to fit an Impreza front splitter to a Forester STI

Thread Starter
Scooby Regular
iTrader: (6)
Joined: Oct 2010
Posts: 8,701
Likes: 128
From: Herts & Bucks
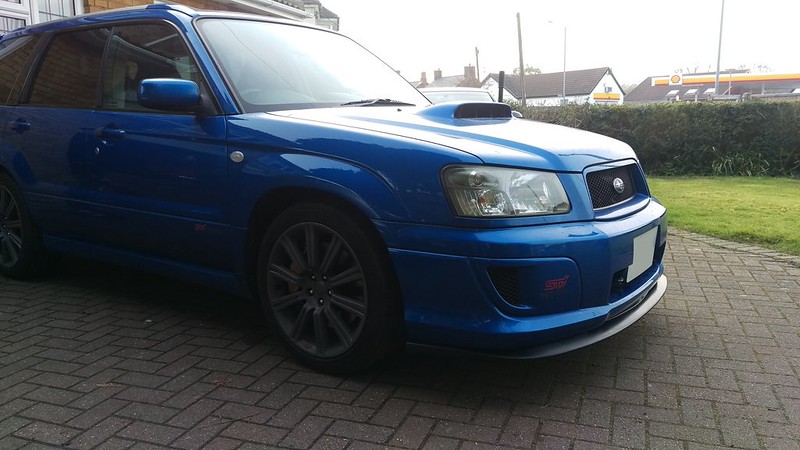
In the last couple of weeks I managed to modify & fit a2006-07 Hawkeye Impreza V-Ltd splitter to my 2004 SG9 Forester STI. I�ve beenasked if I could do a write up on this so others can also have a go, as thegenuine splitter is �400 and nearly impossible to get hold of worldwide now. Todate nobody is making an aftermarket version, so I was left with no option butto make something else fit! I�m very pleased with how it came out.  Especially as the whole thing cost me around �100 total.
I purchased the (Importoliagy) splitter from a trader onscoobynet on this link: https://www.scoobynet.com/subaru-parts-451/1009521-blobeye-and-hawkeye-pu-polyurethane-splitters-89-99-next-day-delivery.html
However, you could also try to fit the HT Autos version fromtheir site: http://htautos.co.uk/shop/subaru-impreza-v-ltd-06-07-hawkeye-front-lip-spoiler-splitter/
I have the HT Autos version fitted to my 2006 HawkeyeImpreza and to be honest it may suit the forester front bumper better than thescoobynet (Importoliagy) version I purchased and fitted as the little pieces Isanded are not there and the front under bumper curve is not as severe. But tobe clear, my instructions below are for the Importoliagy version (although someof the dimensions and cuts will still be the same for other versions.
Other parts fitted were: Self drill self-tap screws providedwith the splitter, M5 X20mm long stainless steel cheese head screws, M5stainless steel shakeproof washers, M5 x 20mm diameter stainless steel pennywashers, M5 stainless steel nylock nuts.
Tools: Flat blade & Philips screwdriver, masking tape,electric drill, 1.5 � 2.0mm drill bit (to pre drill self-drill screw holes),5mm drill bit for M5 fittings, junior hack saw, large hacksaw blade (no needfor actual hacksaw), satin black spray paint.
Procedure:


Please use this as a guide only and not gospel as I don�tknow if your splitter or bumper differ from mine and if alternative cuts arerequired to make everything fit nicely.
Hope this helps anyone wanting to do the same. Good luck!
BrownPantsRacing.
Especially as the whole thing cost me around �100 total. I purchased the (Importoliagy) splitter from a trader onscoobynet on this link: https://www.scoobynet.com/subaru-parts-451/1009521-blobeye-and-hawkeye-pu-polyurethane-splitters-89-99-next-day-delivery.html
However, you could also try to fit the HT Autos version fromtheir site: http://htautos.co.uk/shop/subaru-impreza-v-ltd-06-07-hawkeye-front-lip-spoiler-splitter/
I have the HT Autos version fitted to my 2006 HawkeyeImpreza and to be honest it may suit the forester front bumper better than thescoobynet (Importoliagy) version I purchased and fitted as the little pieces Isanded are not there and the front under bumper curve is not as severe. But tobe clear, my instructions below are for the Importoliagy version (although someof the dimensions and cuts will still be the same for other versions.
Other parts fitted were: Self drill self-tap screws providedwith the splitter, M5 X20mm long stainless steel cheese head screws, M5stainless steel shakeproof washers, M5 x 20mm diameter stainless steel pennywashers, M5 stainless steel nylock nuts.
Tools: Flat blade & Philips screwdriver, masking tape,electric drill, 1.5 � 2.0mm drill bit (to pre drill self-drill screw holes),5mm drill bit for M5 fittings, junior hack saw, large hacksaw blade (no needfor actual hacksaw), satin black spray paint.
Procedure:
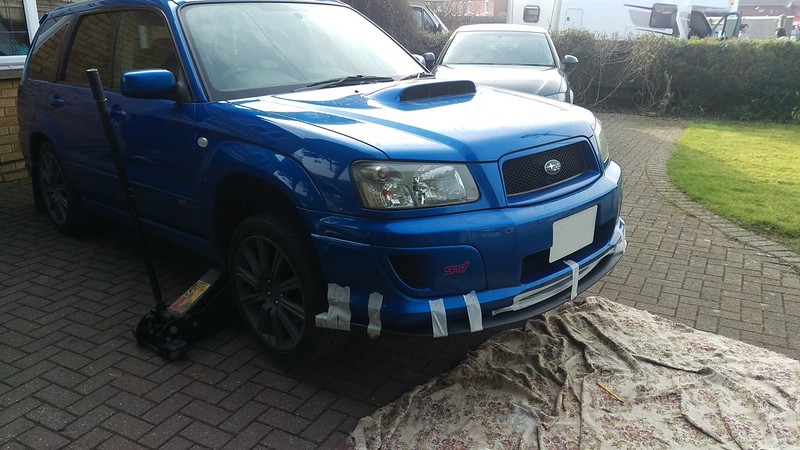
- Apply masking tape to the top of the splitter andto the bottom and front edge of the car front bumper
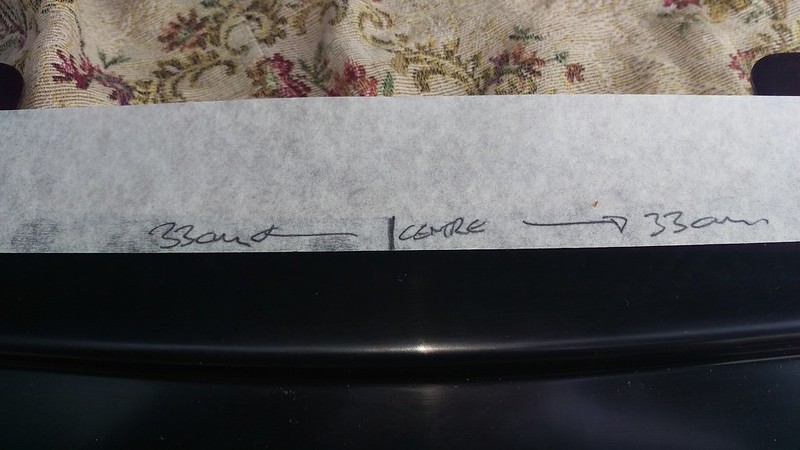
- Measure both the splitter and bumper to find thedead centre points on both and make a line on each to indicate centre position.It is important to do this accurately as this will be the datum point for allcuts and final fitting position.
- Hold the splitter up to the underside of thefront bumper in line with the centre marks and tape it up into position. BeforeI did this I really doubted it would ever fit. I lined the most upper centrepart of the splitter up with the front edge of the bumper so they were almostflush. If you wish you could set this back a little further, but it willcompromise the fitting area (mating surfaces) that are used to bolt the 2 partstogether later if moved back much further.
- Once happy the overall location is acceptable,remove the splitter from the bumper.
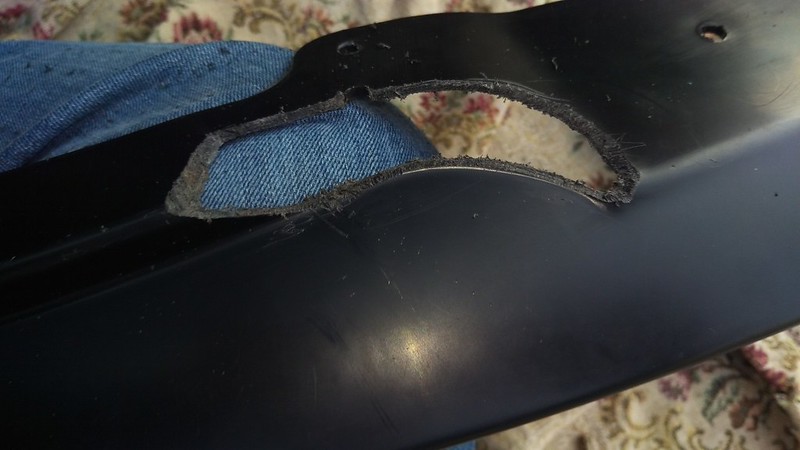
- Trial fitting the splitter helped me to determinethe amount I needed to trim from the splitter sides and front. At the front ofthe splitter measure 33cm in either direction of the centre mark for the first cutpoint at either side. Make a mark on the tape to indicate this.
- At one side of the splitter use the juniorhacksaw to start to cut into the splitter at the 33cm mark. This was at anapproximate 30deg angle to match the curve profile seen at the underside of thefront bumper.
- Cut at this angle for about an inch as shown inthe pictures, repeat this on the other side of the splitter at the other 33cmmark.
- Now use the loose full hacksaw blade tocarefully continue the cut along the splitter lower fold line.
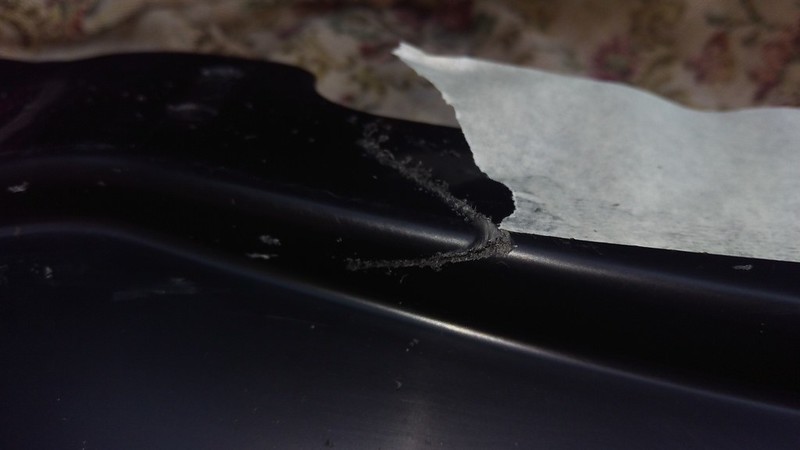
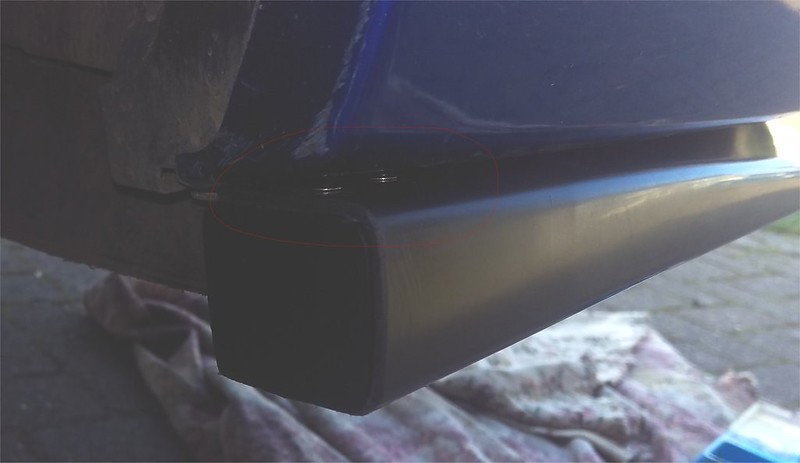
- Once you get to the front most point of thesplitter where the upper section blends into the front splitter profile, stopand withdraw the hacksaw blade. Then start again from the top of the originalcut mark horizontally until you meet up with the 1st cut and areable to remove a complete section of splitter. The remaining splitter holeshould look like the pictures below.
- Making these cuts at either side will now allowthe splitter to sit flush up to the forester front bumper and the remaining topsection should fill the higher void perfectly. NOTE: I purposely only removedthe section shown below and no more ensuring I didn�t completely cut throughthe splitter edge as I wanted to retain as much strength in the splitter aspossible.
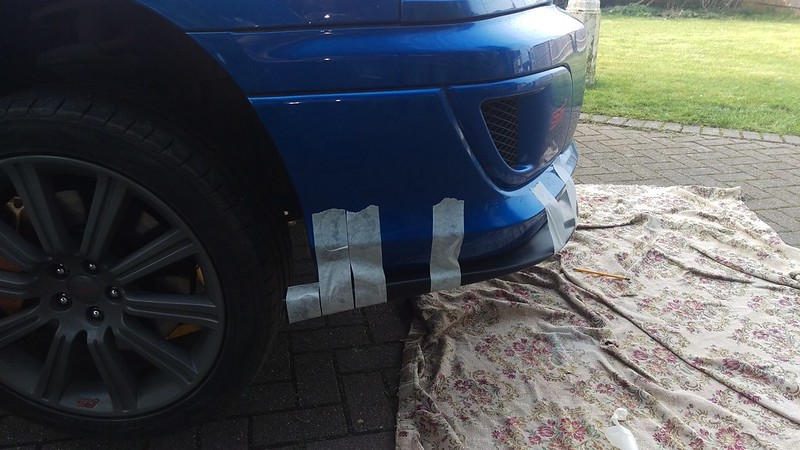
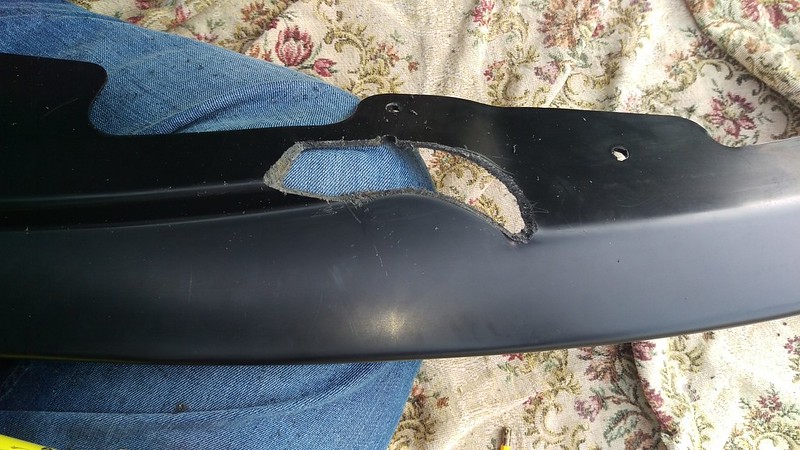
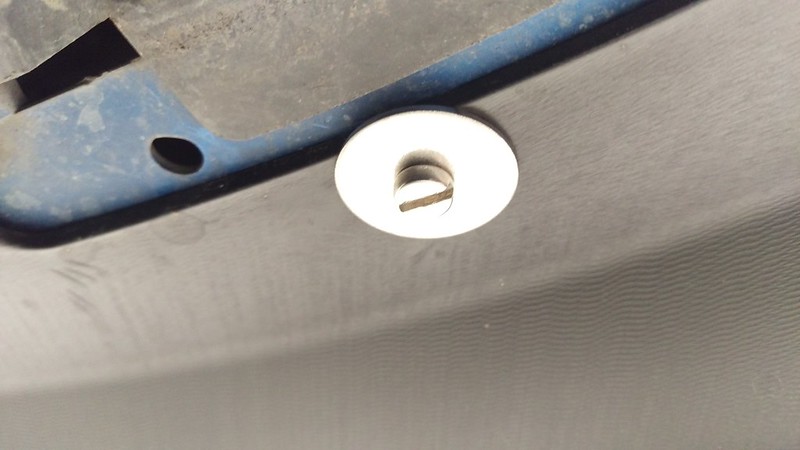
- It should now be possible to fit the splitter tothe underside of the bumper. Start by lining up the centre mark on the splitterwith the centre mark on the bumper again. If required, you can tape thesplitter back onto the bumper, but as I was confident I just held it in placeand drilled the 1st pilot hole in the middle. Once the 1stcentre self-drill screw is in place, work move to the very ends and screw oneside in place with 1 single self-drill screw at a position you are happy withthe side profile.
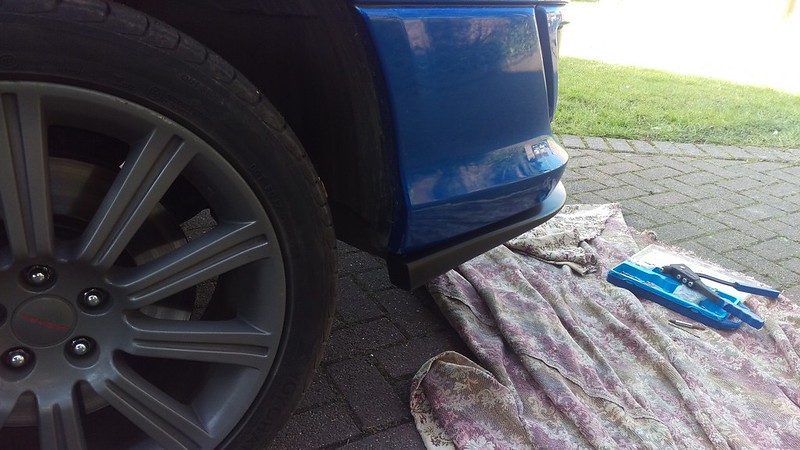
- Measure the amount of overhang you have on thesplitter past the edge of the bumper (this can be seen again in one of my 1st3 pics. In my case I had 55mm overhang on the screwed side, so I marked it withtape and marked the loose end to 55mm also. This enabled me to make sure theends were fitting the same on both sides and the profile would remain constantwhen done.
- Screw the loose side in place and slowly work aroundthe underside of the splitter screwing it to the bumper with the self-drillscrews until it is mounted.
- You can now remove all the masking tape frontthe front of the splitter and check you are happy with the fit.
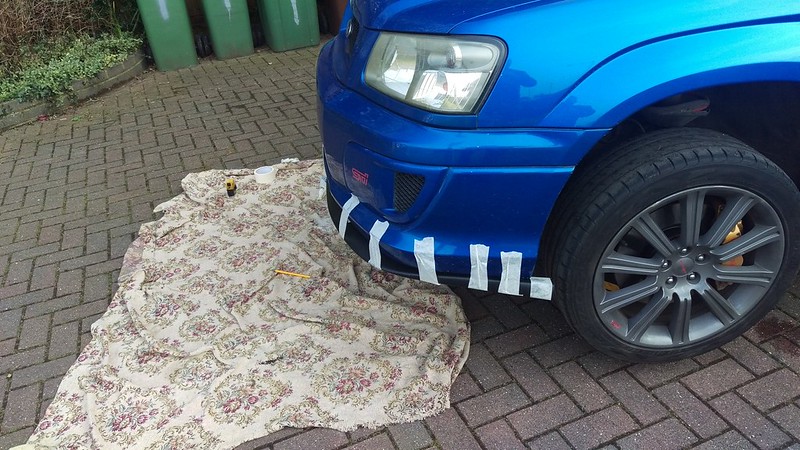
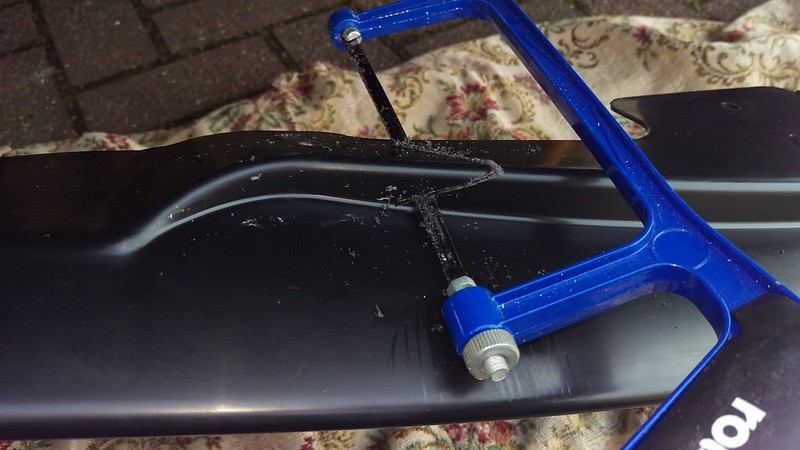
- At this point I used the large hacksaw blade tocut off the 55mm excess from both ends of the splitter in-line with the bumper.DO NOT THROW THESE PIECES AWAY as they can be used later.
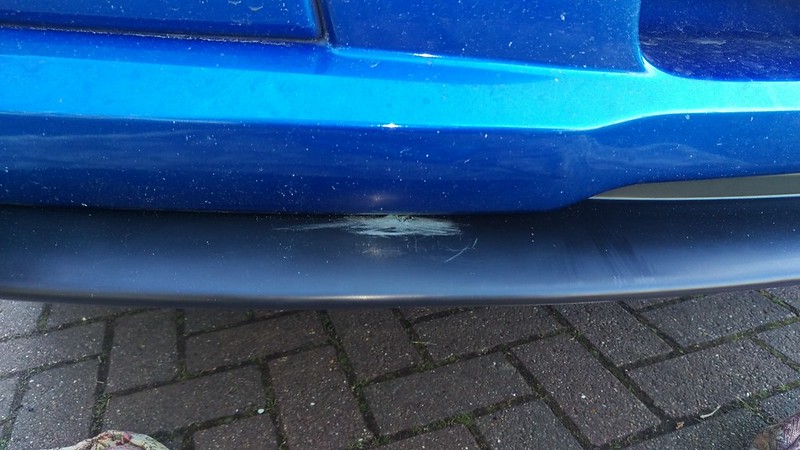
- At this point I wanted it perfect as I could(only very just) see the front of the drop curve on the splitter. So I lightlysanded this back flush ready for painting later. NOTE: If you set the splitterback a little further than I did you will hide these minor points anyhow. To behonest, you couldn�t see them but I�m a perfectionist.
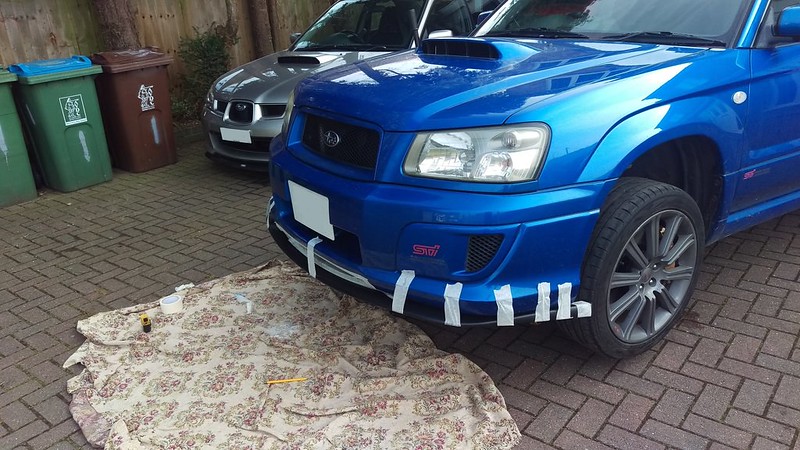
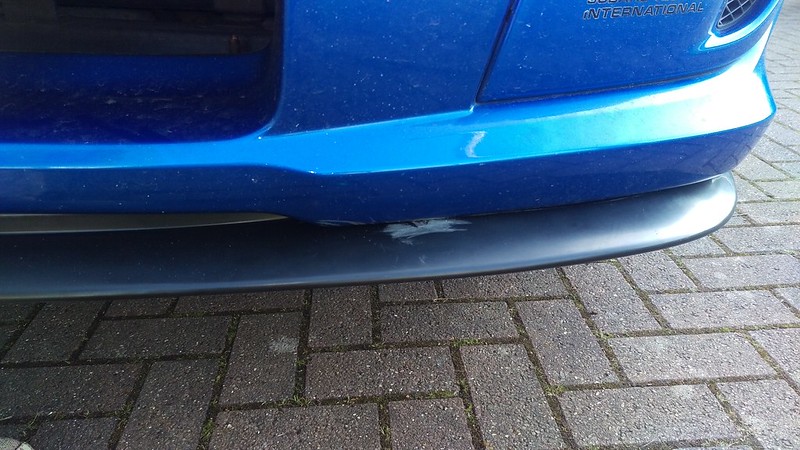
- Now to re-make the side sections and make it alllook factory fitted, as it looked a little incomplete at this angle. It lookedfine when the car was on the floor and it can be left like this, but I wantedit perfect.
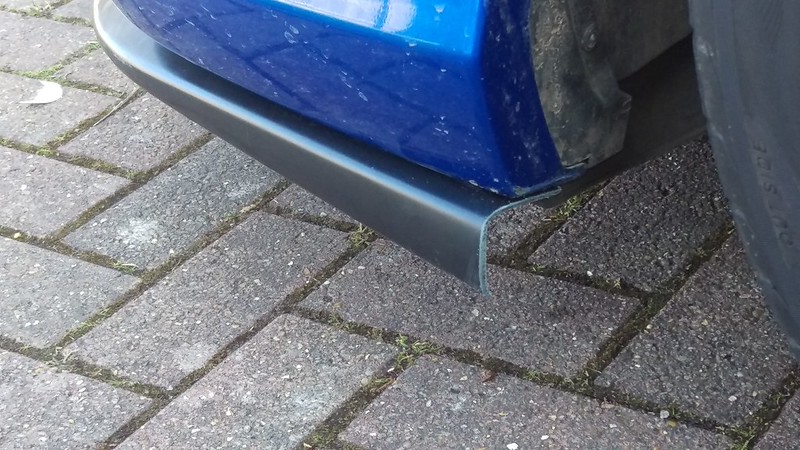
- As I kept the original cut-off end pieces I wasable to offer these up inside the ends of the splitter flush with the cutmarks, I marked the excess material that overhung underneath the 55mm cut-offs,removed the excess with the hacksaw and then rivet them on to the ends of thesplitter (with the ends of the splitter unscrewed from the bumper). This closedthe ends off and completed them.
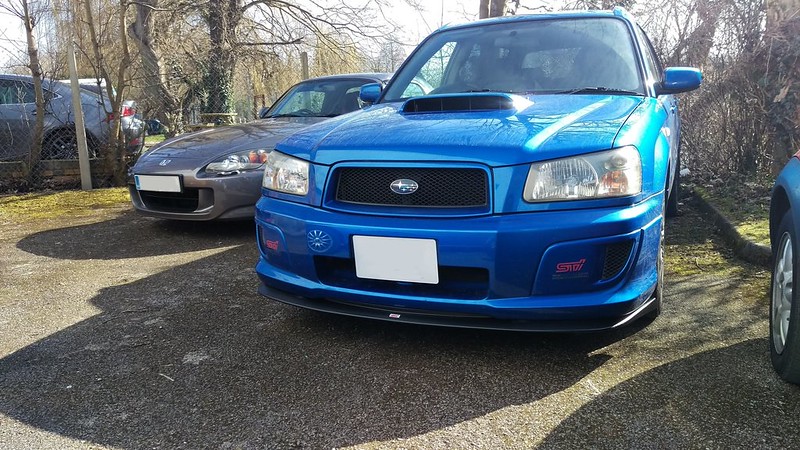
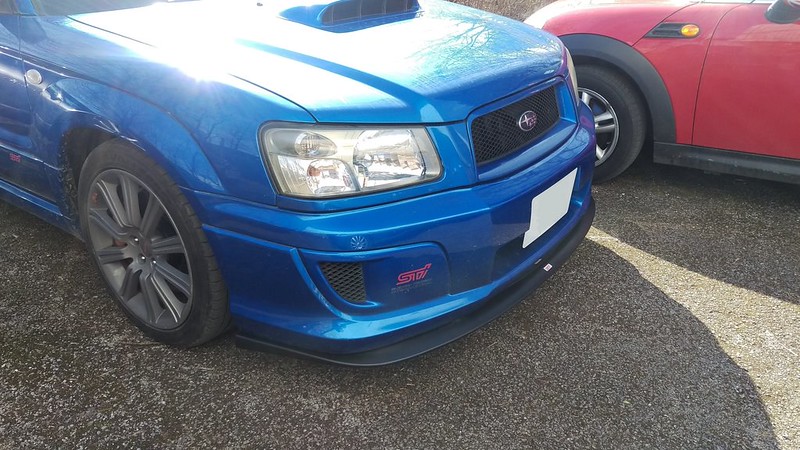
- I then completely removed the splitter, sprayedthe whole splitter in satin black & refitted it to the car with the self-drillscrews, making sure it fitted just right all the way around.
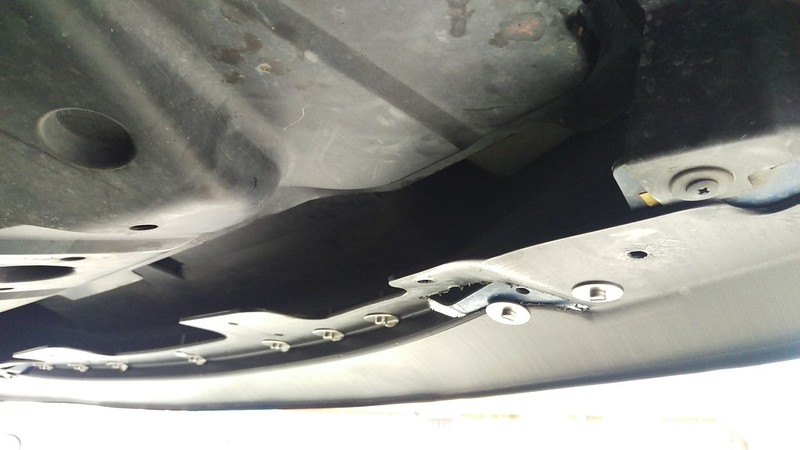
- Now one by one I removed the self-drill screws,re-drilled the hole to 5mm and fitted the stainless steel screws, washers andlock nuts to ensure everything was nice and tight. DO NOT leave the self-drillscrews in permanently as these always fail in my experience. I�ve seensplitters ripped off at speed under the car, knocked off by kerbs etc etc.Always bolt them on with nuts, bolts & large penny washers.
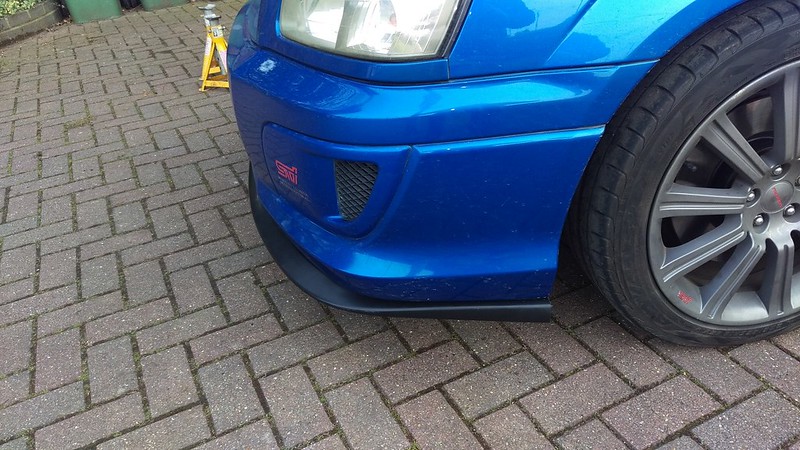
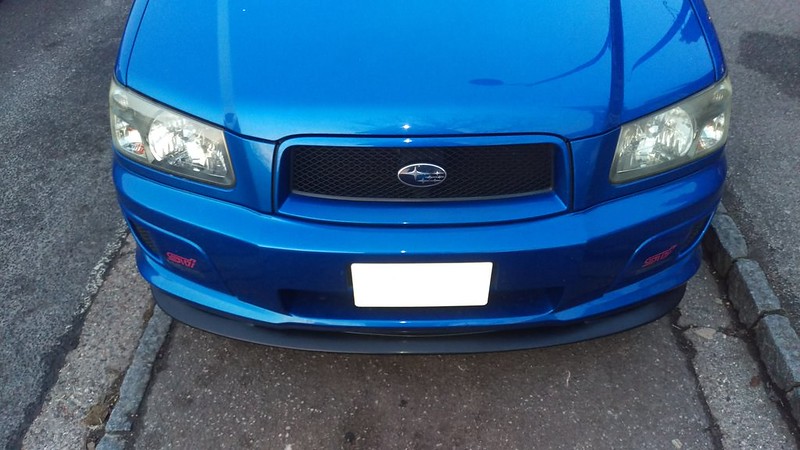
- Done!
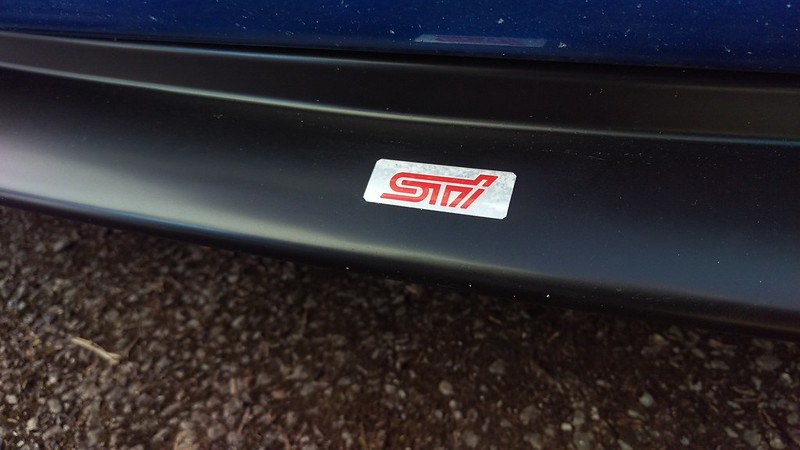
- Although I also made an STI logo for the frontcos I�m a tart!
- Couple more pics of the completed item. Looksfactory installed now.
Please use this as a guide only and not gospel as I don�tknow if your splitter or bumper differ from mine and if alternative cuts arerequired to make everything fit nicely.
Hope this helps anyone wanting to do the same. Good luck!
BrownPantsRacing.
Last edited by BrownPantsRacing; Jul 24, 2017 at 12:04 PM.
Thread Starter
Scooby Regular
iTrader: (6)
Joined: Oct 2010
Posts: 8,701
Likes: 128
From: Herts & Bucks
Some of the text formatting has gone slightly wrong and closed up spaces etc in the copy/paste thread creation process, but at least all the pics are now finally working so hopefully you get the idea.
Nice post there BPR, thanks for sharing. Your Forester posts are starting to sway me from a bug Sti wagon as my next purchase!! I see a black STi Forester in Edinburgh quite a lot and they don't look anywhere near as 'MPV' as in the pics, really quite compact and low! Me likey
Thread Starter
Scooby Regular
iTrader: (6)
Joined: Oct 2010
Posts: 8,701
Likes: 128
From: Herts & Bucks
Thanks mate. Yep, I thought the same for years to be honest until I went to look at one then realised they are quite compact and low, not 4x4 MPV jacked up at all. Very car like indeed. Lovely cars to drive, I'm honestly thinking about selling my Impreza now and just keeping the Forester as I like it that much. Never thought I would.
Lovely cars to drive, I'm honestly thinking about selling my Impreza now and just keeping the Forester as I like it that much. Never thought I would.

Thread
Thread Starter
Forum
Replies
Last Post
scottydouk
Subaru
21
Jul 11, 2016 01:20 PM
Jagga35
Car Parts For Sale
2
Feb 18, 2016 12:35 PM