
Type R


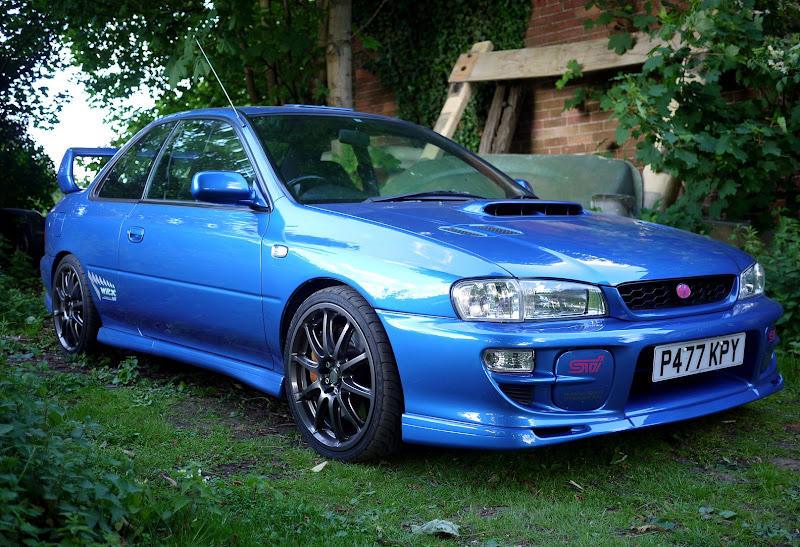
After months of trying to make a decision and then looking and viewing, I've just collected a truly stunning Type R...
Big thanks to Dave Garret (member) who has made a first class job of bringing an exceptional Scooby to an even higher standard. For sale thread
Car has covered just 40K miles. The underneath is 'as good' as the outer bodywork, which is amazing - see pics below
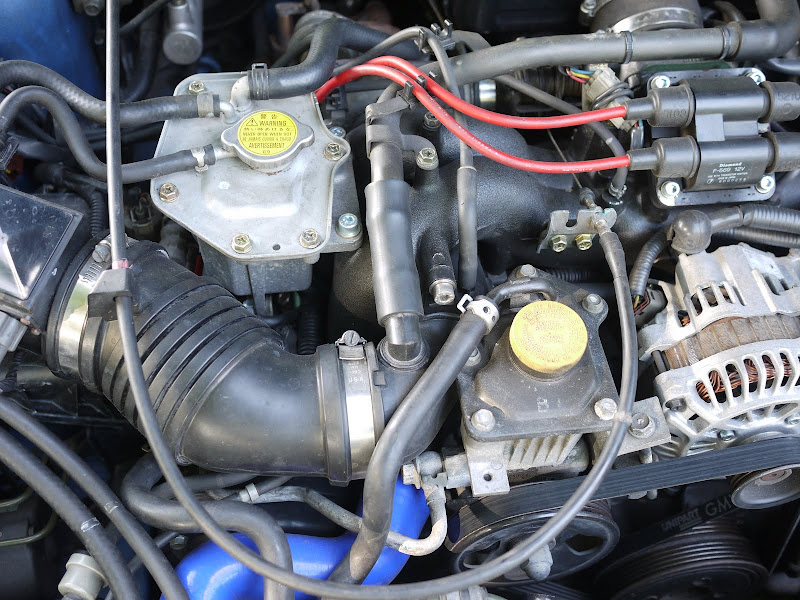
The engine is from a WR1 which has been rebuilt by Pennine Subaru. It hasn't been mapped yet as the engine has only got 1000 running-in miles, but I have to say of all the 7 Scooby's owned, and others I've listened to, this engine already is the sweetest I've heard. Me and a couple of mechanic, ex racers have standing over the engine bay just listening to the music
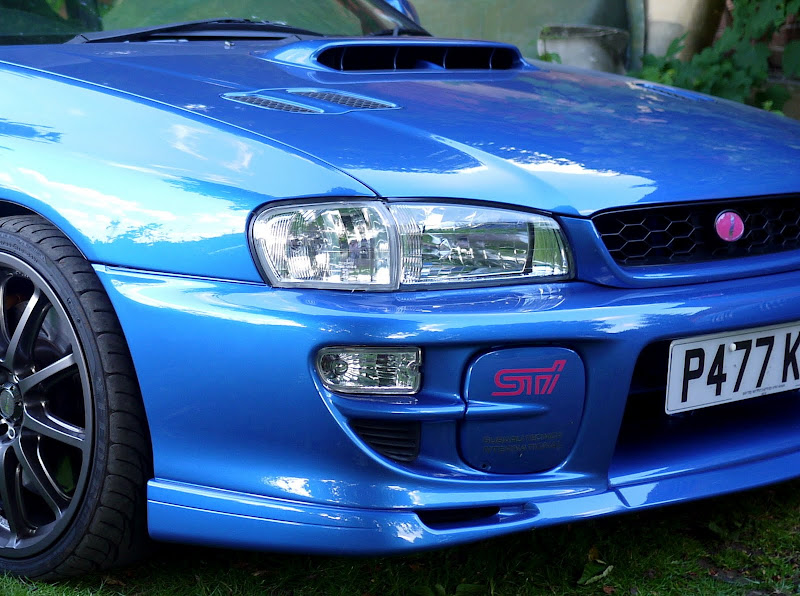
Here's a couple of pics (more on the for sale thread)

Big thanks to Dave Garret (member) who has made a first class job of bringing an exceptional Scooby to an even higher standard. For sale thread
Car has covered just 40K miles. The underneath is 'as good' as the outer bodywork, which is amazing - see pics below
The engine is from a WR1 which has been rebuilt by Pennine Subaru. It hasn't been mapped yet as the engine has only got 1000 running-in miles, but I have to say of all the 7 Scooby's owned, and others I've listened to, this engine already is the sweetest I've heard. Me and a couple of mechanic, ex racers have standing over the engine bay just listening to the music
Here's a couple of pics (more on the for sale thread)


Needs a few bits n bobs doing, like fitting the Simtek along with a K&N, then mapping. Also needs undersealing at some point during the summer.
Getting it geo'd tomorrow as it needs it, then I'll decide if it needs any suspension changes, but that's about it
I think most scooby's you buy need a few personalisations to make them yours

Thanks for the comments


Trending Topics
Scooby Regular
iTrader: (12)
Joined: Jun 2007
Posts: 3,734
Likes: 0
From: 700+ WR1 aka The Vuvu Zela...10.6 @ 136 weighing 1370kg....say no more....

Spot on Phil - it's a WRX V-Ltd so has ABS instead - which I would rather have tbh. The STi has the DCCD
Needs a few bits n bobs doing, like fitting the Simtek along with a K&N, then mapping. Also needs undersealing at some point during the summer.
Getting it geo'd tomorrow as it needs it, then I'll decide if it needs any suspension changes, but that's about it
I think most scooby's you buy need a few personalisations to make them yours
Thanks for the comments
I'd add a newage sti top mount to your list

More suspension goodies...
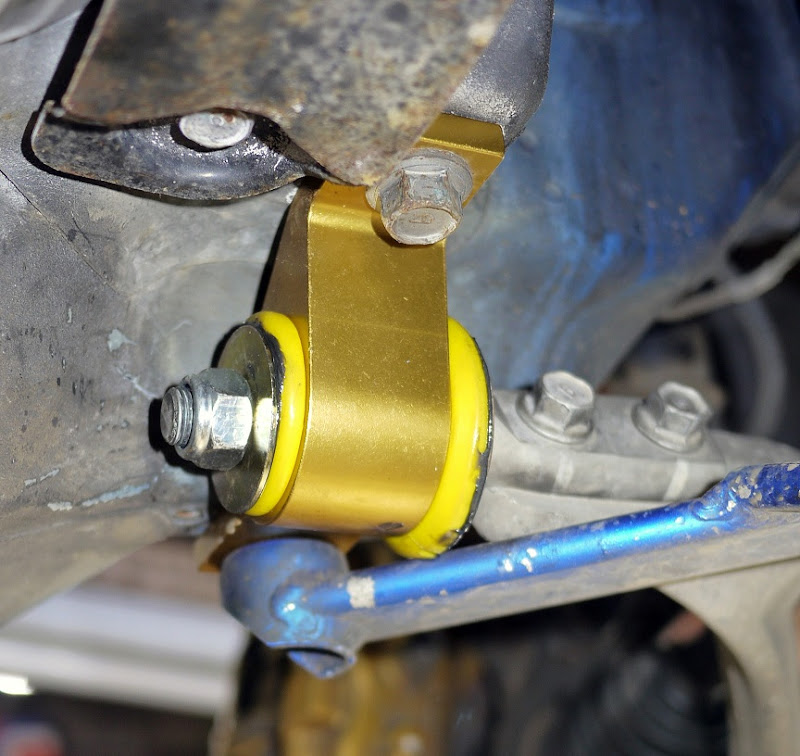
F&R ARB's (24/22), ALK, roll centre & bump steer correction, P1 springs, solid drop links, rear camber bolts, Whiteline HD steering rack bushes

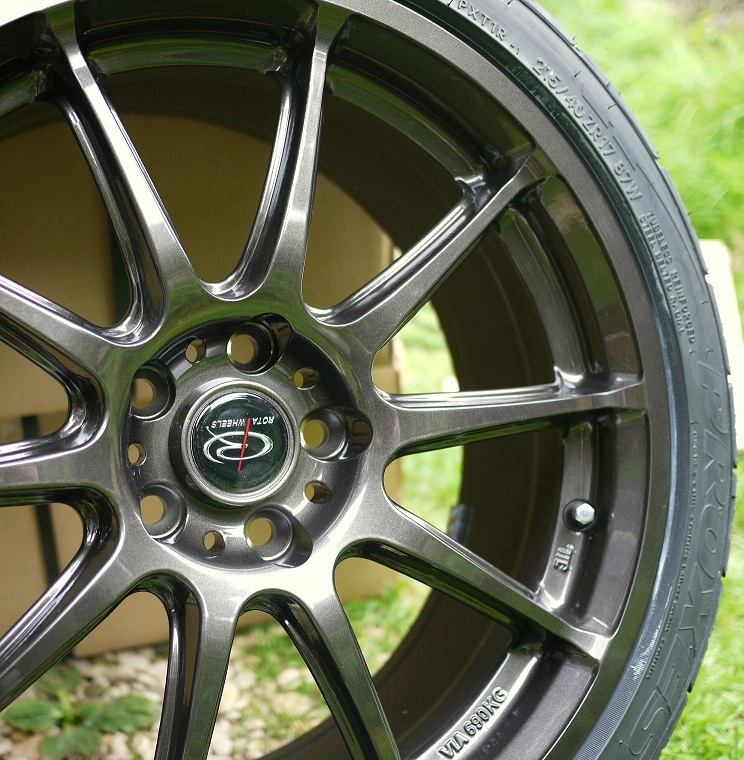
Rota GRA's...

Bits fitted today

ALK was a bit of a ball ache - bushing had to be press fitted
And here's the car for a comparison immediately after fitting (17" wheels not fitted yet)

Geo being done in the morning...
F&R ARB's (24/22), ALK, roll centre & bump steer correction, P1 springs, solid drop links, rear camber bolts, Whiteline HD steering rack bushes
Rota GRA's...
Bits fitted today
ALK was a bit of a ball ache - bushing had to be press fitted
And here's the car for a comparison immediately after fitting (17" wheels not fitted yet)
Geo being done in the morning...
Last edited by bonesetter; Jun 8, 2011 at 07:49 PM.
Looking good. Front DL will not show any improvement IMO.. Probs better off with the OE ones as they slant to suit the roll bar better. Few lads I know have used the WL front DL and they've popped out.
The angle of the DL's were quite oblique when I first fitted the bar, but after a bit of fettleing I have managed to get a more satisfactory vertical alignment. However, I will watching them like a hawk
The front wheel in the pic looks high in the arch, which might be something to do with the arb, although the nearside looks very low - the suspension does have some settleing in to do however, which I'll start tomorrow after geo


Scooby Regular
Joined: Feb 2005
Posts: 512
Likes: 0
From: Germany
Nice! The only reason the bushing has pulled on the alu/poly droplinks is due to incorrect installation. Namely, the installer put the incorrect sized washer at the end of the bushing. You need to put the larger washer at the end of the "empty" side of the endlink. It captures the bushing and keeps it from pulling through. Every single time I've seen a pulled bushing it has been 100% due to installer error and this was the cause despite it being clearly spelled out in the included instructions. Your endlinks, at least the one's pictured, look to be installed correctly. I like the OEM ball joint droplinks but they don't hold up over time on a larger bar. I've had the ball joint pop out using a heavy bar and sticky tires. For road use you should be fine with the OEM but the WL droplink will be a more secure solution if you go sticky or put lots of load on the bar. I agree, you won't feel a difference between the two as the connection is already direct with the ball joint style drop links. Its a more noticeable difference with the steel control arms (GC) and the plastic droplinks. In this case, its more of a security issue/solution.
One thing of concern is the missing cotter pins on the castellated nuts on the roll center kit ball joint and tie rod. Make sure you have those installed.
I don't see why you'd need to press fit the ALK bushing. You yank the control arm down with a pry bar and slide the whole ALK right onto the control arm. Easy. You have to unbolt the tranny carrier so you can clear it when you slide the ALK on.
Actually, before you get your geometry set do one last thing: the free caster mod. You need to rotate the rear pin 180 deg on the front control arm. you'll get about .5 deg more caster this way. for free! so if you can put off your geo for a few hours, do this mod first.
massive thread on it, though pics are missing or buried deep in the thread: http://www.iwsti.com/forums/gd-suspe...astor-mod.html
BTW, gorgeous, gorgeous car. Love it. And good choice on going with 17"s. They are a better size for the classic.
As far as the ride height looking high in that pic, have you rolled the car at all after lowering the car on the ground? Or did you take the pic directly after letting the car on the ground? If so, the wheels are binding inwards and keeping the ride height high. all you have to do is roll the car forward a few meters and then back and the suspension will settle properly.
As a further heads up, the ALK bolts and ARB/droplinks should be given their final torquing when the suspension is fully loaded not up in the air on jack stands. you'll need the front wheels on ramps for this. And if you want to be really picky about how your car handles, you should loosen and retighten your front control front bolt (17mm) fully loaded as well. It will "release" the rotated tension of the bushing and reset it to zero under load. You want rubber bushings to be at their "rest" postion, i.e. not rotated when the car is at its static ride height.
As far as the engine being from a WR1, perhaps its just the shortblock? The intake manifold is not from a late model, i.e. WR1 STi. Actually pretty much nothing I can see up top is GD STi/WR1.
Here's a pic of my intake manifold which is an STi V8 (stock WRX intercooler tho.):

Your endlinks, at least the one's pictured, look to be installed correctly. I like the OEM ball joint droplinks but they don't hold up over time on a larger bar. I've had the ball joint pop out using a heavy bar and sticky tires. For road use you should be fine with the OEM but the WL droplink will be a more secure solution if you go sticky or put lots of load on the bar. I agree, you won't feel a difference between the two as the connection is already direct with the ball joint style drop links. Its a more noticeable difference with the steel control arms (GC) and the plastic droplinks. In this case, its more of a security issue/solution.One thing of concern is the missing cotter pins on the castellated nuts on the roll center kit ball joint and tie rod. Make sure you have those installed.
I don't see why you'd need to press fit the ALK bushing. You yank the control arm down with a pry bar and slide the whole ALK right onto the control arm. Easy. You have to unbolt the tranny carrier so you can clear it when you slide the ALK on.
Actually, before you get your geometry set do one last thing: the free caster mod. You need to rotate the rear pin 180 deg on the front control arm. you'll get about .5 deg more caster this way. for free! so if you can put off your geo for a few hours, do this mod first.
massive thread on it, though pics are missing or buried deep in the thread: http://www.iwsti.com/forums/gd-suspe...astor-mod.html
BTW, gorgeous, gorgeous car. Love it. And good choice on going with 17"s. They are a better size for the classic.
As far as the ride height looking high in that pic, have you rolled the car at all after lowering the car on the ground? Or did you take the pic directly after letting the car on the ground? If so, the wheels are binding inwards and keeping the ride height high. all you have to do is roll the car forward a few meters and then back and the suspension will settle properly.
As a further heads up, the ALK bolts and ARB/droplinks should be given their final torquing when the suspension is fully loaded not up in the air on jack stands. you'll need the front wheels on ramps for this. And if you want to be really picky about how your car handles, you should loosen and retighten your front control front bolt (17mm) fully loaded as well. It will "release" the rotated tension of the bushing and reset it to zero under load. You want rubber bushings to be at their "rest" postion, i.e. not rotated when the car is at its static ride height.
As far as the engine being from a WR1, perhaps its just the shortblock? The intake manifold is not from a late model, i.e. WR1 STi. Actually pretty much nothing I can see up top is GD STi/WR1.
Here's a pic of my intake manifold which is an STi V8 (stock WRX intercooler tho.):
Last edited by Arnie_1; Jun 8, 2011 at 11:58 PM.

Scooby Regular
Joined: Jun 2006
Posts: 8,089
Likes: 0
From: Edinburgh (ish)
Nice! The only reason the bushing has pulled on the alu/poly droplinks is due to incorrect installation. Namely, the installer put the incorrect sized washer at the end of the bushing. You need to put the larger washer at the end of the "empty" side of the endlink. It captures the bushing and keeps it from pulling through. Every single time I've seen a pulled bushing it has been 100% due to installer error and this was the cause despite it being clearly spelled out in the included instructions. Your endlinks, at least the one's pictured, look to be installed correctly. One thing of concern is the missing cotter pins on the castellated nuts on the roll center kit ball joint and tie rod. Make sure you have those installed.
Actually, before you get your geometry set do one last thing: the free caster mod. You need to rotate the rear pin on the front control arm. you'll get a bit more caster this way. for free!
BTW, gorgeous, gorgeous car. Love it.
Your endlinks, at least the one's pictured, look to be installed correctly. One thing of concern is the missing cotter pins on the castellated nuts on the roll center kit ball joint and tie rod. Make sure you have those installed.Actually, before you get your geometry set do one last thing: the free caster mod. You need to rotate the rear pin on the front control arm. you'll get a bit more caster this way. for free!
BTW, gorgeous, gorgeous car. Love it.
Last edited by andythejock01wrx; Jun 8, 2011 at 11:25 PM.