
Type R

Scooby Regular
iTrader: (2)
Joined: May 2000
Posts: 8,626
Likes: 1
From: Class record holder at Pembrey Llandow Goodwood MIRA Hethel Blyton Curborough Lydden and Snetterton
Very nice.
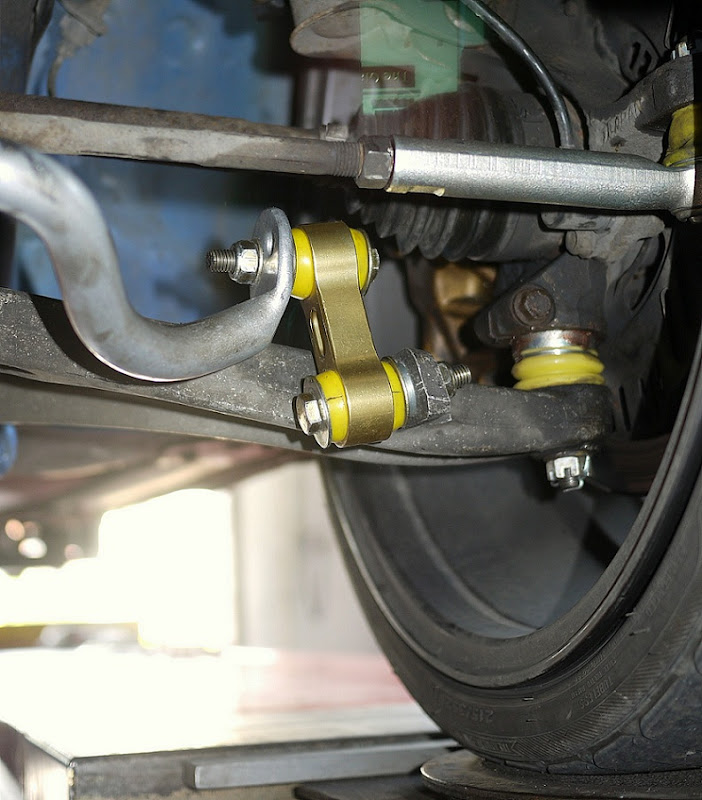
Those front droplinks are for steel wishbones and not the alloy ones you have, which is why they sit wrong. As mentioned earlier the oe ones are solid anyway and don't need replacing unless worn.
Those front droplinks are for steel wishbones and not the alloy ones you have, which is why they sit wrong. As mentioned earlier the oe ones are solid anyway and don't need replacing unless worn.

Scooby Regular
Joined: Feb 2005
Posts: 512
Likes: 0
From: Germany
edit: ok, did some research on some old threads and found this from this threadhttp://suspensionparts.info/showthre...=1954#post1954:
G'day,
An explanation of the differences in the application of Impreza front end links kits KLC30 and KLC32 follows:
Length: The length of both types is the same.
Hole Diameter:
KLC30: Top 8mm. Bottom 10mm
KLC32: Both holes 10mm
KLC30: Replacement end link kit for OE plastic type end links as fitted to "most" vehicles with steel front lower control arms.
KLC32: Replacement end link kit for OE ball joint type end links as fitted to "most" vehicles with alloy front lower control arms.
I trust the above is helpful.
Cheers
Peter
peter@whiteline.com.au
I'm going to send them an email to find out though.
bonesetter - can you get a pic of the droplink angle on the ARB with the car on the ground (and rolled back and forth to fully settle it)? I want to see what the angle of the droplink looks like.
Last edited by Arnie_1; Jun 9, 2011 at 08:20 AM.


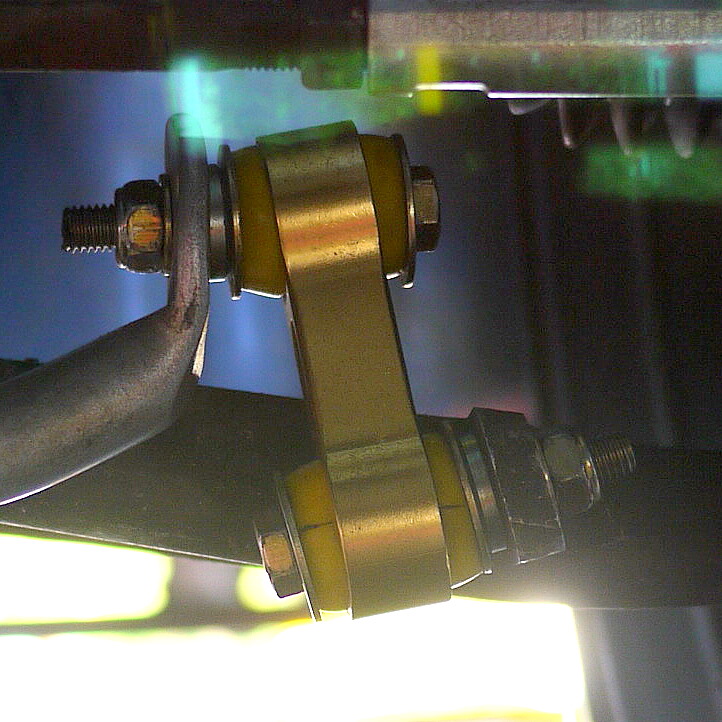
Nice! The only reason the bushing has pulled on the alu/poly droplinks is due to incorrect installation. Namely, the installer put the incorrect sized washer at the end of the bushing. You need to put the larger washer at the end of the "empty" side of the endlink. It captures the bushing and keeps it from pulling through. Every single time I've seen a pulled bushing it has been 100% due to installer error and this was the cause despite it being clearly spelled out in the included instructions.  Your endlinks, at least the one's pictured, look to be installed correctly. I like the OEM ball joint droplinks but they don't hold up over time on a larger bar. I've had the ball joint pop out using a heavy bar and sticky tires. For road use you should be fine with the OEM but the WL droplink will be a more secure solution if you go sticky or put lots of load on the bar. I agree, you won't feel a difference between the two as the connection is already direct with the ball joint style drop links. Its a more noticeable difference with the steel control arms (GC) and the plastic droplinks. In this case, its more of a security issue/solution.
One thing of concern is the missing cotter pins on the castellated nuts on the roll center kit ball joint and tie rod. Make sure you have those installed.
I don't see why you'd need to press fit the ALK bushing. You yank the control arm down with a pry bar and slide the whole ALK right onto the control arm. Easy. You have to unbolt the tranny carrier so you can clear it when you slide the ALK on.
Actually, before you get your geometry set do one last thing: the free caster mod. You need to rotate the rear pin 180 deg on the front control arm. you'll get about .5 deg more caster this way. for free! so if you can put off your geo for a few hours, do this mod first.
massive thread on it, though pics are missing or buried deep in the thread: http://www.iwsti.com/forums/gd-suspe...astor-mod.html
BTW, gorgeous, gorgeous car. Love it. And good choice on going with 17"s. They are a better size for the classic.
As far as the ride height looking high in that pic, have you rolled the car at all after lowering the car on the ground? Or did you take the pic directly after letting the car on the ground? If so, the wheels are binding inwards and keeping the ride height high. all you have to do is roll the car forward a few meters and then back and the suspension will settle properly.
As a further heads up, the ALK bolts and ARB/droplinks should be given their final torquing when the suspension is fully loaded not up in the air on jack stands. you'll need the front wheels on ramps for this. And if you want to be really picky about how your car handles, you should loosen and retighten your front control front bolt (17mm) fully loaded as well. It will "release" the rotated tension of the bushing and reset it to zero under load. You want rubber bushings to be at their "rest" postion, i.e. not rotated when the car is at its static ride height.
As far as the engine being from a WR1, perhaps its just the shortblock? The intake manifold is not from a late model, i.e. WR1 STi. Actually pretty much nothing I can see up top is GD STi/WR1.
Here's a pic of my intake manifold which is an STi V8 (stock WRX intercooler tho.):
Your endlinks, at least the one's pictured, look to be installed correctly. I like the OEM ball joint droplinks but they don't hold up over time on a larger bar. I've had the ball joint pop out using a heavy bar and sticky tires. For road use you should be fine with the OEM but the WL droplink will be a more secure solution if you go sticky or put lots of load on the bar. I agree, you won't feel a difference between the two as the connection is already direct with the ball joint style drop links. Its a more noticeable difference with the steel control arms (GC) and the plastic droplinks. In this case, its more of a security issue/solution.One thing of concern is the missing cotter pins on the castellated nuts on the roll center kit ball joint and tie rod. Make sure you have those installed.
I don't see why you'd need to press fit the ALK bushing. You yank the control arm down with a pry bar and slide the whole ALK right onto the control arm. Easy. You have to unbolt the tranny carrier so you can clear it when you slide the ALK on.
Actually, before you get your geometry set do one last thing: the free caster mod. You need to rotate the rear pin 180 deg on the front control arm. you'll get about .5 deg more caster this way. for free! so if you can put off your geo for a few hours, do this mod first.
massive thread on it, though pics are missing or buried deep in the thread: http://www.iwsti.com/forums/gd-suspe...astor-mod.html
BTW, gorgeous, gorgeous car. Love it. And good choice on going with 17"s. They are a better size for the classic.
As far as the ride height looking high in that pic, have you rolled the car at all after lowering the car on the ground? Or did you take the pic directly after letting the car on the ground? If so, the wheels are binding inwards and keeping the ride height high. all you have to do is roll the car forward a few meters and then back and the suspension will settle properly.
As a further heads up, the ALK bolts and ARB/droplinks should be given their final torquing when the suspension is fully loaded not up in the air on jack stands. you'll need the front wheels on ramps for this. And if you want to be really picky about how your car handles, you should loosen and retighten your front control front bolt (17mm) fully loaded as well. It will "release" the rotated tension of the bushing and reset it to zero under load. You want rubber bushings to be at their "rest" postion, i.e. not rotated when the car is at its static ride height.
As far as the engine being from a WR1, perhaps its just the shortblock? The intake manifold is not from a late model, i.e. WR1 STi. Actually pretty much nothing I can see up top is GD STi/WR1.
Here's a pic of my intake manifold which is an STi V8 (stock WRX intercooler tho.):

The pic was taken before we went around eveything tightening up and fitting split pins
WR1 bottom end
And, yes I got my geo man to flip the rear pins 180. This gave almost exactly 1/2� extra caster each side
Scooby Regular
Joined: Feb 2005
Posts: 512
Likes: 0
From: Germany
Droplinks look absolutely perfect given manufacturing tolerances of bar and assembly tolerances of the car. Look how the mounting tab on the control arm is pretty much parallel to the face of the droplink. Its about the same for the bar end to the droplink too. Properly mounted droplinks do not sit completely vertical, they are canted inwards a bit, as seen in your pic. Good to go there.
Very glad you were able to get your guys to rotate the pins. Like I said, its free performance with zero negatives. All good.
Very glad you were able to get your guys to rotate the pins. Like I said, its free performance with zero negatives. All good.
Last edited by Arnie_1; Jun 9, 2011 at 05:27 PM.

Scooby Regular
Joined: Jun 2006
Posts: 8,089
Likes: 0
From: Edinburgh (ish)
Scooby Regular
Joined: Feb 2005
Posts: 512
Likes: 0
From: Germany
 ich habe gar kein Deutsch studiert. Ich habe das n�r auf der Strasse, so zu sagen gelernt. Leider, ist mein Subaru noch in denn USA. Kommt hoffentlich bald. Ich fahre mit mein anderen lieblings auto, ein Peugeot 106 XSi. N�r etwas langsamer als der Rallye aber die Handling is gleich. Spricht= GEIL.
Last edited by Arnie_1; Jun 9, 2011 at 07:58 PM.


 I'm astounded by just how clean a 13 y.o. car can be. Just goes to show, they are out there
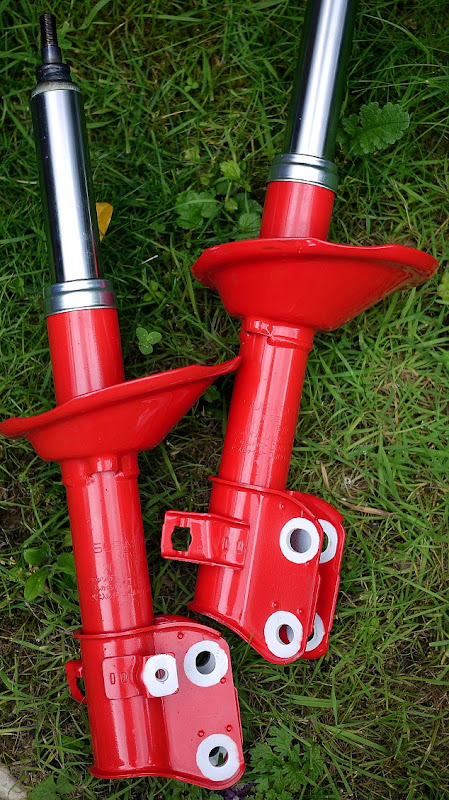
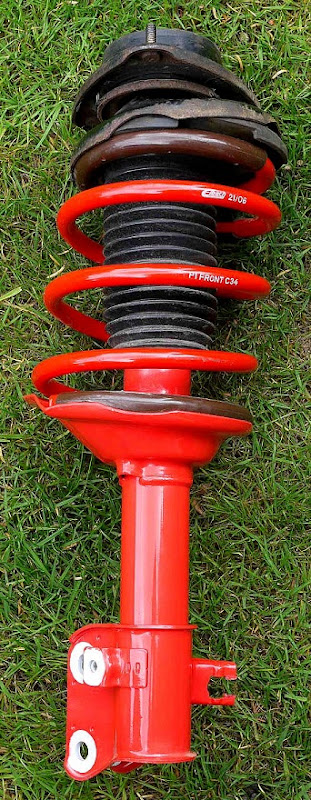
As for the struts, yes STi V5/6 - available from your local Subaru dealer

Coupled with P1 springs - ideal match for B-road hooning

Scooby Regular
Joined: Feb 2005
Posts: 512
Likes: 0
From: Germany
hmm, is the upper spring perch oriented properly? Looks a bit off. There are 3 holes on the top of the spring perch. The center hole should sight straight down between the lower clevis. This is very important. Also make sure your conical washer is oriented properly too. many folk install this upsdie down and experience "memory steer" issues. At some point in the future you might want to look into some Group N topmounts as yours are a bit older and are certainly fairly soft. This will lead to a fairly bouncy ride because the softer duro rubber is basically an undamped spring and its amazing how the that rubber deflection on the road contributes to the bobble head.
A second thing I want to bring up is in regards to your front droplinks. I've been talking to Whiteline about this and they suggest that the KLC139 would be the better droplink for the GC. http://www.whiteline.com.au/product_..._number=KLC139
Tech Support says that the angle of the bolt in the lower bush is too extreme and would, over time, split the lower bush. So, apologies on the wrong advice. Personally, the angles don't look that bad on your links. So who knows. If you end up getting the KLC139, I would suggest disassembling the threaded assemblies and using anti-sieze grease on the threaded portion. Just preventative measure for long term adjustability. I do like these links as they don't make the noises of the full spherical motorsport versions but still react faster than the poly version in addition to being able to dial out the preload on the ARB.
Last edited by Arnie_1; Jun 20, 2011 at 12:14 PM.
The roll bar fixing mount angle looks more the problem. See how it is not parallel to the wishbone mounting tab...? Or is this just a sort of at rest position, when the wheel/wishbone is more in its travel it goes the other way
I don't know, this is the part Whiteline specify for the car, you trust things will be OK? Would I be better off putting the originals back on, those ones you've linked are �110
As for the spring/perch purchase, I adjusted it before fitting
Which way up should the conical washer be?
Thanks for coming in with this
Last edited by bonesetter; Jun 20, 2011 at 07:43 PM.
Hi Mate,
Do you have the part number for the struts? I am going to my local Subaru dealer this week to get them. Did you have to wait long for them? Also what did they charge you for them? Would be good to know as I have had different prices for parts from different dealers.
Thanks again.
Do you have the part number for the struts? I am going to my local Subaru dealer this week to get them. Did you have to wait long for them? Also what did they charge you for them? Would be good to know as I have had different prices for parts from different dealers.
Thanks again.
�263.76 +VAT ea ex stock
Got the rear struts fitted the weekend, which has raised the rear... some
Feels better - less bouncy, and more controlled
Still struggling with geo set-up and handling not quite right. It'll get there soon

Feels better - less bouncy, and more controlled
Still struggling with geo set-up and handling not quite right. It'll get there soon
looks sweet mate, you can get the sti8 ic to fit with the strut brace but it s a struggle and you have to cut down the clutch reservoir plus cut the wire clips that sit on the bulkhead and you might have to get a bit brutil with the hammer on the seams around the gearbox mount and on the bulkhead.
ive just had my engine built by chy at pennine, he knows his stuff and my engine has never sounded so sweet. i`m still running it in aswell, another 500 miles to go
ive just had my engine built by chy at pennine, he knows his stuff and my engine has never sounded so sweet. i`m still running it in aswell, another 500 miles to go
Bit more done...
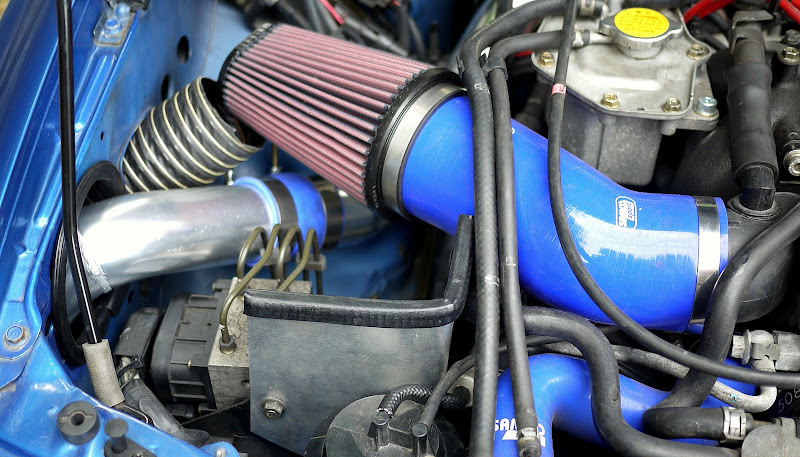
FMIC, shielded cold air induction, re-map, oh and I thought as Mark Thwaite has a VF35 lying around he may as well fit that too.
Remapped to 330BHP


Plus, I have Aluminium Girl keeping my car safe now

FMIC, shielded cold air induction, re-map, oh and I thought as Mark Thwaite has a VF35 lying around he may as well fit that too.
Remapped to 330BHP
Plus, I have Aluminium Girl keeping my car safe now
Last edited by bonesetter; Jul 13, 2011 at 03:51 PM.

Decided to go for an extended blast today as I've been eyeing some of the Black Mountain roads for a while, the car was as in reasonable fettle and the sun was shining...
Decided on the A4069 of the Jeremy Clarkson fame, as I've never been there. Day was going well until we got to the hairpin and I thought it would be a good idea to get a video... after a couple or three runs we noticed water coming from under the car...
I was hoping it was a hose which had been unseated from the recent work which would be an easy fix. As some water had been lost we decided to head down the mountain and fill up. I saw a garage and decided to pop in as we hadn't any tools
Here's where I owe big thanks to Park Garage (Brynamman). They lifted the car on an outside ramp and saw the leak was coming from the thermostat housing block - the part which mates with the block. There's a 10mm bolt which just cant be gained purchase on without a few other hose removals so unfortunately they gave us a gallon water can and we went on our steady 120 mile way home
Here's my totally pathetic attempt of the hairpin.
Nice bright n early pootle out this sunny Sunday around some Shropshire's finest B-roads Saw 2 camera vans and a roadside copper - all at 6-30 Sunday morning
Still trying to find a satisfactory number plate solution. Might remove the block under the plate and fit a bigger one on the bumper, as that one is too small

Saw 2 camera vans and a roadside copper - all at 6-30 Sunday morning Still trying to find a satisfactory number plate solution. Might remove the block under the plate and fit a bigger one on the bumper, as that one is too small
Last edited by bonesetter; Jul 24, 2011 at 10:03 PM.