I've also tried some new cleaning products
 19 October 2008, 09:48 PM
#1
Well the weather was fine this weekend so this gave me a chance to give the old girl a good scrub. I recently had the frontend resprayed along with the STi V6 lip and new bumper, so I wanted to protect the new paint as well. I ended up spending the whole weekend on it 
Cleaning products (Recommended by Polished Bliss for Mica Red);
Meguiars Hyper Wash
HD Foam Lance
Poorboys Super slick n suds
Meguiars Quick Claybar
Menzerna Intensive Polish
Blackfire Gloss Enhancing Polish
Blackfire Wet Diamond All Finish Paint Protection
Autosol Metal Polish
P21S Total Auto Wash
Tyre Gel, silicon plastics spray
Poorboys natural dressing
Poorboys Wheel Sealant
Autoglym Glass Cleaner
Lake Country German CCS Light Cut Pad
Lake Country German CCS Polishing Pad
Blackfire Ultimate LSP Applicator Pad
Various Poorboys Deluxe Mega Towels
1. Firstly I decided to foam the car with the hyperwash, but the HD lance adaptor wouldn't fit my Lavor pressure washer great start
  So I used the hyperwash in the pressure washers standard foam bottle, which was sh1te
 ")
2. Pressure washed/rinsed
3. Washed with Poorboys super slick n suds using 2 bucket method
4. Rinsed
5. Clayed
6. Washed again
After thoroughly rinsing the car with the pressure washer again there were no water marks at all before drying with a waffel towel, even in direct sunlight. The Poorboys super slick n suds really is great stuff.
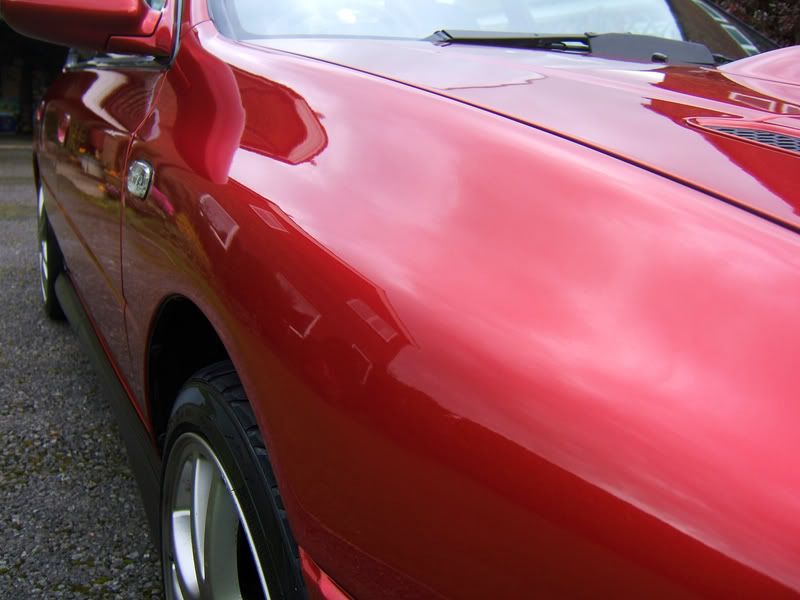
7. My car had a fair few swirl marks and other light defects to correct, so I used a two stage process starting with Menzerna Intensive Polish in conjunction with Lake Country German CCS Light Cut Pad
8. Overall finish was then refined with Blackfire Gloss Enhancing Polish in conjunction with Lake Country German CCS Polishing Pad
9. Then I sealed the above work with Blackfire Wet Diamond All Finish Paint Protection using the LSP applicator pad
10. Wheels washed, sprayed with P21S, then protected with Poorboys wheel sealant
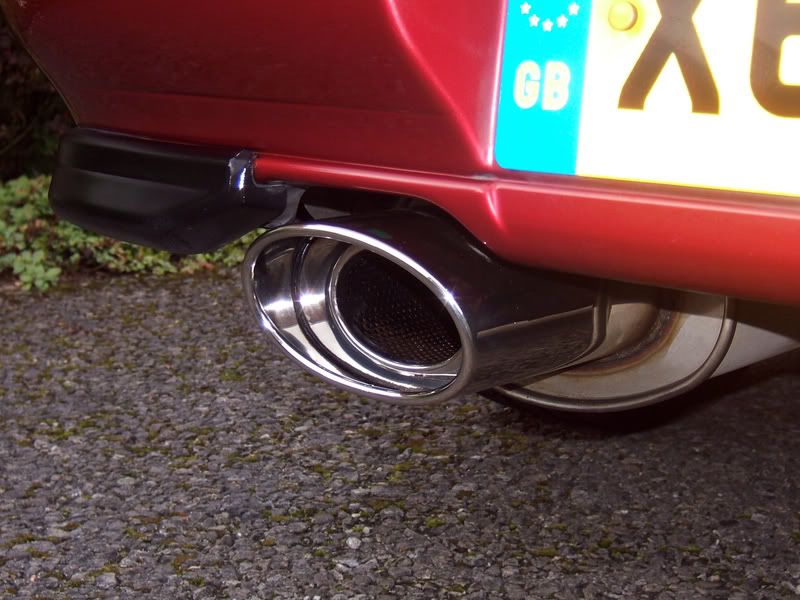
11. Exhaust washed, also sprayed with the P21S, then polished with Autosol
12. Engine also given a quick scrub using the P21S
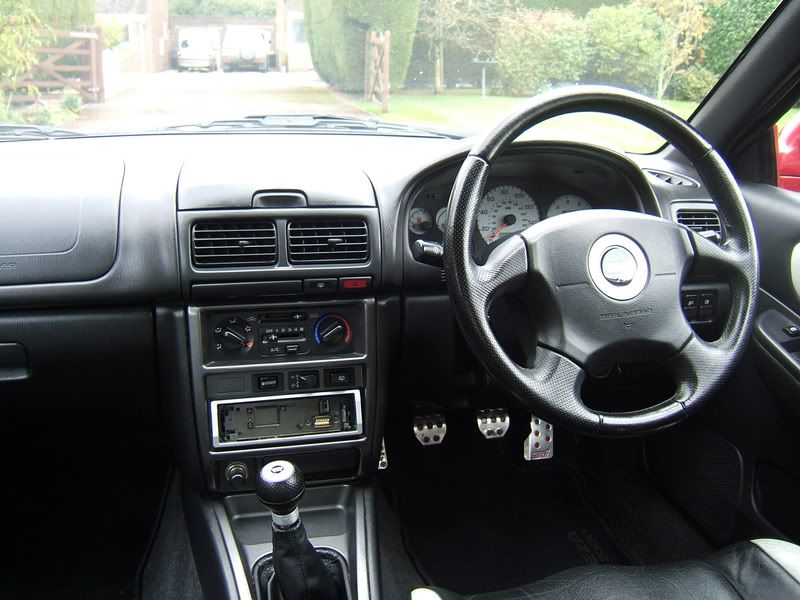
13. Interior vacuumed and plastics/leather cleaned with Poorboys natural dressing
14. All windows cleaned inside n out with Autoglym Glass cleaner, buffed off with newspaper
Job done, anyway pics...
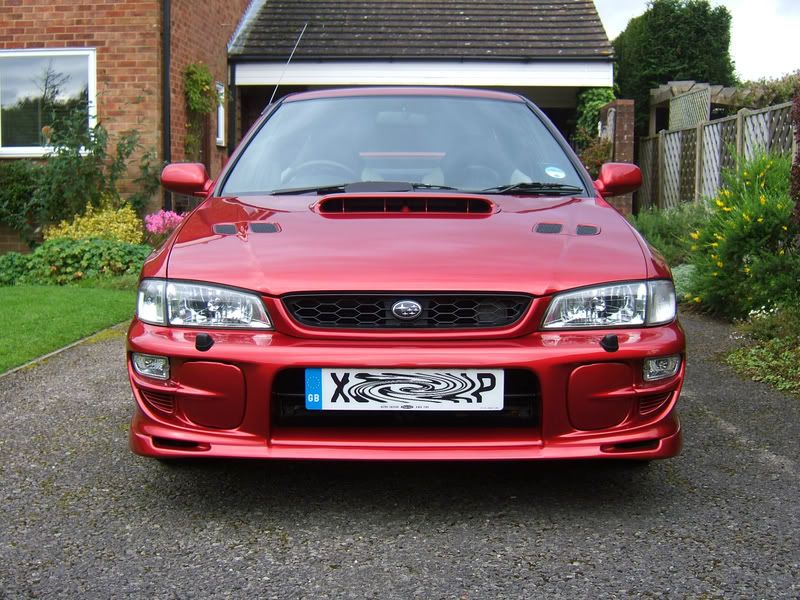
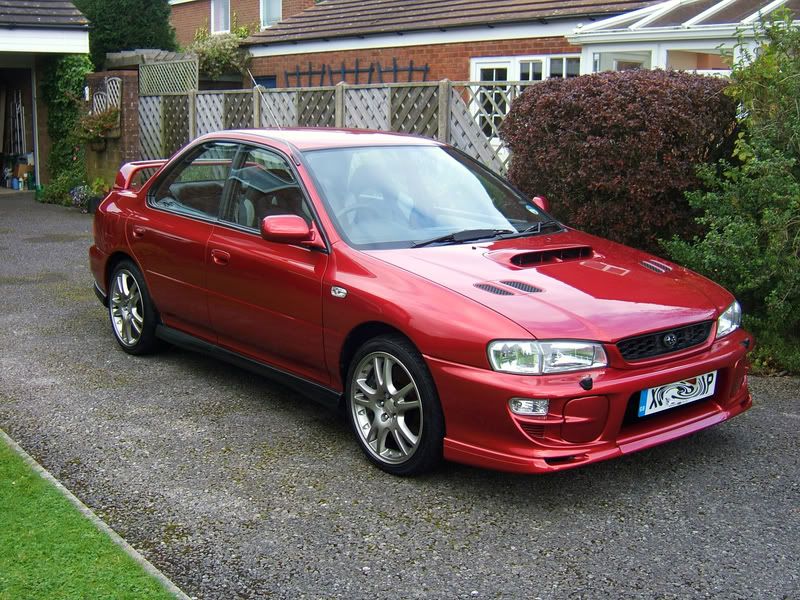
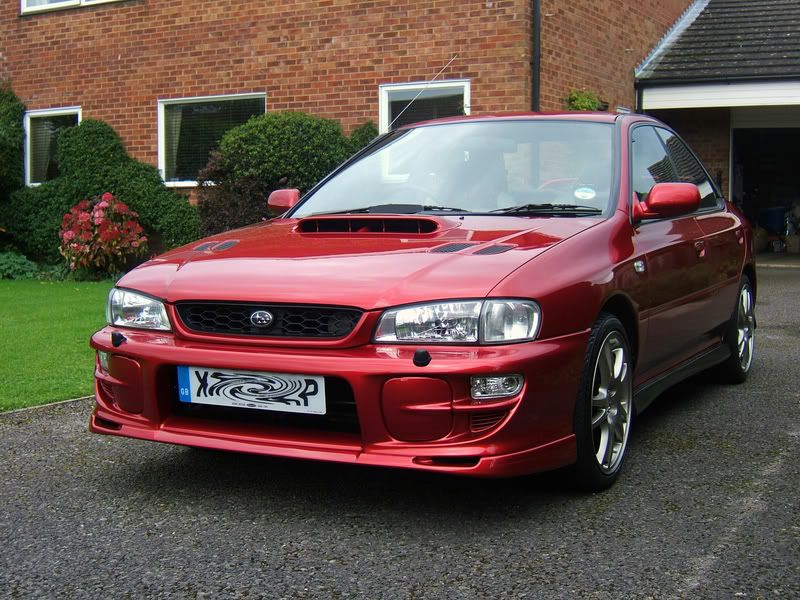

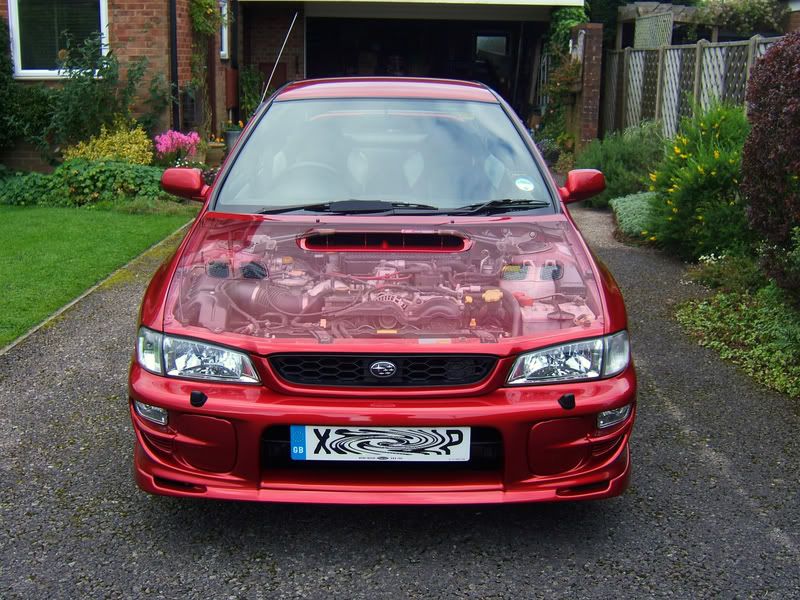

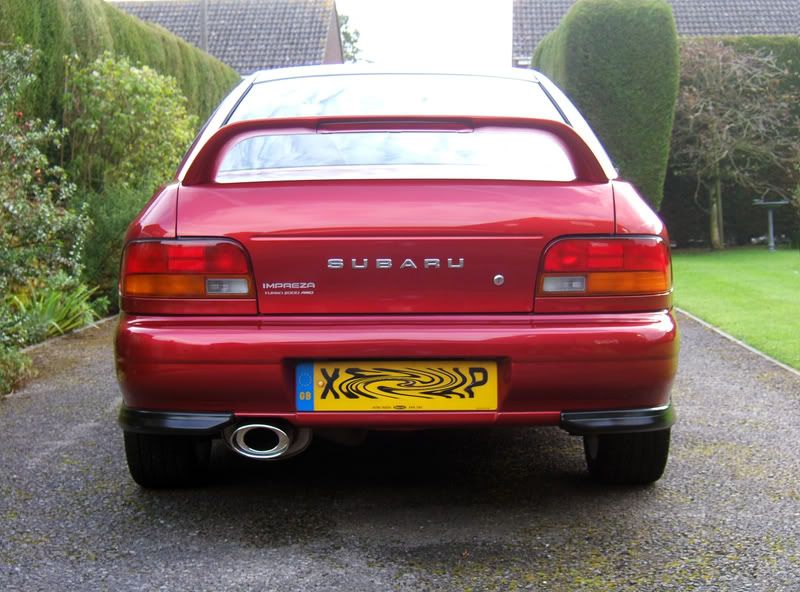
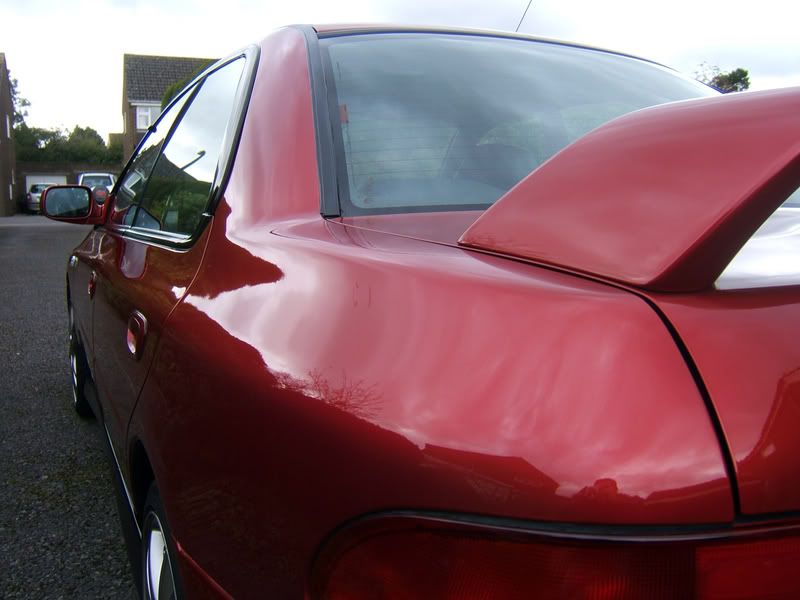
Not bad for an 8yr old car I reckon
I always said I wouldn't get **** about cleaning, but picking the right products and methods really does make a massive difference
Cleaning products (Recommended by Polished Bliss for Mica Red);
Meguiars Hyper Wash
HD Foam Lance
Poorboys Super slick n suds
Meguiars Quick Claybar
Menzerna Intensive Polish
Blackfire Gloss Enhancing Polish
Blackfire Wet Diamond All Finish Paint Protection
Autosol Metal Polish
P21S Total Auto Wash
Tyre Gel, silicon plastics spray
Poorboys natural dressing
Poorboys Wheel Sealant
Autoglym Glass Cleaner
Lake Country German CCS Light Cut Pad
Lake Country German CCS Polishing Pad
Blackfire Ultimate LSP Applicator Pad
Various Poorboys Deluxe Mega Towels
1. Firstly I decided to foam the car with the hyperwash, but the HD lance adaptor wouldn't fit my Lavor pressure washer
great start So I used the hyperwash in the pressure washers standard foam bottle, which was sh1te 2. Pressure washed/rinsed
3. Washed with Poorboys super slick n suds using 2 bucket method
4. Rinsed
5. Clayed
6. Washed again
After thoroughly rinsing the car with the pressure washer again there were no water marks at all before drying with a waffel towel, even in direct sunlight. The Poorboys super slick n suds really is great stuff.
7. My car had a fair few swirl marks and other light defects to correct, so I used a two stage process starting with Menzerna Intensive Polish in conjunction with Lake Country German CCS Light Cut Pad
8. Overall finish was then refined with Blackfire Gloss Enhancing Polish in conjunction with Lake Country German CCS Polishing Pad
9. Then I sealed the above work with Blackfire Wet Diamond All Finish Paint Protection using the LSP applicator pad
10. Wheels washed, sprayed with P21S, then protected with Poorboys wheel sealant
11. Exhaust washed, also sprayed with the P21S, then polished with Autosol
12. Engine also given a quick scrub using the P21S
13. Interior vacuumed and plastics/leather cleaned with Poorboys natural dressing
14. All windows cleaned inside n out with Autoglym Glass cleaner, buffed off with newspaper
Job done, anyway pics...
Not bad for an 8yr old car I reckon
I always said I wouldn't get **** about cleaning, but picking the right products and methods really does make a massive difference


 19 October 2008, 10:12 PM
#6


Looks great you have done some really good work there 
How did you get on with the interior dressing stuff it's something that mine needs in the spring.
That PS21 is quite an eye opener when you have never used it before, a good place to use it is in the arches as well, a good tip is to pull the rubber protector off from the rear arch and clean both inside the rubber strip and the top of the arch as well on the lip it will help to keep future problems away.
19 October 2008, 10:27 PM
#7
omg a +ve comment from the detailing master himself appreciate it.
The Poorboys natural dressing is a brilliant product as is all the pboys stuff. You can wipe this stuff on plastics, dash, leather and buff off with a terry/microfibre towel, it cleans, glosses, protects, simply awesome. The only thing I would say is when using it on the dash use care, as too much will make it shine like a bald head.
Thx for the advice, but how do u reattach the rubber arch strip though, it's glued on isn't it?
appreciate it.The Poorboys natural dressing is a brilliant product as is all the pboys stuff. You can wipe this stuff on plastics, dash, leather and buff off with a terry/microfibre towel, it cleans, glosses, protects, simply awesome. The only thing I would say is when using it on the dash use care, as too much will make it shine like a bald head.
Thx for the advice, but how do u reattach the rubber arch strip though, it's glued on isn't it?
Trending Topics
19 October 2008, 10:37 PM
#8
Cleaning master indeed  your slipping into it without realising like I did trust me..... with a cleaning bag like that your well on the way
I don't want my dash to match the top of my head though but I deffo need to sort a few interior bits out for sure, and I will agree with Frayz on the side skirts as colour coded I think they would really finish the car off well.
your slipping into it without realising like I did trust me..... with a cleaning bag like that your well on the way I don't want my dash to match the top of my head though
but I deffo need to sort a few interior bits out for sure, and I will agree with Frayz on the side skirts as colour coded I think they would really finish the car off well.
 20 October 2008, 10:31 AM
#18
It's just pushed onto the arch it's a tight fit... mine comes all the way off as it is not fitted as it should but I think yours should come off from the rear of the car and is fitted into the side skirt by the back door, you should be ok to remove it but leave it fitted into the side skirt, I used a small screwdriver with a cloth on to drag down the inside of the strip to clean it and a nailbrush as daft as it sounds is good for the top lip on the inner arch itself, it's a potential rust trap so it's good to get the crud out.
20 October 2008, 12:27 PM
#19
Scooby Regular
iTrader: (5)

Join Date: Jan 2004
Location: Bedfordshire
Posts: 8,948
Likes: 0
Received 0 Likes
on
0 Posts
WOW! That is stunning. The products that you have used really have brought out the true colour in the paint even on a dull is day when the photos where taken.
20 October 2008, 07:08 PM
#23
Scooby Regular
Join Date: Nov 2004
Location: London|D**caster
Posts: 2,958
Likes: 0
Received 0 Likes
on
0 Posts
 nearly as bad OCD as that Vauxhall nobber, brilliant work thou mate, credit to you
Thread
Thread Starter
Forum
Replies
Last Post
Sub-Subaru
General Technical
1
28 September 2015 12:47 PM