Help installing GC P1 driving light kit?
 06 March 2008, 09:00 PM
#1
Scooby Regular
Thread Starter

Join Date: Jun 2002
Location: PA, USA
Posts: 35
Likes: 0
Received 0 Likes
on
0 Posts
Hello all,
I ran a quick search but didn't see anything, though there's always a chance I missed it. Been ages since I've logged in here, so hopefully you're all doing well.
I'm in the States, and recently picked up a brand new P1 driving light kit from a performance company here called Oakos. It's plug-and-play, but they didn't come with instructions, and I've no idea how to hook the things up. Looks like one bracket apiece, and a small bag of bolts. Should be simple enough, except that I don't know how everything should be oriented/placed. Also, does it come with a bolt for the included plastic light cover itself?
Anyway, if any remaining GC owners can help out, I'd appreciate it.
=S2=

 07 March 2008, 09:45 AM
#3

Hmmmm, full kits are generally just that: plug and play.
There should be a connector on the supplied wiring loom which attaches to the wire behind one of the headlights which is LIVE when you select main beam, (high beam) but not when you select dip, (low beam).
There should be a relay.
There might be a fuse, or the relay might have one on it.
The relay MAY have numbered terminals. If it has, proceed as follows:
Terminal 85 is the one that connects to the headlight main beam live.
Terminal 86 goes to a good earth (ground) on the car.
Terminal 30 is from the battery +ve, either via a fuse, or straight to relay if relay has a fuse on it.
Terminal 87 takes wires one to each light.
Then simply take the earths(grounds) from each light back to a good earth (ground) or preferably battery-ve.
That's all there is to it.
However, if the realy has no numbers, but HAS wires leading off it, proceed as follows:
Connect the wire with a Scotchlok, a special connector, or the one with nothing on the end to the headlight main beam.
Connect the one that's probably black or brown and possibly has a ring on the end to earth.
Connect the thicker wire that has a ring on the end, and/or a fuse in it to battery +ve.
Connect the TWO wires one to each light.
Connect both lights to earth.
If you're still stuck, try to post a pic of the kit.
Alcazar
07 March 2008, 02:45 PM
#5
Scooby Regular
Thread Starter
Join Date: Jun 2002
Location: PA, USA
Posts: 35
Likes: 0
Received 0 Likes
on
0 Posts
alcazar,
Okay I was able to grab 10 pics, before I have to head out of the house here, soon.
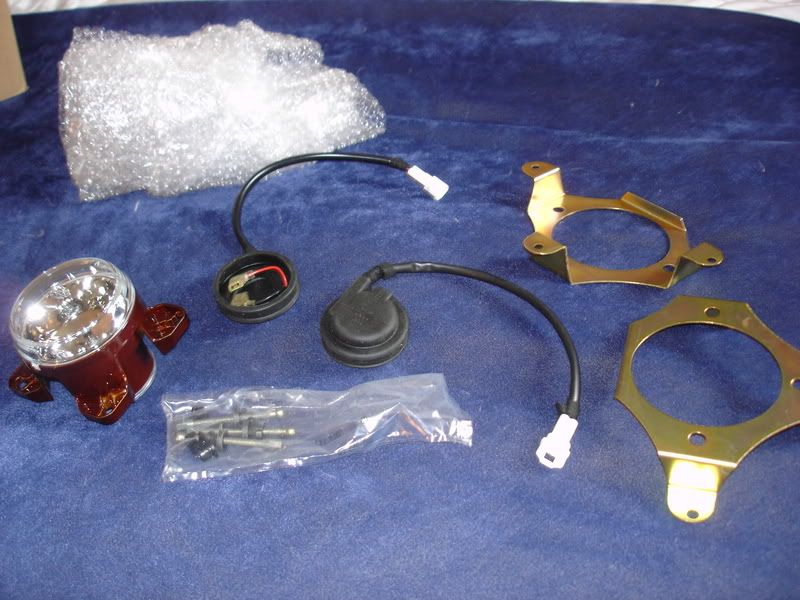
Full kit (sans covers):
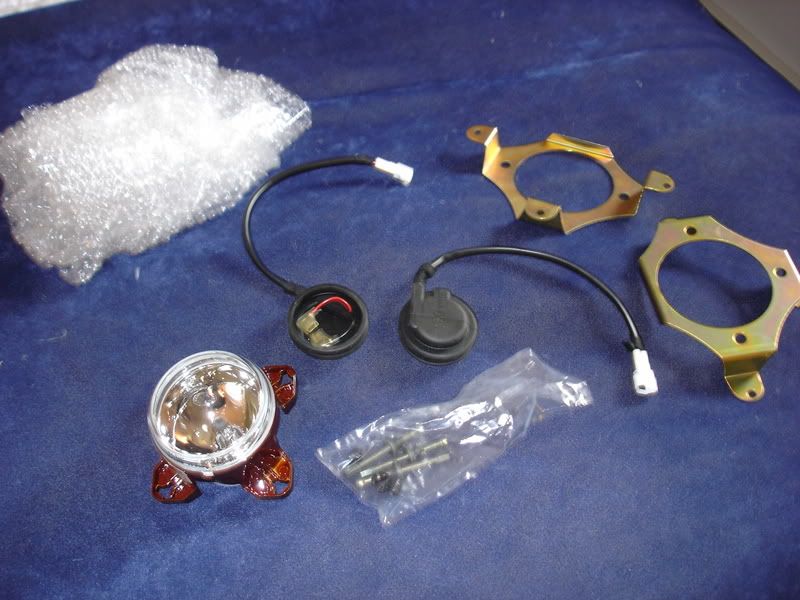
(The bubble wrap just contains the other lamp)
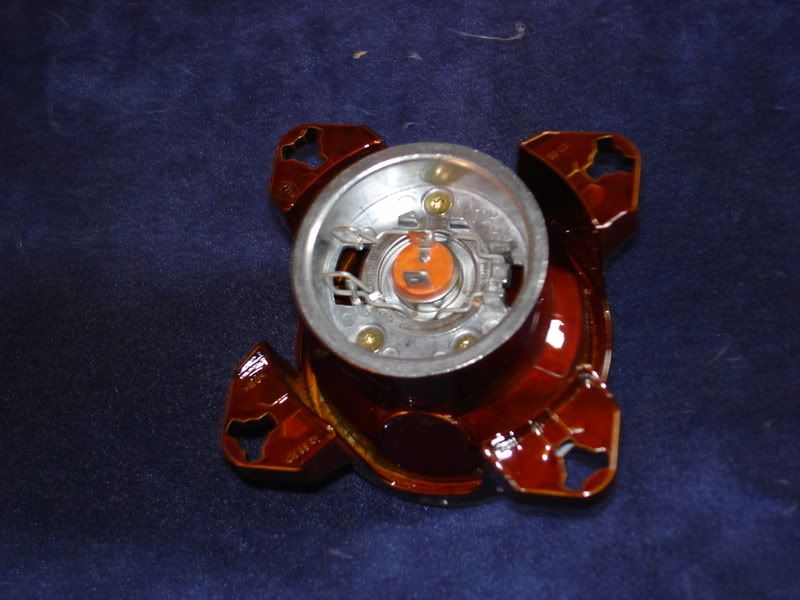
Lamp (Hella HR-2 model)

Back of it does not have numbered terminals:
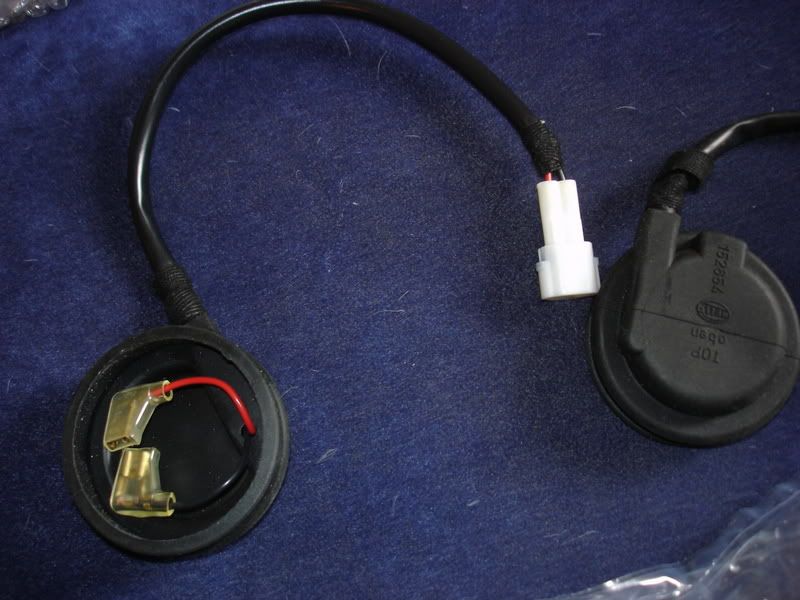
Harnesses have a rubber seal to go over the back of the lamp. Just two connectors, one red and one black:
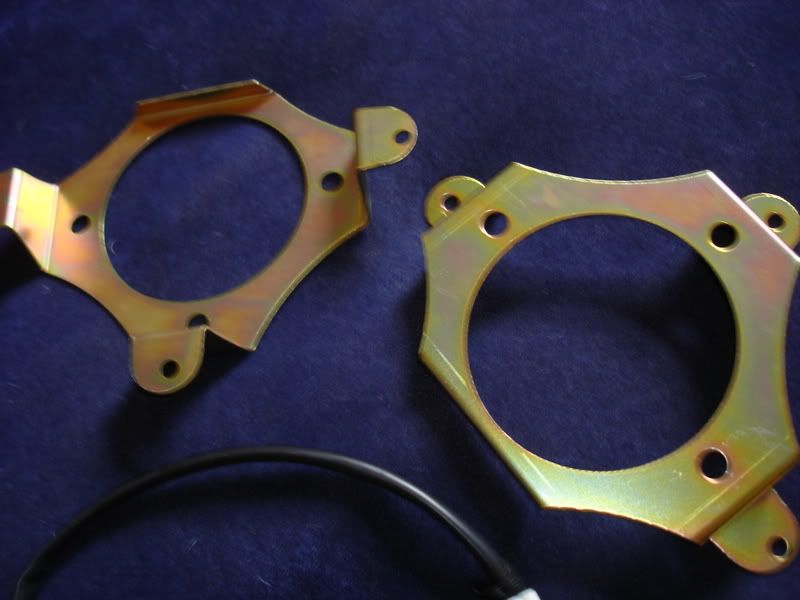
Brackets:
Three screws with plastic clips on them, and three separate clips (one set of these, per lamp):


Covers:
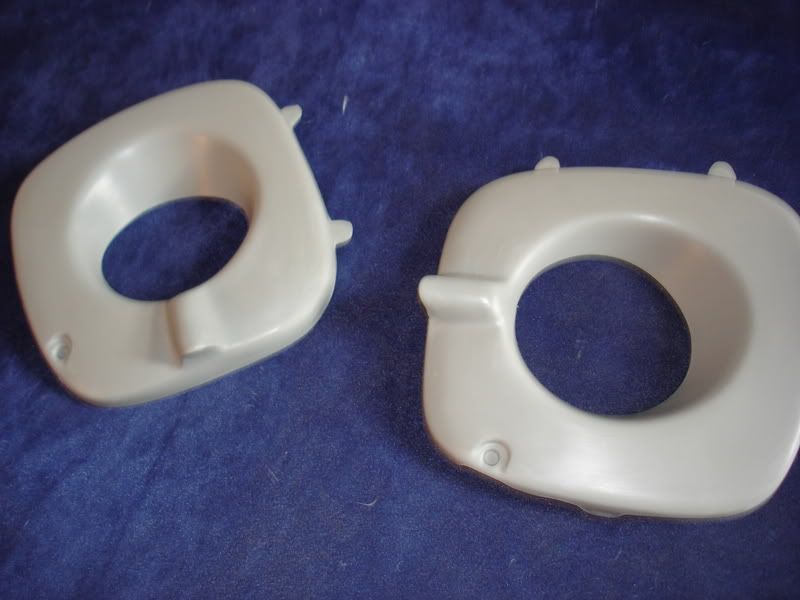
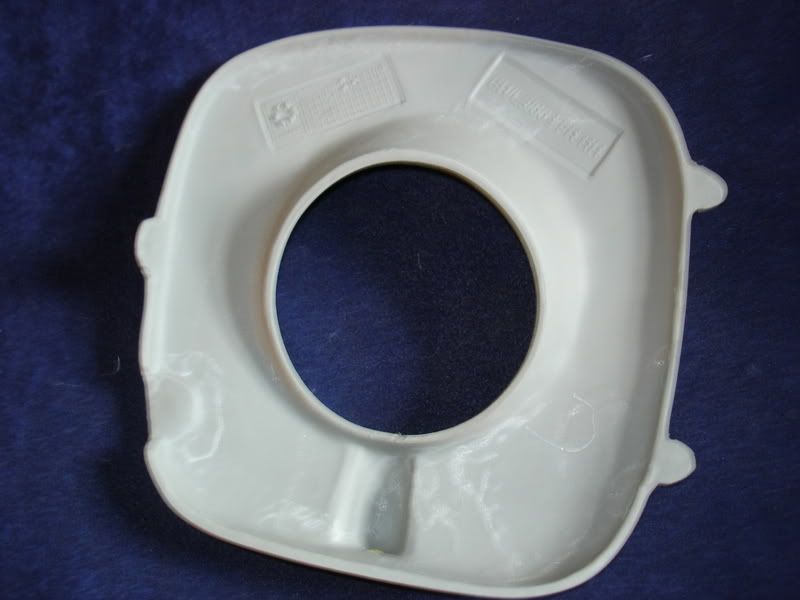
There is no rubber seal or anything, to go between the cover hole and the lamp itself. There's a pretty noticeable gap, when I stuck the lamp through there just to see. But then again I've no idea how it'll truly orient, once on the car.
So... basically it seems there's no mounting screw for the cover itself, I'd have to source one. Wedge from RS25.com, the club I am a Super Moderator for, commented in a post I put up on there:
So I may have to get these parts from Subaru. My car is a 2000 Impreza 2.5RS, which basically has the stock front fascia/fogs from an STi Ver.6.
Having never taken apart my lights before, this could become very evident once I do, but it seems dumb for Prodrive to not have included instructions, here. Guesswork is okay, but I'd rather not go at random on my brand new $300 light kit.
=S2=
Okay I was able to grab 10 pics, before I have to head out of the house here, soon.
Full kit (sans covers):
(The bubble wrap just contains the other lamp)
Lamp (Hella HR-2 model)
Back of it does not have numbered terminals:
Harnesses have a rubber seal to go over the back of the lamp. Just two connectors, one red and one black:
Brackets:
Three screws with plastic clips on them, and three separate clips (one set of these, per lamp):
Covers:
There is no rubber seal or anything, to go between the cover hole and the lamp itself. There's a pretty noticeable gap, when I stuck the lamp through there just to see. But then again I've no idea how it'll truly orient, once on the car.
So... basically it seems there's no mounting screw for the cover itself, I'd have to source one. Wedge from RS25.com, the club I am a Super Moderator for, commented in a post I put up on there:
Originally Posted by Wedge
As for the way the covers go mounted, I used the STi fog cover mounting brackets and screws. A bit expensive for a couple parts, but fits OEM.
Having never taken apart my lights before, this could become very evident once I do, but it seems dumb for Prodrive to not have included instructions, here. Guesswork is okay, but I'd rather not go at random on my brand new $300 light kit.
=S2=
07 March 2008, 06:48 PM
#6
This is a Prodrive kit? I've never seen the likes in the UK. I DO know, however, that Prodrive FITTED Hella 90mm lamps to the UK P1, both Halogen, which yours appear to be, and HID. These are quality lamps and can be aligned accurately.
I really wish I could sit down with you and just SHOW you, but I'll try to explain.
First off, you're going to need a relay, standard 4-terminal type, preferably with an integral fuse. If not, get a blade type inline fuse.
You'll also want ONE Scotchlok type connector, (the type that you slip OVER a wire, feed another in, and clamp shut with pliers to tap into an existing wire.
Also a few female spade terminals with covers, a piggyback type spade terminal, and about 4 ring connectors. You may also need male spade terminals, but see later.
First off, have a look under the existing covers on your car, or remove the foglights if fitted. Three bolts. DON'T let the indicator fall out when you undo the outer one! Put it to one side to avoid damage
Trial fit the brackets you have and bolt them into place using the existing bolts.
Now place the lights against the brackets so you can see which way up they go.
The long blots and plastic fittings you have are fittings/adjusters. If I'm not mistaken, the loose plastic fittings go into the three remaining holes on the brackets, the captive plastic fittings (the ones on the long bolts) go onto the lights, the ball end of the bolt fits into the loose fittings and as the bolts are turned, they will adjust the light in three ways. I might be out a bit in this, as I say, I'd like to SEE it all, but a couple of trial fits will show you how it all goes together.
The bit that worries me is if the brackets you have are Scoob-specific, or Hella items. If it's the former, you're OK, if it's the latter, you MAY have to fabricate something to fit into the existing bolt holes on the car, and then bolt the bracket to that. Being as it's a Prodrive kit, you OUGHT to be OK
Meanwhile, before fitting permanently, remove a bulb and try and see which of the two terminals behind it is positive. TBH, it LOOKS like an H7, so it's not that desperate, just put the red to one and the black to the other, then snug the rubber cover in place.
Now wire up as follows:
A wire from whichever wire is LIVE behind one of the headlights when high beams are selected to relay terminal 85. See next para.
Use a Scotchlok type terminal to tap into the headlight wire. I find lives with a circuit tester which I bought from a carshop. It has a sharp point on one end to pierce insulation, and a brass body with a bulb that lights up when you have a live. The other end has a lead with a crocodile clip to go to a good earth, pref battery -ve.
Another lead from relay terminal 86 to earth, (ground), I use battery -ve.
My relay sits on top of my battery, making the battery-to-relay wire short and neat
Before going any further, have an assistant help you by turning on the headlights, then selecting high and low beam. Check that your new relay clicks. Turn lights off again before continuing
Now run TWO wires from relay terminal 87, using the piggyback connector to help, to the RED wires at the lighting connectors, (the white ones that are on the end of the wires from the lights). You may have to buy a different connector depending on what is IN the white connectors. And two more wires from the black wires at those connectors to battery -ve. This is the point where you MAY need male spades.
All connections to and from battery to be via ring terminals.
Finally, run a piece of thicker wire from Battery +ve to relay terminal 30, via an inline fuse if your relay does not have one. Fuse value must be chosen to suit the bulbs in use:
2x55W = 15A
2x100W = 20A
2x130W = 25A.
Your new lights should now come on with high beams and go off with low beams. All that's left is to set them up, (align them), and fit the covers.
Sorry, I have no experience of fitting covers, but I do know that the holes in the covers are NOT a tight fit, the lamps run warm to hot, so we don't want to melt our new covers, do we?
HTH, Alcazar
Kit looks class, BTW, Hella lights are quality, and the wiring that's provided looks good too. DO do it justice by making all connections neatly, crimp AND solder if you can, and DO fit covers to ALL spades. Also tape the white connectors against water ingress after it's all been tested.
11 March 2008, 12:31 PM
#7
Scooby Regular
Thread Starter
Join Date: Jun 2002
Location: PA, USA
Posts: 35
Likes: 0
Received 0 Likes
on
0 Posts
alcazar,
Sorry it took me a while to respond, but thank you so much for your help. However I'm not sure that this installation will be that involved, as relays, etc. I don't think are needed with the kit.
I received this JPG from Adam Constable at Prodrive:

I've emailed him to ask about the electrical components of the installation, but I'm thinking that it literally will just plug in.
Sorry it took me a while to respond, but thank you so much for your help. However I'm not sure that this installation will be that involved, as relays, etc. I don't think are needed with the kit.
I received this JPG from Adam Constable at Prodrive:
I've emailed him to ask about the electrical components of the installation, but I'm thinking that it literally will just plug in.
Trending Topics
11 March 2008, 12:40 PM
#8
So do you have the part with "TOP" and "OUTBOARD" on it? I hadn't noticed it.
Also, it MAY just plug in, but you'll have to do some rewiring as otherwise your new lights will just come on as fogs.
I dunno about the USA, but over here they MUST be wired so as to come on with high beams, and EXTINGUISH with low beams.
Alcazar
Also, it MAY just plug in, but you'll have to do some rewiring as otherwise your new lights will just come on as fogs.
I dunno about the USA, but over here they MUST be wired so as to come on with high beams, and EXTINGUISH with low beams.
Alcazar
11 March 2008, 02:00 PM
#9

Alcazar,
I don't think he will have that bit - it looks like something that Prodrive used as a jig when installing their kits into the P1 spoilers. That might be an internal to prodrive fitting explanation as opposed to one for the punters.
Plus to the original poster - there definitely wasn't a rubber seal between the lamp and the cover as originally fitted by Prodrive to the P1.
Last edited by Fat Boy; 11 March 2008 at 02:03 PM.
12 March 2008, 03:03 PM
#10
Scooby Regular
Thread Starter
Join Date: Jun 2002
Location: PA, USA
Posts: 35
Likes: 0
Received 0 Likes
on
0 Posts
I'm not sure about that "drill bush jig" part. As for the connectors, it's plug and play, no re-wiring.
Here's an updated post in my thread on RS25.com, with some photos of another member's kit:
P1 driving light install help? - Page 3 - The RS Club
Here's an updated post in my thread on RS25.com, with some photos of another member's kit:
P1 driving light install help? - Page 3 - The RS Club
12 March 2008, 06:18 PM
#11
I'm not sure about that "drill bush jig" part. As for the connectors, it's plug and play, no re-wiring.
Here's an updated post in my thread on RS25.com, with some photos of another member's kit:
P1 driving light install help? - Page 3 - The RS Club
Here's an updated post in my thread on RS25.com, with some photos of another member's kit:
P1 driving light install help? - Page 3 - The RS Club
So what do USA spec cars have there? Fogs? Driving lights? Nowt?
Is there a switch in the car?
And do your cars have to obey the "off with low beam" rule?
Alcazar
 12 March 2008, 07:34 PM
#12
Scooby Regular
Thread Starter
Join Date: Jun 2002
Location: PA, USA
Posts: 35
Likes: 0
Received 0 Likes
on
0 Posts
 12 March 2008, 10:00 PM
#14
Scooby Regular
Thread Starter
Join Date: Jun 2002
Location: PA, USA
Posts: 35
Likes: 0
Received 0 Likes
on
0 Posts
No, I want them to function just like the fogs do. You don't want foglights on, when the high beams are on. I'd want the same with the P1 driving lights; it's illegal to have them be on with the high beams, that's way too bright for oncoming traffic!
13 March 2008, 12:58 PM
#15
In the USA, high beam = what you use when there isn't oncoming traffic, out in the country etc etc.? (What WE call main beam).
Low beam = what you use around town, in the face of oncoming traffic, etc? (What WE call dip beam).
Or do I have it wrong?

Alcazar

Thread
Thread Starter
Forum
Replies
Last Post
Scott@ScoobySpares
Full Cars Breaking For Spares
61
11 January 2021 03:08 PM
Scott@ScoobySpares
Full Cars Breaking For Spares
7
14 December 2015 08:16 AM
Mattybr5@MB Developments
Full Cars Breaking For Spares
20
22 October 2015 06:12 AM