Oil change ?
 15 November 2011, 06:25 PM
#1
I'm going to be doing a Oil change on my car this weekend I have done a few on other cars but heard story's on should I disconnect the "crank sensor " and crank till the oil light goes out.
Or just start it?
Anyone have any experience in this
Thanks
Darcy
Or just start it?
Anyone have any experience in this
Thanks
Darcy
 15 November 2011, 06:32 PM
#2
Scooby Regular
iTrader: (4)
Join Date: Sep 2009
Location: Bath
Posts: 930
Likes: 0
Received 0 Likes
on
0 Posts
i always disconnect the crank sensor and completely fill the new oil filter before fitting it on,crank the engine in 20 sec bursts to avoid overheating the starter ,prevention is better than cure in my opinion.
15 November 2011, 06:43 PM
#3
Scooby Regular
iTrader: (2)
Join Date: Feb 2010
Location: Colchester,Essex
Posts: 1,037
Likes: 0
Received 0 Likes
on
0 Posts
Yea lotsa people say it....personally I dnt see it being that necessary....and it deffo wouldnt happen if u took it to subaru for a service lol...however, it doesnt take 2 secs to disconnect it and crank it over a few times till the oil light goes out so i still do it lol. On my blob it usually throws up a MIL light though as its been disconnected.
15 November 2011, 07:07 PM
#5
Scooby Regular
iTrader: (2)
Join Date: Feb 2010
Location: Colchester,Essex
Posts: 1,037
Likes: 0
Received 0 Likes
on
0 Posts
Once its re connected it may go out again on its own after couple of goes. Last time I done it it was there when i started up again so i just cleared the code with a code reader. Leaving the battery disconnected for a while would clear it if all else fails.
 15 November 2011, 07:27 PM
#7
Scooby Regular
iTrader: (1)
Join Date: Dec 2001
Location: You only live ONCE But if you do it right >>>>> ONCE is enough
Posts: 7,327
Likes: 0
Received 0 Likes
on
0 Posts
From my thread on Scoobycity  :-
:-
In depth (as in it goes on forever ) guide to a DIY Oil Change for a Classic Impreza courtesy of a thread on Surrey Scoobies site.
To those who know the score this isn't intended as an egg sucking exercise but hopefully it will help some of the new guys out. You read an awful lot about dry cranking and I sure it puts some people off, I'd hate to think that the process is skipped due to fear of the unknown, potentially contributing to or directly causing a premature end to an engine.
The term dry cranking simply describes trying to start up the engine with the crank sensor disconnected. The engine will turn over on the starter motor only (as the crank sensor has been unplugged the engine will not fire). The whole point is to distribute the oil and establish a decent pressure before firing the engine.
You will need: -
5 litres (4.5 will be used) of your chosen oil.
A new Subaru manufactured oil filter
A new Subaru sump washer
17mm socket for the sump plug
Flat surface to stand the car on.
1. Warm the engine (to ease the draining process).
2. Pre-fill the new filter with fresh oil. Fill to the very top and keep topping up (it will take 15 minutes or so to fully absorb the oil).
3. Remove the oil filler cap (to allow the oil to drain easily)
4. Remove the under tray.
5. Drain all of the old oil from sump (be careful it will be warm/hot and gushes out so be ready and have a suitable sized (depth & width) container for the oil to drain into). It will take a few minutes to run dry.
6. Remove old filter (you should be able to do this by hand, if not use an oil filter wrench or alternatively stab with a screwdriver for leverage if necessary).
7. Wipe the filter seating & apply a small amount of oil to the face of the new oil seal on the new oil filter and then fit the pre-filled filter (Step 2). Make sure the thread is not crossed and do not over tighten as this can lead to leaks. � to a turn after it begins to feel tight is about right.
8. Wipe the sump plug seating and apply a new washer to sump plug and tighten.
9. Fill the engine with oil to halfway between the two holes on the dipstick (you should allow 5-10 minutes for the oil to settle to get an accurate reading).
10. Refit the oil filler cap.
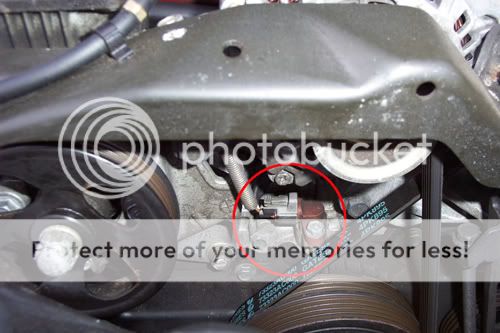
11. Disconnect (unplug) the crank sensor to stop the engine firing (this prevents both spark and fuel injection to the engine) Location: -
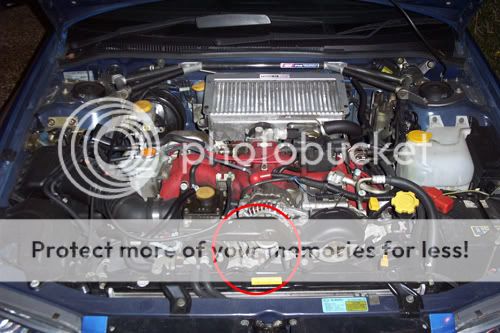
and if you feel the need remove the spark plugs - removal of the spark plugs is generally accepted as the preferred option as it prevents compression meaning that the load on the bearings during the dry cranking process is relieved until oil pressure has been re-established (after dry cranking). It's a bit of a chore. That said it is good to check your plugs every now and than as it can give a heads up of other potential problems.
So you do not have to remove the plugs, disconnecting the crank sensor is sufficient but if you are going to remove the plugs you should disconnect the crank sensor too.
12. Dry crank the engine until the oil pressure light extinguishes (some cars lights don't always extinguish but as long as you crank for the recommended time there should be no issues). This could take 30-80 seconds, don't worry if it takes a little longer. Crank in short bursts to save the battery (wait a few seconds between each crank). You cannot over crank. This action primes the system establishing oil distribution until it meets resistance, creating pressure.
13. Refit spark plugs (only if removed obviously)
14. Refit (plug back in) the crank sensor
15. Start the engine and leave to idle for a minute or two so the oil pressure can stabilise before driving.
16. Check sump plug and filter seal for adequate tightness/leaks
17. Go for a short and slow drive until the engine is at full operating temperature then switch off.
18. Top up the oil to the upper hole on the dipstick but do not overfill. The highest notch on the dipstick is the fully hot/overfill mark. The oil level shouldn't be any higher than the second hole even when hot.
19. Check sump plug and filter seal for adequate tightness/leaks one again.
20. Refit the under tray
Disclaimer: follow at your own risk! I can't guarantee that this guide will stop your engine going pop but a badly carried out oil change can certainly increase the chances. If in any doubt as to your mechanical aptitude - Get professional help!!!
HTH
:-In depth (as in it goes on forever ) guide to a DIY Oil Change for a Classic Impreza courtesy of a thread on Surrey Scoobies site.
To those who know the score this isn't intended as an egg sucking exercise but hopefully it will help some of the new guys out. You read an awful lot about dry cranking and I sure it puts some people off, I'd hate to think that the process is skipped due to fear of the unknown, potentially contributing to or directly causing a premature end to an engine.
The term dry cranking simply describes trying to start up the engine with the crank sensor disconnected. The engine will turn over on the starter motor only (as the crank sensor has been unplugged the engine will not fire). The whole point is to distribute the oil and establish a decent pressure before firing the engine.
You will need: -
5 litres (4.5 will be used) of your chosen oil.
A new Subaru manufactured oil filter
A new Subaru sump washer
17mm socket for the sump plug
Flat surface to stand the car on.
1. Warm the engine (to ease the draining process).
2. Pre-fill the new filter with fresh oil. Fill to the very top and keep topping up (it will take 15 minutes or so to fully absorb the oil).
3. Remove the oil filler cap (to allow the oil to drain easily)
4. Remove the under tray.
5. Drain all of the old oil from sump (be careful it will be warm/hot and gushes out so be ready and have a suitable sized (depth & width) container for the oil to drain into). It will take a few minutes to run dry.
6. Remove old filter (you should be able to do this by hand, if not use an oil filter wrench or alternatively stab with a screwdriver for leverage if necessary).
7. Wipe the filter seating & apply a small amount of oil to the face of the new oil seal on the new oil filter and then fit the pre-filled filter (Step 2). Make sure the thread is not crossed and do not over tighten as this can lead to leaks. � to a turn after it begins to feel tight is about right.
8. Wipe the sump plug seating and apply a new washer to sump plug and tighten.
9. Fill the engine with oil to halfway between the two holes on the dipstick (you should allow 5-10 minutes for the oil to settle to get an accurate reading).
10. Refit the oil filler cap.
11. Disconnect (unplug) the crank sensor to stop the engine firing (this prevents both spark and fuel injection to the engine) Location: -
and if you feel the need remove the spark plugs - removal of the spark plugs is generally accepted as the preferred option as it prevents compression meaning that the load on the bearings during the dry cranking process is relieved until oil pressure has been re-established (after dry cranking). It's a bit of a chore. That said it is good to check your plugs every now and than as it can give a heads up of other potential problems.
So you do not have to remove the plugs, disconnecting the crank sensor is sufficient but if you are going to remove the plugs you should disconnect the crank sensor too.
12. Dry crank the engine until the oil pressure light extinguishes (some cars lights don't always extinguish but as long as you crank for the recommended time there should be no issues). This could take 30-80 seconds, don't worry if it takes a little longer. Crank in short bursts to save the battery (wait a few seconds between each crank). You cannot over crank. This action primes the system establishing oil distribution until it meets resistance, creating pressure.
13. Refit spark plugs (only if removed obviously)
14. Refit (plug back in) the crank sensor
15. Start the engine and leave to idle for a minute or two so the oil pressure can stabilise before driving.
16. Check sump plug and filter seal for adequate tightness/leaks
17. Go for a short and slow drive until the engine is at full operating temperature then switch off.
18. Top up the oil to the upper hole on the dipstick but do not overfill. The highest notch on the dipstick is the fully hot/overfill mark. The oil level shouldn't be any higher than the second hole even when hot.
19. Check sump plug and filter seal for adequate tightness/leaks one again.
20. Refit the under tray
Disclaimer: follow at your own risk! I can't guarantee that this guide will stop your engine going pop but a badly carried out oil change can certainly increase the chances. If in any doubt as to your mechanical aptitude - Get professional help!!!
HTH
Trending Topics


Thread
Thread Starter
Forum
Replies
Last Post
Sam Witwicky
Engine Management and ECU Remapping
17
13 November 2015 10:49 AM