The complete rebuild...build.
 03 April 2013, 09:42 PM
#31
Scooby Regular
Thread Starter
Like white grease type of stuff? Mine won't be doing many miles when finished, 2000 miles a year tops. I'll put up with the clunking. What make have you got? Do they hold up alright over time?
 03 April 2013, 09:46 PM
#32
Scooby Senior
iTrader: (51)
Join Date: Nov 2005
Location: Wherever I park my car, that's my home
Posts: 20,491
Likes: 0
Received 2 Likes
on
2 Posts
I had whiteline drop-links up front that fell apart; the Perrin ones I have now hold up a lot better. The lateral arms are unbranded and the rubber boots rotted but the rose joints are fine. I use spray on silicone spray - like WD40 only better. It keeps them relatively corrosion free given the cr4p on our roads especially in winter. I do a similar mileage too
I do see some corrosion on the drop-links but thats' areas that aren't in contact with other metal so don't seem to lube themselves
I do see some corrosion on the drop-links but thats' areas that aren't in contact with other metal so don't seem to lube themselves
03 April 2013, 09:59 PM
#33
Scooby Regular
Thread Starter
They are very sparing round where I live with salt, main problem is potholes and just **** roads. Defo gunna be choosing my roads when this car is finished. My cars been parked outside for 13 years and never garaged by previous owner and we live near the sea, plenty of rust I can assure you! A lot of it is surface (still looks ****) but I'm getting quite a big scrap pile.
17 April 2013, 02:08 PM
#34
Scooby Regular
Thread Starter
got some stuff back from powder coatings at the weekend and im really impressed with it  can't wait to bolt them back up! also got some r180 rear hubs. Cut my spare wheel well out too and got all the underseal off.


Now, i've cut the spare wheel well out but i presume you have to cut the rear slam panel too otherwise there would be a lot of drag?
can't wait to bolt them back up! also got some r180 rear hubs. Cut my spare wheel well out too and got all the underseal off. 


Now, i've cut the spare wheel well out but i presume you have to cut the rear slam panel too otherwise there would be a lot of drag?
08 August 2013, 11:06 PM
#36
Scooby Regular
Thread Starter
Not updated in a while, so here's some pics of what's been happening! Been repairing my shell cos there was quite a bit of rust lurking about, mainly because it has had a rear quarter on (about 13 years ago mind you) and possibly wasn't sealed properly, I dunno but that's where the rust is! Made the structure for the jacking point (osr) and the inside of the sill near the rear arch. Not made the outer part of the sill yet as I'm waiting to buy to ABW arches and want to see where they lie. All the areas that are red is where new parts have been made, I'm keen with the red oxide haha.... And sikaflex. Seam welded my front end, in the middle of making my fender braces. All rollcage mountings welded into the car and sound proofing off. Got my CDS which needs bending still, struggling to find someone, might just buy the main hoop from custom cages yet.


I made that piece for the wing to create and cold air feed box, planning on ducting through fog light the cuttin a hole coming up into it.


I made that piece for the wing to create and cold air feed box, planning on ducting through fog light the cuttin a hole coming up into it.

 09 August 2013, 06:20 PM
#40
Scooby Regular
Thread Starter
Thanks, the welder was a good investment! Definitely got the hang of it all now. What you need doing in your engine bay? My battery tray was hanging!
09 August 2013, 06:23 PM
#41
Scooby Senior
iTrader: (51)
Join Date: Nov 2005
Location: Wherever I park my car, that's my home
Posts: 20,491
Likes: 0
Received 2 Likes
on
2 Posts
I want to weld up were some of the spot welds went through when I removed the battery tray, plate up some surplus holes and generally tidy up the inner wings
09 August 2013, 06:27 PM
#42
Scooby Regular
Thread Starter
Ah I see , similar to me then, I just need to buy some filler to smooth out the turrets then its in with some primer, looking forward to getting all in one colour. I want to try and keep it all pretty minimalistic in the engine bay, think it looks better. This was it before hand and it looks too busy.
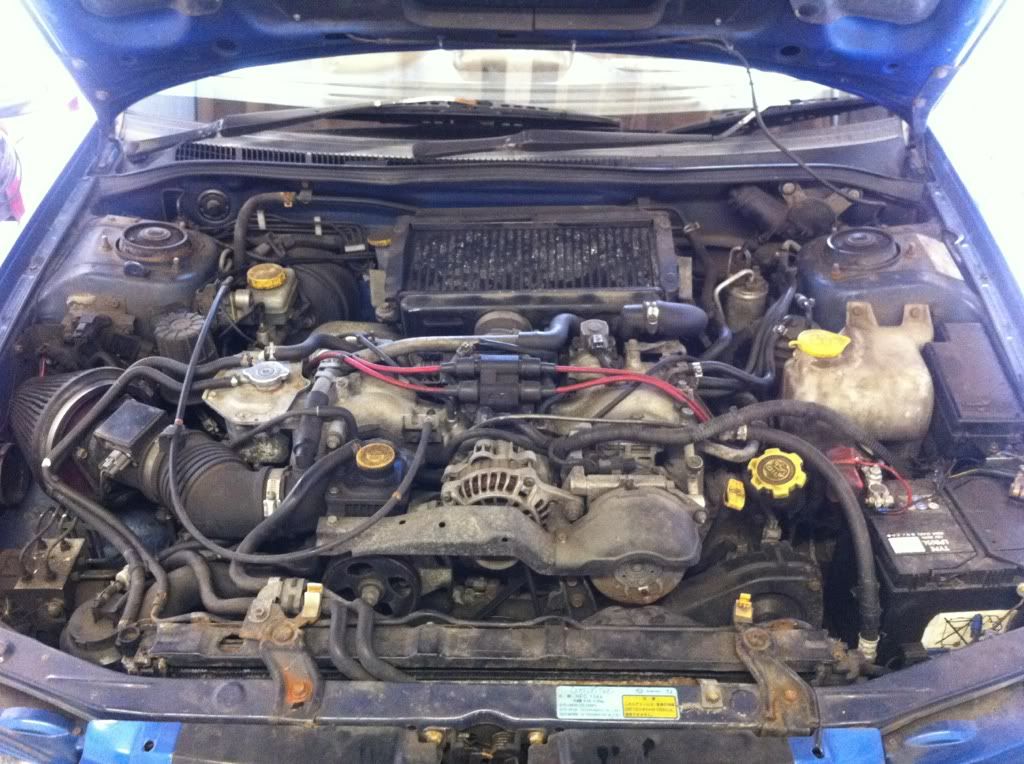
, similar to me then, I just need to buy some filler to smooth out the turrets then its in with some primer, looking forward to getting all in one colour. I want to try and keep it all pretty minimalistic in the engine bay, think it looks better. This was it before hand and it looks too busy.
09 August 2013, 06:55 PM
#44
Scooby Senior
iTrader: (51)
Join Date: Nov 2005
Location: Wherever I park my car, that's my home
Posts: 20,491
Likes: 0
Received 2 Likes
on
2 Posts
Yeah, but I've not taken the engine out so the colour bit is going to be fun - mine's looking like this at the moment...

ABS and aircon have gone, battery is in the boot and I just need to tidy it up...


The washer bottle has been replaced with a smaller on and I am going to use the space for my catch can. I've also been doing some inlet smoothing


So you can see the finish of the inner wings is going to let it all down


 09 August 2013, 09:40 PM
#48
Scooby Senior
iTrader: (51)
Join Date: Nov 2005
Location: Wherever I park my car, that's my home
Posts: 20,491
Likes: 0
Received 2 Likes
on
2 Posts
Washer bottle was one of these I used some spare alloy I had in the garage to make the mounting bracket.
http://www.ebay.co.uk/itm/HYUNDAI-S-...item19dd8faa54
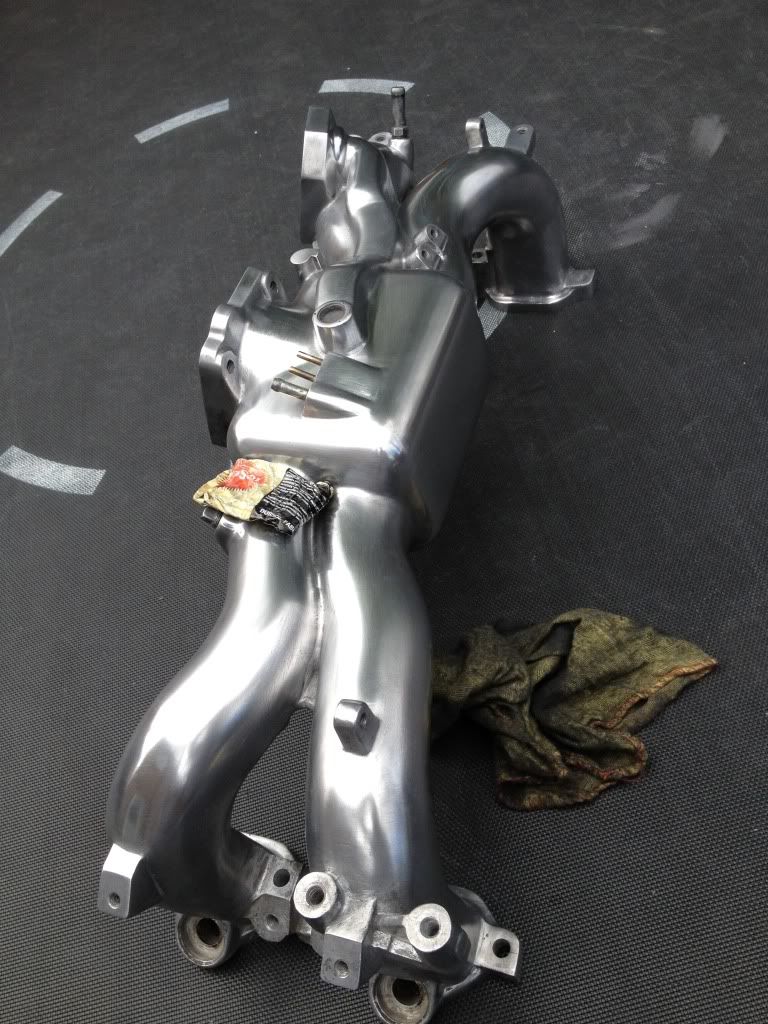
Smoothing was done with an angle grinder, set if files, orbital sander, a dremel and lots of emery paper - it's a bit rough up close but I'm going to get some takes off for the FPR and DV welded on and a bodyshop to finish it off along with my TGV deletes and add a coat of wrinkle black
I used some spare alloy I had in the garage to make the mounting bracket.http://www.ebay.co.uk/itm/HYUNDAI-S-...item19dd8faa54
Smoothing was done with an angle grinder, set if files, orbital sander, a dremel and lots of emery paper - it's a bit rough up close but I'm going to get some takes off for the FPR and DV welded on and a bodyshop to finish it off along with my TGV deletes and add a coat of wrinkle black
09 August 2013, 09:58 PM
#49
Scooby Regular
Thread Starter
Sounds like a lot of work, but then again it's worth it cos they look good when finished. The newage inlets look a lot tidier than the classics, mines a v4 one with bits sticking out everywhere. Think I'm gunna do the otherside inner wing tomorrow, it'd just be lazy if I didn't! Then got under the arch on the n/s/f and seam weld. And I can finish my fender braces too. Should be a productive weekend
Last edited by carterv3typeR; 09 August 2013 at 10:00 PM.
09 August 2013, 10:02 PM
#50
Scooby Senior
iTrader: (51)
Join Date: Nov 2005
Location: Wherever I park my car, that's my home
Posts: 20,491
Likes: 0
Received 2 Likes
on
2 Posts
I've taken a whole load of lugs and take offs off, and may yet do the servo one just to finish it. Didn't help that I kept on finding more to do, all that's left now is the lugs for the header tank

 12 August 2013, 11:16 PM
#55
Scooby Regular
Thread Starter
Did the other side of the engine bay today, it looks sweet, pics up tomorrow. But then found more rust on my back quarter under the rear quarter glass and just at the top of the c pillar next to the roof trim. Been sanding that down to bare metal but ideally need to pop that window and my rear screen out, any ideas on the best way to do this?
20 August 2013, 09:53 PM
#57
Scooby Regular
Thread Starter
Quick update, not had much time to do much over the weekend as a friends dog went missing in the lakes so been up there finding the basterd, which we didn't... Anyway, I did make an air duct, got it welded in the car and have got a bit of filler on it, it's not finished yet but it was getting a bit tedious so made myself a strut brace.


Thread
Thread Starter
Forum
Replies
Last Post
Mattybr5@MB Developments
Full Cars Breaking For Spares
28
28 December 2015 11:07 PM
Mattybr5@MB Developments
Full Cars Breaking For Spares
12
18 November 2015 07:03 AM