
Wide arch, 400+bhp Newage rebuild...For the road :)

[QUOTE=E_M_B;7926949]Exhaust...
OK, I have a 3" system, but when on it looks like this...
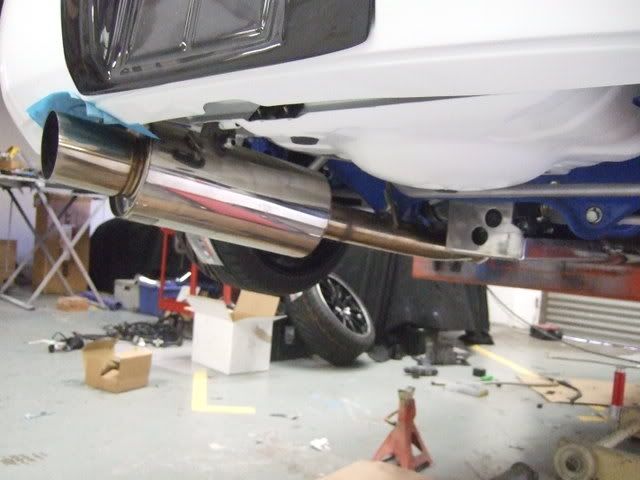
Which is not good because:
a) it looks gash,
b) it hangs too low, and would drive me mad with it catching all the time..
So I needed something which was a bit more subtle, and tight fitting.
Enter stage left a Fujitsibo rear section..
Kakumei do a standard look - standard fit 3" exhaust with STi style exhaust tip which I have fitted which might suit your needs?


OK, I have a 3" system, but when on it looks like this...
Which is not good because:
a) it looks gash,
b) it hangs too low, and would drive me mad with it catching all the time..
So I needed something which was a bit more subtle, and tight fitting.
Enter stage left a Fujitsibo rear section..
Kakumei do a standard look - standard fit 3" exhaust with STi style exhaust tip which I have fitted which might suit your needs?

Scooby Newbie
Joined: Jun 2008
Posts: 7
Likes: 0
From: Southampton
I read this thread last night, hat's off to you mate.
Given the chance and time i would love a project such as this to get my teeth into as i too love attention to detail.
Once again, hats off. Keep up the good work
Ross
Given the chance and time i would love a project such as this to get my teeth into as i too love attention to detail.
Once again, hats off. Keep up the good work
Ross

I'm sure - Flat4online.co.uk Subaru Impreza Mitsubishi Evolution EVO Walbro Fuel Pumps Injectors Intercoolers sell them 
Got the Kakumei system on mine and its a nice sound and the build quality is amazing. If your at the NBO have a look at mine, or I may be able to bring one down with me for you.
S!
Got the Kakumei system on mine and its a nice sound and the build quality is amazing. If your at the NBO have a look at mine, or I may be able to bring one down with me for you.
S!
Thats them, Flat4online but email him first and ask for the STi tail pipe 3" Kakumei or you might end up with the straight exist slash cut jobby which will be the same as you have.
Last edited by Northern Nick; Jun 10, 2008 at 12:47 PM.

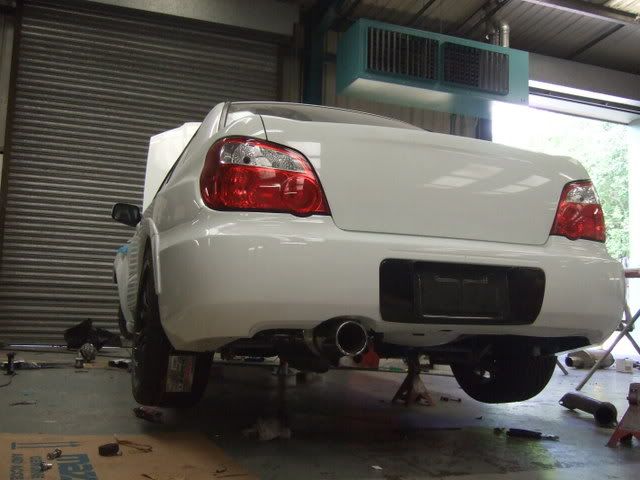
Had a change of heart regarding the exhaust, and I have decided that I need to either get a system made as I want it, or try and find a suitable 3" system..
So for now I have fitted a 2.5" Prodrive back box, which has 3" pipework right up to the silencer.
It'll be fine at least for getting up and running, and whilst I get some miles on the engine.
Whether it'll be a restriction for the engine I don't know, but we'll see how it quiet it is, and how it goes..

Now, I have been having a bit of a nightmare to say the least with the wiring of the car, and it has been holding me up big time.
Finally I have got it sorted, with a valuable lesson learn't along the way, which is that 2001/2002 wiring looms are not compatible with 2003/2004 looms in any way, at all, at all, at all..
So I had to do a bit of parts removal...

This was in order to replace the front loom, and I also had to replace the dashboard mini-loom, which finally resulted in this..
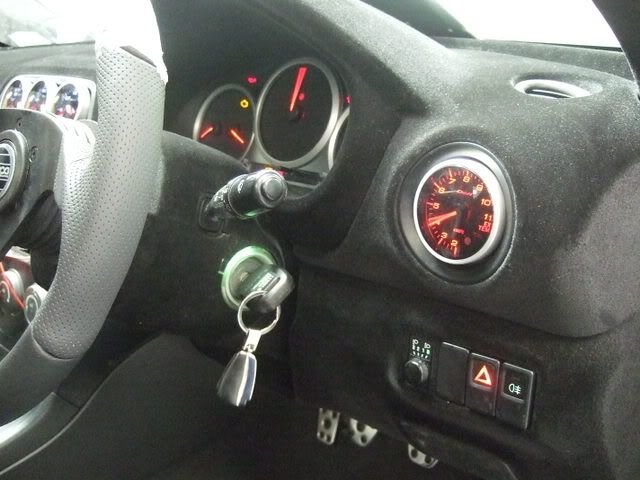
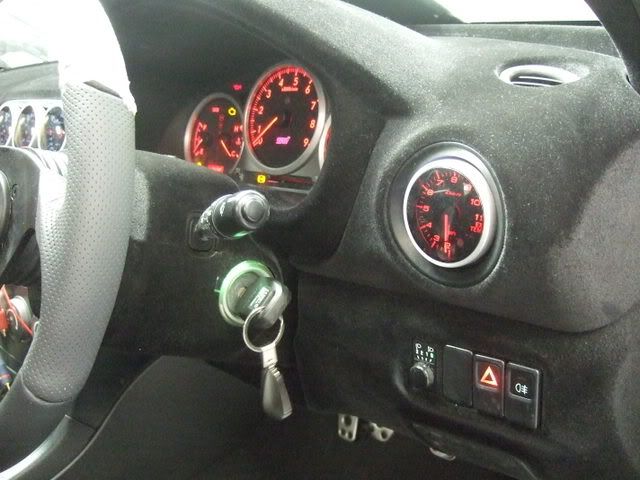
All dashboard functions operative, and you can also see the new hazard light switch which was relocated from the centre vent area..
So, apart from the head unit, the interior is complete.
So for now I have fitted a 2.5" Prodrive back box, which has 3" pipework right up to the silencer.
It'll be fine at least for getting up and running, and whilst I get some miles on the engine.
Whether it'll be a restriction for the engine I don't know, but we'll see how it quiet it is, and how it goes..
Now, I have been having a bit of a nightmare to say the least with the wiring of the car, and it has been holding me up big time.
Finally I have got it sorted, with a valuable lesson learn't along the way, which is that 2001/2002 wiring looms are not compatible with 2003/2004 looms in any way, at all, at all, at all..
So I had to do a bit of parts removal...
This was in order to replace the front loom, and I also had to replace the dashboard mini-loom, which finally resulted in this..
All dashboard functions operative, and you can also see the new hazard light switch which was relocated from the centre vent area..
So, apart from the head unit, the interior is complete.

Scooby Regular
Joined: Oct 2005
Posts: 741
Likes: 0
From: South Wales, near Cardiff

 see, see........ it's nearly alive I tell you
  well at least I hope so anyway
  . I don't know if I can wait any longer for the post where you say "at last the wide arch beast is up, running and completed".
Looking good - you have the patience of a saint, well either that or a lot of holes and dings in the wall where the tools thrown in a rage have impacted
.Keep up the hard work it is looking great
Paul


Will be in touch Darren. 
Todays progress...
Front arch liners turned up today, and with a bit if trimming, a bit of re-shaping with the heat gun, and a few different locating fixings finally got them to fit the wider arches factory-ish like...

Managed to get the mesh sorted for the Off side bumper, but as it is not really used for anything, I have put 2 lots either side of the opening, and looks OK..

Also got a m8 down to sort the wiring out for the headlamps,(cheers Neil) as I had changed the standard 2 bulb set-up for a single H4 bulb, so needed a relay and some electrical expertise to sort it...

Todays progress...
Front arch liners turned up today, and with a bit if trimming, a bit of re-shaping with the heat gun, and a few different locating fixings finally got them to fit the wider arches factory-ish like...
Managed to get the mesh sorted for the Off side bumper, but as it is not really used for anything, I have put 2 lots either side of the opening, and looks OK..
Also got a m8 down to sort the wiring out for the headlamps,(cheers Neil
) as I had changed the standard 2 bulb set-up for a single H4 bulb, so needed a relay and some electrical expertise to sort it...


Joined: Sep 2005
Posts: 19,945
Likes: 2
From: "Engineering Perfection in Essex"

Scooby Regular
Joined: Mar 2007
Posts: 574
Likes: 0
From: In a world of my own.
LOL, not the first time I've been asked that question, cheers Frayz for explaining it in my absence.
Got this back today ...
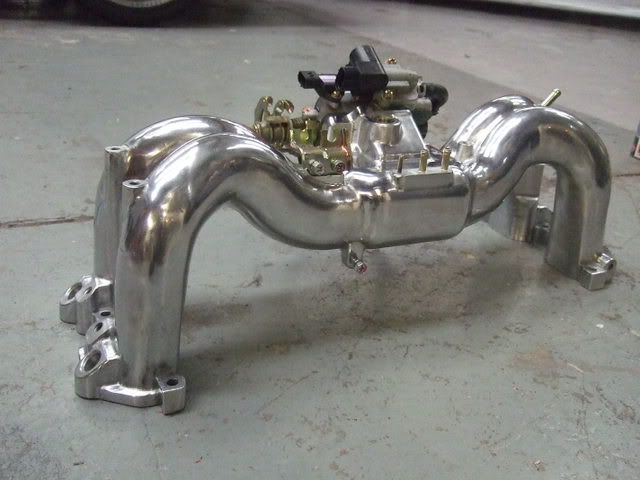
All assembled and nearly ready to go on..
Just awaiting some spacers for the fuel rail/injector brackets, and a blanking plug for the centre block breather to be finished by my machinist.
Got this back today ...
All assembled and nearly ready to go on..
Just awaiting some spacers for the fuel rail/injector brackets, and a blanking plug for the centre block breather to be finished by my machinist.
Finding someone to actually do it was the first problem, most places just didn't want to know.
When I did find someone to do it, they had it for over a fortnight before they touched it.
I had removed most of the casting marks already, and also some of the uneccesary lugs.
Cost me �150.00 to have it polished...
When I did find someone to do it, they had it for over a fortnight before they touched it.
I had removed most of the casting marks already, and also some of the uneccesary lugs.
Cost me �150.00 to have it polished...
looking good, yeah, I looked for someone to polish my manifold and as neil says they arent interested in doing it and if they were it was costing a fortune! I was quoted 300 for it to get done!! so got it powdercoated instead! lol
S!
S!
Mine was a bargain then Paul..
Todays update...
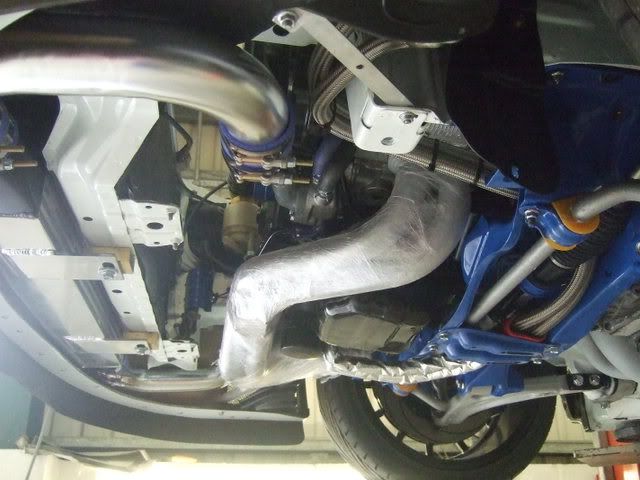
Managed to get the power steering pipes attached to the rack, and got the downpipe fitted, which means the exhaust is now complete.
Most of the underside stuff is now complete, and managed to drop the car to the floor for the first time with all heavy stuff on board.
Sits quite low, but not too low to go onto the ramp..

Few shots of underneath...


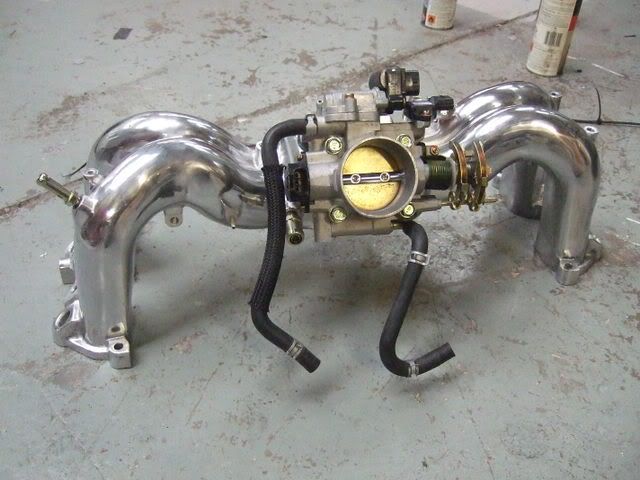
Inlet manifold trial fitted to weigh up all the other bits that need to be fitted..
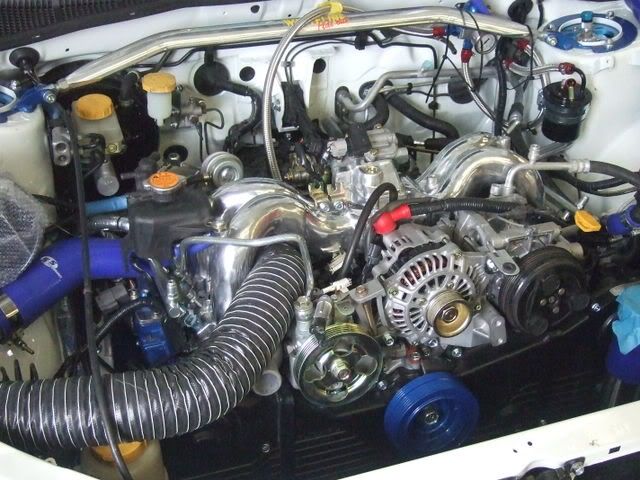

Hopefully by mid next week I will have some parts from the machinists, which will mean the inlet can be fully bolted up, along with the injectors and fuel rails.
This will leave the fuel lines to be fabricated along with bits of plumbing, in order to fire her up for the first time, which will have to wait until after my annual week off work...
Todays update...
Managed to get the power steering pipes attached to the rack, and got the downpipe fitted, which means the exhaust is now complete.
Most of the underside stuff is now complete, and managed to drop the car to the floor for the first time with all heavy stuff on board.
Sits quite low, but not too low to go onto the ramp..
Few shots of underneath...
Inlet manifold trial fitted to weigh up all the other bits that need to be fitted..
Hopefully by mid next week I will have some parts from the machinists, which will mean the inlet can be fully bolted up, along with the injectors and fuel rails.
This will leave the fuel lines to be fabricated along with bits of plumbing, in order to fire her up for the first time, which will have to wait until after my annual week off work...

WOW!! once again, true genius at work!
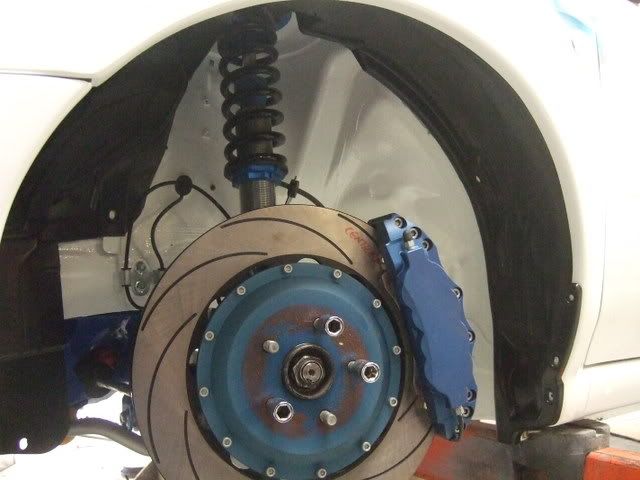
However, back to the brake disc set up as this has confused me slightly
Im guessing that the internal veins on the discs will be opposite to the external ones on show then? i.e if you could see them they would curve towards the rear of the car???
Another quick question neil, what did you use to paint your intercooler please? JUst normal paint or did you water something down loads so that it would not clog up the fins??
Thanks, and keep up the top notch work! inspiration for all who reads this thread!

Scooby Newbie
Joined: Mar 2006
Posts: 14
Likes: 0
From: Chiba, Japan

WOW!! once again, true genius at work!
However, back to the brake disc set up as this has confused me slightly
Im guessing that the internal veins on the discs will be opposite to the external ones on show then? i.e if you could see them they would curve towards the rear of the car???
Another quick question neil, what did you use to paint your intercooler please? JUst normal paint or did you water something down loads so that it would not clog up the fins??
Thanks, and keep up the top notch work! inspiration for all who reads this thread!
The intercooler was lightly blasted to ensure good adhesion, then a few light coats of etch primer, 2 light coats of black, followed by a coat of satin gloss clear coat, but only on the front face of it...
Cheers for the comments.
Quick update as to where I am at the moment...
Been on my annual holiday week, so have had a break from the car, but back on it and I have set myself a date to get it on the road in at least a running in state..July 27th, TOTB weekend.
So this week has seen my parts returned from the machinists..
Bung for the centre breather, which was an interferance fit and required heating the block up to fit nice and snug..

And also the spacers for the fuel rails, here fitted with injectors..
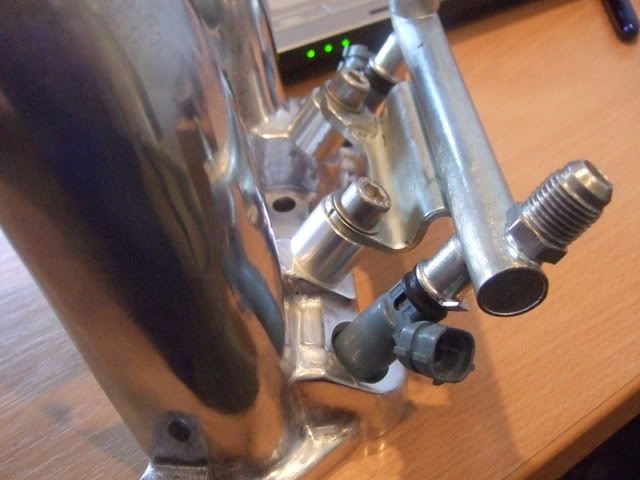

At last I could get the inlet manifold bolted down for the final time, on top of insulating spacers courtesy of Carl Davey,(Carl Davey, specialist Subaru Impreza parts supply) top pieces of kit they are too.
With this sorted I got on with fabricating the fuel lines, and basically working out where everything goes..
Here is my intercooler pipe/Maf housing in place..


And I also made myself a little tool to put some nice ends on my pipework, thanks to a little trick shown to me by Paul @ Zen...

No pipes blowing off for me hopefully.
Today I tested fuel system, so in goes it's first taste of fuel.
Primed the system, no leaks, and holding it's pressure no probs, so all happy there..
Also today I primed the oil system in the engine for the first time.. Nice healthy oil pressure on crank over, and no leaks, again happy there..
Really on the final list of jobs now, but I seem to be getting held up by stupid little things that I didn't realise I never had, and have to locate/order..
Oh the joys of building a car from not having a complete car to start with...")
Getting there...
Been on my annual holiday week, so have had a break from the car, but back on it and I have set myself a date to get it on the road in at least a running in state..July 27th, TOTB weekend.
So this week has seen my parts returned from the machinists..
Bung for the centre breather, which was an interferance fit and required heating the block up to fit nice and snug..
And also the spacers for the fuel rails, here fitted with injectors..
At last I could get the inlet manifold bolted down for the final time, on top of insulating spacers courtesy of Carl Davey,(Carl Davey, specialist Subaru Impreza parts supply) top pieces of kit they are too.
With this sorted I got on with fabricating the fuel lines, and basically working out where everything goes..
Here is my intercooler pipe/Maf housing in place..
And I also made myself a little tool to put some nice ends on my pipework, thanks to a little trick shown to me by Paul @ Zen...
No pipes blowing off for me hopefully.
Today I tested fuel system, so in goes it's first taste of fuel.
Primed the system, no leaks, and holding it's pressure no probs, so all happy there..
Also today I primed the oil system in the engine for the first time.. Nice healthy oil pressure on crank over, and no leaks, again happy there..
Really on the final list of jobs now, but I seem to be getting held up by stupid little things that I didn't realise I never had, and have to locate/order..
Oh the joys of building a car from not having a complete car to start with...
Getting there...

