
Floyd’s ‘economy’ Stage III


Quite a bit going on then!
Do you think your rear firewall cover will make a difference when you have the cage in? I guess it would without the cage though.
I'm glad you've said the VF35 is a good unit, one has just turned up on my doorstep Have you got any tips for porting the wastegate to remove boost creep? I've had a read through your posts, but they don't really show how much was removed.
Will you be keeping your old engine?
Are you not worried that the 440's might max out or have you been mapped appropriately?
Can't wait for the rest
Do you think your rear firewall cover will make a difference when you have the cage in? I guess it would without the cage though.
I'm glad you've said the VF35 is a good unit, one has just turned up on my doorstep
Have you got any tips for porting the wastegate to remove boost creep? I've had a read through your posts, but they don't really show how much was removed.Will you be keeping your old engine?
Are you not worried that the 440's might max out or have you been mapped appropriately?
Can't wait for the rest
VF35 is a great turbo for the money and availability. When I ported the waste gate I opened it up by 10-15% and blended the entry from the up pipe side as far as I could. You shouldn't open it too much - don't get carried away as bigger isn't better here.
I'll keep my old unit as a spare, afterall it's only done 48k miles and is in good order.
I've thought about going bigger with the injectors but the extra cost put me off - phase VII maybe
 It'll also make sense to put forged pistons in it too but again I'm trying to keep the cost down and limit power for reliability IYSWIM. Even now the car is in the top 5-10% of the fastest cars on trackdays that I see. The 2.5 will hopefully reinforce that and provide more flexibility. I've read how much more money it takes to go a little bit faster in real terms. Rockingham full, I was doing 2:08's and I didn't know the track. Terry B and Mike L were doing 2:02's - 2:00's in their extremely quick cars on the same day (thanks for the pax laps chaps). With more laps I could drive my times down to 2:06/5's and the 2.5 may get me a second or two again. I didn't have any 'clear' laps either.
 I have access to liquid Nitrogen so I'll try a flask of that wearing some sturdy gloves of course!!!
  Cheers for the tip.
A little photo update:
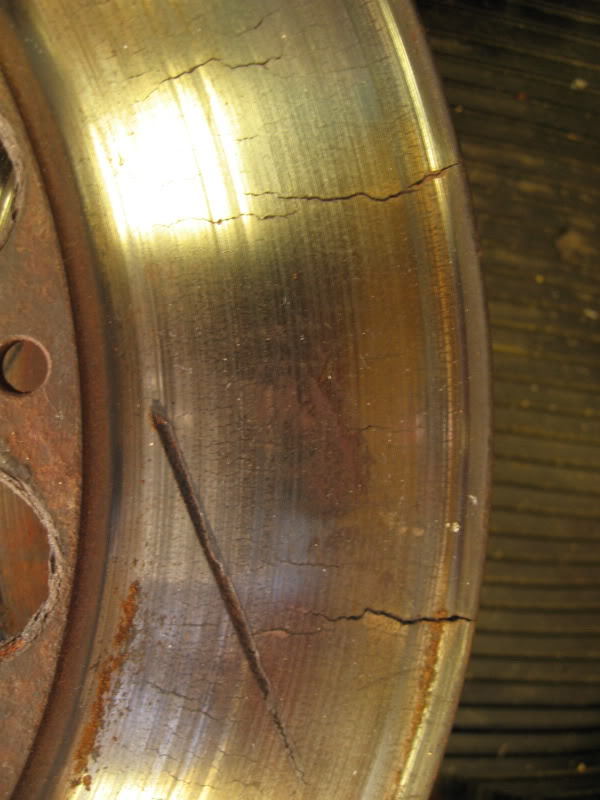
After the last Bedford trackday my AP discs looked a bit sad:
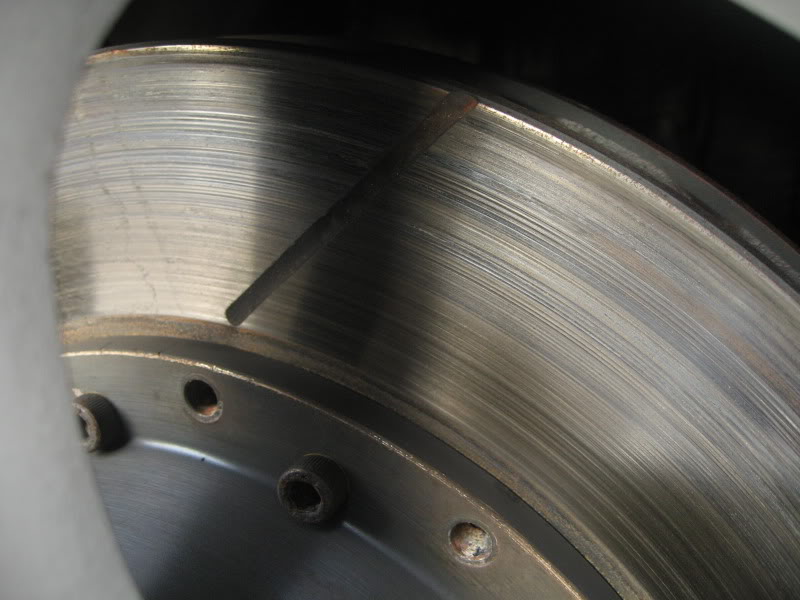
For Rockingham the Comp brake discs went on (post trackday picture)
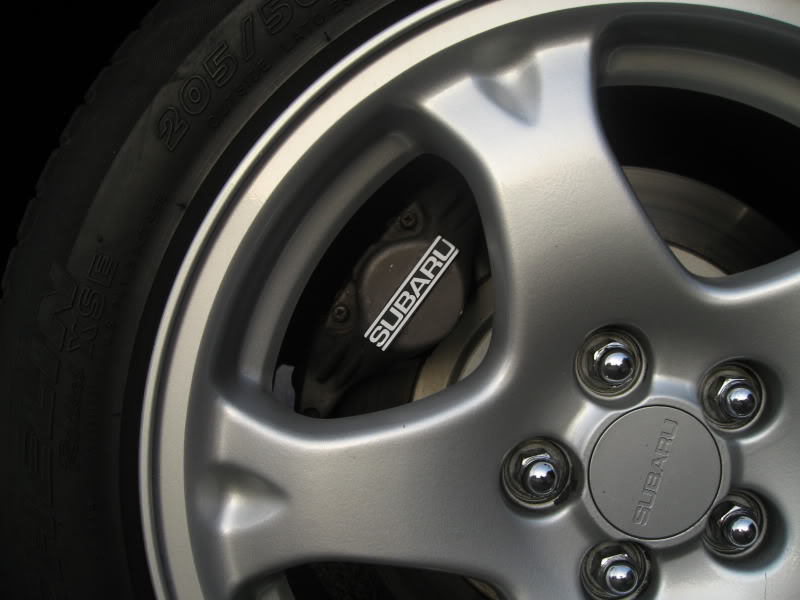
And a colour change for the rears and all lettered up now:
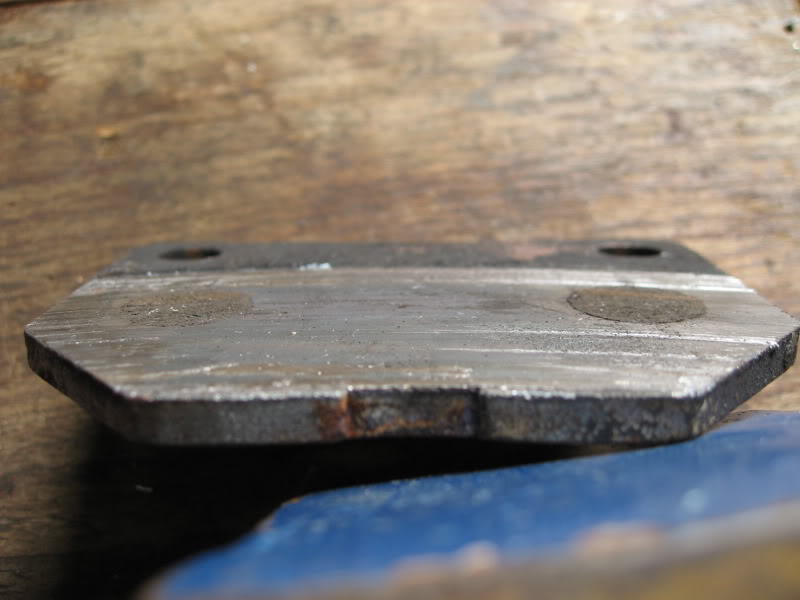
The Standard rear pads lasted Rockingham but looked like this afterwards (were brand new before):
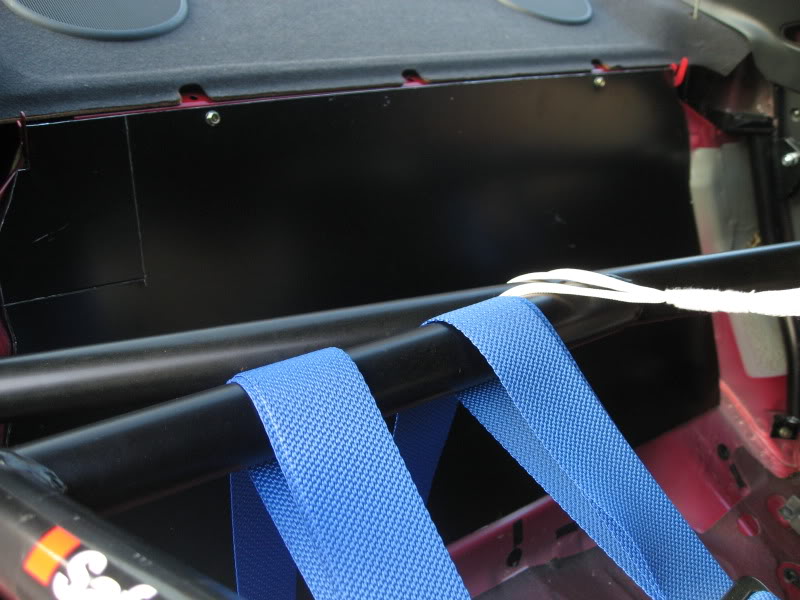
Rear panel fitted - this will be covered in felt eventually:
Old gauges removed from the glove box and sold. Now replaced by Defi's with controller and relocated DIY AFR:

After the last Bedford trackday my AP discs looked a bit sad:
For Rockingham the Comp brake discs went on (post trackday picture)
And a colour change for the rears and all lettered up now:
The Standard rear pads lasted Rockingham but looked like this afterwards (were brand new before):
Rear panel fitted - this will be covered in felt eventually:
Old gauges removed from the glove box and sold. Now replaced by Defi's with controller and relocated DIY AFR:
Scooby Regular


Joined: Mar 2000
Posts: 8,619
Likes: 24
From: 5 beats 4 - RS3 Rulez!!!


Just preparing the update. Wheel bearings were shot, or rather the hubs were. To many kerb hopping sessions at Wipperman and Silverstone. It took 10T to push the bearings off the hubs.
I'm thinking about changing the bearings routinely from now on! Cheaper than a new hub...
I'm thinking about changing the bearings routinely from now on! Cheaper than a new hub...
I managed to swap my steel bonnet for and alloy one that I bought some time ago. I got it painted eventually (one side only to save weight ) and slapped it on.
For those that are interested, I weighed them both (bare):
Steel = 15.6Kg
Alloy = 7.1Kg
I hope this will be worth it...
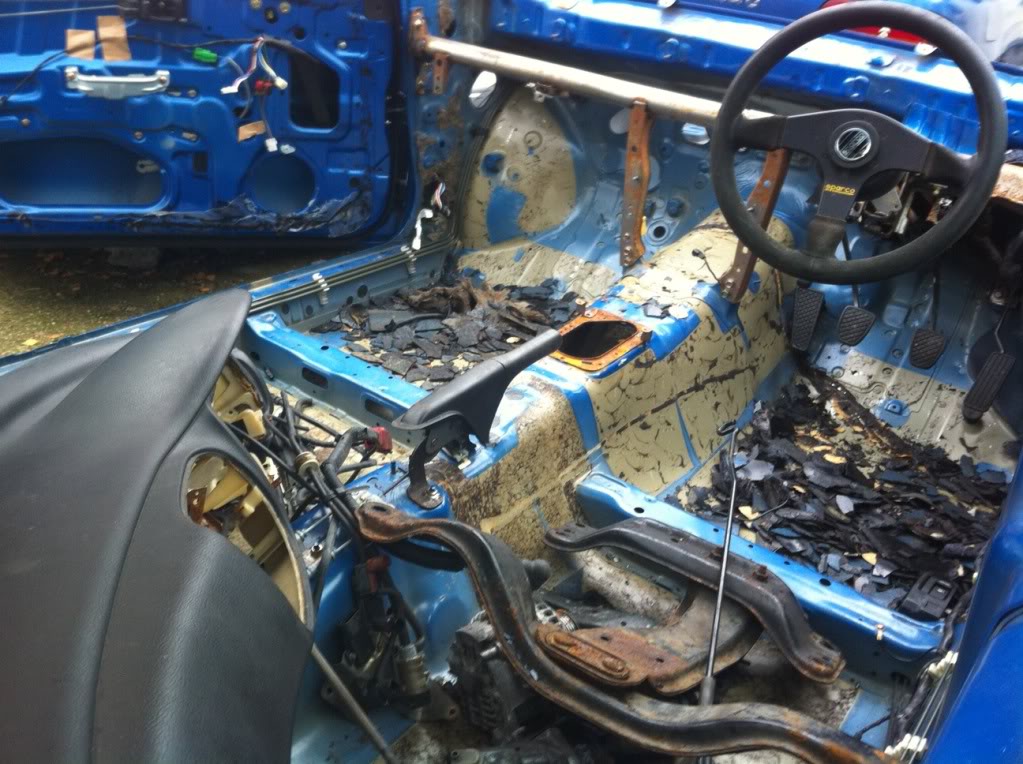
I also had a little go at removing some sound deadening from the spare wheel well. I used Liquid Nitrogen to freeze it and chip it off. Yes it works, but also the metalwork becomes as brittle as an egg shell and the underseal literally falls off the underside of the car. Oops.
) and slapped it on.For those that are interested, I weighed them both (bare):
Steel = 15.6Kg
Alloy = 7.1Kg
I hope this will be worth it...
I also had a little go at removing some sound deadening from the spare wheel well. I used Liquid Nitrogen to freeze it and chip it off. Yes it works, but also the metalwork becomes as brittle as an egg shell and the underseal literally falls off the underside of the car. Oops.

Former Sponsor
iTrader: (4)
Joined: Jan 2001
Posts: 16,548
Likes: 2
From: ECU Mapping - www.JollyGreenMonster.co.uk
Floyd,
dont do that... no need
it comes off this time of year purely with a hammer and chisel
you are then left with a residue that wipes off with petrol
Simon
dont do that... no need
it comes off this time of year purely with a hammer and chisel
you are then left with a residue that wipes off with petrol
Simon
Former Sponsor
iTrader: (4)
Joined: Jan 2001
Posts: 16,548
Likes: 2
From: ECU Mapping - www.JollyGreenMonster.co.uk
Comes out easy, did mine last week, third car I have stripped of mine now ")
Bought ally bonnet from dealer new previously and was reasonably priced but parts gone up this year
Simon
Bought ally bonnet from dealer new previously and was reasonably priced but parts gone up this year
Simon


Did I see you at Snetterton a couple of months ago with teh North Loop lot?
Awesome thread. Gonna sit down with a cup of tea and read it all teh way through tomorrow.
Awesome thread. Gonna sit down with a cup of tea and read it all teh way through tomorrow.

Floyd, where are you at regarding engine/turbo right now?
The only reason I ask, is that I am looking into building a twin scroll classic, but undecided on what engine size/spec to go for...
Great thread BTW.
The only reason I ask, is that I am looking into building a twin scroll classic, but undecided on what engine size/spec to go for...
Great thread BTW.
Saw you in the pits, loved how subtle your car is. It's only really the AP's that are noticeable from the outside! I remember talking to my friend about it and how it's Subaru perfection.
I was there with my friends purple Seat Ibiza. Unfortunately I only got to see you in the pits and not on track.
Will have to get myself onto North Loop.
EMB, thanks. Mine is 2.0 UK std internals and heads. The turbo is VF37 with ported hot side inlet and wastegate. I'd recommend the later heads VVT if you plan to stay with the 2.0. TD make a hybrid twinscroll that I'd like to try and you may want to look at that. The twinscroll can come in very early but the downside is that I've suffered with some surge so you need to map this out or play with the inlet size or both. I have a plan over winter to improve things and I'll publish the results when complete.
Moving Shadow, yes, join Northloop. Join us! If you're into the trackday scene then you'll get on just fine. That Ibiza looks great.
Moving Shadow, yes, join Northloop. Join us! If you're into the trackday scene then you'll get on just fine. That Ibiza looks great.

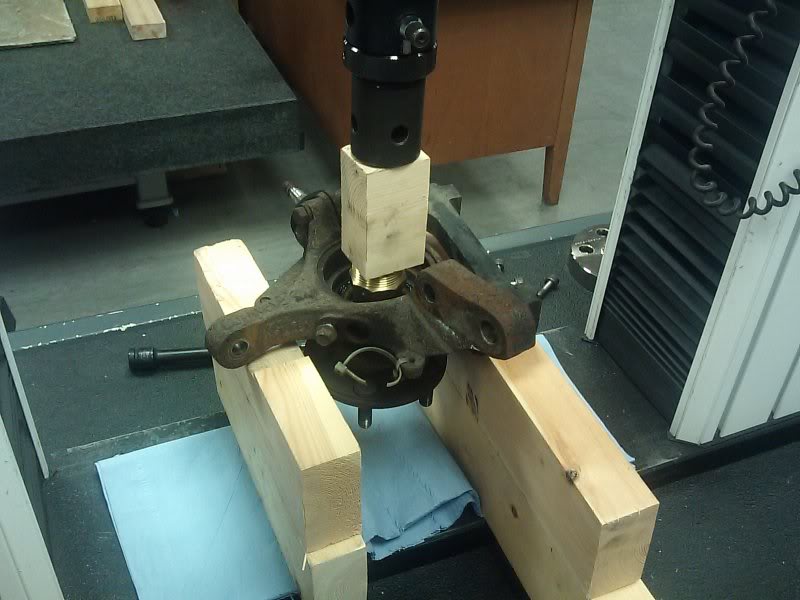
A little guide to changing wheel bearings! I'd never attempted this before but having access to a 'press' (read tensile machine) I thought I'd have a go.
A few track days ago, I started to hear a strange metal on metal noise from the wheel area. I checked it out but couldn't see anything wrong. No play in the wheels or suspension and there were no steering or vibration problems and braking was straight and true. Very strange! The noise got worse after a few hot laps and was noticed while turning into the pits. I took the car to Germany and did the GP + 'Ring track day, where the noise got quite noticeable. I still couldn't see what was wrong and at an indicated 160MPH on Dottinger Hoe there were no obvious problems. I drove home and it got really bad and I was advised to tighten the hub nut as that could sometimes cure it.
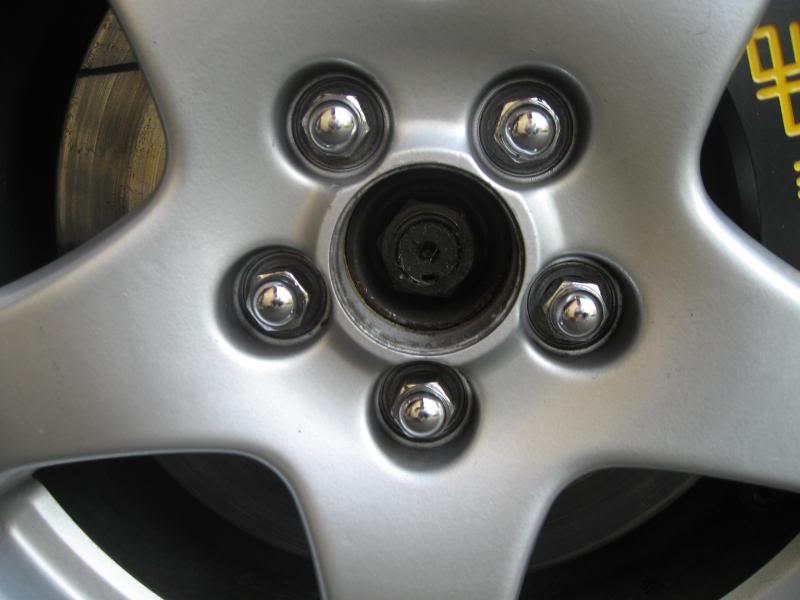
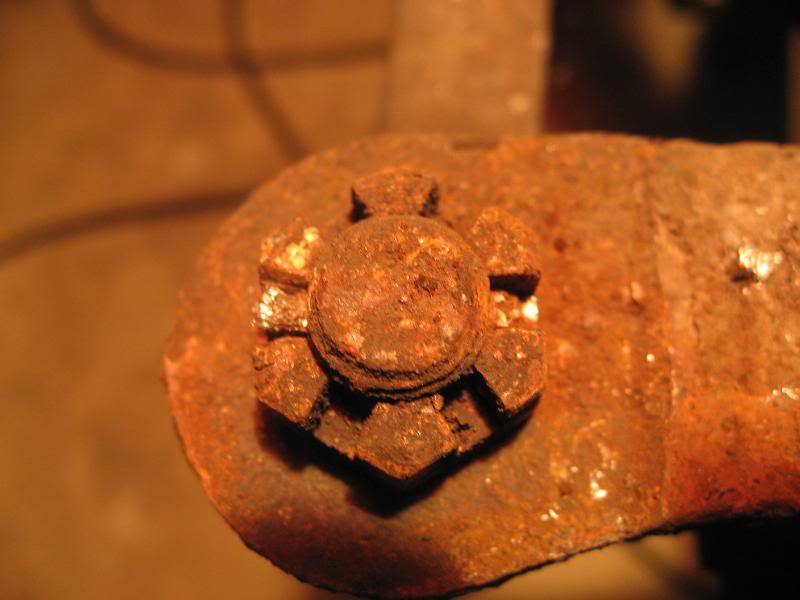
I got the wheel off and saw the hub nut:
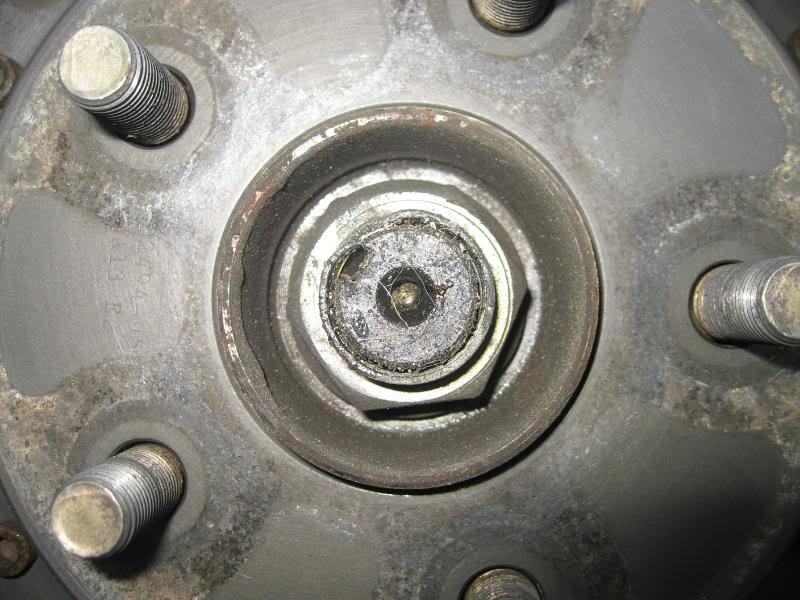
The nut was not locked and was finger tight. Oh! I put my hands on the hub at 12 - 6 O'Clock and I could rock it easily. More oh!
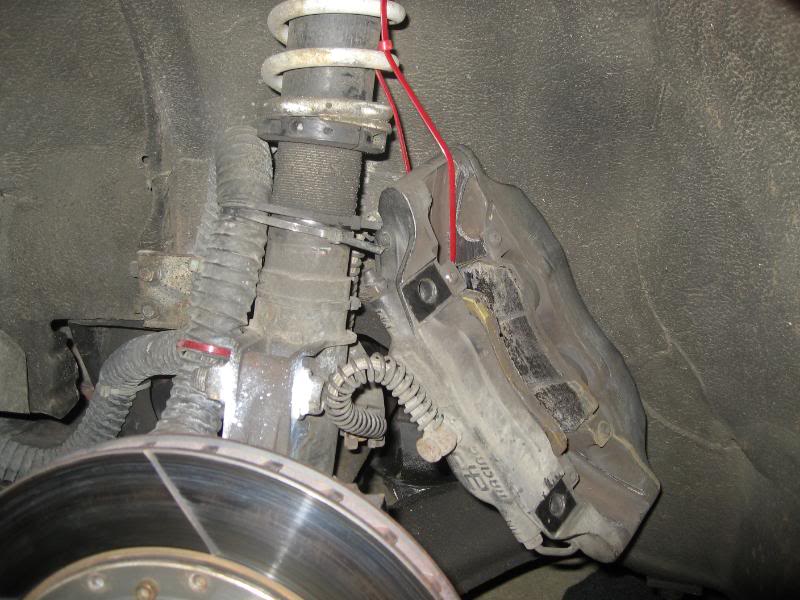
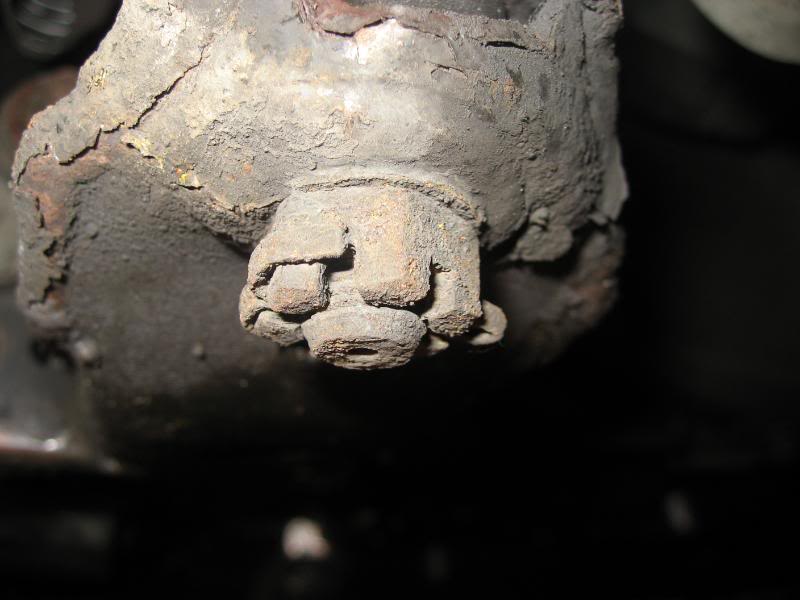
I looked at the calliper and saw where the noise was coming from:
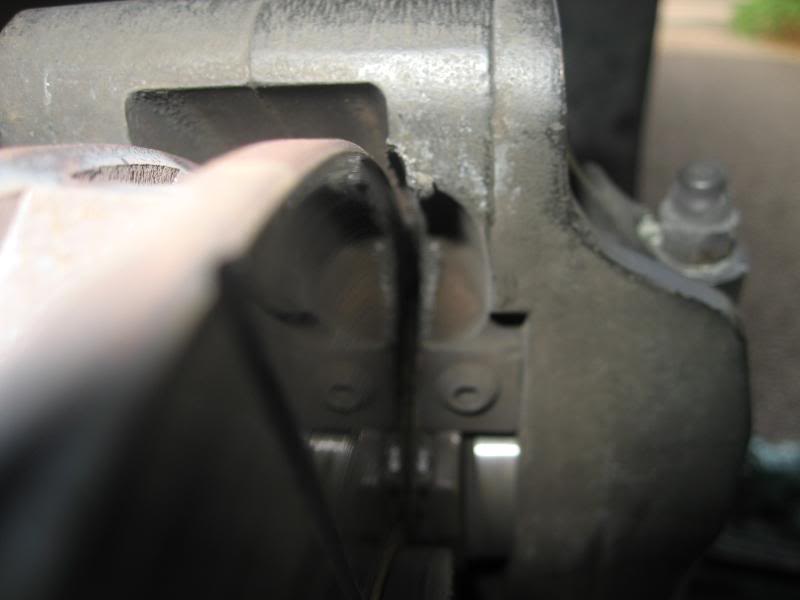
After calliper was removed:

Oh dear The disc had so much movement that it touched the bottom arm
I bought a bearing set and got to work changing it. The set includes inner and outer seal, snap ring and new bearing.
You’ll need:
A ball joint separator (big one)
Bearing separator
Access to a Press
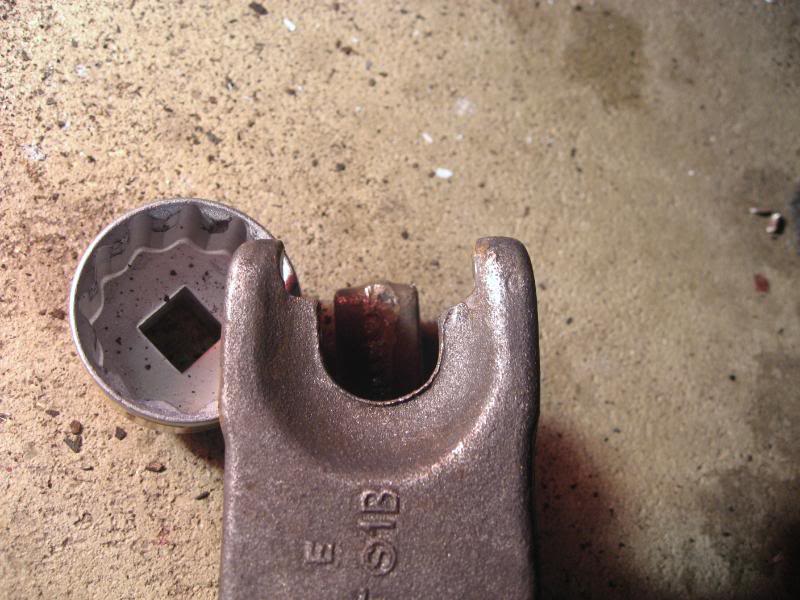
With the wheels on the ground and the wheel centre cap removed (you may need to take the wheel off first to pop these out from the inside out), open out where the lock nut has been tapped into the keyway.
Have a long breaker bar on the hub socket and break it loose but don’t remove it yet. Raise the car and remove the wheel, then remove the brake calliper (tie to one side) and the brake disc.
A few track days ago, I started to hear a strange metal on metal noise from the wheel area. I checked it out but couldn't see anything wrong. No play in the wheels or suspension and there were no steering or vibration problems and braking was straight and true. Very strange! The noise got worse after a few hot laps and was noticed while turning into the pits. I took the car to Germany and did the GP + 'Ring track day, where the noise got quite noticeable. I still couldn't see what was wrong and at an indicated 160MPH on Dottinger Hoe there were no obvious problems. I drove home and it got really bad and I was advised to tighten the hub nut as that could sometimes cure it.
I got the wheel off and saw the hub nut:
The nut was not locked and was finger tight. Oh! I put my hands on the hub at 12 - 6 O'Clock and I could rock it easily. More oh!
I looked at the calliper and saw where the noise was coming from:
After calliper was removed:
Oh dear
The disc had so much movement that it touched the bottom arm I bought a bearing set and got to work changing it. The set includes inner and outer seal, snap ring and new bearing.
You’ll need:
A ball joint separator (big one)
Bearing separator
Access to a Press
With the wheels on the ground and the wheel centre cap removed (you may need to take the wheel off first to pop these out from the inside out), open out where the lock nut has been tapped into the keyway.
Have a long breaker bar on the hub socket and break it loose but don’t remove it yet. Raise the car and remove the wheel, then remove the brake calliper (tie to one side) and the brake disc.
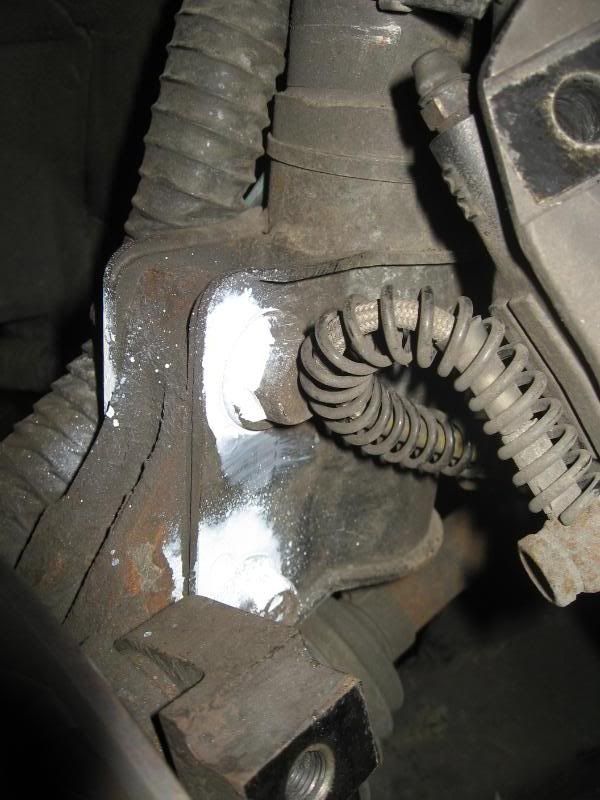
Mark the bottom strut camber adjusters (19mm) before removal so that they can be adjusted to the same position when refitting. There are graduations on the camber adjusters which I marked with black pen on the white paint.
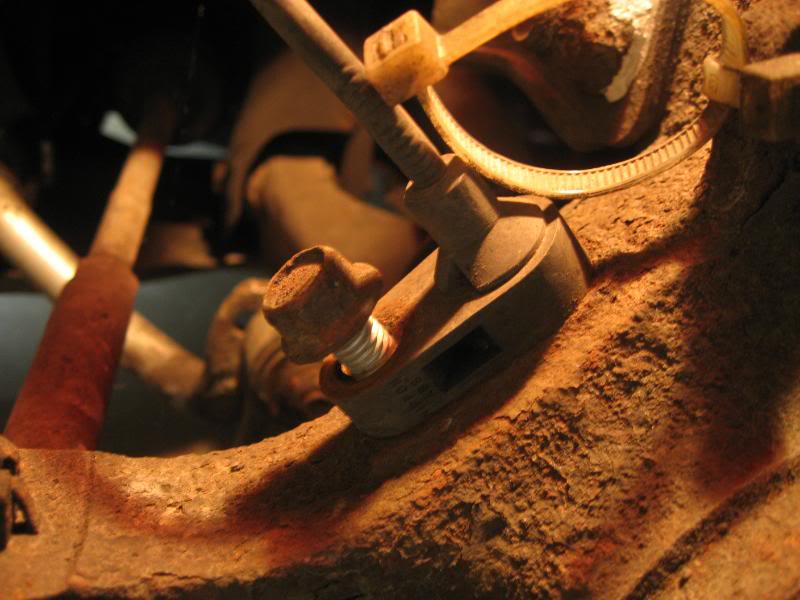
Undo the ABS sensor (12mm) and move to one side (remove bolt and pull the sensor out of the hole on the upright – it may be stuck but twist a bit and it should come out):
Next is the removal of the ball joints (both 19mm). There is one for the steering arm and one for the bottom (wishbone) arm. Remove the split pins. These will bend with some long nose pliers and should push through the castle nut. Mine didn’t They were well and truly rusted into the nuts. I ended up breaking off the excess pin and then simply undoing the nuts. The pins were so rotten that they broke away quite easily.
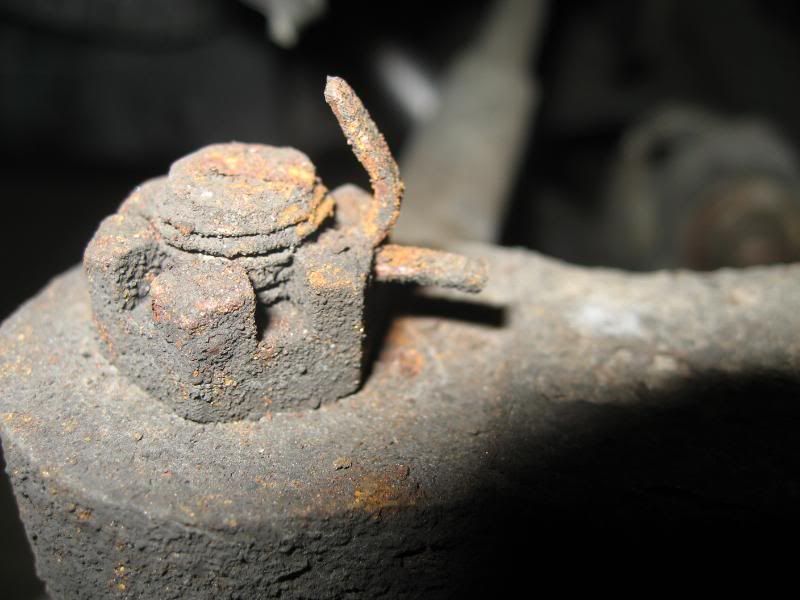
You’ll need to drill out the old pin afterwards to be able to insert new ones upon reassembly.
I prefer to use a splitter like this rather than the fork type, which tend to rip the rubber on the seals.
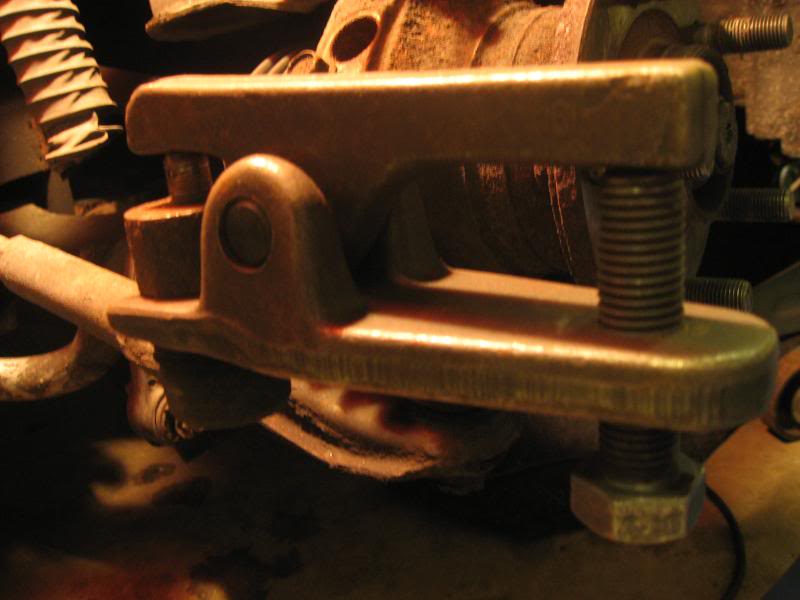
I had to modify my ball joint splitter for the bottom arm ball joint as the jaws weren’t wide enough.
I couldn’t find one wide enough anywhere either!?
You actually have a choice for the bottom arm joint – split as I did or drop the whole ball join out of the hub upright by undoing the long bolt and wedging open the casting. I couldn’t see that the effort would be worth it considering that I’d be replacing this joint anyway (only Ł12 so may as well) and it’s easier to do when the hub upright is on the bench…
Once you’ve split both ball joints you need to undo the bottom strut bolts. These are quite tight but they undid easily with a long leverage on the sockets. If the suspension is at full droop then the strut shouldn’t be under too much tension and it should just push out of the way when undone.
Undo the ABS sensor (12mm) and move to one side (remove bolt and pull the sensor out of the hole on the upright – it may be stuck but twist a bit and it should come out):
Next is the removal of the ball joints (both 19mm). There is one for the steering arm and one for the bottom (wishbone) arm. Remove the split pins. These will bend with some long nose pliers and should push through the castle nut. Mine didn’t
They were well and truly rusted into the nuts. I ended up breaking off the excess pin and then simply undoing the nuts. The pins were so rotten that they broke away quite easily.You’ll need to drill out the old pin afterwards to be able to insert new ones upon reassembly.
I prefer to use a splitter like this rather than the fork type, which tend to rip the rubber on the seals.
I had to modify my ball joint splitter for the bottom arm ball joint as the jaws weren’t wide enough.
I couldn’t find one wide enough anywhere either!?
You actually have a choice for the bottom arm joint – split as I did or drop the whole ball join out of the hub upright by undoing the long bolt and wedging open the casting. I couldn’t see that the effort would be worth it considering that I’d be replacing this joint anyway (only Ł12 so may as well) and it’s easier to do when the hub upright is on the bench…
Once you’ve split both ball joints you need to undo the bottom strut bolts. These are quite tight but they undid easily with a long leverage on the sockets. If the suspension is at full droop then the strut shouldn’t be under too much tension and it should just push out of the way when undone.
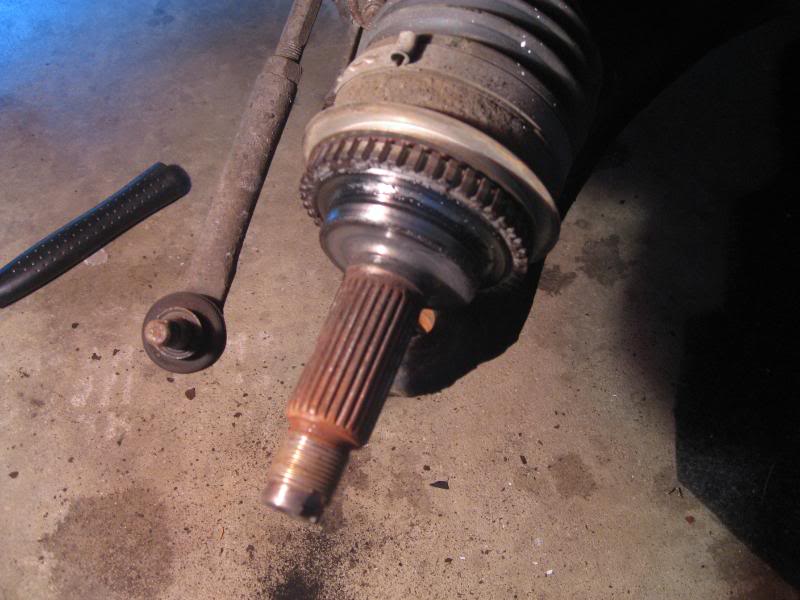
If the hub nut is fully removed then you should be able to just pull, by hand, the hub upright off of the drive shaft. I don’t have brake dust shields anymore so these may need to be removed for other cars first. Keep the driveshaft pushed towards the gearbox and pull the hub away from the car. You may need to articulate the CV joint to provide a release.
Once you have the hub upright/carrier off of the car, you can clean it up and remove the hub and old bearings. First press the hub out from the inside out) – this took 10T of pressure with mine as the hub was well and truly shot. The outer seal came off with part of the bearing when the hub was pushed out.
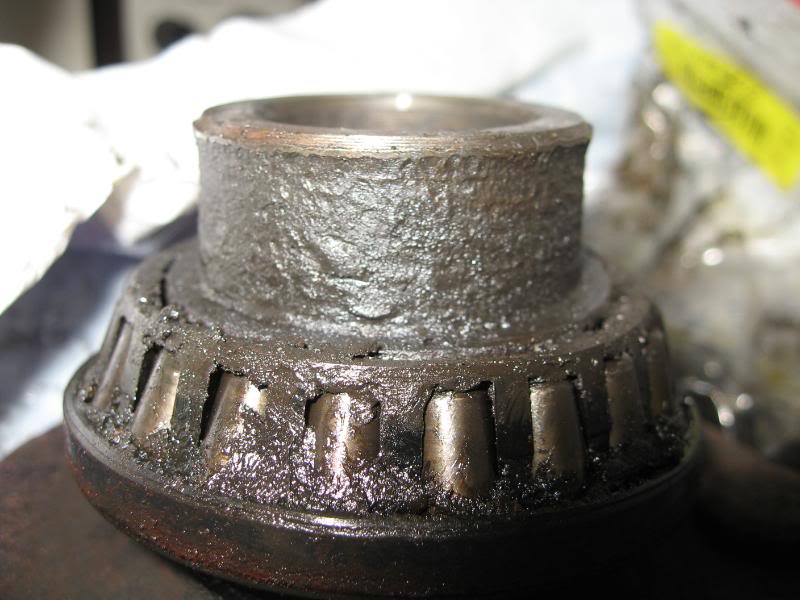
My hub was pitted like it had been hit a thousand times with a peening hammer. It needed to be replaced and a bought a new one (Ł180!!!!). Next time I will change the bearings (Ł40) at 2 year intervals, which is far cheaper. If your hub looks OK then you will need to use a bearing separator to remove the bearing part off of the hub. Inspect the hub very carefully. If there are any signs of a ‘lip’, however tiny, then you risk premature failure of the new bearing and a new hub is required. I needed a second for the other side because of this.
Once you have the hub upright/carrier off of the car, you can clean it up and remove the hub and old bearings. First press the hub out from the inside out) – this took 10T of pressure with mine as the hub was well and truly shot. The outer seal came off with part of the bearing when the hub was pushed out.
My hub was pitted like it had been hit a thousand times with a peening hammer. It needed to be replaced and a bought a new one (Ł180!!!!). Next time I will change the bearings (Ł40) at 2 year intervals, which is far cheaper. If your hub looks OK then you will need to use a bearing separator to remove the bearing part off of the hub. Inspect the hub very carefully. If there are any signs of a ‘lip’, however tiny, then you risk premature failure of the new bearing and a new hub is required. I needed a second for the other side because of this.
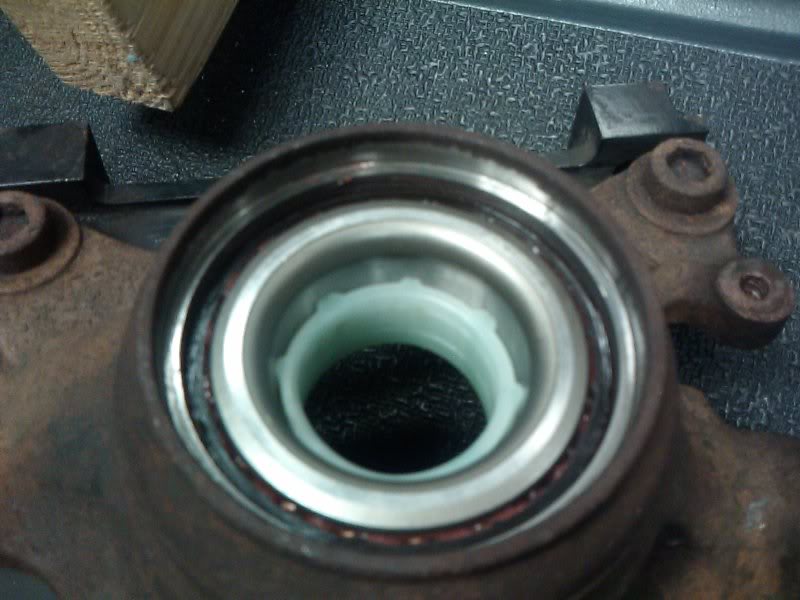
Then remove the inner seal with some pliers but be careful not to damage the hub carrier. Next remove the snap ring from the inside of the hub carrier and push the bearing out (outside in). You will probably only push the outer bearing race out as the inner part should just fall out when the snap ring is removed.
Now thoroughly clean the hub taking care not to damage the bearing surfaces. At this point I replace the ball joint as it only cost Ł12 to do. I removed the long bolt and wedged open the clamp with a screw driver. The ball joint can then be persuaded out of the hub carrier.
I was advised to paint the hub at this point to stop any flaky pieces of rust falling into the hub upon reassembly and to make it look nice!
My bearing kit was supplied pre-greased but I was also advised to change this for high temperature Redline grease:
I dismantled the bearing (it just falls apart when the plastic ‘transit packer’ is removed) and degreased it with paper towel and brake cleaner. I then repacked the bearings with Redline grease, reassembled the bearings and replaced the transit packer. I then worked the bearing and cleaned off excess grease. You’re only supposed to repack with 30% or 40% grease to allow for expansion but I just guessed here!
The excess was cleaned off the bearing before reassembly.
Last edited by Floyd; Jan 31, 2011 at 08:53 PM.
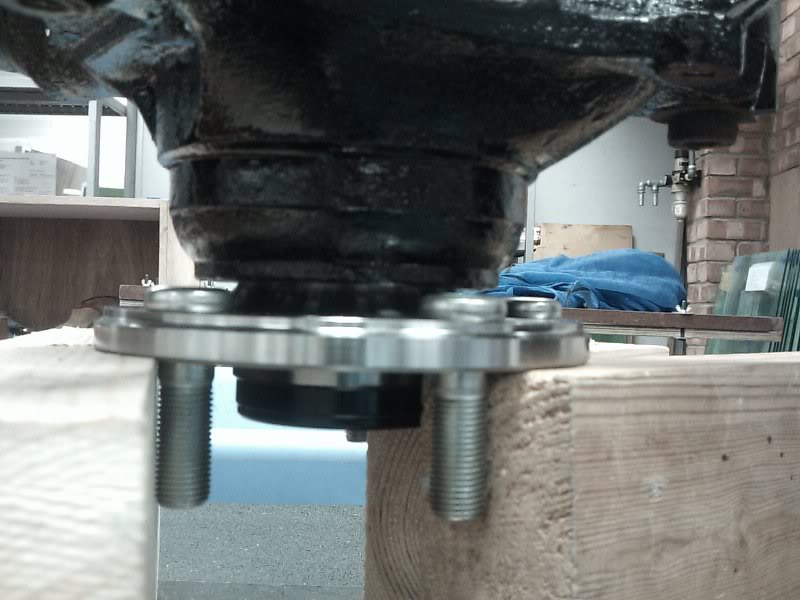
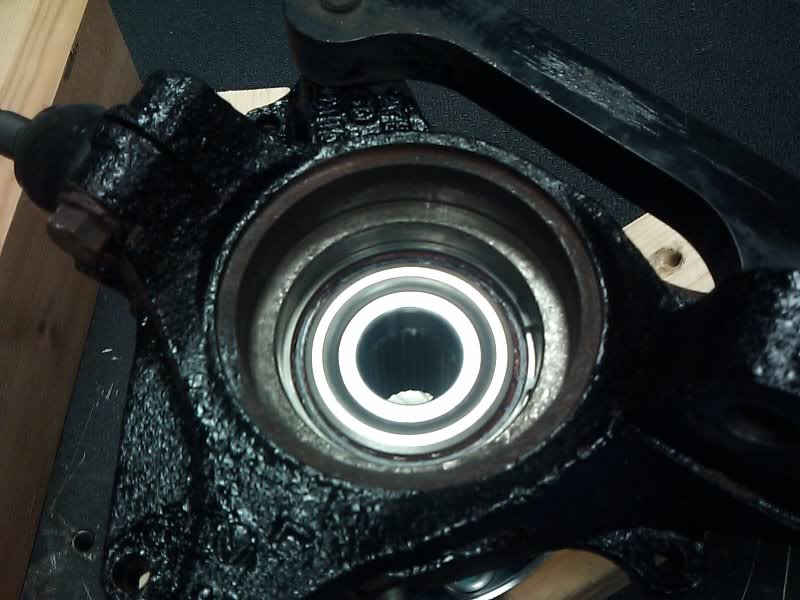
Now press the bearing back in (inside out) using pressure on the outer bearing race only. The surface must be as clean as possible. I could have heated the hub carrier to make things a bit easier but it wasn’t required. The bearing went in fairly smoothly with only slight juddering until a ‘tink’ was heard that signalled it had reached the back stop. I used a piece of wood between the metal driver and the press to take up any alignment problems and over pressure.
Replace the snap ring.
Replace the out seal.
Press in the hub (outside in).
I sat the hub on the base and placed the hub carrier on top. I then put my metal driver (can be a large socket to match the inner bearing race size) on the inner race and pushed the bearing and hub carrier down onto the hub.
Replace the inner seal (it has a weather seal) using a suitably sized socket so as not to damage or distort it. I put a smear of Redline grease on each seal.
Now reassemble the hub onto the drive shaft and tighten the hub nut. Replace and torque up the strut bolts (taking care to line up the top adjuster with your alignment mark) and ball joint bolts. You may find that the steering ball joint just turns in the joint. I jacked the joint up into the hub carrier and used the taper friction to stop it turning. Torque them up and replace the split pins (I used lots of copper grease in the hole to prevent them rusting in again). You may find that some ball joints are supplied with nylock nuts instead of castle nuts these days. I don’t know if this is an issue or not.
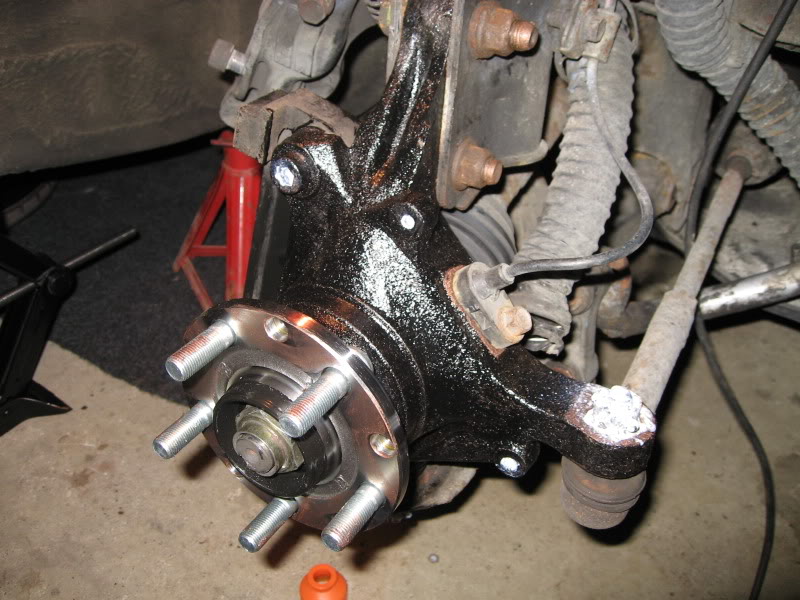
Replace the brake calliper, disc and wheel and lower to the ground. Torque up the hub nut and tap the locking ring into the recess. I think you’re now complete!
I’ll add a couple more pics when I find them…
Replace the snap ring.
Replace the out seal.
Press in the hub (outside in).
I sat the hub on the base and placed the hub carrier on top. I then put my metal driver (can be a large socket to match the inner bearing race size) on the inner race and pushed the bearing and hub carrier down onto the hub.
Replace the inner seal (it has a weather seal) using a suitably sized socket so as not to damage or distort it. I put a smear of Redline grease on each seal.
Now reassemble the hub onto the drive shaft and tighten the hub nut. Replace and torque up the strut bolts (taking care to line up the top adjuster with your alignment mark) and ball joint bolts. You may find that the steering ball joint just turns in the joint. I jacked the joint up into the hub carrier and used the taper friction to stop it turning. Torque them up and replace the split pins (I used lots of copper grease in the hole to prevent them rusting in again). You may find that some ball joints are supplied with nylock nuts instead of castle nuts these days. I don’t know if this is an issue or not.
Replace the brake calliper, disc and wheel and lower to the ground. Torque up the hub nut and tap the locking ring into the recess. I think you’re now complete!
I’ll add a couple more pics when I find them…
Last edited by Floyd; Jan 31, 2011 at 08:56 PM.
Have you planned any track days for this year yet?
I'm looking forward to trying the all new Snetterton, probably going to book on for March or maybe April.