
Floyd’s ‘economy’ Stage III


Floyd’s ‘economy’ Stage III
The history:
The current car is a MY00UK turbo 2000 with 34k miles to date. A trip down to Powerstation in 2000 for a RR shoot out and a Fast Car magazine article saw the standard car produce 201BHP on their rollers with 200 Lb/ft L Oh, dear! The PAW was just over 100HP So this was my starting point.
Stage I:
Much discussion later produced a revelation about the ECU. I had previously owned a MY99 car from new and so I new that the newer MY00 car was down on performance. The RR day proved it wasn’t just a tight engine and attention fell on the AE802 emission control calibration. I talked to Phil Babber about this who also suffered the same problem with his MY00 and suggested the solution of replacing the ECU with the AE801 from the MY99 cars. He tried it and voila, his car was transformed. The results were published on SN, which was a couple of months before ECUTEK was launched. I followed shortly after Phil and also added a home made de-cat DP and centre and modified BB.
The complete exhaust was an OEM spare, which I performed surgery on to remove the cats. The BB was opened and the exhaust flow rearranged but interestingly the sound level got no louder. I whacked in a K&N panel filter in the standard air box and opened up a hole in the resonator just in front of the vent in the bumper for a bit of cold air. The next RR was at Power Engineering and the car produced 233BHP and 232lb/ft. Not a massive increase for Stage I, but pretty good for the cost of a panel filter and a tenners worth of welding. I guess that if I had run at PS then the result would have been about 220BHP as their rollers are more pessimistic (so Ł2.25/HP excluding DIY time). The car felt quite lively and had enough performance to not completely be embarrassed by Sti’s on track.
Stage II:
The next upgrade consisted of tilting the TMIC, adding a splitter to the scoop, putting in a water spray system (diverting the headlamp wash to micro irrigation nozzles) and installing a Dawes. The Dawes gave an increase in performance but I felt unhappy with its agricultural approach. It was removed and sold after a couple of months. I was then given a PPP kit to try, which I felt was a better overall improvement (ECU, Y piece/hose and BB) and the driveability was also very good. I ported my standard headers, but only at the head flanges but I felt no gain with this mod on its own.
A trip to Scotland saw me return with an unexpected loan of an ECU, containing a re-map. This was yet again another improvement so I sold the PPP kit for what I paid for it and bought the ECUTEK with the proceeds. Somewhere in between I also bought and sold different BB’s until I settled for a MY01+ PPP BB. Another OEM air box was sourced (for free) and this was heavily modified to behave like an induction kit but look standard.
This configuration was taken to the ‘Ring (also added 4 pot AP’s by then) in the height of summer 2003. My thermocouple in the TB showed 70C on some sections but little knock link activity thankfully. Plenty of Octane booster was used too for safety reasons. Due to these high temps my next mission was to keep the hot bits hot and the cold bits cold. I shrouded the top of the radiator, added a shield for the air box and also a shield for the TMIC to segregate it from the turbo. I also opened up the TMIC under tray above the turbo for better cooling. All DIY and minimal cost of course This is where I am to date but I’ve not been able to RR the car in its present form. If I were to guess then I would say about 250BHP at PS but this is still enough to stick like glue to a PPP’d STI8 up to 120MPH. Excluding the AP’s I’ve spent another Ł550 net after all the buying and selling. So now its Ł11.90/HP and the power is getting more expensive…
F
The history:
The current car is a MY00UK turbo 2000 with 34k miles to date. A trip down to Powerstation in 2000 for a RR shoot out and a Fast Car magazine article saw the standard car produce 201BHP on their rollers with 200 Lb/ft L Oh, dear! The PAW was just over 100HP
So this was my starting point.Stage I:
Much discussion later produced a revelation about the ECU. I had previously owned a MY99 car from new and so I new that the newer MY00 car was down on performance. The RR day proved it wasn’t just a tight engine and attention fell on the AE802 emission control calibration. I talked to Phil Babber about this who also suffered the same problem with his MY00 and suggested the solution of replacing the ECU with the AE801 from the MY99 cars. He tried it and voila, his car was transformed. The results were published on SN, which was a couple of months before ECUTEK was launched. I followed shortly after Phil and also added a home made de-cat DP and centre and modified BB.
The complete exhaust was an OEM spare, which I performed surgery on to remove the cats. The BB was opened and the exhaust flow rearranged but interestingly the sound level got no louder. I whacked in a K&N panel filter in the standard air box and opened up a hole in the resonator just in front of the vent in the bumper for a bit of cold air. The next RR was at Power Engineering and the car produced 233BHP and 232lb/ft. Not a massive increase for Stage I, but pretty good for the cost of a panel filter and a tenners worth of welding. I guess that if I had run at PS then the result would have been about 220BHP as their rollers are more pessimistic (so Ł2.25/HP excluding DIY time). The car felt quite lively and had enough performance to not completely be embarrassed by Sti’s on track.
Stage II:
The next upgrade consisted of tilting the TMIC, adding a splitter to the scoop, putting in a water spray system (diverting the headlamp wash to micro irrigation nozzles) and installing a Dawes. The Dawes gave an increase in performance but I felt unhappy with its agricultural approach. It was removed and sold after a couple of months. I was then given a PPP kit to try, which I felt was a better overall improvement (ECU, Y piece/hose and BB) and the driveability was also very good. I ported my standard headers, but only at the head flanges but I felt no gain with this mod on its own.
A trip to Scotland saw me return with an unexpected loan of an ECU, containing a re-map. This was yet again another improvement so I sold the PPP kit for what I paid for it and bought the ECUTEK with the proceeds. Somewhere in between I also bought and sold different BB’s until I settled for a MY01+ PPP BB. Another OEM air box was sourced (for free) and this was heavily modified to behave like an induction kit but look standard.
This configuration was taken to the ‘Ring (also added 4 pot AP’s by then) in the height of summer 2003. My thermocouple in the TB showed 70C on some sections but little knock link activity thankfully. Plenty of Octane booster was used too for safety reasons. Due to these high temps my next mission was to keep the hot bits hot and the cold bits cold. I shrouded the top of the radiator, added a shield for the air box and also a shield for the TMIC to segregate it from the turbo. I also opened up the TMIC under tray above the turbo for better cooling. All DIY and minimal cost of course
This is where I am to date but I’ve not been able to RR the car in its present form. If I were to guess then I would say about 250BHP at PS but this is still enough to stick like glue to a PPP’d STI8 up to 120MPH. Excluding the AP’s I’ve spent another Ł550 net after all the buying and selling. So now its Ł11.90/HP and the power is getting more expensive…F
Last edited by Floyd; Jan 28, 2019 at 11:59 AM. Reason: Change of title, no longer 'economy' anything!
Stage III:
Up to now the mods have been gradual and ‘organic’ but my quest for lower inlet temps has lead me to look at bigger TMIC’s. I was offered a WRX TMIC but concluded that it wouldn’t be that much better than stock for the effort involved in fitting it. I then searched for a cheap Sti7/8 TMIC and managed to get one that was in pretty good nick. At this point I had now felt I had passed the point of no return with my stealth mods and the next stage would be pretty obvious from a visual point of view. If this was the case then I may as well change more of the OEM parts for better after market stuff. Serious feature creep had set in J I started to search the for sale forums for parts with a rough idea of what I wanted but with a new baby on the way I had to be ruthless with what was essential and what was not. I sold some suspension in preparation for the new arrival and then realised that I had more cash than I first thought…
The spec that I chose was partly governed by what I could buy cheaply at the time and based on the information I had read over the years. It was strange that the same names kept appearing on the replies to the adverts – it seemed that some of us were on the same quest
This is what I ended up with (all parts second hand unless marked new):
Sti5 centre resonated section (Ł25)
H&S SS DP, pre lagged (Ł100)
Sti8 clutch master cylinder (complete) (Ł30)
Sti8 TMIC with pipes (Ł200)
Sti8 DV (Ł30)
Sti7 replica scoop (in the correct colour to fit my car) (Ł70)
VF35 (4k miles, ex WR1) (Ł350)
Oil catch can kit (new) (Ł60)
Manifold spacers (new) (Ł55)
Samco inlet pipe (unused - bargain!) (Ł125)
Gaskets (new) (Ł37)
3 Port boost solonoid (Ł50)
Coolant hose (new) (Ł15)
Fuel pump 255ltr (unused) (Ł85)
Sti8 TMIC brackets (Ł20)
NGK PFR7B (new) (service item)
Oil temp and pressure guages (new with senders) (Ł50)
Knocklink (new) (Ł60)
AFR (DIY) (Free)
Aluminium and sundries (new) (Ł27)
Shipping for the above (Ł100)
Total (Ł1489)
My approach to Stage III is to build a low lag, responsive car that has approximately 300/300 with plenty of margin for the standard geabox, but a significant step up on the power I have now. I also wanted to build in a good foundation for a possible future Stage IV, which would add a nice degree of reliability into stage III. It needs to be reliable for trips to Germany and tractable enough for everyday driving. Once the chassis is sorted I suspect that if I achieve my target then it’ll take a brave man or a track day special to totally embarress me at the ‘Ring.
Of course you wouldn’t need some of the above list to get the same power level increase but what I want to show is the complete evolutionary build and then later separate just the go faster bits necessary for a super economy build.
Parts already bought to get to stage II:
K&N Panel filter (as new) (Ł15)
I/C piping (Free)
WR BB (made money through sale of various BB’s) (-Ł60)
Welding and sundries (Ł30)
Tek 2.5 (Ł500)
Total (Ł485)
I have kept most of my standard parts just in case it needs to go back to standard at some point  I could have funded some of the build from the sale of these to make this project even cheaper. I have also not included the cost of various parts such as wheels, tyres, brakes, pads and spoilers etc as these do not add to the performance in this context but they do add to the ‘package’ of course.
I've done some tweeking of the parts before fitment, which I'll show later as the parts go on. Some problems that are yet to be solved will be the parallel fuel feed mod, TMIC undertray and DP splitter addition.
Stay tuned
F
PS Stage III & 1/2
Tried a TD05 but it wasn't for me.
Stage III & 3/4
Twinscroll converstion taking the 440's to their safe limit for me and destroying the gearbox immediately.
Up to now the mods have been gradual and ‘organic’ but my quest for lower inlet temps has lead me to look at bigger TMIC’s. I was offered a WRX TMIC but concluded that it wouldn’t be that much better than stock for the effort involved in fitting it. I then searched for a cheap Sti7/8 TMIC and managed to get one that was in pretty good nick. At this point I had now felt I had passed the point of no return with my stealth mods and the next stage would be pretty obvious from a visual point of view. If this was the case then I may as well change more of the OEM parts for better after market stuff. Serious feature creep had set in J I started to search the for sale forums for parts with a rough idea of what I wanted but with a new baby on the way I had to be ruthless with what was essential and what was not. I sold some suspension in preparation for the new arrival and then realised that I had more cash than I first thought…
The spec that I chose was partly governed by what I could buy cheaply at the time and based on the information I had read over the years. It was strange that the same names kept appearing on the replies to the adverts – it seemed that some of us were on the same quest
This is what I ended up with (all parts second hand unless marked new):
Sti5 centre resonated section (Ł25)
H&S SS DP, pre lagged (Ł100)
Sti8 clutch master cylinder (complete) (Ł30)
Sti8 TMIC with pipes (Ł200)
Sti8 DV (Ł30)
Sti7 replica scoop (in the correct colour to fit my car) (Ł70)
VF35 (4k miles, ex WR1) (Ł350)
Oil catch can kit (new) (Ł60)
Manifold spacers (new) (Ł55)
Samco inlet pipe (unused - bargain!) (Ł125)
Gaskets (new) (Ł37)
3 Port boost solonoid (Ł50)
Coolant hose (new) (Ł15)
Fuel pump 255ltr (unused) (Ł85)
Sti8 TMIC brackets (Ł20)
NGK PFR7B (new) (service item)
Oil temp and pressure guages (new with senders) (Ł50)
Knocklink (new) (Ł60)
AFR (DIY) (Free)
Aluminium and sundries (new) (Ł27)
Shipping for the above (Ł100)
Total (Ł1489)
My approach to Stage III is to build a low lag, responsive car that has approximately 300/300 with plenty of margin for the standard geabox, but a significant step up on the power I have now. I also wanted to build in a good foundation for a possible future Stage IV, which would add a nice degree of reliability into stage III. It needs to be reliable for trips to Germany and tractable enough for everyday driving. Once the chassis is sorted I suspect that if I achieve my target then it’ll take a brave man or a track day special to totally embarress me at the ‘Ring.
Of course you wouldn’t need some of the above list to get the same power level increase but what I want to show is the complete evolutionary build and then later separate just the go faster bits necessary for a super economy build.
Parts already bought to get to stage II:
K&N Panel filter (as new) (Ł15)
I/C piping (Free)
WR BB (made money through sale of various BB’s) (-Ł60)
Welding and sundries (Ł30)
Tek 2.5 (Ł500)
Total (Ł485)
I have kept most of my standard parts just in case it needs to go back to standard at some point
I could have funded some of the build from the sale of these to make this project even cheaper. I have also not included the cost of various parts such as wheels, tyres, brakes, pads and spoilers etc as these do not add to the performance in this context but they do add to the ‘package’ of course.I've done some tweeking of the parts before fitment, which I'll show later as the parts go on. Some problems that are yet to be solved will be the parallel fuel feed mod, TMIC undertray and DP splitter addition.
Stay tuned
F
PS Stage III & 1/2
Tried a TD05 but it wasn't for me.
Stage III & 3/4
Twinscroll converstion taking the 440's to their safe limit for me and destroying the gearbox immediately.
Last edited by Floyd; Sep 18, 2007 at 07:33 PM.

Scooby Regular
Joined: Jan 2005
Posts: 63
Likes: 0
Nice write up Floyd,
One thing I have noticed that is yet to be done on mine is the oil breather modification, I understand there are benefits of this but is it a worthwhile mod and could you not just vent to atmosphere or am I treading on a pollution control issue!!.
Only reason i ask obout venting to atmosphere is the simple fact I have no room under the bonnet to suitably place a catch can.
Also with regard to your parallel fuel rail mod is this because you are running the standard reg that you have come up against a problem?
Yes std reg so not quite sure what to do. The std reg is fairly young so probably OK for the power level I'm after and a bit better than those pesky FSE's
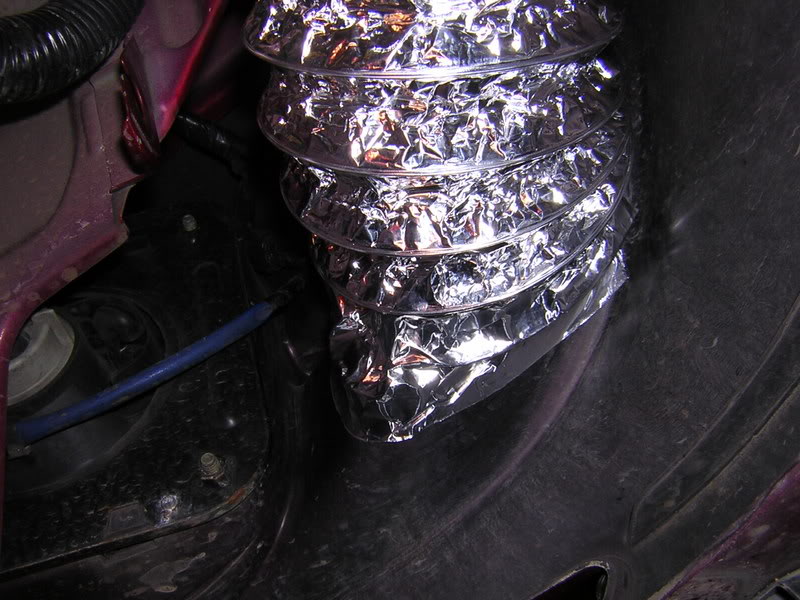
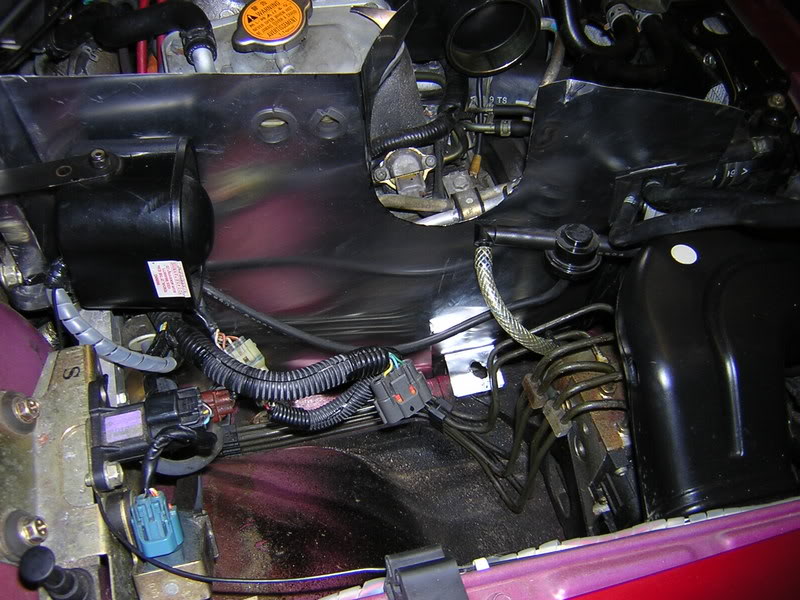
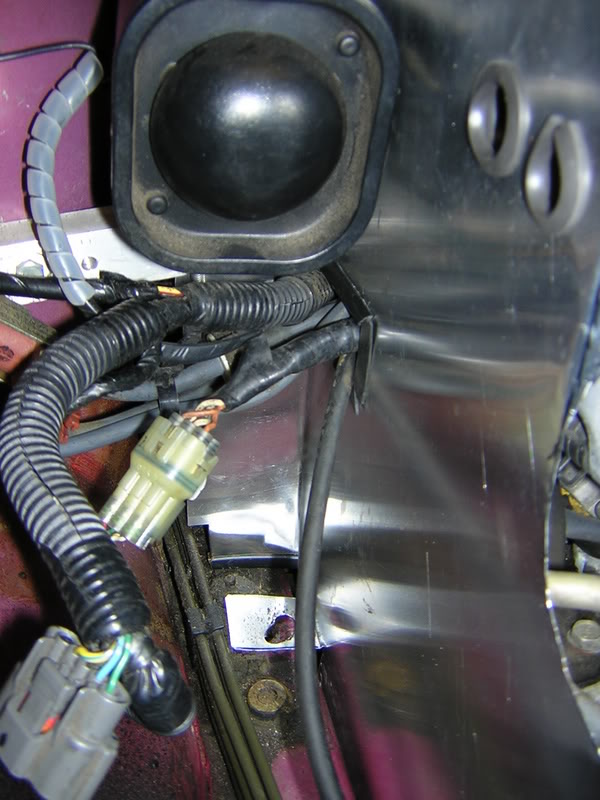
Catch can can go on the bulk head on the near side under the TMIC. I'll post a pic later.
F
Catch can can go on the bulk head on the near side under the TMIC. I'll post a pic later.
F
Steve, I'll be sticking with ECUTEK as I don't want any more guages and I've already invested in the licence. I realise you've had results that you're really happy with via AVCR and Andy F  I've seen what the latest thinking can do with the OEM ECU via BRD first hand, so I'm going to stick with it for now. I'm not going to have any guages on display
F
I've seen what the latest thinking can do with the OEM ECU via BRD first hand, so I'm going to stick with it for now. I'm not going to have any guages on display F

Trending Topics

Ritchie, the headlamp washer pipe has been intercepted before the large black tube to the headlamps. I fed this to a small bore pipe and onto the nozzels bought from any garden centre. I chose the misters 360deg spray pattern. I thought they were better than the P1 nozzels (Ł16 from Subaru dealer) as they mist better.
Forgot to say that you can buy an automatic controllers for Ł40 from Scoobyshop, which i will get around to at some point.
F
Forgot to say that you can buy an automatic controllers for Ł40 from Scoobyshop, which i will get around to at some point.
F
Last edited by Floyd; Mar 25, 2005 at 10:16 PM.
 but i was always under the impression that this made litttle difference to the performance
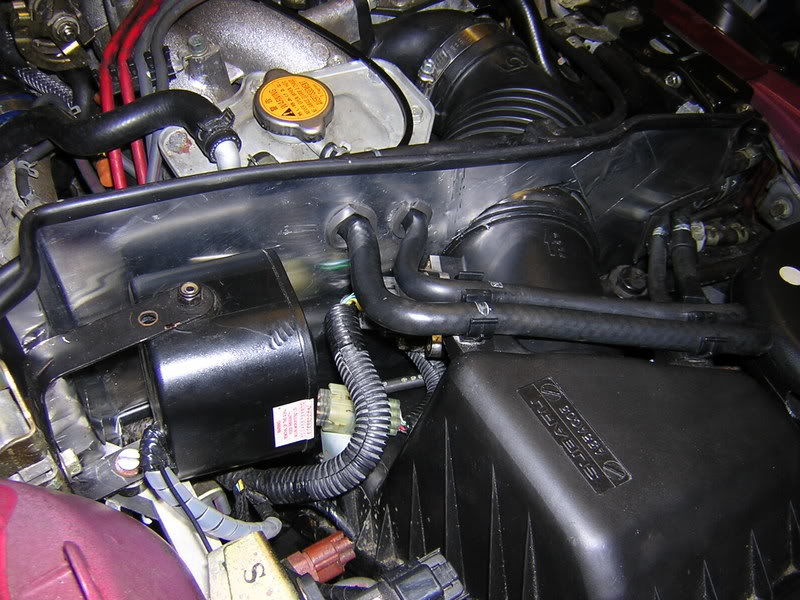
Take the bottom half of the standard air box a knock a hole in the side of it thus:
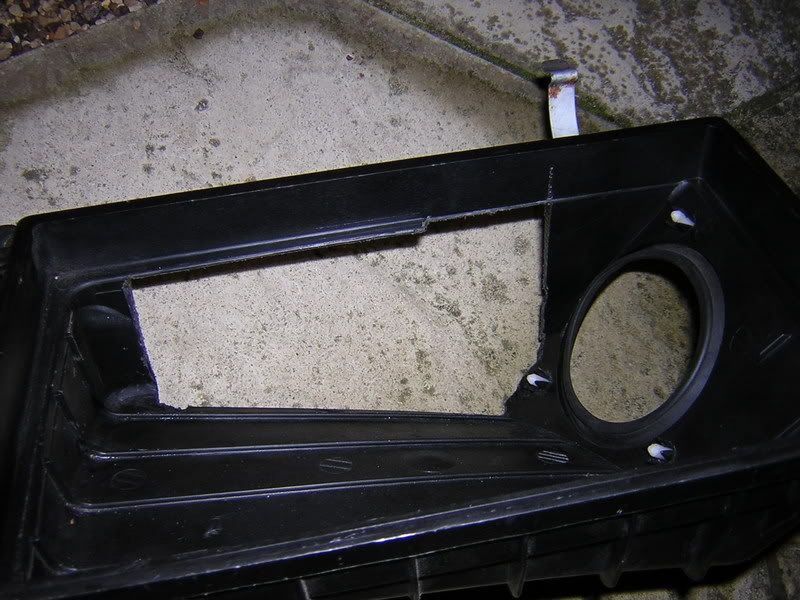
Make sure you don't remove too much plastic or it won't seal against the filter properly. The top half has been smoothed but I decided not to remove the mesh due to possible maf issues:
The hole will face forward. You could remove the rear side and the engine side but I doubt it'll gain anything:
I removed the resonator and snorkel, fitted a piece of ducting in the wing to mate up with the air box and the wedge:

This mod only works well with a heat shield...
F
Make sure you don't remove too much plastic or it won't seal against the filter properly. The top half has been smoothed but I decided not to remove the mesh due to possible maf issues:
The hole will face forward. You could remove the rear side and the engine side but I doubt it'll gain anything:
I removed the resonator and snorkel, fitted a piece of ducting in the wing to mate up with the air box and the wedge:
This mod only works well with a heat shield...
F
Last edited by Floyd; Mar 25, 2005 at 10:53 PM.

\m/ ^_^ \m/
Joined: Dec 2001
Posts: 36,816
Likes: 0
From: 2010 Time Attack Club Pro Champion - Powered by ScoobyClinic
the cats out of the bag  im so tempted to remove the mesh from infront of my maf also, did so on my legacy with no ill effects for a year or so
im so tempted to remove the mesh from infront of my maf also, did so on my legacy with no ill effects for a year or so
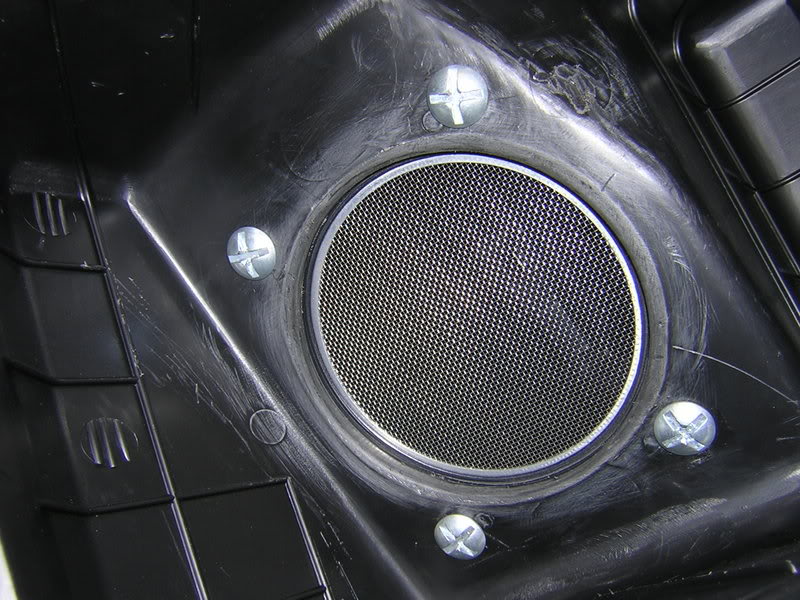
The mesh is a safety feature just in case the filter is forgotten and possibly for air distribution reasons too I'm just not sure what the effects will be vs the gain?
F
I'm just not sure what the effects will be vs the gain?F
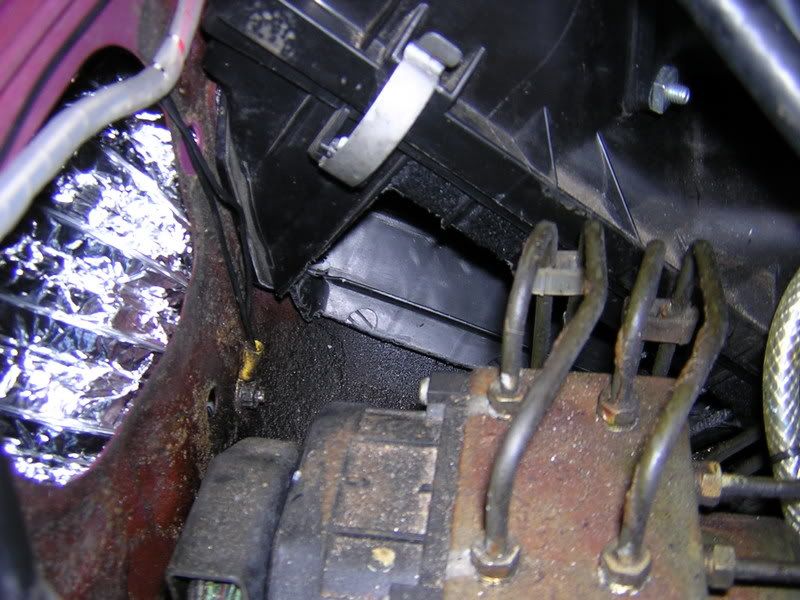
As I said before on the air box mod, you'll need to make a heat shield for this to work well. My first attempt is to use some thin aluminium (easy to form and cut with scissors) that should do the job but still be light. I can always add some more thermal insulation later.
This shows the whole panel fitted with holes for all existing pipe work. I have subsequently decided to reroute the coolant pipes away from the airbox lid. I bought Ł15 worth of samco piping to do this.
The above shows the rear detail, where I have wrapped it back towards the wing to shield from exhaust heat.
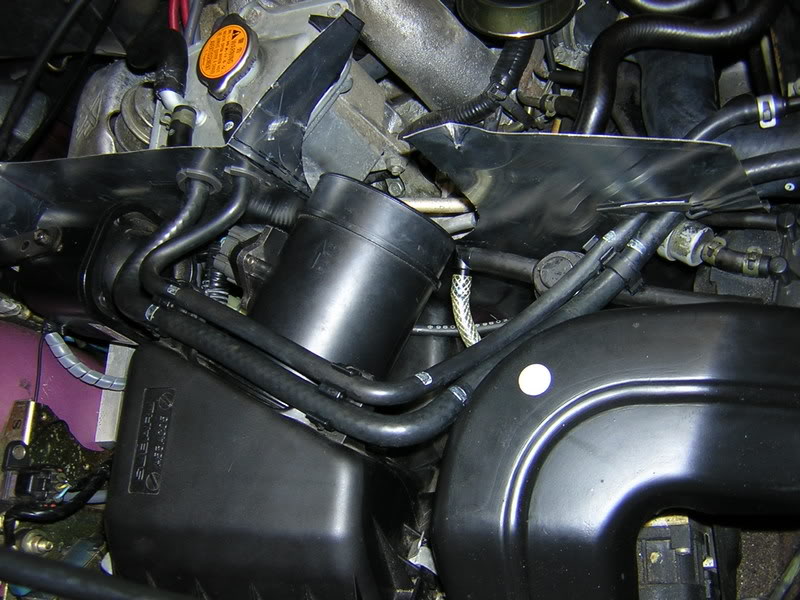 Piping and airbox fit.
 This shows the completed shield with finishing protector on the edge. I wanted to retain the airbox for noise and safety reasons. I also don't believe that there is much gain to be had with an induction kit up to 350BHPanyway.
F
This shows the whole panel fitted with holes for all existing pipe work. I have subsequently decided to reroute the coolant pipes away from the airbox lid. I bought Ł15 worth of samco piping to do this.
The above shows the rear detail, where I have wrapped it back towards the wing to shield from exhaust heat.
F
The air box shield was a significant improvement as far as airbox temps were concerned. Even after a track session and idleing afterwards the airbox would be cool to the touch for some time afterwards. Adding thermal insulation would prolong the heat creap even more. I have removed a portion of bonnet rubber from over the off side headlight to aid cool flow of air to that area.
One problem I didn't anticipate was that when the rad fans activate heat poors into the segregated area. I need to extend the shield past the charcole canister. I could do this around the canister but I may as well remove it. I have read posts on how to do this but I still have a question over the hot fuel overspill issue? Any ideas here?
F
One problem I didn't anticipate was that when the rad fans activate heat poors into the segregated area
. I need to extend the shield past the charcole canister. I could do this around the canister but I may as well remove it. I have read posts on how to do this but I still have a question over the hot fuel overspill issue? Any ideas here?F
Last edited by Floyd; Mar 26, 2005 at 08:34 PM.
Scooby Regular
Joined: Jan 2005
Posts: 63
Likes: 0
I removed the carbon canistor to make way for my DIY front mount intercooler...
I removed all the canister and associated pipework and just bunged up the pipes. Only thing I have noticed is an increase in pressre when undoing the fuel filler cap.
Not sure what you mean by hot fuel overspill though, maybe you could expand on that a little.?
Derek
I removed all the canister and associated pipework and just bunged up the pipes. Only thing I have noticed is an increase in pressre when undoing the fuel filler cap.
Not sure what you mean by hot fuel overspill though, maybe you could expand on that a little.?
Derek
Thanks Carl, I believe that Harvey IIRC, drilled a hole in the fuel cap to release the pressure build up. I only notice it when the tank is empty (but saying that I only fill it up when empty ") Dah! ). There was a post, which I can't find that said someone had fuel come out of one of the pipes after this mod???
Dah! ). There was a post, which I can't find that said someone had fuel come out of one of the pipes after this mod???
I don't think that there needs to be a lid on the heat shield, just as long as it's within a cm will do.
Oh, and BTW Carl, you're a cheaky monkey for saying my engine bay is dirty. That's wax and black underseal to disguise the hole in the airbox side. Any, dirt doesn't make the car slower, as you know
F
Dah! ). There was a post, which I can't find that said someone had fuel come out of one of the pipes after this mod???I don't think that there needs to be a lid on the heat shield, just as long as it's within a cm will do.
Oh, and BTW Carl, you're a cheaky monkey for saying my engine bay is dirty. That's wax and black underseal to disguise the hole in the airbox side. Any, dirt doesn't make the car slower, as you know
F
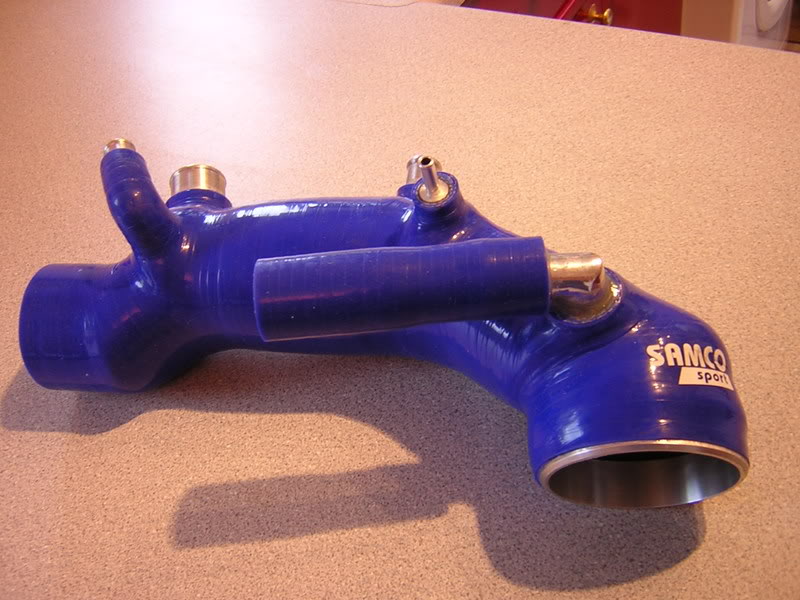
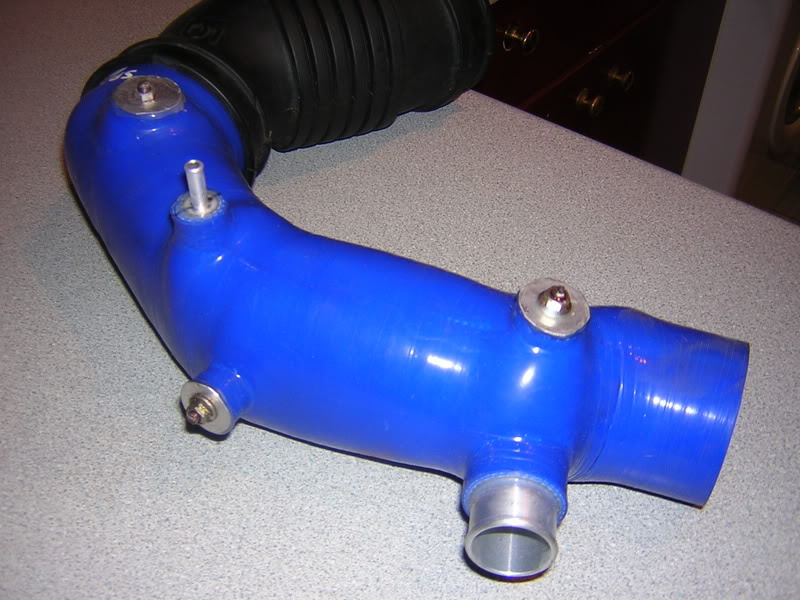
Next up on the path to glory is a Samco inlet pipe. I had been thinking about this mod for a few years now (yes, I'm a bit slow but these things can't be rushed ) after seeing the results that Steven Done made with his pipe. I would have made my own but it was proving quite tricky so I decided to buy one.
I reviewed all the available ones and thought that the Perrin pipe looked quite good. The MRT pipe was high on the list as well but pricey and the prodrive pipe was cheap but I needed the option of connection points (it was also very similar to the Samco). As luck would have it a brand new Samco came up for sale and at nearly half the RRP it was rude not to get it
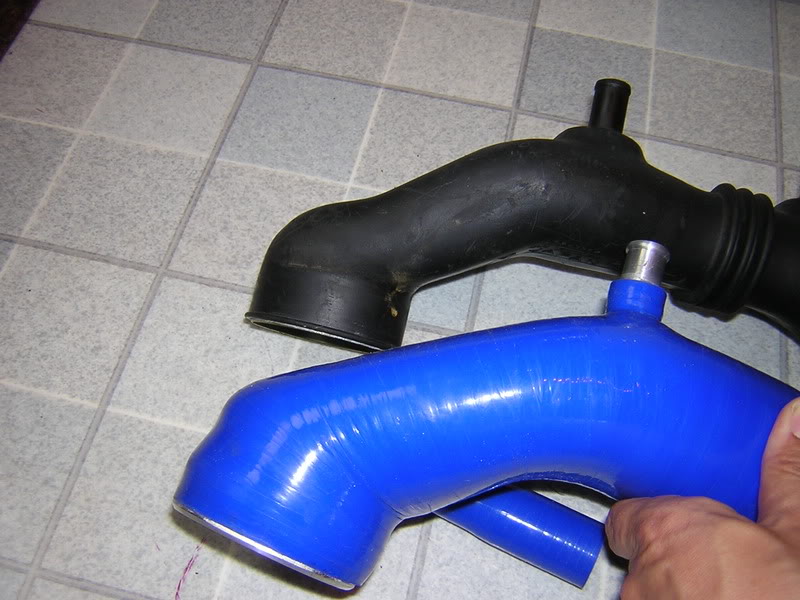
You can see the size difference here
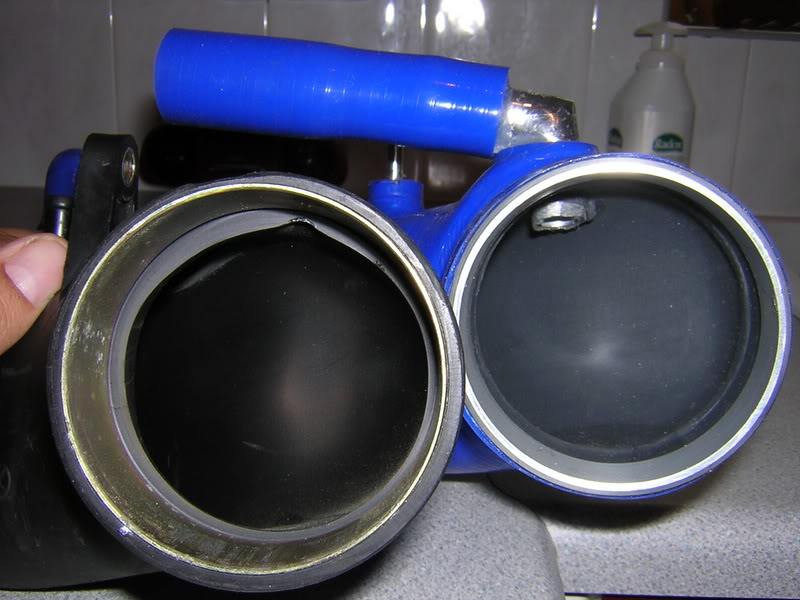
And the restrictive ridges here
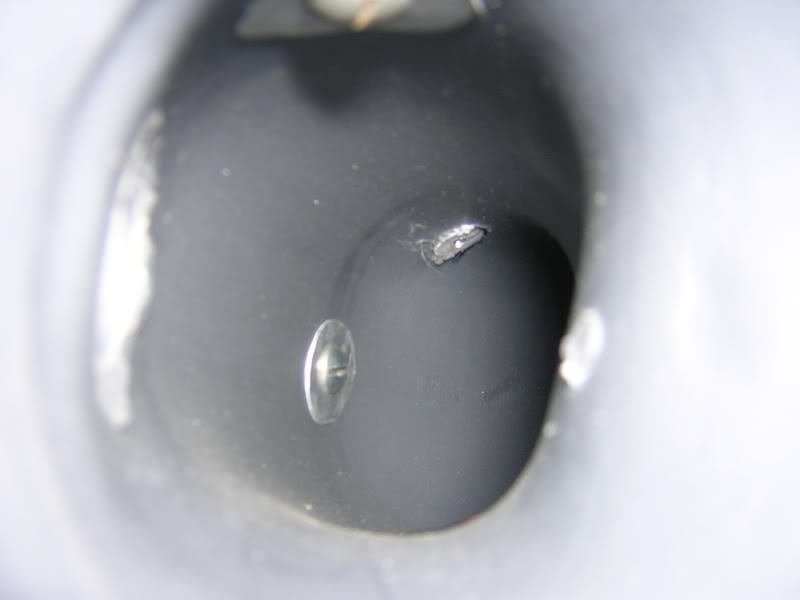
Unfortunately the Samco isn't very 'clean' inside so I had to tweek it, which is unlike me

I removed the connections for the breathers and blanked them with flush bolts and some ali:
The external ends were done too for good measure:
F
) after seeing the results that Steven Done made with his pipe. I would have made my own but it was proving quite tricky so I decided to buy one.I reviewed all the available ones and thought that the Perrin pipe looked quite good. The MRT pipe was high on the list as well but pricey and the prodrive pipe was cheap but I needed the option of connection points (it was also very similar to the Samco). As luck would have it a brand new Samco came up for sale and at nearly half the RRP it was rude not to get it
You can see the size difference here
And the restrictive ridges here
Unfortunately the Samco isn't very 'clean' inside so I had to tweek it, which is unlike me
I removed the connections for the breathers and blanked them with flush bolts and some ali:
The external ends were done too for good measure:
F
You can see in the last picture that the original flexi rubber pipe does fit over the Samco, which some have had trouble with. Few, mine was OK
I plan to cover the pipe in some 'el cheapo thermal insulation and jubilee clip strategic points to avoid the possibilty of collapse and hold the insulation on at the same time.
The pipe will be fitted when the inlet manifold is removed so more pictures of that later.
Time will tell if have surge issues but I'm hopeful that mapping will avoid this.
F

Next on the induction path is the turbo. I did look at getting a TD05 but the world and his wife seem to have one The price seems to have shot up as well TD05's have potential but need careful planning to avoid lag, which I hate. They can work well but IMO they won't match a TD04 for spool. The TD05 can be a great match for a 2.5 build but I'm not there yet.
I looked at VF28's and VF34's but searching the ad's produced a VF35 and the price was reasonable too. It was delivered by hand to my house (nice touch) so I could check it over before handing over the folding. No pipe unfortunately so there's a bit more work to do
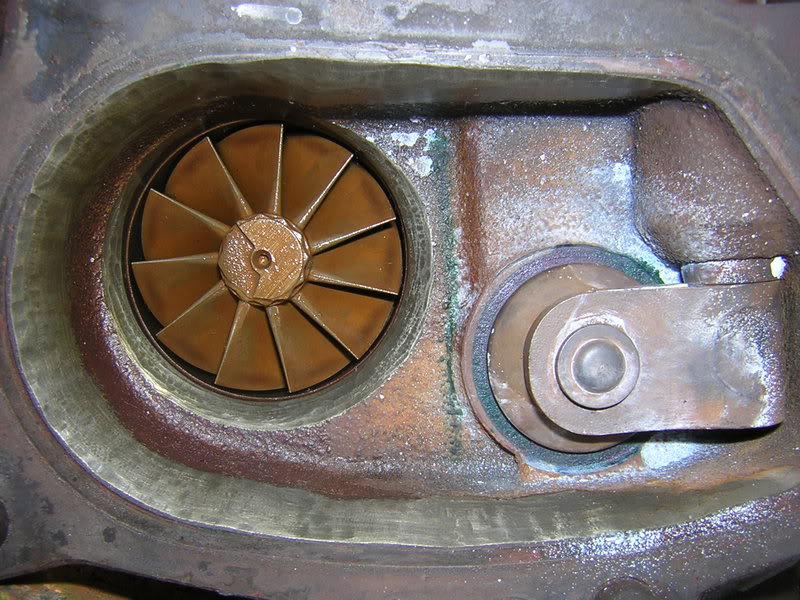
Reading a US web site I discovered 'monster porting'. I know that some have talked about porting turbos but this site showed good pictures for me to copy. I wanted to work on the VF in a mild way to avoid boost creep and improve spool. This meant opening up the waste gate and smoothing the exhaust inlet and outlet.
F
The price seems to have shot up as well TD05's have potential but need careful planning to avoid lag, which I hate. They can work well but IMO they won't match a TD04 for spool. The TD05 can be a great match for a 2.5 build but I'm not there yet.I looked at VF28's and VF34's but searching the ad's produced a VF35 and the price was reasonable too. It was delivered by hand to my house (nice touch) so I could check it over before handing over the folding. No pipe unfortunately so there's a bit more work to do
Reading a US web site I discovered 'monster porting'. I know that some have talked about porting turbos but this site showed good pictures for me to copy. I wanted to work on the VF in a mild way to avoid boost creep and improve spool. This meant opening up the waste gate and smoothing the exhaust inlet and outlet.
F
Standard exhaust:
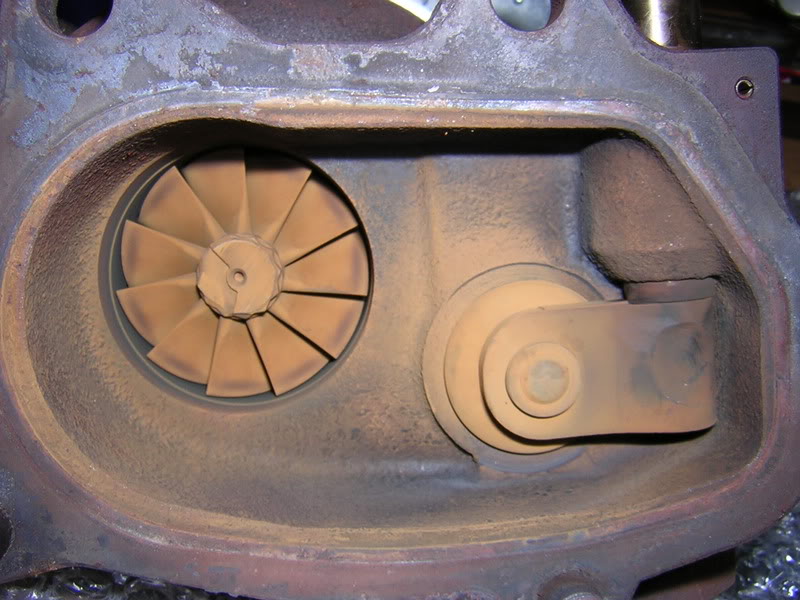
marking out the wastegate material to be removed (blue cresent line to the left only):
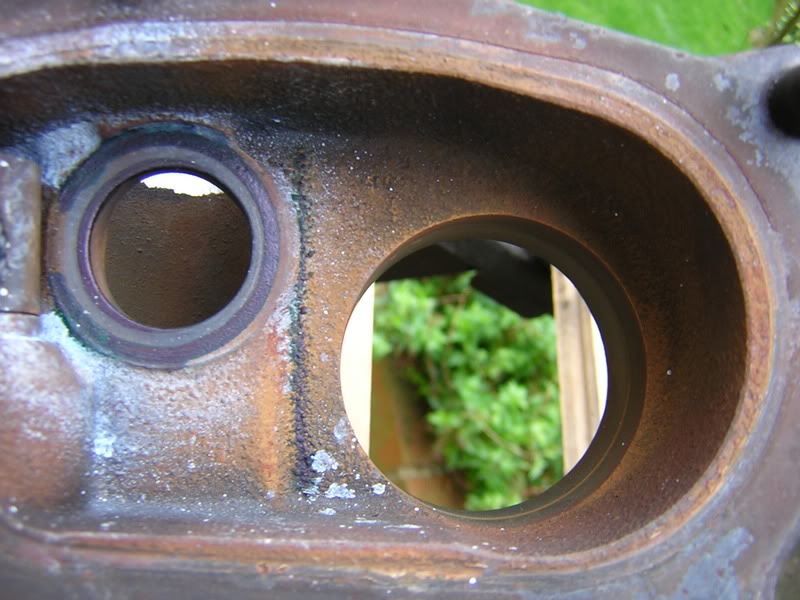
Inlet to exhaust turbine is quite restrictive:
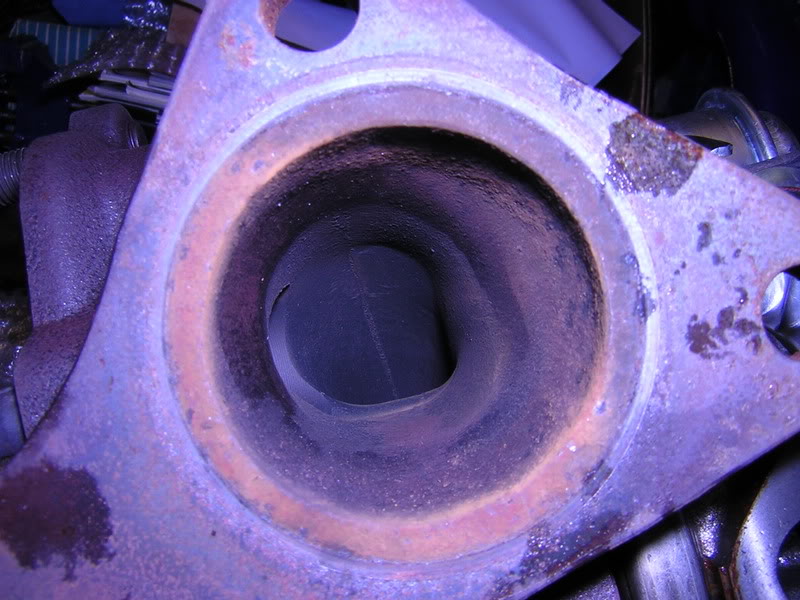
So I took it back to the gasket line:
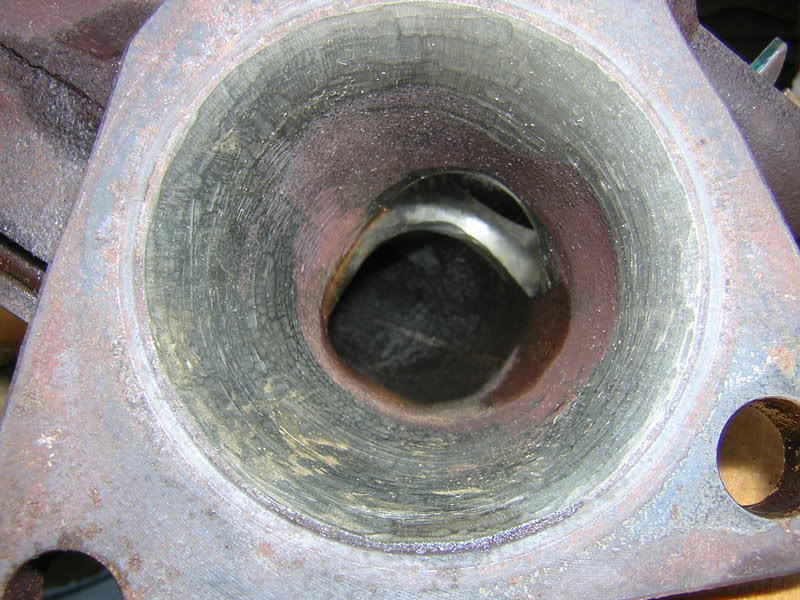
I also ported the wastegate internally and opened up the exhaust turbine exit and housing:
Time will tell if these mild mods work...
F
marking out the wastegate material to be removed (blue cresent line to the left only):
Inlet to exhaust turbine is quite restrictive:
So I took it back to the gasket line:
I also ported the wastegate internally and opened up the exhaust turbine exit and housing:
Time will tell if these mild mods work...
F
Last edited by Floyd; Mar 27, 2005 at 08:22 PM.

Scooby Regular
Joined: May 2004
Posts: 11,341
Likes: 1
Great DIY stuff!
What Project Threads are made for
Not sure from the pics, but hope you put good Loctite on the blanking screws/nuts on the Samco, you wouldn't want those dropping into the turbo...
Turbo mods will be very interesting to see.
Graham.
What Project Threads are made for
Not sure from the pics, but hope you put good Loctite on the blanking screws/nuts on the Samco, you wouldn't want those dropping into the turbo...
Turbo mods will be very interesting to see.
Graham.
