
Floyd’s ‘economy’ Stage III

Originally Posted by Floyd
An interesting point but IMO, no! From the angel of the dangel it misses the pump anyway as std.
F
PS Stage III.II is under way...
F
PS Stage III.II is under way...
lol, you're as bad as the 'Police Acadamy' sequals..!


Scooby Regular
Joined: Sep 2002
Posts: 429
Likes: 0
From: Glasgow
Originally Posted by DuncanG
Unless you're doing ovals you dont want to do that, it'll give an asymetric rate.
Originally Posted by jasonius
Not so, iirc according to whiteline..
It overall length that matters, after all the bars themselves are asymmetric.
It overall length that matters, after all the bars themselves are asymmetric.
- Asymmetric settings result in asymmetric response from side to side.
See http://www.whiteline.com.au/faqswayb...djustable_Bars
and http://www.whiteline.com.au/articles...metric_adj.pdf

 , I did say iirc..
 [Lewis mode off]


No one was asking what I'd got so I didn't post any more!
I've taken pictures and I'll post 'em a little later this evening.
Got myself a new manifold, turbo and oil cooler so far. Now gathering tyres, sump, oil pickup, down pipe, more heat wrap and front a/r with drop links.
Need to fit above stuff, get arches rolled and get it mapped.
F
I've taken pictures and I'll post 'em a little later this evening.
Got myself a new manifold, turbo and oil cooler so far. Now gathering tyres, sump, oil pickup, down pipe, more heat wrap and front a/r with drop links.
Need to fit above stuff, get arches rolled and get it mapped.
F
Back to a VF for me:
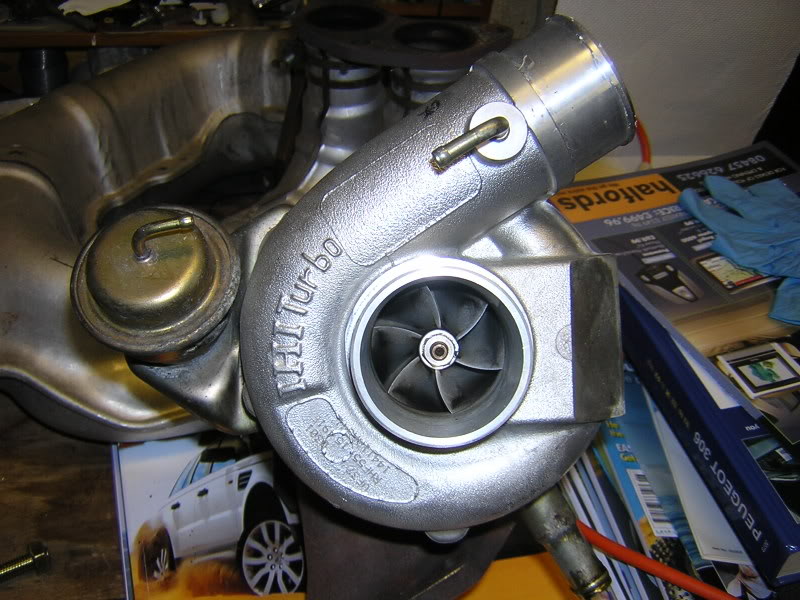
Shrouded exit and double waste gate:

Double entry to hot side, which I'll probably port unless someone says a good reasons not to...
This looks real good for an OEM manifold:
F
Shrouded exit and double waste gate:
Double entry to hot side, which I'll probably port unless someone says a good reasons not to...
This looks real good for an OEM manifold:
F
Last edited by Floyd; Sep 1, 2006 at 10:11 PM.


Steven, see http://bbs.22b.com/cgi-bin/ultimateb...=000306#000000
I've not improved it from this set up but it does need tidying!
Shaun, yep! Not necessarily for more power but I want response!!!!
F
I've not improved it from this set up but it does need tidying!
Shaun, yep! Not necessarily for more power but I want response!!!!
F
Sponsor
Joined: Mar 1999
Posts: 3,938
Likes: 1
From: Swindon
Floyd the turbo alone is not responsible, thats the sleeve bearing version btw. I would port the wastegate otherwise if you port the headers and uprate the actuator you WILL have problems. (been there)
bob
bob
Bob,
I realise that it's not the VF36 with the goodies but for the money and availability, it'll do! OK, I'll open the waste gates up and port the entries.
I wasn't going to do the headers as they looked good already and gains seemed small. I was also worried about weakening the nice welds. Maybe I'll just dress them a little?
I wasn't going to uprate the actuator, ala, Shauns' project unless you've had good results too this way? Can I tighten the actuator to achieve similar characteristics (I'll have to modify the rod appropriately of course)?
F
Mark, I think there has been a few but more likely to be uprated turbo’s like PE’s etc. I think Paul’s monster is a twin scroll, not sure if Simon Lines ever finished his in the US and Sparkywrx (big twinscroll) had all sorts of problems… It’s not really been documented.
F
F
Small update. While waiting for bits I've had the die grinder out again to do it's duty once more. The headers have had some attention with the welds being cleaned up. I'll stick some pictures up a bit later.
I should have an oil cooler on the way to so I've got a few ideas of where to put that that may be a bit unusual...
F
I should have an oil cooler on the way to so I've got a few ideas of where to put that that may be a bit unusual...
F
Got a call from TD this morning. I only sent them my actuator last night and they called to say it had arrived and what they were going to do with it. That's top service  Thanks for the tip Bob.
F
Thanks for the tip Bob.F

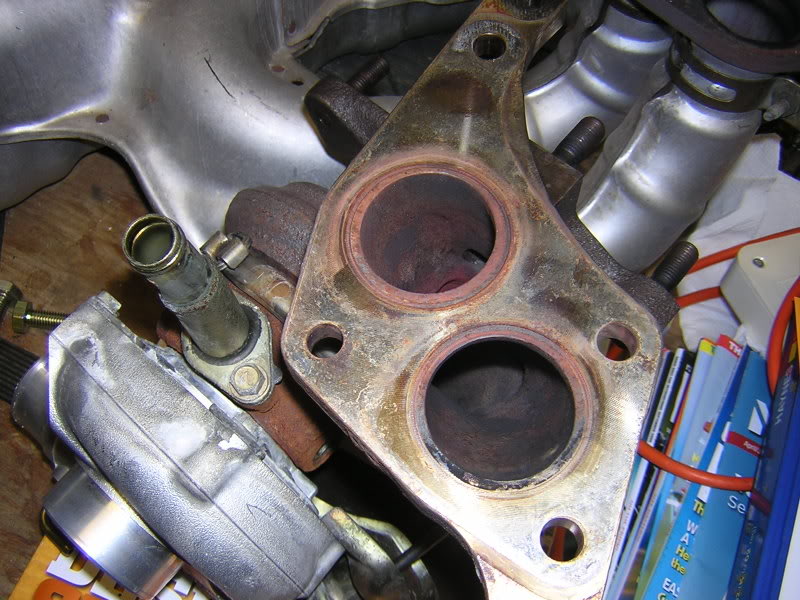
I did some port tidying and waste gate fettling last night. The entry to the turbo is a similar diameter to the up pipes but the up pipe flange is bigger than the port entry to the turbo. This causes a step in the wrong direction especially when the ports can be mismatched. I didn’t want to go crazy with the turbo port enlargement as I am conscious to keep gas speeds high so I took the ports out a little and blended them as smoothly as I could. It was nothing major and quite gentle work for the die grinder.
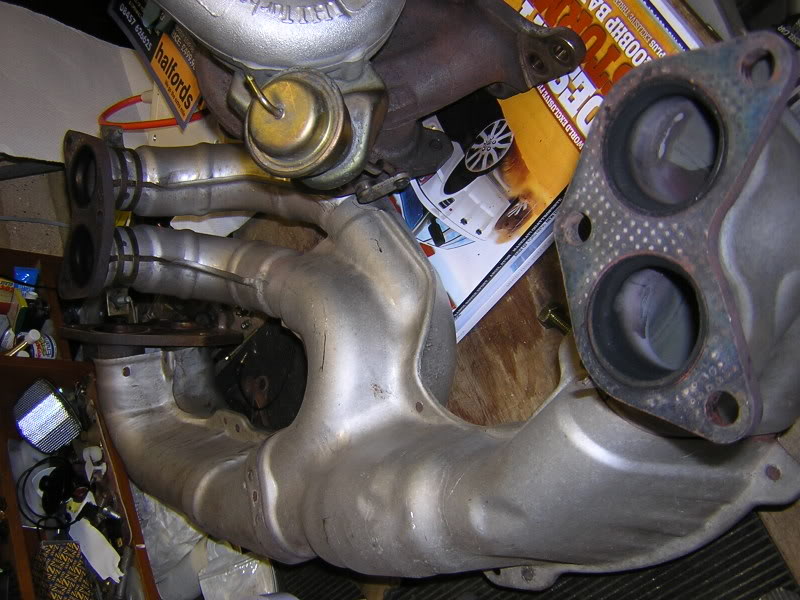
The waste gates would prove a lot more challenging. The double penny joined flap, which I shall now call the ‘dog bone’, doesn’t open in a way that I can really get to the outlets and it can’t be removed easily. I don’t have a flexible drive that can handle 22k rpm+, which would enable a bit more access so I had to make do with mounting the carbide burr as far forward as I could dare in the chuck or the chuck would catch on the dog bone. I marked the outline of the dog bone, making sure I moved it to the ‘worst case position – the dog bone is fairly loosely mounted so you need to move it and mark it to where it is closest to the outlet edge. When I did this I discovered that one outlet has a small gap if I pushed the dog bone to one side, which means that in certain situations the flap would only be 97% sealed. I’m not sure if this would happen in practise as the flap naturally falls to cover the gap when mounted on the engine due to gravity. It may also be dragged that way by exhaust gas when closing? But who knows what happens in reality as gas will find a way to escape.
As it turns out the outlets can be enlarged quite easily without danger of getting near the edge because you can take material from the area between the outlets as this will always be covered. I’ll put some pictures up later to show this. I am also going to be working on a way to persuade the dog bone to fall over the gap each time…
F

Scooby Regular
Joined: Nov 2004
Posts: 1,959
Likes: 0
From: In a 405 BHP/360 ft/lb P1 with SN superstar Sonic dog at my side!
Wherabouts are you Floyd?
I have a quite extensive range of Air and electric die grinders/ mini die grinders / angleheads and all sorts of burrs and extensions.
Currently not doing any engines myself so you can borrow them if you wish till you have done everything (no rush), although i do need my compressor still.
I have a quite extensive range of Air and electric die grinders/ mini die grinders / angleheads and all sorts of burrs and extensions.
Currently not doing any engines myself so you can borrow them if you wish till you have done everything (no rush), although i do need my compressor still.
Wow, thanks Mark. I may take you up on that offer if I get boost creep but for now I'll see how it goes
I'm in North East Bucks but I was at Bruntingthorpe yesterday") so your neck of the woods.
so your neck of the woods.
Cheers
F
I'm in North East Bucks but I was at Bruntingthorpe yesterday
so your neck of the woods.Cheers
F

More bits arrived Oil cooler with remote filter and hoses, 22mm adjustable front a/r and rose joint drop links. Also a set of twin scroll gaskets, which interestingly have their own design for the header to block!
There was another parcel from EBC with front and rear pads at a very reasonable price all delivered in double quick time.
I need some advice on the oil cooler though. The remote filter needs nailing somewhere so where do people put it? The kit is nearly new, having claimed to be fitted for a month before removal and I checked to make sure it wasn’t off a blown engine (as far as I could anyway). I’d like to thoroughly clean it all up – hose, connectors, rad etc so is it as simple as degreaser and a water hose? Will there be a likely residual of degreaser to worry about if I did this?
F
Oil cooler with remote filter and hoses, 22mm adjustable front a/r and rose joint drop links. Also a set of twin scroll gaskets, which interestingly have their own design for the header to block! There was another parcel from EBC with front and rear pads at a very reasonable price
all delivered in double quick time.I need some advice on the oil cooler though. The remote filter needs nailing somewhere so where do people put it? The kit is nearly new, having claimed to be fitted for a month before removal and I checked to make sure it wasn’t off a blown engine (as far as I could anyway). I’d like to thoroughly clean it all up – hose, connectors, rad etc so is it as simple as degreaser and a water hose? Will there be a likely residual of degreaser to worry about if I did this?
F