Jimbobs engine rebuild thread
 11 July 2013, 08:31 AM
#1
Scooby Regular
Thread Starter
iTrader: (13)
Join Date: Apr 2010
Location: Swansea
Posts: 4,008
Likes: 0
Received 0 Likes
on
0 Posts
Well I've come to the conclusion my H/G has gone  will check 100% when I get a day off on Sunday and do a Sniff Test (have bought a cylinder block sniff tester).
Basically the engine runs sweet, gets up to temp, fans kick in, temp never goes over halfway, and all is well when not on boost. Under boost the system gets gas in the system and becomes pressurised
It hasn't been doing it for long so I'm hoping its a Cometic H/G failure, and nothing more.
SO my plan is this, finish my Landy (not a great deal to do), then when I have room put my Impreza up the drive, whip the engine out, and then assess.
Assuming the block and heads are ok (fingers crossed), then new water pump, timing kit, and H/G. Then fit my tubular manifolds, and oil temp and pressure senders.
IF the engine is ok and funds allow, then TD05 20G, and my top feed injectors and fuel rails will be going on and FINALLY getting her mapped. IF there is more to it than that, then I will see what can be salvaged and take it from there.
I WILL be doing all the work myself, as I have done a fair few engines now, but will be my first EJ20 rebuild having only ever taken them apart. Hopefully it will not require the block to come apart, but ce la vie. I WILL NOT be using EBAY specials, all gaskets/seals will be Subaru Genuine, or sourced through RCM etc. Just hope all is not too bad, so I can go with the better plan I have for her.
If anyone is willing to help, ie with torque settings, or someone I can phone when I'm stuck/in two minds please post up, as your brain will be picked. As I'd rather ask a million stupid questions, than make a stupid mistake.
will check 100% when I get a day off on Sunday and do a Sniff Test (have bought a cylinder block sniff tester).Basically the engine runs sweet, gets up to temp, fans kick in, temp never goes over halfway, and all is well when not on boost. Under boost the system gets gas in the system and becomes pressurised
It hasn't been doing it for long so I'm hoping its a Cometic H/G failure, and nothing more.
SO my plan is this, finish my Landy (not a great deal to do), then when I have room put my Impreza up the drive, whip the engine out, and then assess.
Assuming the block and heads are ok (fingers crossed), then new water pump, timing kit, and H/G. Then fit my tubular manifolds, and oil temp and pressure senders.
IF the engine is ok and funds allow, then TD05 20G, and my top feed injectors and fuel rails will be going on and FINALLY getting her mapped. IF there is more to it than that, then I will see what can be salvaged and take it from there.
I WILL be doing all the work myself, as I have done a fair few engines now, but will be my first EJ20 rebuild having only ever taken them apart. Hopefully it will not require the block to come apart, but ce la vie. I WILL NOT be using EBAY specials, all gaskets/seals will be Subaru Genuine, or sourced through RCM etc. Just hope all is not too bad, so I can go with the better plan I have for her.
If anyone is willing to help, ie with torque settings, or someone I can phone when I'm stuck/in two minds please post up, as your brain will be picked. As I'd rather ask a million stupid questions, than make a stupid mistake.
 11 July 2013, 08:44 AM
#2

Download the manuals from here for all the torque settings, if it's just the HG then it's very easy, if you need to do the block as well it's not much more difficult, a good portion of the cost is in the gasket set needed to do the heads as there are only a few rubber seals in the block halves, just post up any questions you have and the combined knowledge of the site will answer them for you.
Good luck.
Good luck.
11 July 2013, 09:05 AM
#3
Scooby Regular
Thread Starter
iTrader: (13)
Join Date: Apr 2010
Location: Swansea
Posts: 4,008
Likes: 0
Received 0 Likes
on
0 Posts
Download the manuals from here for all the torque settings, if it's just the HG then it's very easy, if you need to do the block as well it's not much more difficult, a good portion of the cost is in the gasket set needed to do the heads as there are only a few rubber seals in the block halves, just post up any questions you have and the combined knowledge of the site will answer them for you.
Good luck.
Good luck.

This is also a 100% bitchfest free area, despite my engine having only done 7-8k (allegedly), there will be no dummies spat, no toys thrown, etc, etc.
Last edited by Jimbob; 11 July 2013 at 09:07 AM.
11 July 2013, 03:08 PM
#5
Scooby Regular
iTrader: (6)

Join Date: Aug 2007
Location: Llanelli with a spanner in my hand!
Posts: 2,260
Likes: 0
Received 0 Likes
on
0 Posts
If you need a second pair of eyes, you have my number. Keep Advanced Automotive in mind as they can be cheaper for Subaru parts. As already mentioned download the manuals, they have all the torque settings, sealant paths, etc.
Good luck with the build, as long as you pay attention to the detail you'll be ok.
Good luck with the build, as long as you pay attention to the detail you'll be ok.
11 July 2013, 05:33 PM
#6
Scooby Regular
Thread Starter
iTrader: (13)
Join Date: Apr 2010
Location: Swansea
Posts: 4,008
Likes: 0
Received 0 Likes
on
0 Posts
If you need a second pair of eyes, you have my number. Keep Advanced Automotive in mind as they can be cheaper for Subaru parts. As already mentioned download the manuals, they have all the torque settings, sealant paths, etc.
Good luck with the build, as long as you pay attention to the detail you'll be ok.
Good luck with the build, as long as you pay attention to the detail you'll be ok.
But atleast shes being saved, she will still be on the road in the years to come, others will not

Could have been in a world of issues though, not knowing how to tell the difference between a screw driver and a spanner, which would force me to pay someone else to do it for me. Which lucky for me I can do these things.
Anyhoo I digress, sniff test Sunday and take it from there. And the 3.5 V8 series Landy I have been restoring isn't far off complete, so expect a different burble to be outside yours Rich when I'm done!!
Last edited by Jimbob; 11 July 2013 at 05:35 PM.

Trending Topics
25 August 2013, 07:00 PM
#9
Scooby Regular
Thread Starter
iTrader: (13)
Join Date: Apr 2010
Location: Swansea
Posts: 4,008
Likes: 0
Received 0 Likes
on
0 Posts
Right after a LOT of work, and a LOT of working on my Landy, I FINALLY have had time to do a sniff test.
NOT GOOD!!
Before.

Test 1.
Just before the fans came on.


NOT looking good!!
Test 2.
Fans had kicked in 3-4 times, so was deffo hot.

Soooooooo looks like engine out and the work starts on Sat next week
HAVE to get it ready for Rally Day
NOT GOOD!!
Before.
Test 1.
Just before the fans came on.
NOT looking good!!
Test 2.
Fans had kicked in 3-4 times, so was deffo hot.
Soooooooo looks like engine out and the work starts on Sat next week
HAVE to get it ready for Rally Day
 26 August 2013, 05:41 PM
#13
Scooby Regular
Thread Starter
iTrader: (13)
Join Date: Apr 2010
Location: Swansea
Posts: 4,008
Likes: 0
Received 0 Likes
on
0 Posts
Basically you lower the water lever so that it can't suck up liquid, start the car with the cap off, and leave it get to temp so coolant is hot, and stat is open. When the water is hot the test can begin.
Usually if the head gasket has gone it pressurises the coolant system, by putting exhaust gasses into the coolant. The blue liquid is like the litmus paper or "Universal Indicator" we used to use in School Science lessons, so when you suck the gasses coming out of the hot coolant these gasses will be exhaust gasses, so the Carbon Monoxide etc etc, these gasses cause the colour of the liquid to change to yellow.
Nice and simple, bit like my Gunsons Colour Tune from the 70's, a spark plug replacement that you change the mixture till the flames in the combustion chamber get to the correct colour.
02 September 2013, 03:59 AM
#14
Scooby Regular
Thread Starter
iTrader: (13)
Join Date: Apr 2010
Location: Swansea
Posts: 4,008
Likes: 0
Received 0 Likes
on
0 Posts
Right down to business.


Cold Stat open, Standard Stat closed.

So a "cold" stat opens at 71 Degrees, and an OEM one is at 78 degrees, that 7 degrees must make all the difference lol.
Cold Stat open, Standard Stat closed.
So a "cold" stat opens at 71 Degrees, and an OEM one is at 78 degrees, that 7 degrees must make all the difference lol.
02 September 2013, 06:41 PM
#17
Scooby Regular
Thread Starter
iTrader: (13)
Join Date: Apr 2010
Location: Swansea
Posts: 4,008
Likes: 0
Received 0 Likes
on
0 Posts
Cheers guys, will be cracking on later. Note; no polyester trousers in sight.
My only known issue as to stripping down, are turbo nuts. They all look pretty naffed, but a disk cutter/dremel/nutcracker should sort it!!
My only known issue as to stripping down, are turbo nuts. They all look pretty naffed, but a disk cutter/dremel/nutcracker should sort it!!
Last edited by Jimbob; 02 September 2013 at 06:49 PM.
02 September 2013, 06:51 PM
#19
Scooby Regular
Thread Starter
iTrader: (13)
Join Date: Apr 2010
Location: Swansea
Posts: 4,008
Likes: 0
Received 0 Likes
on
0 Posts

Will need to pick your brain when it comes to setting up the timing.
I've had a look at the cambelt and it looks as new (still getting replaced), only thing I have plastic cam wheels. Know of a set of metal ones??
 02 September 2013, 07:38 PM
#22
Scooby Regular
Thread Starter
iTrader: (13)
Join Date: Apr 2010
Location: Swansea
Posts: 4,008
Likes: 0
Received 0 Likes
on
0 Posts
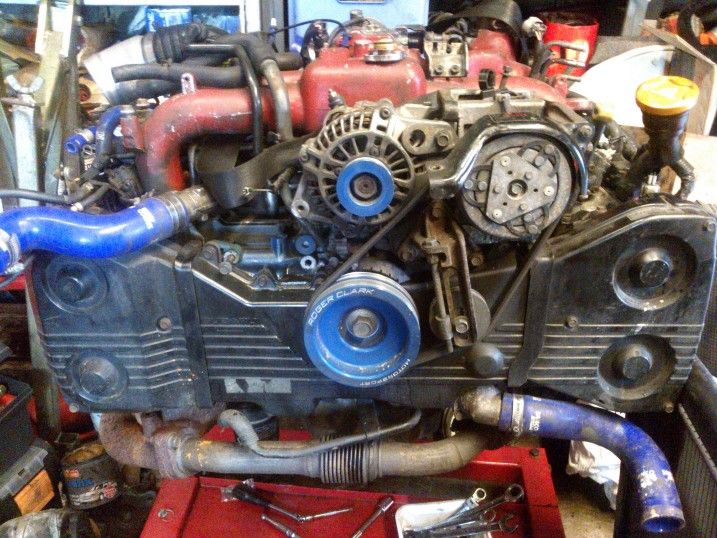
Yeah but due to having a Roger Clarke Markless front pulley will have to set it at TDC before the heads go on, and mark it up with tyre wall paint pen.
02 September 2013, 07:47 PM
#23
Scooby Regular
Join Date: Nov 2008
Location: A4069
Posts: 2,060
Likes: 0
Received 0 Likes
on
0 Posts
02 September 2013, 08:39 PM
#24
Scooby Regular
iTrader: (6)
Join Date: Aug 2007
Location: Llanelli with a spanner in my hand!
Posts: 2,260
Likes: 0
Received 0 Likes
on
0 Posts
re. the timing, has the belt that's on there still got the marks present? You could keep rotating it until all the marks are aligned and then mark the centre pulley.
03 September 2013, 01:49 AM
#25
Scooby Regular
Thread Starter
iTrader: (13)
Join Date: Apr 2010
Location: Swansea
Posts: 4,008
Likes: 0
Received 0 Likes
on
0 Posts
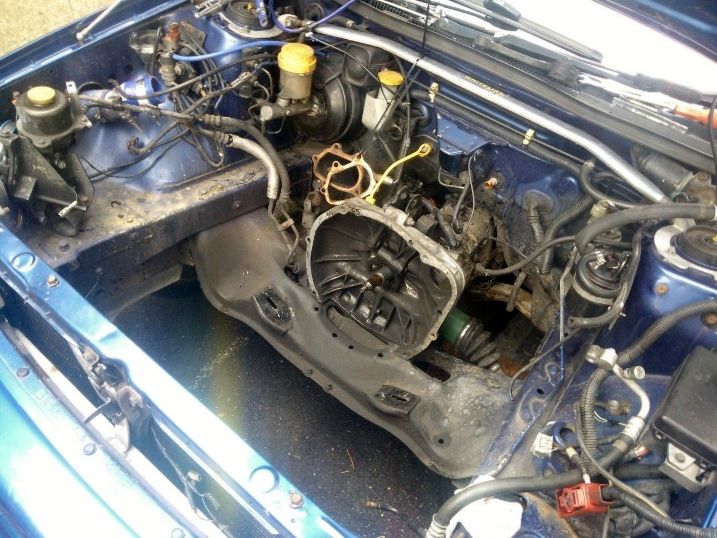
Right a bit fcuked off, in that the Semi-closed deck that this is supposed to be, is actually an open deck  Also the crankshaft where the woodruff key goes on has a raised bit to stop the woodruff key from turning, well mine has a bit of damage where the pulley for the aircon, and alternator fits.
But looks like the pistons are forged, as they do not match the OEM pistons on my shelf.
Anyhoo, pics.


So which of these went then??


Also the crankshaft where the woodruff key goes on has a raised bit to stop the woodruff key from turning, well mine has a bit of damage where the pulley for the aircon, and alternator fits.But looks like the pistons are forged, as they do not match the OEM pistons on my shelf.
Anyhoo, pics.
So which of these went then??
03 September 2013, 01:46 PM
#26
Scooby Regular
Thread Starter
iTrader: (13)
Join Date: Apr 2010
Location: Swansea
Posts: 4,008
Likes: 0
Received 0 Likes
on
0 Posts
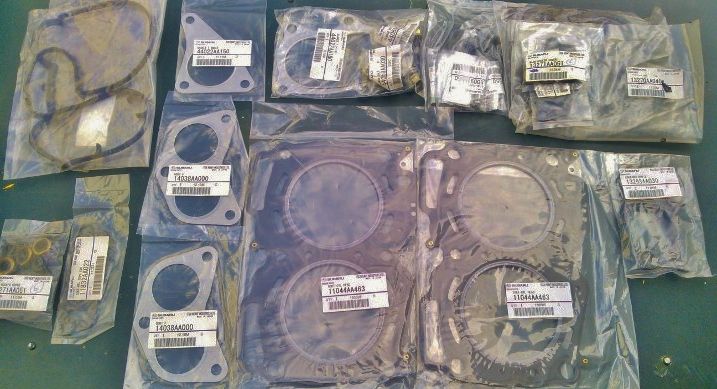
Think I have enough Genuine Subaru Gaskets to last me a couple of days
My Urabus will be back soon hopefully, I'm now on my way to take the heads for a pressure test and possible skim (if needed).
My Urabus will be back soon hopefully, I'm now on my way to take the heads for a pressure test and possible skim (if needed).
03 September 2013, 01:52 PM
#27

Hi Jimbob,
You don't use the front pulley to time the engine up as it is not fitted when you refit the cam belt.. You use the Cam Belt Lower Timing Wheel to do this... It has 2 marks on it. A triangle stamped on the face of the timing wheel denotes TDC, but you don't use this as a Subaru Boxer engine is timed up at 45 deg after TDC... The Mark you use is the one on one of the large trigger teeth at the back of the timing wheel and this is just a straight line cast into the tooth... This needs to be lined up at 12 o clock with an indentation in the crankshaft sensor housing.
03 September 2013, 02:23 PM
#28
Scooby Regular
Thread Starter
iTrader: (13)
Join Date: Apr 2010
Location: Swansea
Posts: 4,008
Likes: 0
Received 0 Likes
on
0 Posts
Hi Jimbob,
You don't use the front pulley to time the engine up as it is not fitted when you refit the cam belt.. You use the Cam Belt Lower Timing Wheel to do this... It has 2 marks on it. A triangle stamped on the face of the timing wheel denotes TDC, but you don't use this as a Subaru Boxer engine is timed up at 45 deg after TDC... The Mark you use is the one on one of the large trigger teeth at the back of the timing wheel and this is just a straight line cast into the tooth... This needs to be lined up at 12 o clock with an indentation in the crankshaft sensor housing.
You don't use the front pulley to time the engine up as it is not fitted when you refit the cam belt.. You use the Cam Belt Lower Timing Wheel to do this... It has 2 marks on it. A triangle stamped on the face of the timing wheel denotes TDC, but you don't use this as a Subaru Boxer engine is timed up at 45 deg after TDC... The Mark you use is the one on one of the large trigger teeth at the back of the timing wheel and this is just a straight line cast into the tooth... This needs to be lined up at 12 o clock with an indentation in the crankshaft sensor housing.
Heads came off nicely, used my preferred method of un-doing the head bolts in tightening order, 1/4 turn each, then back until removed. Made a world of difference on my Daihatsu as that was ally block and head, and they were renowned for warping as soon as looking at them.
Found a guy who will skim, and hot pressure test the heads for �40 each. So hopefully it will be ready to rebuilt on my next 4 days off.

 07 September 2013, 10:10 AM
#30
Scooby Regular
Thread Starter
iTrader: (13)
Join Date: Apr 2010
Location: Swansea
Posts: 4,008
Likes: 0
Received 0 Likes
on
0 Posts
Right update.
Have had these parts through thanks to Davros 1979 on here

Had an update from the guy who skimmed the heads and he use to build race engines, and he said that the people who built my engine (before I bought it) had NOT followed the correct torque procedure, and basically the both heads needed a skim as they had failed between cylinders. His opinion was that the head bolts needed a final 90 degree.
He also said that if I wanted to rebuild it properly that I will need to have the block faces flattened, so block is being split and then there will be new bearings going in, and then rebuilt.
So hopefully I will have a decent engine at the end of this, glad in a way that I have done this now, rather than during a mapping session as that could have been MUCH more costly.
This is the issue with my Woodruff key, you can't really see it in the other pics, as I've had my phone back from Nokia after a repair under warranty, so MUCH better pics.


Hopefully this will be easy to sort as I have a new key to go in as long as the crank is ok.
Have had these parts through thanks to Davros 1979 on here
Had an update from the guy who skimmed the heads and he use to build race engines, and he said that the people who built my engine (before I bought it) had NOT followed the correct torque procedure, and basically the both heads needed a skim as they had failed between cylinders. His opinion was that the head bolts needed a final 90 degree.
He also said that if I wanted to rebuild it properly that I will need to have the block faces flattened, so block is being split and then there will be new bearings going in, and then rebuilt.
So hopefully I will have a decent engine at the end of this, glad in a way that I have done this now, rather than during a mapping session as that could have been MUCH more costly.
This is the issue with my Woodruff key, you can't really see it in the other pics, as I've had my phone back from Nokia after a repair under warranty, so MUCH better pics.
Hopefully this will be easy to sort as I have a new key to go in as long as the crank is ok.