Inlet Manifold painting ??
 05 June 2010, 08:15 PM
#1
Scooby Regular
Thread Starter
iTrader: (7)
Join Date: Mar 2009
Location: Down West.
Posts: 3,843
Likes: 0
Received 0 Likes
on
0 Posts
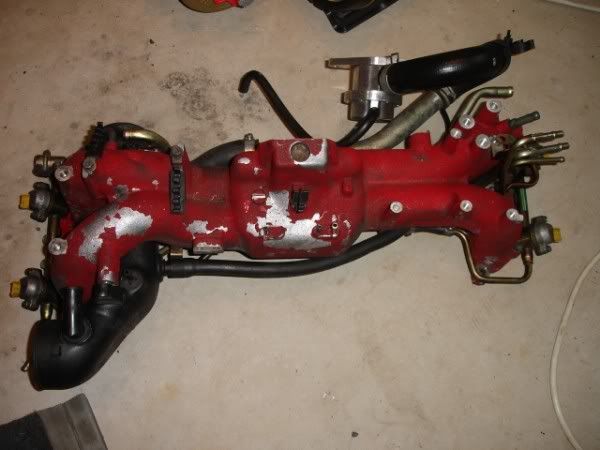
Hi Guy's, I know some of you have done this, wanting to tidy mine whilst off the car - What did you use to do it 
Hammerite or some other tidy stuff
Si
My local Neath B&Q had sod all !!
Hammerite
or some other tidy stuff Si
My local Neath B&Q had sod all !!
 05 June 2010, 08:18 PM
#3
Scooby Regular
iTrader: (2)
Join Date: Oct 2008
Location: Poola poola poola
Posts: 954
Likes: 0
Received 0 Likes
on
0 Posts
How to refurbish your intake manifold as per OE Subaru..
First up, you'll need these products to do the job:
Automotive Nitromors
An Etch Primer
VHT Wrinkle Plus Coating (good for upto 350F)
Wire brush
Masking Tape
Remove the manifold
Remove everything screwed into the manifold.
Use the wire brush to remove all loose flakes and then hit it with the Nitromors paint remover. When it comes to applying the Nitromors, simply dab on with a small brush and leave for around 10 mins before hosing off. If there's still some paint on the manifold, just repeat the previous step.
Here's what it should look like once you're done:

I then left it in a warm area for around an hour so that the moisture could evaporate.
Next was to mask up all the 'bits'. You don't have to mask everything, but I wanted it exactly like Subaru intended.

Time for some primer to go on.
Before you go spraying anything, make sure you have something to raise it from the floor or spray it on something much higher than the floor. Also, devise a way of holding the manifold without touching the paint. I just screwed 4 bolts into the injector rail holes (2 each side).
I then sprayed 3 coats of the primer 10 mins apart (that's what it said on the tin).

The instructions said it was overpaintable in 2 hours.
2 hours later and it's time to spray on the wrinkle paint. To achieve the wrinkle effect, your first coat should be the thickest followed by several thin ones, 2-3 mins apart. I went for 5 thin coats with a sprinkling on top for a sixth.
Place the manifold in a warm area for 48 hours and let it dry.
Here it is 2 days later:


First up, you'll need these products to do the job:
Automotive Nitromors
An Etch Primer
VHT Wrinkle Plus Coating (good for upto 350F)
Wire brush
Masking Tape
Remove the manifold
Remove everything screwed into the manifold.
Use the wire brush to remove all loose flakes and then hit it with the Nitromors paint remover. When it comes to applying the Nitromors, simply dab on with a small brush and leave for around 10 mins before hosing off. If there's still some paint on the manifold, just repeat the previous step.
Here's what it should look like once you're done:
I then left it in a warm area for around an hour so that the moisture could evaporate.
Next was to mask up all the 'bits'. You don't have to mask everything, but I wanted it exactly like Subaru intended.
Time for some primer to go on.
Before you go spraying anything, make sure you have something to raise it from the floor or spray it on something much higher than the floor. Also, devise a way of holding the manifold without touching the paint. I just screwed 4 bolts into the injector rail holes (2 each side).
I then sprayed 3 coats of the primer 10 mins apart (that's what it said on the tin).
The instructions said it was overpaintable in 2 hours.
2 hours later and it's time to spray on the wrinkle paint. To achieve the wrinkle effect, your first coat should be the thickest followed by several thin ones, 2-3 mins apart. I went for 5 thin coats with a sprinkling on top for a sixth.
Place the manifold in a warm area for 48 hours and let it dry.
Here it is 2 days later:
05 June 2010, 08:29 PM
#4
Scooby Regular
Thread Starter
iTrader: (7)
Join Date: Mar 2009
Location: Down West.
Posts: 3,843
Likes: 0
Received 0 Likes
on
0 Posts
Awesome link - thanks very much 
Where's the best place for the VHT Wrinkle/Crinkle finish paint
I have heard that Hammerite do a "Crinkle" finish too
Where's the best place for the VHT Wrinkle/Crinkle finish paint
I have heard that Hammerite do a "Crinkle" finish too

Trending Topics
05 June 2010, 10:46 PM
#8
Scooby Regular
Thread Starter
iTrader: (7)
Join Date: Mar 2009
Location: Down West.
Posts: 3,843
Likes: 0
Received 0 Likes
on
0 Posts
Hi Rich

The replacement block has just been rebuilt and is ready for the heads to go back on, nearly there Mate !! Dylan has done a great job
Will probabaly be back on the road in less than a week
 06 June 2010, 10:28 AM
#12
Scooby Regular
Thread Starter
iTrader: (7)
Join Date: Mar 2009
Location: Down West.
Posts: 3,843
Likes: 0
Received 0 Likes
on
0 Posts
 If the weather stays fine it will be probably be the newly planted flowers that get a red tint !!
  Mrs Simon won't be happy
 Cheers, text'd Dylan yesterday - all going well !!
06 June 2010, 08:32 PM
#13


Si here we go...
http://www.carldavey.co.uk/
http://www.carldavey.co.uk/article.php?id=1
Crinkle from here...
http://www.frost.co.uk/result_search.asp?keyword=VHT
Just be aware that the red is a little brighter than the oem shade.
http://www.carldavey.co.uk/
http://www.carldavey.co.uk/article.php?id=1
Crinkle from here...
http://www.frost.co.uk/result_search.asp?keyword=VHT
Just be aware that the red is a little brighter than the oem shade.
06 June 2010, 08:58 PM
#14
Scooby Regular
Thread Starter
iTrader: (7)
Join Date: Mar 2009
Location: Down West.
Posts: 3,843
Likes: 0
Received 0 Likes
on
0 Posts
Thanks for the links there Si I started the job this afternoon, spookily along the lines of the link pic's...
Started with a good clean over, then masked all those bolt holes/inlet holes, which took forever !!
I got the VHT from Halfords in the end - the red is also a liitle "Red" - but I think it will be OK - currently it's in the airing cupboard, with a few more coats to-morrow I think
I used that same red on my Calipers - a few months ago, so at least something matches
Si
I started the job this afternoon, spookily along the lines of the link pic's...Started with a good clean over, then masked all those bolt holes/inlet holes, which took forever !!
I got the VHT from Halfords in the end - the red is also a liitle "Red" - but I think it will be OK - currently it's in the airing cupboard, with a few more coats to-morrow I think
I used that same red on my Calipers - a few months ago, so at least something matches
Si

Thread
Thread Starter
Forum
Replies
Last Post
Mattybr5@MB Developments
Full Cars Breaking For Spares
28
28 December 2015 11:07 PM
Mattybr5@MB Developments
Full Cars Breaking For Spares
12
18 November 2015 07:03 AM