
scoobyworld spoiler help??


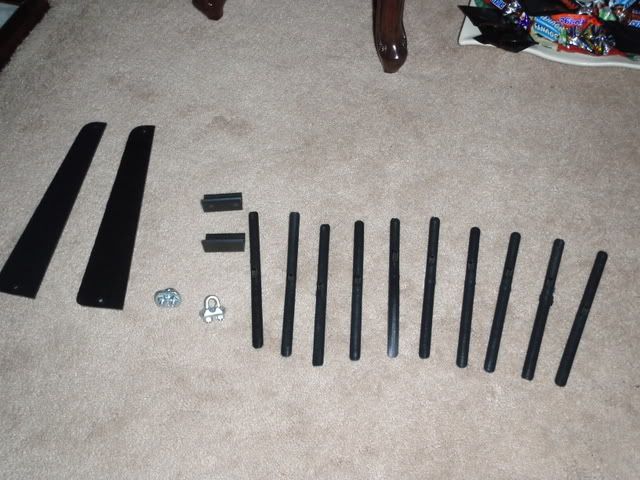
Ive drawn a template and used the existing holes no problems so i now no were to drill the bootlid, only thing i cant work out is what the little u shaped bits with bolts on the end are for and what the little plastic stripes are for?
anyone any idea?
Thankyou
anyone any idea?
Thankyou

Scooby Regular
Joined: Mar 2007
Posts: 527
Likes: 0
From: dorset
dunno what the u-bolts are for, but the black strips push into the holes in the bottom of the spoiler, once your happy with the positioning, you tape down the black strips to your bootlid, you then try to remove the spoiler and leave the strips in place taped to the bootlid, the bits that push into the spoiler holes have a small hole, you mark through this the position on the boot to drill. so they are just hole markers.
What do you think of the spoiler, is it perfectly flat, or is the surface slightly undulating, i had one of the GRP spoilers, but i think they supply ABS ones now, i am not happy with the GRP, it looks ok, even stock at first glance, but when polished up, you can see the light reflecting off the undulations. paint was spot on though...
What do you think of the spoiler, is it perfectly flat, or is the surface slightly undulating, i had one of the GRP spoilers, but i think they supply ABS ones now, i am not happy with the GRP, it looks ok, even stock at first glance, but when polished up, you can see the light reflecting off the undulations. paint was spot on though...

Scooby Regular
Joined: Jan 2008
Posts: 172
Likes: 0
From: Sunny Noth Iron
Interested in your thoughts on this spoiler too as im considering one. Is it the new abs one, and a tight fit to the boot? Are the instructions not clear?
I had a GRP spoiler (make unknown) on my last car and while it looked great but it was a nightmare! Leaked water into the boot regularly. In the end I had to remove and re-seal everywhere. It was also slighty bowed and I had to drill the middle and bolt down to flatten.
Good luck with it.
Let us know how you get on


Scooby Newbie
Joined: Dec 2008
Posts: 10
Likes: 0
From: Milton Keynes
i've also got one of these spoilers and am baffled by all the bits as instructions are in italian and minimal at best.
what are the larger plastic bits for?
also what the picture doesn't show are the 17 adhesive seals that go around each hole stopping leaks
finally, the number of threads i have read where ppl give a COP OUT answer like " buy an sti lid". is this the reply of someone with very little confidence in drilling a few holes? your input is of no use whatsoever.
a more constructive reply like a step by step account of how to fit one would be a 100 times more helpful than "buy an sti lid"
Scooby Regular
Joined: Mar 2007
Posts: 527
Likes: 0
From: dorset
don't buy an sti lid unless you plan to fit an sti spoiler as the holes wont line up accurately.
ok, step by step.
1. get a mate to help you with lifting etc.
2. mask off the parts of the lid that wont be hidden by the spoiler to avoid scratching.
3. place spoiler on boot and make sure you are happy with it. you can roughly mark up position of spoiler with marker pen, permanent marker is ok and will easily come off with hair laquer (yes really), if you are nervous about marking your paintwork, use masking tape.
4. remove spoiler and push in the location strips into the holes on the sspoiler ensuring enough of the strip sticks out so it can be seen poking out from under the spoiler when the spoiler is on the lid.
5. put spoiler back on boot, line it up until you are happy with it. ensure you can see the black strips poking out.
6. once you are happy, tape down the black strips onto the bootlid ensuring there will be no movement at all.
7. lift the spoiler and gently pop out the black strips ensuring they stay taped to the bootlid and have not moved at all, a 3rd person would make this much easier.
8. the lugs on the black strips that slotted into the holes in the bottom of the spoiler are hollow, once you are confident that everything is lined up, mark through the lug holes onto the bootlid, the holes are v small, so use something like a cocktail stick dipped in paint.
9. center punch your holes, otherwise your drill WILL wander across the bootlid.
10. use a v small, good quality drill bit for your pilot holes. i prefer DeWallt drill bits, now drill the correct size holes.
11. paint the newly exposed metal edges to prevent corrosion later on.
12. apply sealant or seals around the holes.
13. test fit the spoiler and check all screws fit and can be tightened.
14. remove spoiler and apply sealant or self adhesive sealing strip around the underside edges of the spoiler
15. fit and tighten.
16. remove any sealant that has oozed out quickly and in small sections.
17. voila
18. no idea what the big plastic bits are for.
p.s. if you have a brake light wire, you will need to measure where the hole needs to go using the spoiler holes drilled into the lid as reference points.
Last edited by stara; Dec 29, 2008 at 05:23 PM.

Former Sponsor
Joined: Sep 2000
Posts: 1,987
Likes: 0
From: www.scoobyworld.co.uk
great guide - couldnt have put it better myself, so thanks for that. The large plastic stips are covers for covering over the bolts that hold the base to the top.
Fitting the spoiler is a two man job and pretty straight forward once you get going.
Neil
Welcome to Scooby world
Fitting the spoiler is a two man job and pretty straight forward once you get going.
Neil
Welcome to Scooby world
Trending Topics
Cheers for all the replys, I thing its great so far, me and my dad attacked it today, we took are time i thing all in all it took 3 hours i drew a template out of cuboard, i then put rivets in the holes with the sharp part pointing up, i then pushed template over this created a perfect template which i bolted using existing holes, i then drilled the holes and trial fitted and it was perfect every hole lined up, i then stuck all the pads on and we decided to run line of silcon around the edge just to help stop water getting in,
Im really happy with the product which i have to say sits perfectly flat and looks great,
ill post a pic up later
Im really happy with the product which i have to say sits perfectly flat and looks great,
ill post a pic up later
Scooby Regular
Joined: Jan 2008
Posts: 172
Likes: 0
From: Sunny Noth Iron
Yes - excellent guide stara!!
Shane when you get a chance please post some pics im interested to see the fit and if you fit the large plastic strips for covering the bolts that hold the base to the top of the lid (presumably underneath bootlid) id like to see this as well.
Shane when you get a chance please post some pics im interested to see the fit and if you fit the large plastic strips for covering the bolts that hold the base to the top of the lid (presumably underneath bootlid) id like to see this as well.
ok ill try and get some up tommrorow at some point, regarding the covers it will be in next few days as staying with my gf and dont have my camera here but see what i can do,
If i had to pick fault the covers underneath aint the best fit but i sorted that with a file etc, im planning to spray them blue aswell,
I choped the wire for the brake light halfway down the black casing and joined it so it doesnt look messy and have painted all thebolts inside blue
If i had to pick fault the covers underneath aint the best fit but i sorted that with a file etc, im planning to spray them blue aswell,
I choped the wire for the brake light halfway down the black casing and joined it so it doesnt look messy and have painted all thebolts inside blue

I fitted one of these to my car fit was excellent paint is good. My car is the actual picture on scoobyworld web site. Only issue I have had is the brake light I cannot stop water getting into it, I contacted scoobyworld followed all their advice but it still mists up. Other than that it is very good quality. I just need to get the uprated boot spring now as the extra weight means I have to be careful closing the boot. And yes the large black pieces are screwed to the underside, either side of the bootlid to close the holes left where two parts bolted together. I presume the u bolts are to bolt to the boot springs to stiffen them up but I couldn't figure it out so will buy new ones from Subaru they are only about �30.
I fitted one of these to my car fit was excellent paint is good. My car is the actual picture on scoobyworld web site. Only issue I have had is the brake light I cannot stop water getting into it, I contacted scoobyworld followed all their advice but it still mists up. Other than that it is very good quality. I just need to get the uprated boot spring now as the extra weight means I have to be careful closing the boot. And yes the large black pieces are screwed to the underside, either side of the bootlid to close the holes left where two parts bolted together. I presume the u bolts are to bolt to the boot springs to stiffen them up but I couldn't figure it out so will buy new ones from Subaru they are only about �30.


I fitted one of these to my car fit was excellent paint is good. My car is the actual picture on scoobyworld web site. Only issue I have had is the brake light I cannot stop water getting into it, I contacted scoobyworld followed all their advice but it still mists up. Other than that it is very good quality. I just need to get the uprated boot spring now as the extra weight means I have to be careful closing the boot. And yes the large black pieces are screwed to the underside, either side of the bootlid to close the holes left where two parts bolted together. I presume the u bolts are to bolt to the boot springs to stiffen them up but I couldn't figure it out so will buy new ones from Subaru they are only about �30.


Scooby Newbie
Joined: Dec 2008
Posts: 10
Likes: 0
From: Milton Keynes
very pleased with it, it's transformed the back end.
though i had moments when i thought i should have left the old one on.
did yours sit flat even when it wasn't bolted, cos when i just sat it on the boot the middle section was a good inch off the surface of the boot, and i'm looking at the 3/4 inch long bolts thinking how am i gonna screw them in.
though i had moments when i thought i should have left the old one on.
did yours sit flat even when it wasn't bolted, cos when i just sat it on the boot the middle section was a good inch off the surface of the boot, and i'm looking at the 3/4 inch long bolts thinking how am i gonna screw them in.

Thread
Thread Starter
Forum
Replies
Last Post