detango ive only done it!!!
 26 January 2011, 02:58 PM
#1

after reading lots of stuff about blobeye detango, i finally thought ill try it.
i decided that the oven option was far to scary so brought myself a 2000w hot air gun from screwfix for Ł12.
after warming the sealer for about 5 mins the light came apart quite easily and the orange lense just unclipped, i found it a good idea to wear plastic disposable gloves when removing the lense to avoid fingerprints on the inside of the light.
i then warmed up the sealer slightly before pushing the light back together and putting the screws back in.
it took me six months to man up enough to do this job which turned out to be oh so simple.
im am not a great mechanic but i would recommend anyone to try it as it took me about 2 hours which included removing and refitting the lights.
my car now looks much better and im going to treat myself to a nice beer.
 26 January 2011, 03:09 PM
#2
Well done. I finally manned up and did mine about two weeks and it was a relatively pain free experience lol 
I, however, came unstuck by not wearing rubber gloves and managed to leave a very small mark in the inside of the lens on one of the lights, you can hardly notice it but I know its there arrrrgggghhhhhhh
I, however, came unstuck by not wearing rubber gloves and managed to leave a very small mark in the inside of the lens on one of the lights, you can hardly notice it but I know its there arrrrgggghhhhhhh

 26 January 2011, 03:47 PM
#6


 30 January 2011, 09:07 AM
#13
Scooby Regular
Join Date: Oct 2010
Location: LINCOLN
Posts: 577
Likes: 0
Received 0 Likes
on
0 Posts
Craig...are you gonna take photos mate while you do it? this thread has given me the confidence to have a crack at it...cos i have wimped out so far.
what bulbs would i need to get that i can pick up at halfords?
cheers.
what bulbs would i need to get that i can pick up at halfords?
cheers.
30 January 2011, 09:22 AM
#20
Best advice i was given is to use extra silicone when sealing back up,and let the silicone set properly before putting them back in.
I did that after the 2nd attempt and been fine since
The first attempt,they ended up with condensation in
I did that after the 2nd attempt and been fine since
The first attempt,they ended up with condensation in
30 January 2011, 09:24 AM
#23
Scooby Regular
Join Date: Oct 2010
Location: LINCOLN
Posts: 577
Likes: 0
Received 0 Likes
on
0 Posts
30 January 2011, 09:25 AM
#24
Scooby Regular
Join Date: Oct 2010
Location: LINCOLN
Posts: 577
Likes: 0
Received 0 Likes
on
0 Posts
do halfords sell the right sort of bulbs?
30 January 2011, 09:42 AM
#26
Halfords do sell the bulbs but if your wanting a nice blue or LED bulbs then ebay or the internet in general is your best bet
30 January 2011, 09:57 AM
#27
Scooby Regular
Join Date: Oct 2010
Location: LINCOLN
Posts: 577
Likes: 0
Received 0 Likes
on
0 Posts
sorry...was thinking of the silvertec type...silver looking indicator bulbs that flash orange.
you gonna have another crack at doing it then Craig? was it the connectors on the back of the headlight that got you stuck?
you gonna have another crack at doing it then Craig? was it the connectors on the back of the headlight that got you stuck?
30 January 2011, 11:04 AM
#29
Got mine of the bay for Ł6:99 delivered (Silvertec)
30 January 2011, 11:33 AM
#30
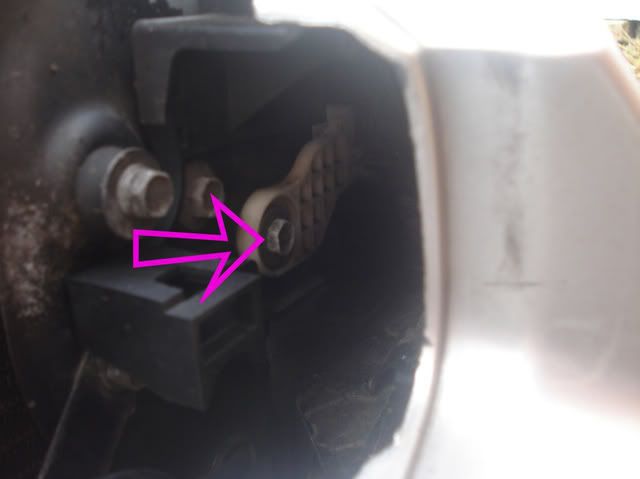
Just to give yoiu an idea if you decide to do it. That is the bolt I was talking about so you dont have to mess about with the 2 screws on the other end of the white bracket.
Take the grill and the 2 plastic clips on the edge out, where the light sits in so you can pull the top of the bumper slightly for easier access (the ones in the pic below)