My HTA rear Diffuser ive fitted on my Bug
 23 March 2012, 08:54 PM
#1
Scooby Regular
Thread Starter
Join Date: Jun 2011
Location: Tamworth
Posts: 593
Likes: 0
Received 0 Likes
on
0 Posts
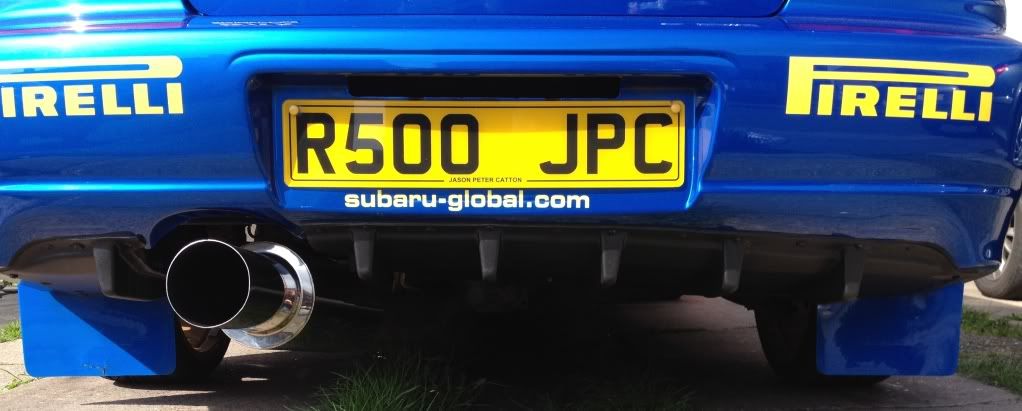
A pic of my HTA rear diffuser that ive fitted, i bit tricky doing it on my own but very pleased overall with the new look 
 ">
">
">
 23 March 2012, 09:07 PM
#3
Scooby Regular
Thread Starter
Join Date: Jun 2011
Location: Tamworth
Posts: 593
Likes: 0
Received 0 Likes
on
0 Posts


Trending Topics
23 March 2012, 10:51 PM
#8
At first I put it down to maybe my bumper was mis-shapen, but seeing that makes me thinks HT's original is out.
Diffuser fitted the other way so centre lines up:

Notice the bulge conveniently pinpointed by the TOW sticker
This will pull up when I add a small nut and bolt just to the right of the fin, but having purchased their v limited splitter and being very happy with it expected something better than this for the money.
Last edited by chronicK; 23 March 2012 at 10:55 PM. Reason: expanding on post
23 March 2012, 10:54 PM
#10
Scooby Regular
Thread Starter
Join Date: Jun 2011
Location: Tamworth
Posts: 593
Likes: 0
Received 0 Likes
on
0 Posts
23 March 2012, 11:01 PM
#11
Scooby Regular
Thread Starter
Join Date: Jun 2011
Location: Tamworth
Posts: 593
Likes: 0
Received 0 Likes
on
0 Posts
It all lines up apart from that corner and no matter what you do you there is always a gap, I wasn't happy with how it looked so i masked up both sides of the diffuser and sealed all the edges and filled any gaps with black Sikaflex.
Now you can't tell and it looks all flush against the bumper
Last edited by JPC500; 23 March 2012 at 11:02 PM.
23 March 2012, 11:37 PM
#12
Sorry but I have to agree with the above, it looks on the pi$$ fitted to far forward in the middle and down on the right you can see more of the diffuser's underneath if that makes sense.
Fitted one to my old mk1 type 25 and the fit was spot on.
Can you pop a few more pics up
Fitted one to my old mk1 type 25 and the fit was spot on.
Can you pop a few more pics up
23 March 2012, 11:47 PM
#13
Scooby Regular
Thread Starter
Join Date: Jun 2011
Location: Tamworth
Posts: 593
Likes: 0
Received 0 Likes
on
0 Posts
I will put more pics on to show it is on properly !
I spent enough time on it getting it right and level due to the incorrect angle of the corner moulding
I spent enough time on it getting it right and level due to the incorrect angle of the corner moulding
 24 March 2012, 11:26 PM
#18
Scooby Regular
Thread Starter
Join Date: Jun 2011
Location: Tamworth
Posts: 593
Likes: 0
Received 0 Likes
on
0 Posts
It definately is a poor fit with the wrong angle for the r/h side but with perseverance and some engineering I have got it fitted level and even on both sides, it's the angle of how the picture was taken that makes it look out. If I get chance I'll take a better pic tomorrow
24 March 2012, 11:32 PM
#19
Scooby Regular
Thread Starter
Join Date: Jun 2011
Location: Tamworth
Posts: 593
Likes: 0
Received 0 Likes
on
0 Posts
No mate, ref your outline I wouldn't want it to sit that high up anyway, the add pic is showing it situated the same as mine. I had to rework it but I'm happy with the finished look !


Thread
Thread Starter
Forum
Replies
Last Post
Scott@ScoobySpares
Full Cars Breaking For Spares
61
11 January 2021 03:08 PM
Mattybr5@MB Developments
Full Cars Breaking For Spares
33
29 August 2017 07:18 PM