Knocklink Display
 24 September 2004, 10:52 AM
#1
Just thought i would show everyone my install of the knocklink display 
http://img.photobucket.com/albums/v1...inkDisplay.jpg
I decided that i didn't like the original box that the LED's were mounted in as it was too big and bulky so i put some new LED's in a smaller box, I've put the new box by the ashtray but it could be mounted anywhere, now before anyone asks I'm not gonna do anymore as it was a real pain in the **** to do
If anyone want's to do this themself i can give them the part numbers of the bits they need from the Maplin catalogue
Granby
Last edited by Granby; 24 September 2004 at 11:00 AM.


 24 September 2004, 12:15 PM
#4
Originally Posted by ozzy
Very neat indeed.
You may want to move it into your line-of-sight as it can't be that noticeable down there.
Stefan
You may want to move it into your line-of-sight as it can't be that noticeable down there.
Stefan

 25 September 2004, 09:21 AM
#6

Very neat job. Wanted to do something similar myself but I'm a bit cack handed with the old soldering iron and I also wanted it right in my line of sight. So I ended up with this,
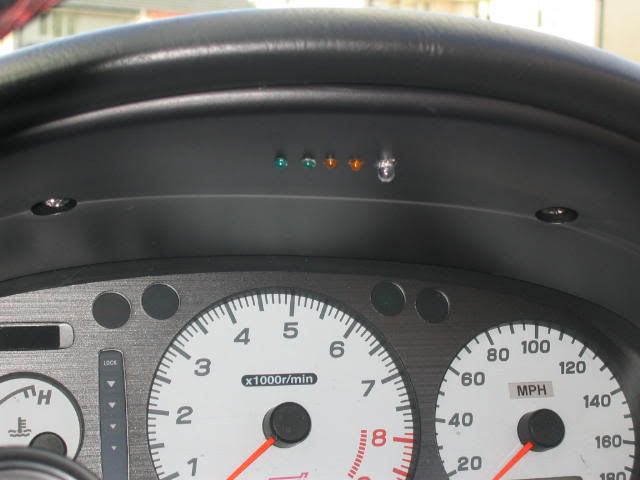
Took about half an hour all in.
Just removed the case, used the holes in it for a template and drilled through the clock surround. Don't even have to take my eyes off the road as if it triggers any lights you can see them easily.
Took about half an hour all in.
Just removed the case, used the holes in it for a template and drilled through the clock surround. Don't even have to take my eyes off the road as if it triggers any lights you can see them easily.
25 September 2004, 09:25 AM
#7
Originally Posted by Playsatan
Very neat job. Wanted to do something similar myself but I'm a bit cack handed with the old soldering iron and I also wanted it right in my line of sight. So I ended up with this,
Took about half an hour all in.
Just removed the case, used the holes in it for a template and drilled through the clock surround. Don't even have to take my eyes off the road as if it triggers any lights you can see them easily.
Took about half an hour all in.
Just removed the case, used the holes in it for a template and drilled through the clock surround. Don't even have to take my eyes off the road as if it triggers any lights you can see them easily.
Granby
Trending Topics
25 September 2004, 09:32 AM
#8
Originally Posted by Granby
I was thinking of doing that myself, the only thing is that the red LED has a very narrow viewing angle & you won't be able to see it light up unless you were looking at it head on (the rest of the LED's are OK so if you see the amber LED's light up just take care).
Granby
Granby
 26 September 2004, 10:09 AM
#10
Originally Posted by Benno
Did you extend the LED's or is the circuit board tucked up there as well??
Theres only two screws holding the clocks surround on, just remove it and tape the knocklink box to the top and test fit it before you start drilling as our dashes might not be the same if they're different years. There should be loads of space even though it looks tight.
Did consider drilling through the top of the dash and having the led's sticking through the top but my bus sized steering wheel blocked the view. Shame as the led's would have reflected in the screen giving me a heads up display at night. How cool would that have been???
All in it only took 30 minutes and I'm a complete muppet when it comes to all things mechanical.
26 September 2004, 12:20 PM
#11
Originally Posted by Granby
Just thought i would show everyone my install of the knocklink display
http://img.photobucket.com/albums/v1...inkDisplay.jpg
I decided that i didn't like the original box that the LED's were mounted in as it was too big and bulky so i put some new LED's in a smaller box, I've put the new box by the ashtray but it could be mounted anywhere, now before anyone asks I'm not gonna do anymore as it was a real pain in the **** to do
If anyone want's to do this themself i can give them the part numbers of the bits they need from the Maplin catalogue
Granby
http://img.photobucket.com/albums/v1...nkDisplay2.jpg
to make it fit nice & snug i put some sticky Velcro on each side of the box and it now fits lovely (i did put it on top of the steering column but it looked CRAP).
Granby
Last edited by Granby; 26 September 2004 at 12:30 PM.

Thread
Thread Starter
Forum
Replies
Last Post
blockhead
Subaru Parts
19
07 November 2015 11:50 PM
Mister:E
Subaru Parts
2
24 September 2015 01:37 PM