Fitting HID kit to a bugeye
 12 January 2008, 07:51 PM
#1
As there are a couple of posts about this but nothing hugely detailed for a bugeye that I could find, I thought I'd add my two pennies' worth on my experience installing the dipped headlamp HID kit from Aztec Performance's recent group buy (thanks and free plug to BOB'5  ).
).
Note that this post isn't endorsed by Aztec or anybody else, and there might be better ways to go about the installation - this is only meant to tell you what I did - if anyone knows better please chip in. I have a WRX but I'm running STI headlights using an adapter from Chaio Fang Imports (I think he's Wagons Ho! on here).
It might be handy to have:
- A long flat-blade screwdriver (to remove clips)
- Pliers
- A drill with a large bit
- A file
- A 10mm socket or spanner
I did make a few mistakes on the way and ended up butchering one of the grommets on the harness as a result - hopefully this will help some of you avoid that sort of pain. Anyhow, here's how I did it, with pics.
All nuts or bolts involved are 10mm, hence you only need the one spanner / socket, even for the battery.
1. Remove the air intake, front grille and headlamps.
The air intake is just two bolts, then pull up and to the right to remove it.
The grille is just a few plastic clips at the top and bottom - you might need a screwdriver to get the bottom two free. Bugeye owners with an earlier 3-piece grille will need to remove all parts of it.
Once you've removed these two pieces, you'll be able to remove the headlamps. Each headlamp is held in place by 3 bolts - one at the top, and two to the side. BE CAREFUL when doing this - replacement lamps ain't cheap .
.
Finally, remove the plugs from the headlamps to remove them from the car.
2. Remove the old bulbs
- Turn the round plastic cover anti-clockwise to gain access to the bulb.
- Release the clip holding the bulb in place.
- Remove the bulb.
- Detach the existing spade connectors from the headlamp and the the bulb.
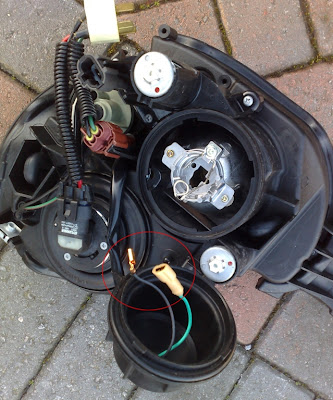
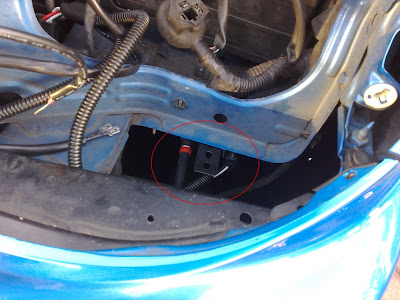
The headlamp should now look like this:
3. Modify the bulb cover. I found this to be the trickiest bit.
- Using a screwdriver, pop the existing wiring's grommet out of the housing - be careful as you don't want to damage the existing wiring.
- Take your drill and "widen" the original hole for the grommet. (Note that if you ever want to revert back I'm told by my Subaru dealer they stock replacement bulb covers ). The hole you make needs to be big enough to both remove the existing connectors (circled in red above), and also to allow the ones connected to the HID bulb to pass through.
HOWEVER it needs to be small enough to ensure a good seal using the grommet around the HID bulb's wiring. This is where the file came in useful for me - to expand the whole, and add a curve to get a better seal on the grommet.
- Whatever you do, don't be tempted to remove the grommet on the bulb's wiring so you can bin the "plug and play" part of the harness. I did this with the first bulb and then realised too late what I'd done.
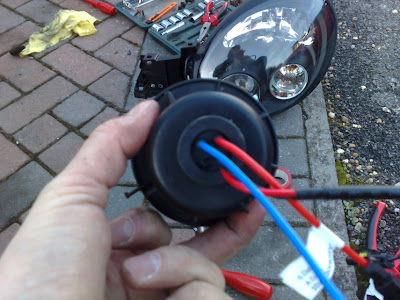
- Make sure that the original connector wiring (green and black in my pic) stays OUTSIDE the cover - we'll need this later to connect to the harness.
- If this is the driver's side lamp, tape up the spades on the original wiring and secure the cabling with a tie - it won't be needed.
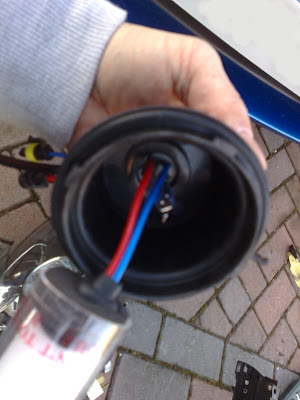
What you want is something that looks like this for each headlamp:
4. Fit the HID bulbs
Right, hard work done. Now remove the protective packaging around the bulbs and insert them into the headlamp. You can't do this wrong, it only fits one way.
Once in place, push the retaining clip back into place, and then screw the plastic cover back on clockwise.
OK - that's the headlights pretty much dealt with. Now onto the ballasts.
5. Fit the ballasts
If you have an STI you're LUCKY - you don't have foglights so you have more room to play with underneath the headlamps. If you're like me and have a WRX, space is somewhat more limited .
.
After considering multiple locations, I came to the conclusion that:
a) Mounting a ballast on something that's likely to be removed would be a bad idea (e.g. air filter box or battery).
b) The WRX needs a bigger engine bay .
.
I went for a different approach each side. I found that the ballast actually fits underneath the headlamp housing without seeming to offset the light in any way, so I mounted the drivers' side one there, as shown below:
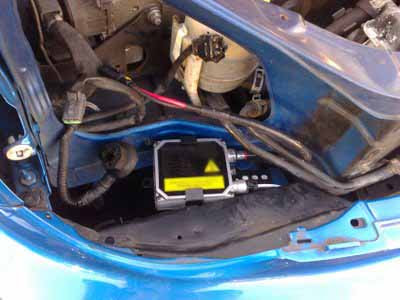
I didn't use the bolts supplied - I just bought Halfords license plate stickies - �1.99 for three. Used one and a half per ballast bracket. I figured they should hold and would be easier to remove if I needed. The ballast will probaby sit just slightly higher than the lip either side - however, looking underneath it didn't make contact with my headlamps so make sure yours don't either.
I fitted the passenger side ballast underneath the battery tray. My main decision for doing this was that there was clearance on the passenger side to do this (not enough room driver's side), plus the harness has more parts on the passenger side so I did it to preserve room and allow maximum access to the harness should I need it. However, I'm sure it would be fine to mount both under the headlamps as above. For what it's worth, here's the passenger side:
6. Route through and plug the wiring harness into the ballasts
- I recommend you thread the harness from the passenger side behind the grille and tuck it into one of the recesses in the bumper - there are several and you can push it in tightly and use cable ties to hold it in place along the length.
- Make sure you have the part of the harness with the relay on the PASSENGER side or you'll be in trouble! Otherwise I'll leave this to you - just make sure the harness won't be touching the radiator and anything else that gets hot.
- Plug the harness into the ballasts - you really can't get this bit wrong .
- You should now be left with three cables on the harness - the positive and negative connection to the battery, and the two spade connectors to go into the original harness.
7. Attaching the harness to the original lamp's wiring loom.
You'll need the passenger side headlamp now.
- Take the original spade connectors (green and black wires) that were initially attached to the housing of the headlamp and the bulb itself. (These were the connectors we purposefully left outside the bulb cover when modifying it).
- Connect the black wired male spade connector on the harness to the black wired female connector of the headlamp. Apply electrical tape around the connectors and ensure it's securely bound.
- Connect the white wired male spade connector on the harness to the green wired female connector of the headlamp. I applied electrical tape to this connection too even though the connector has a protective plastic housing, and I also tightened this connector with pliers as it seemed a little loose.
8. Finishing up
Nearly there now.
- Re-attach the original harness plugs to the headlamp unit.
- Attach the plugs from each ballast to the HID bulb plugs - this is impossible to get wrong as they're different AND colour coded.
- Re-fit the headlamps, but don't tighten everything up just yet.
- Now you need to take the positive and negative connectors for the harness and attach them to the battery (red to positive, black to negative). I generally do negative first, then positive - don't know if this is a safety hazard - I've just always done it that way! I'll assume you can handle this bit!
- Once you've re-attached the battery terminals, you're ready to test the headlamps. I started the engine at this point.
- Switch the lamps on. (HOPEFULLY) the lamps will both come on, no problems. If so, leave the lights on whilst you tighten up the headlamps, and then refit the grille and air intake. It'll probably take a few minutes to do this, but the headlamps are supposed to run for the first time for 10 minutes to allow them to burn in, so make sure you run them for at least that period. AND THAT'S IT!
Here's my 4300K kit fitted and working.
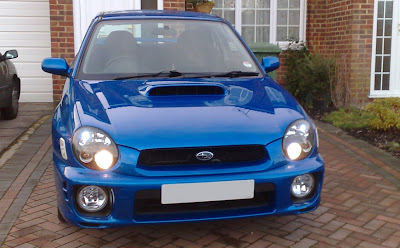
Went out this evening and the difference is AWESOME; everything is much brighter and visibility has been notably extended. Nobody flashed me either.
The main test will be next Saturday when the car goes in for its MOT; I'll update the post with the result.
Update
Car passed its MOT with flying colours - no problem with the beam pattern. The guy at the MOT station did mention that he'd "pretend he hadn't seen my sidelights" as they're slightly tinted blue. He pointed out that in order to be road legal, forward facing lights on any vehicle need to emit yellow or white light - so the 4300K kit was actually fine.
End Update
The only problem now is I wish I'd gone for a 6000K kit as they don't match the LED sidelights I bought to go with em .
Anyone know how much for a pair of 6000K bulbs? Maybe I can replace that butchered grommet... .
.
).Note that this post isn't endorsed by Aztec or anybody else, and there might be better ways to go about the installation - this is only meant to tell you what I did - if anyone knows better please chip in. I have a WRX but I'm running STI headlights using an adapter from Chaio Fang Imports (I think he's Wagons Ho! on here).
It might be handy to have:
- A long flat-blade screwdriver (to remove clips)
- Pliers
- A drill with a large bit
- A file
- A 10mm socket or spanner
I did make a few mistakes on the way and ended up butchering one of the grommets on the harness as a result - hopefully this will help some of you avoid that sort of pain. Anyhow, here's how I did it, with pics.
All nuts or bolts involved are 10mm, hence you only need the one spanner / socket, even for the battery.
1. Remove the air intake, front grille and headlamps.
The air intake is just two bolts, then pull up and to the right to remove it.
The grille is just a few plastic clips at the top and bottom - you might need a screwdriver to get the bottom two free. Bugeye owners with an earlier 3-piece grille will need to remove all parts of it.
Once you've removed these two pieces, you'll be able to remove the headlamps. Each headlamp is held in place by 3 bolts - one at the top, and two to the side. BE CAREFUL when doing this - replacement lamps ain't cheap
. Finally, remove the plugs from the headlamps to remove them from the car.
2. Remove the old bulbs
- Turn the round plastic cover anti-clockwise to gain access to the bulb.
- Release the clip holding the bulb in place.
- Remove the bulb.
- Detach the existing spade connectors from the headlamp and the the bulb.
The headlamp should now look like this:
3. Modify the bulb cover. I found this to be the trickiest bit.
- Using a screwdriver, pop the existing wiring's grommet out of the housing - be careful as you don't want to damage the existing wiring.
- Take your drill and "widen" the original hole for the grommet. (Note that if you ever want to revert back I'm told by my Subaru dealer they stock replacement bulb covers
). The hole you make needs to be big enough to both remove the existing connectors (circled in red above), and also to allow the ones connected to the HID bulb to pass through.HOWEVER it needs to be small enough to ensure a good seal using the grommet around the HID bulb's wiring. This is where the file came in useful for me - to expand the whole, and add a curve to get a better seal on the grommet.
- Whatever you do, don't be tempted to remove the grommet on the bulb's wiring so you can bin the "plug and play" part of the harness. I did this with the first bulb and then realised too late what I'd done.
- Make sure that the original connector wiring (green and black in my pic) stays OUTSIDE the cover - we'll need this later to connect to the harness.
- If this is the driver's side lamp, tape up the spades on the original wiring and secure the cabling with a tie - it won't be needed.
What you want is something that looks like this for each headlamp:
4. Fit the HID bulbs
Right, hard work done. Now remove the protective packaging around the bulbs and insert them into the headlamp. You can't do this wrong, it only fits one way.
Once in place, push the retaining clip back into place, and then screw the plastic cover back on clockwise.
OK - that's the headlights pretty much dealt with. Now onto the ballasts.
5. Fit the ballasts
If you have an STI you're LUCKY - you don't have foglights so you have more room to play with underneath the headlamps. If you're like me and have a WRX, space is somewhat more limited
.After considering multiple locations, I came to the conclusion that:
a) Mounting a ballast on something that's likely to be removed would be a bad idea (e.g. air filter box or battery).
b) The WRX needs a bigger engine bay
.I went for a different approach each side. I found that the ballast actually fits underneath the headlamp housing without seeming to offset the light in any way, so I mounted the drivers' side one there, as shown below:
I didn't use the bolts supplied - I just bought Halfords license plate stickies - �1.99 for three. Used one and a half per ballast bracket. I figured they should hold and would be easier to remove if I needed. The ballast will probaby sit just slightly higher than the lip either side - however, looking underneath it didn't make contact with my headlamps so make sure yours don't either.
I fitted the passenger side ballast underneath the battery tray. My main decision for doing this was that there was clearance on the passenger side to do this (not enough room driver's side), plus the harness has more parts on the passenger side so I did it to preserve room and allow maximum access to the harness should I need it. However, I'm sure it would be fine to mount both under the headlamps as above. For what it's worth, here's the passenger side:
6. Route through and plug the wiring harness into the ballasts
- I recommend you thread the harness from the passenger side behind the grille and tuck it into one of the recesses in the bumper - there are several and you can push it in tightly and use cable ties to hold it in place along the length.
- Make sure you have the part of the harness with the relay on the PASSENGER side or you'll be in trouble! Otherwise I'll leave this to you - just make sure the harness won't be touching the radiator and anything else that gets hot.
- Plug the harness into the ballasts - you really can't get this bit wrong
.- You should now be left with three cables on the harness - the positive and negative connection to the battery, and the two spade connectors to go into the original harness.
7. Attaching the harness to the original lamp's wiring loom.
You'll need the passenger side headlamp now.
- Take the original spade connectors (green and black wires) that were initially attached to the housing of the headlamp and the bulb itself. (These were the connectors we purposefully left outside the bulb cover when modifying it).
- Connect the black wired male spade connector on the harness to the black wired female connector of the headlamp. Apply electrical tape around the connectors and ensure it's securely bound.
- Connect the white wired male spade connector on the harness to the green wired female connector of the headlamp. I applied electrical tape to this connection too even though the connector has a protective plastic housing, and I also tightened this connector with pliers as it seemed a little loose.
8. Finishing up
Nearly there now.
- Re-attach the original harness plugs to the headlamp unit.
- Attach the plugs from each ballast to the HID bulb plugs - this is impossible to get wrong as they're different AND colour coded
.- Re-fit the headlamps, but don't tighten everything up just yet.
- Now you need to take the positive and negative connectors for the harness and attach them to the battery (red to positive, black to negative). I generally do negative first, then positive - don't know if this is a safety hazard - I've just always done it that way! I'll assume you can handle this bit!
- Once you've re-attached the battery terminals, you're ready to test the headlamps. I started the engine at this point.
- Switch the lamps on. (HOPEFULLY) the lamps will both come on, no problems. If so, leave the lights on whilst you tighten up the headlamps, and then refit the grille and air intake. It'll probably take a few minutes to do this, but the headlamps are supposed to run for the first time for 10 minutes to allow them to burn in, so make sure you run them for at least that period. AND THAT'S IT!
Here's my 4300K kit fitted and working.
Went out this evening and the difference is AWESOME; everything is much brighter and visibility has been notably extended. Nobody flashed me either.
The main test will be next Saturday when the car goes in for its MOT; I'll update the post with the result.
Update
Car passed its MOT with flying colours - no problem with the beam pattern. The guy at the MOT station did mention that he'd "pretend he hadn't seen my sidelights" as they're slightly tinted blue. He pointed out that in order to be road legal, forward facing lights on any vehicle need to emit yellow or white light - so the 4300K kit was actually fine.
End Update
The only problem now is I wish I'd gone for a 6000K kit as they don't match the LED sidelights I bought to go with em
. Anyone know how much for a pair of 6000K bulbs? Maybe I can replace that butchered grommet...
.
Last edited by MrNoisy; 19 January 2008 at 01:30 PM. Reason: Updated title
 12 January 2008, 08:39 PM
#3
Scooby Regular
iTrader: (1)
Join Date: Dec 2007
Location: South West Scotland
Posts: 1,209
Likes: 0
Received 0 Likes
on
0 Posts
Ive just bought a set of jdm sti headlights with the HIDS in the headlight its self!
Now im just waiting on Greoge Davies (Wagons Ho on here) of Chaio Fang Imports sending me all the parts for the convertion!
Im looking forward to this mod as i thing it changes the whole look of the bugeye!
I'll put some pic's up once the jobs done.
Now im just waiting on Greoge Davies (Wagons Ho on here) of Chaio Fang Imports sending me all the parts for the convertion!
Im looking forward to this mod as i thing it changes the whole look of the bugeye!
I'll put some pic's up once the jobs done.
13 January 2008, 10:20 AM
#4
Wulsey - suggest you opt for the harness that has dipped and main beam come on together - that's how the UK standard ones operate apparently.
The harnesses George makes are v. well made and worth a wait if you can be patient. One thing I'd recommend is to insist he sends a new harness directly to you and not via someone else in the UK - the latter happened to me and I had to wait over 3 weeks which was very frustrating when I already had the 'lamps... .
.
The delay itself wasn't caused by George in any way, but like I said, if I'd asked him to send me a new harness directly I wouldn't have had the wait. Have fun with the upgrade - it completely transforms the front of the car - esp. if you combine the lights with a later spec STI front grille like mine.
The harnesses George makes are v. well made and worth a wait if you can be patient. One thing I'd recommend is to insist he sends a new harness directly to you and not via someone else in the UK - the latter happened to me and I had to wait over 3 weeks which was very frustrating when I already had the 'lamps...
.The delay itself wasn't caused by George in any way, but like I said, if I'd asked him to send me a new harness directly I wouldn't have had the wait. Have fun with the upgrade - it completely transforms the front of the car - esp. if you combine the lights with a later spec STI front grille like mine.
13 January 2008, 10:52 AM
#5
Scooby Regular
iTrader: (1)
Join Date: Dec 2007
Location: South West Scotland
Posts: 1,209
Likes: 0
Received 0 Likes
on
0 Posts
Bugeye-scoob- the harnesses are coming direct from George himself, but he's on his hols the now & wont be back till 1st of feb! But im sure it'll be worth the wait!
The harness you suggested is the harness George suggested for a uk car!
The harness you suggested is the harness George suggested for a uk car!
Trending Topics
16 January 2008, 06:18 PM
#9
Scooby Regular
iTrader: (3)

Join Date: Aug 2003
Location: AL4 | W1B
Posts: 2,699
Likes: 0
Received 0 Likes
on
0 Posts
Yep, the theory being that the more people that contribute the better it becomes.
Anyone with a scoobynet login can contribute, check out the front page for some details on how to publish pages:
Main Page - ScoobyPedia


Thread
Thread Starter
Forum
Replies
Last Post
JonMc
Subaru Parts
22
06 February 2016 09:50 PM
MH-Racing
Subaru Parts
18
18 October 2015 04:49 PM