FMIC for my Classic rally car
 24 November 2013, 11:11 PM
#1
Scooby Regular
Thread Starter
iTrader: (1)

Join Date: Jun 2013
Location: Stoke
Posts: 44
Likes: 0
Received 0 Likes
on
0 Posts
Following advice from here I bought a GT2 Intercooler Kit from AzTec I stated to Bob that I would do a online installation here for a bit of discount!!
I have reviewed the forum with regard to turning the Manifiold to keep the pipework runs short but I am opting to invert the intercooler and run the pipework under the headlights as I have not seen any posts of it done this way
don't expect a quick job everything on this car takes me ages but generally its right when its done.
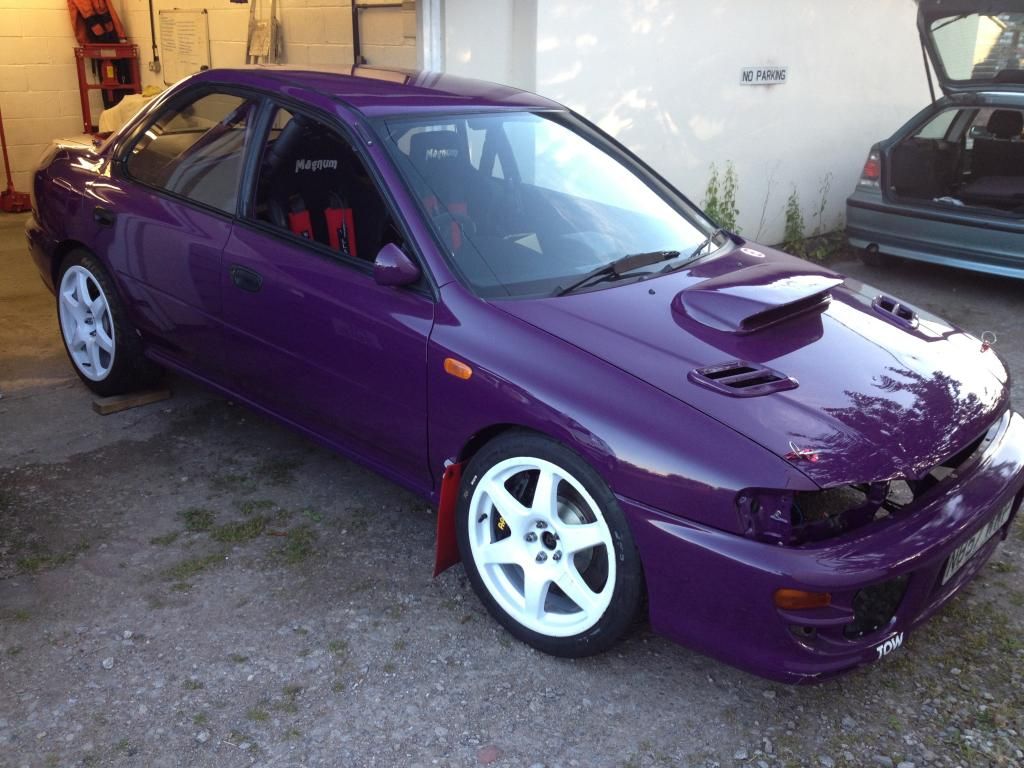
the intercooler is following a engine upgrade from what I call a 3 to a 5 and to my knowledge of the engines running in the car it came out of it will requires far more cooling that the old top mount I used to run
any Ideas throw them in I will start posting shortley
I have reviewed the forum with regard to turning the Manifiold to keep the pipework runs short but I am opting to invert the intercooler and run the pipework under the headlights as I have not seen any posts of it done this way
don't expect a quick job everything on this car takes me ages but generally its right when its done.
the intercooler is following a engine upgrade from what I call a 3 to a 5 and to my knowledge of the engines running in the car it came out of it will requires far more cooling that the old top mount I used to run
any Ideas throw them in I will start posting shortley
Last edited by Bomber633; 24 November 2013 at 11:12 PM.

 25 November 2013, 01:52 PM
#3

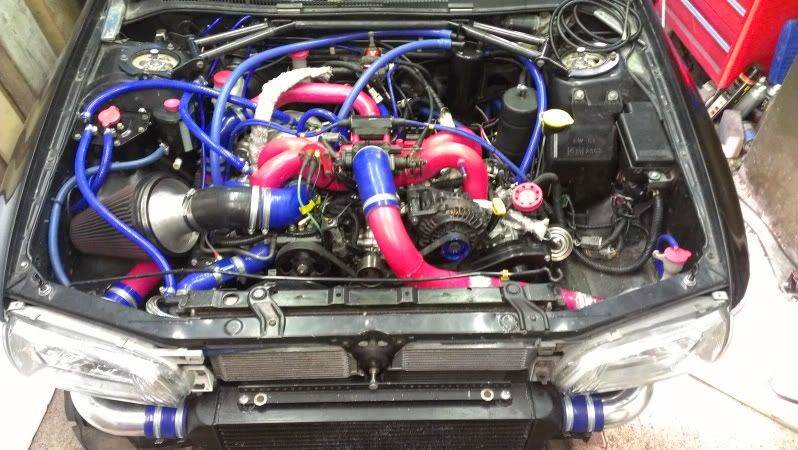
I have a FMIC on my classic rally car, and reversed the inlet to save the pipework- it at least makes it look a little more like an S5 engine bay lol!
I have to sort my front bumper out after the last event, so when I take it off will post some pics to help, but if you dont see anything for a month feel free to prompt me via PM!
I have to sort my front bumper out after the last event, so when I take it off will post some pics to help, but if you dont see anything for a month feel free to prompt me via PM!
25 November 2013, 10:19 PM
#4
Scooby Regular
Thread Starter
iTrader: (1)
Join Date: Jun 2013
Location: Stoke
Posts: 44
Likes: 0
Received 0 Likes
on
0 Posts
Would be interested to set your set up before I start to butcher my front end - I have looked on here at many reverse inlet Manifold set ups but got the impression it wasn't worth the work - where do you compete? I looked at the tax disc on mine and its been 7 years since i did an event - that was Mira -I have built a house in the meantime so I guess I do Have some sort of excuse
started taking headlights out etc this weekend the front end is only put temporary at the moment until I have got the engine running and confirm the new loom is functioning properly
started taking headlights out etc this weekend the front end is only put temporary at the moment until I have got the engine running and confirm the new loom is functioning properly
 26 November 2013, 07:57 PM
#5
You will need seats and belts dude- regs have changed for next year and all need to be in date which is different to that previously.
Im pretty new- based in Jersey so just done the Jersey events, albeit one of which is a 2 day tarmac event around the island- here is a link to one of my in car vids:
Forgot to mention my recirc pipe blew off, so d/v is effectively dumping air to atmosphere, hence the chav noise.
Here is an external one of my car- bumper comes off this weekend I think so will then show you the shots, but in short cut holes under where the lights go.
https://skydrive.live.com/redir?resi...t=photo%2c.JPG
Chassis horizontal plate hasn't needed altering, and lights still fit ok.
You will also need a mount for the alternator- got one off one of the guys on here- matty I think- a trader
Last edited by Grant74; 26 November 2013 at 07:58 PM. Reason: because
26 November 2013, 10:10 PM
#6
Scooby Regular
Thread Starter
iTrader: (1)
Join Date: Jun 2013
Location: Stoke
Posts: 44
Likes: 0
Received 0 Likes
on
0 Posts
cheers for the information I have been discussing the Jersey event as a possible , some of the folks from our club have done it and recommend it highly
look forward to the picture of your install to give me some ideas
yes those belts and seats have been used once and I think they are both scrap
we have to get at least one car ready for next year my Mates just totalled his on mull - he always goes well up there but we cannot fix this one
look forward to the picture of your install to give me some ideas
yes those belts and seats have been used once and I think they are both scrap
we have to get at least one car ready for next year my Mates just totalled his on mull - he always goes well up there but we cannot fix this one
Trending Topics
28 November 2013, 10:18 PM
#8
Scooby Regular
iTrader: (2)

Join Date: Mar 2012
Location: somerset
Posts: 598
Likes: 0
Received 0 Likes
on
0 Posts
the pipework is tight under the headlights and you have to ditch the bumper bar (I think), I just about managed to squeeze some 4ply silicone hose around the pipes, held in place with the pressure between the chassis and the headlight! tight....
also spun inlet... would've clocked turbo too but the one on there is too big
also spun inlet... would've clocked turbo too but the one on there is too big
 28 November 2013, 10:28 PM
#9
Scooby Regular
Thread Starter
iTrader: (1)
Join Date: Jun 2013
Location: Stoke
Posts: 44
Likes: 0
Received 0 Likes
on
0 Posts
that looks a good set up - How are you holding the ic on I can see a bracket on the top but its not connected to anything, did you do your own pipework this is something like I would like to end up with
can you list what you did to turn manifold - my aircon is gone so things like alternator mods, power steering I can see you have remote resevoir etc
cheers for the view it looks good
can you list what you did to turn manifold - my aircon is gone so things like alternator mods, power steering I can see you have remote resevoir etc
cheers for the view it looks good
28 November 2013, 10:43 PM
#10
Ic bolts through the bumper bar and only parts I bought was a reverse inlet alternator kit from matty on here- worth getting as easier to fit.
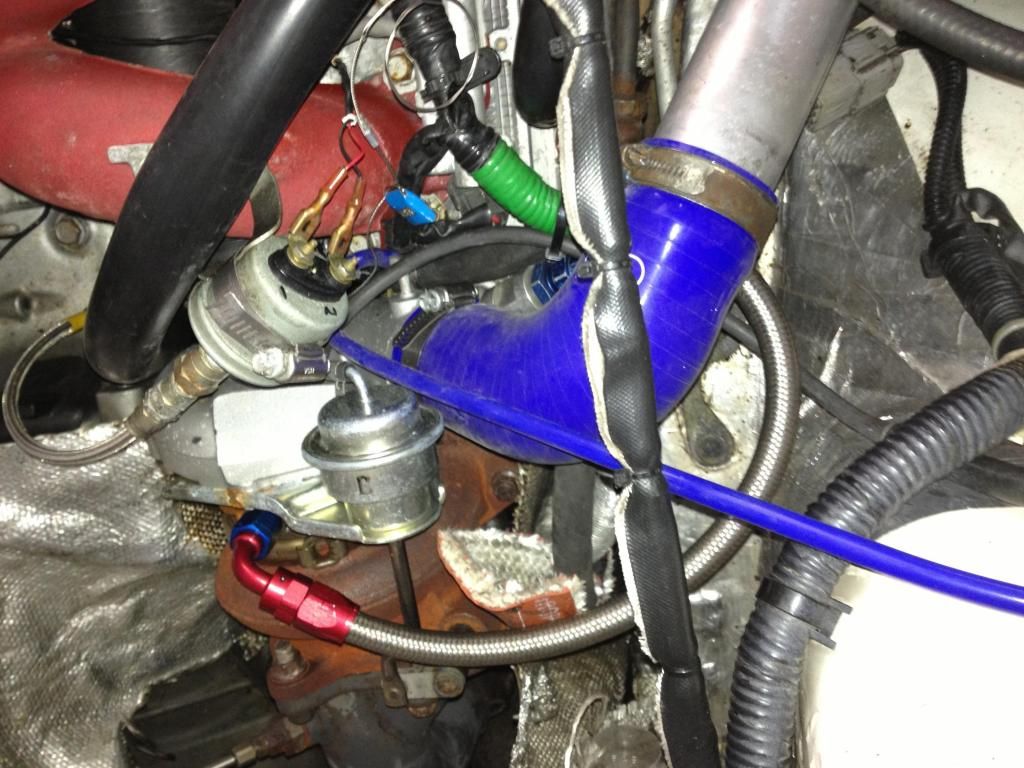
pas reservoir needs a little bracket to move it- flat bit of steel does it, and then you just have to perhaps be a little careful the icv doesnt press on it as it can make it leak- some light grinding sorts that.
most of the existing pipework can be butchered for your needs but make sure you flare all the ends properly or they will blow off, as I found...
My car is a standard engine running 1.4 bar on a scoobyclinic sc36 using a simtek. Has better fueling setup and a swirl pot, and of course a bloody restrictor! Was prob abiut 350 before restricted.
but the real secret is the downgeared box runinng a 4.44 plated diff- its just standard parts rebuikt by api but has held up to a number of full bore hill starts, which I didnt do in the rally as this was my first big event and was just trying to finish and keep it in one piece.
but it keeps the car on song fairly well and is so much faster to accelerate
Last edited by Grant74; 28 November 2013 at 10:46 PM. Reason: edit
29 November 2013, 02:07 PM
#11
Scooby Regular
iTrader: (2)
Join Date: Mar 2012
Location: somerset
Posts: 598
Likes: 0
Received 0 Likes
on
0 Posts
I/c supported from underneath. That bracket at the top ties the I/c to the front panel and also mounts the bumper
I made all my own pipework, taped together at joints, my ally welder is a legend, thr worse my effort the more he enjoys it!!!! Sweet! Lol.
Spun inlet
Fuel lines undone and put on 180deg round. also running parallel
Wiring loom needed stripping back and re-routing
Idle control got ditched
Different length belt (check my thread I pretty sure 1 pic shows the belt info clearly
Belt tensioner
I aslo ditched the p/s reservoir and hooked up a remote one
and mounted the water header tank away from inlet manifold
Alternator flipped over with bracket mounting it solid (easy to make)
Chassis under the headlights cut away
Front bumper modified to clear pipework
Think that's about it tbh!
I did all this in a small garage with just basic tools really
Last edited by tom-r33; 29 November 2013 at 07:21 PM.
29 November 2013, 06:54 PM
#12

Watching this thread closely. I Fitted a GT spec to my v2 RA last summer, what PITA! I'm sure I removed more metal than needed,if you get my drift.
I notice your car is an v2, are you still using top entry turbo? I had all sorts of clearance issues with the pipe work to the turbo inlet.
Getting the bumper/fog light covers to clear the pipe work was a bitch too. I ignored the fitting instructions after a while and improvised using clamps and hoses from www.viperperformance.co.uk
29 November 2013, 06:58 PM
#13
the pipework is tight under the headlights and you have to ditch the bumper bar (I think), I just about managed to squeeze some 4ply silicone hose around the pipes, held in place with the pressure between the chassis and the headlight! tight....
also spun inlet... would've clocked turbo too but the one on there is too big
also spun inlet... would've clocked turbo too but the one on there is too big
Nice work
 29 November 2013, 07:14 PM
#14
Scooby Regular
iTrader: (2)
Join Date: Mar 2012
Location: somerset
Posts: 598
Likes: 0
Received 0 Likes
on
0 Posts
thinking about doing things the easiest way, if you want remote power steering reservoir I'm, pretty sure later spec models have it, so you could probably get the whole setup off one of those. I'm not sure if the take off form the p/s pump is the same, i'm sure there would be a thread on this somewhere?
that's about the only thing I don't like on mine... when the engine isn't running and you turn the steering wheel p/s fluid comes out the reservoir!
Thanks for the compliment, it took a lot of time, effort and head scratching, i'm still not happy, want to go for an intercooler where the pipes go straight back into the bay, instead of out to the side and under the headlights. my aim is to be able to push a front corner back about a foot and still be able to drive on! I'm thinking rs500 style, but smaller volume, as they're monsters
I'll post a pic of it with the vf34 on (when it arrives!) clocked with even shorter pipework
29 November 2013, 07:42 PM
#15
Actually I did have to extend the tps wiring but didnt have to reverse fuel lines, and mine are parallel too.
I habe tried to allow for a little impact by using some soft pipes in the corners and having had an off earlier in the year that worked
I habe tried to allow for a little impact by using some soft pipes in the corners and having had an off earlier in the year that worked
29 November 2013, 08:11 PM
#16
Just got round to watching that vid- hope all were Ok after the off- loving the sequential box if I have that right?
Finally you got me up off my behind- some pics of mine where you can see it goes under the lights both sides, but they are soft pipes there rather than hard.

Its tight by the rad and belts, so have held it in place with an extra clamp:

In under drivers side light:

Out to IC by the battery:
https://skydrive.live.com/redir?resi...t=photo%2c.JPG
Closer shot of engine bay
https://skydrive.live.com/redir?resi...t=photo%2c.JPG
Battery will be relocated in due course for crash reasons too.
Any my nav has agreed to do Bovington, so hopefully get a UK rally in!
Finally you got me up off my behind- some pics of mine where you can see it goes under the lights both sides, but they are soft pipes there rather than hard.
Its tight by the rad and belts, so have held it in place with an extra clamp:
In under drivers side light:
Out to IC by the battery:
https://skydrive.live.com/redir?resi...t=photo%2c.JPG
Closer shot of engine bay
https://skydrive.live.com/redir?resi...t=photo%2c.JPG
Battery will be relocated in due course for crash reasons too.
Any my nav has agreed to do Bovington, so hopefully get a UK rally in!
 06 December 2013, 12:12 PM
#20
Have you got a different shot of that? Im trying to work out my orientation in that pic!
And what do you mean by rad underneath?
And what do you mean by rad underneath?
Last edited by Grant74; 06 December 2013 at 12:13 PM.
07 December 2013, 10:28 AM
#21
Scooby Regular
iTrader: (2)
Join Date: Mar 2012
Location: somerset
Posts: 598
Likes: 0
Received 0 Likes
on
0 Posts
sweet, looks good
is it running standard fuel rails? It looks like I have to mod the end of mine to provide clearance to the compressor.
I managed to spin the comp housing pretty much exactly 180deg, it looks like the one in the pic goes upwards slightly
check my build thread in a day or two, I moved my FPR and header tank as well as 'clocking' the turbo. will update as soon as my new phone decides to start working!
I'm toying with the idea of changing the intercooler/rad, but I don't think I have enough time as I have a job to do which means I will be working on that flat out up until Christmas, and I want to compete in the car at the end of January so don't want to bite off more than I can chew.... but damn its tempting to try and do it now!
07 December 2013, 10:33 PM
#22
Scooby Regular
Thread Starter
iTrader: (1)
Join Date: Jun 2013
Location: Stoke
Posts: 44
Likes: 0
Received 0 Likes
on
0 Posts
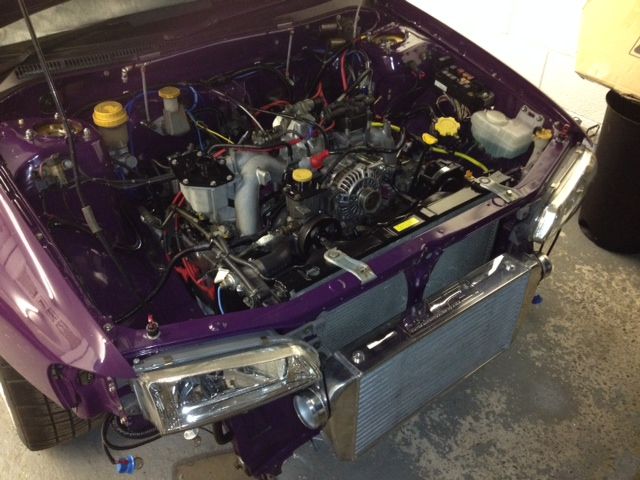
this is the only other picture i have now
the fuel rails I need to to look at - I am sure the rails were standard but i noticed the other day when we were looking at whats left of the engine the pipes we re all made up with steel flexibles

the fuel rails I need to to look at - I am sure the rails were standard but i noticed the other day when we were looking at whats left of the engine the pipes we re all made up with steel flexibles
07 December 2013, 10:34 PM
#23
Scooby Regular
Thread Starter
iTrader: (1)
Join Date: Jun 2013
Location: Stoke
Posts: 44
Likes: 0
Received 0 Likes
on
0 Posts
Tom where you running end of January?
and what I/C make are you running - been fitting up the I/C on mine tonight and the take off on the GT2 look Massive, worried about getting them under the lights
Tom could you take some pictures head on lookin at the pipes going under the headlights please
and what I/C make are you running - been fitting up the I/C on mine tonight and the take off on the GT2 look Massive, worried about getting them under the lights
Tom could you take some pictures head on lookin at the pipes going under the headlights please
Last edited by Bomber633; 07 December 2013 at 10:51 PM.
08 December 2013, 09:51 PM
#28
Scooby Regular
Thread Starter
iTrader: (1)
Join Date: Jun 2013
Location: Stoke
Posts: 44
Likes: 0
Received 0 Likes
on
0 Posts
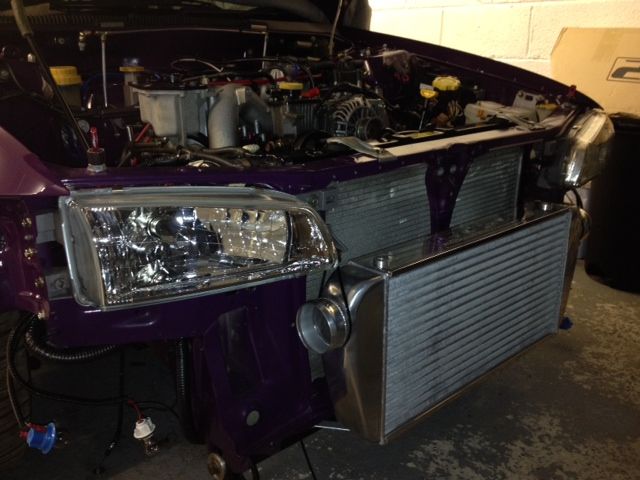
ok fitted the bottom brackets tonight and positioned the IC they are not strong enough - I will make some more out of thicker material = need to start hacking the bumper at the same time and do the jobs together I want the top of the intercooler to support the bumper so I will pack from the bottom brackets and just steady the top- at least i can start to see where its going


 25 December 2013, 09:50 AM
#29
Scooby Regular
iTrader: (2)
Join Date: Mar 2012
Location: somerset
Posts: 598
Likes: 0
Received 0 Likes
on
0 Posts
damn that looks clean!
my rotated, flipped and clocked pipework is for sale if you're interested? slightly different to in the pics on here, I modified it for clocked turbo since then. just thought I'd see if you're interested?
my rotated, flipped and clocked pipework is for sale if you're interested? slightly different to in the pics on here, I modified it for clocked turbo since then. just thought I'd see if you're interested?
26 January 2014, 09:11 PM
#30
Scooby Regular
Thread Starter
iTrader: (1)
Join Date: Jun 2013
Location: Stoke
Posts: 44
Likes: 0
Received 0 Likes
on
0 Posts
ok bit more done I said this would take a long time work in the garage when the weathers half decent and on the loft conversion when its rubbish
so here are a few pics of where I have got to
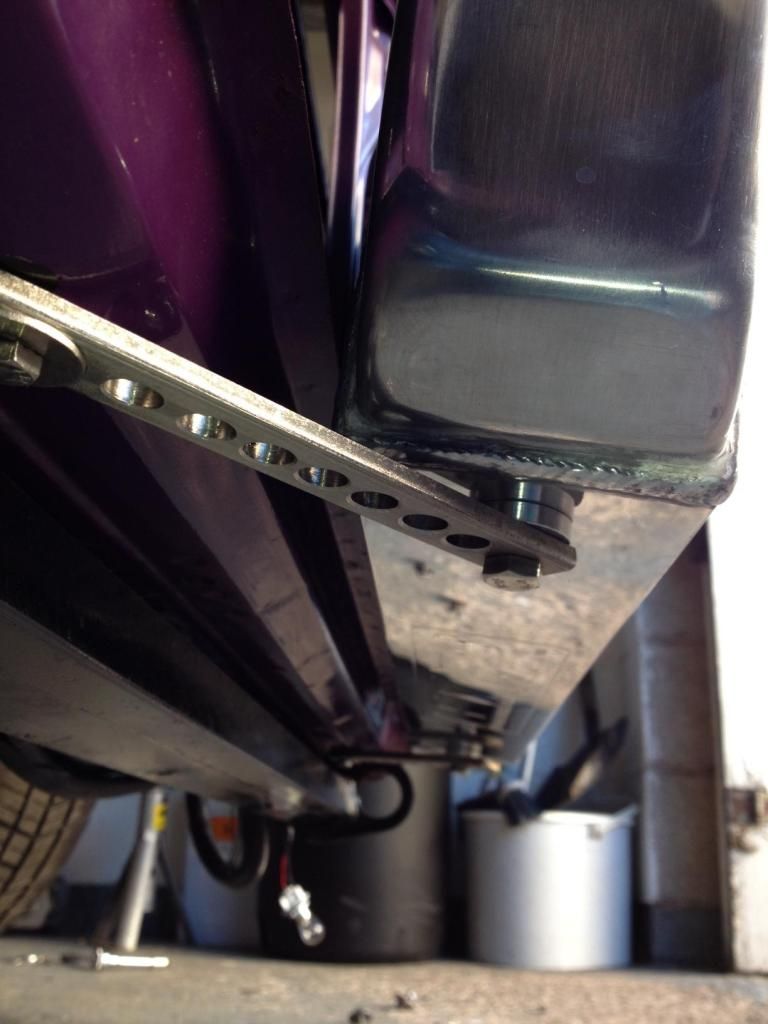
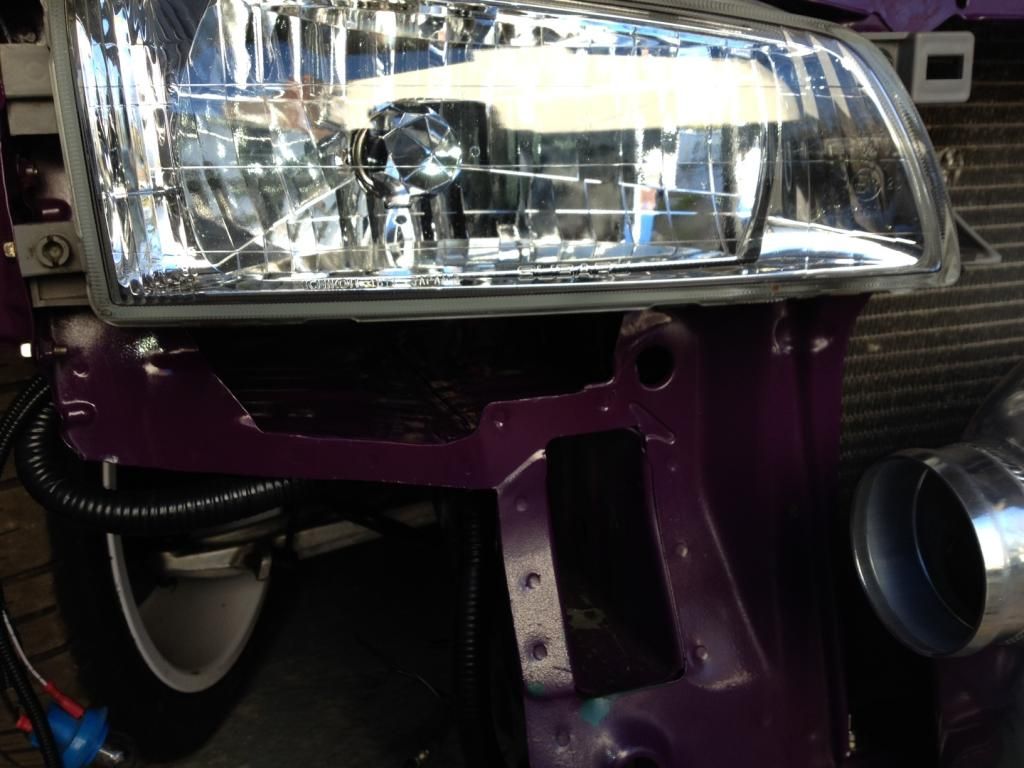
first I have replaced the aluminium brackets that come with the kit they seemed a bit thin and flexible to me so I made some thicker ones
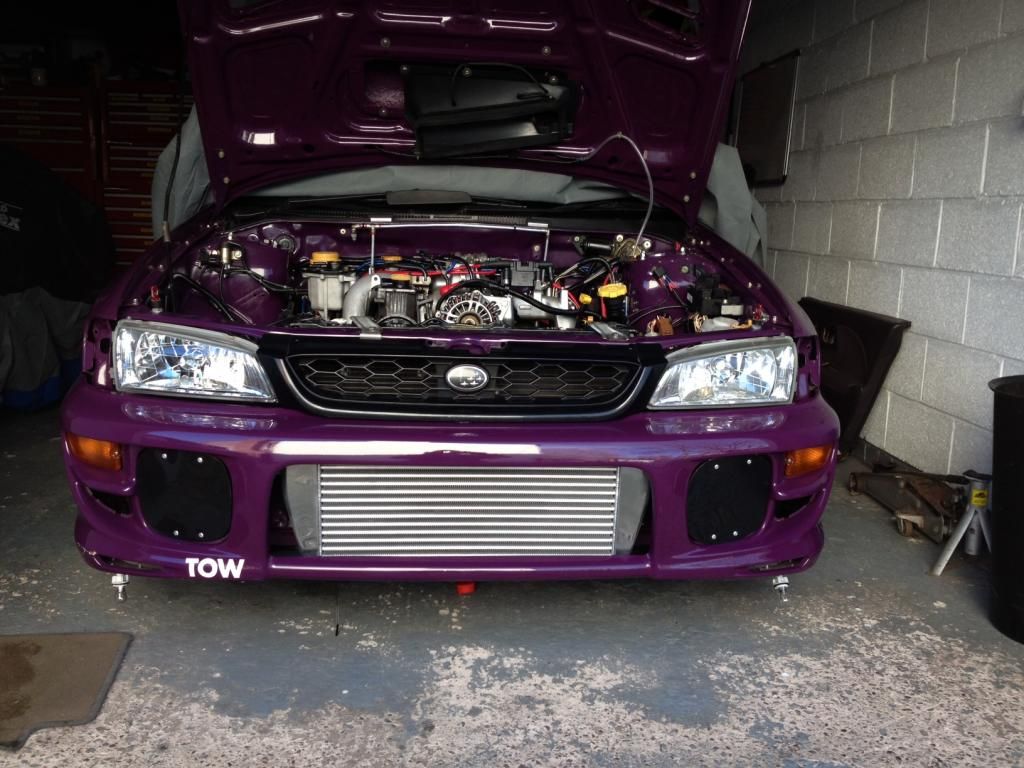
with the Intercooler in the right place I then cut the bumper out - to be honest I have seen several methods of doing this but I just cut the whole lot out to leave a stiffening edge
I fitted the bumper up and realised that the pipes run into the bumper light recesses so I then cut them out to allow the pipes to run past them
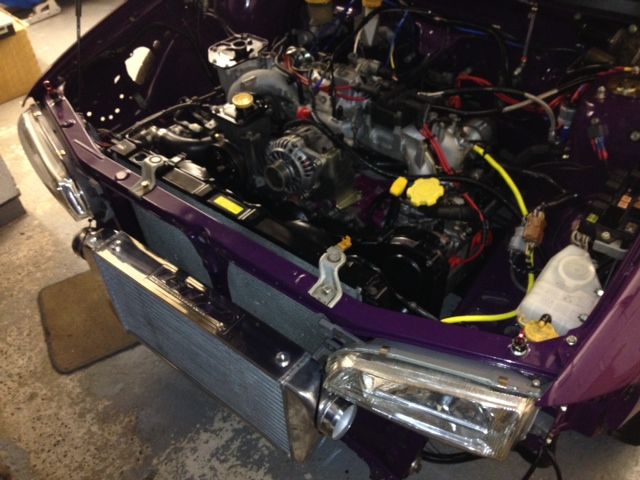
Then tried the bumper for fit - not bad needs a bit of levelling and fettling but that can only be done when the top bracket has been fabricated and fitted
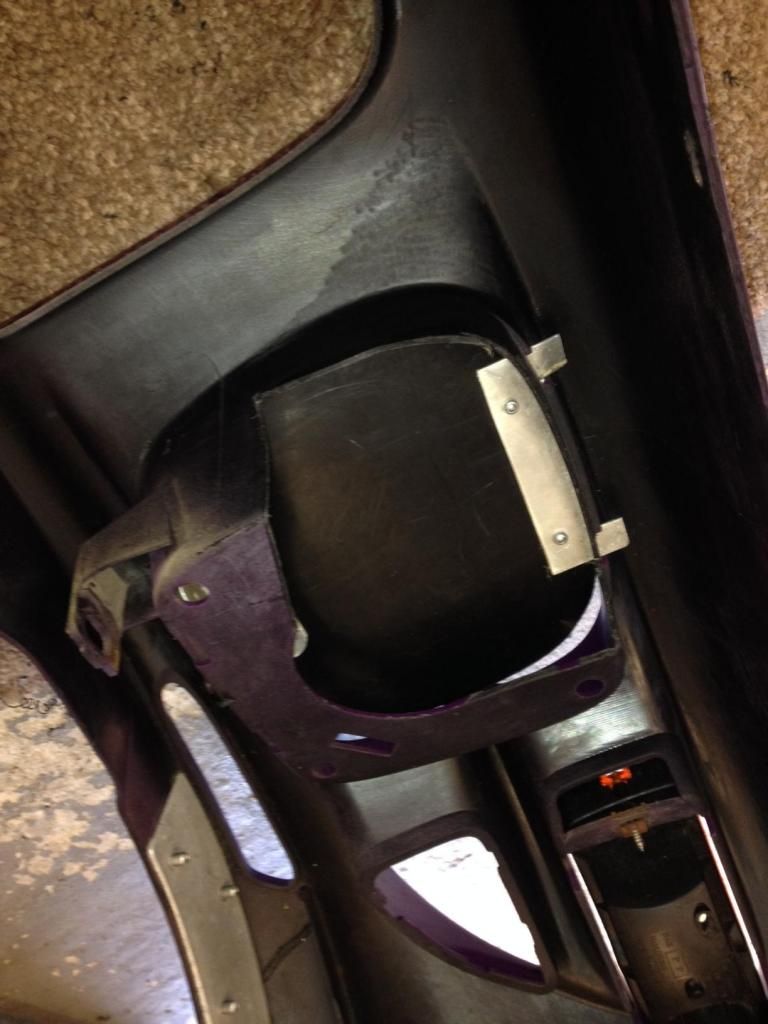
the last job I have done is to cut the panels out under the lights to allow the pipes to run through
I know the gap looks small on the picture but the pipes fit through ok
when I have the top i/c Bracket fitted we are then into the pipework - the bit I have been dreading but one step at a time eh
so here are a few pics of where I have got to
first I have replaced the aluminium brackets that come with the kit they seemed a bit thin and flexible to me so I made some thicker ones

with the Intercooler in the right place I then cut the bumper out - to be honest I have seen several methods of doing this but I just cut the whole lot out to leave a stiffening edge

I fitted the bumper up and realised that the pipes run into the bumper light recesses so I then cut them out to allow the pipes to run past them

Then tried the bumper for fit - not bad needs a bit of levelling and fettling but that can only be done when the top bracket has been fabricated and fitted

the last job I have done is to cut the panels out under the lights to allow the pipes to run through

I know the gap looks small on the picture but the pipes fit through ok
when I have the top i/c Bracket fitted we are then into the pipework - the bit I have been dreading but one step at a time eh