

oil change,any pics


Thread Starter
Scooby Regular
Joined: Jan 2009
Posts: 82
Likes: 0
just to ask does anyone have any pics of the oil changing process on a 97 uk classic?Not long had car but want to do an oil change as was last done in november.Because this is the first one for me on a scoob i want to make sure i get it right!thanks very much

As above - pre -fill the oil filter right up before fitting,fill the engine up to the max mark on the dipstick - disconnect the crank sensor and crank over on the key until the oil light goes out.
Reconnect the sensor and start the engine up - check for leaks and switch off.
Top up to max level if necc.
Drain plug torque with new washer - 44Nm.
Mick
Reconnect the sensor and start the engine up - check for leaks and switch off.
Top up to max level if necc.
Drain plug torque with new washer - 44Nm.
Mick


I'd never changed oil myself on a car before until i bought an impreza, then i started doing things myself, oil change couldnt be simpler
i didnt bother disconnecting crank sensor, just undid nut,took filter off,put new filter and nut back on,filled oil and did checks to make sure oil level was ok.
i didnt bother disconnecting crank sensor, just undid nut,took filter off,put new filter and nut back on,filled oil and did checks to make sure oil level was ok.
Thread Starter
Scooby Regular
Joined: Jan 2009
Posts: 82
Likes: 0
thanks for the info,i have done all my own oil changes previously on my hondas but just the initial thought of doing one on the scoob was a bit scary!just to ask why does the filter have to be filled before fitting?its just that i have never done this before.thanks againoh yeah based in swindon
oh yeah based in swindon
Last edited by c.sparrow; Mar 23, 2009 at 09:03 PM.
Trending Topics
I had previously done all my servicing prior to the scoob, and did a little research before hand
The pre filling of the filter and disconnecting of the crank sensor is a preventative measure i guess to ensure the oil circulates quickly once started and is up to pressure before starting
I believe this is the correct procedure to avoid oil starvation - compared to just sealing the oil filter with oil, starting and watching the oil pressure light illuminate for a second until pressure is up


Scooby Regular
Joined: Feb 2009
Posts: 138
Likes: 0
From: Machynlleth
Agreed , but just bought the car put a couple of tyres on it. Next service will be �500ish so looking for breathing space. But saying that you have a valid point. Buying the car is only half the battle.
Scooby Regular
iTrader: (1)
Joined: Dec 2001
Posts: 7,327
Likes: 0
From: You only live ONCE But if you do it right >>>>> ONCE is enough
In depth guide to a DIY Oil Change for a Classic Impreza courtesy of a thread on Surrey Scoobies site.
To those who know the score this isn't intended as an egg sucking exercise but hopefully it will help some of the new guys out. You read an awful lot about dry cranking and I sure it puts some people off, I'd hate to think that the process is skipped due to fear of the unknown, potentially contributing to or directly causing a premature end to an engine.
The term dry cranking simply describes trying to start up the engine with the crank sensor disconnected. The engine will turn over on the starter motor only (as the crank sensor has been unplugged the engine will not fire). The whole point is to distribute the oil and establish a decent pressure before firing the engine.
You will need: -
5 litres (4.5 will be used) of your chosen oil.
A new Subaru manufactured oil filter
A new Subaru sump washer
17mm socket for the sump plug
Flat surface to stand the car on.
1. Warm the engine (to ease the draining process).
2. Pre-fill the new filter with fresh oil. Fill to the very top and keep topping up (it will take 15 minutes or so to fully absorb the oil).
3. Remove the oil filler cap (to allow the oil to drain easily)
4. Remove the under tray.
5. Drain all of the old oil from sump (be careful it will be warm/hot and gushes out so be ready and have a suitable sized (depth & width) container for the oil to drain into). It will take a few minutes to run dry.
6. Remove old filter (you should be able to do this by hand, if not use an oil filter wrench or alternatively stab with a screwdriver for leverage if necessary).
7. Wipe the filter seating & apply a small amount of oil to the face of the new oil seal on the new oil filter and then fit the pre-filled filter (Step 2). Make sure the thread is not crossed and do not over tighten as this can lead to leaks. � to a turn after it begins to feel tight is about right.
8. Wipe the sump plug seating and apply a new washer to sump plug and tighten.
9. Fill the engine with oil to halfway between the two holes on the dipstick (you should allow 5-10 minutes for the oil to settle to get an accurate reading).
10. Refit the oil filler cap.
11. Disconnect (unplug) the crank sensor to stop the engine firing (this prevents both spark and fuel injection to the engine) Location: -
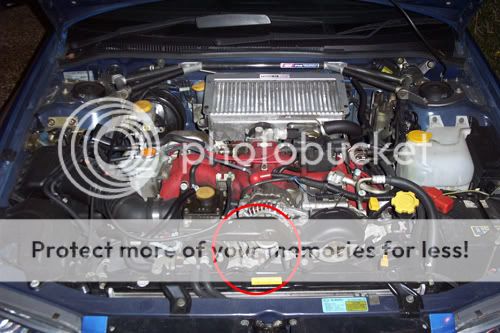
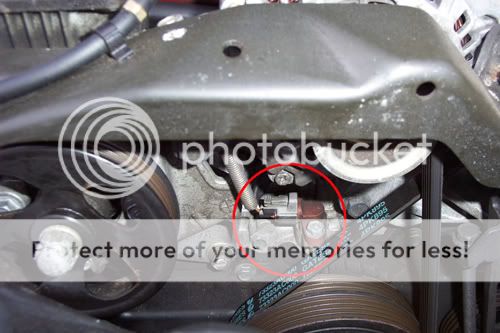
or (preferably) remove the spark plugs - removal of the spark plugs is generally accepted as the preferred option as it prevents compression meaning that the load on the bearings during the dry cranking process is relieved until oil pressure has been re-established (after dry cranking). It's a bit of a chore. That said it is good to check your plugs every now and than as it can give a heads up of other potential problems.
So.You do not have to remove the plugs, disconnecting the crank sensor is sufficient but if you are going to remove the plugs you should disconnect the crank sensor too.
12. Dry crank the engine until the oil pressure light extinguishes (some cars lights don't always extinguish but as long as you crank for the recommended time there should be no issues). This could take 30-80 seconds, don't worry if it takes a little longer. Crank in short bursts to save the battery (wait a few seconds between each crank). You cannot over crank. This action primes the system establishing oil distribution until it meets resistance, creating pressure.
13. Refit spark plugs (only if removed obviously)
14. Refit (plug back in) the crank sensor
15. Start the engine and leave to idle for a minute or two so the oil pressure can stabilise before driving.
16. Check sump plug and filter seal for adequate tightness/leaks
17. Go for a short and slow drive until the engine is at full operating temperature then switch off.
18. Top up the oil to the upper hole on the dipstick but do not overfill. The highest notch on the dipstick is the fully hot/overfill mark. The oil level shouldn't be any higher than the second hole even when hot.
19. Check sump plug and filter seal for adequate tightness/leaks one again.
20. Refit the under tray
Disclaimer: follow at your own risk! I can't guarantee that this guide will stop your engine going pop but a badly carried out oil change can certainly increase the chances. If in any doubt as to your mechanical aptitude - Get professional help!!!
To those who know the score this isn't intended as an egg sucking exercise but hopefully it will help some of the new guys out. You read an awful lot about dry cranking and I sure it puts some people off, I'd hate to think that the process is skipped due to fear of the unknown, potentially contributing to or directly causing a premature end to an engine.
The term dry cranking simply describes trying to start up the engine with the crank sensor disconnected. The engine will turn over on the starter motor only (as the crank sensor has been unplugged the engine will not fire). The whole point is to distribute the oil and establish a decent pressure before firing the engine.
You will need: -
5 litres (4.5 will be used) of your chosen oil.
A new Subaru manufactured oil filter
A new Subaru sump washer
17mm socket for the sump plug
Flat surface to stand the car on.
1. Warm the engine (to ease the draining process).
2. Pre-fill the new filter with fresh oil. Fill to the very top and keep topping up (it will take 15 minutes or so to fully absorb the oil).
3. Remove the oil filler cap (to allow the oil to drain easily)
4. Remove the under tray.
5. Drain all of the old oil from sump (be careful it will be warm/hot and gushes out so be ready and have a suitable sized (depth & width) container for the oil to drain into). It will take a few minutes to run dry.
6. Remove old filter (you should be able to do this by hand, if not use an oil filter wrench or alternatively stab with a screwdriver for leverage if necessary).
7. Wipe the filter seating & apply a small amount of oil to the face of the new oil seal on the new oil filter and then fit the pre-filled filter (Step 2). Make sure the thread is not crossed and do not over tighten as this can lead to leaks. � to a turn after it begins to feel tight is about right.
8. Wipe the sump plug seating and apply a new washer to sump plug and tighten.
9. Fill the engine with oil to halfway between the two holes on the dipstick (you should allow 5-10 minutes for the oil to settle to get an accurate reading).
10. Refit the oil filler cap.
11. Disconnect (unplug) the crank sensor to stop the engine firing (this prevents both spark and fuel injection to the engine) Location: -
or (preferably) remove the spark plugs - removal of the spark plugs is generally accepted as the preferred option as it prevents compression meaning that the load on the bearings during the dry cranking process is relieved until oil pressure has been re-established (after dry cranking). It's a bit of a chore. That said it is good to check your plugs every now and than as it can give a heads up of other potential problems.
So.You do not have to remove the plugs, disconnecting the crank sensor is sufficient but if you are going to remove the plugs you should disconnect the crank sensor too.
12. Dry crank the engine until the oil pressure light extinguishes (some cars lights don't always extinguish but as long as you crank for the recommended time there should be no issues). This could take 30-80 seconds, don't worry if it takes a little longer. Crank in short bursts to save the battery (wait a few seconds between each crank). You cannot over crank. This action primes the system establishing oil distribution until it meets resistance, creating pressure.
13. Refit spark plugs (only if removed obviously)
14. Refit (plug back in) the crank sensor
15. Start the engine and leave to idle for a minute or two so the oil pressure can stabilise before driving.
16. Check sump plug and filter seal for adequate tightness/leaks
17. Go for a short and slow drive until the engine is at full operating temperature then switch off.
18. Top up the oil to the upper hole on the dipstick but do not overfill. The highest notch on the dipstick is the fully hot/overfill mark. The oil level shouldn't be any higher than the second hole even when hot.
19. Check sump plug and filter seal for adequate tightness/leaks one again.
20. Refit the under tray
Disclaimer: follow at your own risk! I can't guarantee that this guide will stop your engine going pop but a badly carried out oil change can certainly increase the chances. If in any doubt as to your mechanical aptitude - Get professional help!!!

Scooby Regular
iTrader: (7)
Joined: Apr 2007
Posts: 545
Likes: 0
From: on the computer.... obviously!
As an aside to the above post, if you were removing the spark plugs, it would be wise to disconnect the crank sensor aswell. You really don't want stray sparks from the leads/packs while fuel is being injected into the now vent to atmosphere cylinders 
Also there is quite a few well known ignition systems, that can cause damage to the coils or ecu if the engine is cranked while the leads are disconnected.
Merely adding caution upon caution
Also there is quite a few well known ignition systems, that can cause damage to the coils or ecu if the engine is cranked while the leads are disconnected.
Merely adding caution upon caution
Scooby Regular
iTrader: (1)
Joined: Dec 2001
Posts: 7,327
Likes: 0
From: You only live ONCE But if you do it right >>>>> ONCE is enough
As an aside to the above post, if you were removing the spark plugs, it would be wise to disconnect the crank sensor aswell. You really don't want stray sparks from the leads/packs while fuel is being injected into the now vent to atmosphere cylinders
Also there is quite a few well known ignition systems, that can cause damage to the coils or ecu if the engine is cranked while the leads are disconnected.
Merely adding caution upon caution
Also there is quite a few well known ignition systems, that can cause damage to the coils or ecu if the engine is cranked while the leads are disconnected.
Merely adding caution upon caution
In bold just above section 12.
So.You do not have to remove the plugs, disconnecting the crank sensor is sufficient but if you are going to remove the plugs you should disconnect the crank sensor too.

Scooby Regular
iTrader: (7)
Joined: Apr 2007
Posts: 545
Likes: 0
From: on the computer.... obviously!

Scooby Regular
Joined: Jun 2008
Posts: 5,559
Likes: 0
Ignore the stuff about removal of crank sensor ..... worse, the spark plugs!
If you had to do that for any reason then you would have to do it every single morning! As the oil distribution is exactly the same after standing all night as it is when you have emptied the oil out! So, forget all that rubbish.
Fill the filter, by all means (I do) ...... but really, that's not necessary (it's simply the only **** thing I allow myself!)
Scooby Regular
Joined: Feb 2006
Posts: 4,554
Likes: 0
From: Bring back infractions!
Ignore the stuff about removal of crank sensor ..... worse, the spark plugs!
If you had to do that for any reason then you would have to do it every single morning! As the oil distribution is exactly the same after standing all night as it is when you have emptied the oil out! So, forget all that rubbish.
Fill the filter, by all means (I do) ...... but really, that's not necessary (it's simply the only **** thing I allow myself!)
If you had to do that for any reason then you would have to do it every single morning! As the oil distribution is exactly the same after standing all night as it is when you have emptied the oil out! So, forget all that rubbish.
Fill the filter, by all means (I do) ...... but really, that's not necessary (it's simply the only **** thing I allow myself!)


Scooby Regular


Joined: Jul 2008
Posts: 15,634
Likes: 22
From: K
As above - pre -fill the oil filter right up before fitting,fill the engine up to the max mark on the dipstick - disconnect the crank sensor and crank over on the key until the oil light goes out.
Reconnect the sensor and start the engine up - check for leaks and switch off.
Top up to max level if necc.
Drain plug torque with new washer - 44Nm.
Mick
Reconnect the sensor and start the engine up - check for leaks and switch off.
Top up to max level if necc.
Drain plug torque with new washer - 44Nm.
Mick
because the "build pressure" nonsence is only for new build engines that have never had any oil pressure in them, to prime the oilways and journals
you will have more oil in you journals and oilways after you drain the oil ready for the new stuff (as long as you dont wait 24 hrs to put the new oil in) than when you start your car in the morning
i would get it up and running as soon as possible
I would pre fill the oil filter though

Scooby Regular
Joined: Sep 2001
Posts: 1,822
Likes: 0
From: Suffolk
Use to do the oil changes every 3k mile on my old type r myself, current 04 STI hasn't needed one yet...
Never disconnected the crank sensor, but did always pre fill the filter. The oil pressure light always went out straight away after starting it, never had any problems.
As already mentioned, providing the car hasn't been sitting there for a day or so to totally "dry up" then there will still be a layer of oil over everything anyway and again is no different to you starting it on a cold morning when its been sitting out all night.
Scooby Regular
iTrader: (1)
Joined: Dec 2001
Posts: 7,327
Likes: 0
From: You only live ONCE But if you do it right >>>>> ONCE is enough
If you had to do that for any reason then you would have to do it every single morning! As the oil distribution is exactly the same after standing all night as it is when you have emptied the oil out! So, forget all that rubbish.
Fill the filter, by all means (I do) ...... but really, that's not necessary (it's simply the only **** thing I allow myself!)
Fill the filter, by all means (I do) ...... but really, that's not necessary (it's simply the only **** thing I allow myself!)

**** maybe but for the sake of a 2 sec unplug & 5-10 sec crank you want to risk a �1.5k rebuild. No brainer.

Do you miss the intermediate oil change as well?
Just found this on a "knackered engine" thread :-
The flat four engine configuration seems to be more susceptible to poor oil change procedure than a regular upright motor. There is also a problem that the Op relief valve can stick in its guide during an oil change. No telling when or why, it just does it sometimes.
The reason for cranking with the cam or crank sensor disconnected is because the oil pick up pipe is now full of air once the oil is drained and you need to purge that through the system before op is created. AND remember that No 3 big end [ the one that usually fails ] is the last to get fed with oil on a fresh fill basis.
Cranking, with the sensors disconnected is a safeguard, if you do it that way one of the problems is overcome. Leave it connected and you create one. Why not do it the safe way?, it doesn't cost anything..................
David APi
Last edited by FLAT ERIC; Mar 25, 2009 at 12:53 AM.
Scooby Regular
Joined: Jun 2008
Posts: 5,559
Likes: 0
Just found this to assist the OP:-
YouTube - Subaru Impreza Oil Change How To DIY
You will note the complete lack of the removal of sensor plug or spark plugs
YouTube - Subaru Impreza Oil Change How To DIY
You will note the complete lack of the removal of sensor plug or spark plugs
Scooby Regular
iTrader: (1)
Joined: Dec 2001
Posts: 7,327
Likes: 0
From: You only live ONCE But if you do it right >>>>> ONCE is enough
Just found this to assist the OP:-
YouTube - Subaru Impreza Oil Change How To DIY
You will note the complete lack of the removal of sensor plug or spark plugs
YouTube - Subaru Impreza Oil Change How To DIY
You will note the complete lack of the removal of sensor plug or spark plugs
I did note the complete lack of the removal of sensor plug or spark plugs
I also noticed the complete lack of :-
1. Warm the engine (to ease the draining process).
2. Pre-fill the new filter with fresh oil. Fill to the very top and keep topping up (it will take 15 minutes or so to fully absorb the oil). The bit in RED.
7. Wipe the filter seating
8. Wipe the sump plug seating
16. Check sump plug and filter seal for adequate tightness/leaks
Would you trust a guide by a guy that uses an old battery as a wheel chock. If the handbrake let go (he should have put the car in gear as a precaution as well) the wheel would push that out the way. A chock idealy needs to be a wedge shape to fit in the angle between wheel & floor. The more push on it the more grip it exerts on the floor.
I will continue to do it my way.
You can remain hell bent on saving 15 seconds & do it your way.

Former Sponsor
iTrader: (4)
Joined: Jul 2003
Posts: 6,377
Likes: 3
From: @Junc 12, M40 Warwicksh; 01926 614522 CV33 9PL -Use 9GX for Satnav. South Mids Alcatek ECu dealer
Ignore the stuff about removal of crank sensor ..... worse, the spark plugs!
*If you had to do that for any reason then you would have to do it every single morning! As the oil distribution is exactly the same after standing all night as it is when you have emptied the oil out! So, forget all that rubbish.*
Fill the filter, by all means (I do) ...... but really, that's not necessary (it's simply the only **** thing I allow myself!)
Leaving the engine for any amount of time with oil in the sump does not create the same conditions as a full drain.
IF YOU DON'T KNOW THIS ELEMENTARY STUFF, FOR GODS SAKE DON'T MISLEAD OTHERS THAT GENUINELY WANT HELP.
David API
Former Sponsor
iTrader: (4)
Joined: Jul 2003
Posts: 6,377
Likes: 3
From: @Junc 12, M40 Warwicksh; 01926 614522 CV33 9PL -Use 9GX for Satnav. South Mids Alcatek ECu dealer
Just found this to assist the OP:-
YouTube - Subaru Impreza Oil Change How To DIY
You will note the complete lack of the removal of sensor plug or spark plugs
YouTube - Subaru Impreza Oil Change How To DIY
You will note the complete lack of the removal of sensor plug or spark plugs
So everything you see /hear in the media is true and correct.
