
Widetrack STI

Thread Starter
Scooby Regular
iTrader: (5)
Joined: Oct 2012
Posts: 1,907
Likes: 1
From: North Yorkshire / Boston, MA
Near York mate.
The grease nipple has got a couple of risks, mainly involving rusted nuts or stripped threads so I'd recommend refurbing a "spare" set of suspension and then swapping over. You can always refurb and sell your suspension if everything goes well!
The grease nipple has got a couple of risks, mainly involving rusted nuts or stripped threads so I'd recommend refurbing a "spare" set of suspension and then swapping over. You can always refurb and sell your suspension if everything goes well!
Thread Starter
Scooby Regular
iTrader: (5)
Joined: Oct 2012
Posts: 1,907
Likes: 1
From: North Yorkshire / Boston, MA
Quick update, been collecting some bits:
Fuel Pump, 7b spark plugs and 3port boost solenoid:
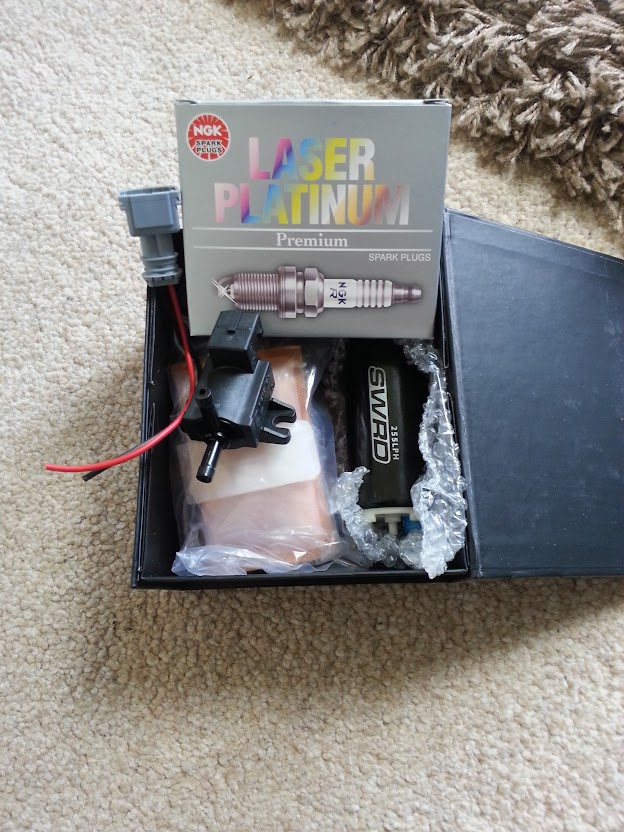
H&S 2.5" Centre, second decat and decat downpipe:

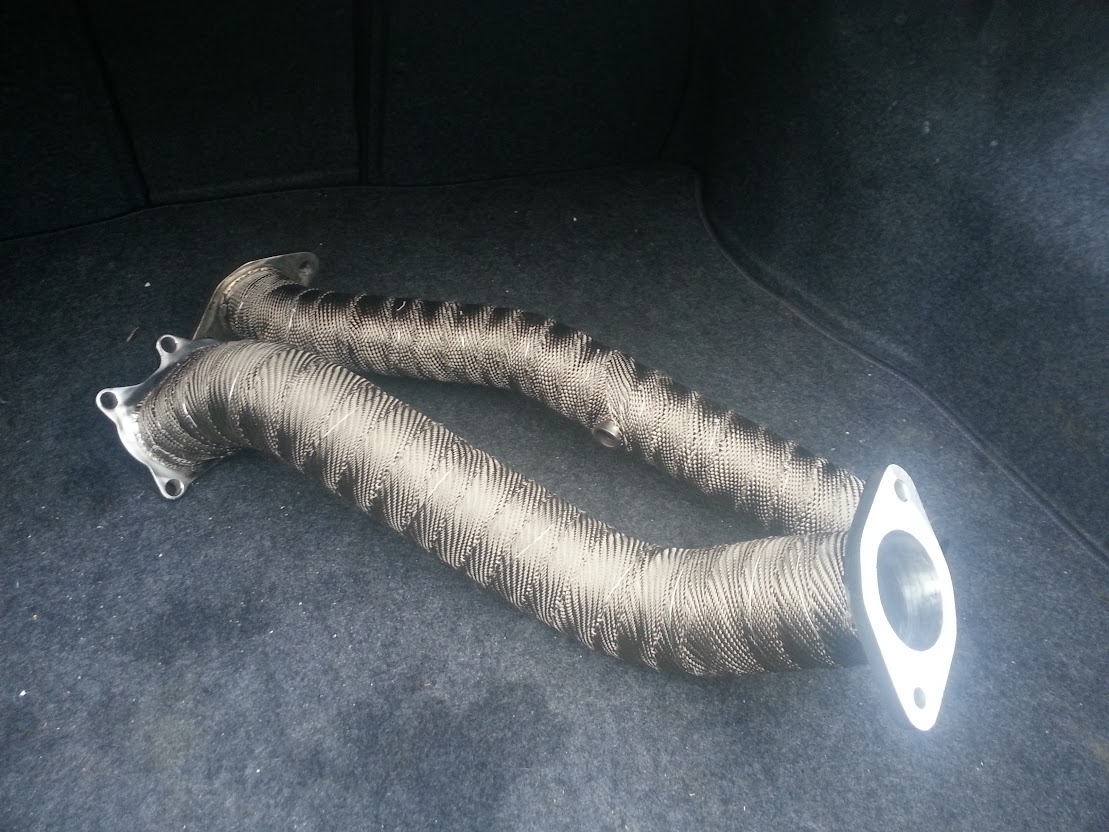
DEI Heatwrap and Kestrel DAS6 DA Polisher:

Wrapped up, going to sort some better quality clips/wire for the wrap. Currently supported by temporary cable ties

Booked in with Richard Henry for Service, MOT and Andrew Carr remap a week tomorrow. Going to give the car a full detail over the next few days whenever the weather turns nice.
Fuel Pump, 7b spark plugs and 3port boost solenoid:
H&S 2.5" Centre, second decat and decat downpipe:
DEI Heatwrap and Kestrel DAS6 DA Polisher:
Wrapped up, going to sort some better quality clips/wire for the wrap. Currently supported by temporary cable ties
Booked in with Richard Henry for Service, MOT and Andrew Carr remap a week tomorrow. Going to give the car a full detail over the next few days whenever the weather turns nice.
Thread Starter
Scooby Regular
iTrader: (5)
Joined: Oct 2012
Posts: 1,907
Likes: 1
From: North Yorkshire / Boston, MA
I've been collecting bits for my early summer clean for a while now. The car has been carrying the dregs of a coat of Megs Ultimate Paste Wax for months now, and was well overdue a full strip, clean, polish and protect.
The wheels will be getting neglected, purely because they were powdercoated and waxed up to **** only a couple of weeks ago.
Some before shots first, after a bit of spirited summer driving yesterday I picked up some victims:

Rear end Crud:


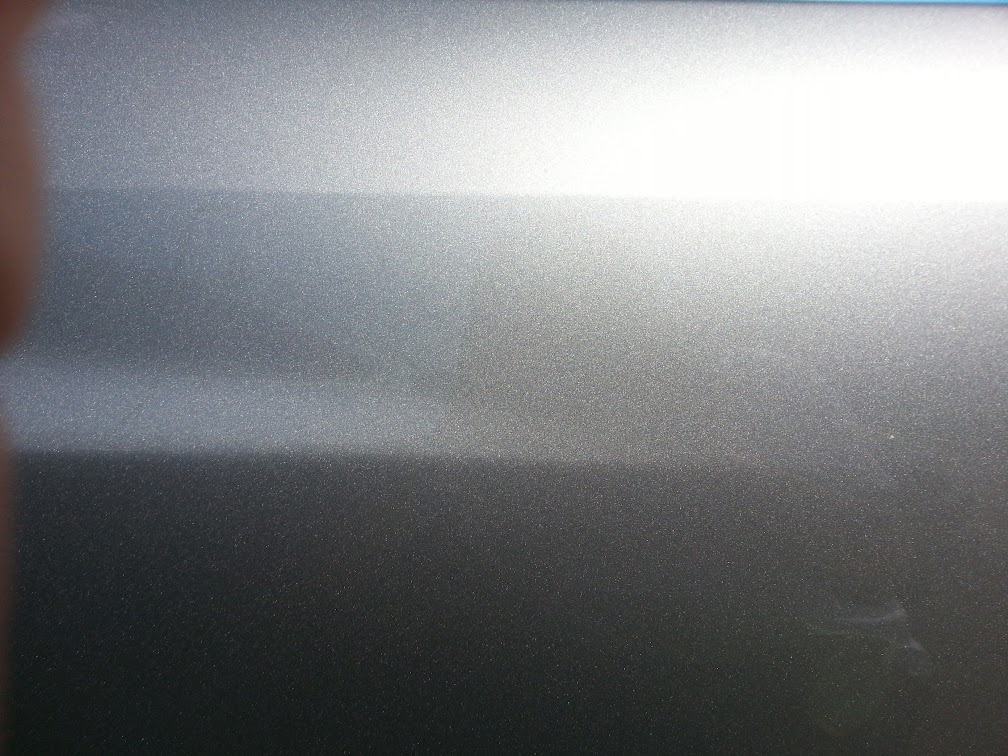
One of the couple of scratches I'd be attacking today. It's a slight backwards 'C' shape near my forearm reflection:

First up I decided to debadge 'SUBARU'. My mitt keeps catching the lettering, and some of them were barely hanging on... so good excuse to try the look.


Once the boot lid was dealt with, onto the cleaning. Opened up by spunking a load of Megs bug/tar remover to soften up my roadkill from yesterday:

Foam up next, ValetPro PH Neutral stuff...

Whilst dwelling, went around panel gaps, badges, keyholes, etc with my soft brush and some APC:

Mixed up my shampoo for the day, Dodo Juice Born to be Mild laced with some Fairy Liquid to cut out the remaining wax.
Onto rinsing off the foam, and my ritual "let's pretend to be an F1 Aero engineer" for 5mins:

All the bug splatter long gone and not touched the car with a sponge/mitt yet:

All shampoo'd down with fuel cap, car smelling like Ainsley Harriot's kitchen and boot and door shuts all cleaned too:

After drying off, I went with the Auto-Finesse Iron-X equivalent. It smells the same, works the same but the trigger sucks ***, was a proper pain to apply. For anyone not clued up, it goes on clear and reacts red/pink when it dissolves out flakes of iron. These flakes normally appear like little rust spots in your paintwork.

You can see the pink flaring up near the bottom left of the photo. I didn't take any shots of the prolific areas (wheel arches, sills, etc) as I was in a hurry to get it sprayed off before it baked on. I'm paranoid about this stuff, and for good reason too - I saw the scene out of that Volcano film re-enacted several times as little flied landed on the Iron-X and proceeded to watch their legs dissolve beneath them
Rinsed off once again, then time for clay. I went with Megs clay with the Megs QD as a lube. No photo of the "dirty claybar look" as I forgot, but it was pretty clean tbh. Testament I guess to my cleaning regime.
Rinsed/Dryed for the last time... looking a bit cleaner:

I had one more job to do before the F1 came on, which was to tape up ready for machine polishing:

I went in and watched the F1 until they redflagged it, then decided to pause and finish the car first. Came back outside and got to work on the machine polishing.
I was using the Werkstatt Acrylic Kit today, with the Prime acting as my finishing polish. I covered the car with a 3M finishing pad with the Prime, my main concern wasn't correcting swirls simply because I didn't have any. The car was professionally polished back in November and my cleaning has been pretty strict since.
This is the only pic I got of my polisher/pad combo

I worked panel at a time, two passes at '2' speed setting and then two passes at '5' speed setting to break the polish down into a clearish haze. Once I'd done the car like that, I switched to a 3M polishing pad (slightly more aggressive) with some Sonus Restore stuff to attack my one-off scratches.
This is a shot of the backwards 'C' scratch I showed earlier. It's not gone, but it no longer catches the light and is quite well hidden:
Once I treated the car's very few wounds, time for a photo:

Oh, you may also notice my fog covers are de-stickered now. I've got some new ones on order, a well placed stonechip ruined one of my old ones so will replace those on tue/wed and refinish the fog covers once done.
Even photobombing my reflections...

It was now time to work on the next stage of the Werkstatt kit, the "Jett". This is a liquid synthetic wax/sealant which you spray on, then work into the paint and buff off in one action. It's so easy to apply, should have multiple coats with 30mins cure time between. Once the first coat was on, I polished up the glass, exhaust trim and blacked the tyres whilst waiting for the 30mins...

Another coat of Jett went on, followed by another 30mins then finished off with the final part of the Werkstatt kit "Glos" which is a QD type spray. For the next couple of months I will simply be washing, drying and Glos'ing.
Here's what I'd used:

Then some results:


Interior tomorrow...
The wheels will be getting neglected, purely because they were powdercoated and waxed up to **** only a couple of weeks ago.
Some before shots first, after a bit of spirited summer driving yesterday I picked up some victims:
Rear end Crud:
One of the couple of scratches I'd be attacking today. It's a slight backwards 'C' shape near my forearm reflection:
First up I decided to debadge 'SUBARU'. My mitt keeps catching the lettering, and some of them were barely hanging on... so good excuse to try the look.
Once the boot lid was dealt with, onto the cleaning. Opened up by spunking a load of Megs bug/tar remover to soften up my roadkill from yesterday:
Foam up next, ValetPro PH Neutral stuff...
Whilst dwelling, went around panel gaps, badges, keyholes, etc with my soft brush and some APC:
Mixed up my shampoo for the day, Dodo Juice Born to be Mild laced with some Fairy Liquid to cut out the remaining wax.
Onto rinsing off the foam, and my ritual "let's pretend to be an F1 Aero engineer" for 5mins:
All the bug splatter long gone and not touched the car with a sponge/mitt yet:
All shampoo'd down with fuel cap, car smelling like Ainsley Harriot's kitchen and boot and door shuts all cleaned too:
After drying off, I went with the Auto-Finesse Iron-X equivalent. It smells the same, works the same but the trigger sucks ***, was a proper pain to apply. For anyone not clued up, it goes on clear and reacts red/pink when it dissolves out flakes of iron. These flakes normally appear like little rust spots in your paintwork.
You can see the pink flaring up near the bottom left of the photo. I didn't take any shots of the prolific areas (wheel arches, sills, etc) as I was in a hurry to get it sprayed off before it baked on. I'm paranoid about this stuff, and for good reason too - I saw the scene out of that Volcano film re-enacted several times as little flied landed on the Iron-X and proceeded to watch their legs dissolve beneath them
Rinsed off once again, then time for clay. I went with Megs clay with the Megs QD as a lube. No photo of the "dirty claybar look" as I forgot, but it was pretty clean tbh. Testament I guess to my cleaning regime.
Rinsed/Dryed for the last time... looking a bit cleaner:
I had one more job to do before the F1 came on, which was to tape up ready for machine polishing:
I went in and watched the F1 until they redflagged it, then decided to pause and finish the car first. Came back outside and got to work on the machine polishing.
I was using the Werkstatt Acrylic Kit today, with the Prime acting as my finishing polish. I covered the car with a 3M finishing pad with the Prime, my main concern wasn't correcting swirls simply because I didn't have any. The car was professionally polished back in November and my cleaning has been pretty strict since.
This is the only pic I got of my polisher/pad combo
I worked panel at a time, two passes at '2' speed setting and then two passes at '5' speed setting to break the polish down into a clearish haze. Once I'd done the car like that, I switched to a 3M polishing pad (slightly more aggressive) with some Sonus Restore stuff to attack my one-off scratches.
This is a shot of the backwards 'C' scratch I showed earlier. It's not gone, but it no longer catches the light and is quite well hidden:
Once I treated the car's very few wounds, time for a photo:
Oh, you may also notice my fog covers are de-stickered now. I've got some new ones on order, a well placed stonechip ruined one of my old ones so will replace those on tue/wed and refinish the fog covers once done.
Even photobombing my reflections...
It was now time to work on the next stage of the Werkstatt kit, the "Jett". This is a liquid synthetic wax/sealant which you spray on, then work into the paint and buff off in one action. It's so easy to apply, should have multiple coats with 30mins cure time between. Once the first coat was on, I polished up the glass, exhaust trim and blacked the tyres whilst waiting for the 30mins...
Another coat of Jett went on, followed by another 30mins then finished off with the final part of the Werkstatt kit "Glos" which is a QD type spray. For the next couple of months I will simply be washing, drying and Glos'ing.
Here's what I'd used:
Then some results:
Interior tomorrow...

Thread Starter
Scooby Regular
iTrader: (5)
Joined: Oct 2012
Posts: 1,907
Likes: 1
From: North Yorkshire / Boston, MA
Cheers mate. I work an on-call rota which means one in four weekends I need to stay home and stay sober. Every now and then that aligns with a stunning day like today, so the gear comes out 

Thread Starter
Scooby Regular
iTrader: (5)
Joined: Oct 2012
Posts: 1,907
Likes: 1
From: North Yorkshire / Boston, MA
Did my interior the day after the exterior, used my all-in-one wonder product (aerospace protectant 303) on the interior plastics (I also used this stuff on the exterior black bits, window seals, etc).
It goes on glossy but once dried it's got a nice matte look to it, perfect.

Shampoo'd and vac'd the mats and then vac'd the seats, doing my best football pitch lawn mower impression on the rears...

I hate my mats, my car came with three genuines and a ****ed driver one. Subaru don't make/sell them anymore for these cars so I'm stuck with third party ones. The pile on these ones looks cheap, and clings to (white) cat hair like a *******. I need to shop around for some better quality ones.
Gave the engine bay a quick wipe down with more aerospace stuff, nothing too severe in here. Did some autosol on the intercooler surround too.
Before:

After:

Gave the car another quick wipe down with the Werkstatt Glos, just because I wanted to... and another cheeky photo...

It goes on glossy but once dried it's got a nice matte look to it, perfect.
Shampoo'd and vac'd the mats and then vac'd the seats, doing my best football pitch lawn mower impression on the rears...
I hate my mats, my car came with three genuines and a ****ed driver one. Subaru don't make/sell them anymore for these cars so I'm stuck with third party ones. The pile on these ones looks cheap, and clings to (white) cat hair like a *******. I need to shop around for some better quality ones.
Gave the engine bay a quick wipe down with more aerospace stuff, nothing too severe in here. Did some autosol on the intercooler surround too.
Before:
After:
Gave the car another quick wipe down with the Werkstatt Glos, just because I wanted to... and another cheeky photo...
Thread Starter
Scooby Regular
iTrader: (5)
Joined: Oct 2012
Posts: 1,907
Likes: 1
From: North Yorkshire / Boston, MA
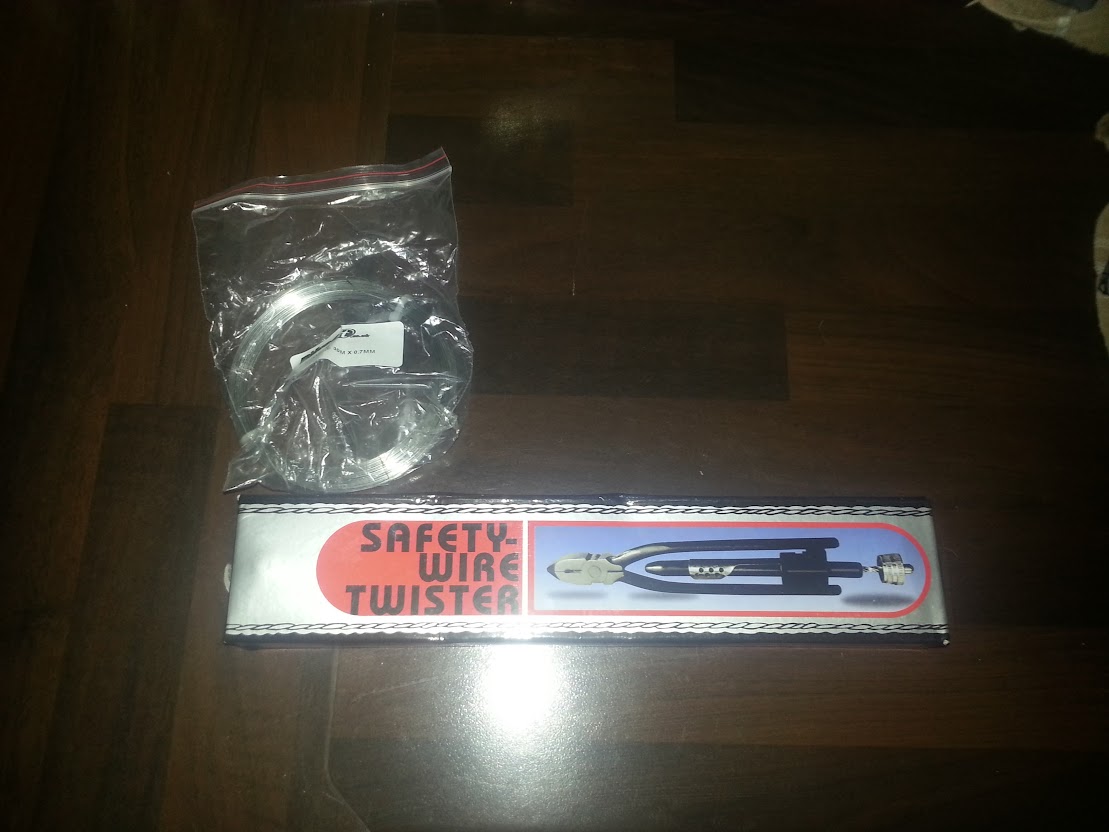
Postie brought me a couple of presents the other day; decals for the fog covers and locking wire with pliers.
I've decided to hold off on the fog cover decals for now, I'm going to take the passenger side to a paint shop whilst the car is getting MOT'd, serviced and mapped to get this repaired:

It's one of the last remaining blemishes on the bodywork, so it needs sorting
I did however get the heatwrapping sorted with the locking wire. Easy to use, and really effective:
I've decided to hold off on the fog cover decals for now, I'm going to take the passenger side to a paint shop whilst the car is getting MOT'd, serviced and mapped to get this repaired:
It's one of the last remaining blemishes on the bodywork, so it needs sorting
I did however get the heatwrapping sorted with the locking wire. Easy to use, and really effective:
Thread Starter
Scooby Regular
iTrader: (5)
Joined: Oct 2012
Posts: 1,907
Likes: 1
From: North Yorkshire / Boston, MA
Car is now sat with the lads at Richard Henry in Bradford. Work getting done is as follows:
Service including:
Engine Oil/Filter
Gearbox/Diff Oil
7b spark plugs
Clutch Fluid
Coolant Flush
Pollen Filter
MOT
Installation of:
Decat Downpipe + Second Cat Pipe
Desresonated Centre Section
255lph Fuel Pump
3port Boost Solenoid
Then on Wednesday I'm going over to meet Andrew Carr and get the car mapped, can't wait
Already running 315bhp with the PPP sports cat, so not hoping for big number increases - but bringing the spool in a bit earlier will be nice.
Thread Starter
Scooby Regular
iTrader: (5)
Joined: Oct 2012
Posts: 1,907
Likes: 1
From: North Yorkshire / Boston, MA
The big day today! Find out my MOT result, have car remapped and have car back in my possession.
I got to Richard Henry's at about 10am, Andy the bossman showed up (not the mapper) and handed me my MOT results, passed with flying colours and not a single advisory. That feels good considering the fact I've been tinkering with the car myself!
He talked me through the work, the exhaust parts were all a brilliant fit and no drama along the way. Only part not done was the pollen filter, as it hadn't arrived yet.
I met a fellow SNet'er who was having his Meth map adjusted,
Mr Carr arrived for the mapping.
All hooked up:

Andrew with his laptop, making sure I don't blow the welds on the intake.

I then had a long chat with Andrew, discussed what I wanted from the car and discussed it's history.
Andrew asked if I wanted to drive during the mapping, but I know that I work better without a spectator - so I left him to it.
Hour or so later, he came rumbling back into the estate and proclaimed everything to be spot on. He explained the process in idiots terms for me - all sounded good
Shortly after the map, the pollen filter arrived - got fitted and I was on my way.
Immediate reaction from me was "HOLY **** THIS IS FAST" but then I have been driving a 1.2 corsa since Saturday After settling back down, the car feels like it's spooling up both quicker and easier and is definitely pulling harder through the gears. I won't even attempt to estimate a BHP figure, but it's nicer to drive for sure
As for the sounds, it's ace It's a bit louder, but a totally different type of sound. The turbo is more vocal now, and the exhaust note has got a slightly metallic tone to it - I'm guessing this is brand new exhaust sections reverberating different to something with 8years of coke on it(?)
I spoke to Andrew about possible "next steps" for my car. He reckons my turbo could give a bit more with a FMIC, headers, uppipe and CAI, he even referenced the backbox as a possible chokepoint. Best case scenario from my turbo is 360bhp, and thats with probably 1.5-2k worth of parts. Alternatively I could spend 1.5k on a turbo and jump straight to 380 with scope to do 400-420 with some of the other bits.
On the way home, I stopped off at my local paintshop to collect my fog cover - incredible colour match considering he didn't have the rest of the car as a reference point and couldn't blend it in.
Got home, did what I do best - washed the car
Then fitted the fog cover decals. I couldn't find an official "positioning guide" so I decided on an arbitrary cental location and just made sure it matched on each side. Used tape as a marker:

Rough positioning mocked up:

Done:

Annoyingly, not perfect. Got a few bits with creases as the fog cover is curved and I couldn't for the life of me work out how to apply the decal smoothly without it "bubbling" sort of thing. ****ing hate stickers.
I'll order some more, and see if I can find a professional sticker sticker-on-er locally or something.
"That'll Do" aren't words I like to use on the car

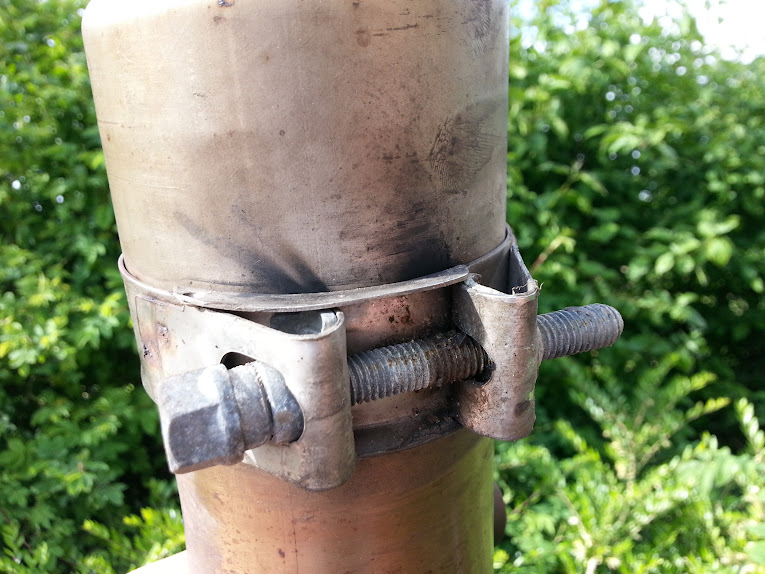
Old Bits:

Reckon this was blowing?
Oh and I decided to be a bit of a chav...
http://smg.photobucket.com/user/Town...5a128.mp4.html
I got to Richard Henry's at about 10am, Andy the bossman showed up (not the mapper) and handed me my MOT results, passed with flying colours and not a single advisory. That feels good considering the fact I've been tinkering with the car myself!
He talked me through the work, the exhaust parts were all a brilliant fit and no drama along the way. Only part not done was the pollen filter, as it hadn't arrived yet.
I met a fellow SNet'er who was having his Meth map adjusted,
Mr Carr arrived for the mapping.
All hooked up:
Andrew with his laptop, making sure I don't blow the welds on the intake.
I then had a long chat with Andrew, discussed what I wanted from the car and discussed it's history.
Andrew asked if I wanted to drive during the mapping, but I know that I work better without a spectator - so I left him to it.
Hour or so later, he came rumbling back into the estate and proclaimed everything to be spot on. He explained the process in idiots terms for me - all sounded good
Shortly after the map, the pollen filter arrived - got fitted and I was on my way.
Immediate reaction from me was "HOLY **** THIS IS FAST" but then I have been driving a 1.2 corsa since Saturday
After settling back down, the car feels like it's spooling up both quicker and easier and is definitely pulling harder through the gears. I won't even attempt to estimate a BHP figure, but it's nicer to drive for sure As for the sounds, it's ace
It's a bit louder, but a totally different type of sound. The turbo is more vocal now, and the exhaust note has got a slightly metallic tone to it - I'm guessing this is brand new exhaust sections reverberating different to something with 8years of coke on it(?)I spoke to Andrew about possible "next steps" for my car. He reckons my turbo could give a bit more with a FMIC, headers, uppipe and CAI, he even referenced the backbox as a possible chokepoint. Best case scenario from my turbo is 360bhp, and thats with probably 1.5-2k worth of parts. Alternatively I could spend 1.5k on a turbo and jump straight to 380 with scope to do 400-420 with some of the other bits.
On the way home, I stopped off at my local paintshop to collect my fog cover - incredible colour match considering he didn't have the rest of the car as a reference point and couldn't blend it in.
Got home, did what I do best - washed the car
Then fitted the fog cover decals. I couldn't find an official "positioning guide" so I decided on an arbitrary cental location and just made sure it matched on each side. Used tape as a marker:
Rough positioning mocked up:
Done:
Annoyingly, not perfect. Got a few bits with creases as the fog cover is curved and I couldn't for the life of me work out how to apply the decal smoothly without it "bubbling" sort of thing. ****ing hate stickers.
I'll order some more, and see if I can find a professional sticker sticker-on-er locally or something.
"That'll Do" aren't words I like to use on the car
Old Bits:
Reckon this was blowing?
Oh and I decided to be a bit of a chav...
http://smg.photobucket.com/user/Town...5a128.mp4.html
Thread Starter
Scooby Regular
iTrader: (5)
Joined: Oct 2012
Posts: 1,907
Likes: 1
From: North Yorkshire / Boston, MA
I'm enjoying it for sure! Going to stop spending money/having it on axle stands for a bit now and enjoy it for the summer - get to some shows etc.
I love the new soundtrack, I need a tunnel local
I love the new soundtrack, I need a tunnel local

Thread Starter
Scooby Regular
iTrader: (5)
Joined: Oct 2012
Posts: 1,907
Likes: 1
From: North Yorkshire / Boston, MA
Was nice to meet you, how did you get on with your mapping session? Hope the car isn't too much slower without Meth!I actually had to fix a pretty serious oversight by the lads at Richard Henry from my coolant change...

Better...

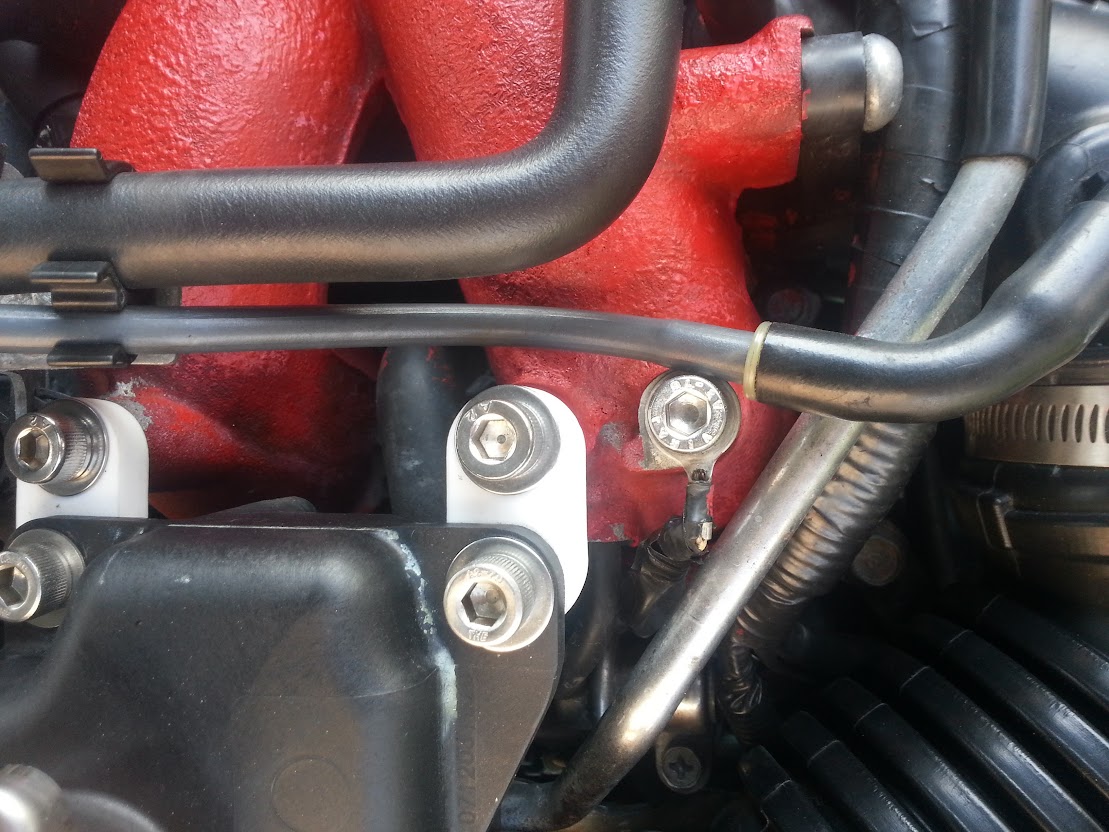
Also did a bit of a fix-up on an eye-sore which you can see on my "engine bay cleaned" picture from t'other week:

It's that steel tube which is bolted to the back of the engine bay. I understand this tube to carry compressed air from the inlet manifold to the brake servo.
It came off easily enough, two circlips on the hoses and then two 10mm bolts. Once off the car, I attacked it with my dremel and a sanding attachment; this made light work of the surface rust.
50:50:

All Done:

My plan was to black hammerite it at this stage, as it'll only rust again quickly I guess. I really liked the brushed ally look it now had though, so decided to polish it up with Autosol and get it back on the car. Removing it is only a 2min job so if/when it rusts up I'll paint it at that time:

It's all looking spot on Kyle. I'll have a word with Andy@RH about their oversight The car feels slightly less perkier on this new map but it's only very slight, the convenience of not having to worry about meth far outweighs any loss. Furthermore with it now being mafless the engine runs smoother both up and down the rev range and the cold start is better.
The car feels slightly less perkier on this new map but it's only very slight, the convenience of not having to worry about meth far outweighs any loss. Furthermore with it now being mafless the engine runs smoother both up and down the rev range and the cold start is better.
Last edited by Maz; Jun 9, 2013 at 05:25 PM.
Thread Starter
Scooby Regular
iTrader: (5)
Joined: Oct 2012
Posts: 1,907
Likes: 1
From: North Yorkshire / Boston, MA
I've been slacking big time on updates, so here's what I've been up to (not much tbf):
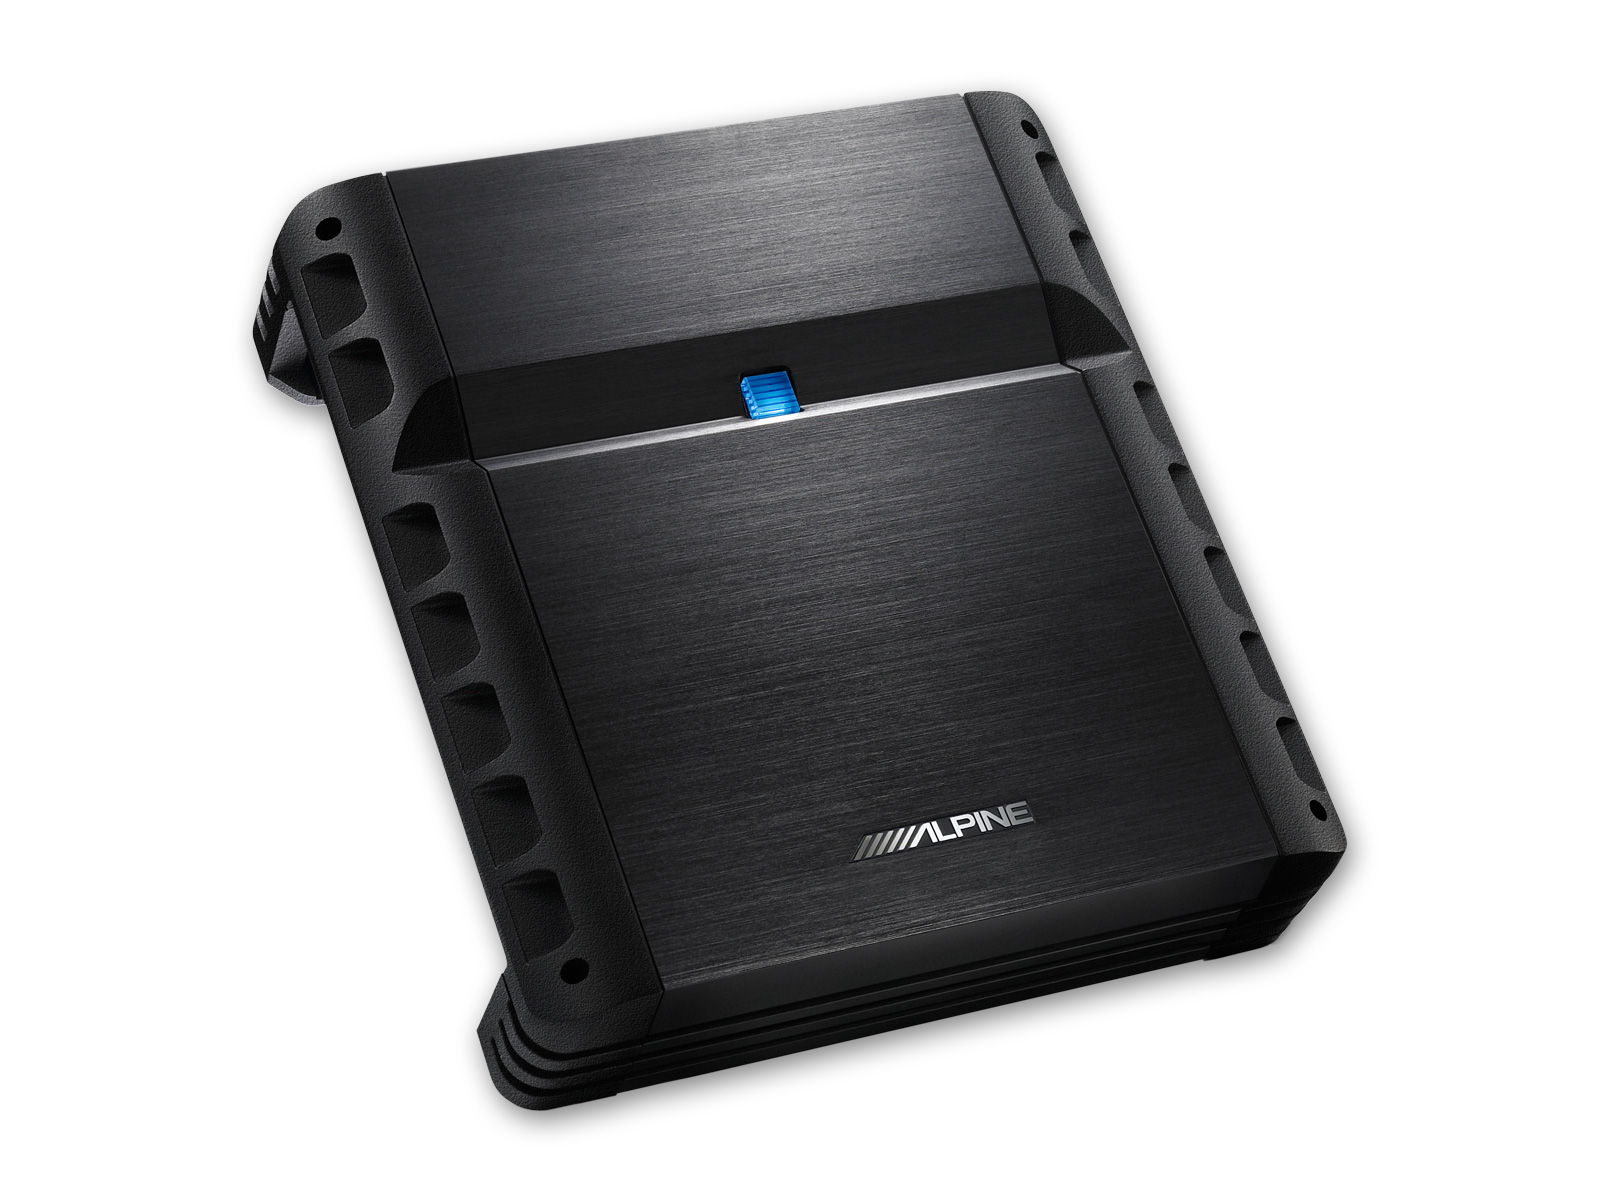
Time to get my amplifier in today. It's a pretty basic two channel Alpine amp, cost me �50 on eBay with no cables/instructions/etc.
As ever Simon was on hand to help, cheers mate
First up was to choose the position for the amp, and the route for the power cable from the battery. I originally had intended for the amp to be in the boot, but the wiring kit I got from Halfords had 5m of power and speaker cable, I felt this was cutting it a bit fine so opted for an under-seat install.
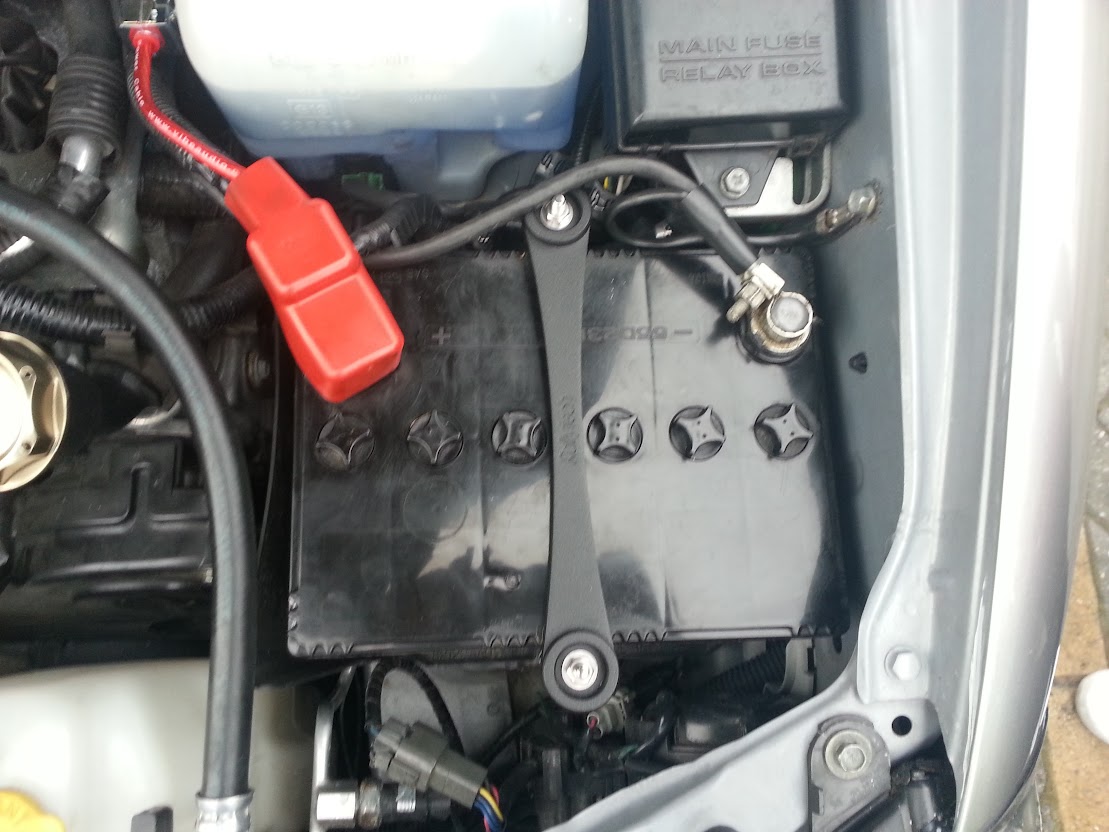
Positive terminal on the battery had space under the cover to attach the ring terminal with no drama:

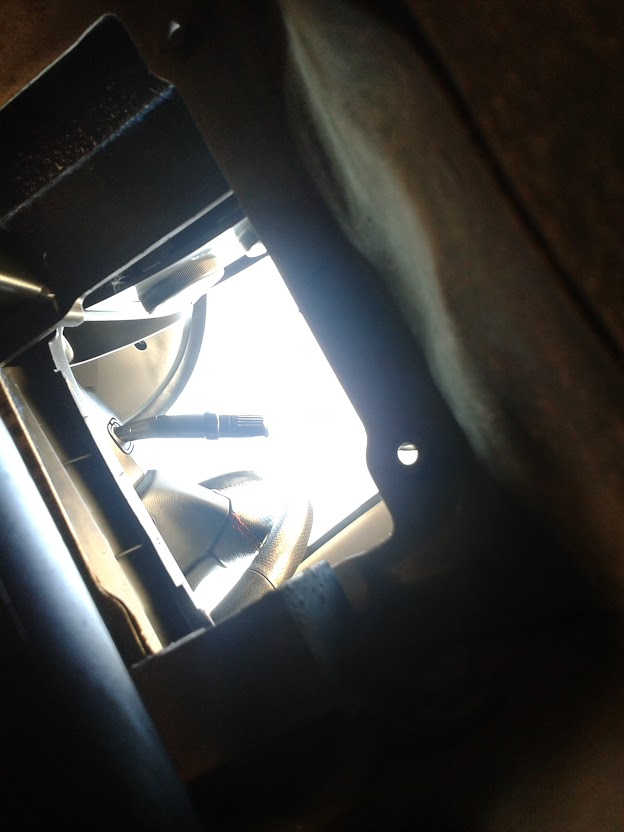
Getting power through to the cabin was pretty easy, found a gromit up in the drivers footwell, well clear of all the pedals/steering rack etc. The gromit was clear of any moving parts in the engine bay, a bit close to the turbo/downpipe but clear enough from the uber hot zone. I may look into some kind of heat wrapping for that section of the wire... but it's probably overkill.
To get through the hole, we used a straightened wire coat hangar - shoved it through with the cable tied to the end:

In place with the grommet:

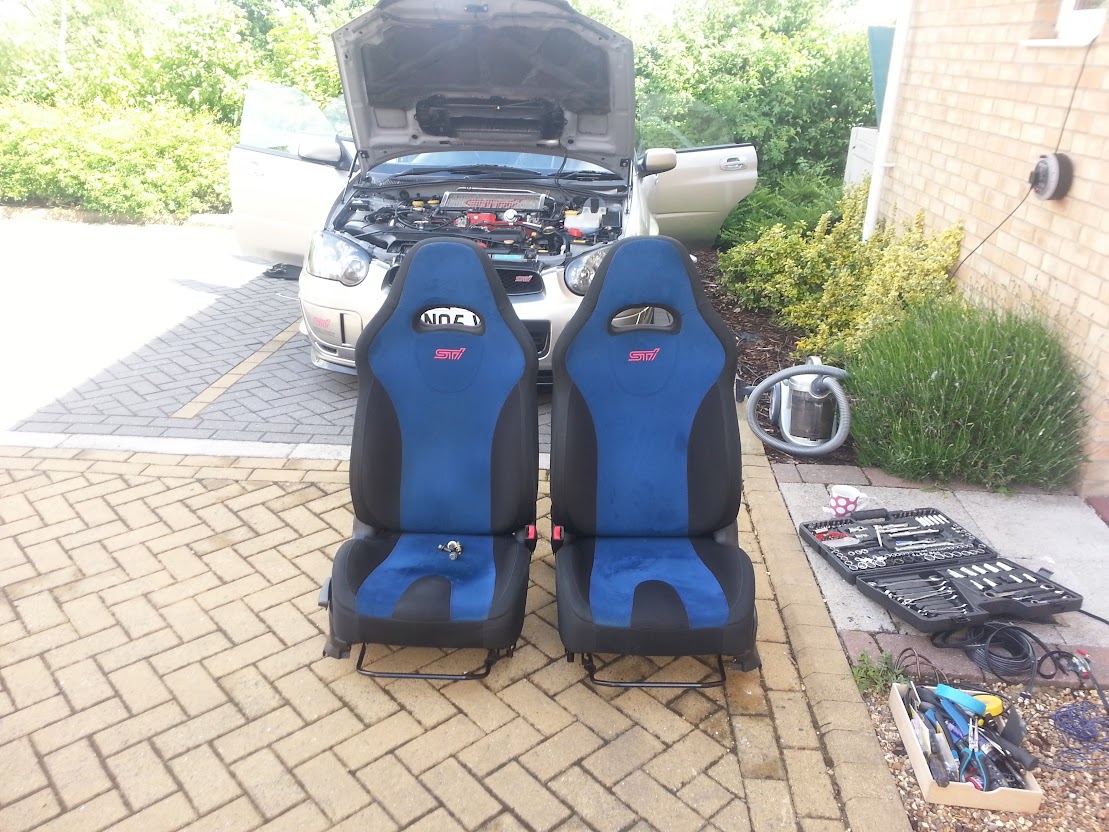
Underseat install meant we needed to remove something... four bolts, dead easy.

Simon is a pretty tall fella, so removing the seat allowed him to enjoy the Impreza like a normal person...

Under the seat was disgusting, chips, burgers, hair... no viagra this time though...

Seeing the mess only meant one thing...
With the McMess cleaned up, much better

The power and remote power cable were run from the amp position under the driver seat, into the door sill trim, up the corner kick panel and navigated away from all moving parts in the footwell. The power cable obviously then splits off into the bonnet via the grommet and the remote cable goes into the back of the head unit enclosure.
Next step, out with the head unit:
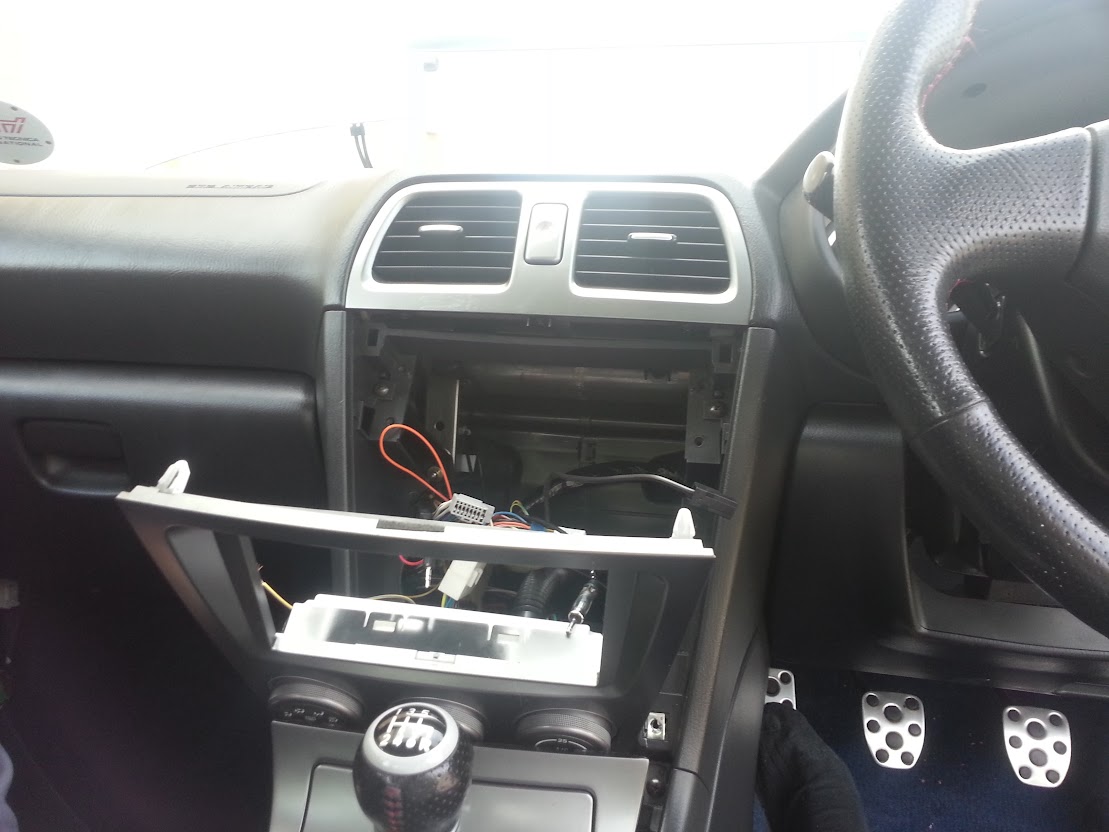
The whole centre console was popped off enough just to run the RCA and speaker cable through:

The RCA cable was 5m long, so coiled up a load of it behind the handbrake in the centre console. The speaker cable went the same way, then split off in the headunit enclosure, passenger side fed up behind the (now removed) glovebox and the driver side under the steering wheel trim, as far enough as I could get away from the power which was also in that area.
Next step, more interior to come out:

We decided to get the speakers off, and do a power test to make sure our work so far was good. We used one of the driver seat bolts as the earth to the amp.

Everything worked a treat, our polarity was all right and we even guessed the L/R channels properly!
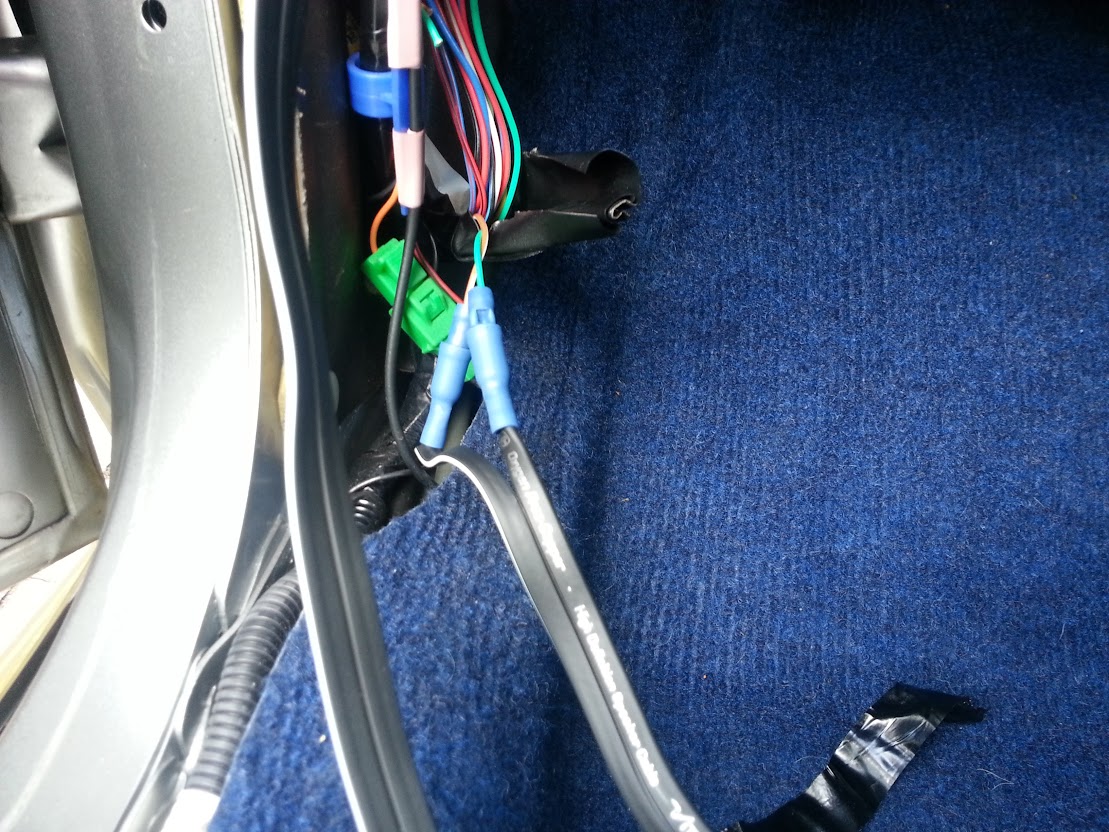
To connect the speaker wire to the speakers, I opted to splice into the loom before the door, as getting into the door looked like a ****ing nightmare. Used bullet connectors and crimps:
Speakers back in:

Got all the trim back together, and did some finishing touches such as terminals on the wire at the amp end:

I then used heavy duty velcro to hold the fuse holder onto the washer bottle. Not the dryest place I concede, but pretty secure and out of the way:

Between rain showers, we got the seats back in the car and everything back together:

The amp was velcro'd onto the carpet, I may see about fabricating some kind of bracket instead which uses the seat bolts - but I reckon this will be pretty secure:

We did the sound config as follows:
Turned off all amp "assistance" and all the headunit settings to 0. We then played a track, and cranked the HU volume up till we got distortion (stupidly loud before that happened, way louder than before).
Cranked the HU volume back a touch, then snuck the amp assistance up until the distortion returned. Cranked it back a bit, then added a bit of the bass boost.
End result is clarity all the way up way beyond volumes which I'd normally listen to. Got much more bass too, nice tight clean bass which doesn't rattle the car.
Massive improvement, I could probably manage with these speakers now - but may opt to replace for components if I get the itch.
Time to get my amplifier in today. It's a pretty basic two channel Alpine amp, cost me �50 on eBay with no cables/instructions/etc.
As ever Simon was on hand to help, cheers mate
First up was to choose the position for the amp, and the route for the power cable from the battery. I originally had intended for the amp to be in the boot, but the wiring kit I got from Halfords had 5m of power and speaker cable, I felt this was cutting it a bit fine so opted for an under-seat install.
Positive terminal on the battery had space under the cover to attach the ring terminal with no drama:
Getting power through to the cabin was pretty easy, found a gromit up in the drivers footwell, well clear of all the pedals/steering rack etc. The gromit was clear of any moving parts in the engine bay, a bit close to the turbo/downpipe but clear enough from the uber hot zone. I may look into some kind of heat wrapping for that section of the wire... but it's probably overkill.
To get through the hole, we used a straightened wire coat hangar - shoved it through with the cable tied to the end:
In place with the grommet:
Underseat install meant we needed to remove something... four bolts, dead easy.
Simon is a pretty tall fella, so removing the seat allowed him to enjoy the Impreza like a normal person...
Under the seat was disgusting, chips, burgers, hair... no viagra this time though...
Seeing the mess only meant one thing...
With the McMess cleaned up, much better
The power and remote power cable were run from the amp position under the driver seat, into the door sill trim, up the corner kick panel and navigated away from all moving parts in the footwell. The power cable obviously then splits off into the bonnet via the grommet and the remote cable goes into the back of the head unit enclosure.
Next step, out with the head unit:
The whole centre console was popped off enough just to run the RCA and speaker cable through:
The RCA cable was 5m long, so coiled up a load of it behind the handbrake in the centre console. The speaker cable went the same way, then split off in the headunit enclosure, passenger side fed up behind the (now removed) glovebox and the driver side under the steering wheel trim, as far enough as I could get away from the power which was also in that area.
Next step, more interior to come out:
We decided to get the speakers off, and do a power test to make sure our work so far was good. We used one of the driver seat bolts as the earth to the amp.
Everything worked a treat, our polarity was all right and we even guessed the L/R channels properly!
To connect the speaker wire to the speakers, I opted to splice into the loom before the door, as getting into the door looked like a ****ing nightmare. Used bullet connectors and crimps:
Speakers back in:
Got all the trim back together, and did some finishing touches such as terminals on the wire at the amp end:
I then used heavy duty velcro to hold the fuse holder onto the washer bottle. Not the dryest place I concede, but pretty secure and out of the way:
Between rain showers, we got the seats back in the car and everything back together:
The amp was velcro'd onto the carpet, I may see about fabricating some kind of bracket instead which uses the seat bolts - but I reckon this will be pretty secure:
We did the sound config as follows:
Turned off all amp "assistance" and all the headunit settings to 0. We then played a track, and cranked the HU volume up till we got distortion (stupidly loud before that happened, way louder than before).
Cranked the HU volume back a touch, then snuck the amp assistance up until the distortion returned. Cranked it back a bit, then added a bit of the bass boost.
End result is clarity all the way up way beyond volumes which I'd normally listen to. Got much more bass too, nice tight clean bass which doesn't rattle the car.
Massive improvement, I could probably manage with these speakers now - but may opt to replace for components if I get the itch.
Thread Starter
Scooby Regular
iTrader: (5)
Joined: Oct 2012
Posts: 1,907
Likes: 1
From: North Yorkshire / Boston, MA
Bit of a disappointing update today! 
I tagged along to a Clipsport rolling road day at RS Tuning in Leeds. I was first up on the Dyno before they rigged it up for the FWD guys.
I was saying to Simon on the way to Leeds this morning that I was convinced the car felt a bit slower. When I first picked it up from decat/mapping it felt like the fastest car ever... but then I had been driving a 1.2 Corsa for a few days prior!
Over the last few weeks, I've felt the car being a little lethargic but I subconsciously put it down to warmer weather and my "**** dyno" from just getting used to the feel of the car.
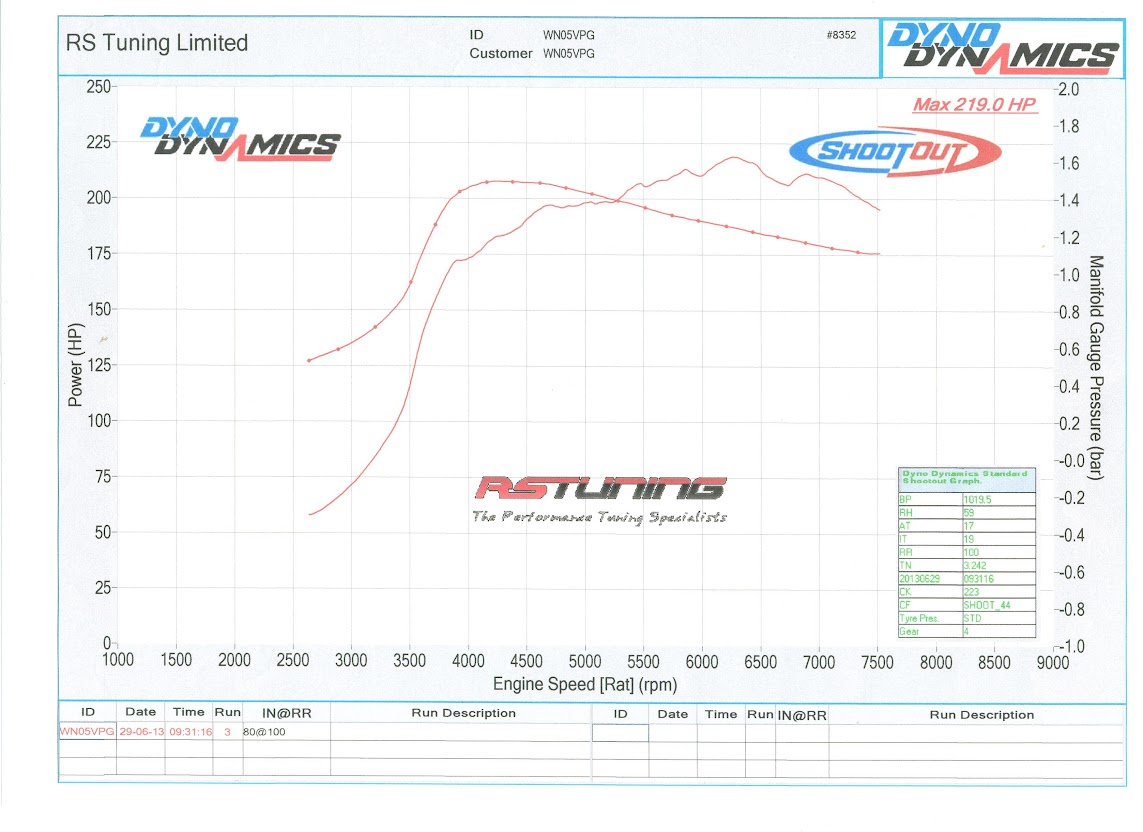
It came off the rollers after making 284.6bhp at the fly... down from 315bhp before christmas pre decat. :|
The Dyno technician said it was running "very lean for a Subaru" and the AFR graph certainly supports that.
As a reminder, the first two graphs are from December and the bottom three are from today:

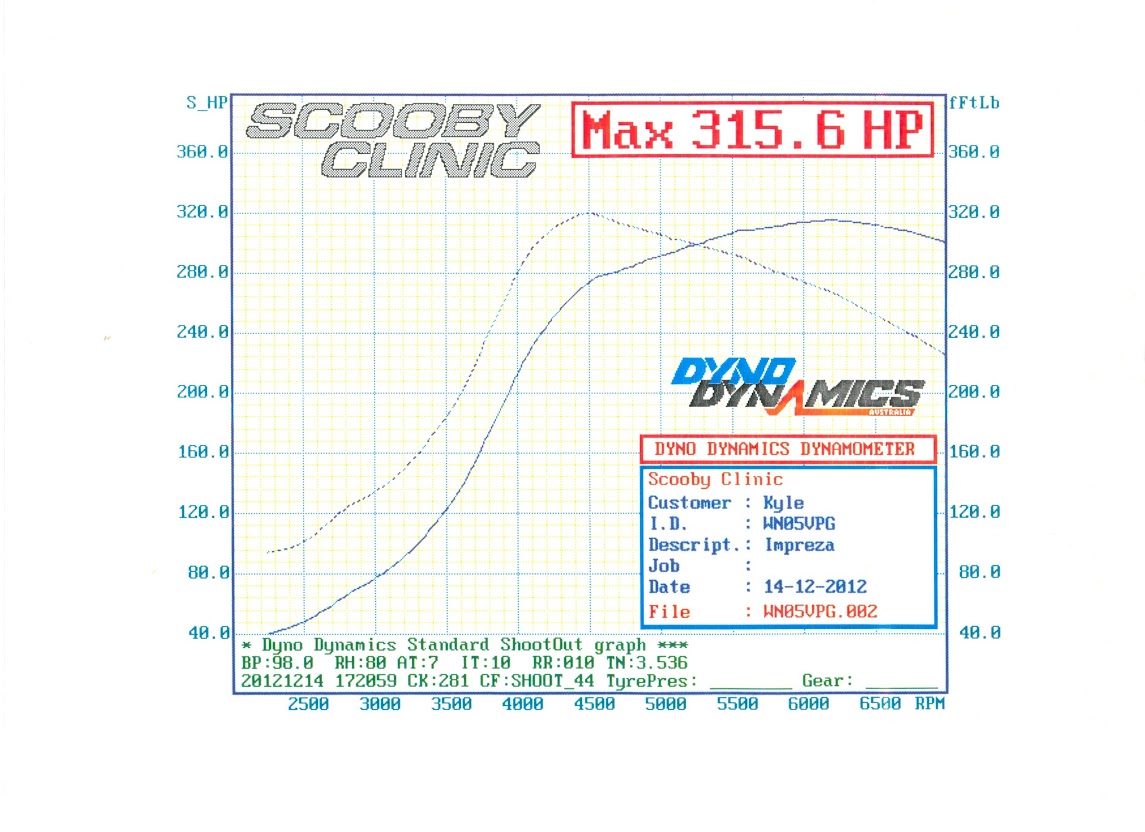
TODAY:


Obviously disappointed, but it gives me something else to fix/work on - and at least it backs up the calibration of my ****-dyno
Not only is the power down, AFR lean but my peak spool seems to be lagging by almost 500 RPM. Decat should have made it more responsive if anything :|
I've already spoken to my mapper, I'm thinking the issue is either with the map or the new fuel pump which was fitted. I've sent him the graphs and he's going to compare with the logs taken during the mapping session. He's since replied and we're going to meet on thursday for him to take a look.
It didn't help my mood when my mates standard Megane RS made 10bhp more than the book said it should Just kidding, was a good day out and got to also see Specky's Corsa
I tagged along to a Clipsport rolling road day at RS Tuning in Leeds. I was first up on the Dyno before they rigged it up for the FWD guys.
I was saying to Simon on the way to Leeds this morning that I was convinced the car felt a bit slower. When I first picked it up from decat/mapping it felt like the fastest car ever... but then I had been driving a 1.2 Corsa for a few days prior!
Over the last few weeks, I've felt the car being a little lethargic but I subconsciously put it down to warmer weather and my "**** dyno" from just getting used to the feel of the car.
It came off the rollers after making 284.6bhp at the fly... down from 315bhp before christmas pre decat. :|
The Dyno technician said it was running "very lean for a Subaru" and the AFR graph certainly supports that.
As a reminder, the first two graphs are from December and the bottom three are from today:
TODAY:
Obviously disappointed, but it gives me something else to fix/work on - and at least it backs up the calibration of my ****-dyno
Not only is the power down, AFR lean but my peak spool seems to be lagging by almost 500 RPM. Decat should have made it more responsive if anything :|
I've already spoken to my mapper, I'm thinking the issue is either with the map or the new fuel pump which was fitted. I've sent him the graphs and he's going to compare with the logs taken during the mapping session. He's since replied and we're going to meet on thursday for him to take a look.
It didn't help my mood when my mates standard Megane RS made 10bhp more than the book said it should
Just kidding, was a good day out and got to also see Specky's Corsa

Thread Starter
Scooby Regular
iTrader: (5)
Joined: Oct 2012
Posts: 1,907
Likes: 1
From: North Yorkshire / Boston, MA
To take my mind off what may or may not be wrong with the running of my car, I fitted a few engine-bay tidy up bits tonight.
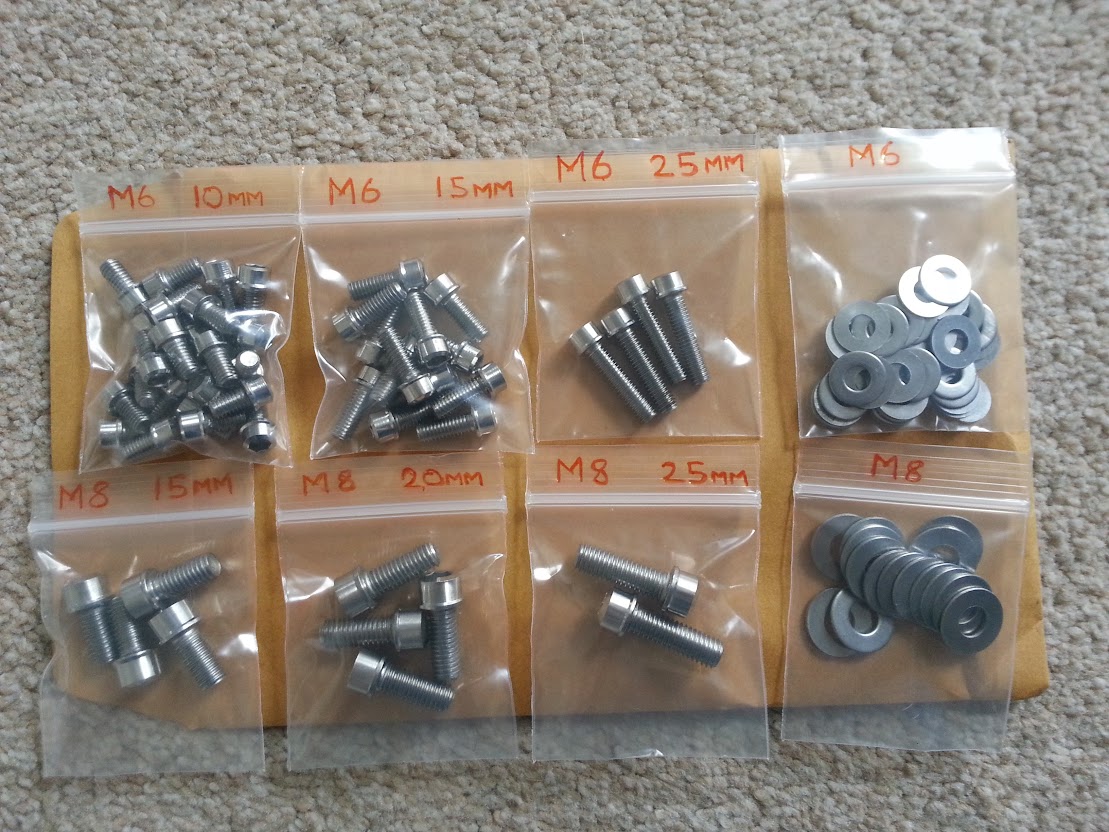
In the below kit are a selection of replacement stainless bolts, washers and nuts for fixings along with a battery bar and PTFE spacer kit for the coolant header tank, to move that hot coolant container away from the inlet manifold a bit.


First job was to label all the bits so I knew what I had. Like Lego, love it...
A couple of before shots, looks pretty tidy from a distance:

Bit minging up close though:

Battery was first up, before:

After:
Radiator brackets after (actual brackets need painting, job for the next weekend I'm oncall and hence home all weekend):

Header tank before:

Spacers fitted:

Long-range shot of the bay after all the changes:

Low light, pics getting blurrrrry:


Few bolts are still outstanding, so ordered some more M8 15mm's and some M6 25mms to finish off, pretty decent kit other than that.
In the below kit are a selection of replacement stainless bolts, washers and nuts for fixings along with a battery bar and PTFE spacer kit for the coolant header tank, to move that hot coolant container away from the inlet manifold a bit.
First job was to label all the bits so I knew what I had. Like Lego, love it...
A couple of before shots, looks pretty tidy from a distance:
Bit minging up close though:
Battery was first up, before:
After:
Radiator brackets after (actual brackets need painting, job for the next weekend I'm oncall and hence home all weekend):
Header tank before:
Spacers fitted:
Long-range shot of the bay after all the changes:
Low light, pics getting blurrrrry:
Few bolts are still outstanding, so ordered some more M8 15mm's and some M6 25mms to finish off, pretty decent kit other than that.
Thread Starter
Scooby Regular
iTrader: (5)
Joined: Oct 2012
Posts: 1,907
Likes: 1
From: North Yorkshire / Boston, MA
Off to see my mapper today, Mr Carr.
He's shown concern over the phone regarding the graphs from the dyno day but was confused as to why the car wasn't feeling rough to drive... he said it would be flat and possibly missfiring if the graphs were indeed accurate.
He initially plugged in and his software showed some kind of table which listed the "corrections" that the ECU had made since the last map.
The first table was knock correction, which was recording 0% correction since the map... good news.
Second one was AFR correction, the one we were expecting the ECU to have corrected and the corrections were all less than 1%, which is well within the parameters of atmospheric changes.
The software also had some kind of "health score" on a scale of 0 - 16 based on all the various corrections and pre-programmed thresholds, my score was 16... which is as good as it gets.
We then went out for a ride, I drove whilst Andrew logged the trip and compared all of the readings from the readings he took during the mapping session. Everything was bang on, and AFR worked out at around 11.4 under WOT - which is exactly where it should be, not the 12-12.5 that RSTuning said I was running.
After a few blasts up the commuter lane of the M606 we called it a day, car was running spot on.
He was quite sympathetic because I now have two conflicting pieces of information, and offered to monitor the car whilst doing a power run on his "local" Dyno which he does a lot of mapping on. It's Manchester way on though, so will time it with another excuse to venture West.
Oh, and he also wouldn't take any money off me despite me effectively wasting an hour of his time. Can't be fairer than that :thumbs:
I've been driving off boost since the Dyno session due to concern, but I had a good blast home - car felt awesome. I'm convinced that my "it feels slower" was purely down to becoming used to the pull of it, as just a few days without boost has given me a honeymoon period back again.
Fun fun fun
He's shown concern over the phone regarding the graphs from the dyno day but was confused as to why the car wasn't feeling rough to drive... he said it would be flat and possibly missfiring if the graphs were indeed accurate.
He initially plugged in and his software showed some kind of table which listed the "corrections" that the ECU had made since the last map.
The first table was knock correction, which was recording 0% correction since the map... good news.
Second one was AFR correction, the one we were expecting the ECU to have corrected and the corrections were all less than 1%, which is well within the parameters of atmospheric changes.
The software also had some kind of "health score" on a scale of 0 - 16 based on all the various corrections and pre-programmed thresholds, my score was 16... which is as good as it gets.
We then went out for a ride, I drove whilst Andrew logged the trip and compared all of the readings from the readings he took during the mapping session. Everything was bang on, and AFR worked out at around 11.4 under WOT - which is exactly where it should be, not the 12-12.5 that RSTuning said I was running.
After a few blasts up the commuter lane of the M606
we called it a day, car was running spot on.He was quite sympathetic because I now have two conflicting pieces of information, and offered to monitor the car whilst doing a power run on his "local" Dyno which he does a lot of mapping on. It's Manchester way on though, so will time it with another excuse to venture West.
Oh, and he also wouldn't take any money off me despite me effectively wasting an hour of his time. Can't be fairer than that :thumbs:
I've been driving off boost since the Dyno session due to concern, but I had a good blast home - car felt awesome. I'm convinced that my "it feels slower" was purely down to becoming used to the pull of it, as just a few days without boost has given me a honeymoon period back again.
Fun fun fun
Thread Starter
Scooby Regular
iTrader: (5)
Joined: Oct 2012
Posts: 1,907
Likes: 1
From: North Yorkshire / Boston, MA
Got my last few stainless bolts today so swapped over the stragglers:
From:

To:
Along with a few others, just about there now in terms of the visible sore thumbs...
Just a few bits to paint when I get a quiet weekend.

From:
To:
Along with a few others, just about there now in terms of the visible sore thumbs...
Just a few bits to paint when I get a quiet weekend.
Thread Starter
Scooby Regular
iTrader: (5)
Joined: Oct 2012
Posts: 1,907
Likes: 1
From: North Yorkshire / Boston, MA
Driver side one seemed most accessible from the interior, no other reason!
Thread Starter
Scooby Regular
iTrader: (5)
Joined: Oct 2012
Posts: 1,907
Likes: 1
From: North Yorkshire / Boston, MA
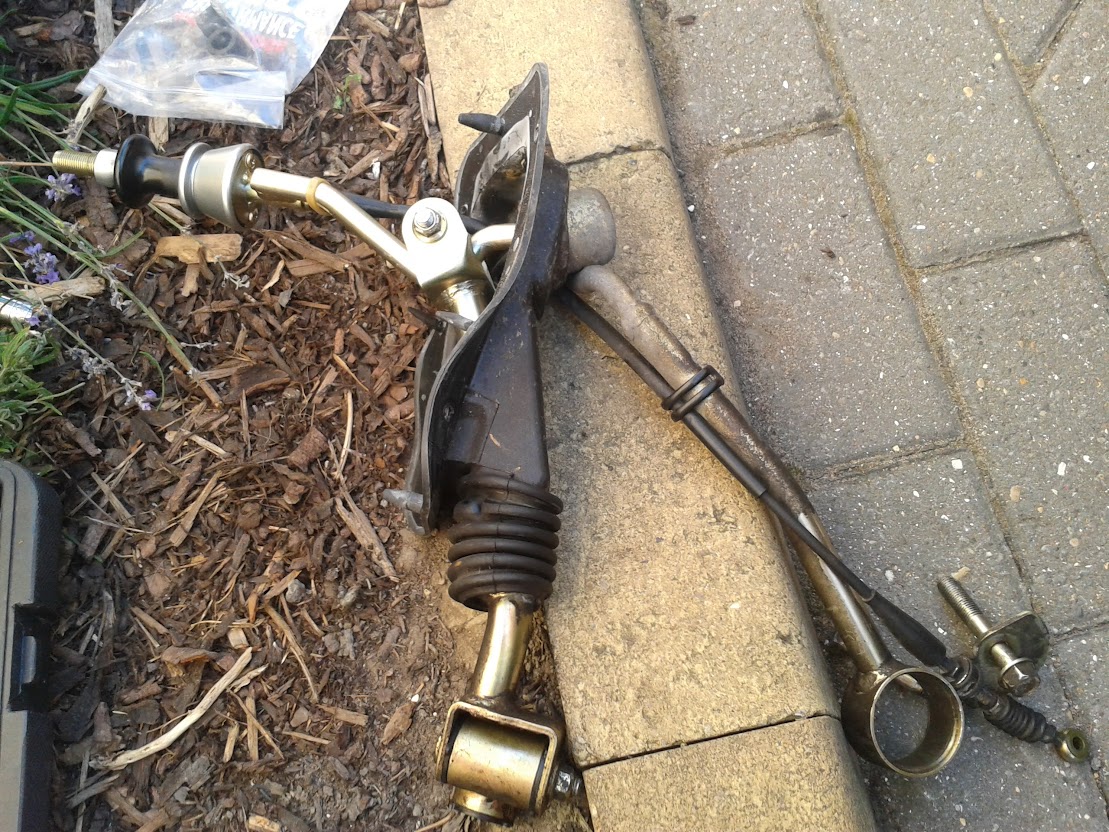
In an attempt to tighten up the driving feel of the car a little bit, I purchased the following from Alyn @ AS Performance.

They're solid gear linkage bushes!
First one to change was the easy one... in the cabin just under the gaitor:

First time I've ever swapped some bushes, ended up using a long bolt, two washers and a couple of nuts to tighten it all down and squeeze the bushing into place.
With that done, under the car I went.
The scene looked as follows, gearbox crossmember needed to come off for access.

Once off I could clearly see my next target, and the remaining two hiding in the background:

You get two choices when removing the linkage from the car, one is to knock a retaining pin out and slid the linkage away from the gearbox and the other is to dismantle the knuckle joint thingy. I opted to dismantle the knuckle which was a huge PITA as I couldn't get clearance to remove the bolt. Ended up levering the transmission over to the side with my jack handle and wiggled toe bolt out:

Four bolts removed in the cabin and we've got a removed linkage:
These next two were a pain, but eventually squeezed them in and cleaned up ready for reinstall:

Last in was the large stay bushing:

First things first, the gear change is SO much better. Very crisp, slick and bolt-action like. It's a huge improvement.
I have however now got a very whiney gearbox, and it has got a slight grumble/grinding sound when I lift off the gas at slow speed. The verdict after speaking to a few people (including Alyn) is that the stiffer bushings are simply transmitting the sound more, it's unlikely that I broke something in the transmission.
The gear feel definitely out-weights the new soundtrack, PROVIDING it's not evidence of something unhealthy... so may get it checked out.
They're solid gear linkage bushes!
First one to change was the easy one... in the cabin just under the gaitor:
First time I've ever swapped some bushes, ended up using a long bolt, two washers and a couple of nuts to tighten it all down and squeeze the bushing into place.
With that done, under the car I went.
The scene looked as follows, gearbox crossmember needed to come off for access.
Once off I could clearly see my next target, and the remaining two hiding in the background:
You get two choices when removing the linkage from the car, one is to knock a retaining pin out and slid the linkage away from the gearbox and the other is to dismantle the knuckle joint thingy. I opted to dismantle the knuckle which was a huge PITA as I couldn't get clearance to remove the bolt. Ended up levering the transmission over to the side with my jack handle and wiggled toe bolt out:
Four bolts removed in the cabin and we've got a removed linkage:
These next two were a pain, but eventually squeezed them in and cleaned up ready for reinstall:
Last in was the large stay bushing:
First things first, the gear change is SO much better. Very crisp, slick and bolt-action like. It's a huge improvement.
I have however now got a very whiney gearbox, and it has got a slight grumble/grinding sound when I lift off the gas at slow speed. The verdict after speaking to a few people (including Alyn) is that the stiffer bushings are simply transmitting the sound more, it's unlikely that I broke something in the transmission.
The gear feel definitely out-weights the new soundtrack, PROVIDING it's not evidence of something unhealthy... so may get it checked out.