
Widetrack STI

Thread Starter
Scooby Regular
iTrader: (5)
Joined: Oct 2012
Posts: 1,907
Likes: 1
From: North Yorkshire / Boston, MA
Thought it was about time I should put my project timeline together on SNet. I've been running it on a non-Scooby forum for a while now, but the target audience here makes a bit more sense!
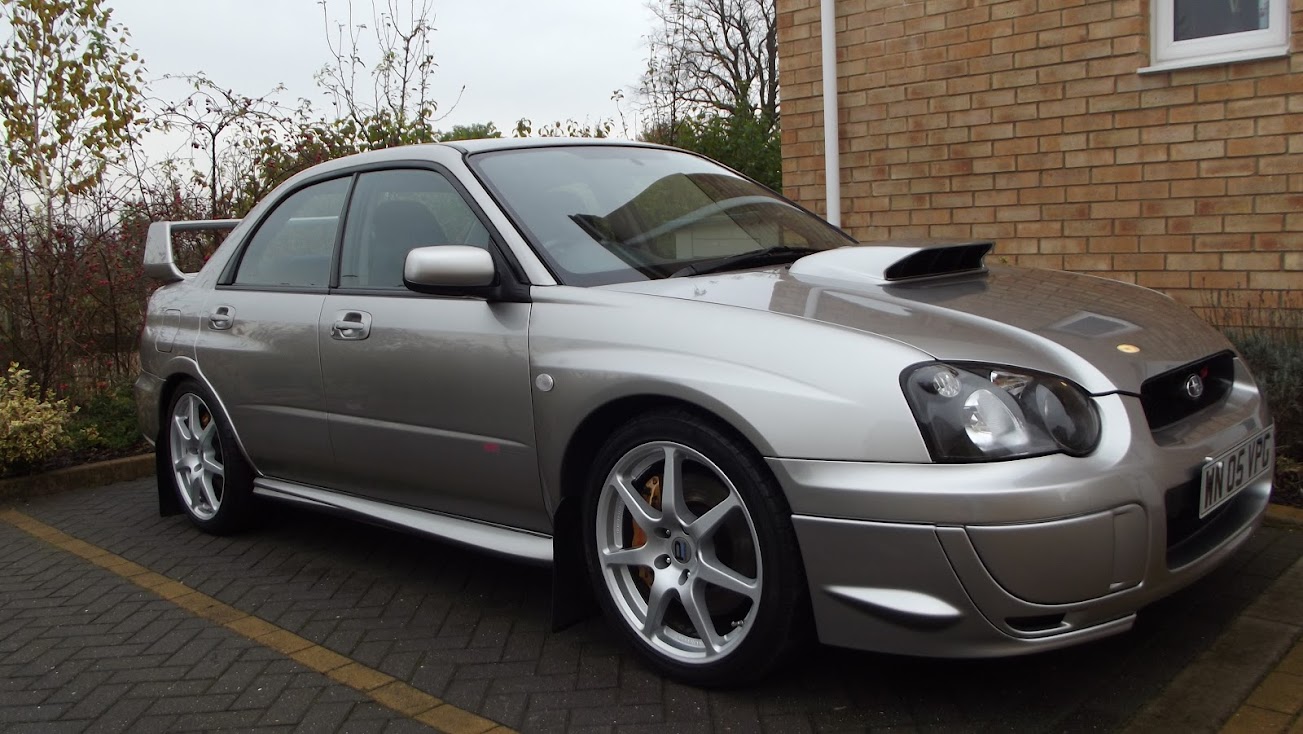
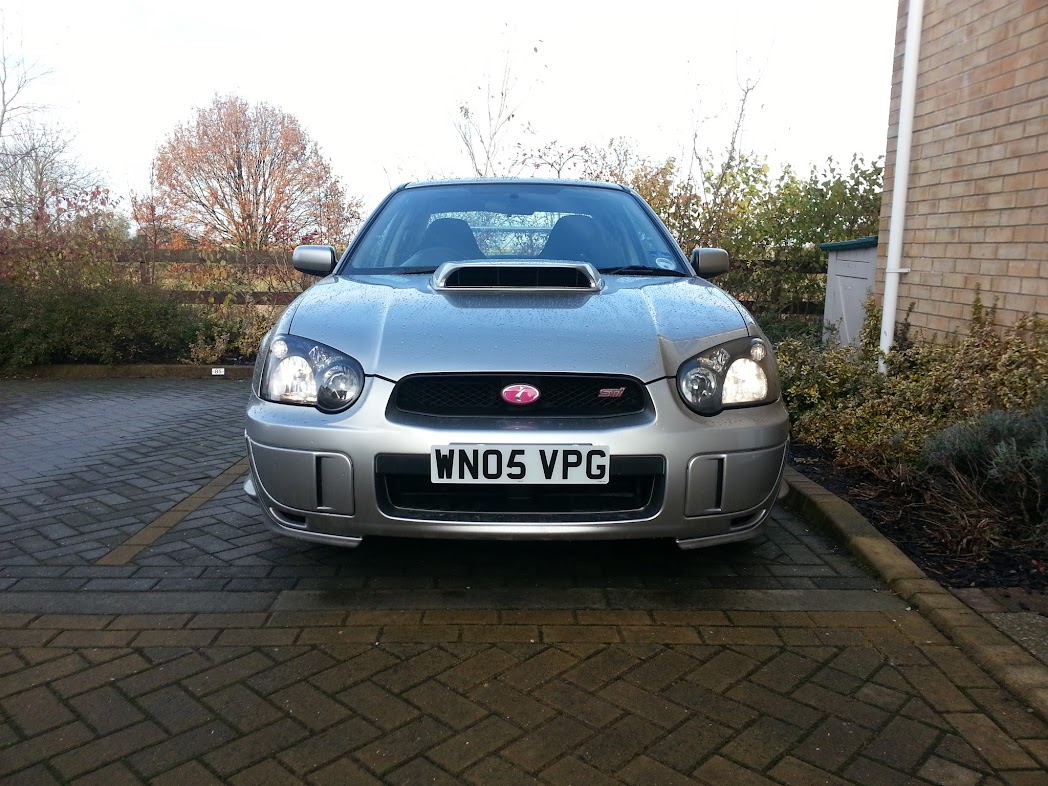
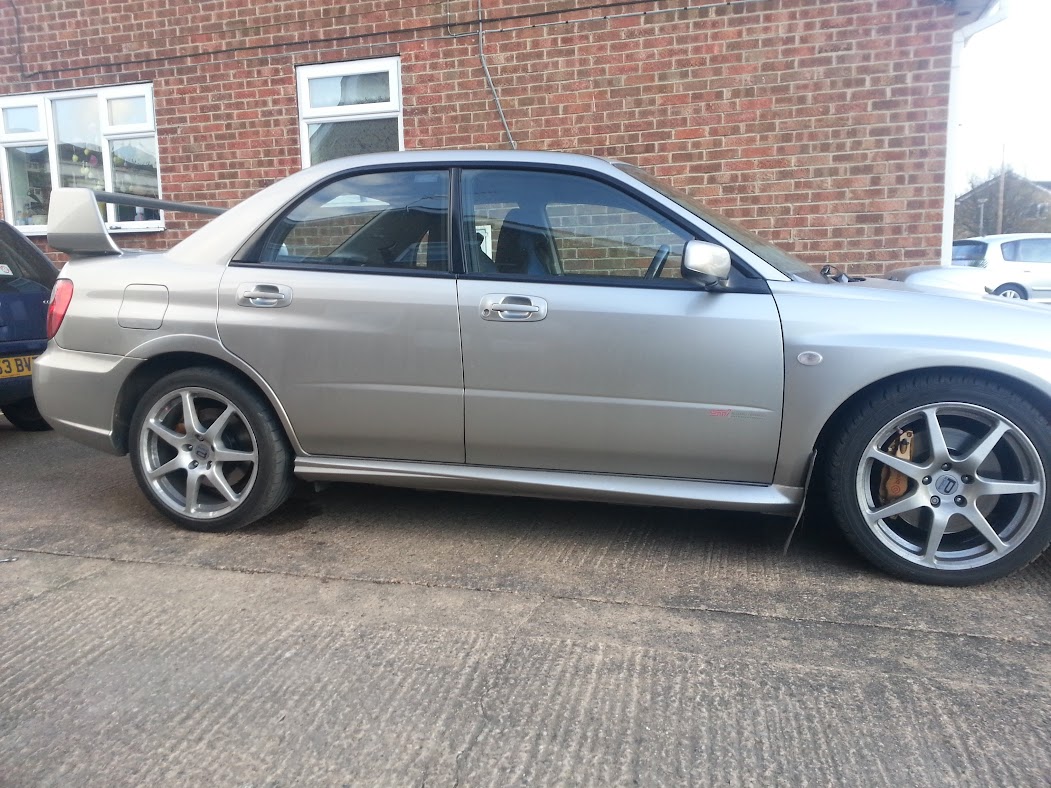
The car is a 2005 WRX STI in Crystal Grey. I bought it from a SNet member back in November 2012.
The car was a PPP car (with certificate) and had been remapped in addition to this by Andrew Carr during the previous ownership.
Car had 38k miles when I bought it, and a FSH including Cambelt/tensioners @ 35k.
Pics on day of collection:


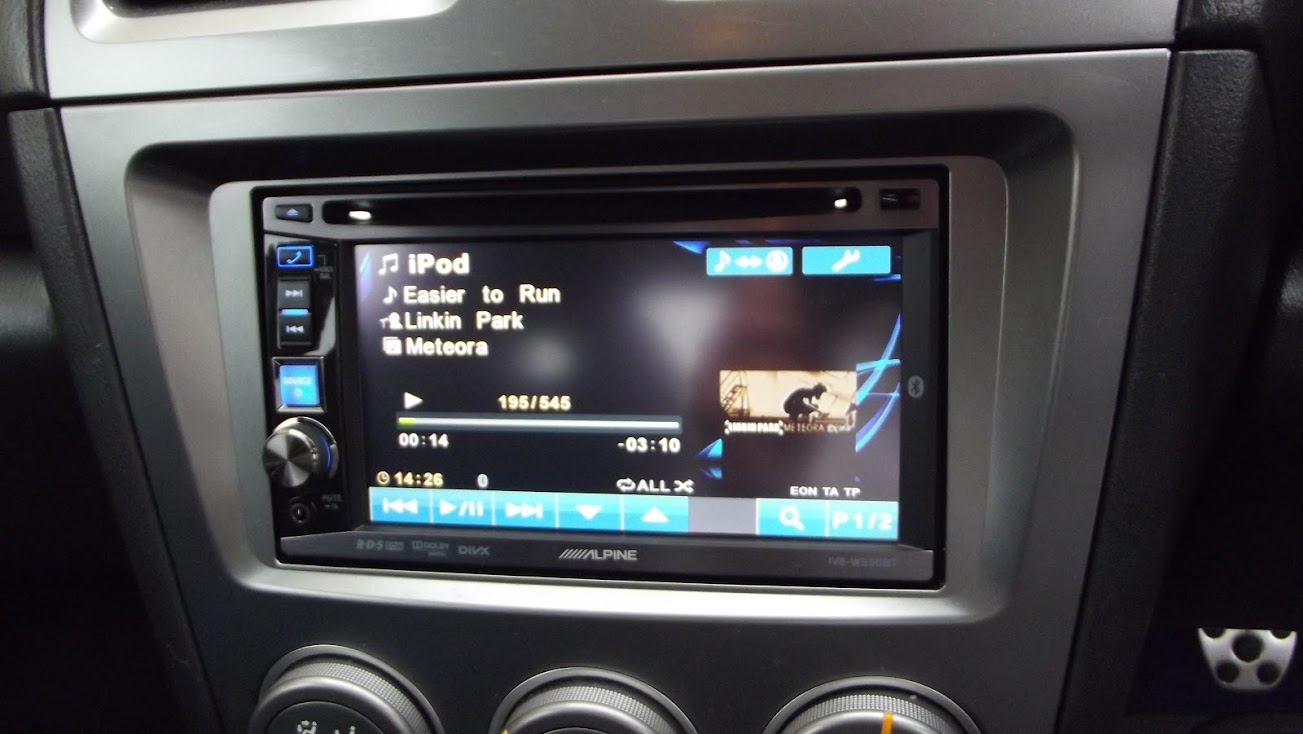
First job was a new head unit, Alpine W530BT:
The previous owner had detango'd/blacked the headlights - but they were seriously scuffed, scratched and were leaking. After attempting to reseal, I eventually bought a new pair of lights from a breakers and fitted those instead.
Before Example:
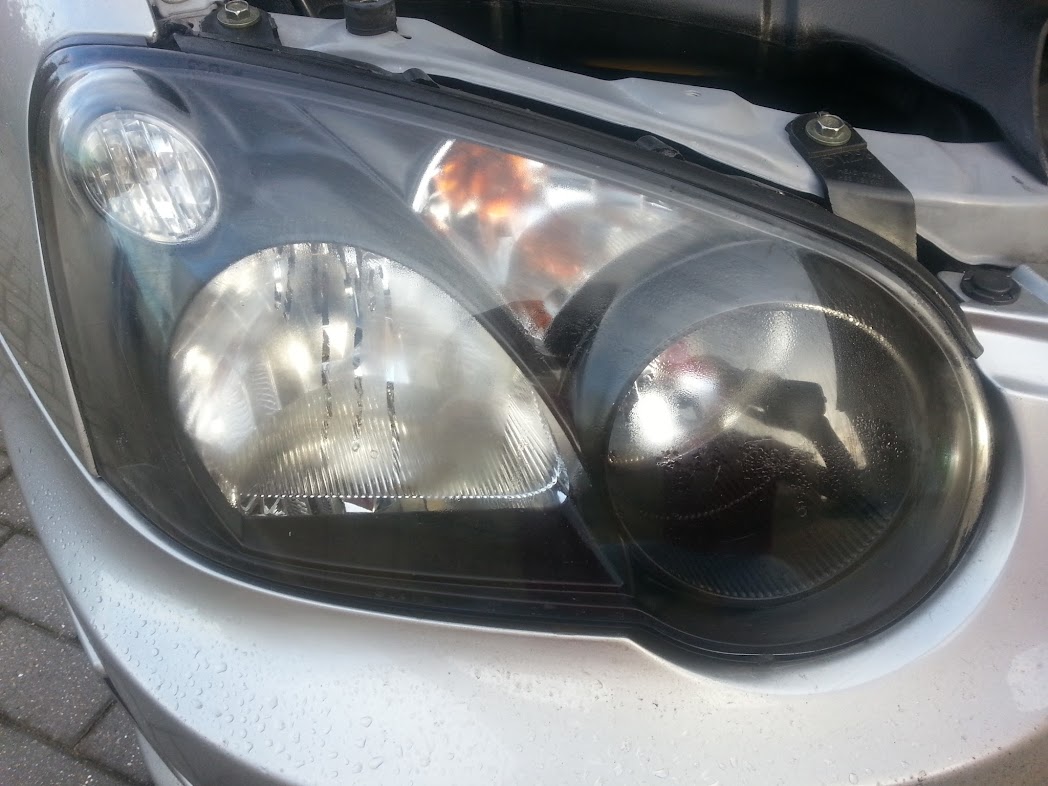
After Example:

The car had 3 genuine mats, and a generic rubber drivers mat so got a new set from Scooby Parts. I'm not massively impressed with these, I've heard Scooby World ones may be better so may switch for Summer.

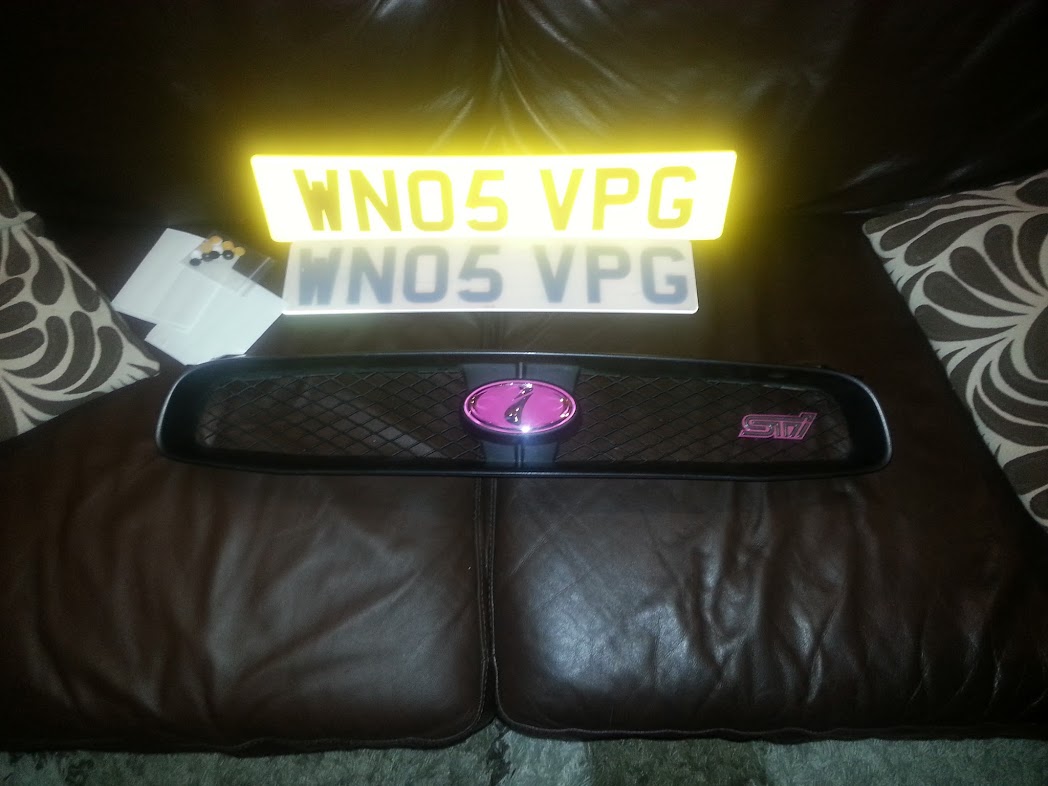
I decided to change the front grill, as the one on my car was severely chipped away. I used this as an excuse for a pink badge too.
At the same time I picked up some new number plates without the odd illegal spacing and honeycomb of the old ones:
Before:

After:
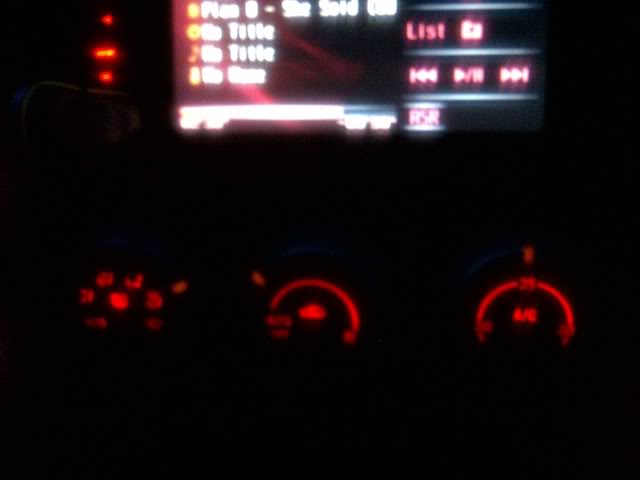
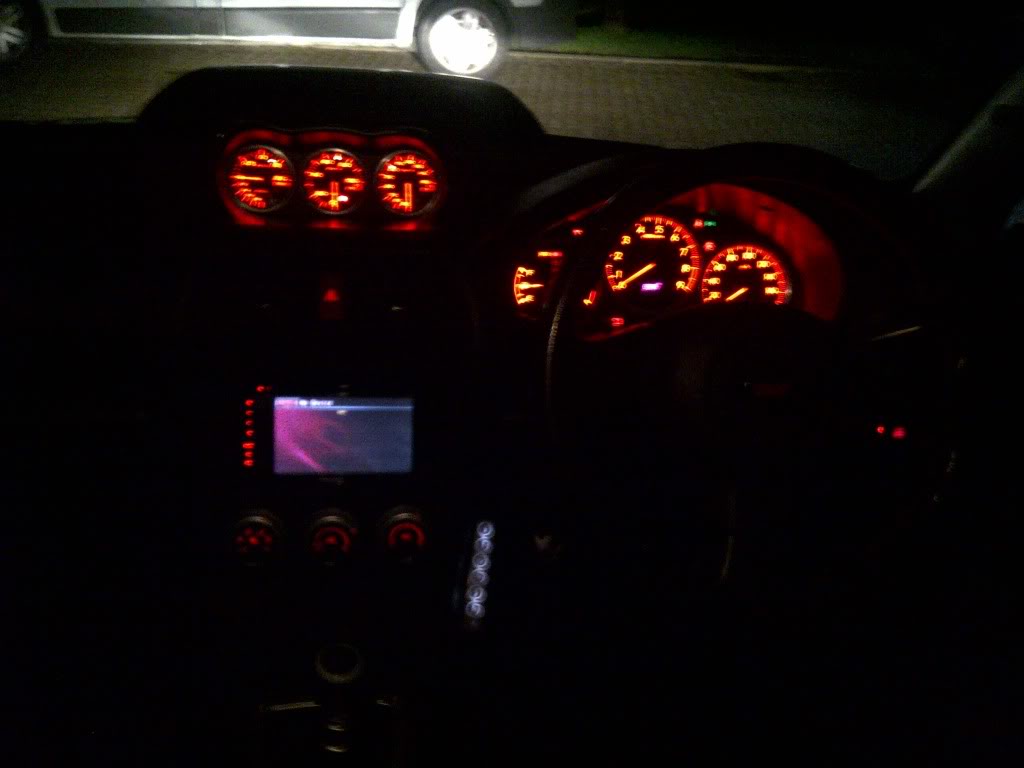
Next up was a set of Red JDM Dials:

They had 80k KM on the clocks so I needed a convertor wiring in, and also the mileage changing. A trip over to Manchester and Scott @ V12 Tuning sorted this for me:
Before:

After:

I even reconfigured the Head Unit colour to match!

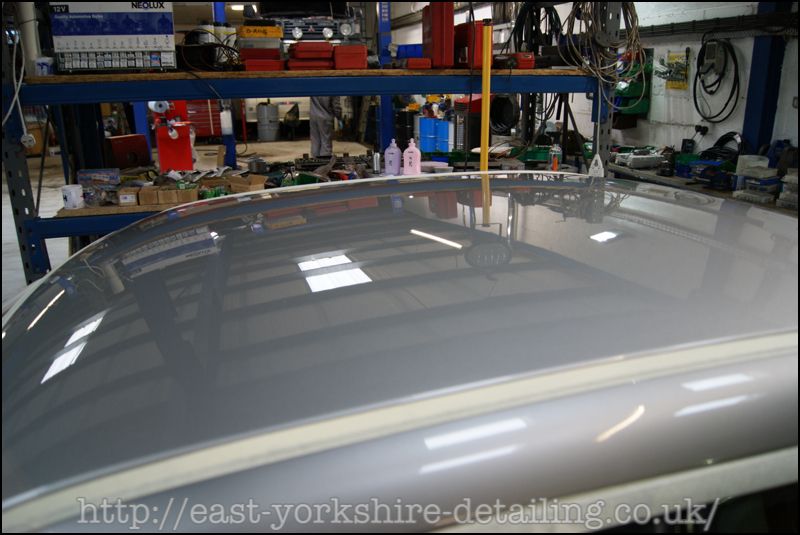
Next job was to have the car detailed. I went for a correction detail with Mike @ Deeper Detail, as the car had evidence of overspray (from the wheels?) and needed sorting as it was rough as hell.
Write-Up is here for any detailing freaks http://www.detailingworld.co.uk/foru...d.php?t=297421
Next up was a re-arrangement of the rear badges.
Before:
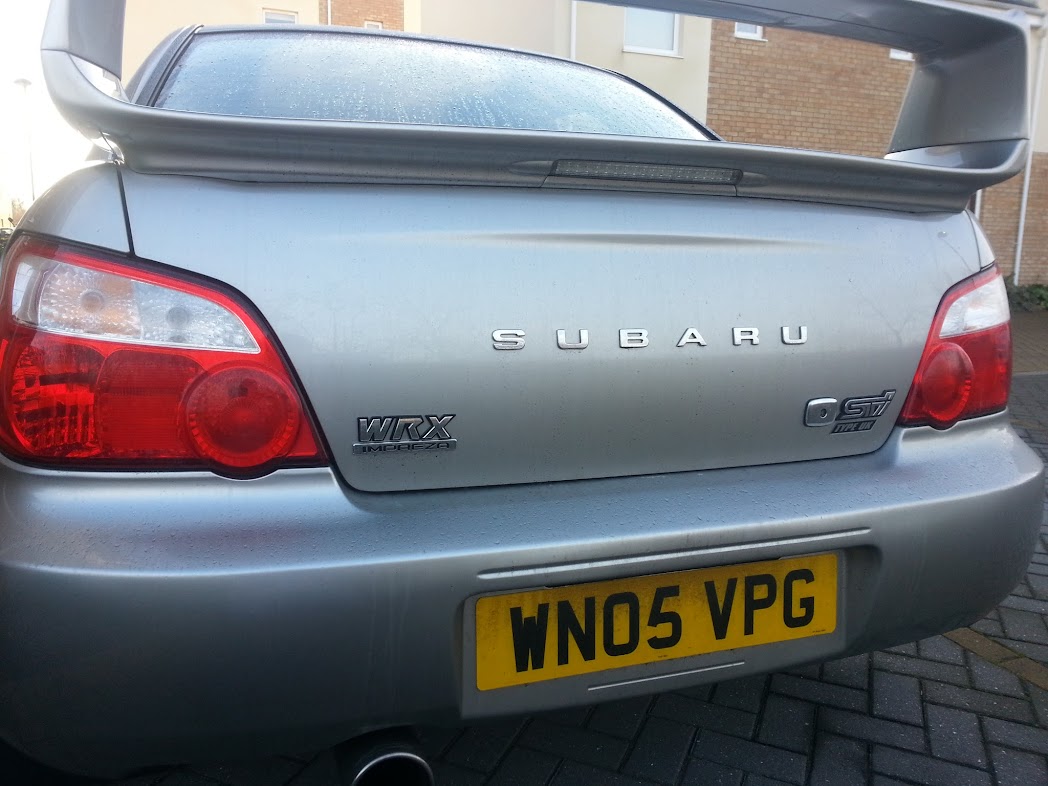
After:

Fog Cover Decals fitted:

At this point I went for a drive to Scooby Clinic for an interim service and a Dyno run/Health check.
A few things were raised as follows:
* OS Front Ball Joint worn and loose (this was the bit preventing the dyno run)
Rear Pads Low (still 2-3k miles left)
OS Rear shock has got play (Clunk)
* Bolt snapped on undertray
* Top hose on wrong way round, and nearly worn through
Brake fluid + Clutch fluid want replacing
* Aircon and Alternator belts want replacing
I had the guys sort the stuff marked with * and would sort the rest myself later.
I also discovered a sneaky mod under the car when on the SC ramps:

Then time for the Dyno:

aaaaand:
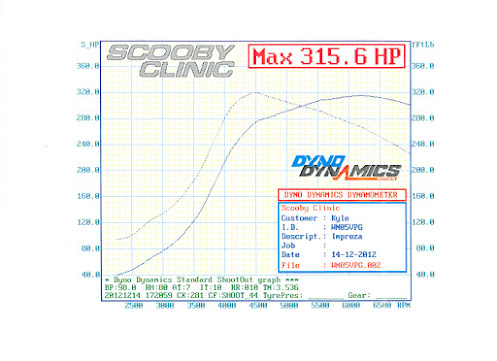
I'd called Andrew Carr around the time of my SC visit and he had notes from when he mapped the car. He said it was excessively gentle at request of the previous owner, and he offered a map tweak if I fancied more out of it.
In the days/weeks following SC - I noticed a whistle under boost between 3 an 4k RPM. To cut a long story short, I spent months chasing this which culminated in a visit to Richard Henry motorsport to drill a snapped bolt from the inlet manifold and reseat it all.
That appeared to fix the whistle, but even then I'm not 100%... it still seems to whisper occasionally.
The exhaust system was all taken off, inspected and reseated. Boost hoses all checked, and the only thing left not to be checked is header/up-pipe and I still need to check this to date.
Oh, whilst Richard Henry had the car they also spotted a rad leak - which they replaced for me.
Next up was signing up to the CDF group buy for Front and Rear ARB's and Drop links. Awaiting delivery on these still.
Next up was another SNet group buy and this front splitter:


Next purchase was two new tyres, due to a puncture. Doh!

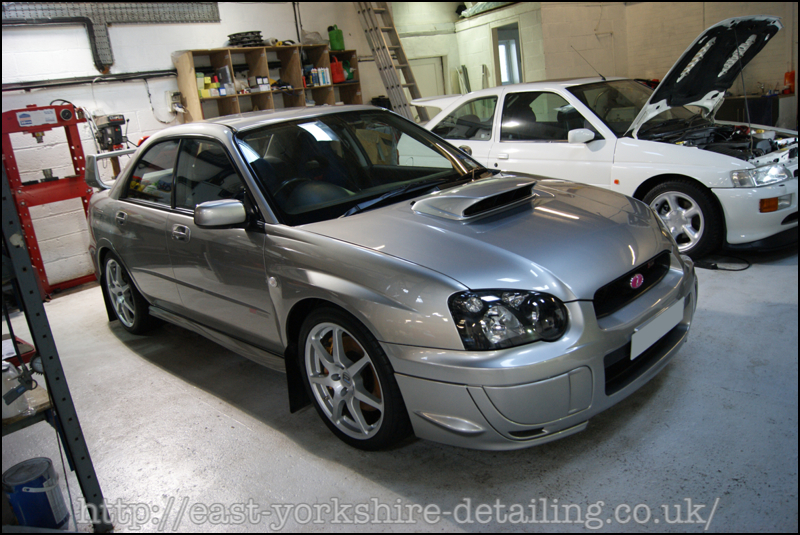
Had a rare sunny day so gave her a good wash and top-up wax:


My next job was to rectify the clunking rear shocks. I toyed with coilovers or replacement KYB shocks - but in the end I saw an opportunity in the for sale section here on SNet and these came up:

Basically it's a full set of STI suspension with the seemingly rare Prodrive springs suited for a widetrack. My intentions is to perform the grease nipple mod on the body of these shocks, and fit them to my car freeing mine up for spares or sell on.
I had major drama dismantling these shocks, I'm pretty sure they were massively over-torqued in a previous life and I destroyed several bolts taking them apart. As a result of this, I'll be just using the strut bodies and springs from this setup, recycling the un-butchered damper inserts from the suspension on my car.
The suspension currently sits like this, drilled, tapped and nippled. I'm still waiting for a nice weekend to swap over the damper inserts, grease up and fit to the car.

I've also rubbed down and painted since this photo to make them look a bit neater.
Something a little less involving:
Before:

After:

50:50:

After:


Another bulb related change, de-egged my lights all around:
Before:

After:

Aaaaaand that's how it stands.
Current pending mods are:
-Red LEDs ordered for Ignition Ring and Ashtray.
-Spare HVAC control unit bought on eBay. I'll solder in some red LEDs and fit to my car as an experiment. If it works, I'll mod my existing HVAC control unit too and sell it on.
-Friday this week scheduled for my suspension change
-CDF Suspension stuff to arrive, fit and get geometry sorted. Thinking ScoobyClinic but if anybody knows anywhere closer to N Yorkshire - I'm all ears.
Once all that's sorted, I need to change disks, pads, hoses(braided) and fluid all around.
Then it's MOT time.
Then it's service and potentially some performance parts. Fuel Pump, Boost Solonoid and Exhaust - maybe more. Will get Mr Carr to map again.
If you managed that lot, thanks for reading. I'll keep it up to date with future developments.
The car is a 2005 WRX STI in Crystal Grey. I bought it from a SNet member back in November 2012.
The car was a PPP car (with certificate) and had been remapped in addition to this by Andrew Carr during the previous ownership.
Car had 38k miles when I bought it, and a FSH including Cambelt/tensioners @ 35k.
Pics on day of collection:
First job was a new head unit, Alpine W530BT:
The previous owner had detango'd/blacked the headlights - but they were seriously scuffed, scratched and were leaking. After attempting to reseal, I eventually bought a new pair of lights from a breakers and fitted those instead.
Before Example:
After Example:
The car had 3 genuine mats, and a generic rubber drivers mat so got a new set from Scooby Parts. I'm not massively impressed with these, I've heard Scooby World ones may be better so may switch for Summer.
I decided to change the front grill, as the one on my car was severely chipped away. I used this as an excuse for a pink badge too.
At the same time I picked up some new number plates without the odd illegal spacing and honeycomb of the old ones:
Before:
After:
Next up was a set of Red JDM Dials:
They had 80k KM on the clocks so I needed a convertor wiring in, and also the mileage changing. A trip over to Manchester and Scott @ V12 Tuning sorted this for me:
Before:
After:
I even reconfigured the Head Unit colour to match!
Next job was to have the car detailed. I went for a correction detail with Mike @ Deeper Detail, as the car had evidence of overspray (from the wheels?) and needed sorting as it was rough as hell.
Write-Up is here for any detailing freaks
http://www.detailingworld.co.uk/foru...d.php?t=297421Next up was a re-arrangement of the rear badges.
Before:
After:
Fog Cover Decals fitted:
At this point I went for a drive to Scooby Clinic for an interim service and a Dyno run/Health check.
A few things were raised as follows:
* OS Front Ball Joint worn and loose (this was the bit preventing the dyno run)
Rear Pads Low (still 2-3k miles left)
OS Rear shock has got play (Clunk)
* Bolt snapped on undertray
* Top hose on wrong way round, and nearly worn through
Brake fluid + Clutch fluid want replacing
* Aircon and Alternator belts want replacing
I had the guys sort the stuff marked with * and would sort the rest myself later.
I also discovered a sneaky mod under the car when on the SC ramps:
Then time for the Dyno:
aaaaand:
I'd called Andrew Carr around the time of my SC visit and he had notes from when he mapped the car. He said it was excessively gentle at request of the previous owner, and he offered a map tweak if I fancied more out of it.
In the days/weeks following SC - I noticed a whistle under boost between 3 an 4k RPM. To cut a long story short, I spent months chasing this which culminated in a visit to Richard Henry motorsport to drill a snapped bolt from the inlet manifold and reseat it all.
That appeared to fix the whistle, but even then I'm not 100%... it still seems to whisper occasionally.
The exhaust system was all taken off, inspected and reseated. Boost hoses all checked, and the only thing left not to be checked is header/up-pipe and I still need to check this to date.
Oh, whilst Richard Henry had the car they also spotted a rad leak - which they replaced for me.
Next up was signing up to the CDF group buy for Front and Rear ARB's and Drop links. Awaiting delivery on these still.
Next up was another SNet group buy and this front splitter:
Next purchase was two new tyres, due to a puncture. Doh!
Had a rare sunny day so gave her a good wash and top-up wax:
My next job was to rectify the clunking rear shocks. I toyed with coilovers or replacement KYB shocks - but in the end I saw an opportunity in the for sale section here on SNet and these came up:
Basically it's a full set of STI suspension with the seemingly rare Prodrive springs suited for a widetrack. My intentions is to perform the grease nipple mod on the body of these shocks, and fit them to my car freeing mine up for spares or sell on.
I had major drama dismantling these shocks, I'm pretty sure they were massively over-torqued in a previous life and I destroyed several bolts taking them apart. As a result of this, I'll be just using the strut bodies and springs from this setup, recycling the un-butchered damper inserts from the suspension on my car.
The suspension currently sits like this, drilled, tapped and nippled. I'm still waiting for a nice weekend to swap over the damper inserts, grease up and fit to the car.
I've also rubbed down and painted since this photo to make them look a bit neater.
Something a little less involving:
Before:
After:
50:50:
After:
Another bulb related change, de-egged my lights all around:
Before:
After:
Aaaaaand that's how it stands.
Current pending mods are:
-Red LEDs ordered for Ignition Ring and Ashtray.
-Spare HVAC control unit bought on eBay. I'll solder in some red LEDs and fit to my car as an experiment. If it works, I'll mod my existing HVAC control unit too and sell it on.
-Friday this week scheduled for my suspension change
-CDF Suspension stuff to arrive, fit and get geometry sorted. Thinking ScoobyClinic but if anybody knows anywhere closer to N Yorkshire - I'm all ears.
Once all that's sorted, I need to change disks, pads, hoses(braided) and fluid all around.
Then it's MOT time.
Then it's service and potentially some performance parts. Fuel Pump, Boost Solonoid and Exhaust - maybe more. Will get Mr Carr to map again.
If you managed that lot, thanks for reading. I'll keep it up to date with future developments.

Nice looking motor 😎
Think it would look better with the badges fully removed from the boot tho and maybe a darker shade on the wheels to break it up a bit, but each to their own still looks lovely tho, certainly got a nice shine to the paint
Think it would look better with the badges fully removed from the boot tho
and maybe a darker shade on the wheels to break it up a bit, but each to their own still looks lovely tho, certainly got a nice shine to the paint

Trending Topics
quote
-Red LEDs ordered for Ignition Ring and Ashtray.
-Spare HVAC control unit bought on eBay. I'll solder in some red LEDs and fit to my car
did this to mine (well paid someone to do it ) defi controller now red too but could do with tweaking a bit
-Red LEDs ordered for Ignition Ring and Ashtray.
-Spare HVAC control unit bought on eBay. I'll solder in some red LEDs and fit to my car
did this to mine (well paid someone to do it
) defi controller now red too but could do with tweaking a bit
Thread Starter
Scooby Regular
iTrader: (5)
Joined: Oct 2012
Posts: 1,907
Likes: 1
From: North Yorkshire / Boston, MA
Thanks guys, nice comments.
RE: Fog Covers.
I was really torn, and still am to be honest whether I like the decals or not. I think they break it up nicely, but they're a bit of a pain and seem easy victim to stonechips.
RE: Wheel Colour.
Powdercoating is on the list for after my brakes are sorted. Previous owner had them rattlecanned and the finish is mostly alright, but the insides of the wheels were not painted and there is a masking like immediately behind the spokes. There seems to be a lot of pressure to change colour when powdercoating to make you feel you're getting your $$ worth. I won't go black, but I'm thinking of a glossy gunmetal colour.
Thread Starter
Scooby Regular
iTrader: (5)
Joined: Oct 2012
Posts: 1,907
Likes: 1
From: North Yorkshire / Boston, MA
I got some off eBay, still waiting for them to arrive.
I believe they were 3mm wide-angle LEDs measured at 8000mcd. I used an online calculator to figure out I should use 330ohm resistors for my 3xLED Array that I plan to use behind each dial.
8000mcd might be a bit too bright, but I spent a grand total of �1.25 so I can adjust my LED selection if needed.
u got a link at all for the things I'll need?
i got mine done by a chap in scotland only charged me �50 but was a 3hr drive each way but i am sure he followed this
http://www.iwsti.com/forums/gd-inter...s-05-06-a.html

Thread Starter
Scooby Regular
iTrader: (5)
Joined: Oct 2012
Posts: 1,907
Likes: 1
From: North Yorkshire / Boston, MA
New arrivals today:
150pc Socket/Spanner set �79.99 down from �199.99 at Halfords over Easter Weekend

Spare HVAC unit, LED's and some Resistors:

I just need some thin wire then I can start the HVAC modification. Job for saturday I think, as tomorrow is suspension day
150pc Socket/Spanner set �79.99 down from �199.99 at Halfords over Easter Weekend
Spare HVAC unit, LED's and some Resistors:
I just need some thin wire then I can start the HVAC modification. Job for saturday I think, as tomorrow is suspension day
Thread Starter
Scooby Regular
iTrader: (5)
Joined: Oct 2012
Posts: 1,907
Likes: 1
From: North Yorkshire / Boston, MA
Mixed results over the past two days...
A friend had agreed to help me out with the suspension change over, he's got no mechanical experience either - but has a flat drive, a garage and a lovely wife who makes the best bacon butties ever.
I turned up nice and early on friday morning and we decided to start on the rears, as they would involve dismantling struts, replacing the damper inserts into my refurbished bodies and then refitting to the car... fronts are an easy straight swap so would leave those till' last.
First job is rear seats to come out, nice and easy - 5 or 6 12mm bolts:

That then exposes the top mounts of the suspension struts so we can remove the dust covers, take a note of the alignment of the tophat and loosen the bolts off a bit:

Now it's time to jack up the car. It seems that I've done more research into safely lifting a car than I have replacing suspension - I'm properly paranoid...
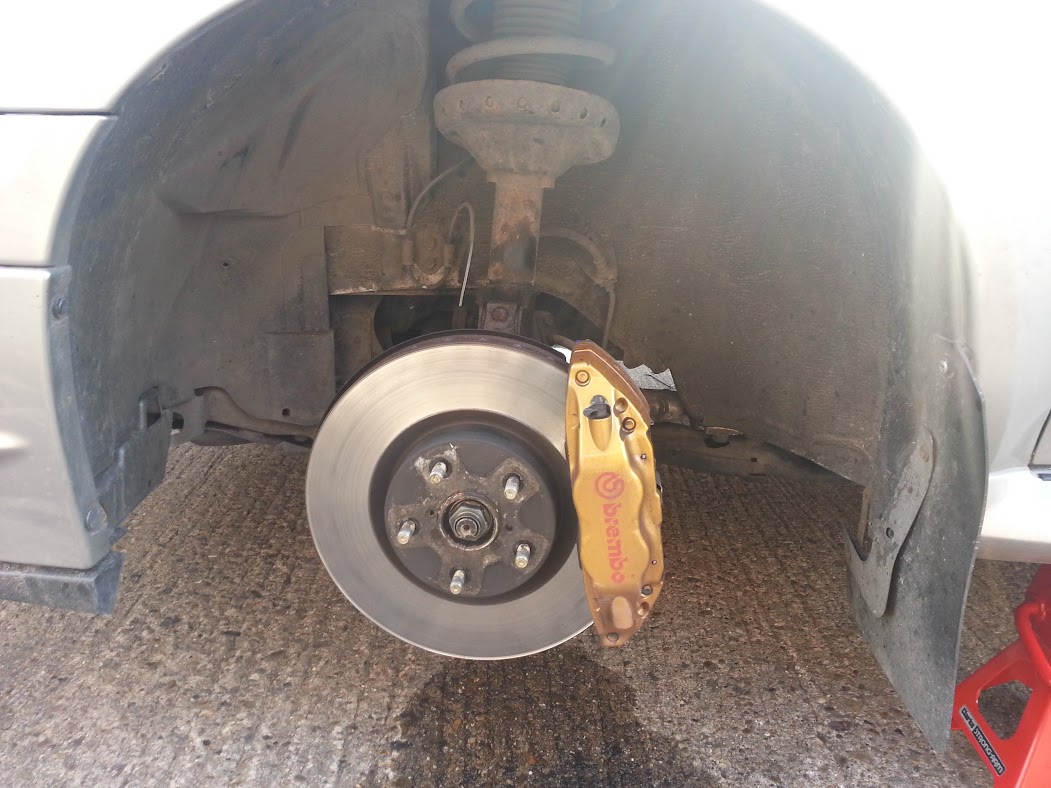
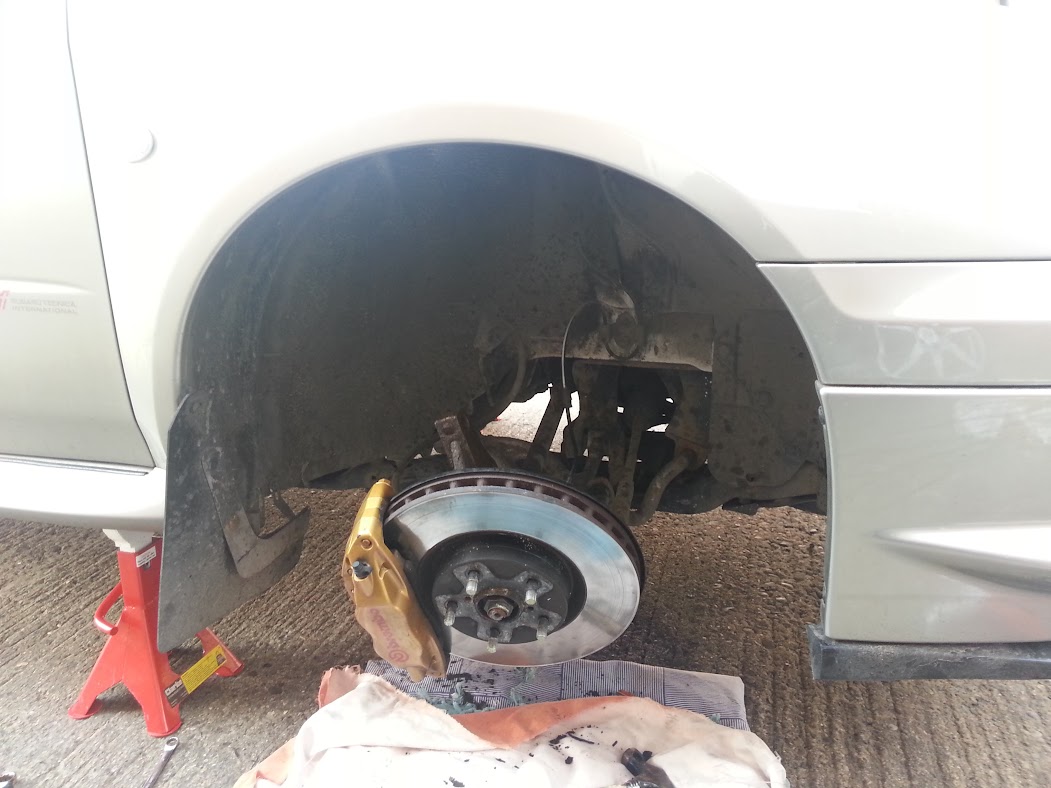
So then, wheels off - I'm sure these have been massively over torqued in a past life... and here's what we've got to look at:

The next job was to disconnect the brake hose from it's clip on the strut, and remove the two 19mm bolts which hold the strut to the hub assembly. Easy, right?!
These bolts just would not move, I've learned so many new swear words in the process of getting these bolts off - you would not believe it.
We soaked in WD40, had about 3 hours worth of swearing, coffee breaks, tea breakes, bacon sarnie, booked a Monaco city break with my missus, etc. They still weren't going anywhere :|
I'd done some reading some weeks ago that WD40 wasn't actually any good for this kind of application, so I suggested we jump in the car and go to Halfords to try a specialist product. 30mins later (damn road closures) I end up with some of this:

It's made by WD40 but intended more for penetration. Ooo err.
Sprayed it on, had another coffee.
Sprayed more on.
WOOSH!

Overjoyed with our achievement, it was time to get a move on.
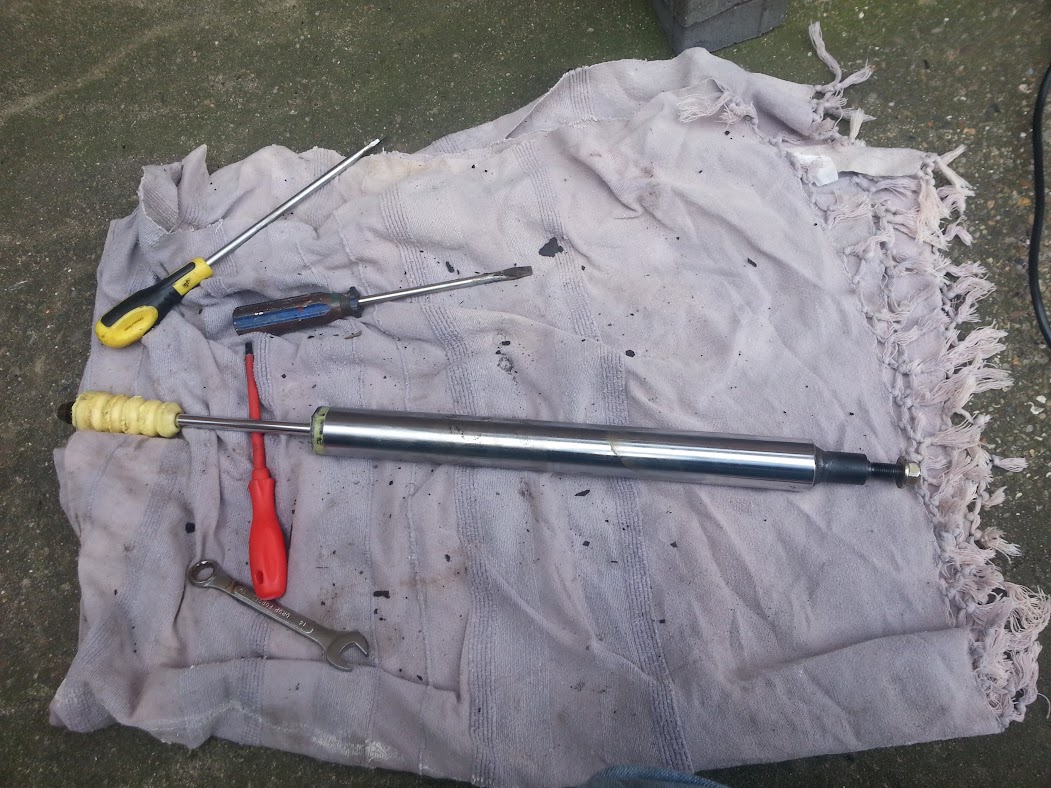
We next clamped the spring, and whizzed off the 17mm nut in the top of the strut with my impact gun. This was the nut which gave me weeks of issues on the bought set of struts some time ago.
Took the tophat and spring off, leaving the strut body with the damper insert inside. Next off was the 14mm on the bottom of the strut.
Annoyingly this is on a shaft that spins inside the damper, so you can't hold it still. I'd read this tip on a US forum, but the fix was a quick dremel grind to create a gap for a flathead screwdriver. Using this we got the nut off no worries.

Damper out, Old vs New(refurbed).
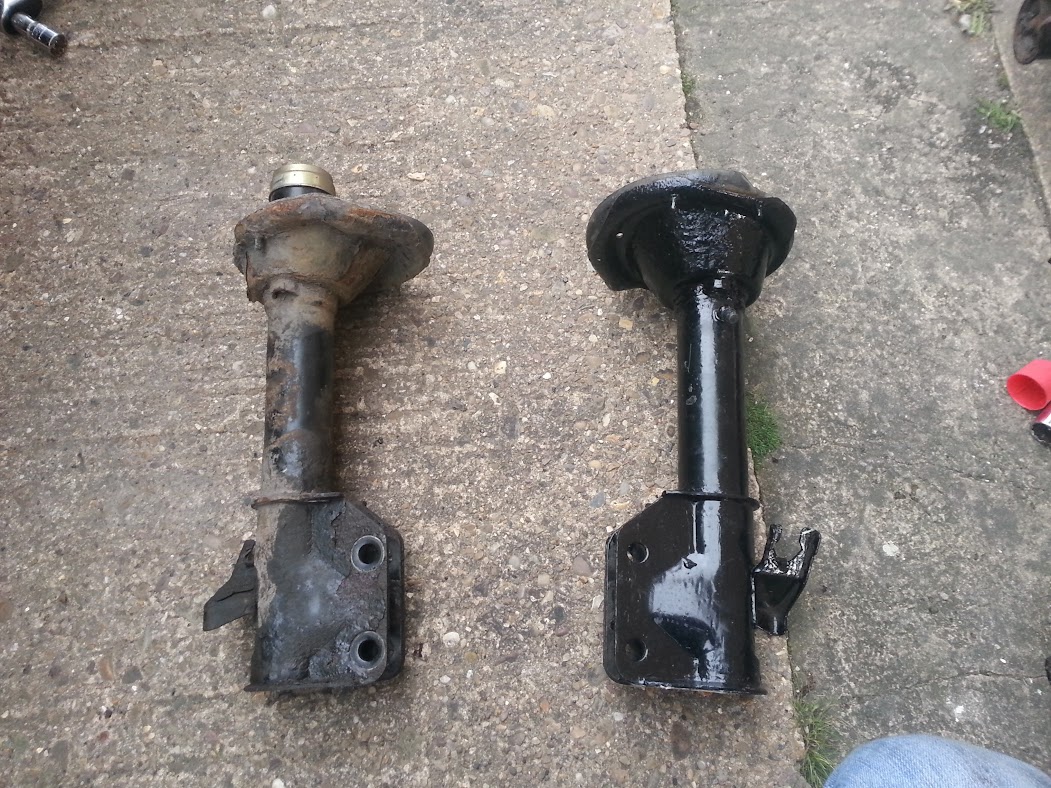
New vs Old.

This is the part I'm retaining from the on-car suspension:
Next up was to clean down the shock insert, and lube up the inside of the strut. We got as much moly grease in as possible without using the new nipple addition, then we slid in the shock.
Hand tightened the 14mm back up, and then started pumping grease in through the nipple. No pics here, hands were minging
I felt the pressure of the grease build up to the point I couldn't pump anymore in - took the grease gun off the nipple to find grease pissing out of the nipple Some one-way valve this has turned out to be.
We watched it weep for a while, then decided it was a duff nipple - so took it out and installed another. This was better, but still didn't hold the grease under maximum pressure.
We decided it had enough grease in, and fitted the nipple with a dust cover to prevent any further seepage. This needs monitoring for the next few weeks/months to make sure we don't lose any more - but we shouldn't as the pressure will never change inside the chamber.
Spring back on, tophat back on, aligned, nuts done up and torqued.
Refitting the strut was cake, just took a minute or so to align the bolts in the top - then voila.


So that was one side done!
I'd love to say the other side was a repeat of that, but it wasn't
We were much quicker on the passenger side and before we knew it were looking at the 14mm nut at the bottom of the strut. My heart sank when I saw it, it was covered in rust - part of which was like a tumor that had eaten into the bolt and when we wire brushed it, we lost half of the bolt too
This was back out, or point of no return territory. We continued!
Armed with the dremel and a chisel, we butchered the remains of the bolt off the bolt and ended up with a pretty sorry looking thread. That said, the small cut(s) we made into the thread all looked clean - and with a spare 14mm bolt we discovered it still actually functioned fine.
We greased up again, with similar issues with a weeping nipple again but had the strut rebuilt in no time.
Torqued everything up, and lowered the car. How's this for a rally stance?
Oh, forgot to mention - Mudflaps came off too, sick of them scraping ont' road.
We went for a shakedown, tentative at first but ended up giving the car a good beating - it was beautiful. Not a clunk to be heard/felt and the rear generally just felt nice. It passed all the tests, and we came home to high 5's and a job well done.
Fronts can wait till tomorrow...
A friend had agreed to help me out with the suspension change over, he's got no mechanical experience either - but has a flat drive, a garage and a lovely wife who makes the best bacon butties ever.
I turned up nice and early on friday morning and we decided to start on the rears, as they would involve dismantling struts, replacing the damper inserts into my refurbished bodies and then refitting to the car... fronts are an easy straight swap so would leave those till' last.
First job is rear seats to come out, nice and easy - 5 or 6 12mm bolts:
That then exposes the top mounts of the suspension struts so we can remove the dust covers, take a note of the alignment of the tophat and loosen the bolts off a bit:
Now it's time to jack up the car. It seems that I've done more research into safely lifting a car than I have replacing suspension - I'm properly paranoid...
So then, wheels off - I'm sure these have been massively over torqued in a past life... and here's what we've got to look at:
The next job was to disconnect the brake hose from it's clip on the strut, and remove the two 19mm bolts which hold the strut to the hub assembly. Easy, right?!
These bolts just would not move, I've learned so many new swear words in the process of getting these bolts off - you would not believe it.
We soaked in WD40, had about 3 hours worth of swearing, coffee breaks, tea breakes, bacon sarnie, booked a Monaco city break with my missus, etc. They still weren't going anywhere :|
I'd done some reading some weeks ago that WD40 wasn't actually any good for this kind of application, so I suggested we jump in the car and go to Halfords to try a specialist product. 30mins later (damn road closures) I end up with some of this:
It's made by WD40 but intended more for penetration. Ooo err.
Sprayed it on, had another coffee.
Sprayed more on.
WOOSH!
Overjoyed with our achievement, it was time to get a move on.
We next clamped the spring, and whizzed off the 17mm nut in the top of the strut with my impact gun. This was the nut which gave me weeks of issues on the bought set of struts some time ago.
Took the tophat and spring off, leaving the strut body with the damper insert inside. Next off was the 14mm on the bottom of the strut.
Annoyingly this is on a shaft that spins inside the damper, so you can't hold it still. I'd read this tip on a US forum, but the fix was a quick dremel grind to create a gap for a flathead screwdriver. Using this we got the nut off no worries.
Damper out, Old vs New(refurbed).
New vs Old.
This is the part I'm retaining from the on-car suspension:
Next up was to clean down the shock insert, and lube up the inside of the strut. We got as much moly grease in as possible without using the new nipple addition, then we slid in the shock.
Hand tightened the 14mm back up, and then started pumping grease in through the nipple. No pics here, hands were minging
I felt the pressure of the grease build up to the point I couldn't pump anymore in - took the grease gun off the nipple to find grease pissing out of the nipple
Some one-way valve this has turned out to be.We watched it weep for a while, then decided it was a duff nipple - so took it out and installed another. This was better, but still didn't hold the grease under maximum pressure.
We decided it had enough grease in, and fitted the nipple with a dust cover to prevent any further seepage. This needs monitoring for the next few weeks/months to make sure we don't lose any more - but we shouldn't as the pressure will never change inside the chamber.
Spring back on, tophat back on, aligned, nuts done up and torqued.
Refitting the strut was cake, just took a minute or so to align the bolts in the top - then voila.
So that was one side done!
I'd love to say the other side was a repeat of that, but it wasn't
We were much quicker on the passenger side and before we knew it were looking at the 14mm nut at the bottom of the strut. My heart sank when I saw it, it was covered in rust - part of which was like a tumor that had eaten into the bolt and when we wire brushed it, we lost half of the bolt too
This was back out, or point of no return territory. We continued!
Armed with the dremel and a chisel, we butchered the remains of the bolt off the bolt and ended up with a pretty sorry looking thread. That said, the small cut(s) we made into the thread all looked clean - and with a spare 14mm bolt we discovered it still actually functioned fine.
We greased up again, with similar issues with a weeping nipple again but had the strut rebuilt in no time.
Torqued everything up, and lowered the car. How's this for a rally stance?
Oh, forgot to mention - Mudflaps came off too, sick of them scraping ont' road.
We went for a shakedown, tentative at first but ended up giving the car a good beating - it was beautiful. Not a clunk to be heard/felt and the rear generally just felt nice. It passed all the tests, and we came home to high 5's and a job well done.
Fronts can wait till tomorrow...
Thread Starter
Scooby Regular
iTrader: (5)
Joined: Oct 2012
Posts: 1,907
Likes: 1
From: North Yorkshire / Boston, MA
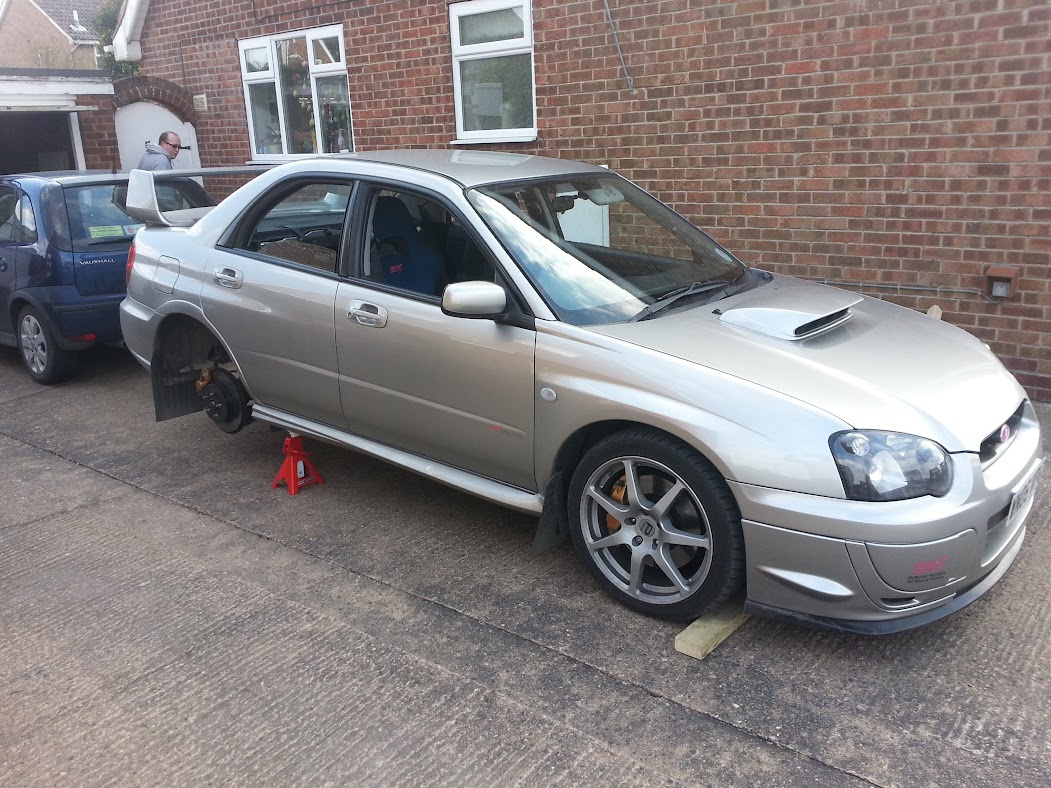
...Which brings me today, and the fronts.
Arrived back at my friends house later today, as I ached all over from those 19mm bolts the day before!
Jacked the car up, on stands, ready to go.

Target for the day:
19mm's soaked right away in my Halfords stuff, and went for a coffee break.
Came back out, and bolts came out relatively easily - followed by the ABS and brake hoses.
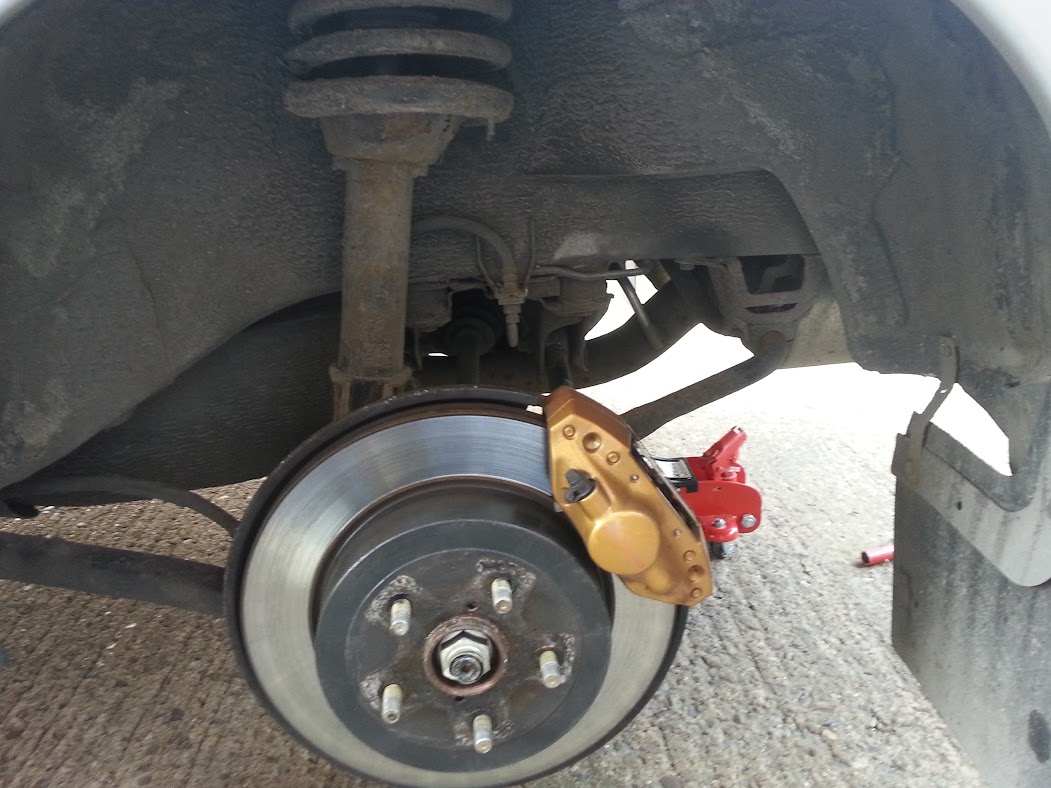
Shock out, and hub gently lowered. No drama:
Old vs New...

No ****ing around with grease or nipples today as the fronts don't suffer the same design fault. Just a straight swap to benefit from the springs.
Strut back in...

Drama!
Basically, we couldn't straighten the hub back up (so that the brake disk is 90 degress to the floor again). All the balljoints seemed to have side to side movement, but the driveshaft just would not slide back towards the gearbox at all.
We removed the passenger side strut to compare, and that rocked back and forth easily.
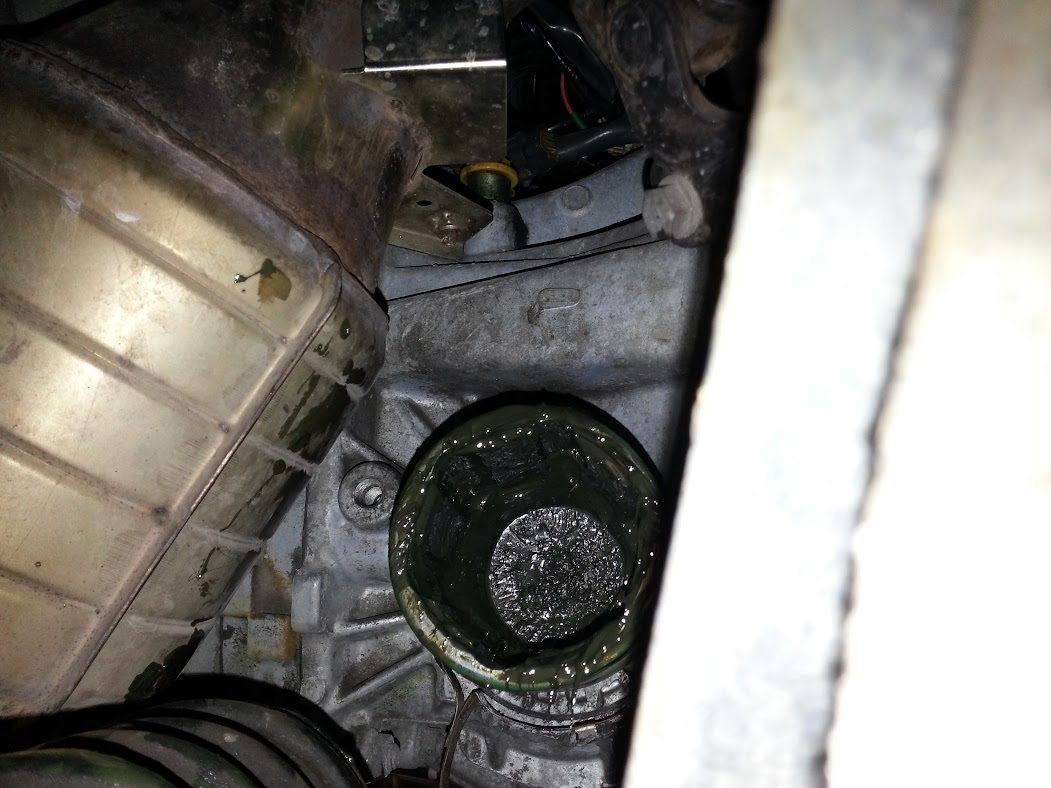
I scurried around under the car, and found the drivers' driveshaft had come apart in the boot closest to the gearbox. I tried for ages to rotate the shaft and push towards the gearbox to get it back together and it just wouldn't go.
Fondled the boot and felt what I thought was a loose ball bearing. Decided it was time to remove the boot and inspect, to which I ended up with a face full of grease and a mouth full of 1cm ball bearings
This is what I've got:
This is the driveshaft end which connects to the gearbox
This lot should go into the housing as pictured above

And here are my bearings, a sixth one was later found.

We replaced the passenger strut without a hiccup - so my friend is now left with a three wheeled rally inspired ornament on his driveway
I got on the blower to a fellow Subaru owner and friend, and he's arranged a local mechanic friend to come visit me and the car tomorrow. The intention is to remove the driveshaft from the car completely, and rebuild it on a workbench. Fill with grease, hope not too much dirt got inside, and refit to the car.
So annoyed really as we were within half an hour of completing the job - completely on our own with no previous experience. Was a massively successful weekend on the whole I think, very satisfying to be torquing stuff up after a job. Those clicks are just the sound of a job well done :thumbs:
Positives:
Fixed my Clunk
Learned loads
Had a laugh
Negatives:
My car has three wheels
Arrived back at my friends house later today, as I ached all over from those 19mm bolts the day before!
Jacked the car up, on stands, ready to go.
Target for the day:
19mm's soaked right away in my Halfords stuff, and went for a coffee break.
Came back out, and bolts came out relatively easily - followed by the ABS and brake hoses.
Shock out, and hub gently lowered. No drama:
Old vs New...
No ****ing around with grease or nipples today as the fronts don't suffer the same design fault. Just a straight swap to benefit from the springs.
Strut back in...
Drama!
Basically, we couldn't straighten the hub back up (so that the brake disk is 90 degress to the floor again). All the balljoints seemed to have side to side movement, but the driveshaft just would not slide back towards the gearbox at all.
We removed the passenger side strut to compare, and that rocked back and forth easily.
I scurried around under the car, and found the drivers' driveshaft had come apart in the boot closest to the gearbox. I tried for ages to rotate the shaft and push towards the gearbox to get it back together and it just wouldn't go.
Fondled the boot and felt what I thought was a loose ball bearing. Decided it was time to remove the boot and inspect, to which I ended up with a face full of grease and a mouth full of 1cm ball bearings
This is what I've got:
This is the driveshaft end which connects to the gearbox
This lot should go into the housing as pictured above
And here are my bearings, a sixth one was later found.
We replaced the passenger strut without a hiccup - so my friend is now left with a three wheeled rally inspired ornament on his driveway
I got on the blower to a fellow Subaru owner and friend, and he's arranged a local mechanic friend to come visit me and the car tomorrow. The intention is to remove the driveshaft from the car completely, and rebuild it on a workbench. Fill with grease, hope not too much dirt got inside, and refit to the car.
So annoyed really as we were within half an hour of completing the job - completely on our own with no previous experience. Was a massively successful weekend on the whole I think, very satisfying to be torquing stuff up after a job. Those clicks are just the sound of a job well done :thumbs:
Positives:
Fixed my Clunk
Learned loads
Had a laugh
Negatives:
My car has three wheels
Last edited by Fonzey; Mar 30, 2013 at 11:03 PM.
Thread Starter
Scooby Regular
iTrader: (5)
Joined: Oct 2012
Posts: 1,907
Likes: 1
From: North Yorkshire / Boston, MA
Update for today:
Got to the motorfactors for opening time to grab a 32mm impact socket for the hub-nut. I'd need this to get the driveshaft off the hub end.
Good start, I looked at a 32mm socket on the shelf and picked up a 35mm one instead - soooo tired after this weekend
An hour later, after realising the mistake and returning to town - we had the correct one.
The hub nut was one of these "stake nut" things where the metal insert is bent to fill a gap to stop the nut undoing with rotation of the hub (I guess).
It was a bit of a pain in the ****, but the patience of my mate Fraser was enough to straighten it out, and we whizzed the nut off with the impact gun in seconds.
With that off, we were able to pull the driveshaft out of the hub and get into the garage to get cleaned up.


All that's missing from that photo is the gearbox end of the shaft, which was still hanging in the gearbox.
At about this time, Wayne arrived. Wayne has helped me before to refit the exhaust (when whistle hunting) and kindly arranged his time for me today. He didn't have long due to other commitments, but upon seeing the removed driveshaft he ran off to grab some tools and CV joint rebuilding materials (clips etc).
Upon his return, the gearbox end of the shaft was quickly pried away from the car and then the rebuild process begun.
I didn't get photo's, as it took him seconds He really did make it look easy and before I knew it the joint was packed full of grease, boot refitted and clipped - and we were back under the car.
Wayne wasted absolutely no time and even refitted the last strut for me too :thumbs:
Top lad, really helped me out and I owe him big time. Gave him �20 for his time, and he left us with a car finally sat on all fours again
Mudflap-less car, finally. Suspension still has some settling to do - will get some road time in tonight and then hopefully get her washed tomorrow for some proper photographs

So that's it, project: restore shocks and replace springs is complete. Hopefully ARBs/Links will arrive sometime soon so I can get those fitted and alignment sorted.
So satisfying to get done, still gutted we stumbled at the end and couldn't 100% complete the job without help - but I'm confident that next time we can a) avoid the driveshaft drama in the first place but b) I fancy my chances of rebuilding a CV joint myself anyway.
Muchos thanks to Fraser & Bev for their drive, patience, tea, coffee and bacon sarnies. Wrighty for helping me out with Wayne, and ofc Wayne for getting his hands dirty and finishing the job.
Ace
Got to the motorfactors for opening time to grab a 32mm impact socket for the hub-nut. I'd need this to get the driveshaft off the hub end.
Good start, I looked at a 32mm socket on the shelf and picked up a 35mm one instead - soooo tired after this weekend
An hour later, after realising the mistake and returning to town - we had the correct one.
The hub nut was one of these "stake nut" things where the metal insert is bent to fill a gap to stop the nut undoing with rotation of the hub (I guess).
It was a bit of a pain in the ****, but the patience of my mate Fraser was enough to straighten it out, and we whizzed the nut off with the impact gun in seconds.
With that off, we were able to pull the driveshaft out of the hub and get into the garage to get cleaned up.
All that's missing from that photo is the gearbox end of the shaft, which was still hanging in the gearbox.
At about this time, Wayne arrived. Wayne has helped me before to refit the exhaust (when whistle hunting) and kindly arranged his time for me today. He didn't have long due to other commitments, but upon seeing the removed driveshaft he ran off to grab some tools and CV joint rebuilding materials (clips etc).
Upon his return, the gearbox end of the shaft was quickly pried away from the car and then the rebuild process begun.
I didn't get photo's, as it took him seconds
He really did make it look easy and before I knew it the joint was packed full of grease, boot refitted and clipped - and we were back under the car.Wayne wasted absolutely no time and even refitted the last strut for me too :thumbs:
Top lad, really helped me out and I owe him big time. Gave him �20 for his time, and he left us with a car finally sat on all fours again
Mudflap-less car, finally. Suspension still has some settling to do - will get some road time in tonight and then hopefully get her washed tomorrow for some proper photographs
So that's it, project: restore shocks and replace springs is complete. Hopefully ARBs/Links will arrive sometime soon so I can get those fitted and alignment sorted.
So satisfying to get done, still gutted we stumbled at the end and couldn't 100% complete the job without help - but I'm confident that next time we can a) avoid the driveshaft drama in the first place but b) I fancy my chances of rebuilding a CV joint myself anyway.
Muchos thanks to Fraser & Bev for their drive, patience, tea, coffee and bacon sarnies. Wrighty for helping me out with Wayne, and ofc Wayne for getting his hands dirty and finishing the job.
Ace
Thread Starter
Scooby Regular
iTrader: (5)
Joined: Oct 2012
Posts: 1,907
Likes: 1
From: North Yorkshire / Boston, MA
I went with a friend to test drive a Megane RS Turbo thingy the other week, lovely car but I was amazed at the bonnet lifters - never seen them in action before on a car
Had to go and grab some for myself! Thanks to Crazyspeedfreaks' group buy on ScoobyNet.


Had to go and grab some for myself! Thanks to Crazyspeedfreaks' group buy on ScoobyNet.

Thread Starter
Scooby Regular
iTrader: (5)
Joined: Oct 2012
Posts: 1,907
Likes: 1
From: North Yorkshire / Boston, MA
Cheers guys
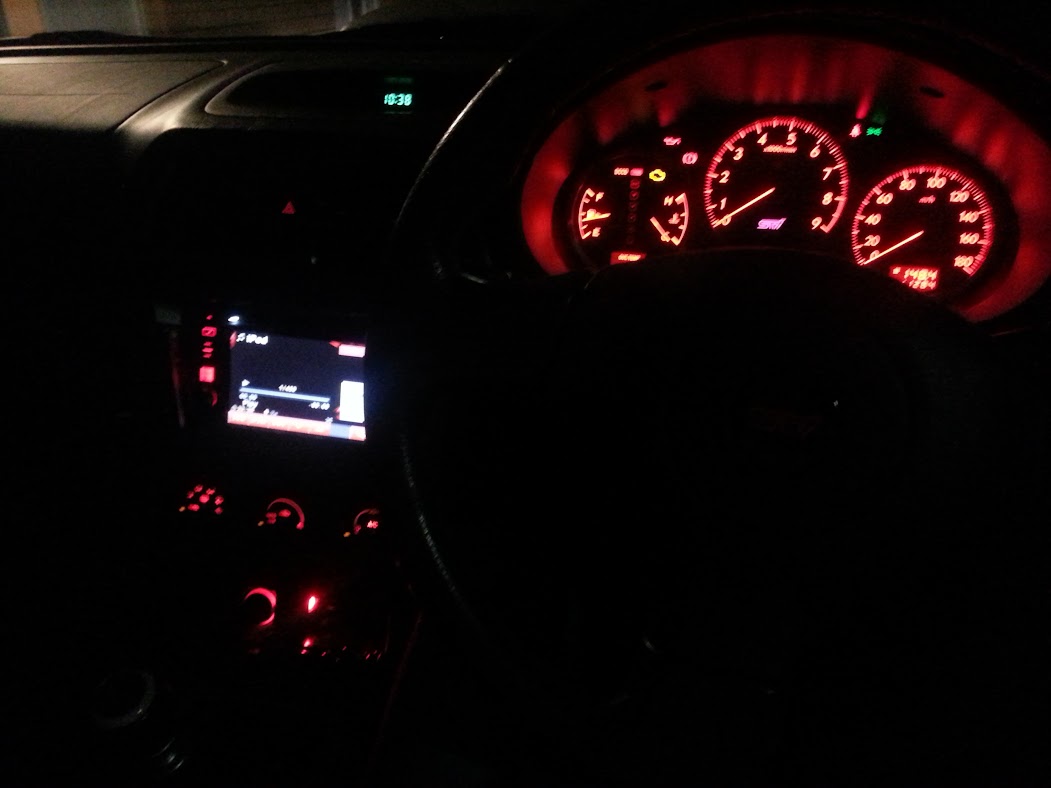
Still not done any mileage in it, but this is how she's sitting atm.

Made a start to my interior illumination project tonight.
Here's what I'm aiming to change:
Ignition Ring from this to red:

Heater Controls and Ashtray to red:

Ashtray and Ignition are just bulb swaps, so I thought I'd start with the more difficult heater controls - or HVAC unit.
Basically the goal is to open up the unit, blank off the existing white LEDs (which sit behind a green filter) and then wire in some red LEDs to the power points on the PCB allowing the dash dimming controls to remain active, and for the unit to come on/off at the usual times. etc.
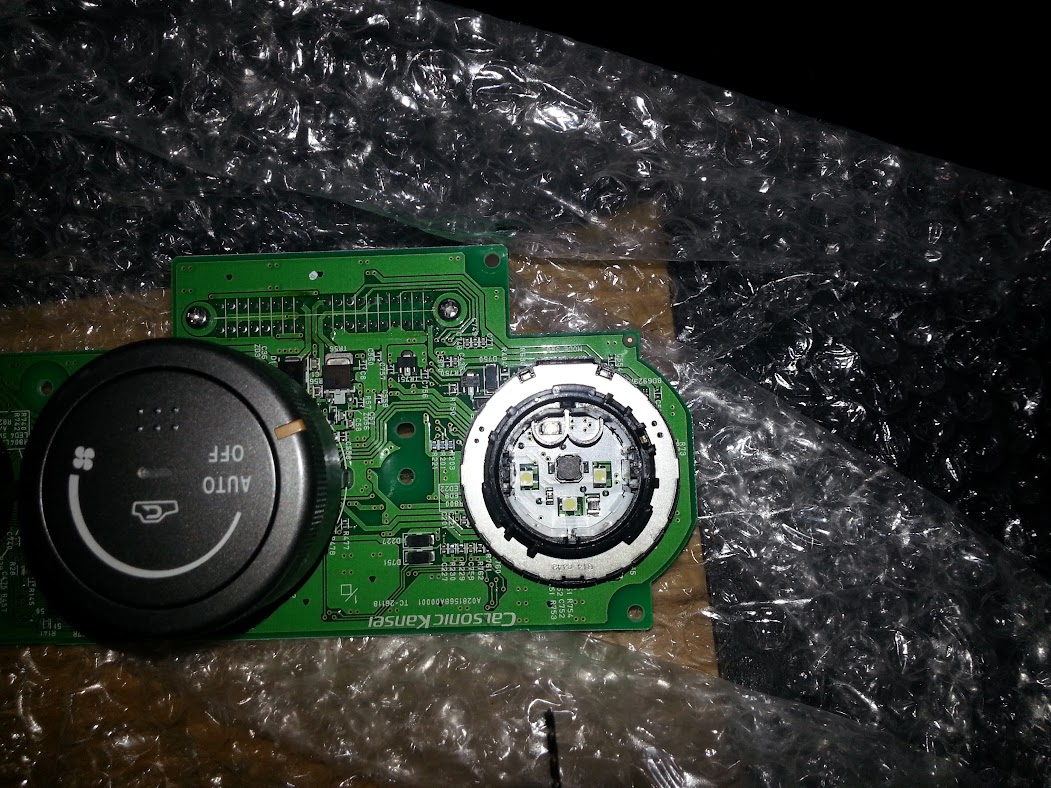
The three yellowish squares inside the **** are the white LEDs to be blanked.
In order to get the wiring out of the ****, I need to drill into the base of the **** - avoiding the PCB/components and the rotating parts of the ****.
That gives me about 4mm to drill a 3mm hole :|

Started uber slow with 1.5mm drill bit and then went in again with a 3mm one. That's just enough to get my wiring through, really - I should have got thinner wiring
Next I need to sort my LEDs out. I've not done electronics, soldering, etc since School - so I needed to do some homework first.
I think this is a "series" of LEDs(?)

Needs some tidying up with some smaller/sharper snips - and then insulating. I needed to test my series' with the resistors I bought, and a 12v supply - so for now it's just a mock-up.
Nice blurry picture to hide my soldering

I'm not sure the proper colour coding for wiring - so mine is Positive = Blue (happy sky colour) and Negative = Brown (poo).
Mockup, eventually the negative will go (via a resistor) to the left-top pin from that group of pins between the left and middle ****, just near that screw. The positive will go to the left-bottom pin in the same group.

After my drilling, I plugged the HVAC unit into the car to make sure I hadn't damaged anything - all seemed to work fine.
I then waited for it to get dark, and setup my controlled test-lab (car battery under the bonnet)

I need to tidy up my LED arrangement for this dial, then make two more. Will continue tomorrow.
Still not done any mileage in it, but this is how she's sitting atm.
Made a start to my interior illumination project tonight.
Here's what I'm aiming to change:
Ignition Ring from this to red:
Heater Controls and Ashtray to red:
Ashtray and Ignition are just bulb swaps, so I thought I'd start with the more difficult heater controls - or HVAC unit.
Basically the goal is to open up the unit, blank off the existing white LEDs (which sit behind a green filter) and then wire in some red LEDs to the power points on the PCB allowing the dash dimming controls to remain active, and for the unit to come on/off at the usual times. etc.
The three yellowish squares inside the **** are the white LEDs to be blanked.
In order to get the wiring out of the ****, I need to drill into the base of the **** - avoiding the PCB/components and the rotating parts of the ****.
That gives me about 4mm to drill a 3mm hole :|
Started uber slow with 1.5mm drill bit and then went in again with a 3mm one. That's just enough to get my wiring through, really - I should have got thinner wiring
Next I need to sort my LEDs out. I've not done electronics, soldering, etc since School - so I needed to do some homework first.
I think this is a "series" of LEDs(?)
Needs some tidying up with some smaller/sharper snips - and then insulating. I needed to test my series' with the resistors I bought, and a 12v supply - so for now it's just a mock-up.
Nice blurry picture to hide my soldering
I'm not sure the proper colour coding for wiring - so mine is Positive = Blue (happy sky colour) and Negative = Brown (poo).
Mockup, eventually the negative will go (via a resistor) to the left-top pin from that group of pins between the left and middle ****, just near that screw. The positive will go to the left-bottom pin in the same group.
After my drilling, I plugged the HVAC unit into the car to make sure I hadn't damaged anything - all seemed to work fine.
I then waited for it to get dark, and setup my controlled test-lab (car battery under the bonnet)
I need to tidy up my LED arrangement for this dial, then make two more. Will continue tomorrow.
Thread Starter
Scooby Regular
iTrader: (5)
Joined: Oct 2012
Posts: 1,907
Likes: 1
From: North Yorkshire / Boston, MA
Completed the HVAC and did the Ashtray bulb tonight.
First up was to knock up a couple more LED arrangements:

Then time to wire it all into the unit. Fiddly job but got there in the end:

Finally back into the car:

There's still a bit of white/green light escaping from the OEM LED's so I'll get some red model paint I think just to blob over them completely, the marker pen I used this time not quite up to the job - but still looks alright I think.
Just Ignition ring LED to go now, job for another day though - tired
First up was to knock up a couple more LED arrangements:
Then time to wire it all into the unit. Fiddly job but got there in the end:
Finally back into the car:
There's still a bit of white/green light escaping from the OEM LED's so I'll get some red model paint I think just to blob over them completely, the marker pen I used this time not quite up to the job - but still looks alright I think.
Just Ignition ring LED to go now, job for another day though - tired