
Engine Stage 1


Thread Starter
Orange Club
Joined: Oct 1998
Posts: 13,763
Likes: 1
As many may appreciate, no job (however straight forward) never seems to be such in reality, in particular this job��
After the manifold had been taken off, we looked at re-fitting a standard inlet pipe.
Since the original inlet pipe from this car had been cut to aid removal in the first instance, we needed to locate another one. Thanks to API Engines, I managed to track one down. All sounds good so far!
Upon inspection of the pipe from API Engines, something was not right. The pipe we had located was from a STI of the same year, but when comparing this pipe with the one that came off originally it was different � oh dear!
Looking at the 2 pipes, the original Spec C one was bigger (closer to that of the replacement silicon one) while the standard one we had was quite a bit smaller. At first it was thought that the one I had located was from a WRX instead of an STI, so we then compared it with one from a JDM STI engine that was in the workshop�.. nope, they were both the same. With the manifold off, this was not the best time to find out that the Spec C had it�s own specific type of inlet pipe!
After some lateral thinking (and sheer dedication by Powerstation), Rich suggested that the inlet pipe from the MY06 Spec C that was to be stripped down ready for the TunerGP could be used. The only trouble with this, was that the manifold on that car would need to be removed as well!!
Nick then got to work on the MY06 Spec C, and since the engine needed to come out anyway, decided to go the full hog and pull the engine out and then remove the manifold�� all in a days work for Powerstation.
Thankfully the inlet pipe on the MY06 Spec C was exactly the same as the original one we took off. The impressive thing though, was that two manifolds and an engine was removed, together with the fitment of a manifold back on to a engine was completed by late afternoon in the same day�� maybe this is nothing out of the ordinary, but it certainly impressed me!
After a few heated moments, we could at last see what difference the standard inlet pipe made.
Thread Starter
Orange Club
Joined: Oct 1998
Posts: 13,763
Likes: 1
TEST 9 – As Per TEST8 plus Standard Inlet Pipe - Summary of Spec
 Standard JDM Spec C MY03 Engine & Turbo
K&N Panel Filter
Standard Inlet Pipe
ScoobySport Twin Scroll De-Catted Exhaust System - 3" from turbo to backbox, no resonator, straight back box design
 ECUTEK remapped ECU modified from basic UK Fuel map
Uprated Actuator
3 Port Boost Solenoid
Peak Boost - 1.6bar
Fuel - Optimax
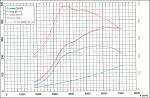
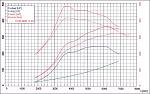
(Graphs show TEST9 Vs TEST8 & TEST 9 Vs Baseline)
TEST 9 figure achieved was 359.5bhp @ Flywheel with 479.8Nm (353.83 lb ft) torque
TEST 9 – As Per TEST8 plus Standard Inlet Pipe - Comments
TEST 9 +41.3bhp +52.80lbft (peak) over Base Line
TEST 9 - 1.6bhp - 2.44lbft (peak) over TEST8
Some interesting results perhaps!!
Ok... the peak figures had only altered very slightly, but it was clear (looking at the above graph) that the standard inlet was gaining more power and torque during spool up, but lost out to the non-restrictive inlet pipe from approx 5000rpm onwards.
Well based on theories, the more restrictive inlet would seem to be creating a higher air speed going in to the turbo aiding power lowdown, but this same restrictive nature of the inlet pipe was causing airflow restriction further up the rev range.
To be perfectly honest the results and theory seems perfectly acceptable and without a doubt a restrictive inlet would hamper power high up the rev range, but also descreased air speed would have the opposite effect lowdown.
This would certainly be an area we would have to consider, when looking at Stage 2.
K&N Panel Filter
Standard Inlet Pipe
ScoobySport Twin Scroll De-Catted Exhaust System - 3" from turbo to backbox, no resonator, straight back box design
Uprated Actuator
3 Port Boost Solenoid
Peak Boost - 1.6bar
Fuel - Optimax
(Graphs show TEST9 Vs TEST8 & TEST 9 Vs Baseline)
TEST 9 figure achieved was 359.5bhp @ Flywheel with 479.8Nm (353.83 lb ft) torque
TEST 9 – As Per TEST8 plus Standard Inlet Pipe - Comments
TEST 9 +41.3bhp +52.80lbft (peak) over Base Line
TEST 9 - 1.6bhp - 2.44lbft (peak) over TEST8
Some interesting results perhaps!!
Ok... the peak figures had only altered very slightly, but it was clear (looking at the above graph) that the standard inlet was gaining more power and torque during spool up, but lost out to the non-restrictive inlet pipe from approx 5000rpm onwards.
Well based on theories, the more restrictive inlet would seem to be creating a higher air speed going in to the turbo aiding power lowdown, but this same restrictive nature of the inlet pipe was causing airflow restriction further up the rev range.
To be perfectly honest the results and theory seems perfectly acceptable and without a doubt a restrictive inlet would hamper power high up the rev range, but also descreased air speed would have the opposite effect lowdown.
This would certainly be an area we would have to consider, when looking at Stage 2.
Last edited by ex-webby; Jan 28, 2007 at 04:53 PM.
Thread Starter
Orange Club
Joined: Oct 1998
Posts: 13,763
Likes: 1
TEST 9 – As Per TEST8 plus Standard Inlet Pipe – Road Test
Upon road testing the car did'nt really feel much different to be honest, apart from feeling brighter on spool up. But obviously at this stage small changes were harder to realise, when continously testing.
For the purpose of our end goal (centered around driveability, but being aware of costs), it was decided that the standard inlet would stay. The benefit of better power/torque low down, together with not having to spend money on something that really wasnt needed at this stage far out weighed the benefit of slightly more power in the higher rpm area.
However, it was now apparant that we had now started to find the limitations of the inlet side of the car, namely the standard airbox and inlet pipe. With this in mind, we decided on one last push to spend a bit more time on the mapping, especially concerning driveability, on and off boost, part throttle and in gear boost parameters.
Last edited by ex-webby; Jan 28, 2007 at 04:53 PM.
Thread Starter
Orange Club
Joined: Oct 1998
Posts: 13,763
Likes: 1
TEST 10 – As Per TEST9 plus remapping – Overview
We were confident that we had tested (within reason) all we could regarding varying changes to the inlet in the quest to understand the limitations. With this in mind (and happy with what we had found out) we decided to have a final concertive push on tweaking the map to further improve driveability.
Make no mistake.... while finding products that work is one thing, another equally important factor is the mapping to get the best out of the engine and it's bolt on products.
With all the benefits of the later ECU's and ECUTEK it was now time to delve in to this arena.
TEST 10 – As Per TEST9 plus remapping - Summary of Spec
 Standard JDM Spec C MY03 Engine & Turbo
K&N Panel Filter
Standard Inlet Pipe
ScoobySport Twin Scroll De-Catted Exhaust System - 3" from turbo to backbox, no resonator, straight back box design
ECUTEK remapped ECU modified from basic UK Fuel map
Uprated Actuator
3 Port Boost Solenoid
Peak Boost - 1.6bar
Fuel - Optimax
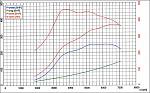
(Graph shows TEST10)
TEST 10 figure achieved was 368.4bhp @ Flywheel with 457.0Nm (337.02 lb ft) torque
We were confident that we had tested (within reason) all we could regarding varying changes to the inlet in the quest to understand the limitations. With this in mind (and happy with what we had found out) we decided to have a final concertive push on tweaking the map to further improve driveability.
Make no mistake.... while finding products that work is one thing, another equally important factor is the mapping to get the best out of the engine and it's bolt on products.
With all the benefits of the later ECU's and ECUTEK it was now time to delve in to this arena.
TEST 10 – As Per TEST9 plus remapping - Summary of Spec
K&N Panel Filter
Standard Inlet Pipe
ScoobySport Twin Scroll De-Catted Exhaust System - 3" from turbo to backbox, no resonator, straight back box design
ECUTEK remapped ECU modified from basic UK Fuel map
Uprated Actuator
3 Port Boost Solenoid
Peak Boost - 1.6bar
Fuel - Optimax
(Graph shows TEST10)
TEST 10 figure achieved was 368.4bhp @ Flywheel with 457.0Nm (337.02 lb ft) torque
Last edited by ex-webby; Jan 28, 2007 at 04:53 PM.
Thread Starter
Orange Club
Joined: Oct 1998
Posts: 13,763
Likes: 1
TEST 10 – As Per TEST9 plus remapping - Comments
TEST 10 +50.2bhp +35.99lbft (peak) over Base Line
TEST 10 + 8.9bhp -16.81lbft (peak) over TEST9
Great…. Peak power had now moved to 368bhp!!! But unfortunately peak torque had moved down slightly (-16lbft). Upon inspection of the graph above and comparison of the datalogs it was evident that we were not achieving the same boost in 5th gear (gear used for run’s) as previously. Nothing major and certainly something we could change.
Slight differences in the bhp and torque delivery up to 6000rpm, still show area’s for slight improvement compared to TEST9, but again nothing that could not be rectified.
In the same vein though from 6000rpm onwards, TEST10 was either as good as TEST9 or better (both bhp and torque are held better and slightly higher). This was down to the fact we tried to hold slightly higher boost at the top end, while also taking out a small amount of ignition advance at the same load sites.
Of course this only shows part of the picture, and personally I was looking forward to the differences (we had hoped were apparent) on the road across the entire gear range.
TEST 10 – As Per TEST9 plus remapping – Road Test
WOW… what a difference the last lot of mapping changes have made on the road.
Every gear now pulls the boost target and reaches it substantially quicker than previously. The way in which the car accelerates through the gear’s is extremely quick. Ok… the car has always felt quick, but it just feels so much more responsive and urgent in it’s quest for the next gear.
The mid-range punch in 2nd, 3rd and 4th just feels mental now and the part throttle response is brilliant.
Again, these are areas that no rolling road will show in reality, and it is not until you drive the car on the road that you fully realise the benefits of what has been done.
Maybe as you would expect, but comparing what the car is like now against what it was like during the BaseLine stage (such a distant memory) there is simply no comparison.
Of course, big peak power figures were never the goal….. it was increased driveability that was key….. I think I can safely say that all the box’s have now been ticked regardless.
While we could continue tweaking the map etc, it was decided that we were now at a stage that was in reality a good stopping point in readiness for Stage2.
Last edited by ex-webby; Jan 28, 2007 at 04:53 PM.
Thread Starter
Orange Club
Joined: Oct 1998
Posts: 13,763
Likes: 1
Engine Stage 1 – Conclusions
Quite a journey really, highlighting both some pleasing and not so pleasing results!!!
As stated in the Introduction, we were not looking at breaking new ground, as much of the testing had already been carried out by Powerstation during their development of the Litchfield cars, however the information gained has been invaluable and gives plenty of information and idea’s for Stage 2.
The Star Product of the article has to go to the ScoobySport exhaust system. For the cost vs power comparison, this was the single biggest improvement given against cost! This latest design of the ScoobySport exhaust system, showed massive improvements (up to 40bhp and 50lbft in places) throughout the rev range.
Surprises certainly developed concerning the use of the Induction Kit and the issue of surge, but equally were the positive increases that were seen using a replacement panel filter.
While it was a given that Intake Temperatures would raise with an induction kit….. we certainly didn’t expect the level’s that we recorded (quite an eye opener).
Perhaps one of the single biggest area’s NOT to be under estimated is that of the individual completing the ECU Mapping. To put it bluntly, it doesn’t matter what “bolt on” mods you install it’s the Mapper that really makes everything work to potential and crucially the part of the job that undoubtedly has the biggest impact on making the best of any products. You can’t buy experience, and considering Rich has been mapping Impreza’s for nearly 9 years backed up with a much longer period of engineering knowledge/experience developing British GT winning race cars and Championship winning Rally cars, you then realise the benefit of working with someone like this.
Last edited by ex-webby; Jan 28, 2007 at 04:54 PM.
Thread Starter
Orange Club
Joined: Oct 1998
Posts: 13,763
Likes: 1
It was evident that we had reached the limits of the standard airbox, as even with TEST10 we were only managing to hold just over 1.2 bar at peak power��. So to make just under 370bhp on standard fuel, standard airbox and such low boost was very impressive�. But in reality this just goes to show how effective the standard engine is to receiving simple, matched modifications.
Again, even with TEST10 we had no ignition taken out by the ECU, the advance multiplier still at 16 and of course no DET. Certainly more room for slight improvement still, even at this level of tune.
Looking back at one of the later comparison graphs (TEST9 Vs BASELINE) clearly displays the improvements that have been gained, showing peak increases of over 40bhp and 50lbft, while also showing increases of up to 45bhp and 90lbft in other areas of the rpm range! Couple this with the major changes the mapping has made to the driveability (as discussed in TEST8, 9 & 10), the overall package has made this car one hell of a fast road car...... and nothing at the expense of the remit for a normal every day driver.
The other beauty of the final TEST configuration is the standard look in the engine bay, proving that you don�t need to detract too much from the OEM look to achieve gains on the newage Subaru�s.
Thread Starter
Orange Club
Joined: Oct 1998
Posts: 13,763
Likes: 1
Another area of discussion is costs……
Approximate Costs of Products
K&N Air Filter - � 39.00+vat
Silicon Intake Pipe - �200.00+vat
Uprated Actuator - �120.00+vat
Induction Kit - �225.00+vat
Boost Controller - �120.00+vat
ECUTEK (this would be
reduced if the ECU already
had an ECUTEK licence) - �550.00+vat
ScoobySport Exhaust - �T.B.C.
Taking the price list from above and using this to construct an approximate cost per TEST (these prices are without VAT and fitting), clearly shows why TEST8 to TEST10 are so cost effective and further reason why the benefits of the Induction Kit and the Silicon Inlet Pipe were not conducive at this level.
In reality we have only touched the surface of what is possible with the newage Subaru, and as already stated, the results and feedback gained so far will be invaluable for Stage 2. Covering the same format we hope to widen the scope further, looking at other bolt on mod’s to improve on Stage 1. Keep an eye on the Official Article Forum for updates.
Last edited by ex-webby; Jan 28, 2007 at 04:54 PM.
Thread Starter
Orange Club
Joined: Oct 1998
Posts: 13,763
Likes: 1
Reality Checks for Comparison
Without getting too deep in thought, we are all aware that while using a consistent Rolling Road for testing is perfect, you always tend to want to compare figures attained on other Rolling Roads for comparison purposes. Just to add some more benchmark information to this article, the car was taken to another Rolling Road (thanks to WRC Technologies) to compare at a couple of stages.
Comparison 1
 15/07/2005 The following figures were recorded at Powerstation. The graph shows 349.2bhp & 333.33lbft with 30.5 deg C Inlet Temps.
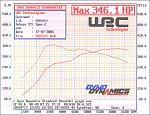 17/07/2005 The following figures were recorded at WRC Technologies. The graph shows 346.1bhp & 369lbft with 31 deg C Inlet Temps.
Comparison 2
 21/07/2005 The following figures were recorded at PowerStation. The graph (TEST8) shows 361.1bhp & 356.27lbft with 26 deg C Inlet Temps.
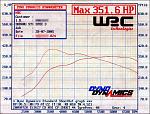 28/07/2005 The following figures were recorded at WRC Technologies. The graph shows 351.6bhp & 396lbft with 30 deg C Inlet Temps.
Personally, I am very happy with this comparison as although the BHP figures between the 2 are certainly within scope (especially considering that the Comparison 2's results from WRC were with inlet's a fair bit higher than Powerstation's), the torque is another issue though, and is probably down to the way the Dyno Dynamics Rolling Road is loaded differently to the MAHA one that PowerStation use. To be perfectly honest the results given by the WRC Technologies rolling road further highlights what magnificient services, products and expertise that PowerStation, LitchField Imports and ScoobySport have provided.
Without getting too deep in thought, we are all aware that while using a consistent Rolling Road for testing is perfect, you always tend to want to compare figures attained on other Rolling Roads for comparison purposes. Just to add some more benchmark information to this article, the car was taken to another Rolling Road (thanks to WRC Technologies) to compare at a couple of stages.
Comparison 1
Comparison 2
Personally, I am very happy with this comparison as although the BHP figures between the 2 are certainly within scope (especially considering that the Comparison 2's results from WRC were with inlet's a fair bit higher than Powerstation's), the torque is another issue though, and is probably down to the way the Dyno Dynamics Rolling Road is loaded differently to the MAHA one that PowerStation use. To be perfectly honest the results given by the WRC Technologies rolling road further highlights what magnificient services, products and expertise that PowerStation, LitchField Imports and ScoobySport have provided.
Last edited by ex-webby; Jan 28, 2007 at 04:54 PM.
Thread Starter
Orange Club
Joined: Oct 1998
Posts: 13,763
Likes: 1
JDM Vs UK
Perhaps an unfair comparison, but a useful one!
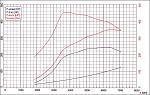
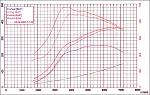 OK.... so a JDM car (especially a SPEC C) differs from a UK car, but what do these differences mean for the driver?! Here is TEST9 Vs a modified UK STi.
As you can see in the comparison graph above, the JDM car produces so much more power throughout the rev range (both bhp and torque), is quicker to create power/spool quicker and also drives so much better on the road. The greatest contributory factor to this is without doubt the twin scroll and equal length header setup of the JDM model. It is also worth pointing out that the UK STi comparison shown above, was modified greater than the JDM car (different turbo as well as similar breathing and exhaust mods as this article) and subsequently cost more to modify to this level.
While peak figure comparison shows +7.5bhp and +27.95lbft advantage to the JDM car, the JDM car shows increases of over 55bhp and 80lbft in other parts of the RPM range! These gains are big in anyones book and further concrete the fact that when comparing power figures you should ALWAYS compare the whole rev range and not just peak figures.
Perhaps an unfair comparison, but a useful one!
As you can see in the comparison graph above, the JDM car produces so much more power throughout the rev range (both bhp and torque), is quicker to create power/spool quicker and also drives so much better on the road. The greatest contributory factor to this is without doubt the twin scroll and equal length header setup of the JDM model. It is also worth pointing out that the UK STi comparison shown above, was modified greater than the JDM car (different turbo as well as similar breathing and exhaust mods as this article) and subsequently cost more to modify to this level.
While peak figure comparison shows +7.5bhp and +27.95lbft advantage to the JDM car, the JDM car shows increases of over 55bhp and 80lbft in other parts of the RPM range! These gains are big in anyones book and further concrete the fact that when comparing power figures you should ALWAYS compare the whole rev range and not just peak figures.
Last edited by ex-webby; Jan 28, 2007 at 04:54 PM.
Thread Starter
Orange Club
Joined: Oct 1998
Posts: 13,763
Likes: 1
Thanks
Huge thanks goes to the mentioned companies for their involvement, expertise and supply of products/services for this article over the past 6 months. The single biggest commendation goes to PowerStation, which without their dedication (beyond my expectations) and expertise this article would not of been possible. Of course working with a company that has been the key development arm for cars such as Litchfields Subaru Type20 and Type25, has reaped many benefits from that specific knowledge/development already gained.
Contact Details:

Powerstation
Northway Trading Estate
Northway Lane
Tewkesbury
Gloucestershire
GL20 8JH
+44 (0)1684 296675
email@powerstation.org.uk

ScoobySport
enquiries@scoobysport.com

Litchfield Imports
Northway Trading Estate
Northway Lane
Tewkesbury
Gloucestershire
GL20 8JH
+44 (0)1684 850999
sales@litimports.co.uk
Huge thanks goes to the mentioned companies for their involvement, expertise and supply of products/services for this article over the past 6 months. The single biggest commendation goes to PowerStation, which without their dedication (beyond my expectations) and expertise this article would not of been possible. Of course working with a company that has been the key development arm for cars such as Litchfields Subaru Type20 and Type25, has reaped many benefits from that specific knowledge/development already gained.
Contact Details:
Powerstation
Northway Trading Estate
Northway Lane
Tewkesbury
Gloucestershire
GL20 8JH
+44 (0)1684 296675
email@powerstation.org.uk
ScoobySport
enquiries@scoobysport.com
Litchfield Imports
Northway Trading Estate
Northway Lane
Tewkesbury
Gloucestershire
GL20 8JH
+44 (0)1684 850999
sales@litimports.co.uk
Last edited by ex-webby; Jan 28, 2007 at 04:54 PM.

Thread
Thread Starter
Forum
Replies
Last Post
Mattybr5@MB Developments
Full Cars Breaking For Spares
28
Dec 28, 2015 11:07 PM