
Interior


Thread Starter
Orange Club
Joined: Oct 1998
Posts: 13,763
Likes: 1
Note: If you have problems changing pages on this article, please ensure you have the following option set in your USERCP -> "Number of Posts to Show Per Page" set to "Use Forum Default"
Moving towards the remit of converting the car to be track orientated (as regards to Engine Stage 2 and beyond), we also decided to expand this to the interior. Following this remit, it made sense to keep both safety and functionality in mind, together with weight loss (where possible) as an added bonus.
SUPPORT AND SUPPLY OF PRODUCTS AND SERVICES FOR INTERIOR

Powerstation - Technical Help/Guidance, Workshop Facilities (fitment of products and interior removal)

ScoobySport - Technical Help, Product Supplier
PSI3 - Product Supplier

API - Technical Help/Guidance, Product Supplier
This remit could of covered many different approaches and of course it all depends on the intended use, dictating how far any given approach would take. All this has to be weighed up and costed for, as you may appreciate while equipment (anything motorsport seem�s to command higher prices) is not cheap, you also have to cost any depreciation that modifications could have against a vehicle (having a weld in roll cage for instance).
Interior modifications will be split in to 3 sections for the purpose of this article, namely:
Moving towards the remit of converting the car to be track orientated (as regards to Engine Stage 2 and beyond), we also decided to expand this to the interior. Following this remit, it made sense to keep both safety and functionality in mind, together with weight loss (where possible) as an added bonus.
SUPPORT AND SUPPLY OF PRODUCTS AND SERVICES FOR INTERIOR
Powerstation - Technical Help/Guidance, Workshop Facilities (fitment of products and interior removal)
ScoobySport - Technical Help, Product Supplier
PSI3 - Product Supplier
API - Technical Help/Guidance, Product Supplier
This remit could of covered many different approaches and of course it all depends on the intended use, dictating how far any given approach would take. All this has to be weighed up and costed for, as you may appreciate while equipment (anything motorsport seem�s to command higher prices) is not cheap, you also have to cost any depreciation that modifications could have against a vehicle (having a weld in roll cage for instance).
Interior modifications will be split in to 3 sections for the purpose of this article, namely:
- Gauges
- Weight Saving
- Safety
Last edited by ex-webby; Feb 19, 2008 at 05:16 PM.
Thread Starter
Orange Club
Joined: Oct 1998
Posts: 13,763
Likes: 1
Gauges
 To gauge or not to gauge? That is the question!Many people have arguments, for and against this. For a road car at nominal levels of tune (assuming a car has been setup correctly), I can quite understand that any gauges over standard are not a necessity (but obviously can be useful). For a car that is to be used on track though, I think specific gauges are a necessity. Obviously, at the end of the day the decision is down to the owner and there are a number of nice packages available should the wish to go down this route be taken. A PSI3 Data Monitor , is a
 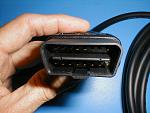 multifunction device that utilises the 16 pin OBD connector (multiplug under the lower dash on the drivers side - shown to the right). The unit is available in many different fitment types, but for this we are looking at the DIN fitment (to be mounted in the centre console).
This monitor allows the driver to look at the following live data:
Some are more useful than others, in particular the Battery Voltage, Intake Temperature, Air/Fuel Ratio, Boost and Oil Pressure/Temperature.Not only does this unit provide live readings, but it also has some other interesting features……
This monitor allows the driver to look at the following live data:
- Battery Voltage
- Engine Speed
- Vehicle Road Speed
- Coolant Temperature
- Intake Temperature (at the MAF sensor)
- Fuel Injector Pulse Width
- Ignition Point
- Knock Correction
- Lambda air/fuel ratio
- Throttle Position
- Air Flow Meter Mass
- Boost Pressure
- Oil Pressure (with appropriate additional sensor)
- Oil Temperature (with appropriate additional sensor)
Some are more useful than others, in particular the Battery Voltage, Intake Temperature, Air/Fuel Ratio, Boost and Oil Pressure/Temperature.Not only does this unit provide live readings, but it also has some other interesting features……
Last edited by ex-webby; Jan 28, 2007 at 04:38 PM.
Thread Starter
Orange Club
Joined: Oct 1998
Posts: 13,763
Likes: 1
User Adjustable Alarms for:
Battery Voltage Low
Battery Voltage High
Boost Pressure
Coolant Temperature
Oil Pressure
Oil Temperature
This enables the user to either trigger a LED or buzzer, when a predefined variable (listed above) is exceeded.
Store PEAK readings for:
Engine Speed
Boost Pressure
Road Speed
Coolant Temperature
Oil Pressure
Oil Temperature
The unit is also capable of controlling both water injection and nitrous hardware.Two of the other biggest convenience features are the fact that not only will it read and display any fault codes picked up by the ECU, but you can also reset the ECU by the touch of a button (none of this leaving the battery or main fuse out for 20 minutes anymore).To be quite honest, for an all in, purposeful and easy to fit unit, this is probably one of the best options available.
 This specific unit was already fitted to the car when I bought it, but had it not been I would of fitted one in any case. This unit has the ability for a shift light, which has been connected to the unit in
 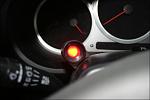 the Spec C�� some may think that is a bit of a gimmick, but considering I want to spend my time looking at what is in front of me and not at my rev counter, it makes perfect sense��. and it certainly does help.
Battery Voltage Low
Battery Voltage High
Boost Pressure
Coolant Temperature
Oil Pressure
Oil Temperature
This enables the user to either trigger a LED or buzzer, when a predefined variable (listed above) is exceeded.
Store PEAK readings for:
Engine Speed
Boost Pressure
Road Speed
Coolant Temperature
Oil Pressure
Oil Temperature
The unit is also capable of controlling both water injection and nitrous hardware.Two of the other biggest convenience features are the fact that not only will it read and display any fault codes picked up by the ECU, but you can also reset the ECU by the touch of a button (none of this leaving the battery or main fuse out for 20 minutes anymore).To be quite honest, for an all in, purposeful and easy to fit unit, this is probably one of the best options available.
Last edited by ex-webby; Jan 28, 2007 at 11:48 AM.
Thread Starter
Orange Club
Joined: Oct 1998
Posts: 13,763
Likes: 1
Installation of PSI3 Data Monitor
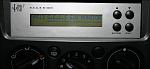
 The PSI3 monitor comes in 2 flavours, one is a LCD display while the other is a VFD (Vacuum Fluorescent Display - shown right). Essentially the units function the same, but the display type is a different technology. The advantage of the VFD is that it can be easier to read in varying light conditions and also comes in various display colours. As part of this article I decided to upgrade my PSI3 unit from a LCD to a VFD one.
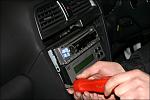 The removal of the carrier that houses DIN sized products. Once you have removed the screw just inside the cup holder (top left hand corner of console), you are then able to pull off the plastic
 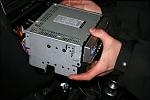 surround of the DIN surround. Once this has been done, you will then see 4 screws in the corners of the DIN carrier. Remove these and you will then be able to pull the DIN carrier out.
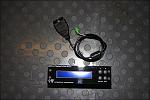
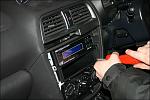 The DIN carrier back in place (minus the head unit - don't need that anymore - and with a DIN bucket in it's place). Everything is then the reverse of the above. Ensure that the OBD loom is
 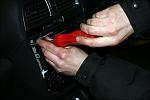 connected to the back of the PSI3 monitor before securing the unit back in the centre console. Loom can then be routed behind the console towards the trim underneath the steering wheel. You can then disengage the OBD socket within this same trim panel and connect both the PSI3 loom to the OBD socket you have just relocated. No other connections are required for the unit itself, as power is fed from the OBD connector on the cars loom.
Last edited by ex-webby; Jan 28, 2007 at 04:39 PM.
Thread Starter
Orange Club
Joined: Oct 1998
Posts: 13,763
Likes: 1
DEFI Gauges and Control Unit (DEFI – Link System)
Some prefer that certain readings are better read from an analogue gauge, rather than a digital one. In specific, boost levels…. the reasoning behind this is that a value that rapidly goes up and down can be harder to view when shown via a digital readout. Obviously this is all down to personal preference, but at least this choice is available. DEFI gauges are available for all manner of readings, but for the purpose of this we will be looking at displaying Boost, Oil Temperature and Oil Pressures levels (all very important factors when running both a tuned car and also a car that will be used either in competition and/or track events – at some point in the future we will look at adding Exhaust Gas Temperature monitoring to this).
The Defi - Link system is a set of electronic gauges that can be mounted on the vehicle dashboard. The design of this system allows each of the gauges to be attached to the control unit II with a single "DAISY CHAIN" wiring system.
Each gauge has two LEDs. One LED illuminates when the gauge indicator exceeds a warning level that can be preset with the Control UnitII. The other LED illuminates when the gauge indicator exceeds a maximum level.
Via the control unit that these gauges “daisy chain” to, other facilities are also available…
Data displayed by these gauges can be recorded and replayed up to 3 minutes.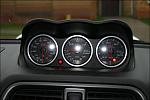 Personally, I think one of the best things about mounting gauges in the Impreza, is the original fitment look of such gauges.The PSI3 gauge mentioned previously, is available for a multitude of different fitments, but the specific one in this car has been fitted in the DIN space within the centre console. Whereas that may seem to use up the obvious mounting place, there is another one (and others besides)…….Subaru seemed to have the forethought and gave us a perfect mounting receptical on a plate…. directly inline with the centre console, on top of the dash! This little cubby hole, flip-top lided hidey place (sound’s good!) can be converted to house gauges perfectly. Many aftermarket suppliers sell gauge pods that mount in this space (removing the flip-top lid), providing the ideal place for many a gauge. As with the PSI3 monitor, the DEFI’s were also installed in the car prior to me purchasing it (good move which saved me time in fitting them) and also installed in this mentioned mounting place.
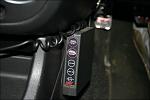 As well as the mounting of the gauges, you will also need to find a suitable place for the controller unit. I have seen a number of these mounted in the space that is taken up by the cupholder in the upper centre console. This one though, has been mounted to the drivers side of the centre console.
Some prefer that certain readings are better read from an analogue gauge, rather than a digital one. In specific, boost levels…. the reasoning behind this is that a value that rapidly goes up and down can be harder to view when shown via a digital readout. Obviously this is all down to personal preference, but at least this choice is available. DEFI gauges are available for all manner of readings, but for the purpose of this we will be looking at displaying Boost, Oil Temperature and Oil Pressures levels (all very important factors when running both a tuned car and also a car that will be used either in competition and/or track events – at some point in the future we will look at adding Exhaust Gas Temperature monitoring to this).
The Defi - Link system is a set of electronic gauges that can be mounted on the vehicle dashboard. The design of this system allows each of the gauges to be attached to the control unit II with a single "DAISY CHAIN" wiring system.
Each gauge has two LEDs. One LED illuminates when the gauge indicator exceeds a warning level that can be preset with the Control UnitII. The other LED illuminates when the gauge indicator exceeds a maximum level.
Via the control unit that these gauges “daisy chain” to, other facilities are also available…
Data displayed by these gauges can be recorded and replayed up to 3 minutes.
- Double warning function by a meter’s LED lamp and a beep.
- Def-Link Indicator (external LED that can be mounted anywhere) blinks if an meter has exceeded a preset warning level.
- Peak levels can be instantly shown.
Last edited by ex-webby; Jan 28, 2007 at 04:39 PM.
Thread Starter
Orange Club
Joined: Oct 1998
Posts: 13,763
Likes: 1
Weight Saving
Many people comment on the fact that UK Newage Subaru’s can seem to be more sluggish then previous UK Classic Shaped Subaru’s (based on a bhp to bhp comparison). Some of this is down to the power to weight ratio between these 2 vehicle types (coupled with transmission changes and drag co-efficiencies etc). Unfortunately as cars progress, trim levels and build quality increases and chassis and body styling changes and more importantly newer safety measures normally mean more weight.
Before we go on to explaining examples of what this can mean, we need to explain the normal way in which vehicles are weighed (according to factory spec weights). All vehicles will have a specified Kerb Weight, and by common meaning this entails the vehicle weight, unladen, but with FULL fuel and all other fluids. If your comparing the weight of your vehicle (say on a weigh bridge) ensure to take this in to account. Another meaning to Kerb Weight was introduced as an EU directive recently and this relates to unladen, 90% fuel, all other fluids PLUS a 68kg driver and 7kg of luggage. While the latter is an optional method (and should be clearly stated as being used in specification listings), it would seem that all known kerb weights for Subaru's are based on the former, so for the purpose of this article that is exactly the method we will be using.
Take for example, the fact that since the introduction of the Saloon Impreza Turbo in this country, the kerb weight of vehicles has gone from 1235kg's to the present MY06 Sti model which weighs in at 1495kg's. That equates to 260kg's (21% increase over Classic) increase. As a direct comparison the power has increased from 208bhp to 276bhp (Original Classic to current MY06 STi). That equates to 68bhp (33% increase over Classic) increase.
Last edited by ex-webby; Jan 28, 2007 at 04:39 PM.
Thread Starter
Orange Club
Joined: Oct 1998
Posts: 13,763
Likes: 1
A common way of comparison, is by using the BHP per Ton method (power to weight ratio). To work this out, you simply take the power of the vehicle in bhp and devide it by (weight/1000).
For example:
Classic has a bhp per ton of 168bhp
MY06 Sti has a bhp per ton of 184bhp
So based on BHP alone, it would be acceptable to state the MY06 Sti is more powerful (which it is), but certainly not the 33% quicker that the straight BHP comparison would suggest (as you need to remember the weight difference as well).
Ok�. None of this is clear and cut, but generally (especially when comparing like for like) a reduction in car weight will certainly make that car quicker than it was previously (and in many cases can be worth a multitude of BHP in comparison).
In all honesty, this was one of the main reasons why I chose the Spec C. With an advertised kerb weight of 1350kg's in RA form, the car had a better power to weight ratio than the MY05 STi at the time, being approximately 120kg's lighter than the STi (of the same year) but having at minimum the same power (the Spec C was known for having more power than a standard JDM STi car).
Just working back through the power to weight ratio calculation above (and for this example using the same bhp figures of 310bhp fro both cars):
MY03 STi has a bhp per ton of 210bhp
MY03 Spec C has a bhp per ton of 230bhp
Then compare a standard Spec C against a UK MY06 STi (based on a standard Spec C having 310bhp)
MY06 STi has a bhp per ton of 184bhp
MY03 Spec C has a bhp per ton of 230bhp
With all things being equal, the above figures would suggest that for a MY06 STi to be as quick as a Standard MY03 Spec C (based on the 310bhp base figure of a Spec C), the MY06 STi would require an overall bhp figure of 345bhp. While this all seem's straight forward, it does highlight that when you are talking apples and apples, weight does indeed have an impact on performance and is something to be considered.
One last comparison.....
The Spec C in this article achieved 368bhp after Stage 1 of Engine Modifications (HERE), to achieve this same power to weight (based on 1350kg) and arguably the same performance, would require a MY05 STi (based on 1470kg) to have 400bhp and a MY06 STi (based on 1495kg) to have 407bhp!
Ok.... thats enough of the comparisons...... let's get down to the real work!
Trending Topics
Thread Starter
Orange Club
Joined: Oct 1998
Posts: 13,763
Likes: 1
Stripping the Interior
As clearly defined above, the Spec C is already much less weight than a comparable model STi of the same year (based on manufacturers figures of a Spec C RA having a kerb weight of 1350kg, as opposed to a STi having a kerb weight of 1470kg). This is down to the fact that the following has been altered on the Spec C RA:
 Inspiration for all of this (and part of the reason to take the car from a pure daily driver to a car that was track orientated) was the PowerStation MY06 TYPE25 Spec C Race Car. After
 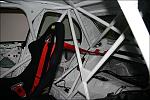 discussing what was required, it was decided to enlist the help of PowerStation to ensure the removal of the interior was completed without breaking anything! For those that have tried this before, there seems to be a knowledge to remove trim, A) because Joe Bloggs does not know where all the fixings are and B) trim panels are notoriously prone to snapping lugs, unless you are aware specifically where to prize them away etc. Since I did'nt want a box full of broken trim parts, PowerStation completed this task.
The initial steps were to remove as much interior trim as possible.
As clearly defined above, the Spec C is already much less weight than a comparable model STi of the same year (based on manufacturers figures of a Spec C RA having a kerb weight of 1350kg, as opposed to a STi having a kerb weight of 1470kg). This is down to the fact that the following has been altered on the Spec C RA:
- Lightened Roof
- Lightened Glass all round
- Smaller Boot Spoiler
- No sound deadening
- Lighter rear seats
- No Boot Interior Trim
- No air conditioning
- No Electric windows/Door mirrors
- No Stereo
- No Central locking
- So, is it really worth stripping any more out of the car?
The initial steps were to remove as much interior trim as possible.
Last edited by ex-webby; Jan 28, 2007 at 04:39 PM.
Thread Starter
Orange Club
Joined: Oct 1998
Posts: 13,763
Likes: 1
So, with several box's full of interior bits the car had now undergone an initial strip (and not one bit of trim was broken in the process -phew!).
Would this strip process actually make any difference to the cars kerb weight? Let's find out!
The car was placed on a weighbridge and returned a kerb weight of 1340kg's.
So based on the book kerb weight, that was 10kg's less...... not much I hear you say. Well, while it may not seem a lot, but it is worth pointing out that the car (at this specific time) has the following (additional weight over standard) items fitted:
- 18" Wheels (and associated tyres)
- Front AP 6 pot Brakes and 355mm rotors
- Big rear wing
- Stereo Head Unit
- Guages and pods
- Security devices x 2
- Strut Brace
- Whiteline Handling Kit
- Electric Windows
- Central Locking
- And.... a glove box full of crap!
Thread Starter
Orange Club
Joined: Oct 1998
Posts: 13,763
Likes: 1
Safety
After the initial strip it was decided to look at Safety next, but with the added advantage of reducing more weight at the same time.
The area that lent it's self to this, was around the front part of the cabin, namely the seats.
As with most cars, the front seats are very heavy. Containing both rigid steel frames to the seats, loads of padding and of course the normal OE seat rails and sliders. On top of this, you have the added weight of the front seat belt mechanisims. So what better way to improve safety and feel, while reducing some more weight...... fit some lightweight bucket seats and harnesses.
Bucket Seats
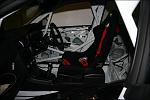
When thinking of replacement, it is obviously paramount to find a seat that is comfortable, which is probably something that is not assumed when using bucket seats. Surely a bucket seat by it's design, with lack of padding will be uncomfortable? Not nessercerily the case with a well chosen model.
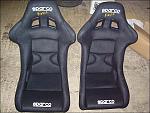 After a lot of searching and speaking with manufacturers, it was decided to get a set of Sparco Evo seats. These seats are especially good, as they come in a variety of sizes as regards to general width. With myself being some what larger than most people at 6ft 6", it was good to find a seat that could be obtained that suited my frame better than most. The EVO seat is available in 3 sizes, medium, large and extra large. I decided to go for Large.
After the initial strip it was decided to look at Safety next, but with the added advantage of reducing more weight at the same time.
The area that lent it's self to this, was around the front part of the cabin, namely the seats.
As with most cars, the front seats are very heavy. Containing both rigid steel frames to the seats, loads of padding and of course the normal OE seat rails and sliders. On top of this, you have the added weight of the front seat belt mechanisims. So what better way to improve safety and feel, while reducing some more weight...... fit some lightweight bucket seats and harnesses.
Bucket Seats
When thinking of replacement, it is obviously paramount to find a seat that is comfortable, which is probably something that is not assumed when using bucket seats. Surely a bucket seat by it's design, with lack of padding will be uncomfortable? Not nessercerily the case with a well chosen model.
Last edited by ex-webby; Jan 28, 2007 at 04:40 PM.
Thread Starter
Orange Club
Joined: Oct 1998
Posts: 13,763
Likes: 1
Apart from finding a seat that is comfortable, it is also worth thinking about how you are going to mount these seats. Some seats come with purpose made brackets and frame work specifically for specific makes of cars (more or less bolt in). Unfortunately this method was not available for the Sparco's, so other methods had to be used. Since it was important (at this stage) not to do anything to the car that could not be reversed, the other normal alternative method of fixing the seat to the car by means of a box section mounting frame welded to the floorplan (ensuring that the side mounts of the seat could then be attached to this) was also out of the question. After a bit of head scratching, it was decided to look at the possibility of using the standard OE sliders.
Deciding to use the standard OE sliders is not that straight forward, as it was accepted that a fair bit of fabrication would need to take place to attach the seats to this. The upside of this, that whilst utilising the standard sliders the existing mounting points could be utilisied, along with the added benefit of adjustability on the slider and a simple bolt in method. Obviously, some weight would have to be retained (in the shape of the OE slider), but the overall benefits seemed positive using this method.
I discussed what I wanted to do with API and subsequently came away with a set of runners from a Classic (as these fit newage mounting points with slight modification) Impreza and some advice on how to go about it.
The next painful step was to start the actual fabrication!
Luckily, one of my friends has a lot of experience in fabrication and more importantly has all the equipment to complete such a task.
Thread Starter
Orange Club
Joined: Oct 1998
Posts: 13,763
Likes: 1
While the overview above sounds quite straight forward, in essence it took about 2 days to complete this task properly. Problems encountered were issues like slight differences in measurements and gapping and problems with metal warping due to the various welding processes. In the end the final product was spot on, but it is certainly something I would not recommend as an easy job..... especially if you don't like the sound of pulling your hair out every 1hr!!!!
Thread Starter
Orange Club
Joined: Oct 1998
Posts: 13,763
Likes: 1
Harnesses
While the seats were out of the car, all the remaining trim and seatbelt equipment was removed from the pillars behind the front cabin. With the new bucket seats in the car, it was now ready to install the harnesses.
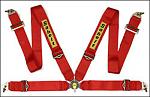 Many different types of harnesses are available, all dependant on what you want. I plumbed for a set of SABELT lightweight 4 point harnesses, since it was deemed that 5 or 6 point ones would be a bit over the top for purpose of this car.
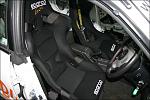 Fitment of the harnesses was very straight forward, utilising a mixture of existing seatbelt and seat rail mounting points. Ideally the shoulder straps should be mounted horizontal to the shoulder and
 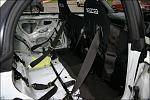 rear cabin, but since (at least for the time being) I won't be entering a "Blue Book" scrutineered event, the fixing eyes have been located within the normal rear seatbelt fixing points. With the new bucket seats and harnesses in, the interior was finished (for now).
Please note..... MOT regulations insist that the aero-type buckle (as seen in the pictures above) is not legal for road use. This has meant that harnesses with the normal buckle (similar to standard belt buckles) are fitted for road legal use.
How does the car feel?
Following these interior modifications, would you expect to feel a difference?! I did!
Strangely enough, driving seated in a bucket seat with harnesses gives you more confidence in the car...... a fair bit more. Hold on before you call me mental! Gone has the bum sliding in the seats when going around a corner, which for me, gave me that much more confidence and more of the feeling that the car is on rails.
Since the car has been stripped, it certainly feels a lot sharper and eager...... thats for sure.
The only downside is possibly the noise levels. If you have a passenger, you do find yourself having to speak much louder and having to speak very loud when giving it some beans! To me that is part of what this car is becoming and certainly does not bother me, if anything it add's to the experience.
Approximate Costs of Products
PSI3 Data Monitor (DIN Mount)- �325.00+vat
DEFI Guages/DEFI Link and Pod - �450.00+vat
Sparco EVO L Seats (Pair) and side mounts - �580.00+vat
Sabelt Harnesses (Pair) - �240.00+vat
While the seats were out of the car, all the remaining trim and seatbelt equipment was removed from the pillars behind the front cabin. With the new bucket seats in the car, it was now ready to install the harnesses.
Please note..... MOT regulations insist that the aero-type buckle (as seen in the pictures above) is not legal for road use. This has meant that harnesses with the normal buckle (similar to standard belt buckles) are fitted for road legal use.
How does the car feel?
Following these interior modifications, would you expect to feel a difference?! I did!
Strangely enough, driving seated in a bucket seat with harnesses gives you more confidence in the car...... a fair bit more. Hold on before you call me mental! Gone has the bum sliding in the seats when going around a corner, which for me, gave me that much more confidence and more of the feeling that the car is on rails.
Since the car has been stripped, it certainly feels a lot sharper and eager...... thats for sure.
The only downside is possibly the noise levels. If you have a passenger, you do find yourself having to speak much louder and having to speak very loud when giving it some beans! To me that is part of what this car is becoming and certainly does not bother me, if anything it add's to the experience.
Approximate Costs of Products
PSI3 Data Monitor (DIN Mount)- �325.00+vat
DEFI Guages/DEFI Link and Pod - �450.00+vat
Sparco EVO L Seats (Pair) and side mounts - �580.00+vat
Sabelt Harnesses (Pair) - �240.00+vat
Last edited by ex-webby; Jan 28, 2007 at 04:40 PM.
Thread Starter
Orange Club
Joined: Oct 1998
Posts: 13,763
Likes: 1
Thanks
Huge thanks goes to the mentioned companies for their involvement, expertise and supply of products/services for this article over the past 3 months.
Contact Details:
Powerstation
Northway Trading Estate
Northway Lane
Tewkesbury
Gloucestershire
GL20 8JH
+44 (0)1684 296675
email@powerstation.org.uk
ScoobySport
enquiries@scoobysport.com
PSI Automotive Technology
+44 (0)1453 793011
+44 (0)7796 992992
API Impreza
3 & 4 Churchlands Farm Ind. Est.
Bascote Road
Harbury
Warwickshire
CV33 9PL
Sales +44 (0)1926 614333
General Enquiries +44 (0)1926 614522
dob@apiengines.com
Last edited by ex-webby; Jan 28, 2007 at 04:40 PM.

Thread
Thread Starter
Forum
Replies
Last Post