
Floyd’s ‘economy’ Stage III


Graham, plenty of loctite on the threads, don't you worry! I'll also try to check them every so often. Where I cut the threads the nut would have trouble to undo its self anyway.
If anyone is wondering what the white stuff is on the turbo its paint. I was trying to mark out the closed waste gate a little better as I didn't have any tippex. The paint was off though and just made a mess") The oil on the turbine is where I flushed the bearings and some passed through to the exhaust blades. It shoulg smoke quite nicely for the first few miles
The oil on the turbine is where I flushed the bearings and some passed through to the exhaust blades. It shoulg smoke quite nicely for the first few miles 
F
If anyone is wondering what the white stuff is on the turbo its paint. I was trying to mark out the closed waste gate a little better as I didn't have any tippex. The paint was off though and just made a mess
The oil on the turbine is where I flushed the bearings and some passed through to the exhaust blades. It shoulg smoke quite nicely for the first few miles F
 . Havent had much of a chance to fully read but looks very detailed.
Scooby Regular
Joined: Feb 2003
Posts: 21,611
Likes: 0
From: Zed Ess Won Hay Tee
re adding clips to stop the samco collapsing
here is where i added mine
excuse the MS paint and laptop thumbpointer thingy style graphics LOL
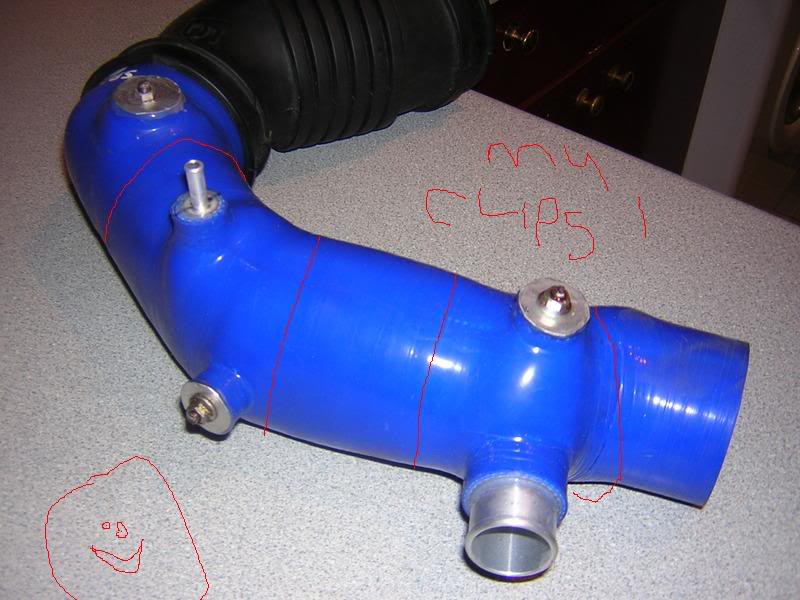
i tightened it up quite a bit, makes it VERY hard, to deform the tube by hand, and is allowing me full boost at the redline, where it was previously collapsing and sucking itself closed
mine is a 3ply model which is the crap one
here is where i added mine
excuse the MS paint and laptop thumbpointer thingy style graphics LOL
i tightened it up quite a bit, makes it VERY hard, to deform the tube by hand, and is allowing me full boost at the redline, where it was previously collapsing and sucking itself closed
mine is a 3ply model which is the crap one
The next mod on the 'to do' list is the STi8 TMIC.
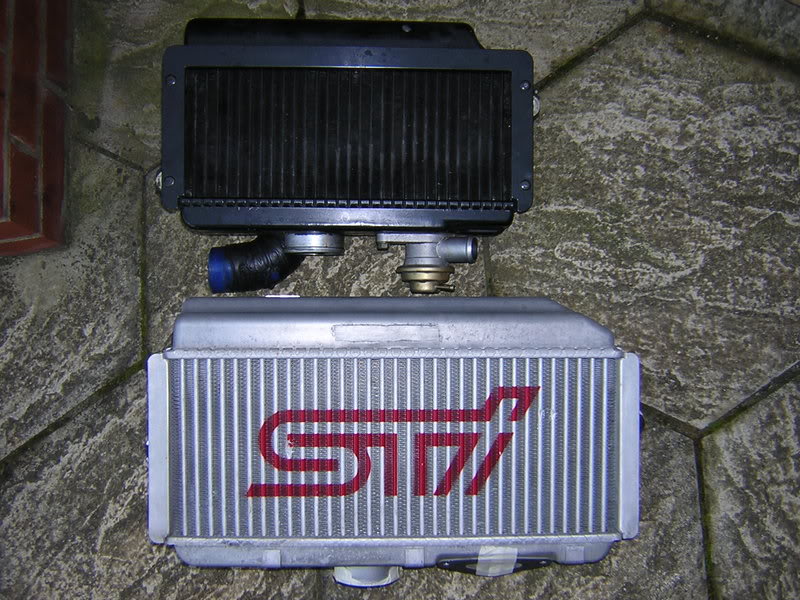
I could only modify the inlet pipes on this item as they have quite a large lip where the hose connects to them. I decided to taper them as much as I dare:

The picture above shows one of the 2 pipes part way through the porting. I just can't seem to help myself once the die grinder gets in my hands
Once that the pipes were fettled I started to work out how to fit the TMIC. I've read most of the projects on here and elsewhere and tried to piece together how to do it. My car is a MY00 so its considered to be one of the easiest classic fitments. I got hold of some new age brackets which are a little closer than existing but they still need work. Some people weld or hammer the brackets to fit but I will try extending them with a bolt on fitment (pictures to come later).
I have ordered so Samco hoses - a 90deg elbow 51mm and a 70mm connector along with some smooth jubilee clips. The original red elbow is too short and the connector is too hard. I'm not sure whether I'll need to cut any metal from the connector off the TMIC as some have done (6mm has been quoted), I'll try without first.
The master cylinder res for the clutch is in the way and I decided not to cut it down because I managed to buy the STi version quite cheaply instead. This was easier than I first thought to fit and the pipes bent easily to fit. I'll need to make a new heat shield though.
F
I could only modify the inlet pipes on this item as they have quite a large lip where the hose connects to them. I decided to taper them as much as I dare:
The picture above shows one of the 2 pipes part way through the porting. I just can't seem to help myself once the die grinder gets in my hands
Once that the pipes were fettled I started to work out how to fit the TMIC. I've read most of the projects on here and elsewhere and tried to piece together how to do it. My car is a MY00 so its considered to be one of the easiest classic fitments. I got hold of some new age brackets which are a little closer than existing but they still need work. Some people weld or hammer the brackets to fit but I will try extending them with a bolt on fitment (pictures to come later).
I have ordered so Samco hoses - a 90deg elbow 51mm and a 70mm connector along with some smooth jubilee clips. The original red elbow is too short and the connector is too hard. I'm not sure whether I'll need to cut any metal from the connector off the TMIC as some have done (6mm has been quoted), I'll try without first.
The master cylinder res for the clutch is in the way and I decided not to cut it down because I managed to buy the STi version quite cheaply instead. This was easier than I first thought to fit and the pipes bent easily to fit. I'll need to make a new heat shield though.
F
 i found that the 90deg pipe needed to be 75mm long from turbo and (i think) 130mm to IC

\m/ ^_^ \m/
Joined: Dec 2001
Posts: 36,816
Likes: 0
From: 2010 Time Attack Club Pro Champion - Powered by ScoobyClinic
yes, centre of the bend so to speak, i had a big enough job working that out myself, but remember that's for my phase 1.5 manifold, not sure what's on yours, Graham would of ordered the same length hose as me

Former Sponsor
iTrader: (234)
Joined: Jan 2003
Posts: 14,406
Likes: 0
From: Over 500ft/lbs of torque @ just 1.1bar
After a day battling with the I/C yesterday here is what I found:
Indeed the Original STi pipework is too short and rigid. I had originally put my old Samcos on but found a leak at the gasket which connect the Y to the i/c. Also found that the pipe kept slipping off on boost occasionally. Its v tight to get the I/C in place but I found it helps to shorten the throttle-body pipe.
I ended up using all the STi pipework apart from the last bit that connects to the turbo. For this I cut the old samco at the same point but leaving a bit more length and connected this. This makes it a much easier job and seems to hold tight. Havent had a chance to give it boost yet but it does seem well fixed. You may also find that the I/C knocks around a little (when reversing etc). I padded all the knock points I could notice with some foam.
Havent fitted any brackets (as yet).
Bob

Scooby Regular
Joined: May 2004
Posts: 11,341
Likes: 1
Mine is an Exacting Fit to say the least.
The Samco hoses come in fixed 'leg length'.
The tube on the TMIC is in full contact with the throttle body 'tube' when in place, visible if i assenble it without the tube of course.
The brackets keep this true, and keep the IC off the bulkhead by the engine fore/aft steady.
I have no knocking/rattles from my TMIC at all which amazes me to be honest its soooo close.
Fitting is a bitch, especially the throttle tube, but i remove the bracket on the fuel filter side completely first and PUSH/SHOVE/SWEAR in that order.
Graham.
This is great stuff chaps, V. helpful. I have placed the TMIC in rough orientation and it looks as if there is enough room without chopping 5mm on my car. I have ordered the TB connecting Samco to aid fitement but I could have ut down the original black rubber jobbie. I also could have cut down my y piece Samco but couldn't bring myself to do it! Last resort I think. If my bracket adapters work I 'may' make a couple more...
F
F
Former Sponsor
iTrader: (234)
Joined: Jan 2003
Posts: 14,406
Likes: 0
From: Over 500ft/lbs of torque @ just 1.1bar
F: you may well get the Samco to fit. Mine did intitially but kept comeing off. In saying that you only have to get a good fit once and clamp it into place. I never did get the good fit with it though.
Chopping up the Samcos was last resort for me and I did think twice as the blasted thing cost too much just to chop it.
Would be interested in the bracket adaptors.
Bob
Chopping up the Samcos was last resort for me and I did think twice as the blasted thing cost too much just to chop it.
Would be interested in the bracket adaptors.
Bob
\m/ ^_^ \m/
Joined: Dec 2001
Posts: 36,816
Likes: 0
From: 2010 Time Attack Club Pro Champion - Powered by ScoobyClinic
if you modify/hammer your bulkhead enough the IC and TB tubes will be far enough apart for you to not cut the TB hose, infact i order one slightly longer than the stock black hose i had that much room
\m/ ^_^ \m/
Joined: Dec 2001
Posts: 36,816
Likes: 0
From: 2010 Time Attack Club Pro Champion - Powered by ScoobyClinic
wasn't aware you could raise it, you can only have it at the same height as the throttle body opening surely? you can tilt the rear up if that's what you mean
\m/ ^_^ \m/
Joined: Dec 2001
Posts: 36,816
Likes: 0
From: 2010 Time Attack Club Pro Champion - Powered by ScoobyClinic
i would guess you can go as far as the rubber seal around the back of the bulkhead, that's where it meets the bonnet, yet to try it on mine so probably not the best person to ask just yet 

Scooby Regular
Joined: May 2004
Posts: 11,341
Likes: 1
Beware!
Take the scoop off (easy) and the undertry/seal and carefully close the bonnet.
The gap is obvious and needs sealing. I removed the scooby seal and made a deeeeeeep sponge rubber foam seal to bridge the 40mm or so gap.
The new seal is stuck onto the periphery of the TMIC and not the tray.
Put the tray/scoop back on and all is well.
Time = 45 mins or so.
Cost = Ł2.50
Can post pics if you need some.(of the finished job)
Graham
Last edited by 911; Mar 31, 2005 at 05:02 PM. Reason: missed a bit
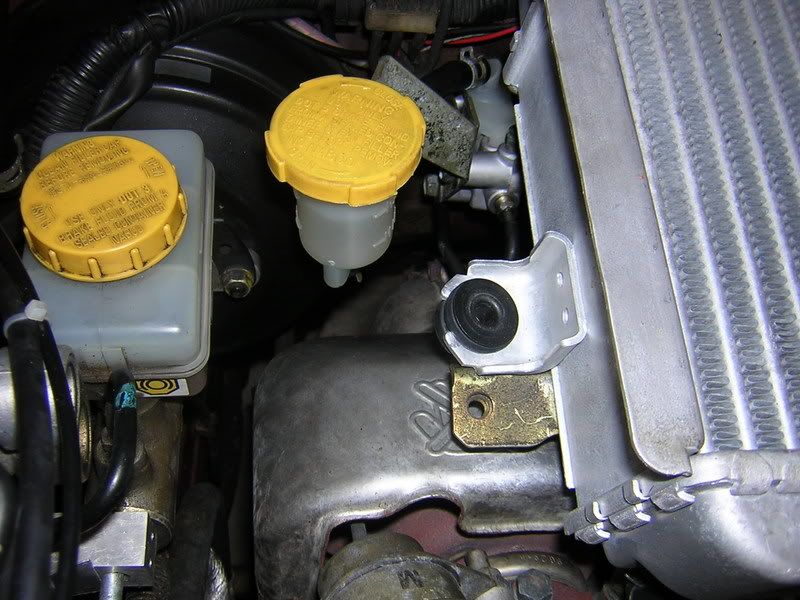
A little more detail on the clutch res change:
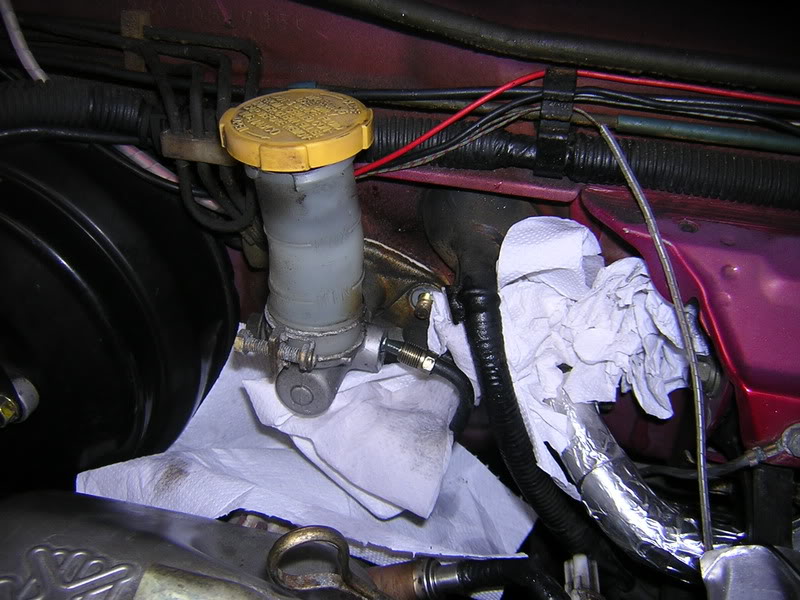
The old one being removed. Bleed top circuit only and remove pipe as shown.

The picture above shows the new res connections but it has 2 where the old one had one! Use the end connection as the side is a bleed connection only.
The installation is next and it fitted really easily to the clutch pedal inside the car - as long as you are flexible and have a good back

You can see the old pipe in it's new position. I just man handled it to fit - quite easy to do. Just refill the new res and pump until the air is removed. The pipe looks close to the exhaust but in reality it isn't. I have made a template for a new shield and I will finish it when I get some more ali.
F
The old one being removed. Bleed top circuit only and remove pipe as shown.
The picture above shows the new res connections but it has 2 where the old one had one! Use the end connection as the side is a bleed connection only.
The installation is next and it fitted really easily to the clutch pedal inside the car - as long as you are flexible and have a good back
You can see the old pipe in it's new position. I just man handled it to fit - quite easy to do. Just refill the new res and pump until the air is removed. The pipe looks close to the exhaust but in reality it isn't. I have made a template for a new shield and I will finish it when I get some more ali.
F
Last edited by Floyd; Mar 31, 2005 at 09:05 PM.
I fitted the STi8 off-side bracket and you can see how close it is. the TMIC rests on it quite nicely so I could measure up the near-side.
The near-side of the TMIC was held in position with a long drill bit:

This will enable me to fabricate an adapter for the STi8 bracket.
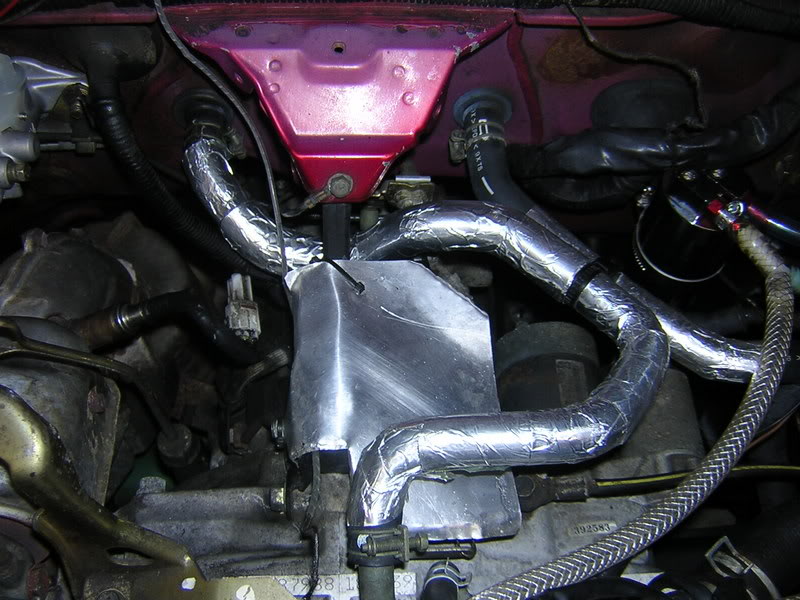
The next picture shows some heat shielding on the heater pips and a small plate to deflect excess water away from the clutch release. I read that too much water spray can affect this so I came up with this solution just in case. You can also see where I have placed the catch can - plenty of room down here...
F
The near-side of the TMIC was held in position with a long drill bit:
This will enable me to fabricate an adapter for the STi8 bracket.
The next picture shows some heat shielding on the heater pips and a small plate to deflect excess water away from the clutch release. I read that too much water spray can affect this so I came up with this solution just in case. You can also see where I have placed the catch can - plenty of room down here...
F