VW Bus project
 11 February 2012, 05:13 PM
#1
Scooby Regular
Thread Starter
iTrader: (6)

Join Date: Aug 2007
Location: Llanelli with a spanner in my hand!
Posts: 2,260
Likes: 0
Received 0 Likes
on
0 Posts
Not scooby related but I thought I'd post on here for some of you to enjoy.
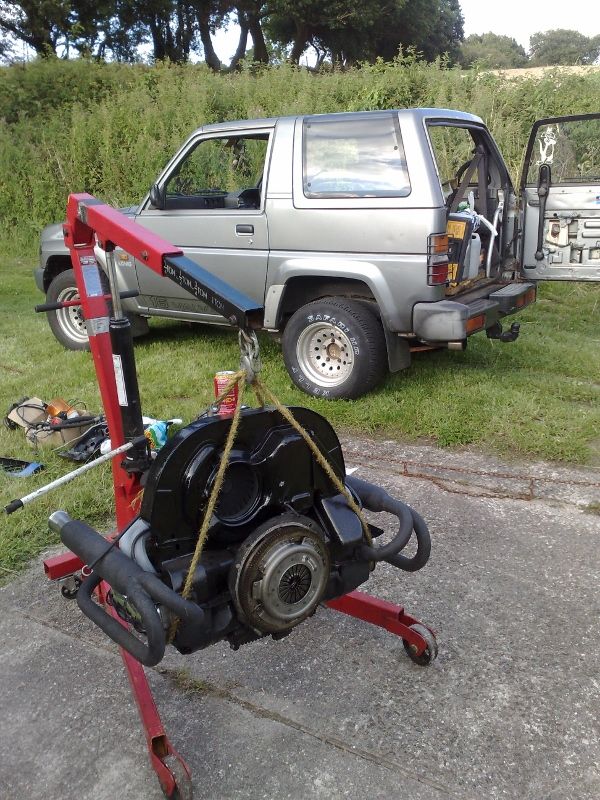
I bought the van last summer as a present for the wife. The plan was to buy a van with sound body work and sort out the interior / mechanicals. Here's some pics of when she was first bought.


Nothing changed for a few months due to a baby turning up soon
Now the boy has arrived I can get on with the camper ready for the summer. Took the engine out on the weekend, it took a little longer than I expected, but it's out now along with the box.


Got the engine on the stand

Took the exhaust off first, as it was sticking out from the stand. Had a bit of a shock when I removed the pipes, hopefully she'll breath a little easier once I'm done!

Next job is to strip and clean the engine, then sort out the gear linkage bushes. Paint the engine bay, and refit.
Popped down the garage this evening. An hour and half later, the engine went from this:

To this!

The underside was a bit oily.

The pushrod tube seals were knackered, so that's why it was leaking oil.

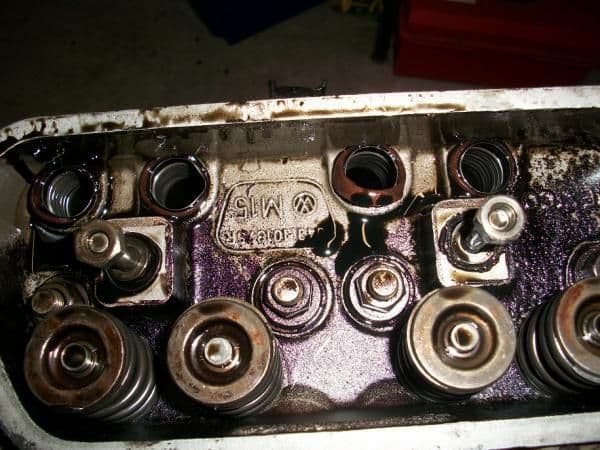
Found metal in the cylinder, so need to find out where that has come from.

Plenty of crud on the top of the pistons, and these are new Mahle parts!

All in all I'm glad I made the decision to strip the engine as it is in dire need of some TLC. Jobs for the morning are splitting the block and checking over the gearbox linkage.
Split the block this morning, it would have gone a little smoother if I had undone all the nuts :roll:

Everything looked ok on the inside apart from the camshaft gear, so a new one of those is on the shopping list.


All I have to do now is order parts and start alot of cleaning! I will post some before and after pics, but it'll be a fortnight before the rebuild starts.
I bought the van last summer as a present for the wife. The plan was to buy a van with sound body work and sort out the interior / mechanicals. Here's some pics of when she was first bought.
Nothing changed for a few months due to a baby turning up soon
Now the boy has arrived I can get on with the camper ready for the summer. Took the engine out on the weekend, it took a little longer than I expected, but it's out now along with the box.
Got the engine on the stand
Took the exhaust off first, as it was sticking out from the stand. Had a bit of a shock when I removed the pipes, hopefully she'll breath a little easier once I'm done!
Next job is to strip and clean the engine, then sort out the gear linkage bushes. Paint the engine bay, and refit.
Popped down the garage this evening. An hour and half later, the engine went from this:
To this!
The underside was a bit oily.
The pushrod tube seals were knackered, so that's why it was leaking oil.
Found metal in the cylinder, so need to find out where that has come from.
Plenty of crud on the top of the pistons, and these are new Mahle parts!
All in all I'm glad I made the decision to strip the engine as it is in dire need of some TLC. Jobs for the morning are splitting the block and checking over the gearbox linkage.
Split the block this morning, it would have gone a little smoother if I had undone all the nuts :roll:
Everything looked ok on the inside apart from the camshaft gear, so a new one of those is on the shopping list.
All I have to do now is order parts and start alot of cleaning! I will post some before and after pics, but it'll be a fortnight before the rebuild starts.
Last edited by redwards; 11 February 2012 at 05:15 PM.
 11 February 2012, 06:36 PM
#3
Scooby Regular
Thread Starter
iTrader: (6)
Join Date: Aug 2007
Location: Llanelli with a spanner in my hand!
Posts: 2,260
Likes: 0
Received 0 Likes
on
0 Posts
I'm sticking with the 1.6 for now, but there may be a future project involving a turbo. 
I bought one that was fairly straight bodywise, so there won't be much to do there. I need to sort out the poptop roof and paint the top half white.
I bought one that was fairly straight bodywise, so there won't be much to do there. I need to sort out the poptop roof and paint the top half white.
11 February 2012, 07:33 PM
#4
Scooby Regular
iTrader: (13)
Join Date: Apr 2010
Location: Swansea
Posts: 4,008
Likes: 0
Received 0 Likes
on
0 Posts
Looking good mate.
This is my mates 1954 prototype hes rebuilding.

The Subaru engines are developed from the Van engine.
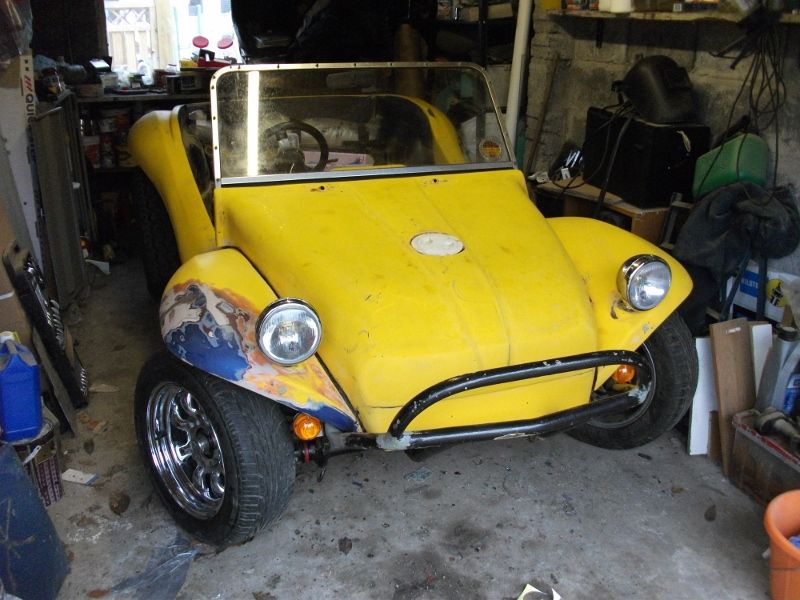
This is my Bro`s Beetle based beach buggy, with my Impreza not long after I bought it and was near the end of getting it ready for MOT.
The 1303 engine was bored out to 1800/2000 from 1600cc (can`t remember which), and was set up by a local guy who used to race them in the 1960`s.

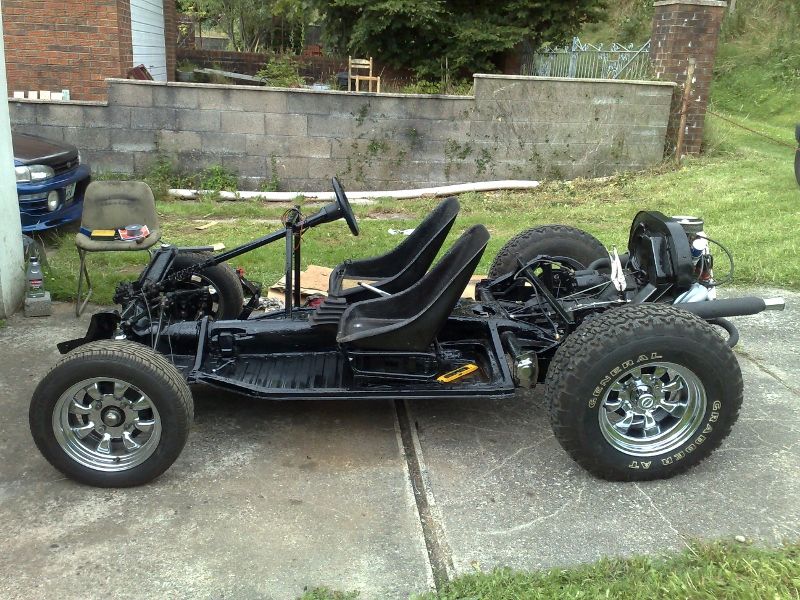
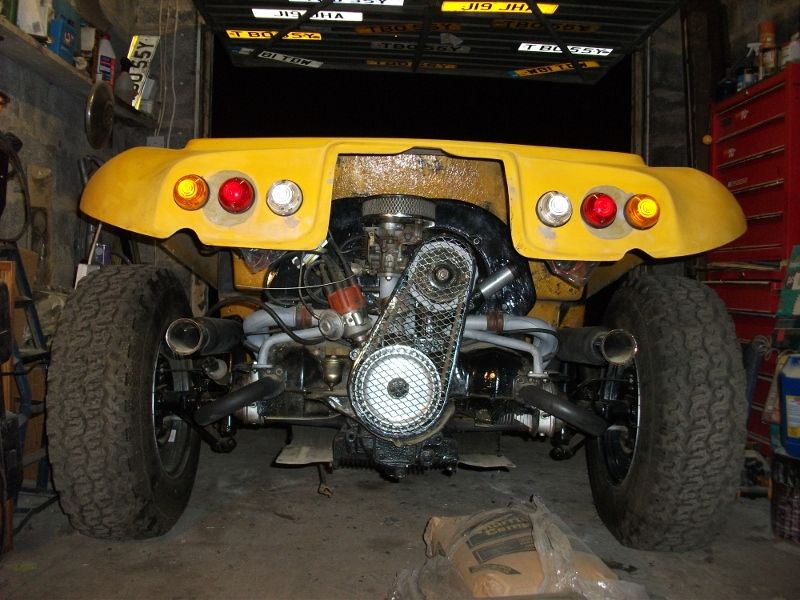
So I`ve have had some fun on these old flat fours.
This is my mates 1954 prototype hes rebuilding.
The Subaru engines are developed from the Van engine.
This is my Bro`s Beetle based beach buggy, with my Impreza not long after I bought it and was near the end of getting it ready for MOT.
The 1303 engine was bored out to 1800/2000 from 1600cc (can`t remember which), and was set up by a local guy who used to race them in the 1960`s.
So I`ve have had some fun on these old flat fours.
Last edited by Jimbob; 11 February 2012 at 07:37 PM.
 12 February 2012, 07:36 PM
#6
Scooby Regular
Thread Starter
iTrader: (6)
Join Date: Aug 2007
Location: Llanelli with a spanner in my hand!
Posts: 2,260
Likes: 0
Received 0 Likes
on
0 Posts
The previous owner did all the hard work, body work wise. Although the are are some bubbles in the paint but this may be his dodgy welding.


14 February 2012, 01:49 PM
#7
Top project to do there mate,i still enjoy watching re-runs of campervan crises on tv.
Are you planning more of a user friendly RV or a wolf in sheeps clothing sport bus?
I've never seen so much coke build up on an exhaust,cleaning it up will probably double the hp.lol . Good luck and keep us informed.
Are you planning more of a user friendly RV or a wolf in sheeps clothing sport bus?
I've never seen so much coke build up on an exhaust,cleaning it up will probably double the hp.lol . Good luck and keep us informed.
Trending Topics
14 February 2012, 10:19 PM
#8
Scooby Regular
Thread Starter
iTrader: (6)
Join Date: Aug 2007
Location: Llanelli with a spanner in my hand!
Posts: 2,260
Likes: 0
Received 0 Likes
on
0 Posts
It's for the wife so it'll stay as a gentle 1600 for a few years, then perhaps I'll look at power. Been reading a thread about a guy who fitted a 07 wrx engine in one, had it mapped by Bob Rawle and produced 330 on the rollers. It took a lot work just to setup the cooling, brakes, etc so I'm not sure yet.
Part of the build up in the exhaust was gasket sealant which had squeezed in pipe work when the previous owner fitted the exhaust.
Part of the build up in the exhaust was gasket sealant which had squeezed in pipe work when the previous owner fitted the exhaust.
14 February 2012, 10:54 PM
#9
Scooby Regular
iTrader: (13)
Join Date: Apr 2010
Location: Swansea
Posts: 4,008
Likes: 0
Received 0 Likes
on
0 Posts
It's for the wife so it'll stay as a gentle 1600 for a few years, then perhaps I'll look at power. Been reading a thread about a guy who fitted a 07 wrx engine in one, had it mapped by Bob Rawle and produced 330 on the rollers. It took a lot work just to setup the cooling, brakes, etc so I'm not sure yet.
Part of the build up in the exhaust was gasket sealant which had squeezed in pipe work when the previous owner fitted the exhaust.
Part of the build up in the exhaust was gasket sealant which had squeezed in pipe work when the previous owner fitted the exhaust.
Last edited by Jimbob; 14 February 2012 at 10:56 PM.
25 February 2012, 06:45 PM
#12
Scooby Regular
Thread Starter
iTrader: (6)
Join Date: Aug 2007
Location: Llanelli with a spanner in my hand!
Posts: 2,260
Likes: 0
Received 0 Likes
on
0 Posts
Not too much news, been cleaning bits today, before stopping to watch Wales win the rugby.
Block and Pistons came up ok


Then the bad news began, the top of this piston is damaged, not sure if it was dropped or the result of valve contact.

One of the heads has a crack from the sparkplug hole all the way to under the vavle seat, so I need to see if this can be repaired.

To top it all, the other head looks like it has been damaged from valve contact.

Looking at the cylinders, they are bore washed so will need honing. Now I need to decided wether to repair or buy new. The way it's going, it'll be cheaper to buy a head kit or a long block for �700 ish from TES.
Block and Pistons came up ok
Then the bad news began, the top of this piston is damaged, not sure if it was dropped or the result of valve contact.
One of the heads has a crack from the sparkplug hole all the way to under the vavle seat, so I need to see if this can be repaired.
To top it all, the other head looks like it has been damaged from valve contact.
Looking at the cylinders, they are bore washed so will need honing. Now I need to decided wether to repair or buy new. The way it's going, it'll be cheaper to buy a head kit or a long block for �700 ish from TES.

 .
.
 27 March 2012, 09:51 AM
#19
Scooby Regular
Thread Starter
iTrader: (6)
Join Date: Aug 2007
Location: Llanelli with a spanner in my hand!
Posts: 2,260
Likes: 0
Received 0 Likes
on
0 Posts
Quick update for you all.
Been delayed a bit due to me chipping a bone in my foot
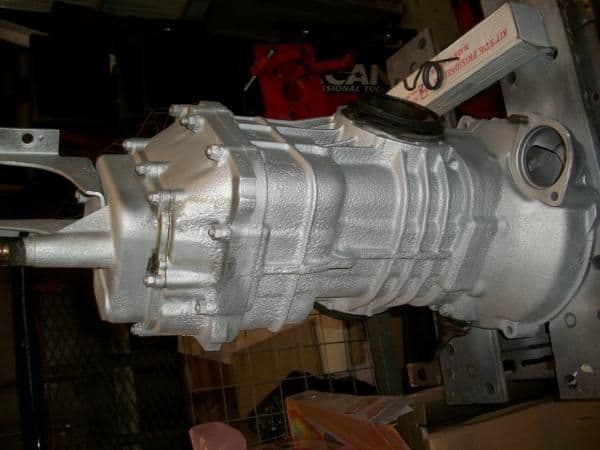
I cleaned up the crankcase and gearbox, refreshed them with a quick dusting of paint.

Had problems assembling the short block, due to the bearings not fitting in the dowels. Cost me �40, but lesson learnt.
Currently having trouble finding new 10mm studs for a sensible price, so it looks like I may have to reuse the old ones.
Been delayed a bit due to me chipping a bone in my foot
I cleaned up the crankcase and gearbox, refreshed them with a quick dusting of paint.
Had problems assembling the short block, due to the bearings not fitting in the dowels. Cost me �40, but lesson learnt.
Currently having trouble finding new 10mm studs for a sensible price, so it looks like I may have to reuse the old ones.
17 April 2012, 10:30 PM
#21
Scooby Regular
Thread Starter
iTrader: (6)
Join Date: Aug 2007
Location: Llanelli with a spanner in my hand!
Posts: 2,260
Likes: 0
Received 0 Likes
on
0 Posts
Well, after a while I have finally made some progress.
When we had the heat wave the other week I decided to sand down and basecoat the engine bay


Tonight I finally had a couple of hours to progress the engine. Forget to take pics at the start, got the cylinders and head fitted loosely on the push rod tubes.

Torqued it all down and fitted rockers and rocker covers.


The other side will be built tomorrow night and I can then start putting all the ancillaries on.
When we had the heat wave the other week I decided to sand down and basecoat the engine bay
Tonight I finally had a couple of hours to progress the engine. Forget to take pics at the start, got the cylinders and head fitted loosely on the push rod tubes.
Torqued it all down and fitted rockers and rocker covers.
The other side will be built tomorrow night and I can then start putting all the ancillaries on.
18 April 2012, 06:52 AM
#25
Scooby Regular
Thread Starter
iTrader: (6)
Join Date: Aug 2007
Location: Llanelli with a spanner in my hand!
Posts: 2,260
Likes: 0
Received 0 Likes
on
0 Posts
Thanks for the comments guys. Damn thing has been pi$$ing me off for so long it's nice to get some positive work down.
They go together great, the problems start when you have to figure out what the last 20 odd owners have done!
They go together great, the problems start when you have to figure out what the last 20 odd owners have done!
18 April 2012, 10:12 PM
#27
Scooby Regular
Thread Starter
iTrader: (6)
Join Date: Aug 2007
Location: Llanelli with a spanner in my hand!
Posts: 2,260
Likes: 0
Received 0 Likes
on
0 Posts
You'll be sorry you asked!
Initial wash with neat truck wash stuff I was given. Sprayed it with Jizer scrubbed it with a brush and hosed it off, more Jizer and a power wash. Sand blast with Alu oxide. Gasket scraper to get all the tetroseal overspray off it. Jizer and a scrub then a hose down. More truck wash stuff and a hose down.
I then painted it with black VHT paint, but it came out a matt smokey black (which made it look dirty) and I was hoping for a gloss finish. So I used the Silver VHT paint left over from the block.
Last edited by redwards; 18 April 2012 at 10:13 PM.
18 April 2012, 10:15 PM
#28
Scooby Regular
Thread Starter
iTrader: (6)
Join Date: Aug 2007
Location: Llanelli with a spanner in my hand!
Posts: 2,260
Likes: 0
Received 0 Likes
on
0 Posts
Fitted the opposite side cylinders and head tonight, and also the oil pump, but left the camera down the garage, so no pics yet.
18 April 2012, 11:38 PM
#30
You'll be sorry you asked!
Initial wash with neat truck wash stuff I was given. Sprayed it with Jizer scrubbed it with a brush and hosed it off, more Jizer and a power wash. Sand blast with Alu oxide. Gasket scraper to get all the tetroseal overspray off it. Jizer and a scrub then a hose down. More truck wash stuff and a hose down.
I then painted it with black VHT paint, but it came out a matt smokey black (which made it look dirty) and I was hoping for a gloss finish. So I used the Silver VHT paint left over from the block.
Initial wash with neat truck wash stuff I was given. Sprayed it with Jizer scrubbed it with a brush and hosed it off, more Jizer and a power wash. Sand blast with Alu oxide. Gasket scraper to get all the tetroseal overspray off it. Jizer and a scrub then a hose down. More truck wash stuff and a hose down.
I then painted it with black VHT paint, but it came out a matt smokey black (which made it look dirty) and I was hoping for a gloss finish. So I used the Silver VHT paint left over from the block.
 .
.