
my 97 uk turbo project (creep)

iv had my 97 uk turbo for two years now and still loving it so excuse the pic heavy begining to my thread  id been on here for almost a year before i even owned a scoob
i started off by searching around on several forums for as much info on what to look out for in a scoob with only a �2.5 k buget
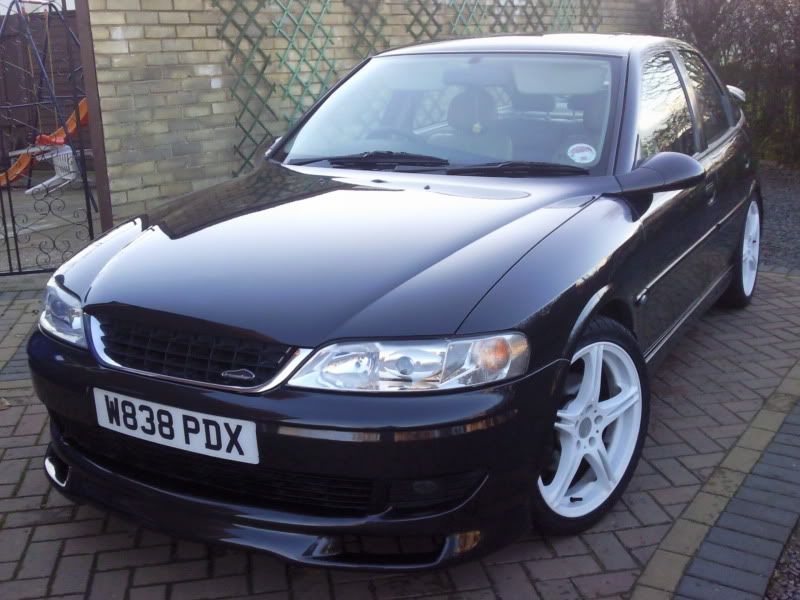
after trawling the net for 4 months or so looking for the most standard ,fsh,cleanest uk scoob my money could buy this turned up on a forcourt 5 mls down the road 92k mls 3 owners fsh and bog standard appart from some braided brake lines so i chopped in the v6 vectra
 ")
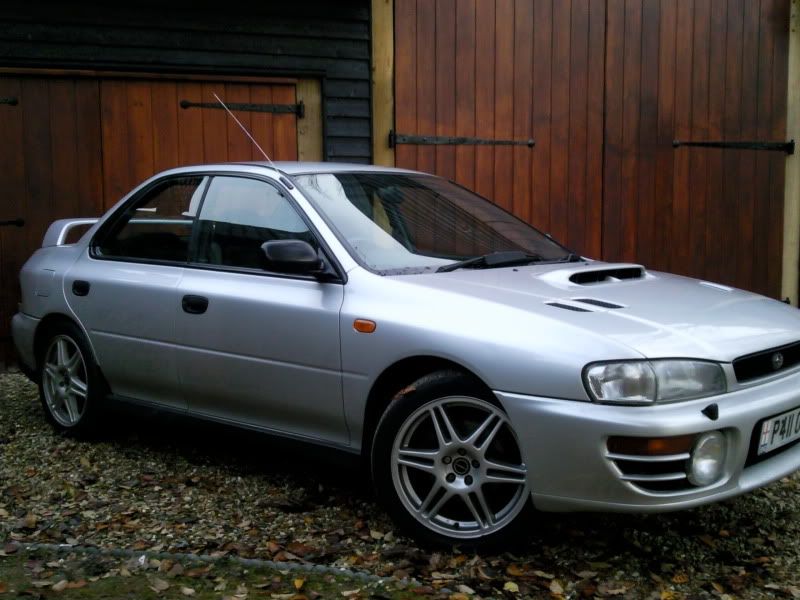
and drove this home
id promsised the mrs i wouldnt be spending any money untill after xmas but ,the mrs said she liked it but the "orion orange indicators had to go" seeing as id been into my vaxhauls before i was straight on the net looking at options and soon fitted some crystal indicators
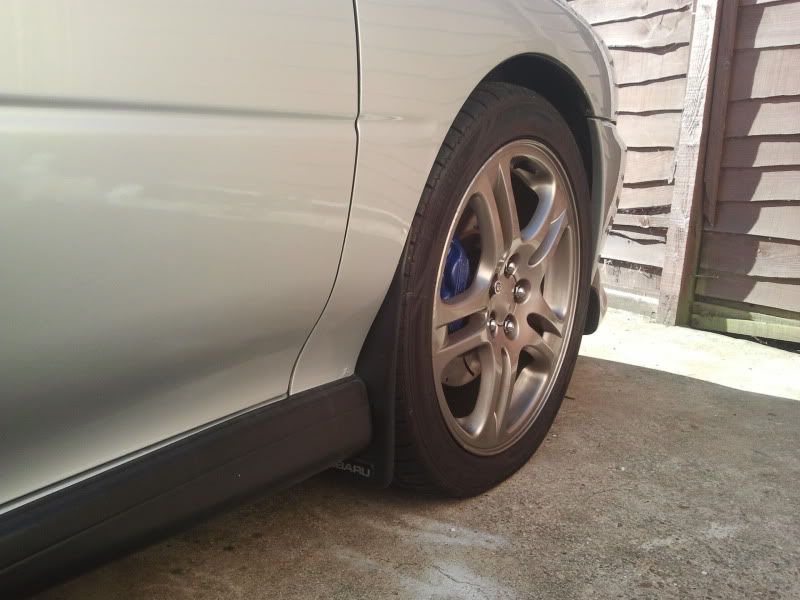
with xmas been n gone next came the abw fog covers ,newage wrx wheels and hta front splitter
shortly followed by the new number plate, tinted rear lights and a magnex 2.5"oval exit cat back
id been on here for almost a year before i even owned a scoob i started off by searching around on several forums for as much info on what to look out for in a scoob with only a �2.5 k buget
after trawling the net for 4 months or so looking for the most standard ,fsh,cleanest uk scoob my money could buy this turned up on a forcourt 5 mls down the road
92k mls 3 owners fsh and bog standard appart from some braided brake lines so i chopped in the v6 vectra 
and drove this home


id promsised the mrs i wouldnt be spending any money untill after xmas but ,the mrs said she liked it but the "orion orange indicators had to go" seeing as id been into my vaxhauls

with xmas been n gone next came the abw fog covers ,newage wrx wheels and hta front splitter

shortly followed by the new number plate, tinted rear lights and a magnex 2.5"oval exit cat back

Last edited by savage bulldogs; May 21, 2013 at 10:04 PM.
first mot came round and it filed through with only a advisory on front droplinks so i fitted some ally front droplinks,carbon sti strutt brace and elbaich pro springs ,as the area i live in is full of potholes and speed bumps, i didnt want to lower or stiffen the suspension to much. Being a 97 uk turbo the 2 pot front brakes were shocking  so i fitted some 4 pots refurbed with stainless pistons and drilled/groved discs and kevlar pads

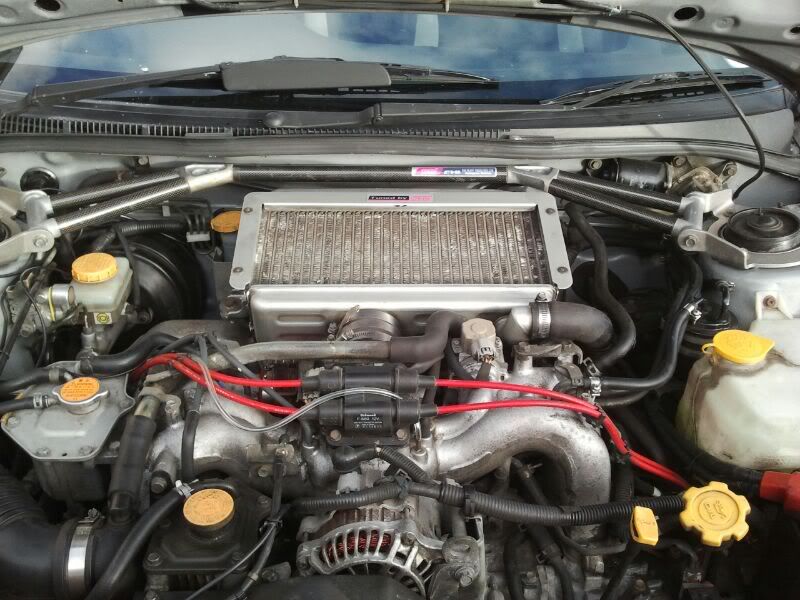
then started on sutble engine mods that wouldnt require a map as at that point the esl was still in testing and didnt fancy the simtec or apexi mainly due to expense but,partcially due to the duel maps ,mafless and factory knock that comes with the esl .so first off a good service (oil flush ,ngk7's and replaced all fluids) followed by k&n pannel filter with resonator delete,cobra belmouth sports cat,v3 sti tmic and a walbro fuel pump. then saved for the esl and re map  which made the standard clutch slip so i fitted a pink box exedy renewed the gearbox oil seals and refilled the box with redline shock proof oil .it was road mapped at the time but, recently it made 265 on the dyno not massive power but you could feel the differance
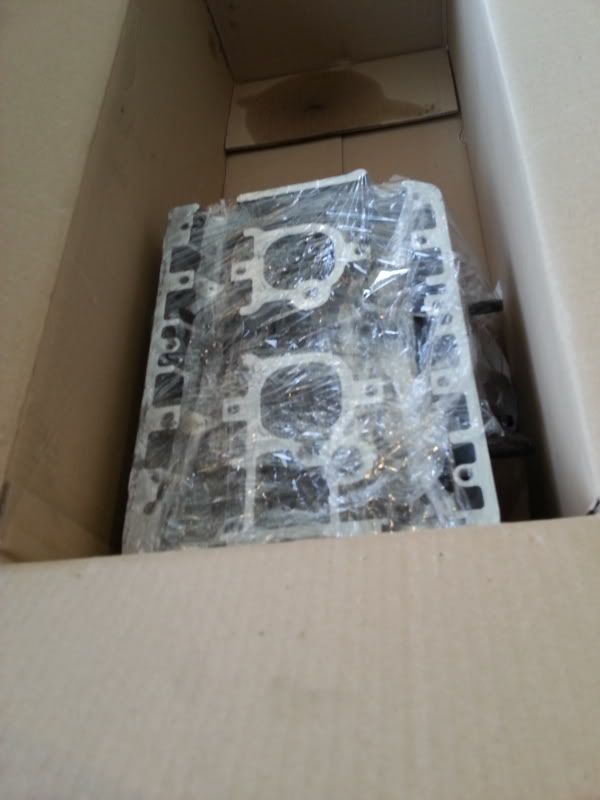
as my brv owns a v1sti when another on came up on here cheap, with a break in the loom, but a few choice mods we bought it with the intension of repairing it as it had a sweet sounding cdb (with graphs showing a healthy 345bhp) but couldnt find the fault so we broke it and i kept the engine . which brings me almost up to date with the next mod in progress a 2ltr forged self build
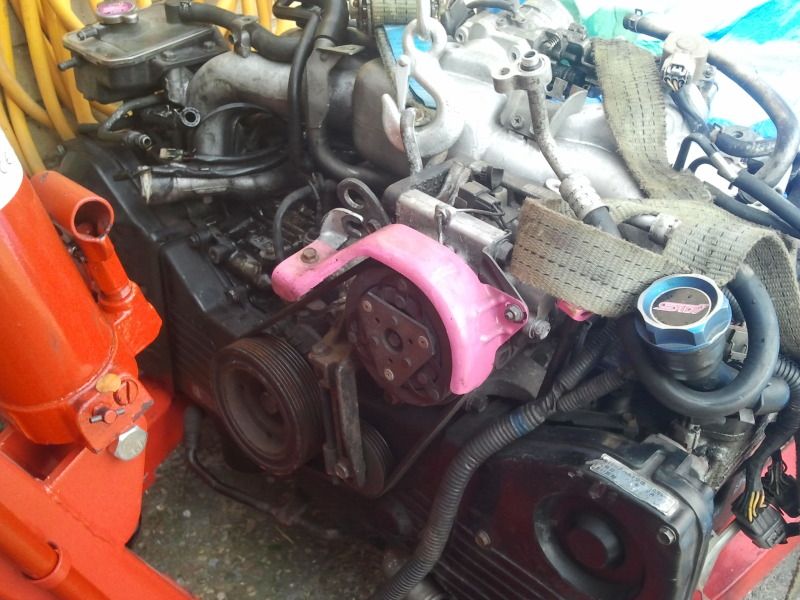
ill get a few pics up of the build so far tomorrow
cheers clive
so i fitted some ally front droplinks,carbon sti strutt brace and elbaich pro springs ,as the area i live in is full of potholes and speed bumps, i didnt want to lower or stiffen the suspension to much. Being a 97 uk turbo the 2 pot front brakes were shocking so i fitted some 4 pots refurbed with stainless pistons and drilled/groved discs and kevlar pads

then started on sutble engine mods that wouldnt require a map
as at that point the esl was still in testing and didnt fancy the simtec or apexi mainly due to expense but,partcially due to the duel maps ,mafless and factory knock that comes with the esl .so first off a good service (oil flush ,ngk7's and replaced all fluids) followed by k&n pannel filter with resonator delete,cobra belmouth sports cat,v3 sti tmic and a walbro fuel pump. then saved for the esl and re map which made the standard clutch slip so i fitted a pink box exedy renewed the gearbox oil seals and refilled the box with redline shock proof oil .it was road mapped at the time but, recently it made 265 on the dyno not massive power but you could feel the differance
as my brv owns a v1sti when another on came up on here cheap, with a break in the loom, but a few choice mods we bought it with the intension of repairing it as it had a sweet sounding cdb (with graphs showing a healthy 345bhp) but couldnt find the fault
so we broke it and i kept the engine . which brings me almost up to date with the next mod in progress a 2ltr forged self build 
ill get a few pics up of the build so far tomorrow
cheers clive
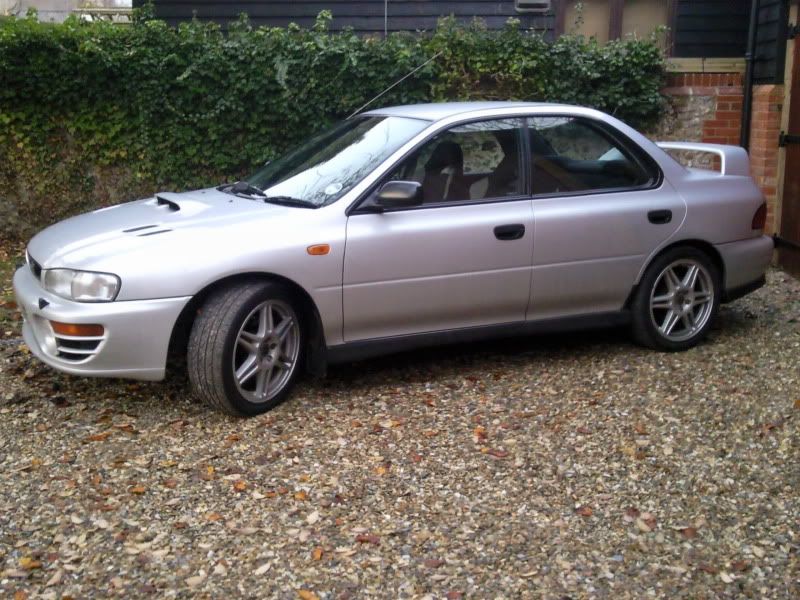
hmm 90 views no comments i hope its the vectra putting people off cos im fairly happy with the outside of the scoob (for now)
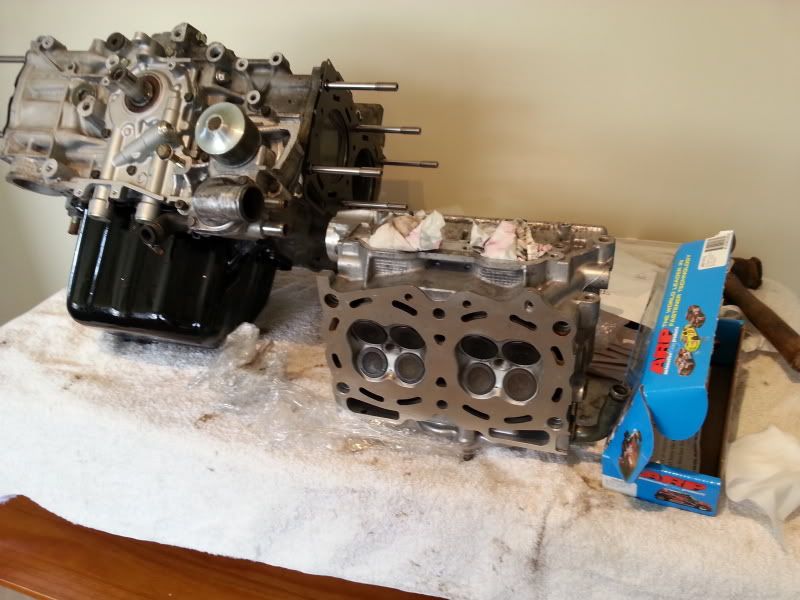
i never intended on building a forged motor as the v1sti engine sounded sweet and was making good power ,just some new bearings and headstuds .so i downloaded the pdf manual on ken gilbert and set about stripping the engine
manifold ,auxiliarys,and cam covers off revealed a newish water pump and timing belt
once the cam covers were off i was surprised to see the inside looking so cleanas the engine is out of a 20 yr old sti it must of had regular services and quality oil
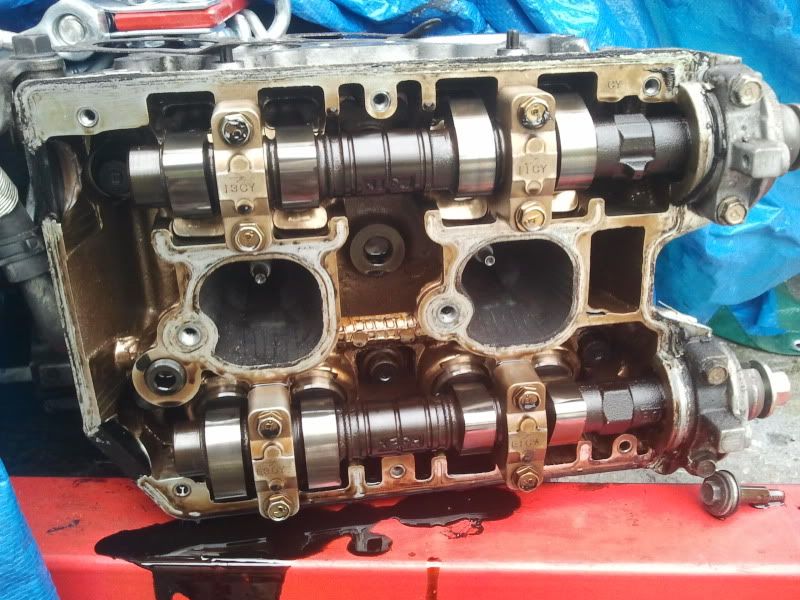
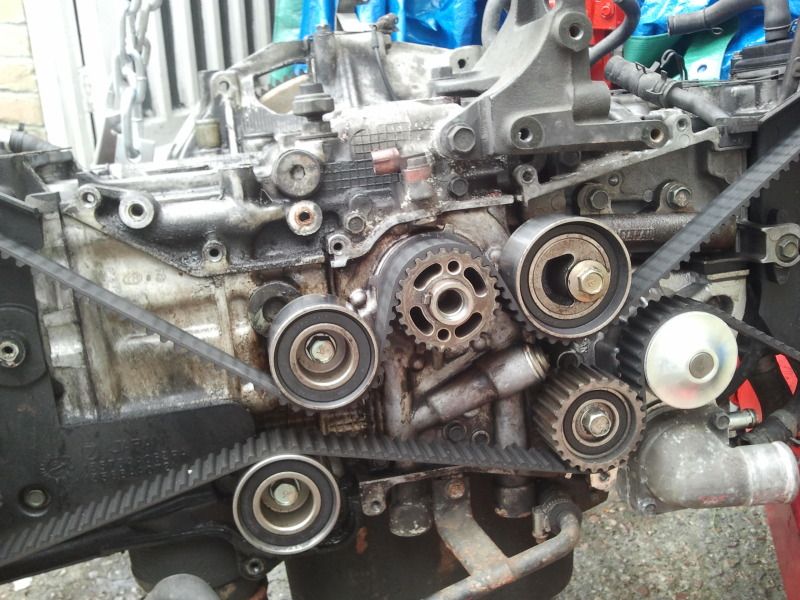
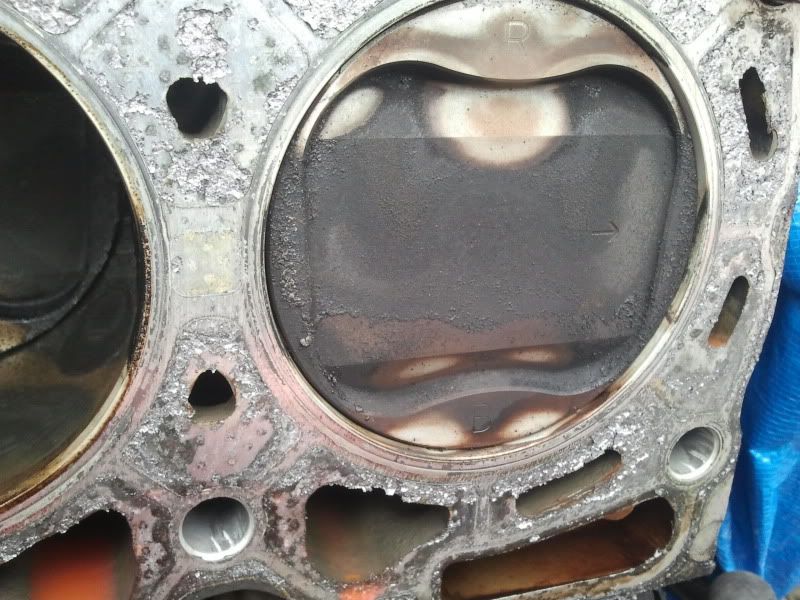
once the cam pulleys and heads were off, allthough the pistons had plenty of carbon on them it was no more than i expected for its age, the bores showed little wear and the water ports were nice and rust free
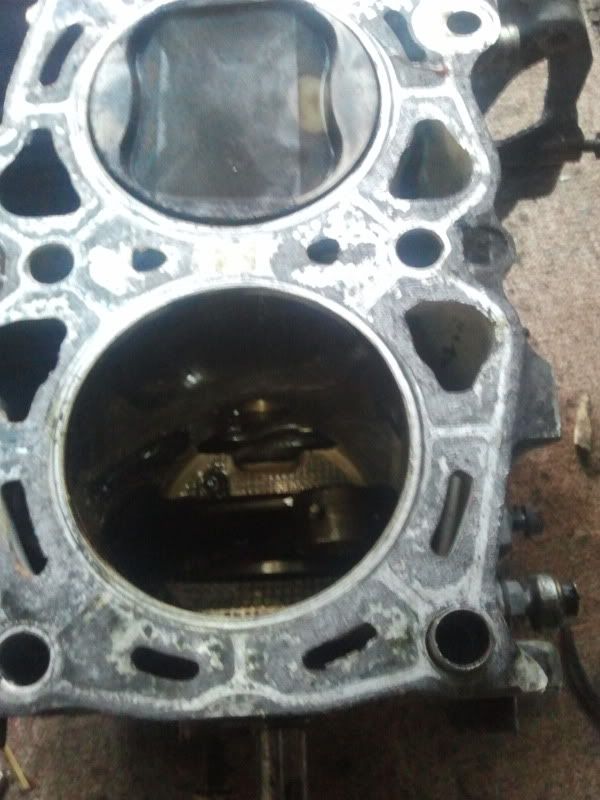
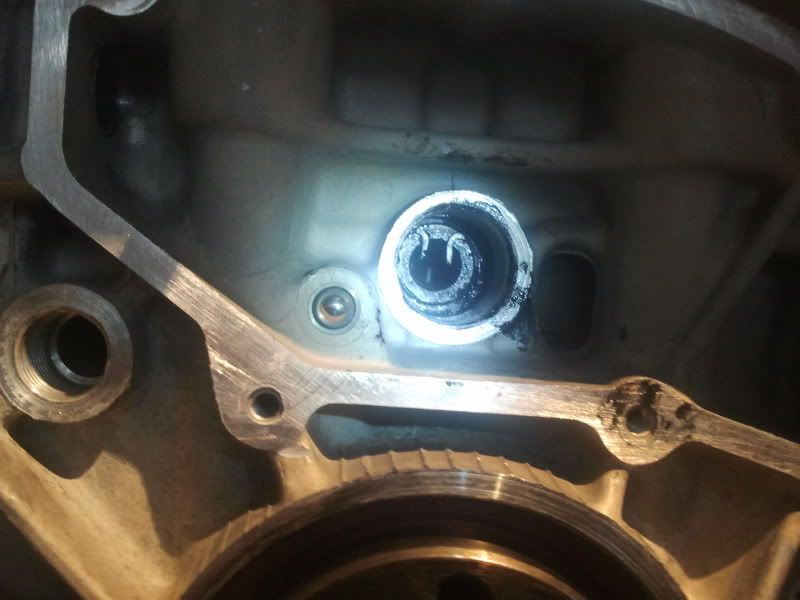
i then set about removing the sump and pistons revealing the under bore squirters
once all the pistons and all the block bolts were removed the halves started to part by themselves all the way round appart from where the cross hatch is and i didnt want to damage the block faces buy prising them appart
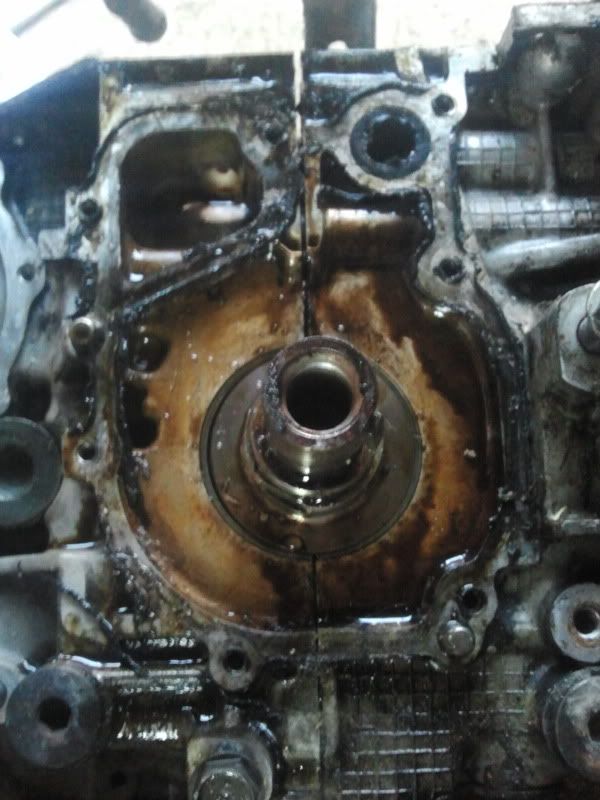
so after trying numerous bolts in the varoius threaded holes in the outter casing and trying to leaver it appart with bits of wood i put all the bolts back in nipped them up and released the modine end first
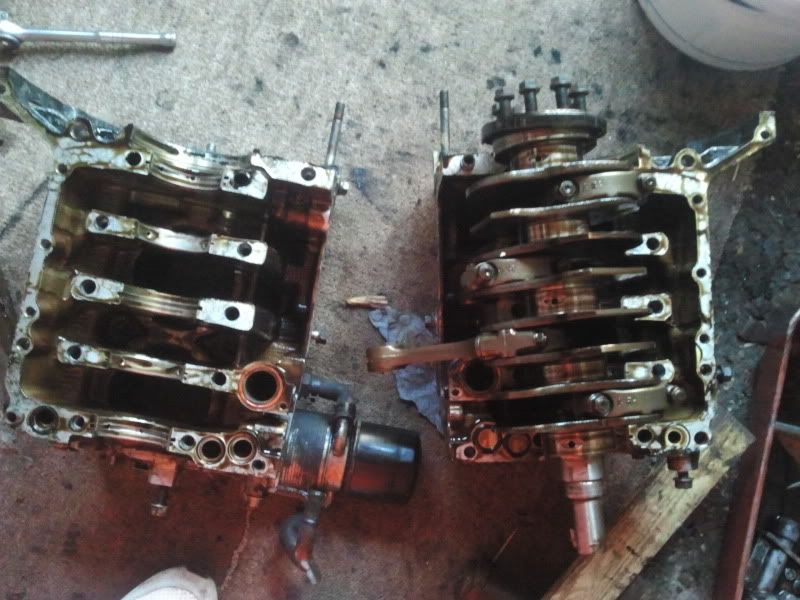
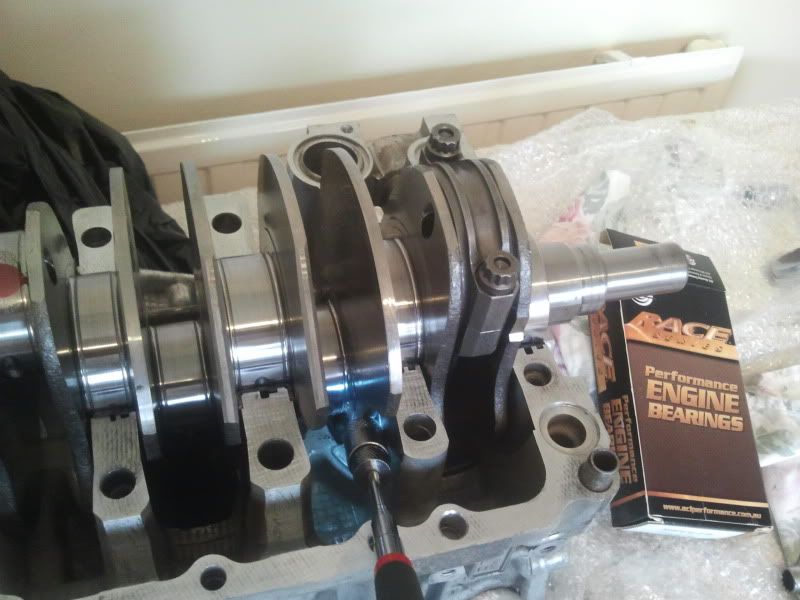
on inspection of the crank journels and the general lack of sludge anywhere i decided that it would be daft not to fit a drop in set of pistons and rods at first to keep the machining costs down but thats where the CREEP comes from in my project title
i hope its the vectra putting people off cos im fairly happy with the outside of the scoob (for now)i never intended on building a forged motor as the v1sti engine sounded sweet and was making good power ,just some new bearings and headstuds .so i downloaded the pdf manual on ken gilbert and set about stripping the engine
manifold ,auxiliarys,and cam covers off revealed a newish water pump and timing belt

once the cam covers were off i was surprised to see the inside looking so clean
as the engine is out of a 20 yr old sti it must of had regular services and quality oil 
once the cam pulleys and heads were off, allthough the pistons had plenty of carbon on them it was no more than i expected for its age, the bores showed little wear and the water ports were nice and rust free

i then set about removing the sump and pistons revealing the under bore squirters

once all the pistons and all the block bolts were removed the halves started to part by themselves all the way round
appart from where the cross hatch is and i didnt want to damage the block faces buy prising them appart
so after trying numerous bolts in the varoius threaded holes in the outter casing and trying to leaver it appart with bits of wood
i put all the bolts back in nipped them up and released the modine end first 
on inspection of the crank journels and the general lack of sludge anywhere
i decided that it would be daft not to fit a drop in set of pistons and rods at first to keep the machining costs down but thats where the CREEP comes from in my project title

Scooby Regular

Joined: Dec 2003
Posts: 3,708
Likes: 1
From: Staffs
nice thread. were the rods on their original bearing shells? what kind of condition were they in? got a v1 cdb myself on the originals and wondering how much life they could have left. my engine has 80k and ive owned it from 35k and given it regular oil changes.
Cheers fella
i don't think the heads had been off before ,unless new bolts and gaskets were used as there wasn't any tell tale signs of it being took apart before .there was no noise from the bottom end and the apexi ecu showed low knock (even running at 345) but it is a hand built v1sti engine not a wrx cdb .
The engineer checked over the crank and said he was very surprised at how good a condition it was in ,so much so that it's being ultrosonically cleaned (to make sure the sludge bearings are clear )and im reusing it
yeah dreaded project creep snuck in lol
i was gonna stick with standard size pistons (drop in set) and just a hone, as the bores were well within subaru tollerances ,but kwik offered me his brian crower sport compact rods at a price i could'nt refuse as they're rated to 750 hp i then decided to go with some mahle 2618 pistons of the same spec http://www.advancedautomotives.com/f...sti-1378-p.asp
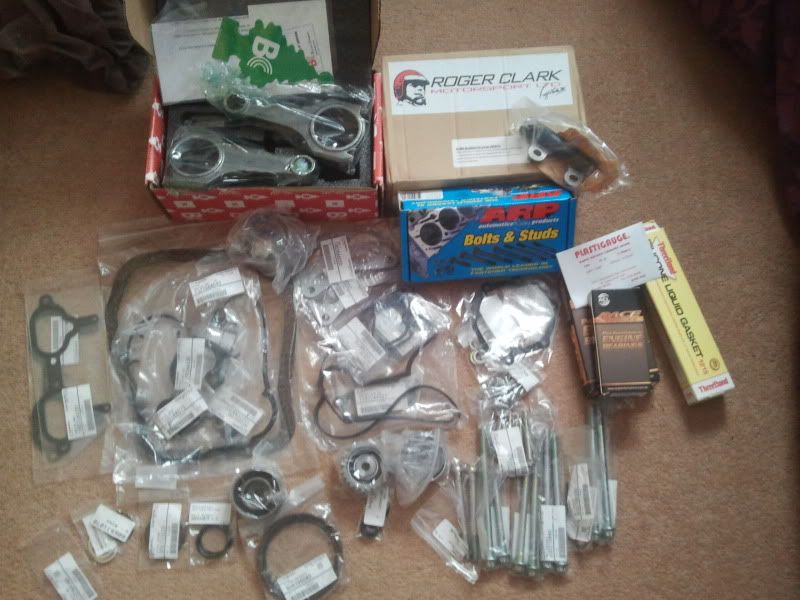
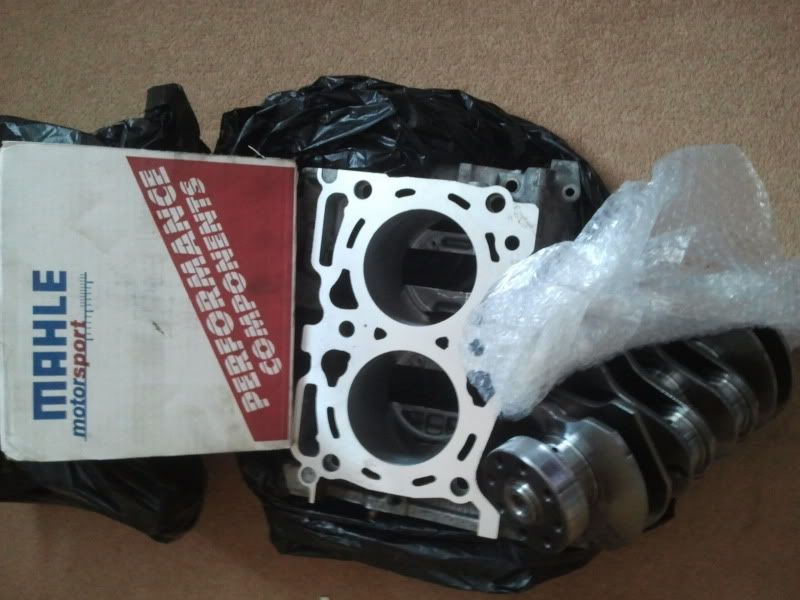
also managed to pick up a brand new rcm oil pump for �120 then after trawling the net for the best prices for all the rest of bits i needed like...
acl bearings
arp head studs
block bolts
group n and full oe gasket set
ect...
i then phoned luke @ importcarparts who price matched most of the bargains i found the end result was this lot
i was gonna stick with standard size pistons (drop in set) and just a hone, as the bores were well within subaru tollerances ,but kwik offered me his brian crower sport compact rods at a price i could'nt refuse
as they're rated to 750 hp i then decided to go with some mahle 2618 pistons of the same spec http://www.advancedautomotives.com/f...sti-1378-p.aspalso managed to pick up a brand new rcm oil pump for �120
then after trawling the net for the best prices for all the rest of bits i needed like...acl bearings
arp head studs
block bolts
group n and full oe gasket set
ect...
i then phoned luke @ importcarparts who price matched most of the bargains i found
the end result was this lot 
Trending Topics
cheers chaps
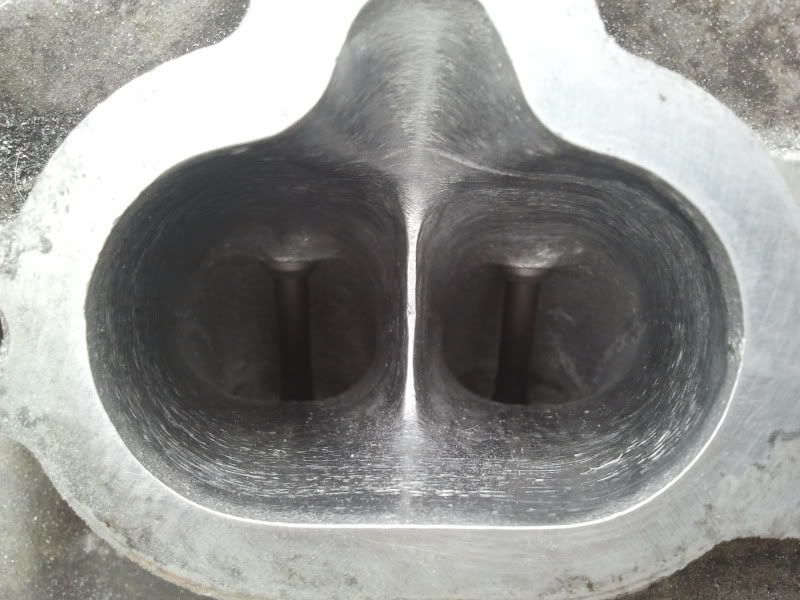
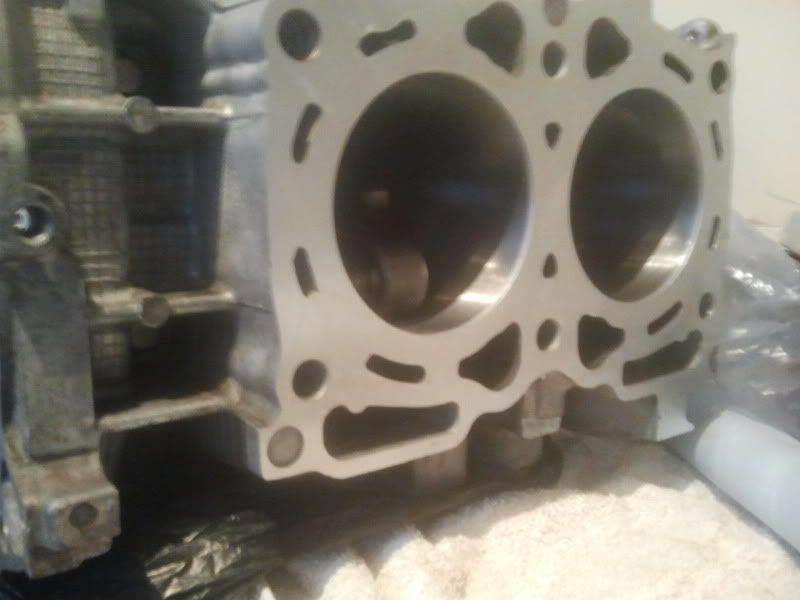
before i sent the heads off to the engineers i decided to do a bit of work on the inlet ports ,nothing to drastic (i didnt increase the intake size) just knife edge the center seperation and a light port and polish
STANDARD
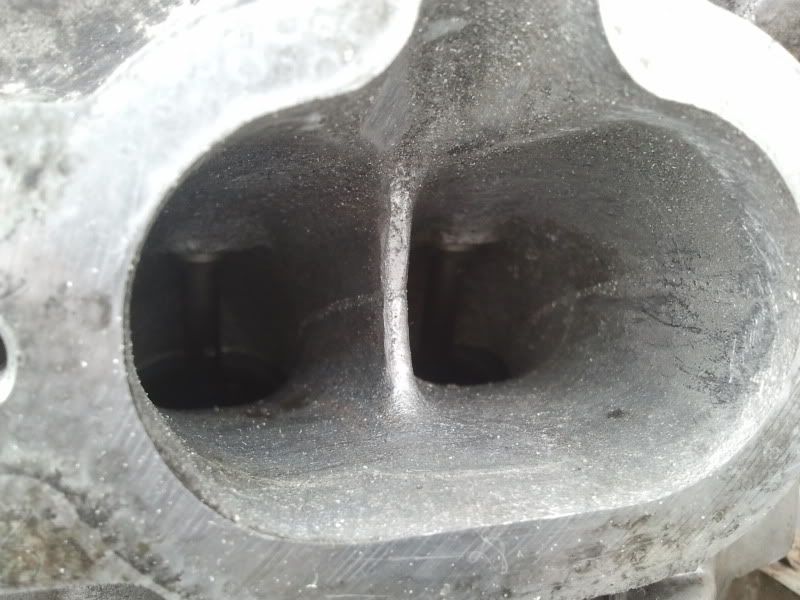
PORTED
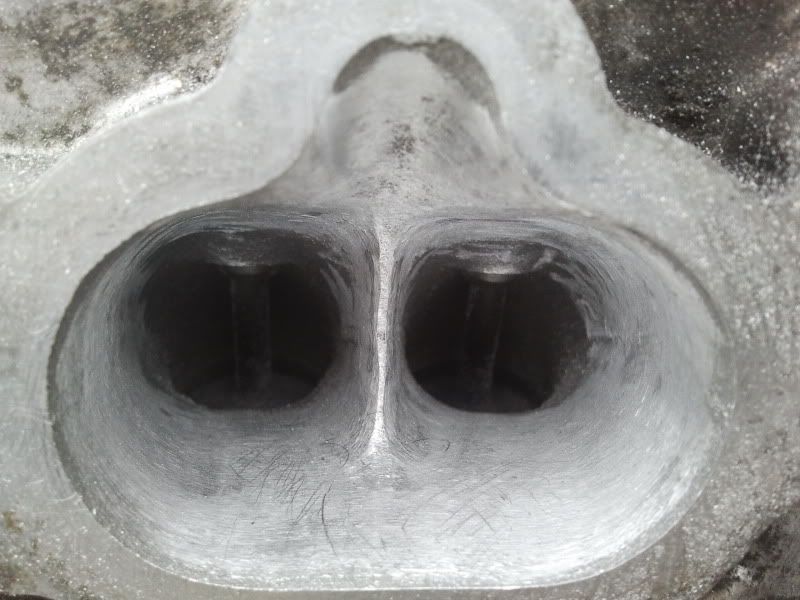
POLISHED
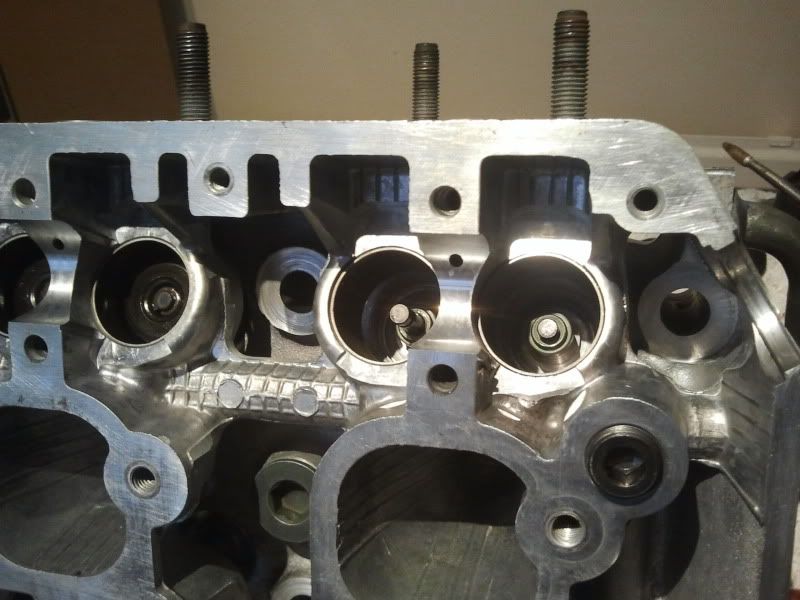
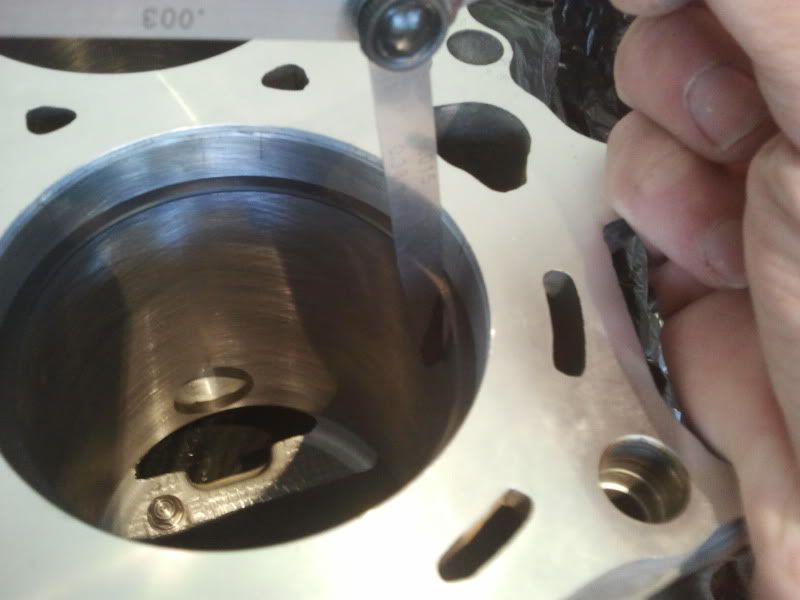
i removed all the valves,springs,collets and stem seals and sent the heads off to the engineer to be checked over and faced .Yet again the engineer was pleased with the condition but, still took 2 tho" of both the block and head faces .just to make sure that the two surfaces were 100% straight and true . being a v1sti the valves were (more than likely) sodium filled and in good condition. so once id got the heads back i started to lap them in but , although they were within subaru tollerance ,i was unhappy with the ammount of contact area for the valve to seal .
before and after lapping pic
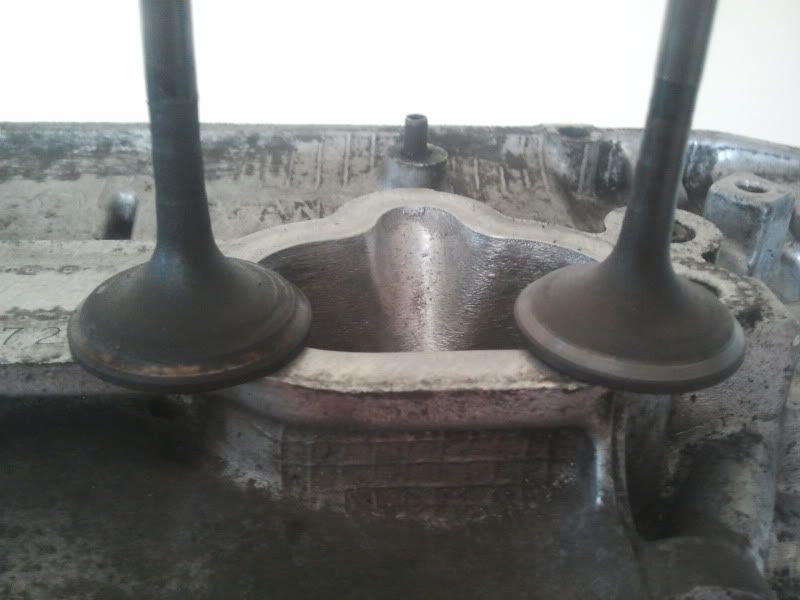
so i decided to get them recut and was well chuffed with the results as i only needed to use the fine paste to achieve a good contact areakudos to my engineer
before i sent the heads off to the engineers i decided to do a bit of work on the inlet ports ,nothing to drastic (i didnt increase the intake size) just knife edge the center seperation and a light port and polish
STANDARD

PORTED

POLISHED

i removed all the valves,springs,collets and stem seals and sent the heads off to the engineer to be checked over and faced .Yet again the engineer was pleased with the condition but, still took 2 tho" of both the block and head faces .just to make sure that the two surfaces were 100% straight and true . being a v1sti the valves were (more than likely) sodium filled and in good condition. so once id got the heads back i started to lap them in but , although they were within subaru tollerance ,i was unhappy with the ammount of contact area for the valve to seal .
before and after lapping pic

so i decided to get them recut and was well chuffed with the results as i only needed to use the fine paste to achieve a good contact area
kudos to my engineer
Last edited by savage bulldogs; Apr 17, 2013 at 10:04 PM.


i know the bloke that bought your silver classic ,lovely example (credit to ya fella) and im trying to get wozza to sell me that silky 6 speed you sold him cos my 5 speed ain't gonna like my new engine much
id spend more if the mrs would let me and go for a billet crank but ill be sticking with the standard crank (unless the plastigauge dry build shows it needs replacing)
saying that though the mrs did moan about the lack of noise the scoob made ,due to the 2.5 " magnex zorst .so she bought this 3" slip jointed jasma cat back and 100 cpi sports cat for my birthday last year she a goodn really
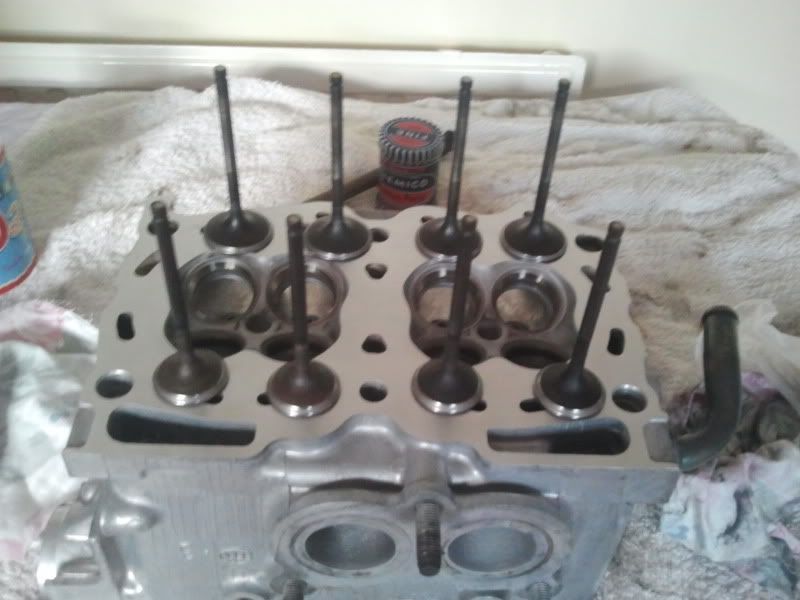
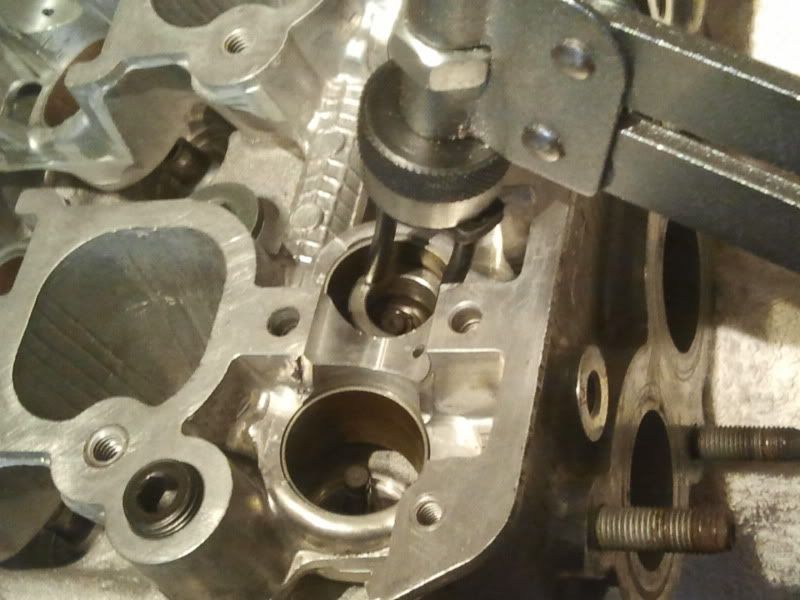
the engineer said the valve guides were in good nick and didnt need replacing so i just upgraded the stem seals .so armed with a tube of builders paste i started to rebuild the heads. I found that instead of buying a costly subaru tool a 10mm long reach 3/8 drive socket worked fine to push the seals in place .Taking care not to damage the seal springs as i made sure they were pushed firmly home
will admit the spring compressor iv got tried my patients as it made the collets a sod to get in and i ended up smothered in graphogen builders paste, but hey their all in now (lash caps as well) i then plugged all the ports ,sprayed both heads with oil,sealed them with cling film and put them in a box upstairs to await the bottom end returning from the .5mm overbore
id spend more if the mrs would let me
and go for a billet crank but ill be sticking with the standard crank (unless the plastigauge dry build shows it needs replacing)saying that though the mrs did moan about the lack of noise the scoob made ,due to the 2.5 " magnex zorst .so she bought this 3" slip jointed jasma cat back and 100 cpi sports cat for my birthday last year
she a goodn really 
the engineer said the valve guides were in good nick and didnt need replacing so i just upgraded the stem seals .so armed with a tube of builders paste i started to rebuild the heads. I found that instead of buying a costly subaru tool a 10mm long reach 3/8 drive socket worked fine to push the seals in place .Taking care not to damage the seal springs as i made sure they were pushed firmly home

will admit the spring compressor iv got tried my patients
as it made the collets a sod to get in and i ended up smothered in graphogen builders paste, but hey their all in now (lash caps as well) i then plugged all the ports ,sprayed both heads with oil,sealed them with cling film and put them in a box upstairs to await the bottom end returning from the .5mm overbore 
Yeah Shane's a good lad, I know he'll look after it I should of broken it really as the wagon is identical spec and is on to make �3.5k more than what I sold the WRX for Hey ho it was too good to break you'll defo need a six speed mate, they feel lovely in a good powered classic
I should of broken it really as the wagon is identical spec and is on to make �3.5k more than what I sold the WRX for Hey ho it was too good to break you'll defo need a six speed mate, they feel lovely in a good powered classic

thanks again alex for the rods i just wanna start building it now those rods have done a few thousand air miles, been up and down the country but still haven't been fitted into a scooby yet
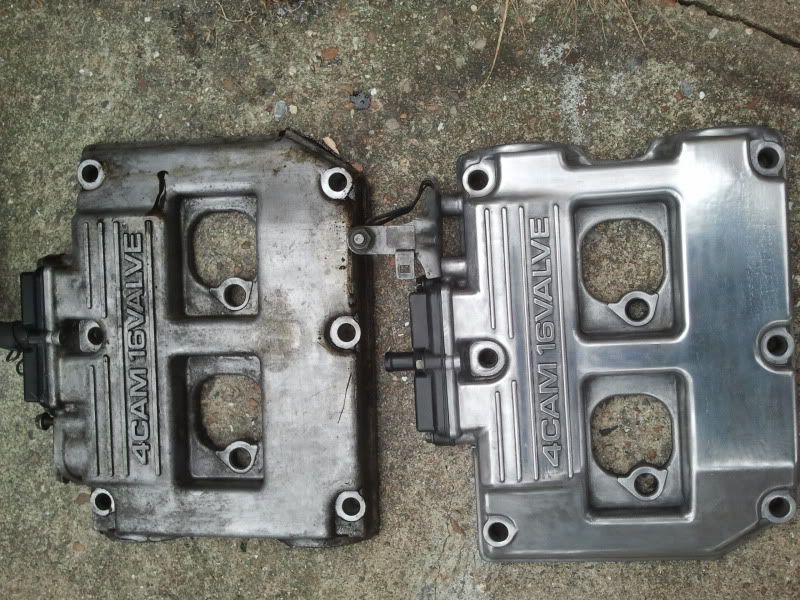
I started to get bored looking at my box of scooby shiny stuff whilst waiting for my block to come back from the engineers i was orignally going to polish some ally bits under the bay ,but didnt fancy re polishing the parts every 4 months .Nor did i want to use a clear laquer as apparently most yellow over time .So i started to do some research on painting ally bits and to be quite honest you can't beat powder coating for quality that lasts but,i wanted to do it myself (it was either that or the mrs was going to get me doing DIY around the house
 ) I had prepped the cam covers already
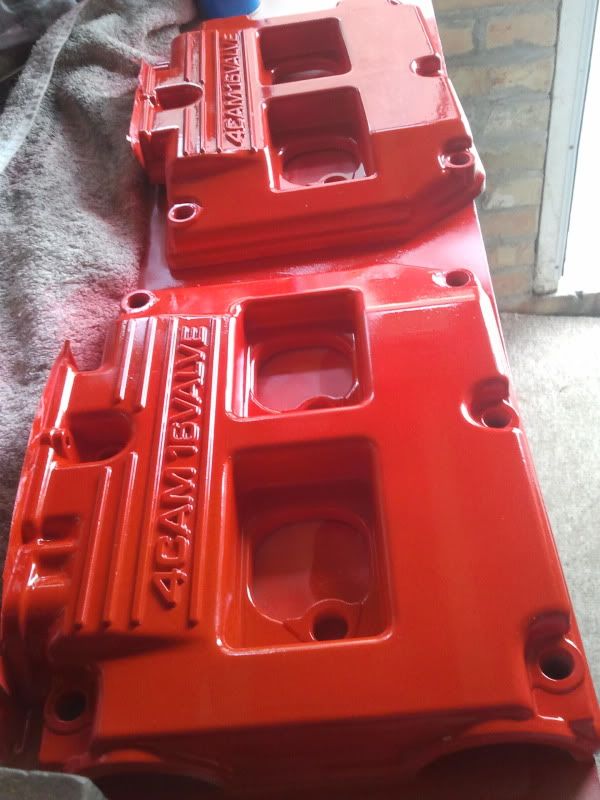
wiped them clean with some thinners and (because ally is non ferous) i started with a few coats of enamel adhesion premoter ,followed buy a enamel primer and finally enamel top coat .
its not the finished item in the pic ,i flattened them off and they've had 2 more top coats since,but the enamels dried nice and hard and will hopefully withstand the heat better than normal car paint
id bought a powder coated inlet manifold of here for �20 cheers shusby

and then painted a few of the pipes and brackets with the same enamel paints and polished the throttle body

i just wanna start building it now those rods have done a few thousand air miles, been up and down the country but still haven't been fitted into a scooby yet I started to get bored looking at my box of scooby shiny stuff whilst waiting for my block to come back from the engineers
i was orignally going to polish some ally bits under the bay ,but didnt fancy re polishing the parts every 4 months .Nor did i want to use a clear laquer as apparently most yellow over time .So i started to do some research on painting ally bits and to be quite honest you can't beat powder coating for quality that lasts but,i wanted to do it myself (it was either that or the mrs was going to get me doing DIY around the house) I had prepped the cam covers already 
wiped them clean with some thinners and (because ally is non ferous) i started with a few coats of enamel adhesion premoter ,followed buy a enamel primer and finally enamel top coat .
its not the finished item in the pic ,i flattened them off and they've had 2 more top coats since,but the enamels dried nice and hard and will hopefully withstand the heat better than normal car paint

id bought a powder coated inlet manifold of here for �20 cheers shusby

and then painted a few of the pipes and brackets with the same enamel paints and polished the throttle body

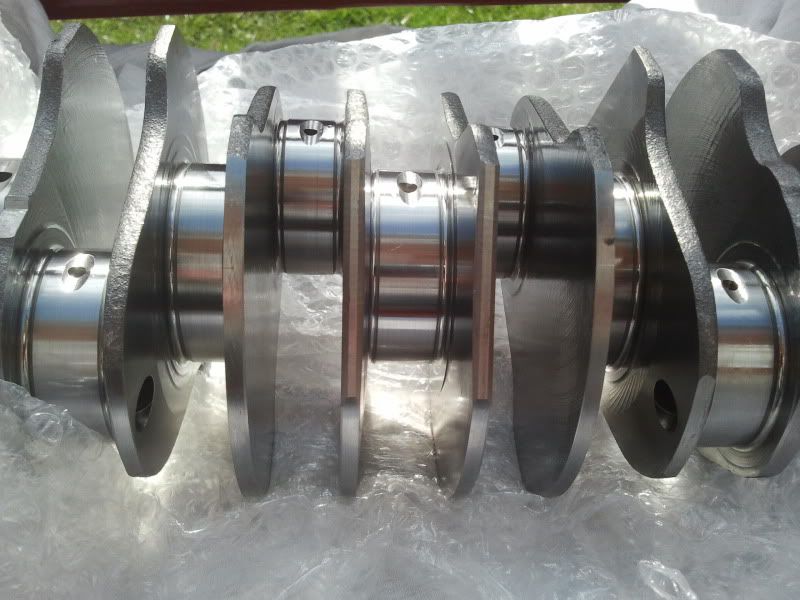
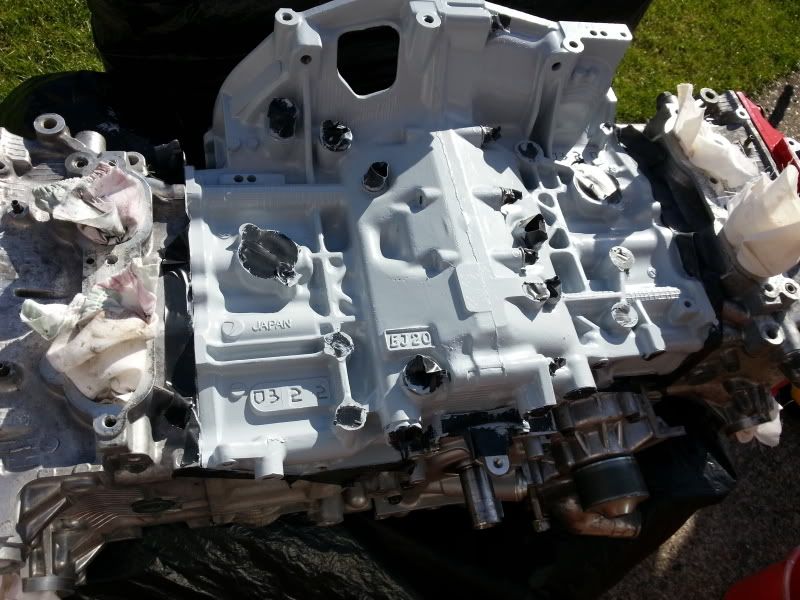
the good news is iv got my block,pistons and crank back from the engineers
the bad news is now the suns out all the world and thier mum want their plastering doing dont get me wrong being self employed its nice to have a lot of work but , im booked up every saturday till the middle of next month.so not much time to start building the engine, I did find some time today to go over the block halves and remove any silicone (that dose'nt come off in the engineers hot wash) and rod the oil ports with de greasent (which were nice and clean anyway but, im not taking any chances and making sure everything is uber clean) .pat segar (my engineer) has taken his time but,the results were worth the wait as you can see by the quality of the faced block

he also ultrasonically cleaned the crank ,as the 2ltr crank has sludge trap bearings in some of the oil ports which cant rodded clean, the nearly 20 yr old crank looks like new
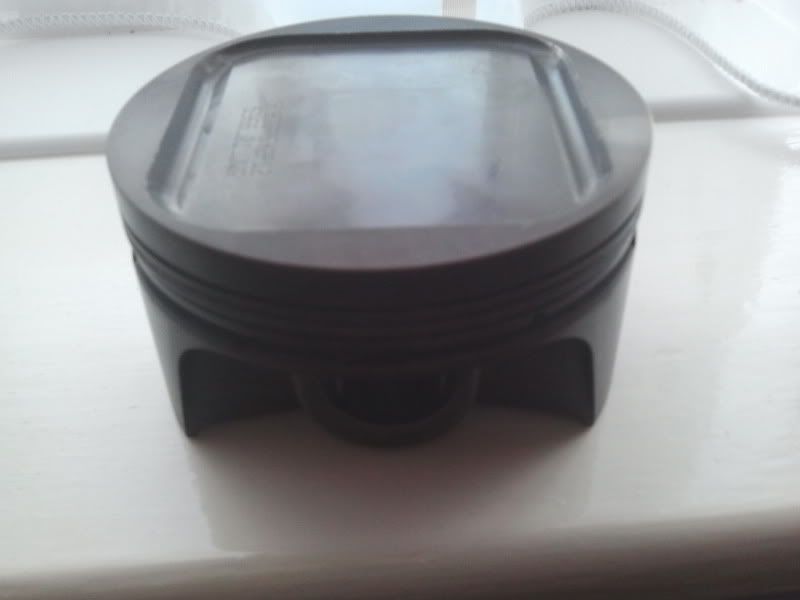
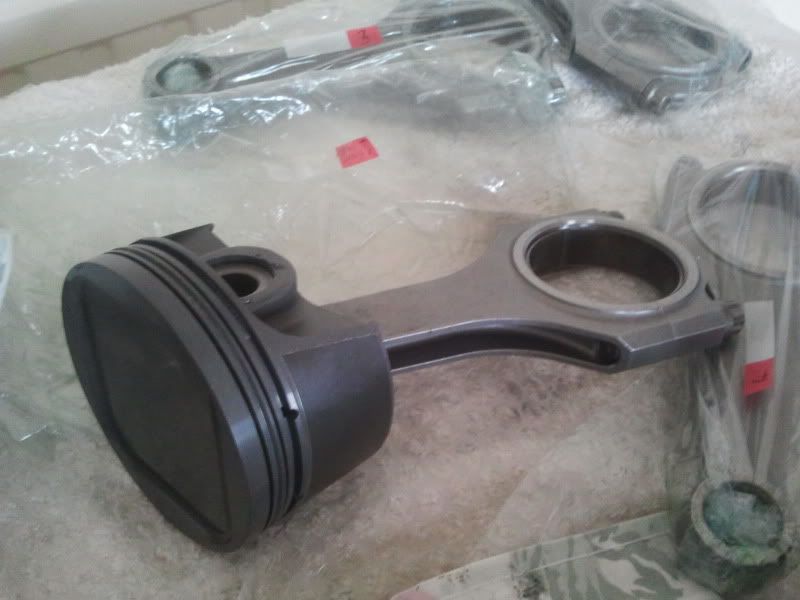
i bought the race spec teflon coated mahle pistons a month or so ago but had'nt seen them as id had them sent directly to pats and was well surprised how light they are
as i said before cant see me finding the time to do anything for about a month but hopfully the next pics will be of the dry build and crank plastigauge results

the bad news is now the suns out all the world and thier mum want their plastering doing dont get me wrong being self employed its nice to have a lot of work but , im booked up every saturday till the middle of next month
.so not much time to start building the engine, I did find some time today to go over the block halves and remove any silicone (that dose'nt come off in the engineers hot wash) and rod the oil ports with de greasent (which were nice and clean anyway but, im not taking any chances and making sure everything is uber clean) .pat segar (my engineer) has taken his time but,the results were worth the wait as you can see by the quality of the faced block 
he also ultrasonically cleaned the crank ,as the 2ltr crank has sludge trap bearings in some of the oil ports which cant rodded clean, the nearly 20 yr old crank looks like new

i bought the race spec teflon coated mahle pistons a month or so ago but had'nt seen them as id had them sent directly to pats and was well surprised how light they are

as i said before cant see me finding the time to do anything for about a month but hopfully the next pics will be of the dry build and crank plastigauge results

cheers j
well id booked this saturday off work as it was my wedding annirversary and spent the day with the mrs , that earnt me some valuable brownie points which i promptly cashed in for a sunday scooby session
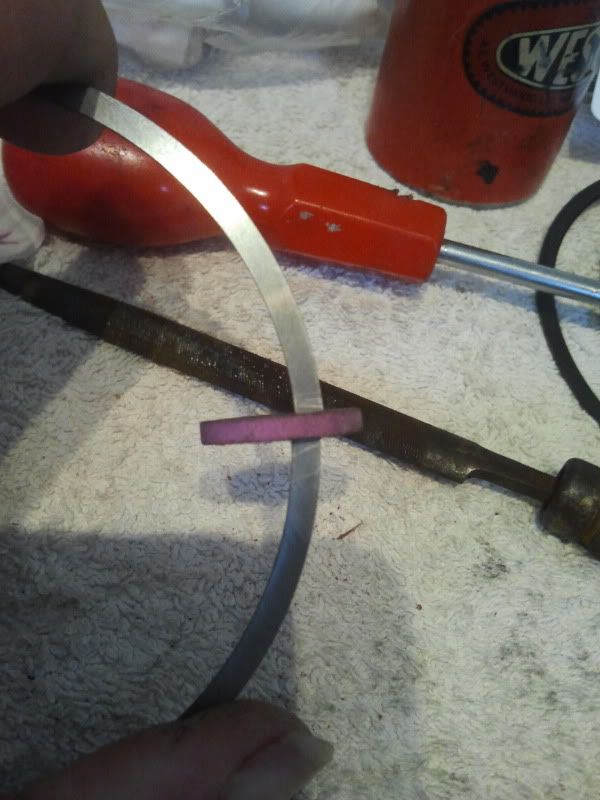
started off buy fitting all the acl race series bearings to the B.C rods and then checking the big end clearance with plastigauge , basically (for those who dont know) its a thin strip of wax which you place on the (clean) journels of the crank before you put the big end caps on .
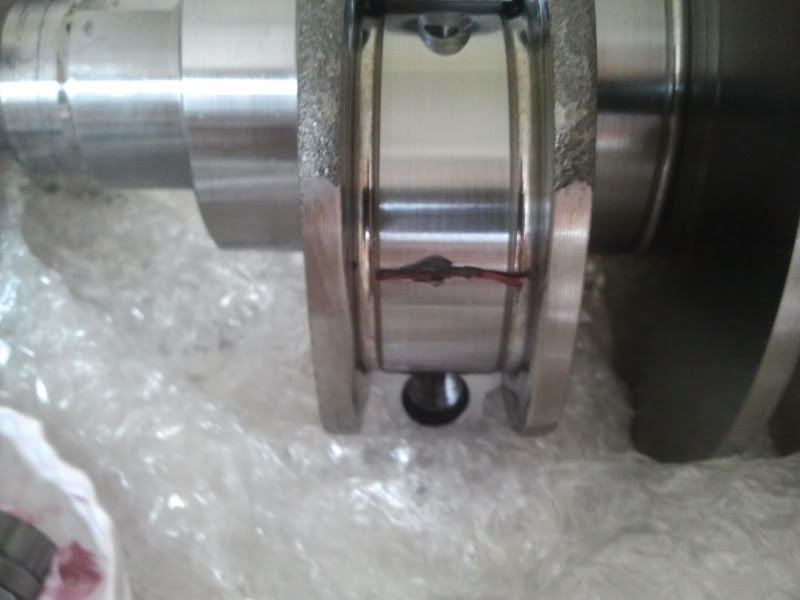
then put the caps on and touque to the correct settings then remove the caps and the wax compresses giving you the excact (oil) clearence between the crank and bearing which is measured with a gauge
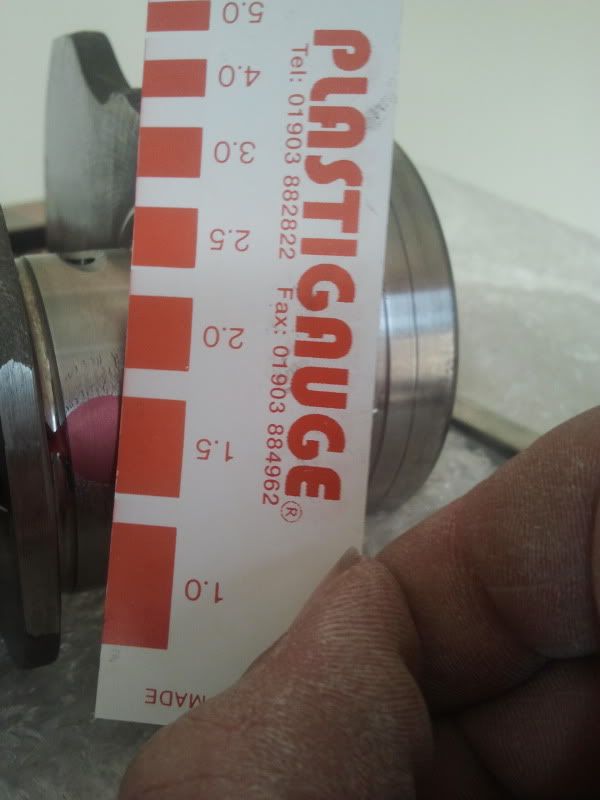
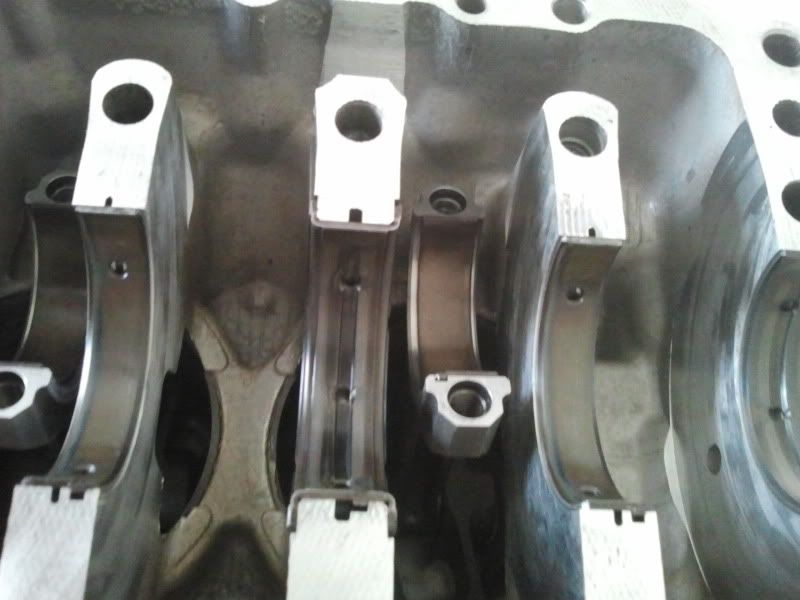
next i dry built the block (no liquid gasket between the 2 block halves) fitting the race acl's and plastigauged the main journels
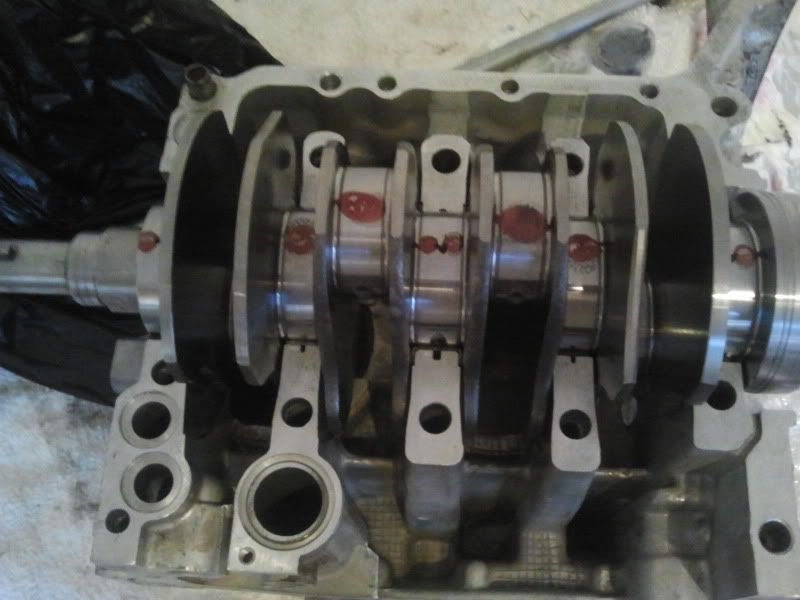
both big end and main bearing clearances were well within the standard tollerances and nowhere near the "limit" tolerances subaru give for a rebuild
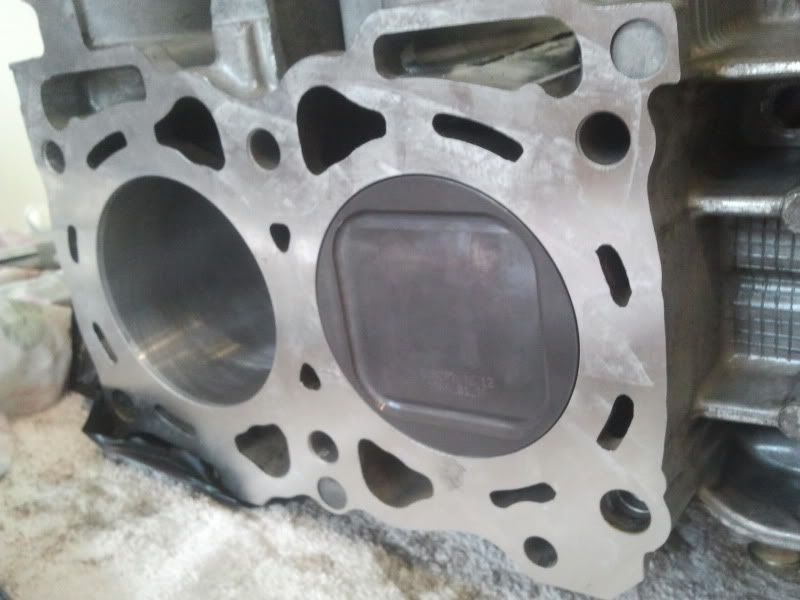
id been warned to check for under bore oil squirter to piston skirt contact ,as the race spec mahles have a deeper skirt to cope with the extra power, so i assembled one of the pistons and rods
slid it into a bore
everythings been going well so far spose something had to cause a bit of a problem
theres a tiny amount of clearance but not enough for my liking apparently iv got a couple of options either delete the squirters (by fitting a blanking grub screw) which is not a problem as newer piston materials dont need as much cooling and the mahles cool the gudgen pin via the oil ring .
or have the surface where the squirters sit milled to allow more clearance . so im gonna do some more research and see what the more common solution is
well id booked this saturday off work as it was my wedding annirversary and spent the day with the mrs , that earnt me some valuable brownie points which i promptly cashed in for a sunday scooby session
started off buy fitting all the acl race series bearings to the B.C rods and then checking the big end clearance with plastigauge , basically (for those who dont know) its a thin strip of wax which you place on the (clean) journels of the crank before you put the big end caps on .

then put the caps on and touque to the correct settings then remove the caps and the wax compresses giving you the excact (oil) clearence between the crank and bearing which is measured with a gauge

next i dry built the block (no liquid gasket between the 2 block halves) fitting the race acl's and plastigauged the main journels

both big end and main bearing clearances were well within the standard tollerances and nowhere near the "limit" tolerances subaru give for a rebuild
id been warned to check for under bore oil squirter to piston skirt contact ,as the race spec mahles have a deeper skirt to cope with the extra power, so i assembled one of the pistons and rods

slid it into a bore

everythings been going well so far spose something had to cause a bit of a problem


theres a tiny amount of clearance but not enough for my liking apparently iv got a couple of options either delete the squirters (by fitting a blanking grub screw) which is not a problem as newer piston materials dont need as much cooling and the mahles cool the gudgen pin via the oil ring .
or have the surface where the squirters sit milled to allow more clearance . so im gonna do some more research and see what the more common solution is
from what iv read alex they only work under high pressure/revs (have a valve in them i assume) and are not a open jet (like in a carb) i have read of a few people cutting the piston skirt but that dose'nt seem like a good idea imo due to throwing the weight and balance of the pistons out . plus iv read a few horror stories of cracks in the skirts coming from the cut out towards the piston crown .so after loads of research i think im going to ask my engineer to turn down the back of the squirters (take 3mm or so of the washer side) and reem and retap the hole they fit into to give me about 6 mm more clearance
but that dose'nt seem like a good idea imo due to throwing the weight and balance of the pistons out . plus iv read a few horror stories of cracks in the skirts coming from the cut out towards the piston crown .so after loads of research i think im going to ask my engineer to turn down the back of the squirters (take 3mm or so of the washer side) and reem and retap the hole they fit into to give me about 6 mm more clearance
cheers fella
iv changed my mind about the squirters and will be going for the delete option .time scale is a issue, due to my engineer not being so busy hes not able to fit the work in for about 2 months and hes not convinced that at the lower height they'd be squirting in the same place as originally designed, due to the angle their positioned anyway
also my further research has brought up a issue with the squirters possibily getting blocked with a bit of liquid gasket (from the block halves) and leading to a vital change in oil pressure .
in the meantime ,if anybody has been down the same route pls let me know how you got on
iv changed my mind about the squirters and will be going for the delete option
.time scale is a issue, due to my engineer not being so busy hes not able to fit the work in for about 2 months and hes not convinced that at the lower height they'd be squirting in the same place as originally designed, due to the angle their positioned anyway also my further research has brought up a issue with the squirters possibily getting blocked with a bit of liquid gasket (from the block halves) and leading to a vital change in oil pressure .
in the meantime ,if anybody has been down the same route pls let me know how you got on
well iv spent a good 10 hrs and made some good progress with the build today
started off by degreasing and blowing everything through with a air line id decided to delete the oil squirters to get over the problem with the contact they made with the piston skirts .Pat had give me some suitable grub screws and i covered them in loctite (so they dont vibrate loose)
the main reason i started the build in the first place was because of the piston slap my engine has when its cold and as id decided to aim for a maxium of 550 hp the piston to bore clearance was at the lower end of mahles spec .which should make it a bit quiter when cold but meant i had to adjust the ring gaps on all 8 compression rings to avoid the heat expansion causing a piston to swell and trap in the bore .
I checked the gaps with a feeler gauge for each individual bore/piston yet again kudos to pat (engineer) as no matter where in the bore i positioned the rings they all had the same .009" gap to start off with
you adjust them by gradually filing (both ends at once) by closing the ring around a file or stone to bring them to the required gap size
i oiled and fitted the rings to all the pistons making sure each ring gap was in the right position acording to the mahle spec sheet .As you dont want the gaps inline cos you'd get "blow by" before i slid any pistons into a bore i coated the bore walls with graphogen paste
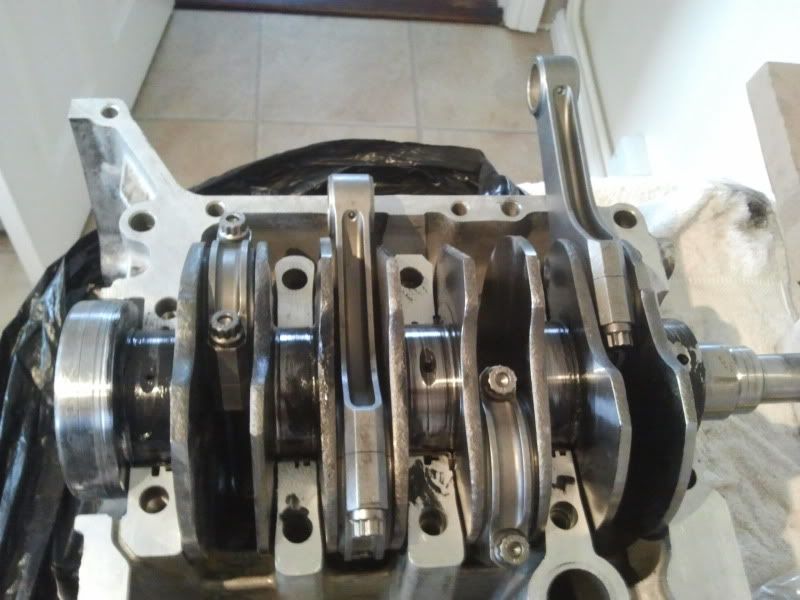
As subaru engines require you to fit the wrist pins (to connect the rods to the pistons) via a fidiley access hole i decided to connect the the right bank rods and pistons ,fit the circlips and drop them in the bores
i could now connect all the rods (and the ones with the pistons attached) to the crank which makes life a bit eaiser, as i only have to use the access holes for fitting 2 pistons
once id torqued the arp big end bolts on the b.c rods i prepped the other block halve by fitting the new seals to the water and oilways ,smearing graphogen paste on the acl'd mains and give the block face a coat of threebond liquid gasket
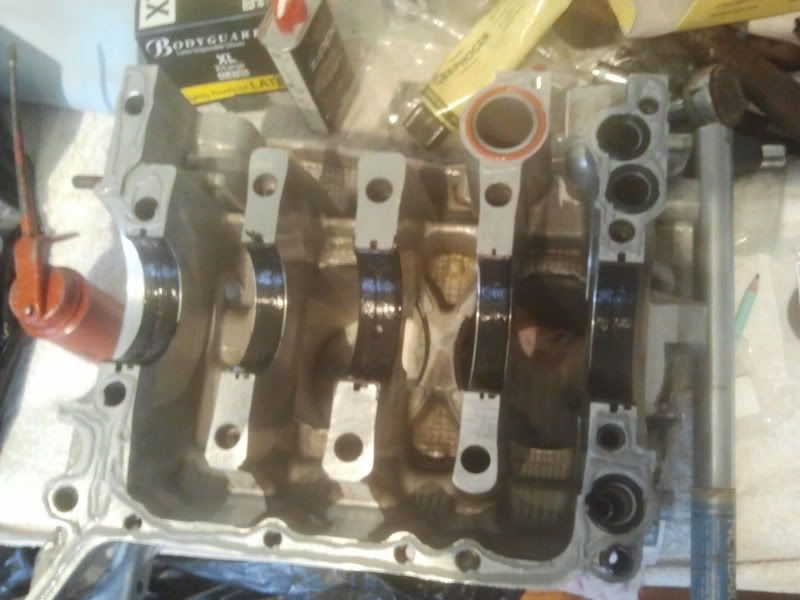
i copperslipped the dowels and lowered the block half (with the pistons and crank in) onto the half with the "o" rings in to keep everything in place ,then torqued up the new block bolts(with new dowty washers on the ones in the waterways) in sequance
i fitted the inner wrist pin circlips and managed to fit the other 2 piston and wrist pins/circlips through the acess holes but was chuffed i only had to do 2 as they are propper fidiley
still got a fair way to go but, im propper chuffed with the progress this weekend
started off by degreasing and blowing everything through with a air line id decided to delete the oil squirters to get over the problem with the contact they made with the piston skirts .Pat had give me some suitable grub screws and i covered them in loctite (so they dont vibrate loose)

the main reason i started the build in the first place was because of the piston slap my engine has when its cold and as id decided to aim for a maxium of 550 hp the piston to bore clearance was at the lower end of mahles spec .which should make it a bit quiter when cold but meant i had to adjust the ring gaps on all 8 compression rings to avoid the heat expansion causing a piston to swell and trap in the bore .
I checked the gaps with a feeler gauge for each individual bore/piston yet again kudos to pat (engineer) as no matter where in the bore i positioned the rings they all had the same .009" gap to start off with

you adjust them by gradually filing (both ends at once) by closing the ring around a file or stone to bring them to the required gap size

i oiled and fitted the rings to all the pistons making sure each ring gap was in the right position acording to the mahle spec sheet .As you dont want the gaps inline cos you'd get "blow by"
before i slid any pistons into a bore i coated the bore walls with graphogen paste As subaru engines require you to fit the wrist pins (to connect the rods to the pistons) via a fidiley access hole i decided to connect the the right bank rods and pistons ,fit the circlips and drop them in the bores

i could now connect all the rods (and the ones with the pistons attached) to the crank which makes life a bit eaiser, as i only have to use the access holes for fitting 2 pistons

once id torqued the arp big end bolts on the b.c rods i prepped the other block halve by fitting the new seals to the water and oilways ,smearing graphogen paste on the acl'd mains and give the block face a coat of threebond liquid gasket

i copperslipped the dowels and lowered the block half (with the pistons and crank in) onto the half with the "o" rings in to keep everything in place ,then torqued up the new block bolts(with new dowty washers on the ones in the waterways) in sequance

i fitted the inner wrist pin circlips and managed to fit the other 2 piston and wrist pins/circlips through the acess holes but was chuffed i only had to do 2 as they are propper fidiley

still got a fair way to go but, im propper chuffed with the progress this weekend

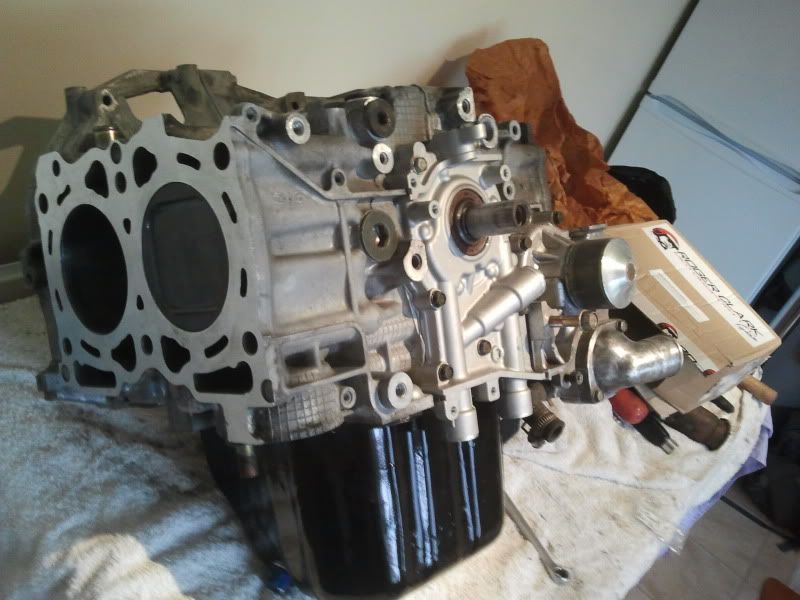
didnt get much spare time over the weekend but, i did still manage to fit the oil pickup,sump (with new bolts and group n gasket) water pump,and rcm oil pump its starting to look a bit more like a engine now (rather than just a bare block)
hopefully i'll find enough time this coming weekend, to fit the heads and then paint the block with etch primer and engine enamel .
its starting to look a bit more like a engine now (rather than just a bare block)
hopefully i'll find enough time this coming weekend, to fit the heads and then paint the block with etch primer and engine enamel .
cheers alex
I do feel like im starting to get somewhere now (at last) any updates on yours fella ?
will admit i have come to a hault on my sub projectthe temporary turbo and headers
as i had the spare top entry td05 and headers off the donor cdb i thought id port the headers and covert the turbo to front entry .idea being to make the most of the 550 injectors,haywood & scott slip jointed upipe and fpr iv got to fit (once its run in) while im saving for the twin scroll set up
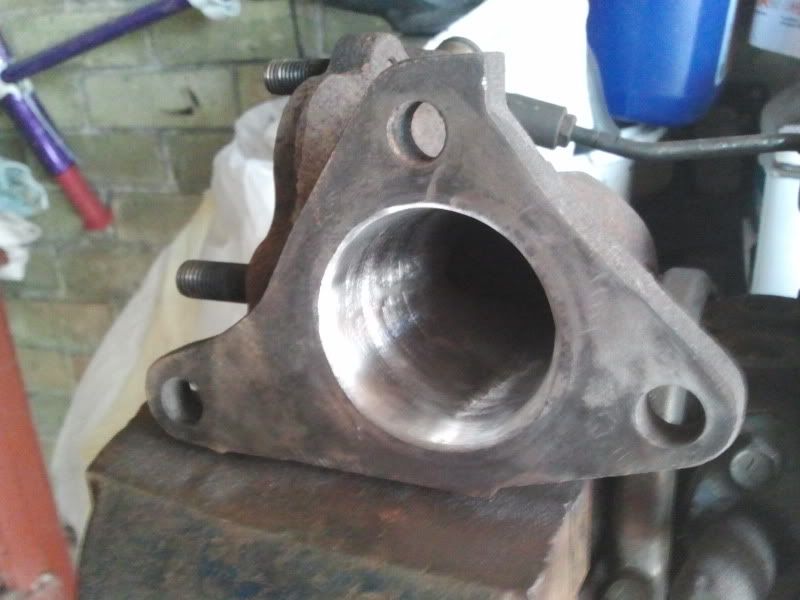
i have already cut the snorkel off ,but i need to know how long the turbo entry flange needs to be before i get it welded back on
i dont really want to remove my intake pipe just to measure it .ideally i need to find somebody who has a front entry turbo off their car to take the measurement for me
heres a couple of pics so far anyways
savaged turbo with snorkel cut off
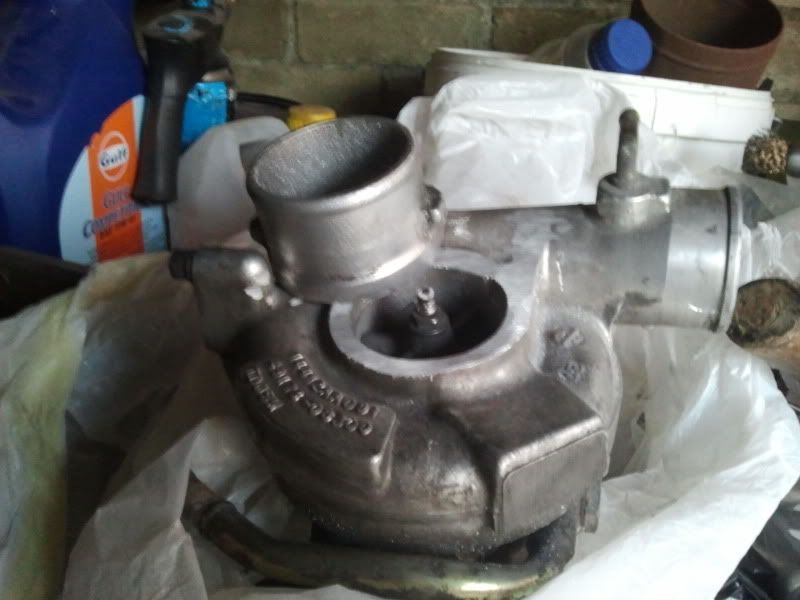
pipe in new position but dont know if i need to cut it down
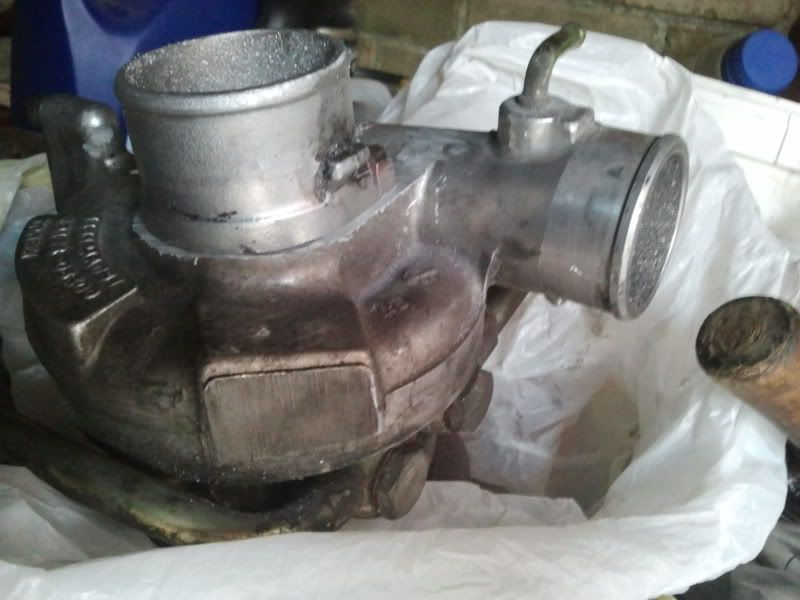
iv ported the upipe side of the turbo by about 5mm already to match better with the H&S upipe
I'll also port the header to upipe flange to match the H&S upipe better as the bores are miles apart . You can see by the soot that i can afford to take some off the headers without affecting the gasket sizes
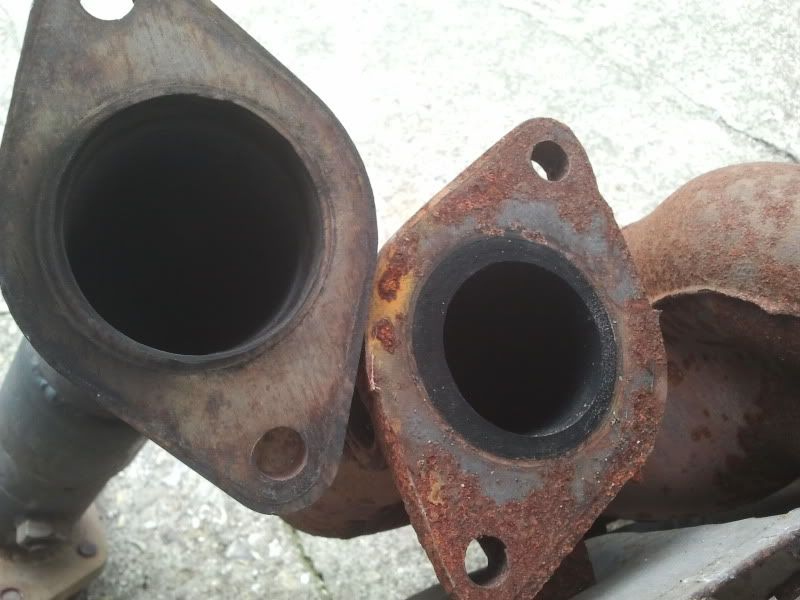
Im sure it will all help with earlier spool but , the way i look at it is if it dont work all iv lost is a bit of my time
I do feel like im starting to get somewhere now (at last) any updates on yours fella ?
will admit i have come to a hault on my sub project
the temporary turbo and headers as i had the spare top entry td05 and headers off the donor cdb i thought id port the headers and covert the turbo to front entry .idea being to make the most of the 550 injectors,haywood & scott slip jointed upipe and fpr iv got to fit (once its run in) while im saving for the twin scroll set up
i have already cut the snorkel off ,but i need to know how long the turbo entry flange needs to be before i get it welded back on
i dont really want to remove my intake pipe just to measure it .ideally i need to find somebody who has a front entry turbo off their car to take the measurement for me
heres a couple of pics so far anyways
savaged turbo with snorkel cut off

pipe in new position but dont know if i need to cut it down

iv ported the upipe side of the turbo by about 5mm already to match better with the H&S upipe

I'll also port the header to upipe flange to match the H&S upipe better as the bores are miles apart . You can see by the soot that i can afford to take some off the headers without affecting the gasket sizes

Im sure it will all help with earlier spool but , the way i look at it is if it dont work all iv lost is a bit of my time
spent another 5 hrs or so on the engine build over the weekend started off by cleaning the threads for the studs and applied a small amount of loctite to the block end of the threads.Then fitted the ARP's by hand and tightened them with the small length end of a allen key,as iv read a few posts about them working loose ,but didnt want to overtighten them
heads out of storage at last
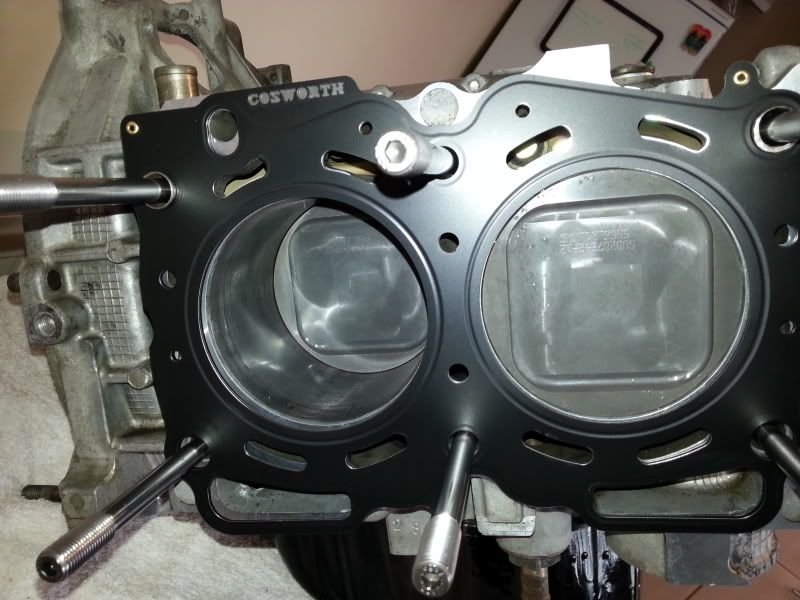
fitted the heads and coated the studs ,nuts and washers in the fastener lube and started by slowly and equally hand tightening the nuts in sequance ,to insure dowels were in a straight line, then torqued the heads down in correct stages and settings to reach 90ft lbs. I left the cams out so i could re torque the studs after they'd settled over night .
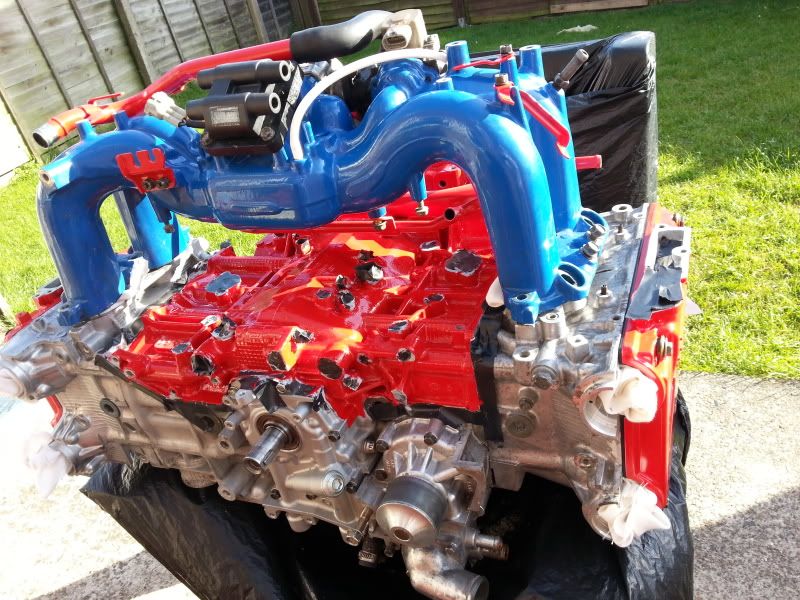
after painting a few pipes and buying the powder coated inlet id had a discussion with my engineer about painting the block (as he used to paint some of the blocks he worked on for holbay racing) he recomended a brush on acid etch primer followed by a brush on high temp engine enamel .I fitted the cam covers(with gaskets but no three bond) ,masked all threaded holes/bungs and plugged all outlets/inlets
PRIMED
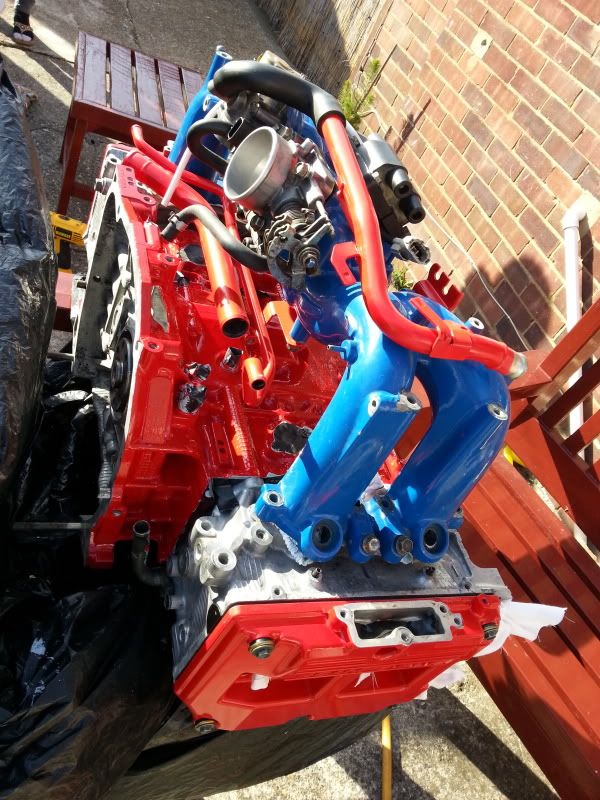
after one coat of enamel i couldnt resist sitting the inlet on top to get a idea of the end result although its still got some black masking tape on the block im well chuffed with the general look
started off by cleaning the threads for the studs and applied a small amount of loctite to the block end of the threads.Then fitted the ARP's by hand and tightened them with the small length end of a allen key,as iv read a few posts about them working loose ,but didnt want to overtighten them 
heads out of storage at last


fitted the heads and coated the studs ,nuts and washers in the fastener lube and started by slowly and equally hand tightening the nuts in sequance ,to insure dowels were in a straight line, then torqued the heads down in correct stages and settings to reach 90ft lbs. I left the cams out so i could re torque the studs after they'd settled over night .
after painting a few pipes and buying the powder coated inlet id had a discussion with my engineer about painting the block (as he used to paint some of the blocks he worked on for holbay racing) he recomended a brush on acid etch primer followed by a brush on high temp engine enamel .I fitted the cam covers(with gaskets but no three bond) ,masked all threaded holes/bungs and plugged all outlets/inlets
PRIMED

after one coat of enamel i couldnt resist sitting the inlet on top to get a idea of the end result
although its still got some black masking tape on the block im well chuffed with the general look 


Hats off to you fella it's a well thought out and put together engine build,I only wish I had the knowledge,skill and time to do one of these builds myself,maybe in the future if my wife's car ever needs a rebuild as she is already talking about a 2.1 engine.SJ.