
my 97 uk turbo project (creep)

Thanks for the coments
Yeah will admit a lot of research, planning and time has gone into the build as it's my first boxer build .I have done n/a straight four's v6's and v8's before though ;-)
Cost has been another issue as I wanted to keep the engine build as close to �2k as I could .As i know that drivetrain , turbo and brake upgrades will also be needed .which is the main reason I didn't go 2.1 due to the extra machining and crank costs . it's only a road car so im sure the 500 hp target will be ample :-)to be quiet honest it will probably spend most of its life on the low boost map ferrying the mrs and kids about .
Excellent work, hat's off to anyone who build's their own.
I think Scoobynet should start offering an exclusive "built not bought" badge.
i agree alex there's something apealing about knowing every nut n bolt on your own built car ,but each to their own and i can understand why a lot of people leave it to the experts .As it depends on how much mechanical skill ,spare time and cash you've got at your disposal . I'v always enjoyed mechanics but ,after a 3 yr aprentership and working as a mechanic for a further 3 yrs i did'nt enjoy it as much  but now working as a self employed plasterer i find that working on the scoob more fun and keeps me outta the pub at weekends
  saying that MAJOR hangover has stopped play today
")

just got off the phone after a lenghty dissusion with my brv and hes thrown something in the mix im really not sure which choice to make as hes offered me his clean v1 sti as its looking like we're gonna have to break it
  .heres a link to his car on here
https://www.scoobynet.com/subaru-444...eline-ect.html
the way i see it iv got a few options so whats your opinions peoples pls
break his nic the 6 speed and fmic put it in mine

sell mine (with the piston slap when cold engine) how much is mine worth ?
fit his 350 bhp sweet cdb in mine and then sell it, how much would mine be worth then ?
break mine sell the parts/shell and his engine then put my forged engine in his
i can tell im not gonna sleep to well tonight so any opinons would be great
cheers clive
but now working as a self employed plasterer i find that working on the scoob more fun and keeps me outta the pub at weekends saying that MAJOR hangover has stopped play todayjust got off the phone after a lenghty dissusion with my brv and hes thrown something in the mix
im really not sure which choice to make as hes offered me his clean v1 sti as its looking like we're gonna have to break it .heres a link to his car on here https://www.scoobynet.com/subaru-444...eline-ect.html
the way i see it iv got a few options so whats your opinions peoples pls
break his nic the 6 speed and fmic put it in mine
sell mine (with the piston slap when cold engine) how much is mine worth ?
fit his 350 bhp sweet cdb in mine and then sell it, how much would mine be worth then ?
break mine sell the parts/shell and his engine then put my forged engine in his
i can tell im not gonna sleep to well tonight so any opinons would be great
cheers clive


will admit i like the sound of that option the most ,but after spending �1800 on the engine build recently iv only just managed to talk the mrs into spending another �1500 on a 6 speed set up
 my only chance of being able to pull this one off would be if my uk turbo would make the extra �2.5k difference if i broke it .although iv spent over �4k on the uk turbo i think id be lucky to get �2.5k back
iv only just managed to talk the mrs into spending another �1500 on a 6 speed set up my only chance of being able to pull this one off would be if my uk turbo would make the extra �2.5k difference if i broke it .although iv spent over �4k on the uk turbo i think id be lucky to get �2.5k back

thanks im not rushing things (leaving nothing to chance) i have been checking and double checking everything
still have'nt come to a desision about the v1sti but,iv made a little progress on the engine this week
i have been doing a few things during the evenings due to not spending any time on the build over the weekend .
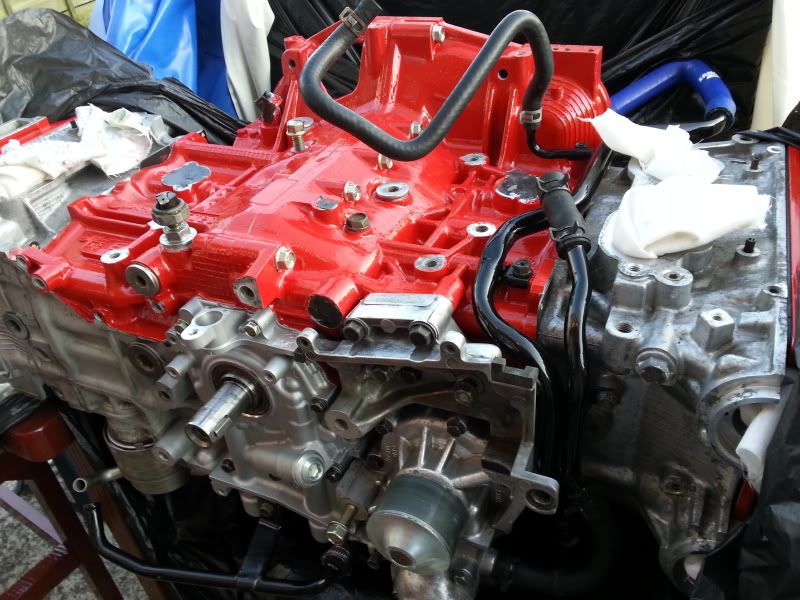
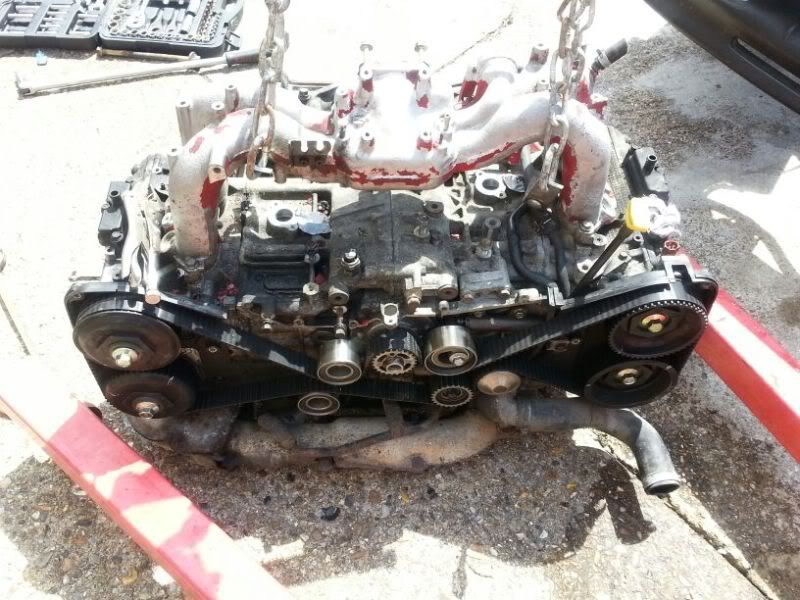
i stripped and repainted the small bore black block water pipes ,cleaned and polished the bungs ,timing belt tensioner bracket and oil pressure sender bevel (the knackerd oil pressure sender is only in situ to bung the hole) . Then fitted those and the oil cooler in preperation for the rear cambelt cover to be fitted prior to cam pulleys .As im hoping to find the time to be able to dial the cams in this weekend and mabey fit the new rollers,tensioner and kevlar timing belt .
not much of a visual difference but heres a pic anyways
still have'nt come to a desision about the v1sti but,iv made a little progress on the engine this week
i have been doing a few things during the evenings due to not spending any time on the build over the weekend .
i stripped and repainted the small bore black block water pipes ,cleaned and polished the bungs ,timing belt tensioner bracket and oil pressure sender bevel (the knackerd oil pressure sender is only in situ to bung the hole
) . Then fitted those and the oil cooler in preperation for the rear cambelt cover to be fitted prior to cam pulleys .As im hoping to find the time to be able to dial the cams in this weekend and mabey fit the new rollers,tensioner and kevlar timing belt .not much of a visual difference but heres a pic anyways

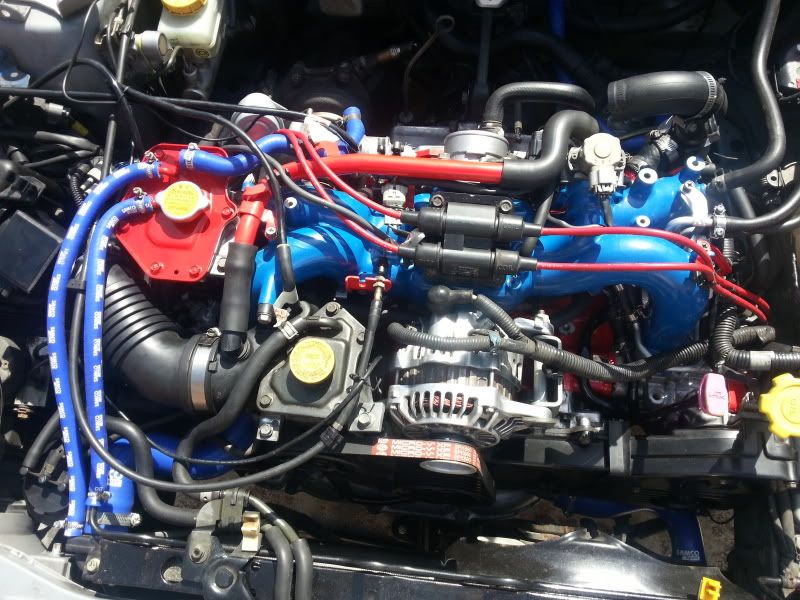
well i finished lightly porting the spare standard headers heres a pic of one of the inlets before and after i adjusted them to the new gasket sizes
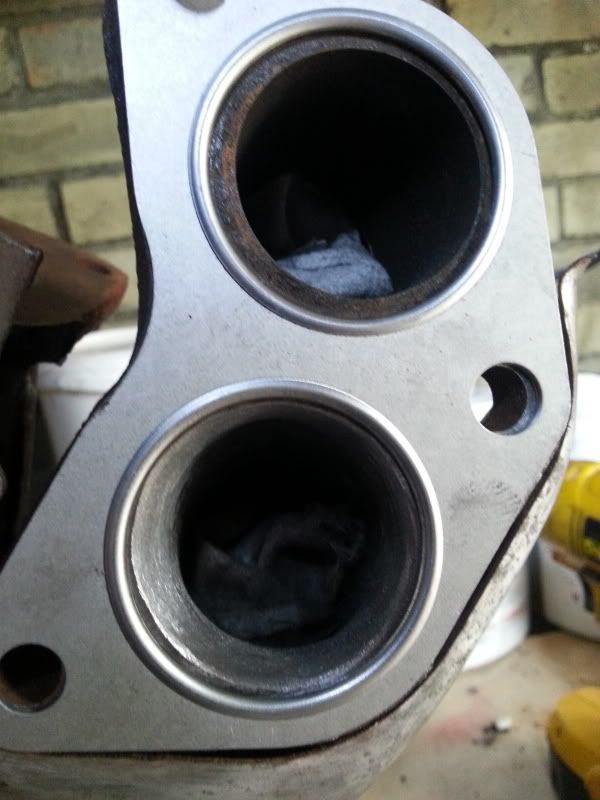
i know the ported one looks offset but, its not it was just the me trying to hold the gasket up and take a pic at the same time
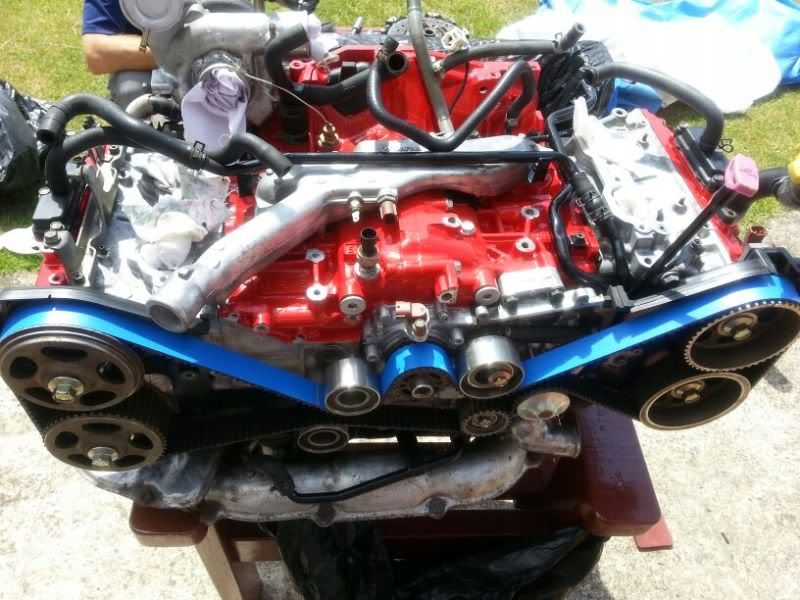
i also plastigauged the camshaft caps cleaned the cams and caps (give them a coat of graphogen paste) and then torqued them down. fitted the rear cam covers,cam pulleys,all new rollers and new hydrolic tensioner
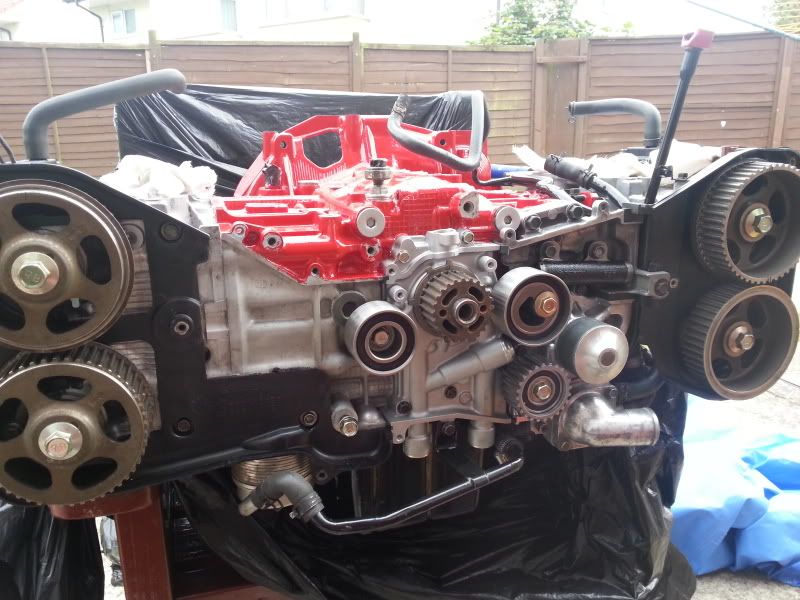
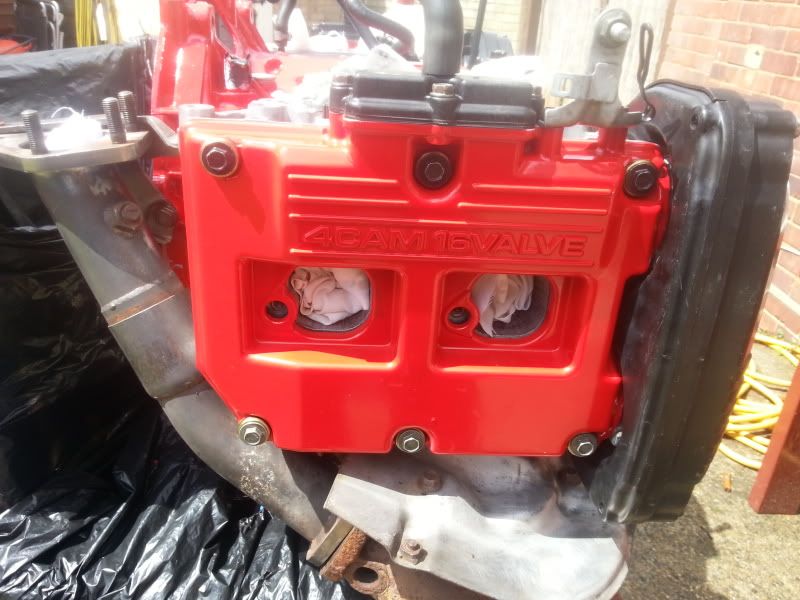
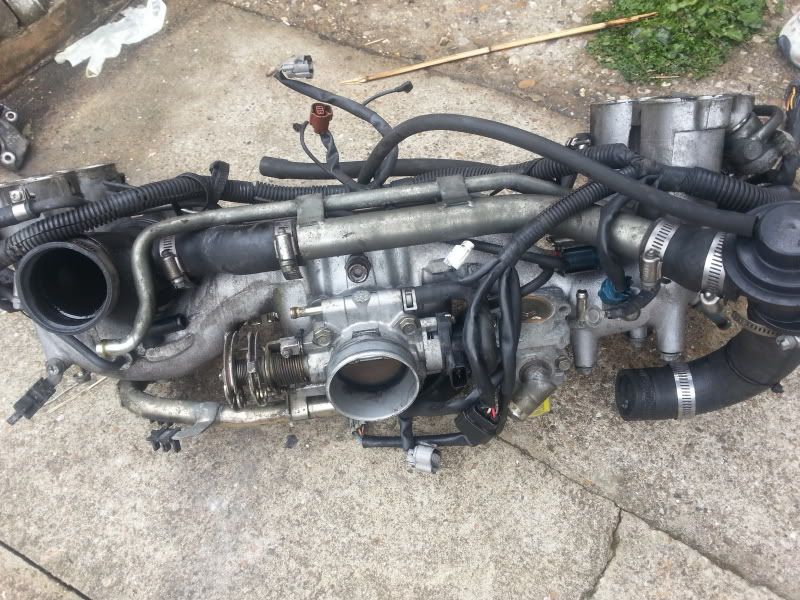
as all thats left to do is fit the kevlar timing belt i thought id chuck the inlet,550's and injector caps on and take another pic
excuse the pink dip stick in the pic it was on the engine when i got it
as for the dog shes always under my feet wherever i go

i know the ported one looks offset but, its not
it was just the me trying to hold the gasket up and take a pic at the same time i also plastigauged the camshaft caps cleaned the cams and caps (give them a coat of graphogen paste) and then torqued them down. fitted the rear cam covers,cam pulleys,all new rollers and new hydrolic tensioner

as all thats left to do is fit the kevlar timing belt i thought id chuck the inlet,550's and injector caps on and take another pic

excuse the pink dip stick in the pic
as for the dog shes always under my feet wherever i go
your not wrong there alex
i can see a gap in work in about 2 weeks between job start dates but , the weathers going to be a factor outta my hands
As i need at least a 3 day weekend to strip the v3 bits off my scoob (so i can clean and paint a few more bits) fit them to the new engine and then finally fit the engine into the car. i intend to run it in for 1k mls with the (switchable esl 0.8 bar) low boost map , once run in fit the fpr and 550's and have it re mapped by simon @ jgm .So i cant see it running decent power for a while but, i'll be happy just to have it running and not sounding like a bag of spanners when its cold
i can see a gap in work in about 2 weeks between job start dates but , the weathers going to be a factor outta my hands
As i need at least a 3 day weekend to strip the v3 bits off my scoob (so i can clean and paint a few more bits) fit them to the new engine and then finally fit the engine into the car
. i intend to run it in for 1k mls with the (switchable esl 0.8 bar) low boost map , once run in fit the fpr and 550's and have it re mapped by simon @ jgm .So i cant see it running decent power for a while but, i'll be happy just to have it running and not sounding like a bag of spanners when its cold

yep will defo need a 6 speed once shes run in
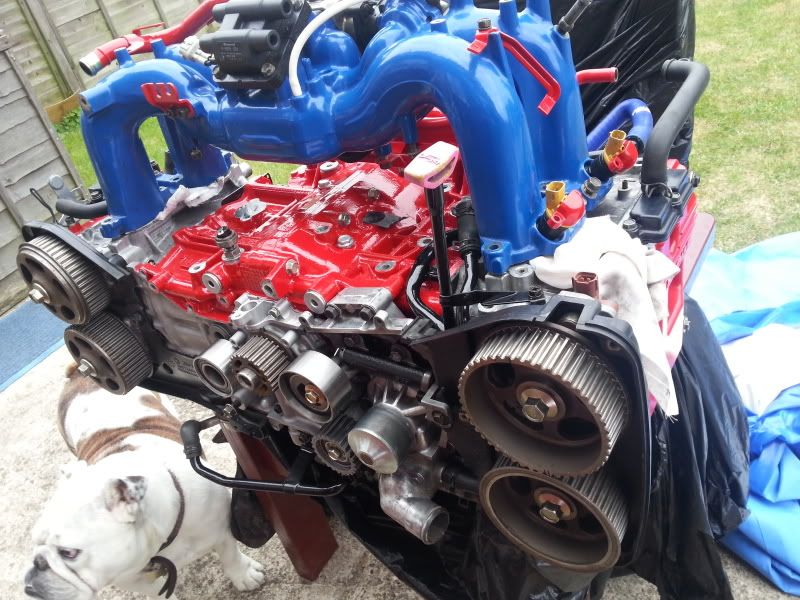
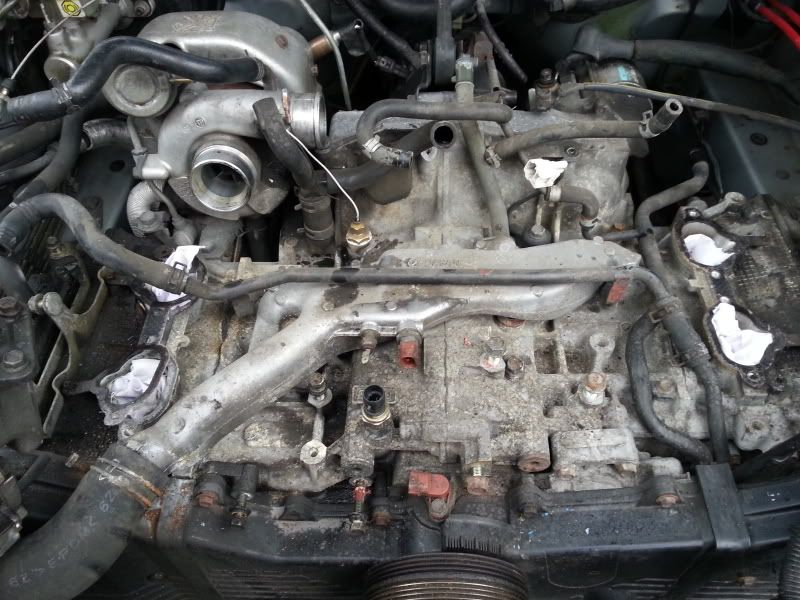
cambelt,ported headers and haywood &scott upipe fitted so can't do anymore to the engine now as i need the auxilaries off my v3

the cambelt covers off the v1 are scratched so iv only fitted those untill i get my v3 ones off
did have a few bits of the v3 over the weekend to paint and clean though
alternator looked a bit manky
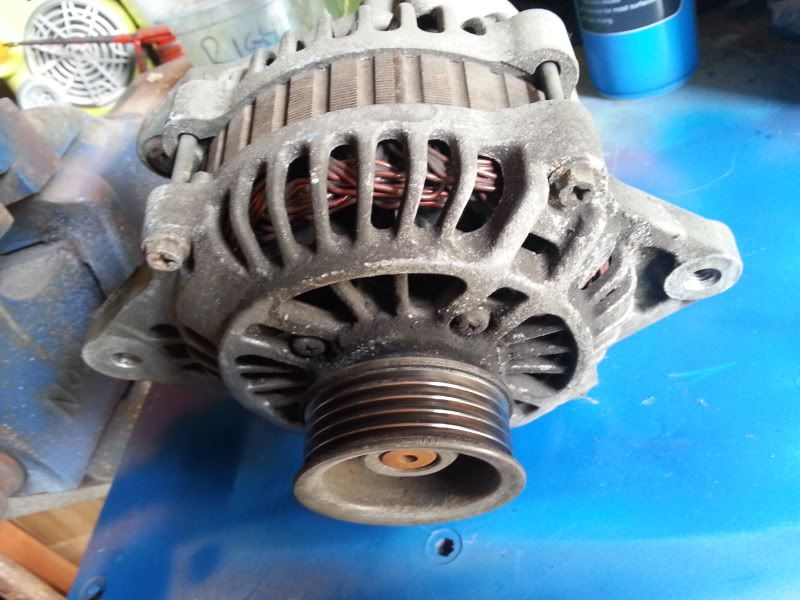
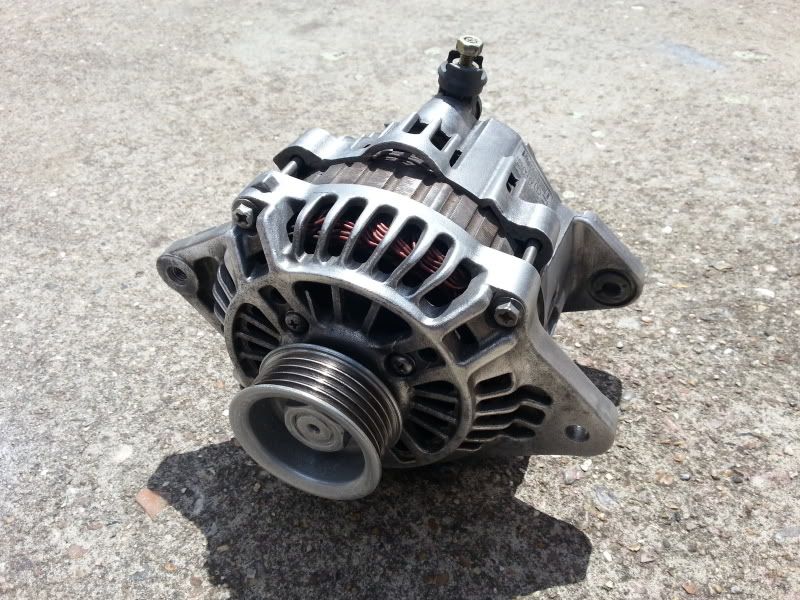
after a session with a wire brush
also cleaned a few bits in the bay then prepped and painted the aux belt cover whilst it was off
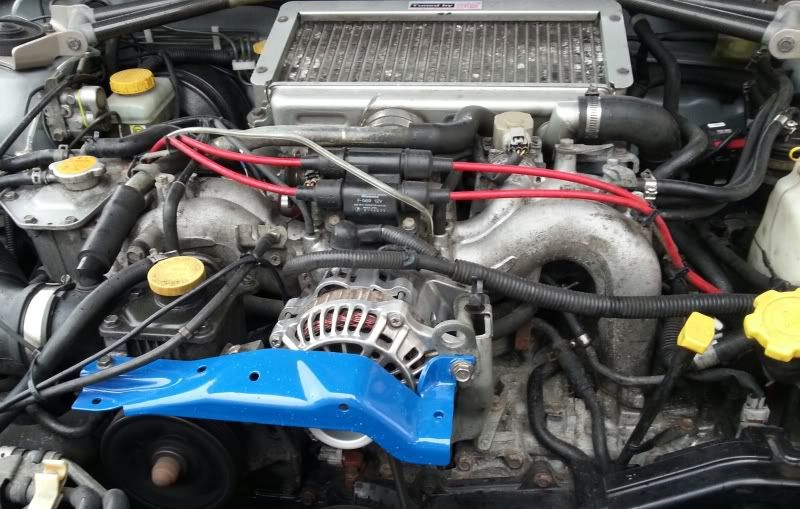
cover looks a bit outta place but i was,nt gonna take any chances leaving it off for the next 5 days
cambelt,ported headers and haywood &scott upipe fitted so can't do anymore to the engine now as i need the auxilaries off my v3


the cambelt covers off the v1 are scratched so iv only fitted those untill i get my v3 ones off
did have a few bits of the v3 over the weekend to paint and clean though
alternator looked a bit manky

after a session with a wire brush

also cleaned a few bits in the bay then prepped and painted the aux belt cover whilst it was off

cover looks a bit outta place but i was,nt gonna take any chances leaving it off for the next 5 days
Id like to have the chance to miss my air con ,but
A. I live in England :-)
B. It's a uk car which didn't have air con to start with bud ;-)
Will admit I do miss the vectras climate/cruise control and heated leather though
A. I live in England :-)
B. It's a uk car which didn't have air con to start with bud ;-)
Will admit I do miss the vectras climate/cruise control and heated leather though

Scooby Regular
Joined: Apr 2012
Posts: 467
Likes: 0
From: wales
That is one awesome read and project. Assisted me a lot as I may soon be doing my first Strip / examination project and could not work out how the two halves of the block came apart.
I will be fitting new head gaskets but also want to just check bottom end shells as engine is now out of the car.
So I guess the best way is to remove pistons of their rods on the left bank and leave them in the right bank before splitting the two halves?
I will be fitting new head gaskets but also want to just check bottom end shells as engine is now out of the car.
So I guess the best way is to remove pistons of their rods on the left bank and leave them in the right bank before splitting the two halves?
Love threads like this also love the fact you have gone into detail about what you have done and steps etc its very inspiring I still need to get my project off the floor and threads like these are a big help keep up the top work matey 
don't think it really matters which bank you leave the rods in whilst taking it apart, only on assembly as the block "o" rings sit in a recess (so that's the halve you want flat on the bench to stop the "o" rings falling out) .Make sure you download the pdf manual from "ken gilbert" as ideally you want to remove the cam,head and block bolts in the correct sequence to avoid warpage
cheers Craig I found that kwik's thread helped me a lot as hes gone into much more detail on the strip down of the engine .
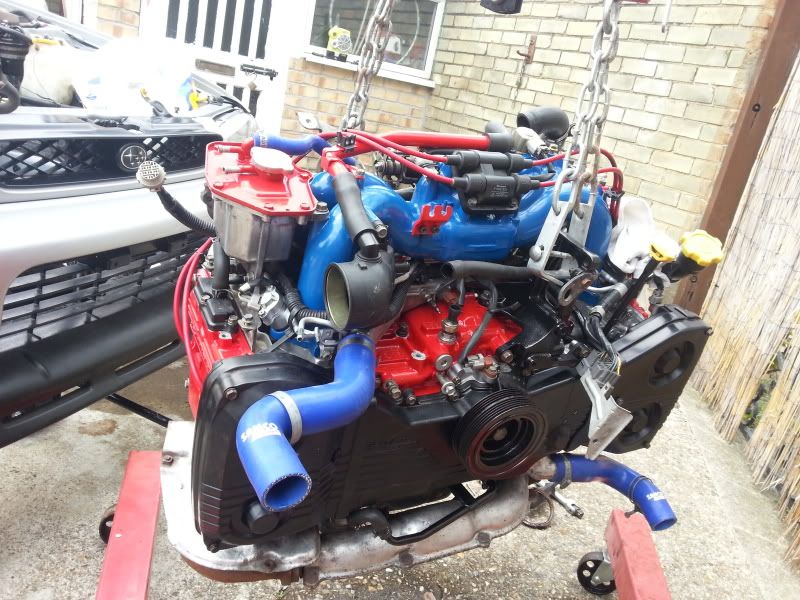
a bit more progress made
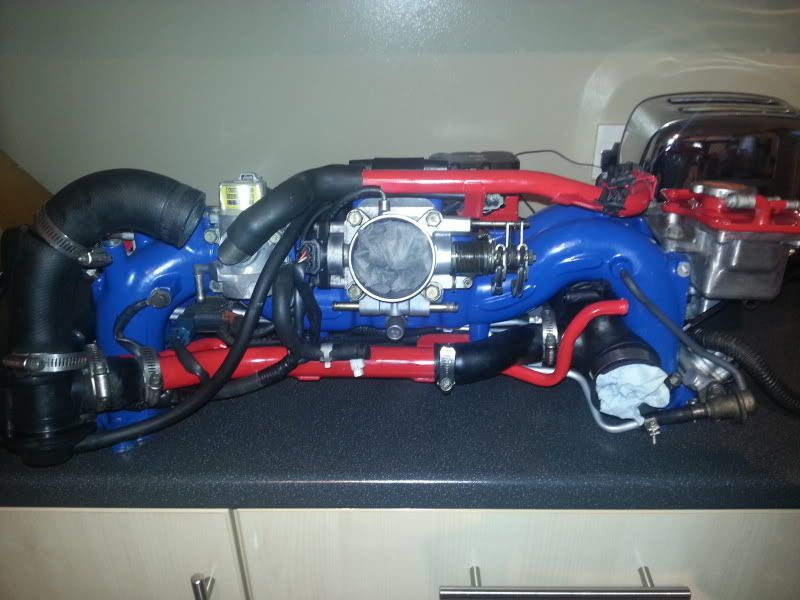
stripped the inlet and with fuel rails,injectors,loom ect
cleaned up the v3 water crossover pipe, transferred the sensors over and fitted the (temporary turbo) converted tdo5
fitted the fuel lines, injectors ,breathers ,engine loom ect to the new inlet
to make the install a bit easier
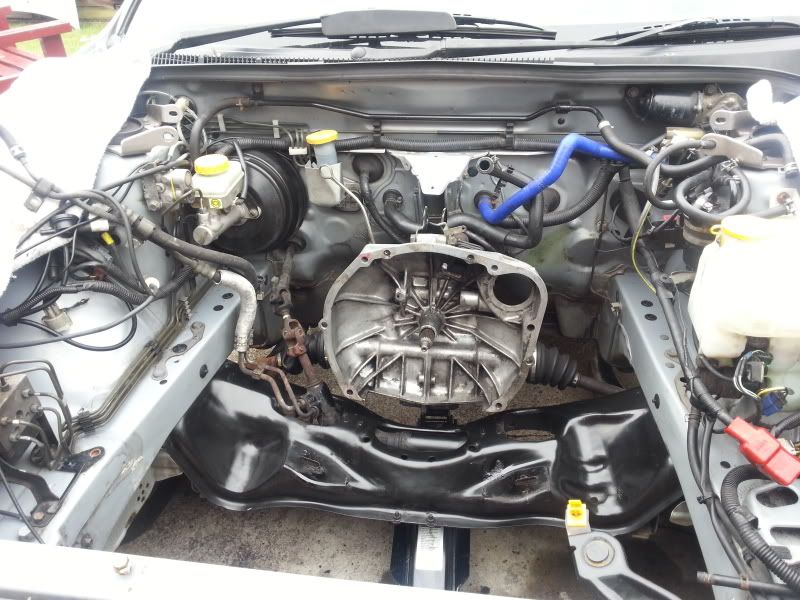
out with the oldI used a spare inlet to remove the old engine
cheers Craig I found that kwik's thread helped me a lot as hes gone into much more detail on the strip down of the engine .
a bit more progress made
stripped the inlet and with fuel rails,injectors,loom ect


cleaned up the v3 water crossover pipe, transferred the sensors over and fitted the (temporary turbo) converted tdo5

fitted the fuel lines, injectors ,breathers ,engine loom ect to the new inlet
to make the install a bit easier

out with the old
I used a spare inlet to remove the old engine
Scooby Regular
Joined: Apr 2012
Posts: 467
Likes: 0
From: wales
What's the old engine like? I may need one soon unless I get enough interest in the car I'm stripping. Only problem is, I just got ripped off for �400 on a knackered closed deck replacement and have to be really sure I'd be getting the best possible unit.
Scooby Regular
Joined: Apr 2012
Posts: 467
Likes: 0
From: wales
By removing the sump, is it possible to just remove big end and main bearing caps just to examine the bearing shells for wear? If so and all looks well with the crank. Is it possible to renew the standard shells from this position?

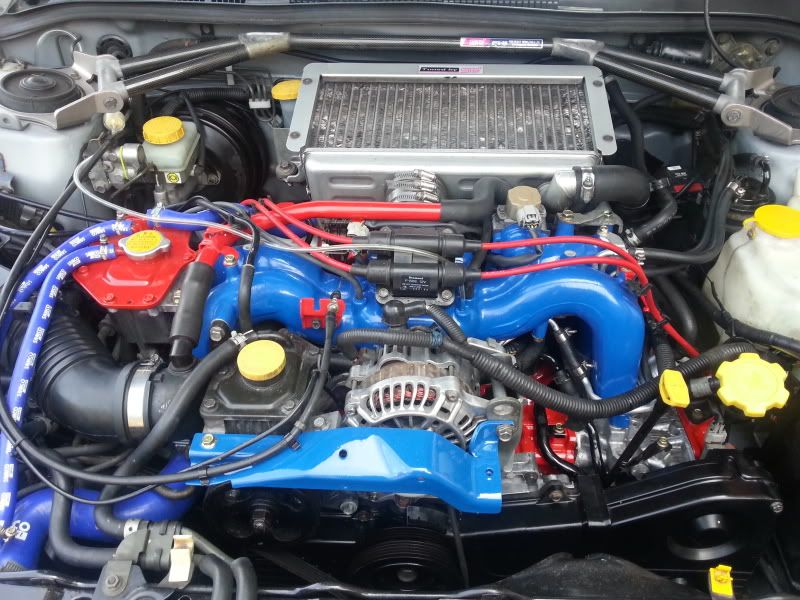
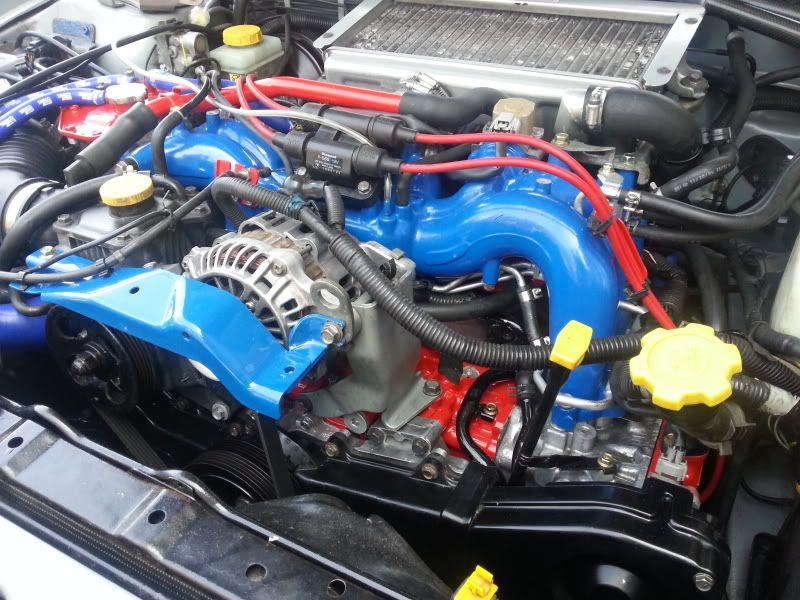
while the engine was out I cleaned up the bay a bit then lowered the engine in using a spare inlet manifold
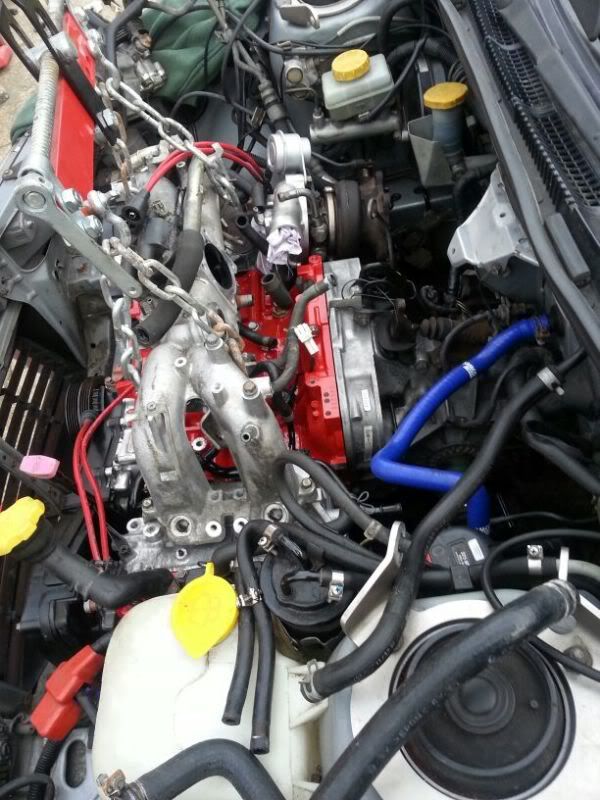
next up I fitted the shiny inlet with the loom,fuel rails, injectors ect already attached
followed by power steering pump,alternator,rad ect
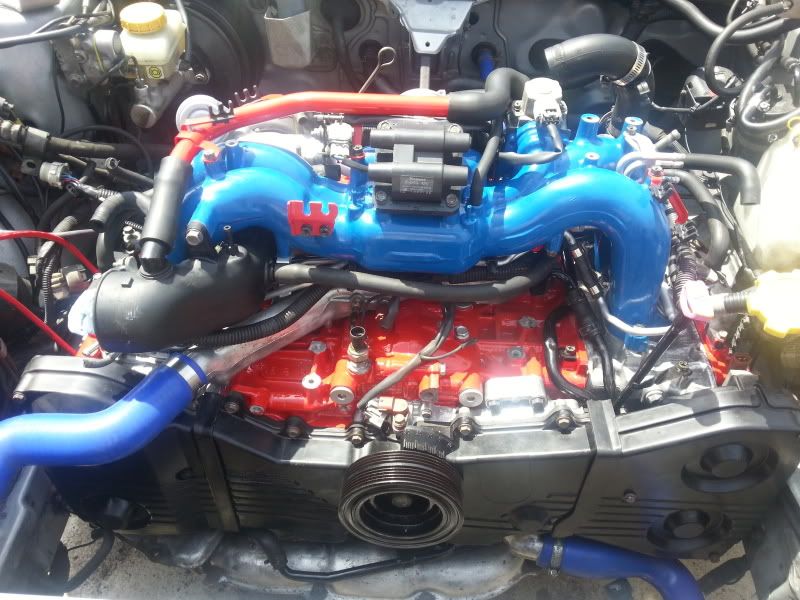
tmic on and filled it up with coolant ,oil and turned it over by hand a few times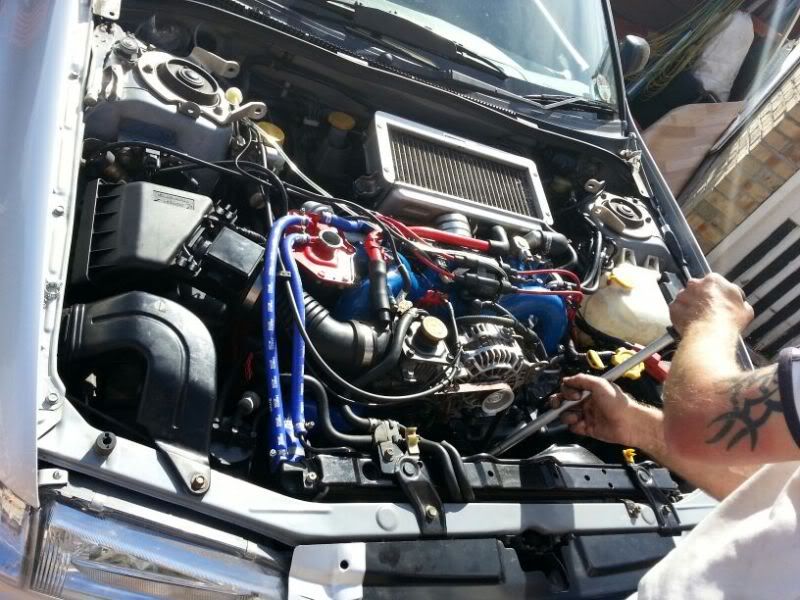
double checked all levels hoses and wires disconnected the crank sensor(so it wouldn't fire up) and turned it over a few more turns to let the oil coat everything .Re connected the crank sensor took a deep breath and flicked the key ..... it started on the button with a good 6.8 bar of cold high idle oil pressure I continued to let it idle with the header tank cap off whilst topping up the coolant but , just as the choke was about to come off disaster struck as oil began to drip from what appeared to be between the engine and box
 switched it off and tried to locate the leak but there was no oil anywhere on the block id been meticulous through out the build with all new gaskets and followed the manual to the letter .I had no choice but to remove the engine to investigate further
I guessed it was the crankshaft seal and bit of research showed that Subaru rear crankshaft oil seals DONT LIKE BEING PUSHED ALL THE WAY HOME and the oil separator plate(yellow plate on the right is another likely culprit) now showed fine cracks which were not apparent when it was clean
heres a pic of the wrong way to fit a rear crank seal (pushed in to far)and the cracked plate
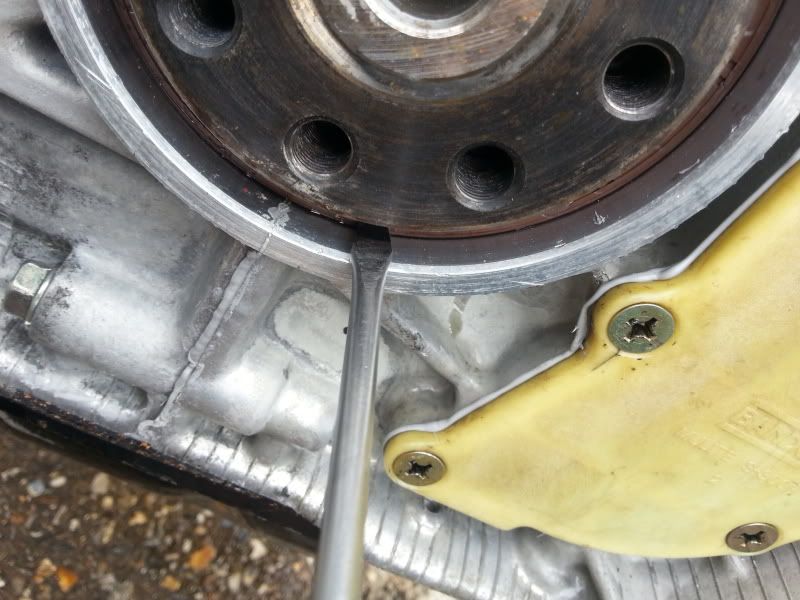
and a pic of the old engine with the seal flush with the casing (in the correct position)
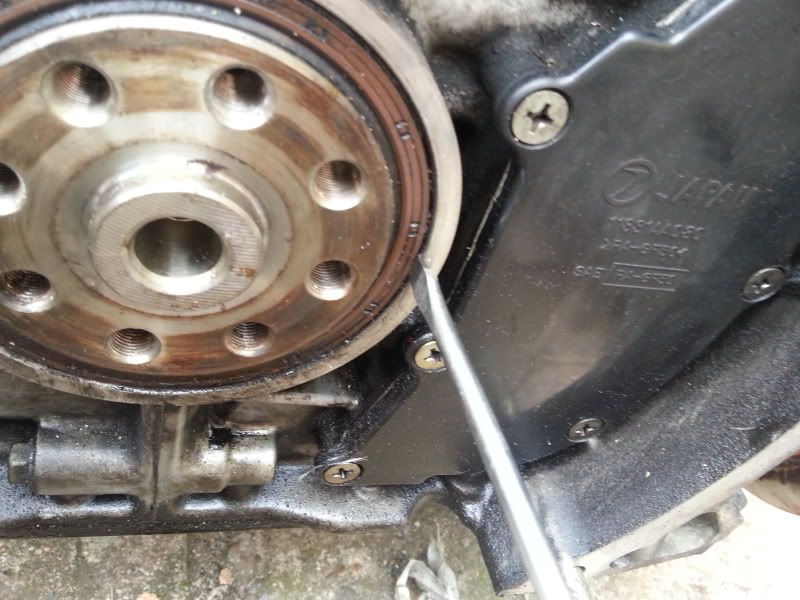
there is nowhere in the manual that said to fit the seal flush with the front of the casing just to use a Subaru tool to fit it,but front crankshaft and camshaft oil seals are all pushed fully home I took no chances fitted a new seal (in the right position and) took the (uncracked) oil separator plate off my uk turbo engine cleaned it up and fitted it as well
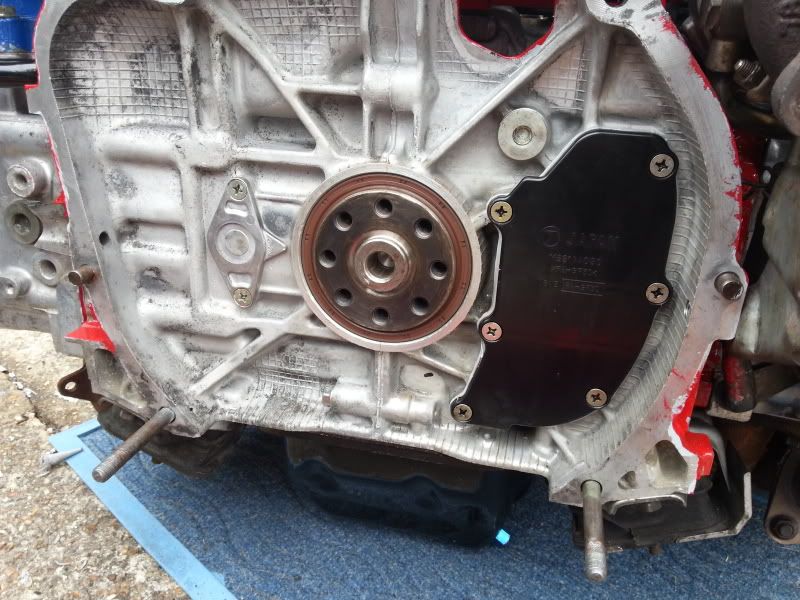
I let the 3 bond sealant go off over night and refitted the engine
no leaks ive done 50 miles so far with no issues apart from having to drive it like miss daisy with no boost and a lesson learnt about the oil seal


next up I fitted the shiny inlet with the loom,fuel rails, injectors ect already attached

followed by power steering pump,alternator,rad ect

tmic on and filled it up with coolant ,oil and turned it over by hand a few times

double checked all levels hoses and wires disconnected the crank sensor(so it wouldn't fire up) and turned it over a few more turns to let the oil coat everything .Re connected the crank sensor took a deep breath and flicked the key ..... it started on the button with a good 6.8 bar of cold high idle oil pressure
I continued to let it idle with the header tank cap off whilst topping up the coolant but , just as the choke was about to come off disaster struck as oil began to drip from what appeared to be between the engine and box switched it off and tried to locate the leak but there was no oil anywhere on the block id been meticulous through out the build with all new gaskets and followed the manual to the letter .I had no choice but to remove the engine to investigate further 
I guessed it was the crankshaft seal and bit of research showed that Subaru rear crankshaft oil seals DONT LIKE BEING PUSHED ALL THE WAY HOME
and the oil separator plate(yellow plate on the right is another likely culprit) now showed fine cracks which were not apparent when it was clean heres a pic of the wrong way to fit a rear crank seal (pushed in to far)
and the cracked plate 
and a pic of the old engine with the seal flush with the casing (in the correct position)

there is nowhere in the manual that said to fit the seal flush with the front of the casing
just to use a Subaru tool to fit it,but front crankshaft and camshaft oil seals are all pushed fully home I took no chances fitted a new seal (in the right positionand) took the (uncracked) oil separator plate off my uk turbo engine cleaned it up and fitted it as well 
I let the 3 bond sealant go off over night and refitted the engine

no leaks
ive done 50 miles so far with no issues apart from having to drive it like miss daisy with no boost and a lesson learnt about the oil seal
That looks good, glad you have managed to sort it out.
That said, it would have been a good opportunity to upgrade to a metal separator plate. Also the front crank seal is not pushed all the way in, it needs to be flush with the outer face of the oil pump.
That said, it would have been a good opportunity to upgrade to a metal separator plate. Also the front crank seal is not pushed all the way in, it needs to be flush with the outer face of the oil pump.
Cheers chaps
I did check the depth of the front crank seal against the old cdb oil pump (as ive got a spare subaru seal cos the rcm pump came with one ) and yes it sits flush at the front of the pump but, it also butts against the back .the reason for the rear seal having a space behind it is because any oil that makes it past the crankshaft is centerfrugally thrown to the outside of the recess and drips into the quarter inch drain channel at the bottom and returns back to the sump
Will admit I did think about buying the rcm separator plate (although @� 100 + it did seem a tad pricey) might get one at a later date and fit it with the 6 speed or when I need a clutch that can handle more power than the current pink box exedy

Will do alex 80 miles and counting
I know I could've saved myself a bit of embarrassment by leaving out the part about the crankshaft oil sealbut if one person reads this and it stops them making the same mistake it was worth it imo
Another plus is I can now remove a scooby engine in under 2hrs on my own
80 miles and counting I know I could've saved myself a bit of embarrassment by leaving out the part about the crankshaft oil seal
Another plus is I can now remove a scooby engine in under 2hrs on my own
I certainly have

your right there Alex
a man that says he's never made a mistake has probably never made anything
not much of a update but, its now had its two millers running in oil and filter changes (within the first 500 miles) and is running on millers fully synthetic with spurts of low boost ,once warmed up
hopefully should be fitting the fpr,550,s and aiming for a remap early September

Last edited by savage bulldogs; Aug 15, 2013 at 10:26 PM.

Scooby Regular
Joined: Nov 2012
Posts: 116
Likes: 0
From: north wales
well great job ,
funny the bond subaru owners have with each other , it's not like this on other car forums , cant wait to be a subaru driver aswell as a owner lol
and now anyone that reads this post won't push the seal all the way home , legend!