Notices
Projects For Serious DIY Car Projects

Project *** Polished Inlet Manifold ***

Thread Tools
 
Search this Thread
 
Old 26 October 2009, 08:00 PM
  #1  
Ian
Scooby Regular
Thread Starter
iTrader: (10)
 
Ian's Avatar
 
Join Date: Jul 2005
Location: Cambridge
Posts: 7,845
Likes: 0
Received 1 Like on 1 Post
Default Project *** Polished Inlet Manifold ***

I am giving my self a project over the winter to have a go at a polished inlet manifold for my classic.

I know this is going to be a big job for me, but i like a challenge.

I am aiming for a clean polished look with as little on as poss.

I raided my dads shed today for some tools and i have..

Grinder
files
hack saw
drimmel
sand paper
eye protection

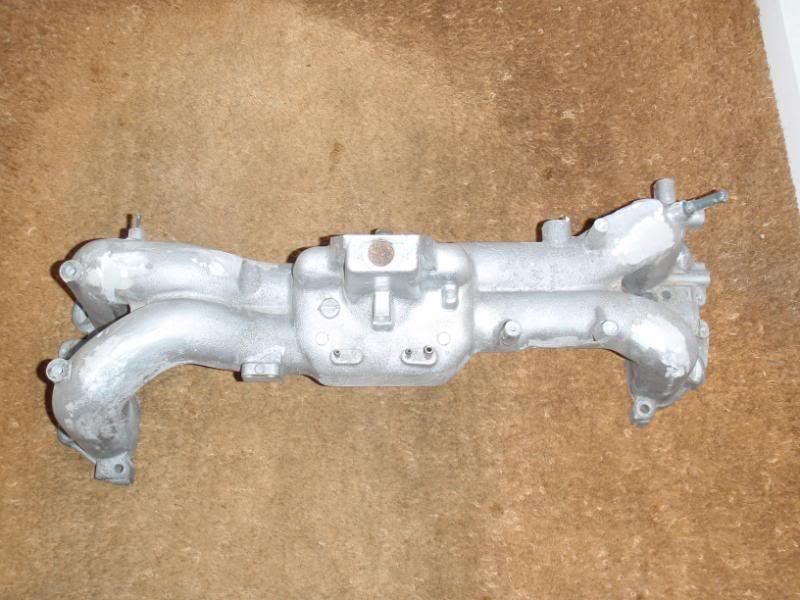
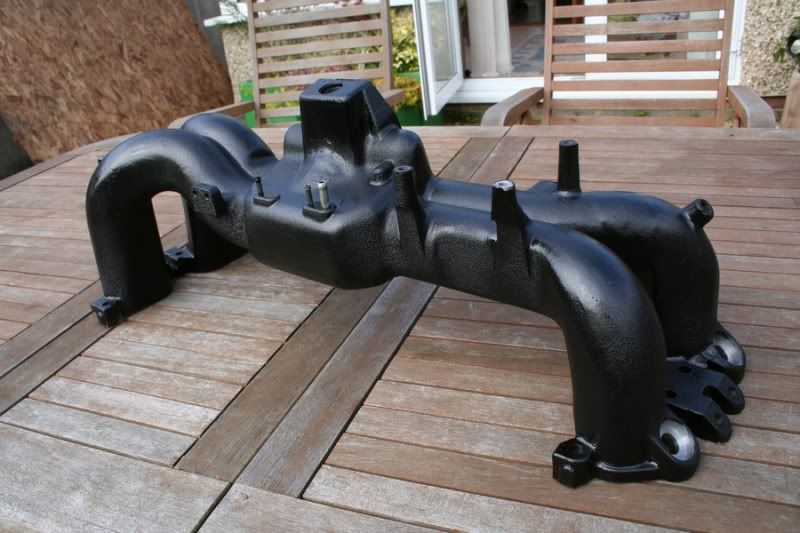
standard classic my99 inlet manifold


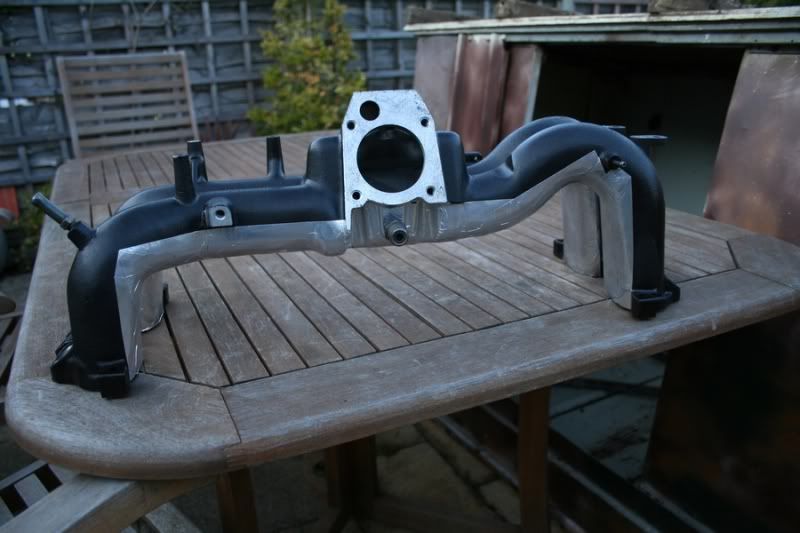
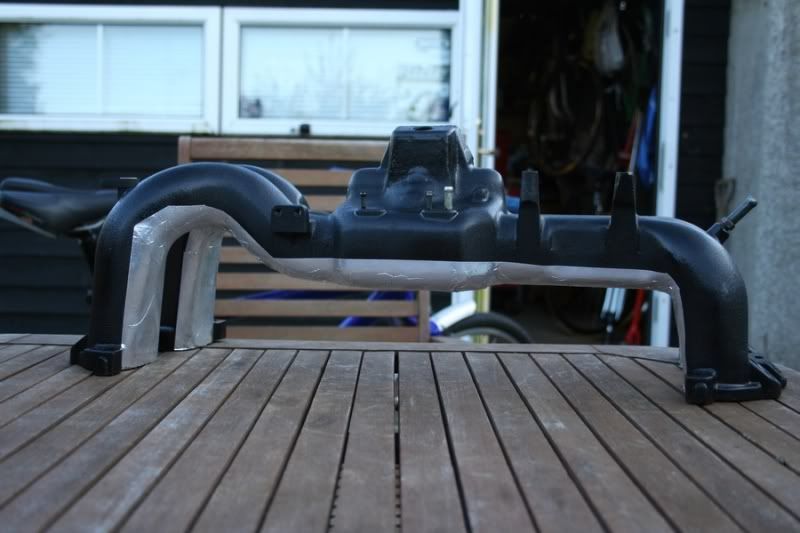
this was after around 1-1.5 hours with the grinder and file


Old 26 October 2009, 08:03 PM
  #2  
Ian
Scooby Regular
Thread Starter
iTrader: (10)
 
Ian's Avatar
 
Join Date: Jul 2005
Location: Cambridge
Posts: 7,845
Likes: 0
Received 1 Like on 1 Post
Default

the 3 prong bits on the right of the inlet manifold that the spark plug leads go into/black box sits on.

do i need to leave the black box here, or can i tuck it behind/under the inlet manifold when finished?
Old 26 October 2009, 08:05 PM
  #3  
JonMc
Scooby Senior
iTrader: (51)
 
JonMc's Avatar
 
Join Date: Nov 2005
Location: Wherever I park my car, that's my home
Posts: 20,491
Likes: 0
Received 2 Likes on 2 Posts
Default

Good luck, it's hard work but if you get a cheap polishing kit from ebay (about £20) that attached to a power drill you can finish it off a treat. I went mad earlier this year did my induction kit, TMIC and diff guard
Old 26 October 2009, 08:20 PM
  #4  
SwissTony
Scooby Regular
iTrader: (19)
 
SwissTony's Avatar
 
Join Date: Mar 2003
Location: In the Doghouse
Posts: 28,226
Received 12 Likes on 3 Posts
Default

Originally Posted by DaOne
the 3 prong bits on the right of the inlet manifold that the spark plug leads go into/black box sits on.

do i need to leave the black box here, or can i tuck it behind/under the inlet manifold when finished?
Well the HT leads are designed to meet the box in the middle with the left leads longer as you look at the block, so at a guess you would have to find longer HT leads from somewhere as it is normally a tight fit anyway. And dont forget the plug connector that goes into the box
Old 26 October 2009, 08:34 PM
  #5  
Ian
Scooby Regular
Thread Starter
iTrader: (10)
 
Ian's Avatar
 
Join Date: Jul 2005
Location: Cambridge
Posts: 7,845
Likes: 0
Received 1 Like on 1 Post
Default

im just wondering about feeding the ht leads under/between the legs of the inlet manifold and have the black box under the inlet/behind manifold around the same sort of area as standard. i was wondering if it needed to be grounded at all?

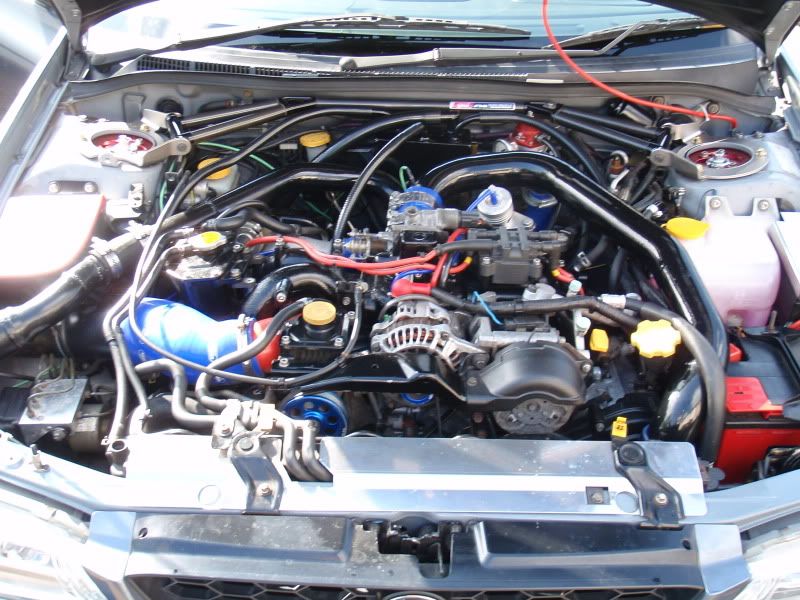
this is a pic of what i have on my inlet at the mo

Old 26 October 2009, 08:39 PM
  #6  
SwissTony
Scooby Regular
iTrader: (19)
 
SwissTony's Avatar
 
Join Date: Mar 2003
Location: In the Doghouse
Posts: 28,226
Received 12 Likes on 3 Posts
Default

Definately needs to be grounded. Have a look at this website. Tim moght be able to source longer HT leads
Scoobyparts Ltd MAGNECOR 8mm PERFORMANCE HT LEAD SET 40205
Old 26 October 2009, 08:55 PM
  #7  
dazdavies
Scooby Regular
iTrader: (22)
 
dazdavies's Avatar
 
Join Date: Oct 2000
Location: N/A
Posts: 7,061
Received 82 Likes on 46 Posts
Default

Leave coil pack above inlet otherwise you'll have problems with heat.
Old 26 October 2009, 09:02 PM
  #8  
Ian
Scooby Regular
Thread Starter
iTrader: (10)
 
Ian's Avatar
 
Join Date: Jul 2005
Location: Cambridge
Posts: 7,845
Likes: 0
Received 1 Like on 1 Post
Default

Originally Posted by dazdavies
Leave coil pack above inlet otherwise you'll have problems with heat.

kk will do

think im going to try and find one of the sand paper flap wheels that go into a elec drill, that should speed the sanding up

anything else anyone recomends?
Old 26 October 2009, 10:57 PM
  #9  
dazdavies
Scooby Regular
iTrader: (22)
 
dazdavies's Avatar
 
Join Date: Oct 2000
Location: N/A
Posts: 7,061
Received 82 Likes on 46 Posts
Default

B&Q sell the flapper wheels.
Old 26 October 2009, 11:32 PM
  #10  
Silver Scooby Sport
Moderator
Support Scoobynet!
Support Scoobynet!
iTrader: (15)
 
Silver Scooby Sport's Avatar
 
Join Date: Sep 2002
Location: South Wales
Posts: 13,846
Likes: 0
Received 3 Likes on 3 Posts
Default

I'm still part way into mine and hope to finish it through the winter months, it's a big job but well worth it when you finish. I have some insulated spacers to go back under mine when I change it because I figured if it's coming off I just as well make the most of things.
Old 27 October 2009, 11:58 AM
  #11  
trails
Scooby Regular
iTrader: (41)
 
trails's Avatar
 
Join Date: Nov 2003
Location: in the woods...........555 Wagon Sqn
Posts: 13,347
Received 55 Likes on 42 Posts
Default

Good luck with the polishing, I used an air die grinder and some small files from a £1 shop to remove the casting and other imperfections...well most of them


Old 27 October 2009, 05:49 PM
  #12  
Ian
Scooby Regular
Thread Starter
iTrader: (10)
 
Ian's Avatar
 
Join Date: Jul 2005
Location: Cambridge
Posts: 7,845
Likes: 0
Received 1 Like on 1 Post
Default

have you got any front pics of it trails?

spent an hour or so again to day on it


Old 28 October 2009, 09:32 AM
  #13  
trails
Scooby Regular
iTrader: (41)
 
trails's Avatar
 
Join Date: Nov 2003
Location: in the woods...........555 Wagon Sqn
Posts: 13,347
Received 55 Likes on 42 Posts
Default

photo ***** at your disposal


Finished article...


Old 28 October 2009, 11:26 AM
  #14  
SwissTony
Scooby Regular
iTrader: (19)
 
SwissTony's Avatar
 
Join Date: Mar 2003
Location: In the Doghouse
Posts: 28,226
Received 12 Likes on 3 Posts
Default

Its a big spider
Old 28 October 2009, 12:04 PM
  #15  
trails
Scooby Regular
iTrader: (41)
 
trails's Avatar
 
Join Date: Nov 2003
Location: in the woods...........555 Wagon Sqn
Posts: 13,347
Received 55 Likes on 42 Posts
Default

Originally Posted by SwissTony
Its half a big spider
edited for accuracy
Old 28 October 2009, 01:39 PM
  #16  
Ian
Scooby Regular
Thread Starter
iTrader: (10)
 
Ian's Avatar
 
Join Date: Jul 2005
Location: Cambridge
Posts: 7,845
Likes: 0
Received 1 Like on 1 Post
Default

what did you use to gring the bits off the front where the TB is?
Old 28 October 2009, 03:38 PM
  #17  
trails
Scooby Regular
iTrader: (41)
 
trails's Avatar
 
Join Date: Nov 2003
Location: in the woods...........555 Wagon Sqn
Posts: 13,347
Received 55 Likes on 42 Posts
Default

Originally Posted by DaOne
what did you use to gring the bits off the front where the TB is?
brute force, an angle grinder and die grinder
Old 29 October 2009, 05:25 PM
  #18  
Ian
Scooby Regular
Thread Starter
iTrader: (10)
 
Ian's Avatar
 
Join Date: Jul 2005
Location: Cambridge
Posts: 7,845
Likes: 0
Received 1 Like on 1 Post
Default

had another hour or so today with the grinder etc

have got quite alot of the orange peel off now


Old 29 October 2009, 07:31 PM
  #19  
trails
Scooby Regular
iTrader: (41)
 
trails's Avatar
 
Join Date: Nov 2003
Location: in the woods...........555 Wagon Sqn
Posts: 13,347
Received 55 Likes on 42 Posts
Default

good job, I knew I should have removed that other little wedgy bit
Old 29 October 2009, 08:01 PM
  #20  
Ian
Scooby Regular
Thread Starter
iTrader: (10)
 
Ian's Avatar
 
Join Date: Jul 2005
Location: Cambridge
Posts: 7,845
Likes: 0
Received 1 Like on 1 Post
Default

Originally Posted by trails
good job, I knew I should have removed that other little wedgy bit

i saw that you haddent, so was not sure if there was going to be a hole under it or not.

so thought i woulf be brave and have a go

result
Old 29 October 2009, 10:31 PM
  #21  
trails
Scooby Regular
iTrader: (41)
 
trails's Avatar
 
Join Date: Nov 2003
Location: in the woods...........555 Wagon Sqn
Posts: 13,347
Received 55 Likes on 42 Posts
Default

^ its quite time intensive but I found it oddly relaxing

may be starting again as I'm thinking of rotating the IM while the engine is out
Old 05 November 2009, 10:11 PM
  #22  
STI_Baly
Scooby Regular
iTrader: (23)
 
STI_Baly's Avatar
 
Join Date: Feb 2008
Location: My Workshop, Kent
Posts: 2,588
Likes: 0
Received 1 Like on 1 Post
Default

What the PEG was used for???

Good Job BTW
Old 06 November 2009, 06:35 PM
  #23  
Silver Scooby Sport
Moderator
Support Scoobynet!
Support Scoobynet!
iTrader: (15)
 
Silver Scooby Sport's Avatar
 
Join Date: Sep 2002
Location: South Wales
Posts: 13,846
Likes: 0
Received 3 Likes on 3 Posts
Default

I've been trying to get motivated on mine since the summer I got part way in and it did my head in slightly hopefully now over the winter I can finish it off, far from easy and a ton of patience required for sure.

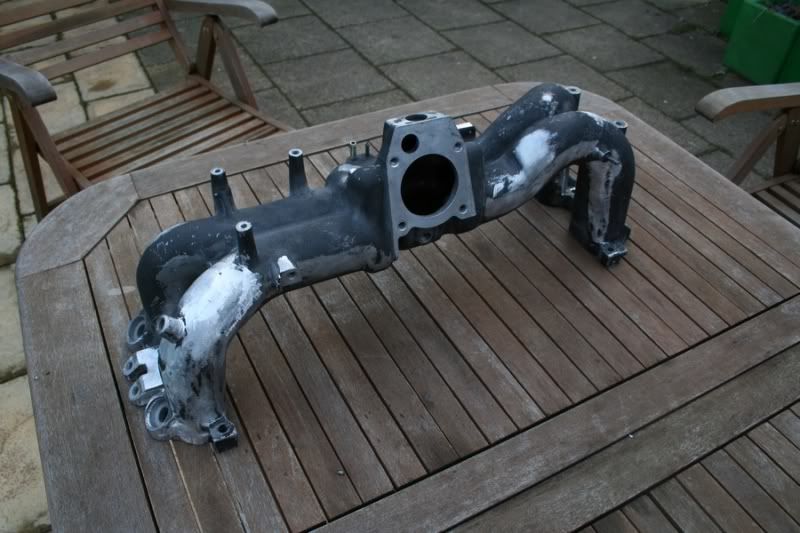
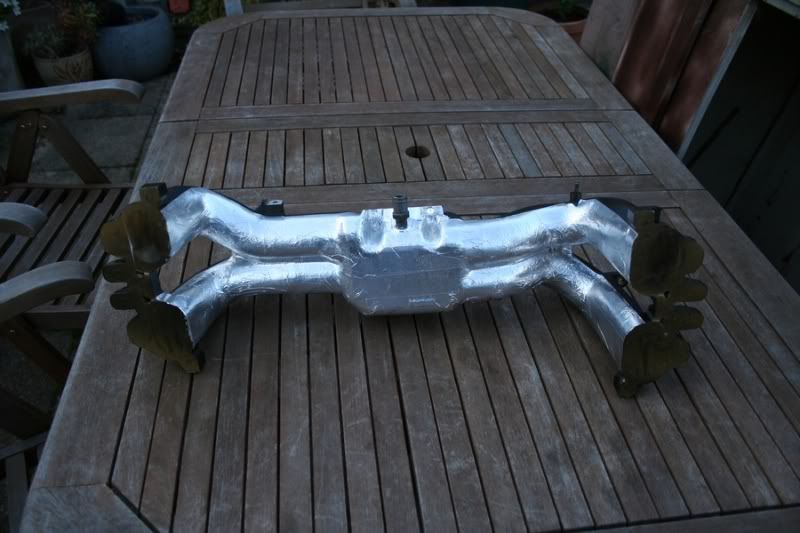
I simply went for a full polish on a few areas straight off to see how much prep was really needed now I need to work back a few steps then go for the finished polish again.


Good luck there

Last edited by Silver Scooby Sport; 06 November 2009 at 06:37 PM.
Old 07 November 2009, 12:16 PM
  #24  
Ian
Scooby Regular
Thread Starter
iTrader: (10)
 
Ian's Avatar
 
Join Date: Jul 2005
Location: Cambridge
Posts: 7,845
Likes: 0
Received 1 Like on 1 Post
Default

looking good there, mine is getting there, have had a few days off now as it has been wet outside, and i nearly got killed the other day when i started it on the kitchen table lol

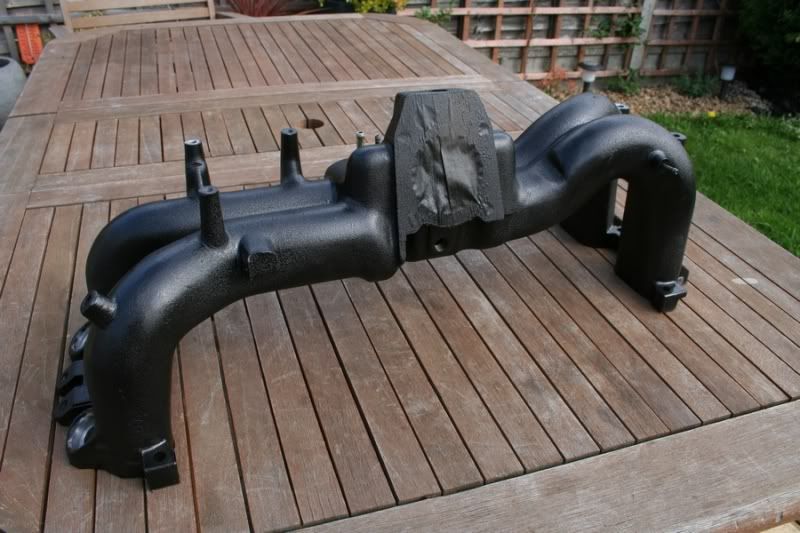
have started to go over with sand paper. it is when you get it nice and smooth apart form one or two small scrach marks in the smooth finish that really bugs me!!
Old 07 November 2009, 12:40 PM
  #25  
frayz
Essex Area Moderator
Support Scoobynet!
iTrader: (7)
 
frayz's Avatar
 
Join Date: Sep 2005
Location: "Engineering Perfection in Essex"
Posts: 19,945
Received 2 Likes on 2 Posts
Default

Far too much work vs the gain for me guys but hats off to you.
Old 17 November 2009, 04:15 PM
  #26  
Ian
Scooby Regular
Thread Starter
iTrader: (10)
 
Ian's Avatar
 
Join Date: Jul 2005
Location: Cambridge
Posts: 7,845
Likes: 0
Received 1 Like on 1 Post
Default

you know them little holes you get in the casting when you start to smooth it down, will i had some on the front that were really bugging me so i started to try and sand them away.

and the result.
.
.
.
.
.
.
.
.
.
.
.
.
.
.
.
.
.
.
.
.
.
.


ouch

am going to see if i can get the front cut out and a new bit of alloy weilded in

bugger

Old 17 November 2009, 04:22 PM
  #27  
Rice Rocket
Scooby Regular
iTrader: (23)
 
Rice Rocket's Avatar
 
Join Date: May 2006
Location: Rota Subzeros FOR sale!
Posts: 3,701
Likes: 0
Received 0 Likes on 0 Posts
Default

^^^ Bugger!!! ^^^
Old 17 November 2009, 05:16 PM
  #28  
frayz
Essex Area Moderator
Support Scoobynet!
iTrader: (7)
 
frayz's Avatar
 
Join Date: Sep 2005
Location: "Engineering Perfection in Essex"
Posts: 19,945
Received 2 Likes on 2 Posts
Default

Easy fix mate, dont let it get you down
Old 17 November 2009, 07:55 PM
  #29  
Ian
Scooby Regular
Thread Starter
iTrader: (10)
 
Ian's Avatar
 
Join Date: Jul 2005
Location: Cambridge
Posts: 7,845
Likes: 0
Received 1 Like on 1 Post
Default

my dad is going to take it to work and see what he can do to fix it. he also wondered what a bead blasted finish would look like, maybe a satan finish.

its all part of the learning curve
Old 18 November 2009, 08:28 AM
  #30  
trails
Scooby Regular
iTrader: (41)
 
trails's Avatar
 
Join Date: Nov 2003
Location: in the woods...........555 Wagon Sqn
Posts: 13,347
Received 55 Likes on 42 Posts
Default

I sliced through mine when I removed the lump from the top part (angle grinder clutz)...welded and cleaned up and it's good as new. I'm sure your will be fine


Quick Reply: Project *** Polished Inlet Manifold ***


All times are GMT +1. The time now is 02:47 AM.