
Time for an engine fettle


Thread Starter
Scooby Regular
iTrader: (2)
Joined: Sep 2005
Posts: 1,897
Likes: 0
From: I want a Spec C!
Well, it started with a bust plug and the requirement for the engine to be removed to sort it properly.
Engine out was not a big drama, Cheers Aston
Spliting the heads off the engine was a litttle bit tricky cos it was on the floor and i didnt have an engine stand, although i have one now, just a little something a mate a work knocked up for me.
However, it was done and the heads were sent away to an engineer for the plug to be removed.
I decided, to skim the heads while they were off, 0.5mm i was reccomended so off it came - yes i know that some of you out there will baulk at this but i can run 100+ ron from the pump so it will be ok.
I also had the valve seats recut as they have been as they are for 120,000miles or so and i think they needed doing, and they did indeed, so they were done as well.
So anyway, i now have all these bits in the garage, i need to do something with them, thinks I.
Inlet manifold - this isnt an STI engine so it looks rubbish in standard trim, it was time for a little bit of paint.
Now, shall i do it in red or something a little bit different, i liked the different option so blue it was, and i managed to fine some nice 650 degree blue paint down the local B&Q equivalent, i also got some Aluminium primer from the same place, it was if they were just waiting for me to come and buy the stuff.
On went the paint.
Looked at the gasket on it and then decided that i could remove a little bit of metal just to make it the same size as the gasket, with the intention to do the same to the heads.
Wow, now have lots of metal swarf on the floor in the gargae, hope i not taken to much off, cos it wont go back on now!!
Pics to follow.
Whats next then?
Port heads
Heat management on the engine
Clean injectors
Thermally sheild fuel rails
Re-shim heads
rebuild engine
refit engine
test and adjust, go for a drive.............. i hope.
Not much of a project, but someone might be interested.
Engine out was not a big drama, Cheers Aston
Spliting the heads off the engine was a litttle bit tricky cos it was on the floor and i didnt have an engine stand, although i have one now, just a little something a mate a work knocked up for me.
However, it was done and the heads were sent away to an engineer for the plug to be removed.
I decided, to skim the heads while they were off, 0.5mm i was reccomended so off it came - yes i know that some of you out there will baulk at this but i can run 100+ ron from the pump
so it will be ok.I also had the valve seats recut as they have been as they are for 120,000miles or so and i think they needed doing, and they did indeed, so they were done as well.
So anyway, i now have all these bits in the garage, i need to do something with them, thinks I.
Inlet manifold - this isnt an STI engine so it looks rubbish in standard trim, it was time for a little bit of paint.
Now, shall i do it in red or something a little bit different, i liked the different option so blue it was, and i managed to fine some nice 650 degree blue paint down the local B&Q equivalent, i also got some Aluminium primer from the same place, it was if they were just waiting for me to come and buy the stuff.
On went the paint.
Looked at the gasket on it and then decided that i could remove a little bit of metal just to make it the same size as the gasket, with the intention to do the same to the heads.
Wow, now have lots of metal swarf on the floor in the gargae, hope i not taken to much off, cos it wont go back on now!!
Pics to follow.
Whats next then?
Port heads
Heat management on the engine
Clean injectors
Thermally sheild fuel rails
Re-shim heads
rebuild engine
refit engine
test and adjust, go for a drive.............. i hope.
Not much of a project, but someone might be interested.
Last edited by scoobysmiff; Sep 20, 2006 at 07:11 AM.


Thread Starter
Scooby Regular
iTrader: (2)
Joined: Sep 2005
Posts: 1,897
Likes: 0
From: I want a Spec C!
photos to follow soon,
i will be trying to stick to a limited budget, hense i am doing all the work myself, however.............................time will tell
i will be trying to stick to a limited budget, hense i am doing all the work myself, however.............................time will tell
Thread Starter
Scooby Regular
iTrader: (2)
Joined: Sep 2005
Posts: 1,897
Likes: 0
From: I want a Spec C!

Well as you can see it is now blue, i quite like it now it's been done, which is good cos i aint changing it

This is how i have ported the inlet manifold, i didn't take much out really, but just thought a smooth would be ok.
 t
tAs part of my heat management programme i thought i could cover the underneath of the manifold, i'm hoping that it will reflect heat away and assist in keeping the charge temp lower than it normally would without it.

a side view of how it looks, i hope not to see too much of this when i get it refitted.

I think this is the water transfer pipe, i have covered this as well, i shall also complete all the heater pipes just to be silly
 p,
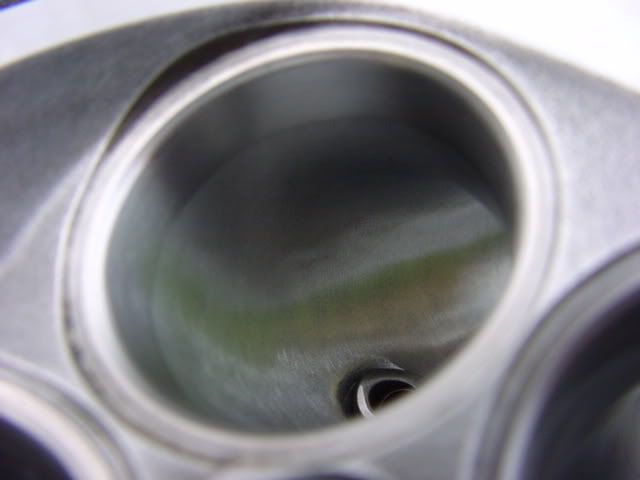
p,The start of porting, i have taken the exhaust ports out a little bit, i don't think i will go to far, just more of a clean up and a bit of a polish really, it's got to be better than standard?

A close up, you can just about see the base of the valve seats which i have blended in with the port, they were quite nasty steps which have to be better removed.

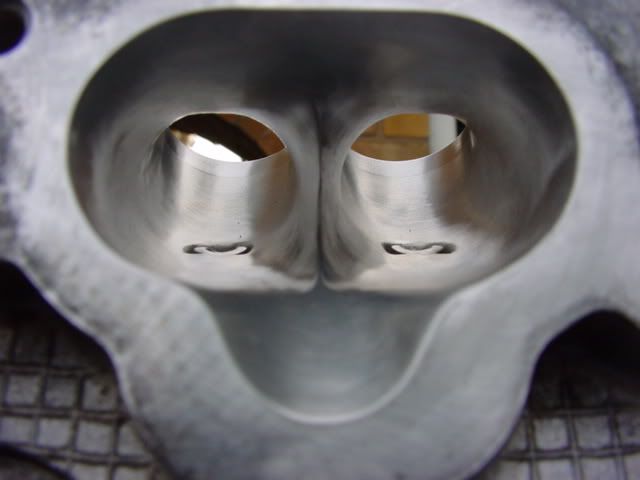
Now, this is an inlet port in the process of being ported, you can see it's a bit rough at the moment, i won't be polishing these super smooth as i want to retain a bit of tumble in the charge as it enters the heads- should aid mixing of the mixture.

a close up of the above

An almost finished port, looks nice but a bit too smooth for my liking, i think i will be running a wire brush attatchment over this before it's done

Here i have fitted one of the Carl Davey 10mm inlet manifold spacers just too see how the ports blend in, i am happy with the result that you can see, you can also see the difference between the in progress port and the almost finished one

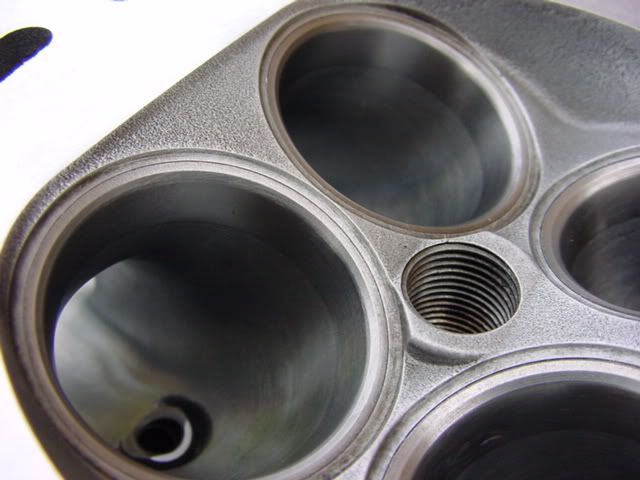
another view of the valve seats, you can see how well they are blended in, i am quite pleased with how this part of the process went, you can also see the crack between the exhaust valve seat and the plug hole


And here we have the offending plug hole, freshly helicoiled, and nearly looking like new!
It's all still a bit dirty, but it will all clean up when i get it in the 150 degree steam cleaner at work

I still have loads to do yet, i want to fit a FMIC as well but i'm not going to do that untill i fit my VF28, which will be just before i make the long trip to see Bob Rawle for the remap..........................CAN'T FOOKIN WAIT
Last edited by scoobysmiff; Sep 19, 2006 at 08:23 PM.

Scooby Regular
Joined: Jul 2006
Posts: 38
Likes: 0
Originally Posted by doppelganger
ive taken my exhaust ports out to the same as the gasket
Good work with the thermal management Smiffy, every little helps
Trending Topics
Thread Starter
Scooby Regular
iTrader: (2)
Joined: Sep 2005
Posts: 1,897
Likes: 0
From: I want a Spec C!
Cheers MR it will be a bit of trial and error, hopefully not much in the way of error though
i shall be putting in a thermal barrier for the induction kit as well
My headers are of the superb Harvey Smith option 2 ported type, these will be more than good enough for what i want for the time being.
it will be a bit of trial and error, hopefully not much in the way of error though i shall be putting in a thermal barrier for the induction kit as well
My headers are of the superb Harvey Smith option 2 ported type, these will be more than good enough for what i want for the time being.
Good point MR, IMO the exhaust ports on the heads must be smaller than the headers and I wouldn't open the ports up as it may be detrimental to flow.
SM, good work there I appreciate how much work goes into porting so I think it’s a shame you’re not going to go wilder than a VF28 for this project. It deserves more
F
SM, good work there
I appreciate how much work goes into porting so I think it’s a shame you’re not going to go wilder than a VF28 for this project. It deserves more F
Thread Starter
Scooby Regular
iTrader: (2)
Joined: Sep 2005
Posts: 1,897
Likes: 0
From: I want a Spec C!
F, i know what your saying, however, it is just a start and will be a good/better base point for the future.
I have no plans on selling this car so all that gets done to it will be of benefit to me long term anyhow, i would like to put an 18G on it, but i can't afford it, i already have the Vf28 so for now it will have to suffice. The porting effort you see so far is already several hours worth of work (as you prob already know) in the garage locked away from sanity, there is a long way to go yet!!!
Will be nice to see what it makes on a VF28 though? any guess's gents?
Last edited by scoobysmiff; Sep 20, 2006 at 07:44 PM.


Scooby Regular
Joined: Nov 2004
Posts: 1,959
Likes: 0
From: In a 405 BHP/360 ft/lb P1 with SN superstar Sonic dog at my side!
Looking good ScoobySmiff,
Before i did mine i checked the ratio of the valve guide support to stem diameter and it fell well within that of previous engines i have built (high RPM/specific output race bike engines) even if i removed the protruding guides. so i took them out. been fine for 10K miles so far.
If you look close at the pics, you see that you still keep the same length guide anyway and just the back is angled off.
For best results, you may want to bring the fettling a bit further up into the 30 deg seat angle as well.
Agree with you that polishing is not needed and in some applications maybe actually best left slightly rough, but on a FI engine not to sure. I made mine nice anyway cos im sad!
Same as you, i just cleaned the exhaust exit up, but i did do significant work in the exhaust seat area. I left my inet manifold till the motor was built and then matched it up to the assembled engine using marking blue.
.
Thread Starter
Scooby Regular
iTrader: (2)
Joined: Sep 2005
Posts: 1,897
Likes: 0
From: I want a Spec C!
i wasn't sure about cutting back the valve guides tbh, these heads have done 120k and i'm not sure the valve stem clearances are within tolerance, i have a given figure but i'm not sure how to go about measuring it?
I can see the benefit of doing them though, but if my clearances are on the loose side of the tolerance then i think i'd rather keep them for support, if you see what i mean.
P1Mark yours look like a far more proffesional job than my meagre efforts, bit i am happy with my first time try, lol. How do i remove the valve stem seals? how do you set them further back when re-fitting them
i have actually taken a bit of the lip for the 30 degree off on some of the seats but wasn't sure if i had done a good or bad thing, i just kind of rounded it off so there isn't a sharp drop off into the port, i guess this is ok then, if it is then cool, there all gonna get it
Last edited by scoobysmiff; Sep 20, 2006 at 08:27 PM.
Scooby Regular
Joined: Nov 2004
Posts: 1,959
Likes: 0
From: In a 405 BHP/360 ft/lb P1 with SN superstar Sonic dog at my side!
Originally Posted by scoobysmiff
i wasn't sure about cutting back the valve guides tbh, these heads have done 120k and i'm not sure the valve stem clearances are within tolerance, i have a given figure but i'm not sure how to go about measuring it?
I can see the benefit of doing them though, but if my clearances are on the loose side of the tolerance then i think i'd rather keep them for support, if you see what i mean.
P1Mark yours look like a far more proffesional job than my meagre efforts, bit i am happy with my first time try, lol. How do i remove the valve stem seals? how do you set them further back when re-fitting them
i have actually taken a bit of the lip for the 30 degree off on some of the seats but wasn't sure if i had done a good or bad thing, i just kind of rounded it off so there isn't a sharp drop off into the port, i guess this is ok then, if it is then cool, there all gonna get it
I can see the benefit of doing them though, but if my clearances are on the loose side of the tolerance then i think i'd rather keep them for support, if you see what i mean.
P1Mark yours look like a far more proffesional job than my meagre efforts, bit i am happy with my first time try, lol. How do i remove the valve stem seals? how do you set them further back when re-fitting them
i have actually taken a bit of the lip for the 30 degree off on some of the seats but wasn't sure if i had done a good or bad thing, i just kind of rounded it off so there isn't a sharp drop off into the port, i guess this is ok then, if it is then cool, there all gonna get it
Normal radial clearance is round about 15-20 microns on most engines. its easy to measure the stem, but not so the guide. At 120K you may well be better not touching them.
The ratio i was reffering to above is a quideline for most engines that says for example a 5mm stem will require 25mm of guide. cant remember the ratio off the top of my head but will post it tommorrow.
The seals just pop off after you have removed the litle retainer clip/spring. Im not sure what you mean by "setting them further back upon fitting"
The closer to the combustion chamber the charge gets, the more important things become, so time spent in the seat area is better than time spent elsewhere. if you look at mine i have blended it maybe 50% of the way up the 30 deg.
Im no subaru expert, but i have spent countless hours porting, on a flow bench, and on dynos with bike engines and i know what works with those. A FI engine is different i appreciate and with a bit of luck a 'scoob head tecchie' will come along shortly!

Scooby Senior

Joined: Oct 2000
Posts: 3,105
Likes: 0
From: Zurich, Switzerland
Isn't the issue of cutting the guides also one of heat transfer away from valve? My builder left mine intact for this reason. See http://bbs.22b.com/cgi-bin/ultimateb...2;t=000011;p=2 for photos.
Richard
Richard
Scooby Regular
Joined: Nov 2004
Posts: 1,959
Likes: 0
From: In a 405 BHP/360 ft/lb P1 with SN superstar Sonic dog at my side!
Originally Posted by dowser
Isn't the issue of cutting the guides also one of heat transfer away from valve? My builder left mine intact for this reason. See http://bbs.22b.com/cgi-bin/ultimateb...2;t=000011;p=2 for photos.
Richard
Richard
Thread Starter
Scooby Regular
iTrader: (2)
Joined: Sep 2005
Posts: 1,897
Likes: 0
From: I want a Spec C!
I have decided not to cut the guides back, i think it will in in the best interest of this engine to keep them as Subaru intended, if i could afford to replace them with new items, then it would be a consideration to get the best out of the heads- maybe in the future with a bigger turbo to reap the benefits etc
P1mark, ref the guides and refitting them further back, what i thought you meant when you said that you still get full length of the guide was that you had fitted a full length guide but not set it as far down into the head, i see that this isn't the case now so not to worry.
Anyway, thats the left head complete for porting now, valves have been lapped in and refitted, springs have been measured for free length and are ok so on they went, just needs a bloody good clean up now.
The right head will be started this weekend just got to try and match what i've done to the other side, fingers crossed.
with a bigger turbo to reap the benefits etcP1mark, ref the guides and refitting them further back, what i thought you meant when you said that you still get full length of the guide was that you had fitted a full length guide but not set it as far down into the head, i see that this isn't the case now so not to worry.
Anyway, thats the left head complete for porting now, valves have been lapped in and refitted, springs have been measured for free length and are ok so on they went, just needs a bloody good clean up now.
The right head will be started this weekend
just got to try and match what i've done to the other side, fingers crossed.
Last edited by scoobysmiff; Sep 22, 2006 at 07:05 AM.
Thread Starter
Scooby Regular
iTrader: (2)
Joined: Sep 2005
Posts: 1,897
Likes: 0
From: I want a Spec C!
The second head is nearly finished now, just need to do some cleaning and polishing.
i have bust 2 flexi drives so far i must be a little bit to brutal for them. I have 2 types of flexi drive and drill as well. One is a normal drill with a large 6mm chuck on it, this one gets very very hot and is not very well made imo and the other is a dremmel alternative with a 3mm chuck on the driven end and i guess is supported with ball bearings as it rotates with much less effort and dosn't get half as hot, the dremmel is worth its weight in gold for doing this type of work, the other drill is ok for chunking out in relatively large capacity due to its better torque and use of bigger cutting bits, but you couldn't do as nicer job as what you get with the dremmel imo.
i have bust 2 flexi drives so far i must be a little bit to brutal for them. I have 2 types of flexi drive and drill as well. One is a normal drill with a large 6mm chuck on it, this one gets very very hot and is not very well made imo and the other is a dremmel alternative with a 3mm chuck on the driven end and i guess is supported with ball bearings as it rotates with much less effort and dosn't get half as hot, the dremmel is worth its weight in gold for doing this type of work, the other drill is ok for chunking out in relatively large capacity due to its better torque and use of bigger cutting bits, but you couldn't do as nicer job as what you get with the dremmel imo.
Last edited by scoobysmiff; Sep 23, 2006 at 02:24 PM.
Thread Starter
Scooby Regular
iTrader: (2)
Joined: Sep 2005
Posts: 1,897
Likes: 0
From: I want a Spec C!
I have gone as far as i'd like to on the heads now, they are as ported and polished as i think i have in me (if you have done it then that will make sense)
All i need to do now to them is have a bloody good clean up and get rid of ALL the swarf and then check/adjust valve clearances.
I've been looking through dazdavies thread on his 450 self build and i like his black heads so i am considering this before it goes back together now???
Lapping the valves in wasn't to bad at all really, did it by hand and felt that i got much better results than by using a drill, which i did try.
Thread Starter
Scooby Regular
iTrader: (2)
Joined: Sep 2005
Posts: 1,897
Likes: 0
From: I want a Spec C!
i have a problem.
I had to break the L/H rear camshaft sprocket cover to remove the cam when i took it out as the securing bolt for the sprocket was so flippin tight!
I have new covers so that isn't the problem, what is however, is how bloody tight this sprocket bolt is.
I need ideas gents that might work, i've used heat, 10ft bar, vice, electric impact guns and normal impact drivers?
Wot you say peeps? it is starting wind me up good and proper as i want to get this together now!
Thread Starter
Scooby Regular
iTrader: (2)
Joined: Sep 2005
Posts: 1,897
Likes: 0
From: I want a Spec C!
right then, problem solved.
in the end i drilled the head of the bolt untill it just fell off. my plan then was to file a couple of flats on the resulting stud, put it in a vice, use some more heat and try to twist it out.
Didn't need to in the end after the head was taken off cos it was finger tight!, they must butt up against those cam wheels real tight!
What i will say though, the bolts are hardened steel and will trash a HSS bit in seconds, well they did mine.
Fortunatly, i had in my possesion at work, a small selection of cobalt drill bits, these did the trick and off it came.
The rest as they say is history.
Rebuild comming up!!!
Thread Starter
Scooby Regular
iTrader: (2)
Joined: Sep 2005
Posts: 1,897
Likes: 0
From: I want a Spec C!
It's been quiet for a while but i have a small update as things have progressed to a decent level now.
A mate has offered to shim the heads for me and i had to accept as he has been succesfully building race engines for bikes for years now so i know i can trust him, i should be getting these back within the week so i thought i would thermally shield the fuel lines, which i have now done and am quite happy with.


now was this worth while doing? i think it looks quite good tbh or am i just being sad
A mate has offered to shim the heads for me and i had to accept as he has been succesfully building race engines for bikes for years now so i know i can trust him, i should be getting these back within the week so i thought i would thermally shield the fuel lines, which i have now done and am quite happy with.
now was this worth while doing? i think it looks quite good tbh or am i just being sad
Last edited by scoobysmiff; Oct 19, 2006 at 04:14 PM.
I would have thought you should parallel the fuel supply and reverse the flow too while the manifold is off. Fit an SX reg while you're at it as you'll need it for the next upgrade.
Good work, you deserve the golden anorak
F
Good work, you deserve the golden anorak
F
Thread Starter
Scooby Regular
iTrader: (2)
Joined: Sep 2005
Posts: 1,897
Likes: 0
From: I want a Spec C!
yipee, a golden anorak, just what i always wanted
whats the best way to parallel the flow then? i have been told that i don't need an SX at my projected bhp as the OE is more than capable, was going to reverse flow when it all goes together, all good fun
whats the best way to parallel the flow then? i have been told that i don't need an SX at my projected bhp as the OE is more than capable, was going to reverse flow when it all goes together, all good fun
Yes, you don’t need the SX yet BUT you said that you were porting the heads to future proof the build for late upgrades. So, I followed your reasoning and so while the manifold is off you should use the opportunity to parallel and add an SX as its easy (relatively) now. I’ve detailed one method and where to get parts in my project thread…
F
F
Thread Starter
Scooby Regular
iTrader: (2)
Joined: Sep 2005
Posts: 1,897
Likes: 0
From: I want a Spec C!
F, i understand your logic but, i havn't the funds at the moment to parallel the fuel lines just yet, i think i will go for some insulated billet fuel rails if/when i plan/start on the next stage of this journey (of which i will doubt there will ever be an end )
I should be getting the heads back tomorrow, after a quick check for piece of mind i shall start the rebuilt in ernest, i hope i put it back together properly, it's been a while now
)I should be getting the heads back tomorrow, after a quick check for piece of mind i shall start the rebuilt in ernest, i hope i put it back together properly, it's been a while now
Thread Starter
Scooby Regular
iTrader: (2)
Joined: Sep 2005
Posts: 1,897
Likes: 0
From: I want a Spec C!
i still not got the flippin heads back yet, i'm starting to get a bit of an itch now coz i want to get the bloody car back on the road, it's still in bit's in the garage and it's getting cold in there as well at night now. need them back so i can make a concentrated effort to get this done and finished (for the time being)

Scooby Regular
Joined: Feb 2004
Posts: 194
Likes: 0
From: READING
i did some experiments with a pair of 98 heads, gasflows etc, i used a flow bench to check what was going on, no matter what we did with the ports we could not get airflow up or efficentcy of the port up at all, they seemed to be pretty good standard, capable of 350+ BHP without problems, but they do look good.

Scooby Regular
Joined: Oct 2004
Posts: 222
Likes: 0
From: 11.23@127mph second drag vw beetle with a stock subaru legacy engine and a 50 shot of gas