New/Old Familiar Wagon
#181
Scooby Newbie
Great to hear you got the car back and fixing it 
+1 for Matt B for getting parts. He might even have it in the correct colour for body parts.
Highly recommend getting Saloon Sti wings. You would also need:
1. Saloon front arch liners
2. Saloon front bumper
3. Door can be from the wagon/saloon
Only seeing the thread now and I had a set of steel wishbones in the garage taken off my wagon. If you need any oem parts, let me know as I have a fair few in the garage.
I have a front saloon bumper painted in 18L Black with a small amount of cracked paint on the left corner as well if it's of any use. Only issue is that I am based in Dublin, Ireland and you would need to organise a courier.
Best of luck with the rebuild

#182
Not sure what I am going to do about bodywork yet. I was forgetting that I needed bumper as well with saloon wings. I can get a Blob wagon wing for about £50, less paint. It's only once I fit a straight wing that I'll be able to determine whether the bumper needs replacing or just paint.
Removed the U-brace yesterday. It's scrap so won't be going back on.
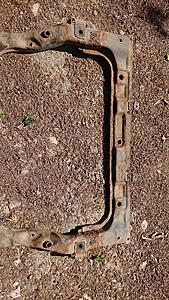
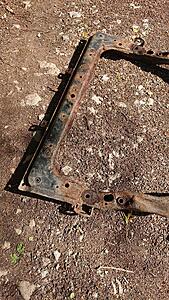
Removed the U-brace yesterday. It's scrap so won't be going back on.
The following users liked this post:
#183
Removed everything I needed only to discover that I've lost my ball joint separator. So have ordered another but delivery probably won't be until after the weekend.
And I'd forgotten that there were Superpro bushes fitted already, but they have been there for 4 years, so no harm in replacing them with new.
And I'd forgotten that there were Superpro bushes fitted already, but they have been there for 4 years, so no harm in replacing them with new.
Last edited by TECHNOPUG; 22 April 2020 at 07:31 PM.
The following users liked this post:
#185
Scooby Regular
How's it all going with the car
#186
Long gap for update- you'd think what with having all this time on my hands I'd be making quick progress but having 4 month and 30 month old babies to look after, leaves zero free time, day after day after day....
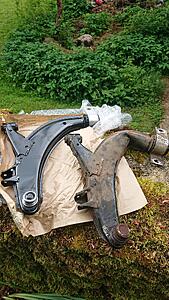
Picking up where I left off, the 3 foot pry bar still wouldn't separate the wishbone from the ball joint, even with me jumping on it. It did however remove the ball joint from the hub (whilst still attached to the wishbone). I imagine that this would be a lot easy with the car on a lift but all good in the end. Although I'm a little disappointed that I didn't get to use the fancy ball joint remover bought from ICP, as it looks a nicely engineered piece of kit.
Spot the odd one out....
#187
Fitted the new wishbone without any drama, along with a spare Whiteline droplink I had and new Superpro ARB bushes each side.
I spent a while looking for a 32J wing without any joy. Lots of saloon wings or Blue wagon ones etc. In the end I found a cheap one that had been 32J but then had some weird matt overspray on it. The rest of the car that was being broke looked fine, just the one piece I actually wanted was defective. But it was cheap and available. It's also only going to be temporary so I can drive the car again.
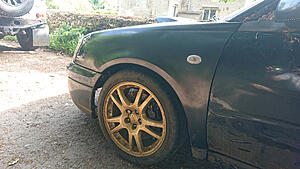
Where you can see the white ripple by the headlight; that's the original shiny 32J paint....it might buff up but I'm really not bothered. I was a little annoyed when I received the wing, as whoever removed it, hadn't realised that to remove the bottom bolt on the B pillar, you first have to remove all the paint/underseal. They'd just pulled/twisted it off. It's not the end of the world though and you can't really see it. Also, I snapped the same bolt when removing my old wing (rust gets between the wing and the body)....easy enough to drill out and put a new nut and bolt through.
That weird bolt/nut combo I mentioned in post #165 pic 4? Yeah, that wasn't coming off so had to take a Dremel to it. Sure it can't be a Subaru fixing which I think confirms my long held suspicions that the bumper has been off previously, as the driver's side bumper doesn't align quite how it should with the wing. Probably had a bump in the past. The bumper has actually lined up well with the the replaced wing, however, there are plastic mounting brackets on the inside that have sheared off, so it will have to be replaced at some stage.
The biggest issue was the damage caused to the inner wing as per post #165 pic 3. I couldn't get the headlight to fit again and had to give the body some judicial persuasion for it to line up so that the headlight would fit and the mounting tab meet the securing hole in the frame. I also need to cut the plastic battery tray down by about 10mm.
The headlight housing at the rear (as well as the lens cover) was pretty smashed up, although all the lights work. Looking at my non-HID lights, it looks like the housing is identical to the HID units (there are even "HID" marking where the ballasts and motors should be attached) so I reckon I can swap the ballast and bulb holder from the smashed HID lights to the unabused non-HID units.
Ultimately the plan is still to swap the whole front end of my Bug onto this car.
I spent a while looking for a 32J wing without any joy. Lots of saloon wings or Blue wagon ones etc. In the end I found a cheap one that had been 32J but then had some weird matt overspray on it. The rest of the car that was being broke looked fine, just the one piece I actually wanted was defective. But it was cheap and available. It's also only going to be temporary so I can drive the car again.
Where you can see the white ripple by the headlight; that's the original shiny 32J paint....it might buff up but I'm really not bothered. I was a little annoyed when I received the wing, as whoever removed it, hadn't realised that to remove the bottom bolt on the B pillar, you first have to remove all the paint/underseal. They'd just pulled/twisted it off. It's not the end of the world though and you can't really see it. Also, I snapped the same bolt when removing my old wing (rust gets between the wing and the body)....easy enough to drill out and put a new nut and bolt through.
That weird bolt/nut combo I mentioned in post #165 pic 4? Yeah, that wasn't coming off so had to take a Dremel to it. Sure it can't be a Subaru fixing which I think confirms my long held suspicions that the bumper has been off previously, as the driver's side bumper doesn't align quite how it should with the wing. Probably had a bump in the past. The bumper has actually lined up well with the the replaced wing, however, there are plastic mounting brackets on the inside that have sheared off, so it will have to be replaced at some stage.
The biggest issue was the damage caused to the inner wing as per post #165 pic 3. I couldn't get the headlight to fit again and had to give the body some judicial persuasion for it to line up so that the headlight would fit and the mounting tab meet the securing hole in the frame. I also need to cut the plastic battery tray down by about 10mm.
The headlight housing at the rear (as well as the lens cover) was pretty smashed up, although all the lights work. Looking at my non-HID lights, it looks like the housing is identical to the HID units (there are even "HID" marking where the ballasts and motors should be attached) so I reckon I can swap the ballast and bulb holder from the smashed HID lights to the unabused non-HID units.
Ultimately the plan is still to swap the whole front end of my Bug onto this car.
Last edited by TECHNOPUG; 19 May 2020 at 10:41 PM.
#188
So that's the mechanical and body parts sorted. I still need to refit the arch liner and plastic sill trim.
The final issue is the alignment. It's quite a long way out....It's much easier to see in the flesh but hopefully these photos comparing the passenger to driver side will illustrate the point:
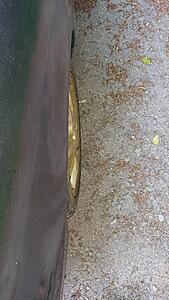
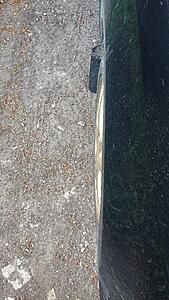
So a lot of toe-out and negative camber. I was expecting the wheel to require alignment but the difference seems quiet pronounced, more than simply down to manufacturing tolerances?
I have been for a quick test drive to check if anything fundamentally was faulty (steering or drive for example) but everything seemed OK, except for some wheel vibration after a couple of miles, which I have put down to the toe-out.
I'm a little loath to pay for an alignment if there is something actually bent out of shape. But I didn't notice anything obviously amiss when working on the car. Bent ARB? Top mount/strut? Driveshaft? Also, I don't really want to just replace parts for the sake of it.
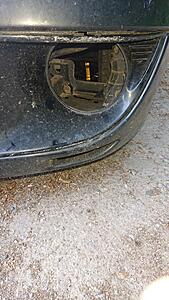
Here is a photo of the drop link angle, although I don't have the other side to compare.
The final issue is the alignment. It's quite a long way out....It's much easier to see in the flesh but hopefully these photos comparing the passenger to driver side will illustrate the point:
So a lot of toe-out and negative camber. I was expecting the wheel to require alignment but the difference seems quiet pronounced, more than simply down to manufacturing tolerances?
I have been for a quick test drive to check if anything fundamentally was faulty (steering or drive for example) but everything seemed OK, except for some wheel vibration after a couple of miles, which I have put down to the toe-out.
I'm a little loath to pay for an alignment if there is something actually bent out of shape. But I didn't notice anything obviously amiss when working on the car. Bent ARB? Top mount/strut? Driveshaft? Also, I don't really want to just replace parts for the sake of it.
Here is a photo of the drop link angle, although I don't have the other side to compare.
Last edited by TECHNOPUG; 19 May 2020 at 11:05 PM.
#190
Scooby Regular

#192
I finally got round to having a play with the camber. Looks like there is about 2 degrees of adjustment, so I just set it up with the lowest amount of camber. Visibly it still looks a bit out but the toe has come in quiet a lot and I expect when I get the tracking done, it will also adjust the camber further. More importantly, I have test driven it without any undue vibrations or causes for concern. I should also add that the camber gauges are only of limited use. Unless both sides of the car are on perfectly level ground, the readings are pretty meaningless. However, they are useful in showing how much adjustment you have applied.
#194
Wheel hum was wheel alignment (toe) BTW.
So the car is now sporting a fetching green door, courtesy of my recently departed Bug. It also has the uprated fuel pump fitted, plus I removed the Whiteline rear ARB - although I'm sure I've read somewhere that the Bug/Blob Wagon rear ARBs are different and not compatible between cars. Not sure what has changed at the rear for that to be so but haven't test fitted yet.
I've ordered some Pedders camber top mounts which should be arriving today. See if they are any different to the Whiteline ones - hoping that the bearing seat is angle as I suspect that is what caused the Whiteline ones to consistently fail. I've also going to mod the strut housings by cutting a big hole at the bottom so that the Koni insert can drop through and I should gain another inch or so of travel. With standard springs, the reduced travel probably isn't an issue but with the Prodrive springs being so short, the travel is already compromised to some extent. Every inch helps so my missus says... In the States, someone designed and made an alloy cup to go over the now exposed bottom of the insert and securely bolt it to the strut body. A shop bought the design, made one batch, sold out and never made anymore. So I'm going to just build it up with washers instead. A bit Jerry-Rigged but should work fine. Need to replace the bump stops too - hopefully 2-Pot will be along to advise whether a different model should be used.
Still needs a new wing and bumper. Undecided whether to just bite the bullet and order new from Subaru, as trying to find a decent set of Wagons body parts is proving difficult. Or swap to a saloon front end (both wings and bumper) as there is far greater choice. It will all need to be resprayed at some point and I really want an alloy bonnet too (more cost cutting when they moved from Bug to Blob) but that's all for another day. I'll get it Mot'd first and give it a full service.
#195
Scooby Regular
iTrader: (3)
I'm sure I've got some of those front (no point at the rear) Koni extenders, somewhere ....23mm extension, if I remember correctly.
However, Koni made 2 x differing OD's of threaded tube at the base of the insert - 20mm od and 25mm od. I machined some 25mm for the early versions.
Watch out for coil bind, with lowering springs, if you lower the front insert - contact between the top perch and the insert must occur before coil bind.
You can use the bump stops, to stop coil bind, but they are wear items.
These are useful to change contact points - Raid HP 300025:
I can suggest some bump stops, but I'd need the wheel centre to arch measurements.
FYI - The saloon front wings will increase the front wheel arch gap by 9mm.
Last edited by 2pot; 05 May 2021 at 12:57 PM.
#196
What's your opinion on extending the inserts? The car definitely didn't handle broken roads as well as with the original KYB struts and was hitting the bump stops more frequently. I hadn't considered the increased gap from spring perch to top mount if I'm honest. I didn't come across it as an issue when I was researching in the US sites. I guess I could contact Peter Cambridge to see if he has an opinion.
WRT saloon wings, do you mean 9mm increase in width or height?
WRT saloon wings, do you mean 9mm increase in width or height?
#197
Scooby Regular
iTrader: (3)
The saloon wings are wider, to allow for the wider track. The 9mm refers to an increased front wheel centre to arch measurement, as the curvature of the saloon front arch is also greater.
Dropping the insert will allow 23mm further bump travel, before contacting the bump stop, but coil bind will occur 23mm earlier, which may be an issue, depending on the spring design.
The oem 60mm front stops are soft. So, they'd be 30mm compressed before you start to feel them engaging. If you can frequently feel the stops engaging, I'd assume you must be riding on them at static ride height.
Lowering springs have less travel, before they coil bind - you could measure and add up the gaps you have between the coils, at ride height, or simulated ride height - jack under the suspension = the travel you have before coil bind.
Then push the bump stop fully upward and measure the gap between the 60mm front stop and its contact point on the insert. You may, however, find the bump stop is already pre-compressed or it has started to disintegrate, as it is constantly being heat cycled.
Or, we make an educated guess with shorter/stiffer front stops, which will depend on the current ride heights and don't drop the inserts.
The oem rear bump stops, which are 90mm and soft, may require the 2 smallest nodes cutting off. Again, depending on the current rear ride heights
#200
Car passed it's MoT today - no advisories.
Still having an issue with brake binding on the front. I'll have to strip them down in due course but maybe bite the bullet and buy some other pads, as I've been having issues with both calipers on and off for a couple of years now, since I swapped to PFC-Z pads.
Still having an issue with brake binding on the front. I'll have to strip them down in due course but maybe bite the bullet and buy some other pads, as I've been having issues with both calipers on and off for a couple of years now, since I swapped to PFC-Z pads.
#201
Thought I'd give a update as it's been a few months since the last one.
The issue with the brake binding was to do with galvanic corrosion between the alloy calipers and stainless steel pads guides that screw into the calipers. Basically corrosion occurs between the caliper and the guides and forces the guides to bend out, thus causing the pads to bind. There are 4 guides per caliper. They have small hex bolts screwed into the calipers securing the guides. I managed to removed a couple of screws on each caliper, lift out the guides and clean up the corrosion. Perfect. The rest of the screws I couldn't undo. Managed to round one trying. So a job for another day - probably need some heat on them. After stripping and cleaning as much of the calipers as I could without actually removing them from the brake hoses, I then took a Dremel to the pads and ground the edges down until they moved smoothly in the calipers. I also cleaned up a couple of the pistons that were sticking. No more binding. Note to self - overhaul brakes once a year - not wait until they stop working properly!
Fitted the Pedders top mounts and stripped, cleaned and painted the struts before the MoT. Although the car passed with no advisories, it's clear that it need a new wheel bearing. From the wheel that took the crash impact. Unsurprisingly. I also have a clunk from the drivetrain that sounds like top mounts binding but I'm pretty sure now that it's the driveshaft. From the wheel that took the crash impact. Unsurprisingly. It's not all the time and you can drive round it. Basically it depends on how aggressively I apply right hand lock or whether I'm going over a bump at the same time as steering. As I say, I can drive round it but it's definitely there, and can be induced pretty much at will. So I'm guessing it's the driveshaft binding.
I did also replace the track rods and ends as that was relatively cheap and easy and figured I may as well replace EVERYTHING that took the force of the impact on the wheel (and obviously do the opposite side at the same time. That didn't fix the clunk unfortunately... So have resigned to replacing the driveshaft(s). Subaru want £550+ for a Wagon front driveshaft "They never fail, so there is no demand for them so we have to ship them in from Japan as a special order". Fair enough. I don't see any point in buying cheap aftermarket parts but neither do I want to pay crazy money for new OEM. Trying to find secondhand wagon shafts has been tricky, so potentially I am going to pick up a pair of saloon shafts, as they are only ~9mm longer and wisdom suggest they should fit without issue - although I'm guessing I will need to do both sides?
What else? Changed the oil in the rear diff. Will do the gearbox soon also. That's about it. When I was out of work I have lots of time but no money. Now I am working, I have lots of money but no time....The other big issue is that I'm simply not driving the car. At all. Maybe 5 miles a fortnight. I don't need to drive to work. We use my wife's Cayenne for family duties. On the very rare occasions that I do have a need to drive somewhere on my own, the wife's Cayenne is invariably parked in front and I can't be bothered to swap the cars over, so I just take hers. I need to book the car into to my local indy to get the wheel bearing changed and I'll get them to fit the driveshaft while they are at it. Thinking of also getting some Grp N engine & gearbox mounts fitted at the same time. Maybe I'll have some renewed interest in it again once the drivetrain issues have been fixed.
Last edited by TECHNOPUG; 08 October 2021 at 12:41 PM.
The following users liked this post:
#203
So another year, another MoT. 723miles driven since the last one....Had to tweak the Lamdba probe to get it to pass, no big deal though. I've held off doing anything until it passed and had another 12 month ticket. I've replaced the rear diff oil and was going to do the gearbox but couldn't find my T70, so will have to wait until a new one is delivered. Have also order some service parts (fluids & filters).
Prior to the MoT, I managed to source a complete hub and a pair of genuine WRX Wagon driveshafts (second hand) from Matty B. I'm gambling that the bearing will be OK and I have a choice of 2 driveshafts - I can then replace the lot myself without having to get a garage to replace the bearing. Should it transpire that the replacement hub also has a duff bearing, I can take the one I have just removed and get the bearing replaced, rather than having to pay for the removal/fitting labour. That's the theory anyway.
Took it on a 200mile shakedown journey at the weekend. It's developed a knock/bang at the passenger side rear but I'm not convinced it's suspension related. Doesn't appear to be caused by bumps, it's more akin to something swinging and hitting the body, as if there was a tennis ball hanging from some string in the boot. Checked all the interior trim and boot contents. Doesn't happen if you open the boot and bounce the rear of the car, for example. Can't detect any play in the exhaust. Top mounts maybe? They must be 7 years old and 40k+. Struts have Koni inserts so figured that ruled out the classic Impreza strut knock?
I'm going to replace the Koni's with KYBs during the summer, so hopefully once I've stripped everything the source of the noise will become apparent or it will disappear upon install. Have to decide beforehand whether to replace the top mounts though.
Polished the headlights too!
Last edited by TECHNOPUG; 29 June 2022 at 04:29 PM.
The following 2 users liked this post by TECHNOPUG:
#204
Another year, another MoT pass. No advisories but the flanges on the centre section had rotted, so required a little welding. I have a full Miltek system in the garage that I'll have to get round to fitting next year.
Only covered 1300 miles this year but the body is beginning to look pretty tatty. Pretty much every panel needs attention, be it dents, chips rust etc. Doesn't make financial sense to tidy it up as it'll need a full respray and doubt I will ever see my money back. Best bet is to try and find second hand parts in the same colour that are better than those on the car.
But I have no real mechanical concerns other than a front wheel bearing and it's had lots of new parts over the last few years. Think I may try and promote the Subaru rat-rod look

The following users liked this post:
Thread
Thread Starter
Forum
Replies
Last Post
Steve Subaru Parts
Car Parts For Sale
2
28 December 2012 12:59 AM


