Red Lights!
 05 January 2013, 07:41 PM
#1
Scooby Regular
Thread Starter
iTrader: (1)

Join Date: May 2012
Location: Sunderland
Posts: 113
Likes: 0
Received 0 Likes
on
0 Posts
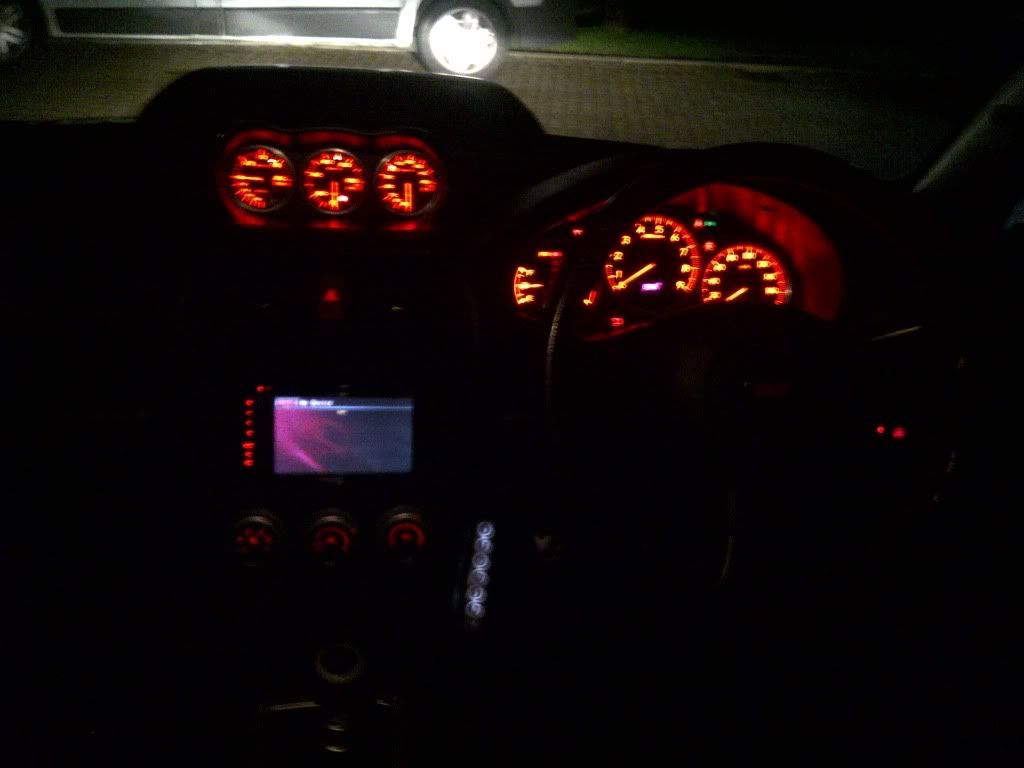
finally got the time to sit down and play with all the LEDs, bulbs and resistors i bought off ebay and im very happy with the result.
i'll be sorting out some hawkeye or JDM speedo dials soon and wanted to change the other lights in the interior to red to match in advance (cant stand the green, reminds me of an old daewoo :P)
changed the ignition barrel light...

ashtray/lighter...

and the most annoying and fiddly bit by far, the HVAC controls (heater etc)


still need to change the the lights to the lower right of the steering wheel (fog lights and headlight adjuster) and the electric window switches in the door but i need to open these up and have a look how they are lit.
thanks, Mike.
i'll be sorting out some hawkeye or JDM speedo dials soon and wanted to change the other lights in the interior to red to match in advance (cant stand the green, reminds me of an old daewoo :P)
changed the ignition barrel light...
ashtray/lighter...
and the most annoying and fiddly bit by far, the HVAC controls (heater etc)
still need to change the the lights to the lower right of the steering wheel (fog lights and headlight adjuster) and the electric window switches in the door but i need to open these up and have a look how they are lit.
thanks, Mike.
 05 January 2013, 08:29 PM
#2
Scooby Regular

Join Date: Mar 2012
Location: lincoln
Posts: 176
Likes: 0
Received 0 Likes
on
0 Posts
Looks good matey!
have you just changed the old bulb with a coloured LED and resistor to sort this?
im looking to get my blobeye dials abit brighter and was considering changing the bulbs to LED's
sam
have you just changed the old bulb with a coloured LED and resistor to sort this?
im looking to get my blobeye dials abit brighter and was considering changing the bulbs to LED's
sam
 05 January 2013, 09:06 PM
#6
The fog/IC switch`s have a small removable bulb in the side of them, The replacements you can get or the ones i found are about 0.5-1mm larger at the end where it goes into the switch so gave them a file down as its a plastic mount, easy job, You still have to remove the green tint/film off the back of the illuminated front part, Not sure on the door switches as mine dont light up 
05 January 2013, 09:24 PM
#7
Scooby Regular
Thread Starter
iTrader: (1)
Join Date: May 2012
Location: Sunderland
Posts: 113
Likes: 0
Received 0 Likes
on
0 Posts
for all those looking to do the same, i cant take the credit as i followed some how to vids here...
here...
and here...
the ashtray and ignition are just simple bulb swaps (but you do have to get into the steering column cover but that's a doddle), the heater controls involve opening them up and adding some LEDs resistors and a bit of soldering and drilling (this is the scariest part as there isn't a lot of room to get your drill bit in and its milometers from the circuit board, plus i used a dremmel with "dentist" as its slowest speed setting :P).
I bought everything i needed from eBay for about �7 all in (not including tools like the soldering iron etc).
i do love how it looks though, was a bit more of a ball ache than the video made out but that's probably because i'm not experienced with electronics and soldering. would definitely be quicker to do a second time around.
I'm not sure how different it is to do on the older bugeye style heater controls but i remember reading somewhere that its a bit easier, sure there's a similar how to vid knocking around somewhere online.
now to look for decently priced jdm/hawkeye clocks!
thanks, Mike.
Last edited by mike2367; 05 January 2013 at 09:26 PM.
Trending Topics
05 January 2013, 09:28 PM
#9
Scooby Regular
Thread Starter
iTrader: (1)
Join Date: May 2012
Location: Sunderland
Posts: 113
Likes: 0
Received 0 Likes
on
0 Posts
The fog/IC switch`s have a small removable bulb in the side of them, The replacements you can get or the ones i found are about 0.5-1mm larger at the end where it goes into the switch so gave them a file down as its a plastic mount, easy job, You still have to remove the green tint/film off the back of the illuminated front part, Not sure on the door switches as mine dont light up
i'll post up when ive got round to checking them.
07 January 2013, 06:48 PM
#11
Scooby Regular
iTrader: (10)
Join Date: Apr 2010
Location: preston
Posts: 2,081
Likes: 0
Received 0 Likes
on
0 Posts
for all those looking to do the same, i cant take the credit as i followed some how to vids here...
http://youtu.be/BVjGogk88Vo
here...
http://youtu.be/w8G5jjz3Y74
and here...
http://youtu.be/NYkpNjw1SbI
the ashtray and ignition are just simple bulb swaps (but you do have to get into the steering column cover but that's a doddle), the heater controls involve opening them up and adding some LEDs resistors and a bit of soldering and drilling (this is the scariest part as there isn't a lot of room to get your drill bit in and its milometers from the circuit board, plus i used a dremmel with "dentist" as its slowest speed setting :P).
I bought everything i needed from eBay for about �7 all in (not including tools like the soldering iron etc).
i do love how it looks though, was a bit more of a ball ache than the video made out but that's probably because i'm not experienced with electronics and soldering. would definitely be quicker to do a second time around.
I'm not sure how different it is to do on the older bugeye style heater controls but i remember reading somewhere that its a bit easier, sure there's a similar how to vid knocking around somewhere online.
now to look for decently priced jdm/hawkeye clocks!
thanks, Mike.

as for your switches down to the right i think he changed the bulbs and scraped off the green backing inside the switch

 07 January 2013, 09:41 PM
#13
Scooby Regular
Join Date: Mar 2012
Location: lincoln
Posts: 176
Likes: 0
Received 0 Likes
on
0 Posts
08 January 2013, 01:41 AM
#14
Scooby Regular
Thread Starter
iTrader: (1)
Join Date: May 2012
Location: Sunderland
Posts: 113
Likes: 0
Received 0 Likes
on
0 Posts
One thing i'll say, if you attempt this, you will hate the guy on the video by the end, especially the way he says "solder"
 08 January 2013, 01:44 AM
#15
Scooby Regular
Thread Starter
iTrader: (1)
Join Date: May 2012
Location: Sunderland
Posts: 113
Likes: 0
Received 0 Likes
on
0 Posts
Looks really good that dave.
Dont suppose you know what type of bulbs he used for the switches and windows? Getting conflicting information all over the net.
Cheers. Mike
Dont suppose you know what type of bulbs he used for the switches and windows? Getting conflicting information all over the net.
Cheers. Mike

Thread
Thread Starter
Forum
Replies
Last Post
Mattybr5@MB Developments
Full Cars Breaking For Spares
28
28 December 2015 11:07 PM
Mattybr5@MB Developments
Full Cars Breaking For Spares
12
18 November 2015 07:03 AM