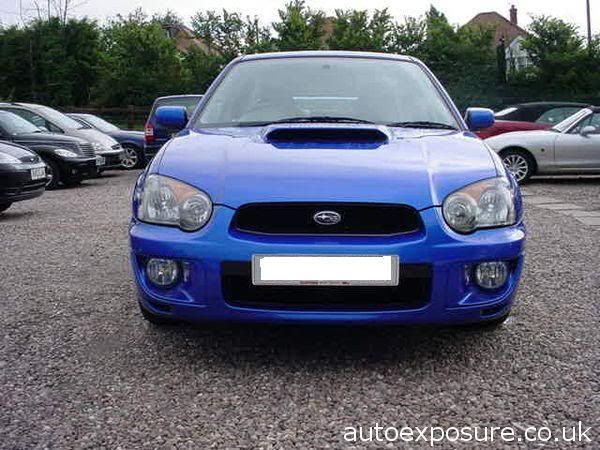
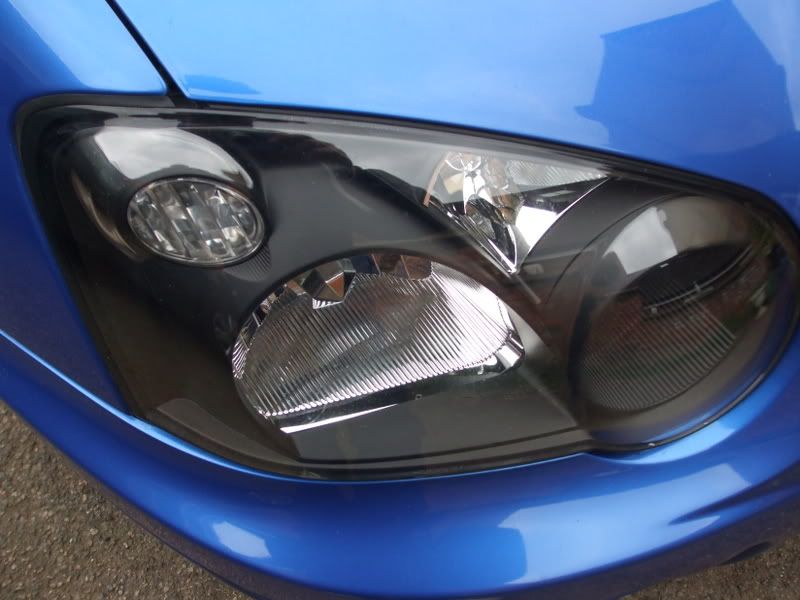
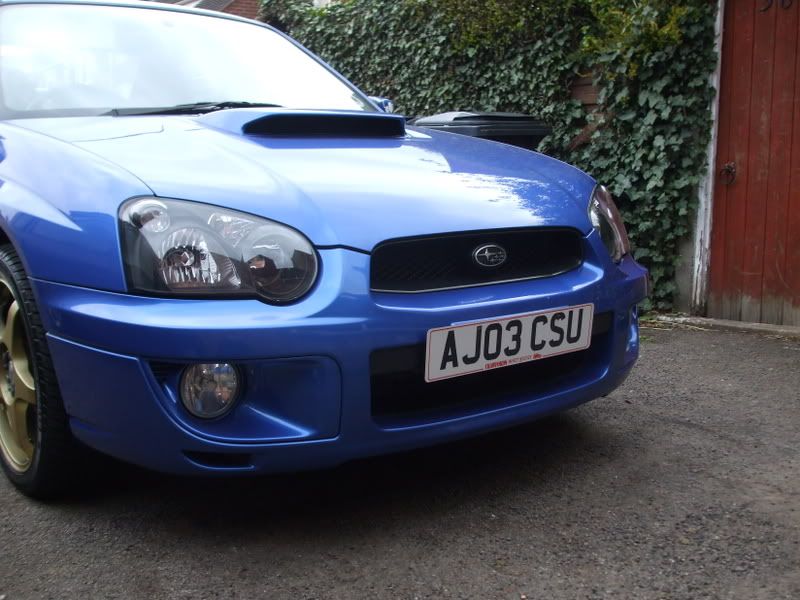
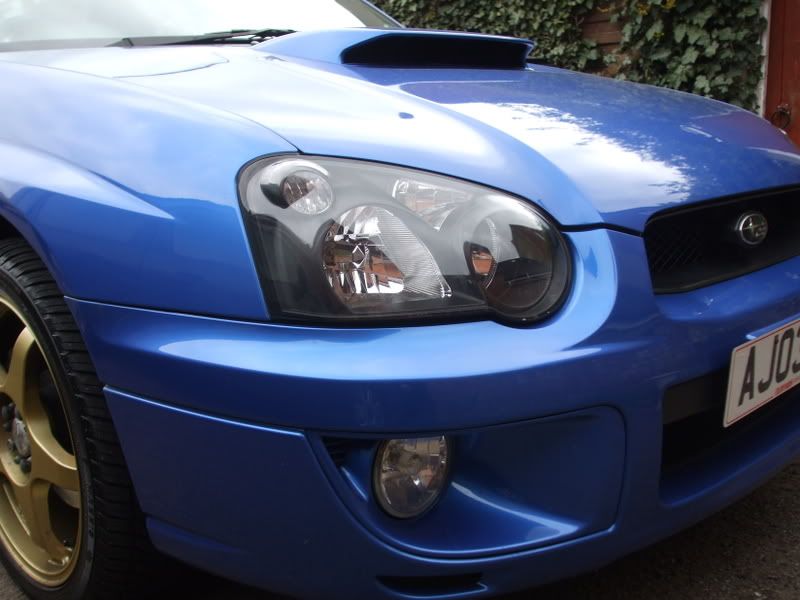
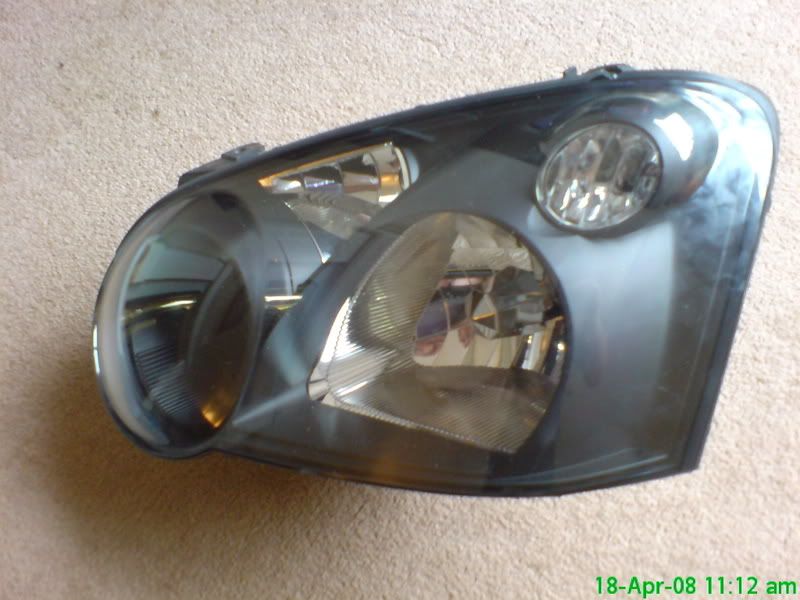
De-tangoed and sprayed Blob eye :)
 19 April 2008, 01:54 PM
#1
Scooby Regular
Thread Starter
iTrader: (1)
Join Date: Jan 2008
Location: lichfield staffordshire
Posts: 396
Likes: 0
Received 0 Likes
on
0 Posts
just finished fitting my lights back on after de-tangoing and spraying black
really easy to do and think they look loads better
Before
After
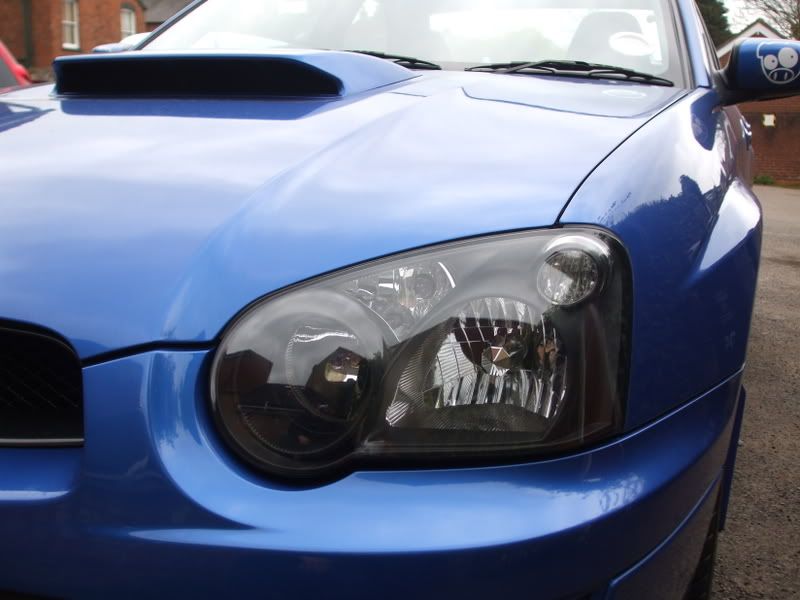

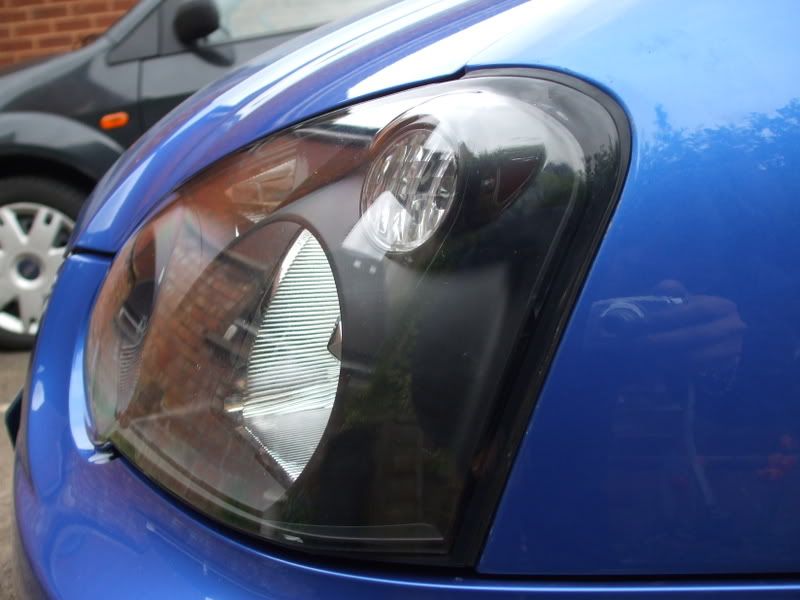
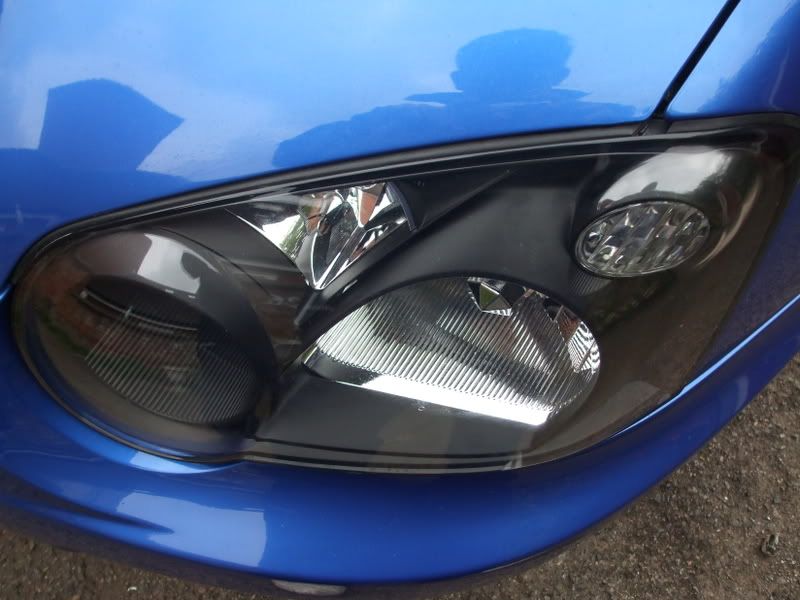
really easy to do and think they look loads better
Before
After


 Was it difficult? I have read a few guides but would be to scared to butcher my lights!!!!
19 April 2008, 03:40 PM
Was it difficult? I have read a few guides but would be to scared to butcher my lights!!!!
19 April 2008, 03:40 PM
#5
Scooby Regular

Join Date: Oct 2005
Location: In a house
Posts: 1,244
Likes: 0
Received 0 Likes
on
0 Posts
Im exactly the same! Im scared to do them! I want to soooo badly it looks miles better!
How did you do them in the end fat boy?
U got a new pic of the car head on? (same as first one) but de-tangoed
How did you do them in the end fat boy?
U got a new pic of the car head on? (same as first one) but de-tangoed
Last edited by Clarkie172; 19 April 2008 at 03:44 PM.
19 April 2008, 06:06 PM
#6
Scooby Regular
Thread Starter
iTrader: (1)
Join Date: Jan 2008
Location: lichfield staffordshire
Posts: 396
Likes: 0
Received 0 Likes
on
0 Posts
Headlight removal
First both headlights must obviously be removed.
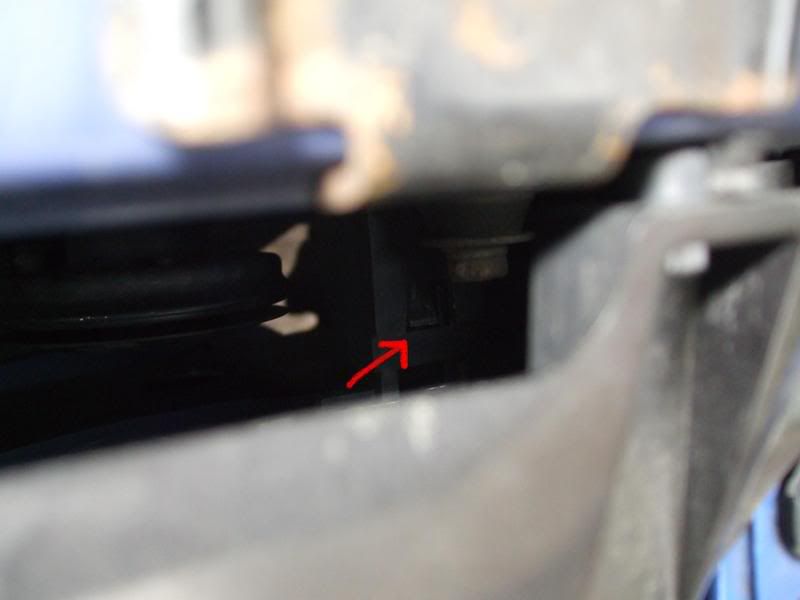
The driver�s side requires the black plastic air ducting going to the air box be removed to allow easier access to headlight.
This is secured by 2 x 10mm bolts onto the slam panel. (shown green).
To remove the headlights, these are also secured by 2 x 10mm bolts. (shown red)
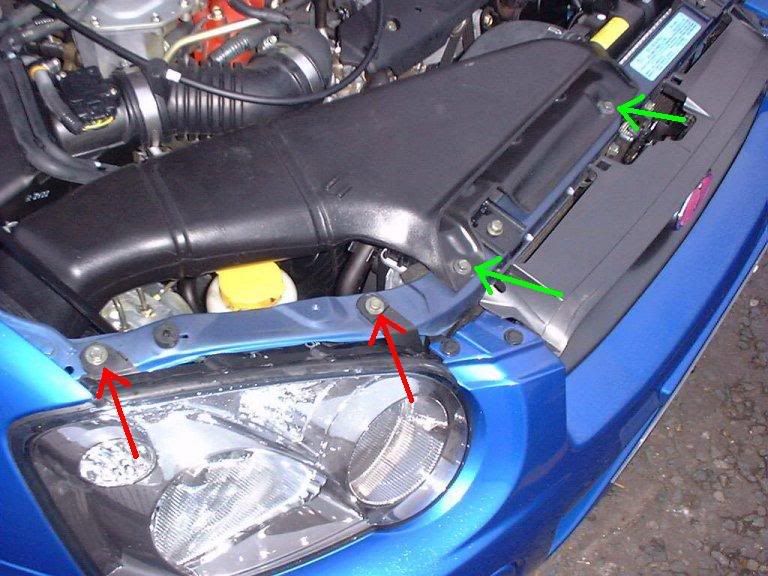
Same bolts for passenger side headlight. (shown red)
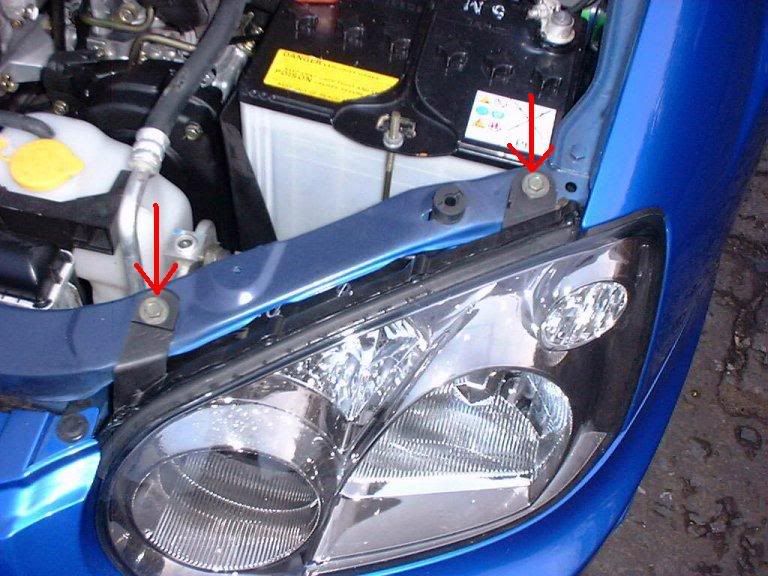
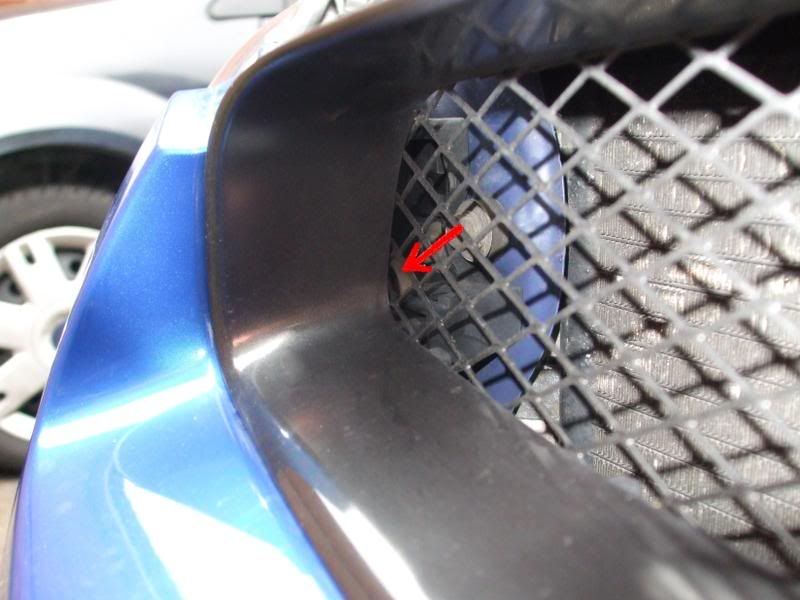
On the back of each headlight, nearest the grille side, there are 2 small phillips screws holding the headlight against a bracket, which is bolted onto the slam panel behind the grille.
i found the easy way was to take off the front grill by popping 4 black clip off top of the grill (shown in red.)
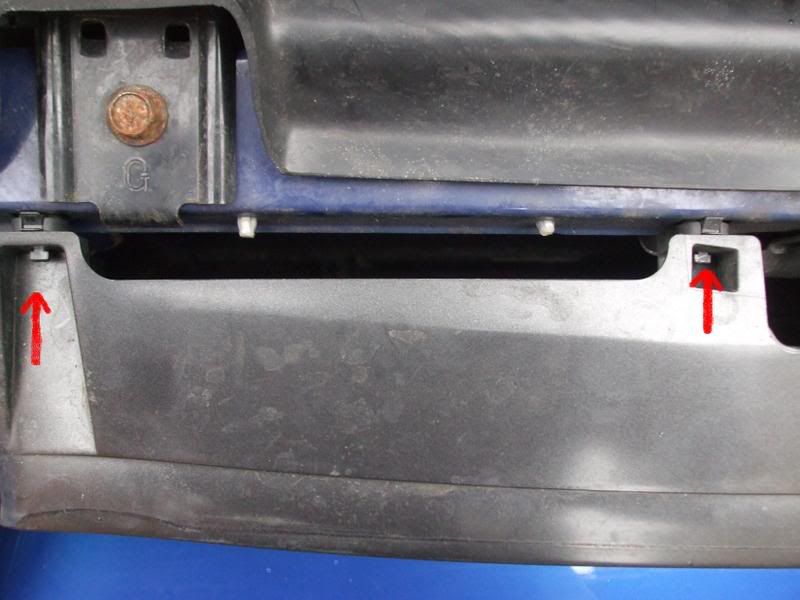
Then there is a big black clip 1 each side an bottom on the grill (shown red)
once un clipped grill should just come straght out.
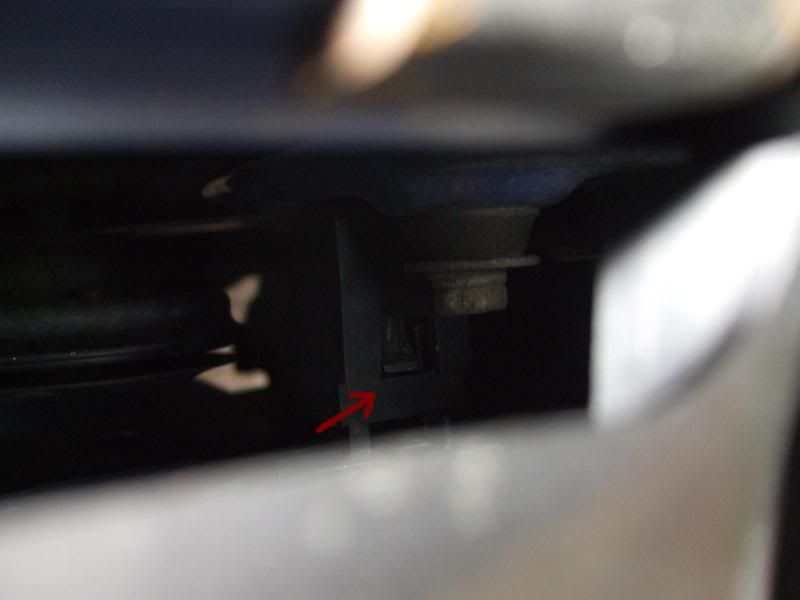
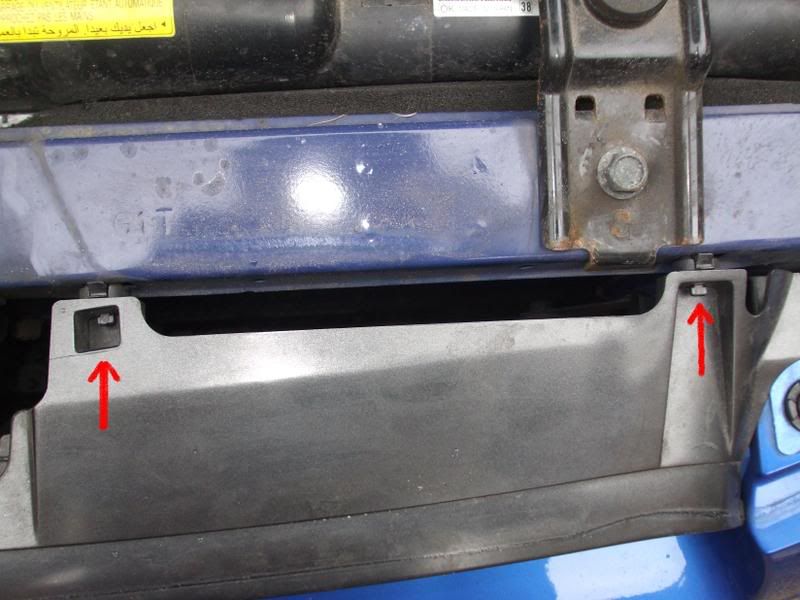
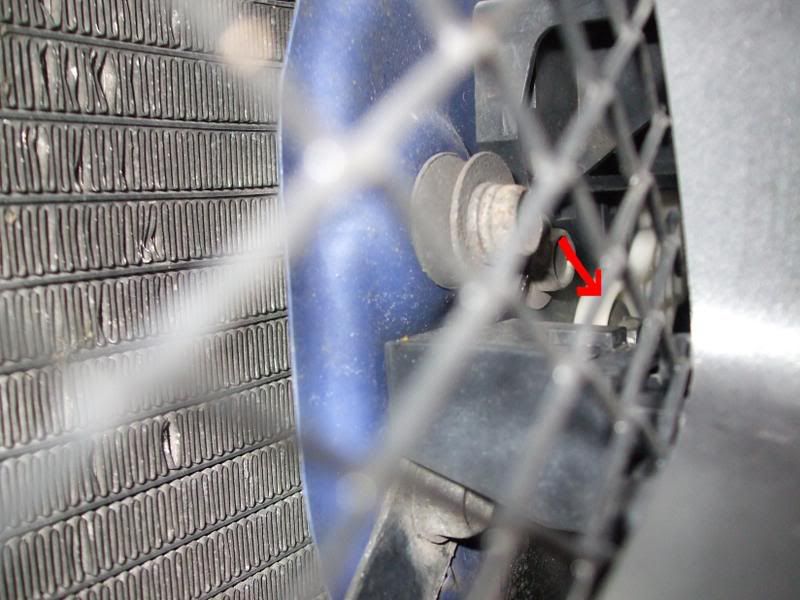
once the grill is out if you look to the left you will see a white bracket with a 10mm bolt holding it to slam pannel and drivers headlight.undo this (shown red)
Look to the right for the white bracket that holds the pass side headlight to the slam pannel undo this also.(shown in red)
once these are all undone just dissconect the wires that go to the head light and remove the headlight.
it will be abit stiff but just be patient and it will come with a bit of wiggle
p.s sorry the pics arnt the best just took them after i had re fitted the lights lol
Splitting the headlight
This is the bit were every1 panics bout the oven and i was no different lol
first you will need to take out 9 screws from the back of the unit and one of them is hidden under some tape so make sure all 9 are out.
once all unscrewed i got a normal hair dryer and heated up the join and gently pulled the lights apart bit by bit whilst quickly zapping it with the hair dryer every now and then keeping the mastik soft.
once apart there is one screw holding the silver plastic reflector in the lens.
undo this and pull the reflector out.and pop the orange bit out and chuck as far away as possible lol
Painting
i then rubbed it down with some 800 grade wet and dry (wet)
and washed them with some soap and dryed them off.
i then applied 3 coats of grey primer let it dry and lightly rubbed down with 800 grade wet and dry (dry) and washed off dust and let dry.
then applied 4 coats of matt black paint and let them dry over night.
RE-Sealing Lights
to RE-Seal just put the reflector back in with the one screw and re heat the lens and housing with the hair dryer and push back together.
once sealed just screw back together and admire your hany work lol
RE-Installing lights
to put ur light back on the car just reverse the procedure just be carefull of your paint work as they are a tight fit and might require a gentle bit of persauding
hope this helps people any questions let me know i will be more than happy to help you out
First both headlights must obviously be removed.
The driver�s side requires the black plastic air ducting going to the air box be removed to allow easier access to headlight.
This is secured by 2 x 10mm bolts onto the slam panel. (shown green).
To remove the headlights, these are also secured by 2 x 10mm bolts. (shown red)
Same bolts for passenger side headlight. (shown red)
On the back of each headlight, nearest the grille side, there are 2 small phillips screws holding the headlight against a bracket, which is bolted onto the slam panel behind the grille.
i found the easy way was to take off the front grill by popping 4 black clip off top of the grill (shown in red.)
Then there is a big black clip 1 each side an bottom on the grill (shown red)
once un clipped grill should just come straght out.
once the grill is out if you look to the left you will see a white bracket with a 10mm bolt holding it to slam pannel and drivers headlight.undo this (shown red)
Look to the right for the white bracket that holds the pass side headlight to the slam pannel undo this also.(shown in red)
once these are all undone just dissconect the wires that go to the head light and remove the headlight.
it will be abit stiff but just be patient and it will come with a bit of wiggle
p.s sorry the pics arnt the best just took them after i had re fitted the lights lol
Splitting the headlight
This is the bit were every1 panics bout the oven and i was no different lol
first you will need to take out 9 screws from the back of the unit and one of them is hidden under some tape so make sure all 9 are out.
once all unscrewed i got a normal hair dryer and heated up the join and gently pulled the lights apart bit by bit whilst quickly zapping it with the hair dryer every now and then keeping the mastik soft.
once apart there is one screw holding the silver plastic reflector in the lens.
undo this and pull the reflector out.and pop the orange bit out and chuck as far away as possible lol
Painting
i then rubbed it down with some 800 grade wet and dry (wet)
and washed them with some soap and dryed them off.
i then applied 3 coats of grey primer let it dry and lightly rubbed down with 800 grade wet and dry (dry) and washed off dust and let dry.
then applied 4 coats of matt black paint and let them dry over night.
RE-Sealing Lights
to RE-Seal just put the reflector back in with the one screw and re heat the lens and housing with the hair dryer and push back together.
once sealed just screw back together and admire your hany work lol
RE-Installing lights
to put ur light back on the car just reverse the procedure just be carefull of your paint work as they are a tight fit and might require a gentle bit of persauding
hope this helps people any questions let me know i will be more than happy to help you out
19 April 2008, 08:57 PM
#7
Scooby Regular

Join Date: Mar 2008
Location: on the edge of out of control
Posts: 63
Likes: 0
Received 0 Likes
on
0 Posts
nice guide mate well done
did mine a couple o weeks ago but did the oven on 50 degrees for 15 mins technique, which i have to say was really really easy to do.
don't forget your silver/orange flasher bulbs eh
did mine a couple o weeks ago but did the oven on 50 degrees for 15 mins technique, which i have to say was really really easy to do.
don't forget your silver/orange flasher bulbs eh
Trending Topics
 20 April 2008, 11:18 AM
#12
Scooby Regular

Join Date: Jan 2008
Location: SMACS
Posts: 301
Likes: 0
Received 0 Likes
on
0 Posts
that looks amazing mate, i want to do this to mine but theres no way im letting myself loose on my lights, it can only go wrong if i do it haha! is their anyone that will do it for you like a bodyshop or garage?
20 April 2008, 11:53 AM
#13
Scooby Regular
iTrader: (1)

Join Date: Apr 2003
Location: Glasgow, Scotland
Posts: 5,947
Likes: 0
Received 0 Likes
on
0 Posts
Yeah good guide... reminds me of a similar one....
https://www.scoobynet.com/projects-4...eadlights.html
blatant theft of my pics too
https://www.scoobynet.com/projects-4...eadlights.html
blatant theft of my pics too
20 April 2008, 12:34 PM
#14
Scooby Regular
Thread Starter
iTrader: (1)
Join Date: Jan 2008
Location: lichfield staffordshire
Posts: 396
Likes: 0
Received 0 Likes
on
0 Posts
yea lol thanks to talizman for the first two pics couldnt be arsed to spray any more arrows on in paint
but the rest are mine but cheers
but the rest are mine but cheers
20 April 2008, 03:47 PM
#17
Scooby Regular

Join Date: Jun 2004
Location: Arctic circle
Posts: 45
Likes: 0
Received 0 Likes
on
0 Posts

 20 April 2008, 09:19 PM
#22
Scooby Regular

Join Date: Nov 2005
Location: irchester / northants , can also be found at babs.forumotion.com
Posts: 1,365
Likes: 0
Received 0 Likes
on
0 Posts
Well i got my h/lights out and fooked off the orangey plasticy thingy  , And got the reflectors all rubbed down and primed..........................Then the bloody missus wines loud enough for me to down tools and go out for he rest of the day ,
Will hopefully get finished in the week sometime .
, And got the reflectors all rubbed down and primed..........................Then the bloody missus wines loud enough for me to down tools and go out for he rest of the day , Will hopefully get finished in the week sometime .
 i hate whingers
20 April 2008, 09:57 PM
i hate whingers
20 April 2008, 09:57 PM
#24
Scooby Regular
Thread Starter
iTrader: (1)
Join Date: Jan 2008
Location: lichfield staffordshire
Posts: 396
Likes: 0
Received 0 Likes
on
0 Posts
just tell her that you need to do them asap cuz the mastik will **** up and you wont be able to seal them again thats what i did lol
04 May 2008, 07:45 PM
#27
Scooby Regular
iTrader: (3)
Join Date: Jan 2008
Location: Wolves
Posts: 564
Likes: 0
Received 0 Likes
on
0 Posts
I've done it on mine not used any more sealer just use a hair dryer to warm the original sealer up, and then plonk the lense back on if you are a little worried get some dumm-dumm from Halfrauds its the same kinda stuff.
06 May 2008, 11:34 PM
#29
Scooby Regular


Thread
Thread Starter
Forum
Replies
Last Post