Flip Key Mod...
 13 February 2012, 09:03 PM
#1
Scooby Regular
Thread Starter
iTrader: (1)
Join Date: Nov 2005
Posts: 547
Likes: 0
Received 0 Likes
on
0 Posts
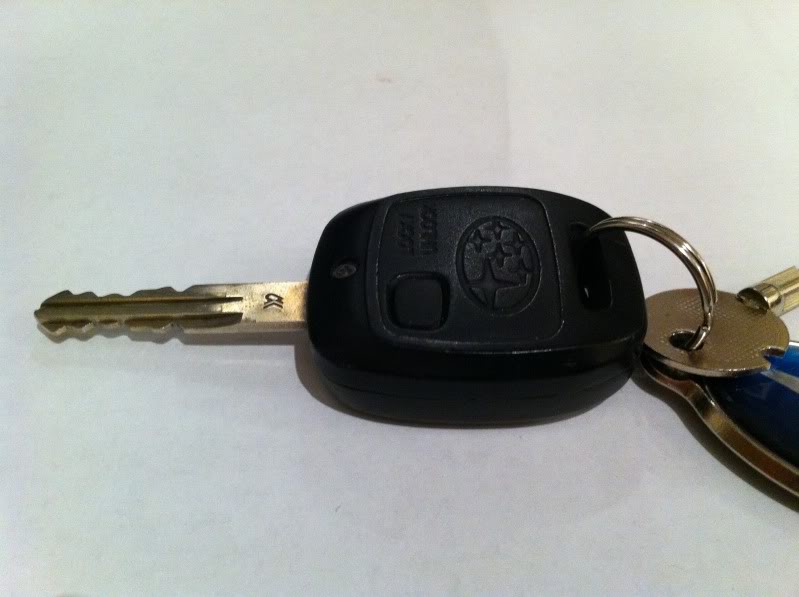
By popular demand (okay, one request so far  ) here's a guide on how I changed my spare key over to a flip key. Reason for this is simple - I prefer the flip style of key to the standard Subaru one which seems a bit dated these days. This works on Subaru keys with a single button to lock / unlock that look like this (it might work with others as well, the principle would be the same):
Anyway, to start with, I strongly recommend that you do this to your SPARE key in case it goes wrong! Anyone who chooses to try this does so at their own risk as well
Right, step 1 - get yourself a blank flip key casing from eBay. I used this one for a Peugeot 206 / 306 as it seemed to be the best fit (total guess, worked out okay). There may be others that fit better, but this guide is based around this type of key.
Once that arrives, put it to one side and get your spare key on the bench.
In order to 'migrate' the contents of the old style key into the new case, the old key will have to be taken apart - it doesn't like this so be prepared to destroy it!
Remove the screw next to the key blade and carefully prize the casing apart. It will resist this, so take your time and make sure you don't damage the insides - there is a good chance that it will come away in small pieces; just don't throw anything out yet....
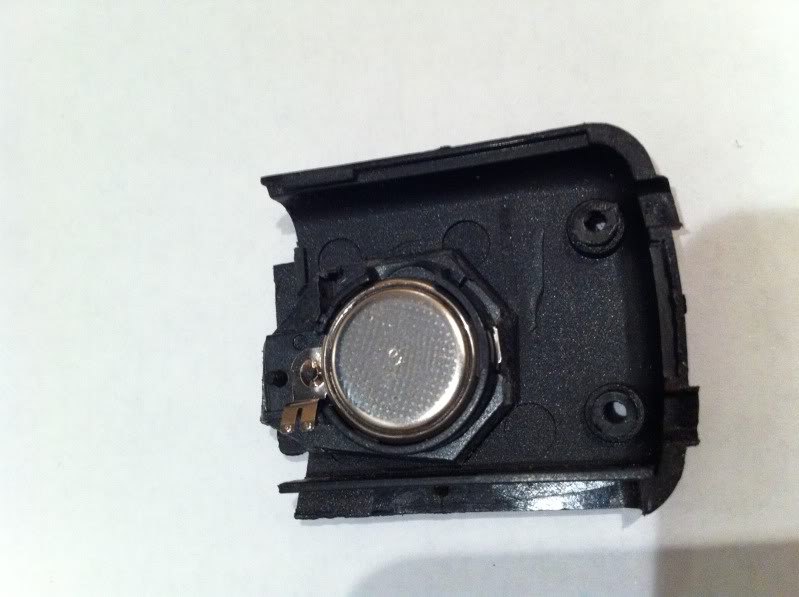
Take the battery out of it and put it to one side as we will need that later. There is a rubber casing over the back of the key - remove this if you like to give yourself a clearer view of what has to be removed (I used a sharp knife and a pair of wire cutters).
BE VERY CAREFUL HERE as you need to make sure you don't damage the RFID chip, which is a small black chip that looks like this (shown to the left in the pic below):

It is near the key blade itself I think and is almost exactly the same colour as the plastic surround. It should come out easily enough as it's not glued - once you find it, remove it and keep it in a safe place as we will need that later.
Once the key casing has been separated you should be able to remove the key blade itself. Once removed put that to one side as well. It's the wrong shape but that can be fixed.
Next, remove the PCB with the central locking transmitter and put that to one side. There is a small metal battery terminal contact that you will need to remove as well - put this in the 'keep' pile. Put the remains of your old key to one side (don't discard anything just yet just in case...)
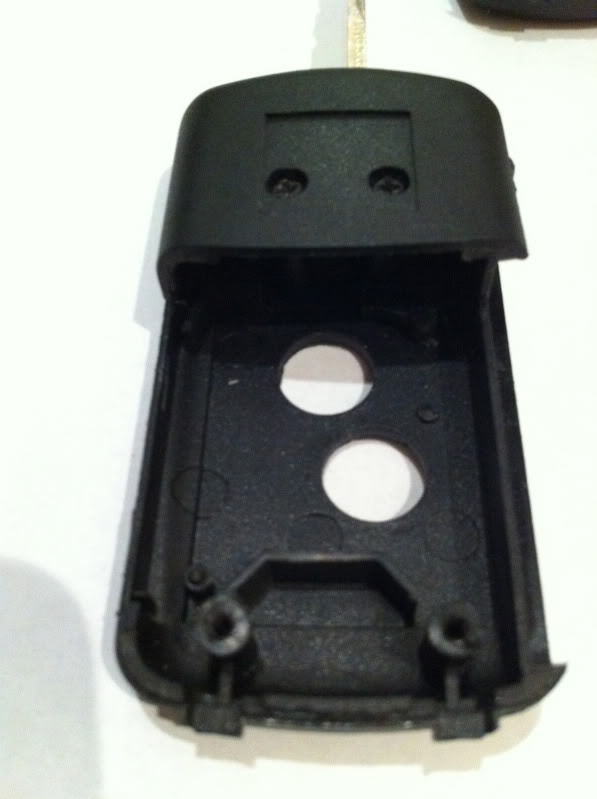
Next, take the new flip key blank apart - start by removing the battery cover. On inspection you will notice that it is not really the correct shape inside to take the radio transmitter, but we can fix that. Also, note that the Subaru key only has one button and this one has two - I am using the 'lock' button as the active one.
Here's a view of the inside of the flip key with the inside parts cut away to allow the new internals to fit:
Looking at this again, I now realise I could have got away with not actually removing the flip mechanism from the new key at all, but I did. If you do remove it, make a note of how the spring is located and how it is held together for when you re-build it. It came apart on me, but it wasn't too hard to figure out where the bits go to get it working again.
Look at the blank key blade where it meets the metal holder and you should find a small hollow pin holding it in place, much like the sort of thing you will find on a watch link. If you haven't removed the key blade holder, just fold it open or closed slowly and you will see the hole on the top of the block where the pin goes through to locate the key blade. It's fairly tight but it should press out and allow you to pull the key blade out of the holder.
Once removed, look at it closely - the end that fitted inside the block looks nothing like the one you just removed from your old key
The Subaru key is thicker and has an L shape at the end where it was located in the plastic case. Cut this off with a hacksaw (carefully - don't break the key blade). Next, mark the area that needs to be filed down to the correct thickness and carefully file this down a fraction at a time until it is a good fit in the blade holder. You may also have to take a fraction off either side as well to make it fit depending on the key style.
Next, you need to make the U channel that holds the key blade in place using that pin you removed earlier. I used the edge of a metal file to carefully file away enough to create this groove. You make sure you don't remove too much - if the pin is too tight a fit then take off a little more, comparing it to the blank key blade for reference.
Once that is completed, fit the old key blade in the new holder using the retaining pin; make sure this is secure. Next, put that to one side and look at the transmitter card...
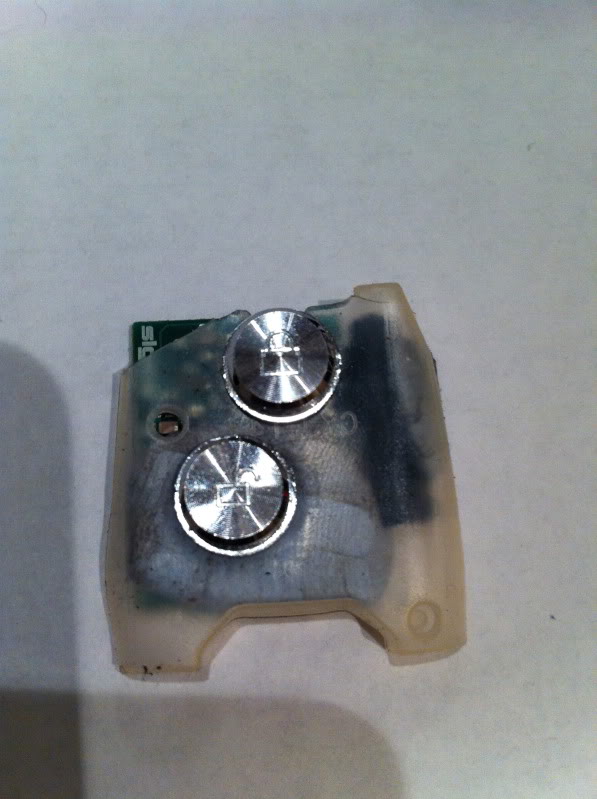
This part I found the hardest and to be honest mine is still a bit of a work in progress, but works well. I used nothing more complicated than Blu-Tac to actually locate the card itself, with a small piece of the broken plastic from the old key as a pressure plate glued to the membrane underneath the new 'lock' button - this helps to ensure that the button on the card is pressed when you press the lock button on the key fob. You can experiment with the best location for this if you like.
The new key blank comes with a clear rubber membrane that I again trimmed a bit to allow the card to fit - this rubber membrane locates the buttons on the key fob, so its relatively easy to get the lock button to line up with the push button on the actual card itself. Using aforementioned BluTac, stick the card to the membrane, ensuring that there is enough space above the card to locate the battery etc.
Here's a view of mine from the button side:
Fit this part back inside the key blank - it should look something like this now:
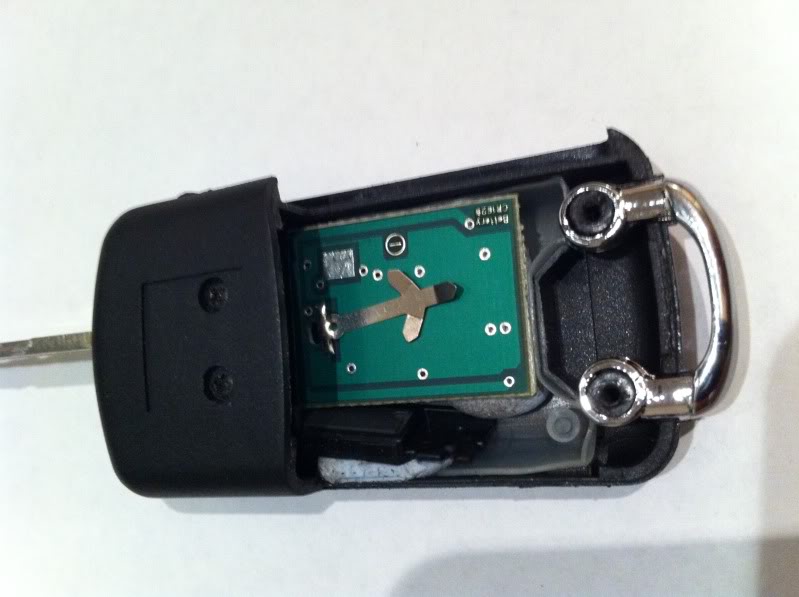
Next, I trimmed the section of the old key that held the battery, and the metal better contact, to that i could fit it inside the new case. Note that this will have to align correctly with the PC board that is now fitted inside the key - the contacts for the battery should not short on anything so make sure the alignment is correct. Stick this to the inside of the battery cover again using BluTac - seems to work fine. Make sure it is held firmly but doesn't require too much pressure to close the lid as that may affect how the button works. Mine looks like this:
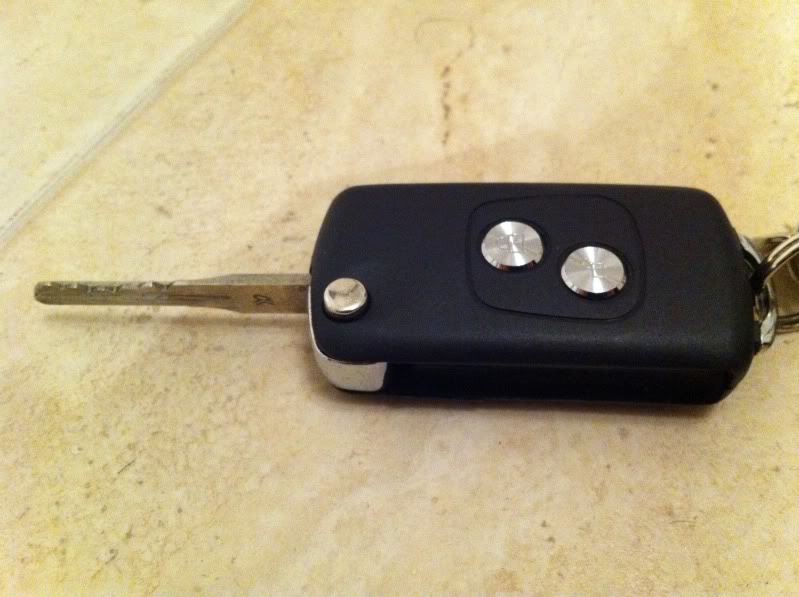
Once that is done, double check you have installed the RFID chip with yep you guessed it, BluTac, then screw the case closed. Take it out to the car and test... the finished key should look like this:
Hope this helps, and remember:
1. Only do this to your spare key in case it goes wrong!
2. As always, at yer own risk
3. Make sure you fit the RFID chip
Cheers,
Pete
) here's a guide on how I changed my spare key over to a flip key. Reason for this is simple - I prefer the flip style of key to the standard Subaru one which seems a bit dated these days. This works on Subaru keys with a single button to lock / unlock that look like this (it might work with others as well, the principle would be the same):Anyway, to start with, I strongly recommend that you do this to your SPARE key in case it goes wrong! Anyone who chooses to try this does so at their own risk as well
Right, step 1 - get yourself a blank flip key casing from eBay. I used this one for a Peugeot 206 / 306 as it seemed to be the best fit (total guess, worked out okay). There may be others that fit better, but this guide is based around this type of key.
Once that arrives, put it to one side and get your spare key on the bench.
In order to 'migrate' the contents of the old style key into the new case, the old key will have to be taken apart - it doesn't like this so be prepared to destroy it!
Remove the screw next to the key blade and carefully prize the casing apart. It will resist this, so take your time and make sure you don't damage the insides - there is a good chance that it will come away in small pieces; just don't throw anything out yet....
Take the battery out of it and put it to one side as we will need that later. There is a rubber casing over the back of the key - remove this if you like to give yourself a clearer view of what has to be removed (I used a sharp knife and a pair of wire cutters).
BE VERY CAREFUL HERE as you need to make sure you don't damage the RFID chip, which is a small black chip that looks like this (shown to the left in the pic below):
It is near the key blade itself I think and is almost exactly the same colour as the plastic surround. It should come out easily enough as it's not glued - once you find it, remove it and keep it in a safe place as we will need that later.
Once the key casing has been separated you should be able to remove the key blade itself. Once removed put that to one side as well. It's the wrong shape but that can be fixed.
Next, remove the PCB with the central locking transmitter and put that to one side. There is a small metal battery terminal contact that you will need to remove as well - put this in the 'keep' pile. Put the remains of your old key to one side (don't discard anything just yet just in case...)
Next, take the new flip key blank apart - start by removing the battery cover. On inspection you will notice that it is not really the correct shape inside to take the radio transmitter, but we can fix that. Also, note that the Subaru key only has one button and this one has two - I am using the 'lock' button as the active one.
Here's a view of the inside of the flip key with the inside parts cut away to allow the new internals to fit:
Looking at this again, I now realise I could have got away with not actually removing the flip mechanism from the new key at all, but I did. If you do remove it, make a note of how the spring is located and how it is held together for when you re-build it. It came apart on me, but it wasn't too hard to figure out where the bits go to get it working again.
Look at the blank key blade where it meets the metal holder and you should find a small hollow pin holding it in place, much like the sort of thing you will find on a watch link. If you haven't removed the key blade holder, just fold it open or closed slowly and you will see the hole on the top of the block where the pin goes through to locate the key blade. It's fairly tight but it should press out and allow you to pull the key blade out of the holder.
Once removed, look at it closely - the end that fitted inside the block looks nothing like the one you just removed from your old key
The Subaru key is thicker and has an L shape at the end where it was located in the plastic case. Cut this off with a hacksaw (carefully - don't break the key blade). Next, mark the area that needs to be filed down to the correct thickness and carefully file this down a fraction at a time until it is a good fit in the blade holder. You may also have to take a fraction off either side as well to make it fit depending on the key style.
Next, you need to make the U channel that holds the key blade in place using that pin you removed earlier. I used the edge of a metal file to carefully file away enough to create this groove. You make sure you don't remove too much - if the pin is too tight a fit then take off a little more, comparing it to the blank key blade for reference.
Once that is completed, fit the old key blade in the new holder using the retaining pin; make sure this is secure. Next, put that to one side and look at the transmitter card...
This part I found the hardest and to be honest mine is still a bit of a work in progress, but works well. I used nothing more complicated than Blu-Tac to actually locate the card itself, with a small piece of the broken plastic from the old key as a pressure plate glued to the membrane underneath the new 'lock' button - this helps to ensure that the button on the card is pressed when you press the lock button on the key fob. You can experiment with the best location for this if you like.
The new key blank comes with a clear rubber membrane that I again trimmed a bit to allow the card to fit - this rubber membrane locates the buttons on the key fob, so its relatively easy to get the lock button to line up with the push button on the actual card itself. Using aforementioned BluTac, stick the card to the membrane, ensuring that there is enough space above the card to locate the battery etc.
Here's a view of mine from the button side:
Fit this part back inside the key blank - it should look something like this now:
Next, I trimmed the section of the old key that held the battery, and the metal better contact, to that i could fit it inside the new case. Note that this will have to align correctly with the PC board that is now fitted inside the key - the contacts for the battery should not short on anything so make sure the alignment is correct. Stick this to the inside of the battery cover again using BluTac - seems to work fine. Make sure it is held firmly but doesn't require too much pressure to close the lid as that may affect how the button works. Mine looks like this:
Once that is done, double check you have installed the RFID chip with yep you guessed it, BluTac, then screw the case closed. Take it out to the car and test... the finished key should look like this:
Hope this helps, and remember:
1. Only do this to your spare key in case it goes wrong!
2. As always, at yer own risk
3. Make sure you fit the RFID chip
Cheers,
Pete
Last edited by scooby546; 14 February 2012 at 10:47 AM. Reason: updated to include finished photo - thanks riiidaa


Trending Topics
 Nice one Pete, thanks for the PM...I may well have a crack at this, top work
  14 February 2012, 11:42 AM
#11
Scooby Regular
Thread Starter
iTrader: (1)
Join Date: Nov 2005
Posts: 547
Likes: 0
Received 0 Likes
on
0 Posts
No probs mate - and yes riiidaa I still have that nasty little sticker in the bag - won't be going on I do have a couple of small scooby badges, but haven't got round to sticking them on the key yet...
I do have a couple of small scooby badges, but haven't got round to sticking them on the key yet...
14 February 2012, 08:55 PM
#13
Scooby Regular
iTrader: (13)
Join Date: Feb 2010
Location: North Wales.
Posts: 4,636
Likes: 0
Received 0 Likes
on
0 Posts
There was a similar `craze` on FTO forum. People bought folding key blanks off eBay to do this and the folding function stopped after a while and the key was much bulkier!
27 July 2012, 09:37 PM
#14
Scooby Regular

Join Date: Nov 2004
Posts: 85
Likes: 0
Received 0 Likes
on
0 Posts
A few days ago I was investigating doing something similar for the enormous key that starts my Legacy. It looks about the same but with a longer laser cut key.
The pcb is 20x28mm so I would be curious to know if it would fit the same case. It has the button in the corner as well.
Next, is the rfid under the rubber backing or is it removed from inside the fob ? I've peeled back some of the rubber on the worn key and it looks like there is a small rectangular inset in it that looks like it might be the chip.
Last edited by scubascooby; 28 July 2012 at 09:12 PM.

Thread
Thread Starter
Forum
Replies
Last Post
Mattybr5@MB Developments
Full Cars Breaking For Spares
28
28 December 2015 11:07 PM
Mattybr5@MB Developments
Full Cars Breaking For Spares
12
18 November 2015 07:03 AM
toyney83
General Technical
10
02 October 2015 08:38 PM