
GC8 Dash


Hi,
Im looking for a blank dash insert for a (pre-facelift) GC8.
Its going to replace the OEM clocks on a track car and i'll mount a digital dash and various LEDs to it,
Cant seem to find one either in GRP/Carbon/plastic or whatever.
Any ideas.??!!
Thanks,
Im looking for a blank dash insert for a (pre-facelift) GC8.
Its going to replace the OEM clocks on a track car and i'll mount a digital dash and various LEDs to it,
Cant seem to find one either in GRP/Carbon/plastic or whatever.
Any ideas.??!!
Thanks,


I would rather use the proper insert if I can get hold of one, that way it picks up on the OEM holes and fits nicely.
Theres a few about for GDB shape but early ones seem to be harder to find now,
Theres a few about for GDB shape but early ones seem to be harder to find now,


Do you mean the center console, or the actual dash binnacle, where the speedometer and rev counter sit??.
The dash binnacle part is actually very easy to make, when you disassemble the stock dash you'll see that the stock black plastic part is actually sandwiched between the clear plexiglass and the white plastic part the gauges actually mount to.
Unclip the clear plastic front, and trace the black plastic onto some carbon or black abs plastic.
Here is mine with a Stack dash fitted to it.
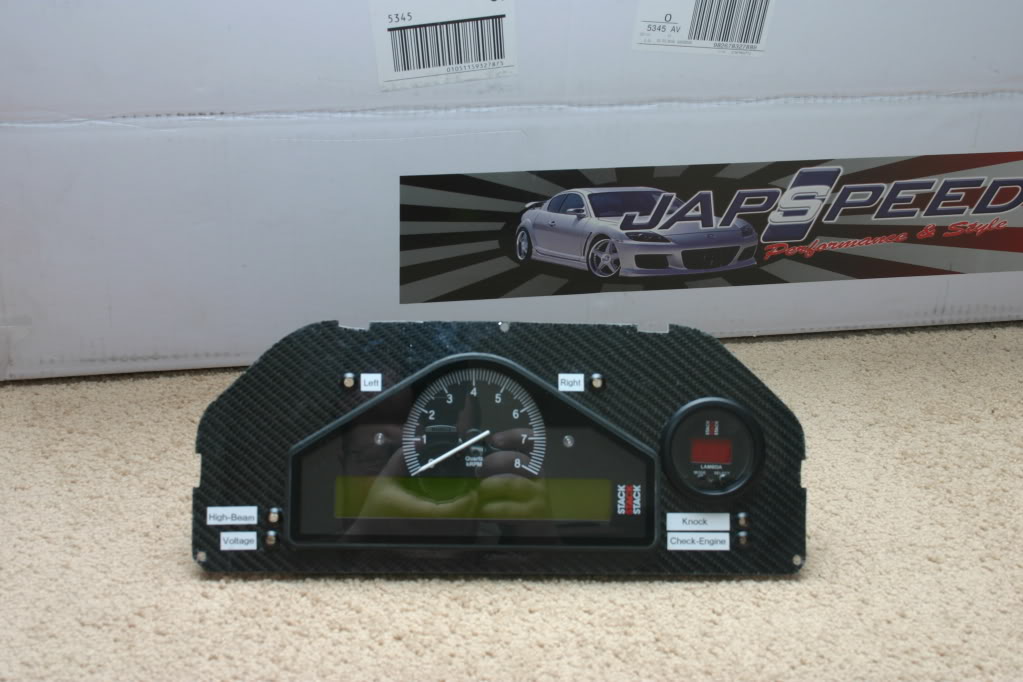
And without it.
If you mean the center console, then you'll have to fabricate something yourself, or try rally car related shops (I found a replacement center console some time ago, but as the company did not bother to reply I made a new center console out of aluminium and carbon sheet, but I have no pictures of this ATM.
This company never replied, but seem to have them.
The part numbers are GC8-004 and GC8-005, but even if they quote 2 different centre console styles the picture is the same.
http://www.northeastrallyspares.com/...Panels_16.html
Magnum motorsports also had the carbon center console on sale, but they seem out of business, and the few reviews that exist on them would shy me away from them even if they are still in business TBH.
The dash binnacle part is actually very easy to make, when you disassemble the stock dash you'll see that the stock black plastic part is actually sandwiched between the clear plexiglass and the white plastic part the gauges actually mount to.
Unclip the clear plastic front, and trace the black plastic onto some carbon or black abs plastic.
Here is mine with a Stack dash fitted to it.
And without it.
If you mean the center console, then you'll have to fabricate something yourself, or try rally car related shops (I found a replacement center console some time ago, but as the company did not bother to reply I made a new center console out of aluminium and carbon sheet, but I have no pictures of this ATM.
This company never replied, but seem to have them.
The part numbers are GC8-004 and GC8-005, but even if they quote 2 different centre console styles the picture is the same.
http://www.northeastrallyspares.com/...Panels_16.html
Magnum motorsports also had the carbon center console on sale, but they seem out of business, and the few reviews that exist on them would shy me away from them even if they are still in business TBH.
Last edited by Dutch Scooby lover; Dec 29, 2011 at 11:58 PM.
Hi,
This is exactly what i need to do, i have the Stack dash now (same model as yours) and need to make a panel to mount it and some LEDs.
Pics look great, how does it fix to the car ?
Thanks
This is exactly what i need to do, i have the Stack dash now (same model as yours) and need to make a panel to mount it and some LEDs.
Pics look great, how does it fix to the car ?
Thanks
Trending Topics
It mounts the same as the stock cluster.
The actual cluster housing consists of 3 parts.
1 The clear plastic in front of the gauges (I ditched this, as the Stack is already behind a clear cover, the stock gauges do not have this, so Subaru made this cover to keep people from damaging the gauges when touching them)
2 The backside, which is white, and where all the stock gauges screw on to
3 The black plastic part which has holes cut out, through which you can see the actual gauge units.
Part number 3 click into part number 2, and part number 1 clips over it, sandwiching part number 2 in the progress.
Part number 2 is about 2 mm thick, so If you use carbon or plastic which is the same thickness the Stack can be mounted in the same way (Screw Stack to carbon/p[lastic, and then clip the entire assembly into part 2.
If you dissasemble the cluster, you need to use a dremel or something like that to cut of all protrusions/mounting tabs in part 2, this is only slightly thicker then the Stack dash, so all the mounting tabs to which the gauges screw need to be removed, so you'll end up with an empty shell.
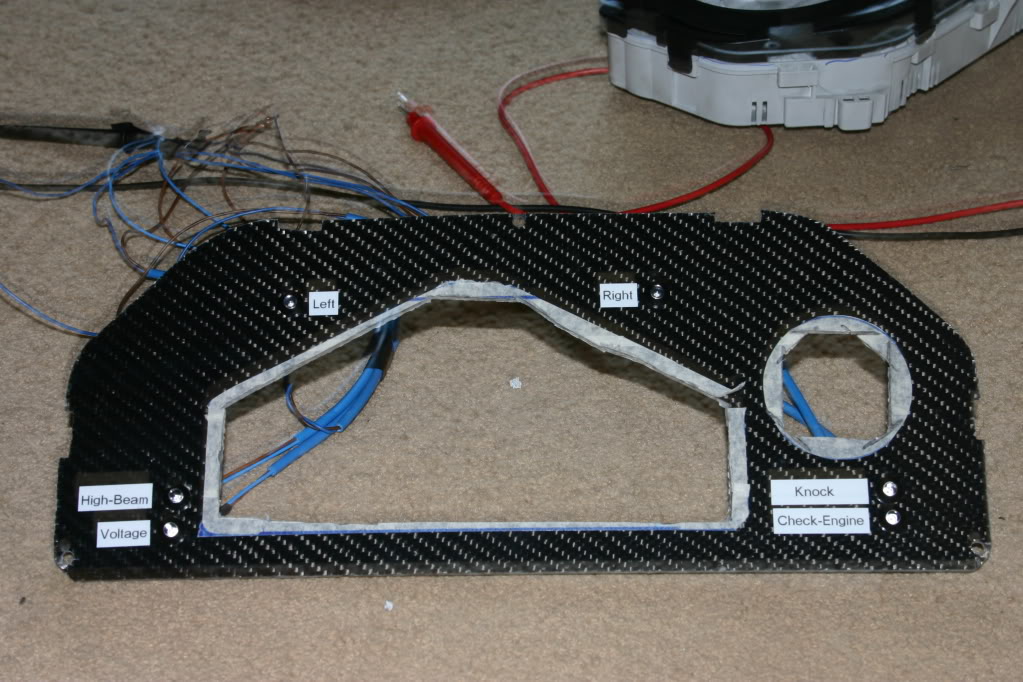
In reality, the hardest part was not the fabrication of the panel (THAT's a 10 minute job) but sussing out the wiring.
I chose to use LED's instead of incandescant bulbs, so besides finding out which of the 30 odd wires does what I also had to keep track of polarity.
If you have a wiring diagram it's much easier, but as I have some sort of Dutch MY98 special edition, which has the MY99 clocks, but uses a different cable loom then either the normal MY98 or MY99 I did not have the luxury of a diagram.
I quickly got fed up with that, so inthe end to get the indicator lights working (and having ditched the entire centre console)I used a Hella hazard light switch (for the indicator/hazard warning lights, and took a wire directly from the Morette's to get a high beam indicator.So effectively I did not use any of the stock cluster wiring loom (fuel elvel is directly from the pump to the Stack.
The only thing you'll face then is that the alternator field circuit has to be rigged/bypassed but I chose to forgo that, and use the Syvecs to drive the alternator field.
Great stuff thanks, i'll likely get a set of scrap/spare clocks to salvage the connectors and make a template, then make up the new panel and wiring, then just swap it all over once the new one is made.
The wiring is what i spend much of my time doing, so it shouldn't be too bad i hope. The car is a '95 version 2 Sti, i think the wiring info i have for a the OEM dash plugs should be correct.
Planning to use LEDs for; the indicators, high beam, battery warning (might use a bulb for this) and also for centre diff position as i have a DCCD box. My Stack doesnt have fuel level (i dont think?) so I will need a separate fuel guage.
Looking forward to getting it all connected and working!

Thread
Thread Starter
Forum
Replies
Last Post
Mattybr5@MB Developments
Full Cars Breaking For Spares
28
Dec 28, 2015 11:07 PM
Mattybr5@MB Developments
Full Cars Breaking For Spares
12
Nov 18, 2015 07:03 AM