Defi Linkmeters fitting advice..
 10 December 2008, 05:21 PM
#1
Scooby Regular
Thread Starter
iTrader: (5)

Join Date: Aug 2008
Posts: 732
Likes: 0
Received 0 Likes
on
0 Posts
Hi all
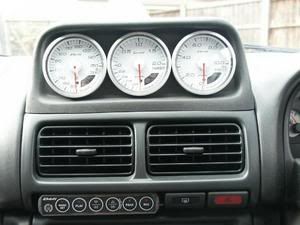
Some advice needed on fitting Defi LinkMeters in a classic please...
Will be wiring them in over the holiday period into my my99 classic.
Got them off the for sale forum and they have come with all the wiring and sensors needed.
The oil pressure and temp gauges come with their own sensors which according to the manual, have thread sizes of 1/8PT.
Am planning on using the bung above cylinder three for the temp sensor which I understand is the best place rather than using a sandwich plate??
The thread on the sensor is 1/8PT, is this correct or will I need an adaptor defi do to convert it to 1/8NPT?
Was planning on using the oil pressure T-Pipe system for the pressure sensor fitting from Scoobyparts in order to keep the origional sensor connected, Is this the best way and again will the 1/8PT Thread be ok?
Any advice or fitting pictures and guides much appriciated!!
Must say...top class bit of kit by the looks of it and well worth the money, can't wait to get them working!
Cheers.
 10 December 2008, 05:26 PM
#3
Scooby Regular
iTrader: (2)

Join Date: Jan 2007
Location: l'on n'y peut rien
Posts: 2,922
Likes: 0
Received 0 Likes
on
0 Posts
Yes, you'll need an adaptor for the O/T sensor, plus some PTFE tape for the threads and a LONG 8mm Allen key to remove the bung.
Yes, you can use a T-piece for the O/P sensor, but many people just put the sensor where the OE O/P switch was: Defi's have an adjustable limit alarm, you can set it to whatever pressure you see fit
Have a look here for fitting help: chiark.co.uk, and here: http://www.defi-shop.com/product/ima...nual06064e.pdf which might help.
10 December 2008, 05:31 PM
#4
Scooby Regular
iTrader: (2)
Join Date: Jan 2007
Location: l'on n'y peut rien
Posts: 2,922
Likes: 0
Received 0 Likes
on
0 Posts
It needs FOUR connections:
Red, permanent live, mine came from the hazard warning light switch,
Orange, switched live, mine came from the headunit live,
White, lighting, mine came from sidelights,
Black, earth, mine now goes to an earth point beside the ecu under the carpet, passenger side.
Last edited by tanyatriangles; 10 December 2008 at 05:33 PM.
10 December 2008, 10:27 PM
#5
Twatful
Join Date: Apr 2003
Location: Grew up and don't drive Scoobs anymore!
Posts: 9,050
Likes: 0
Received 0 Likes
on
0 Posts
Adaptor is part no LMA067
LMA Performance Homepage - UK Supplier of Car / Automobile Custom Parts and Accessories
I know Alyn at ASP usually has these in stock, 0191 4103770
LMA Performance Homepage - UK Supplier of Car / Automobile Custom Parts and Accessories
I know Alyn at ASP usually has these in stock, 0191 4103770


 It was just a cover, so I had no qualms about losing it
Trending Topics
 11 December 2008, 07:57 PM
#9
Scooby Regular
Thread Starter
iTrader: (5)
Join Date: Aug 2008
Posts: 732
Likes: 0
Received 0 Likes
on
0 Posts
Thanks all for the info!!
I'm keen on having the controller where the drinks holder is as I think it looks just right there and is easy to get to....but I do find myself using the holder often....decisions, decisions!!!
Went upto ScoobyParts in Bedford today to get the items needed, checked the fittings while I was there and both the defi sensors fit smoothly into the adaptors with a little play, I assume this is for the PTFE tape to take up??
Got a triple centre pod from them aswell which I have to say is pretty good quality for a hand made item.
Tim's a nice guy to deal with there and would recommend them to all.
Does anyone have any advice or instructions on how to remove the existing flap cover on the dash and acsess the dash to do the wiring on the basis of the controller being located in place of the drinks holder?
I had a brief go earlier and found two small covers to prise off under the flap at the front, took out the two screws underneath but can't see how the bottom part under the air vents come's loose??
Also, where's the best place to bring in the wires through the bulkhead from the engine bay and route them to the drinks holder area??
All advice much appriciated!!
Last edited by carlito; 11 December 2008 at 08:01 PM.
12 December 2008, 01:19 PM
#10
Scooby Regular
iTrader: (2)
Join Date: Jan 2007
Location: l'on n'y peut rien
Posts: 2,922
Likes: 0
Received 0 Likes
on
0 Posts
<<Sighs>> I might as well come round and do it for you as well
Seriously:
Flap cover: Remove screws. Grasp front edge of base, (it sometimes helps to wrap a cloth through the catch to give more grip), and pull HARD towards you. It will come away with the grilles for the vents as part of it.
I then unscrewed and kept the cover/lid.
Meanwhile, once this is out, you can now see how the drinks holder or cheapo '98 cover comes out.
My control unit is held in place with double sided tape and electricains tape across the top, invisible once fitted But you WILL have to cut away part of the drinks holder fittings to get it in place....not a problem if it's just a cover, it'l go back, if ever, with clear silicone.
Feeding wires through from under bonnet: There are two useful grommets you can use, one where the aircon goes through, (or an un-pierced grommet if no aircon, like cheapo 98 cars), and one where the clutch/brake pipes come through. I found it slightly easier to get at the one on the n/s, the aircon one. I pierced it with a sharp blade, then fed wires through by attaching them to a length of stiff wire, (I used an old metal coathanger) which is FAR easier to feel under the dash. They come through HIGH UP under the pass side dash
Fitting pod: With the lid of the tray removed, refit the tray, having bored a small hole in one corner to allow the wire and it's connector to enter. My pod then sits on top, held in place by two blobs of clear silicone on it's underside, again, invisible, but WILL allow it to be removed by force with no damage if necessary.
HTH. Any more questions?
Seriously:
Flap cover: Remove screws. Grasp front edge of base, (it sometimes helps to wrap a cloth through the catch to give more grip), and pull HARD towards you. It will come away with the grilles for the vents as part of it.
I then unscrewed and kept the cover/lid.
Meanwhile, once this is out, you can now see how the drinks holder or cheapo '98 cover
comes out.My control unit is held in place with double sided tape and electricains tape across the top, invisible once fitted
But you WILL have to cut away part of the drinks holder fittings to get it in place....not a problem if it's just a cover, it'l go back, if ever, with clear silicone.Feeding wires through from under bonnet: There are two useful grommets you can use, one where the aircon goes through, (or an un-pierced grommet if no aircon, like cheapo 98 cars
), and one where the clutch/brake pipes come through. I found it slightly easier to get at the one on the n/s, the aircon one. I pierced it with a sharp blade, then fed wires through by attaching them to a length of stiff wire, (I used an old metal coathanger) which is FAR easier to feel under the dash. They come through HIGH UP under the pass side dashFitting pod: With the lid of the tray removed, refit the tray, having bored a small hole in one corner to allow the wire and it's connector to enter. My pod then sits on top, held in place by two blobs of clear silicone on it's underside, again, invisible, but WILL allow it to be removed by force with no damage if necessary.
HTH. Any more questions?

 13 December 2008, 09:02 AM
#12
Scooby Regular
Thread Starter
iTrader: (5)
Join Date: Aug 2008
Posts: 732
Likes: 0
Received 0 Likes
on
0 Posts
<<Sighs>> I might as well come round and do it for you as well
Seriously:
Flap cover: Remove screws. Grasp front edge of base, (it sometimes helps to wrap a cloth through the catch to give more grip), and pull HARD towards you. It will come away with the grilles for the vents as part of it.
I then unscrewed and kept the cover/lid.
Meanwhile, once this is out, you can now see how the drinks holder or cheapo '98 cover comes out.
My control unit is held in place with double sided tape and electricains tape across the top, invisible once fitted But you WILL have to cut away part of the drinks holder fittings to get it in place....not a problem if it's just a cover, it'l go back, if ever, with clear silicone.
Feeding wires through from under bonnet: There are two useful grommets you can use, one where the aircon goes through, (or an un-pierced grommet if no aircon, like cheapo 98 cars), and one where the clutch/brake pipes come through. I found it slightly easier to get at the one on the n/s, the aircon one. I pierced it with a sharp blade, then fed wires through by attaching them to a length of stiff wire, (I used an old metal coathanger) which is FAR easier to feel under the dash. They come through HIGH UP under the pass side dash
Fitting pod: With the lid of the tray removed, refit the tray, having bored a small hole in one corner to allow the wire and it's connector to enter. My pod then sits on top, held in place by two blobs of clear silicone on it's underside, again, invisible, but WILL allow it to be removed by force with no damage if necessary.
HTH. Any more questions?
Seriously:
Flap cover: Remove screws. Grasp front edge of base, (it sometimes helps to wrap a cloth through the catch to give more grip), and pull HARD towards you. It will come away with the grilles for the vents as part of it.
I then unscrewed and kept the cover/lid.
Meanwhile, once this is out, you can now see how the drinks holder or cheapo '98 cover
comes out.My control unit is held in place with double sided tape and electricains tape across the top, invisible once fitted
But you WILL have to cut away part of the drinks holder fittings to get it in place....not a problem if it's just a cover, it'l go back, if ever, with clear silicone.Feeding wires through from under bonnet: There are two useful grommets you can use, one where the aircon goes through, (or an un-pierced grommet if no aircon, like cheapo 98 cars
), and one where the clutch/brake pipes come through. I found it slightly easier to get at the one on the n/s, the aircon one. I pierced it with a sharp blade, then fed wires through by attaching them to a length of stiff wire, (I used an old metal coathanger) which is FAR easier to feel under the dash. They come through HIGH UP under the pass side dashFitting pod: With the lid of the tray removed, refit the tray, having bored a small hole in one corner to allow the wire and it's connector to enter. My pod then sits on top, held in place by two blobs of clear silicone on it's underside, again, invisible, but WILL allow it to be removed by force with no damage if necessary.
HTH. Any more questions?
Thanks for your usefull advice T...
I have actually done this before on a Type R I used to have (pre kids/mortgage etc!!) but the gauges were Autometer one's which were more of a pain to fit as they all needed their own power supply's etc.
I remember undoing the two screws under the tabs for the flap at that time but could'nt figure out how to actually remove the flap, so ended up cutting the hinges for the flap to remove it!
I think I brought the wires in through the clutch side on that occasion and this was tricky so I'll try the other side as you recommended.
Managed to get hold of the old white face defi's and can't wait to see them working....just gotta find the time to fit them round work/kids etc!! frustrating as I've had them for a couple of weeks now!
Thanks for the advice again!

Thread
Thread Starter
Forum
Replies
Last Post
Scott@ScoobySpares
Full Cars Breaking For Spares
61
11 January 2021 03:08 PM
JonMc
Subaru Parts
22
06 February 2016 09:50 PM
blockhead
Subaru Parts
19
07 November 2015 11:50 PM
Mattybr5@MB Developments
Full Cars Breaking For Spares
20
22 October 2015 06:12 AM

