
Jimbobs engine rebuild thread

So my Kit is
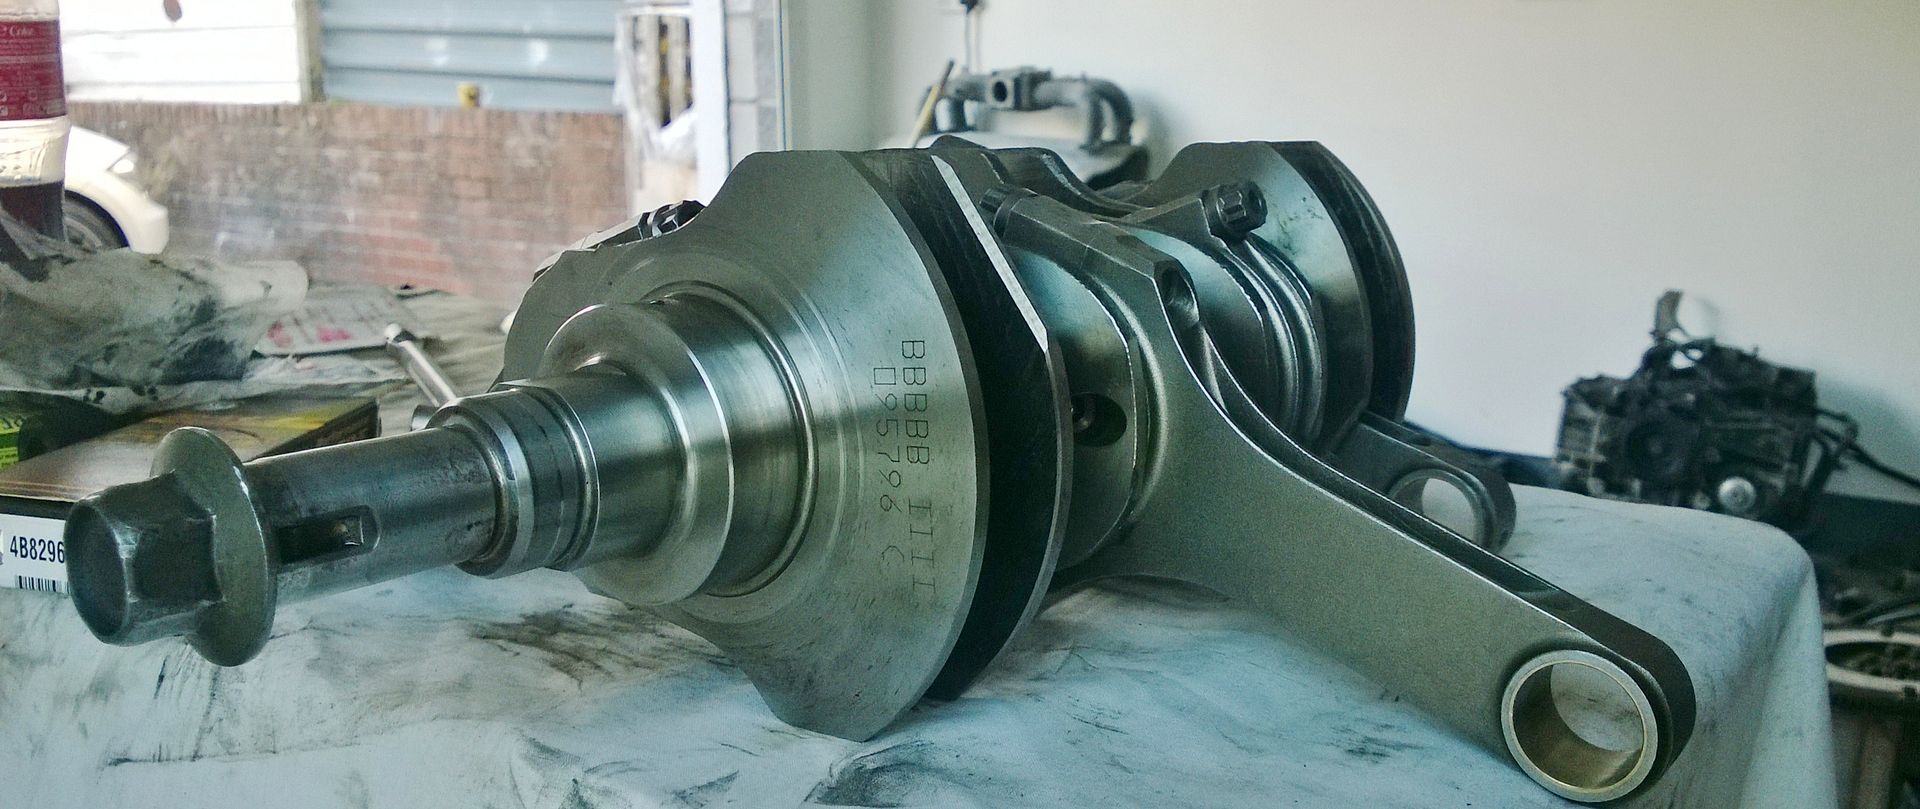
Mains - - - 5M8297 H. Standard Size.
Big End - - 4B8296 H. Standard Size.
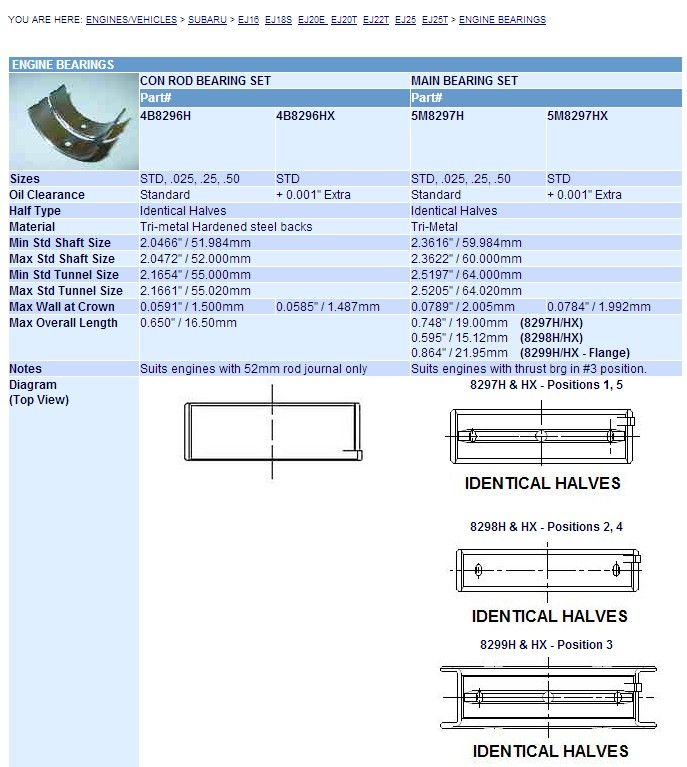
Mains - - - 5M8297 H. Standard Size.
Big End - - 4B8296 H. Standard Size.

Its all straight forward, just having somewhere to do it, and instructions are all anyone needs.
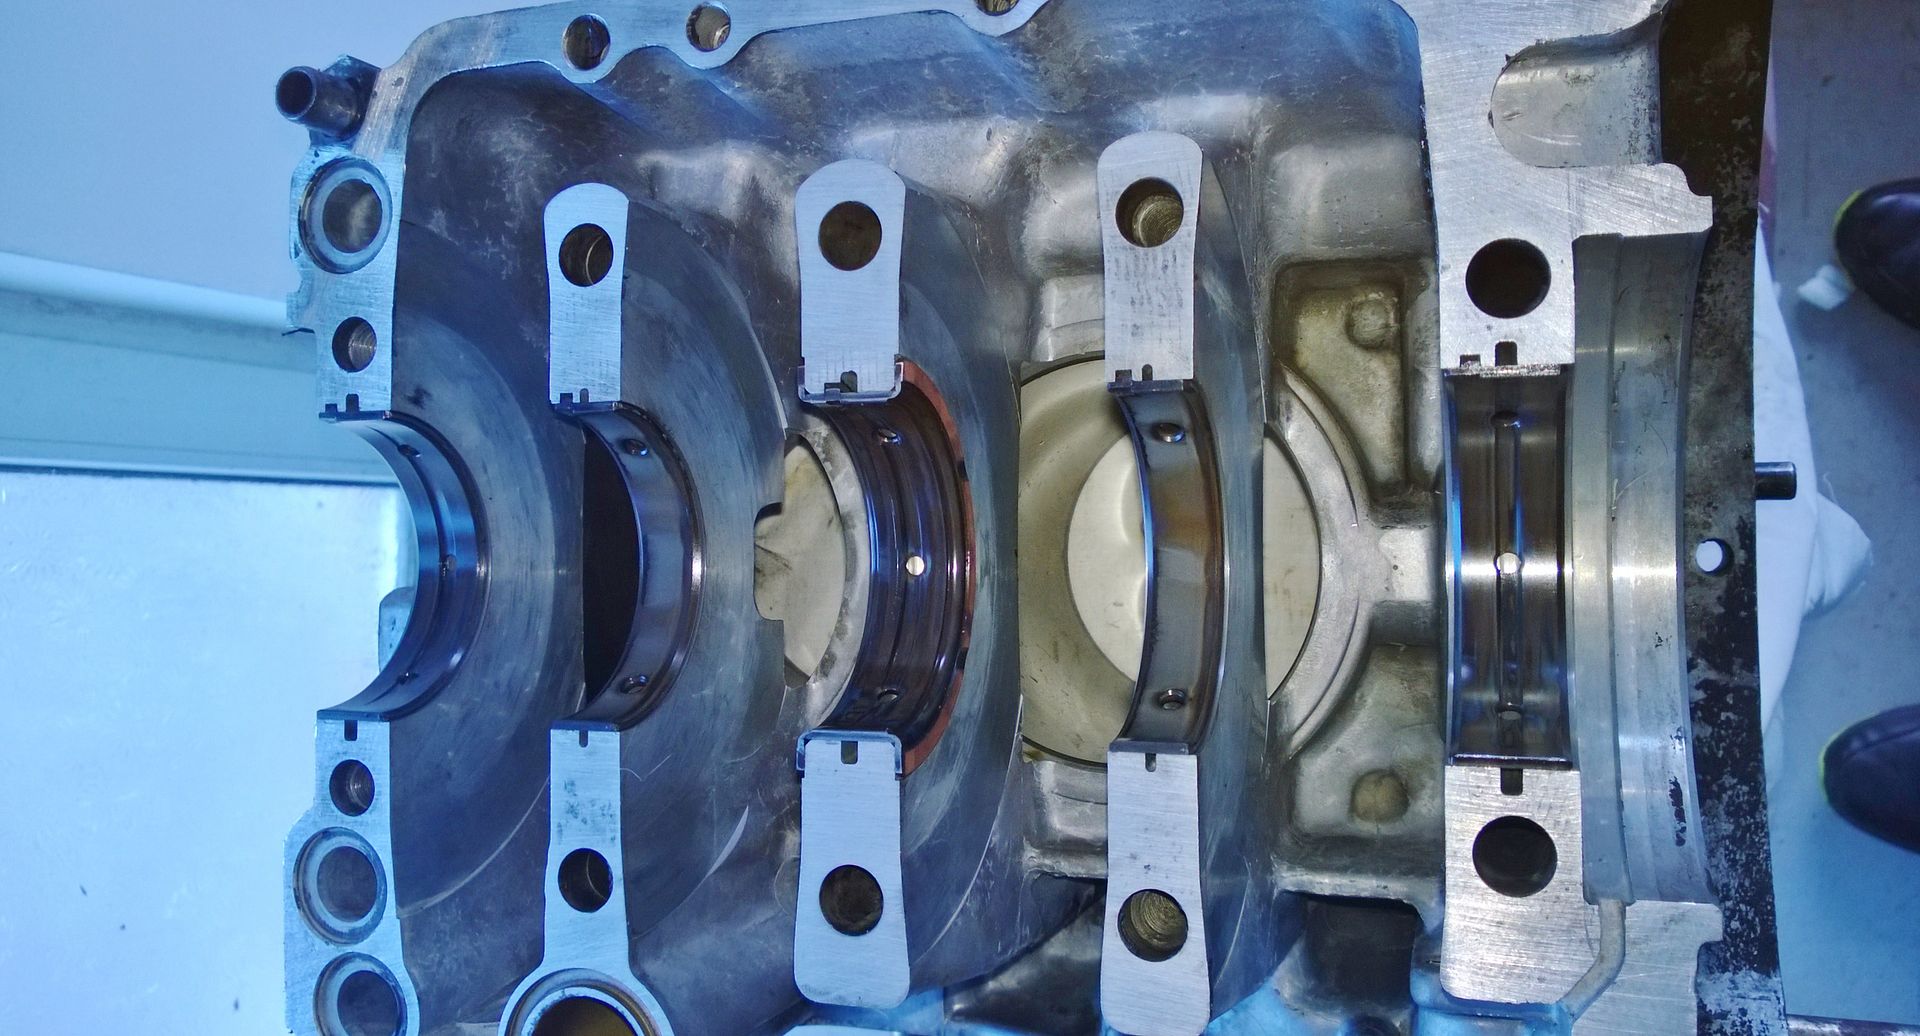
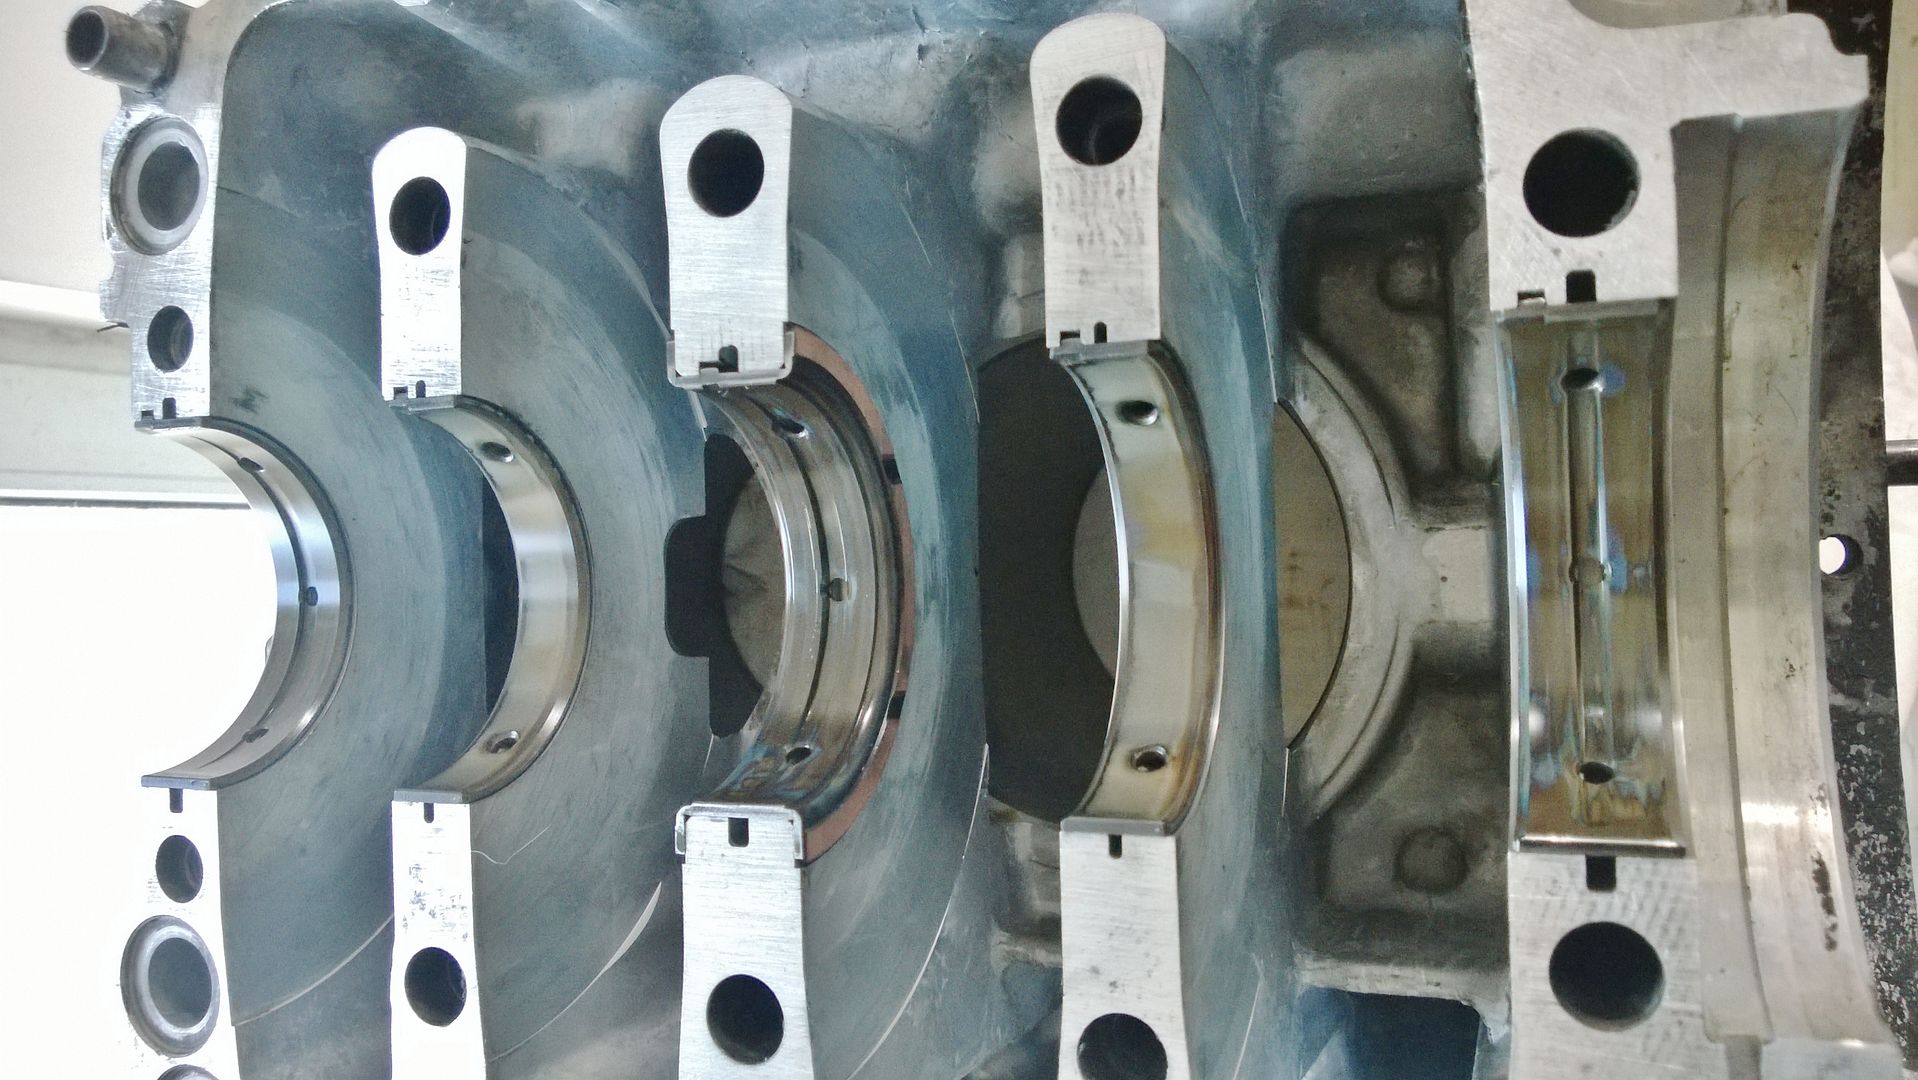
Anyways here's my pics from today, all plastigauged to correct tolerances/clearances and then torqued down, then rechecked.
Prior to this there was a couple of marks on the crank that I had to polish off, using 1000grit paper, but sorted now

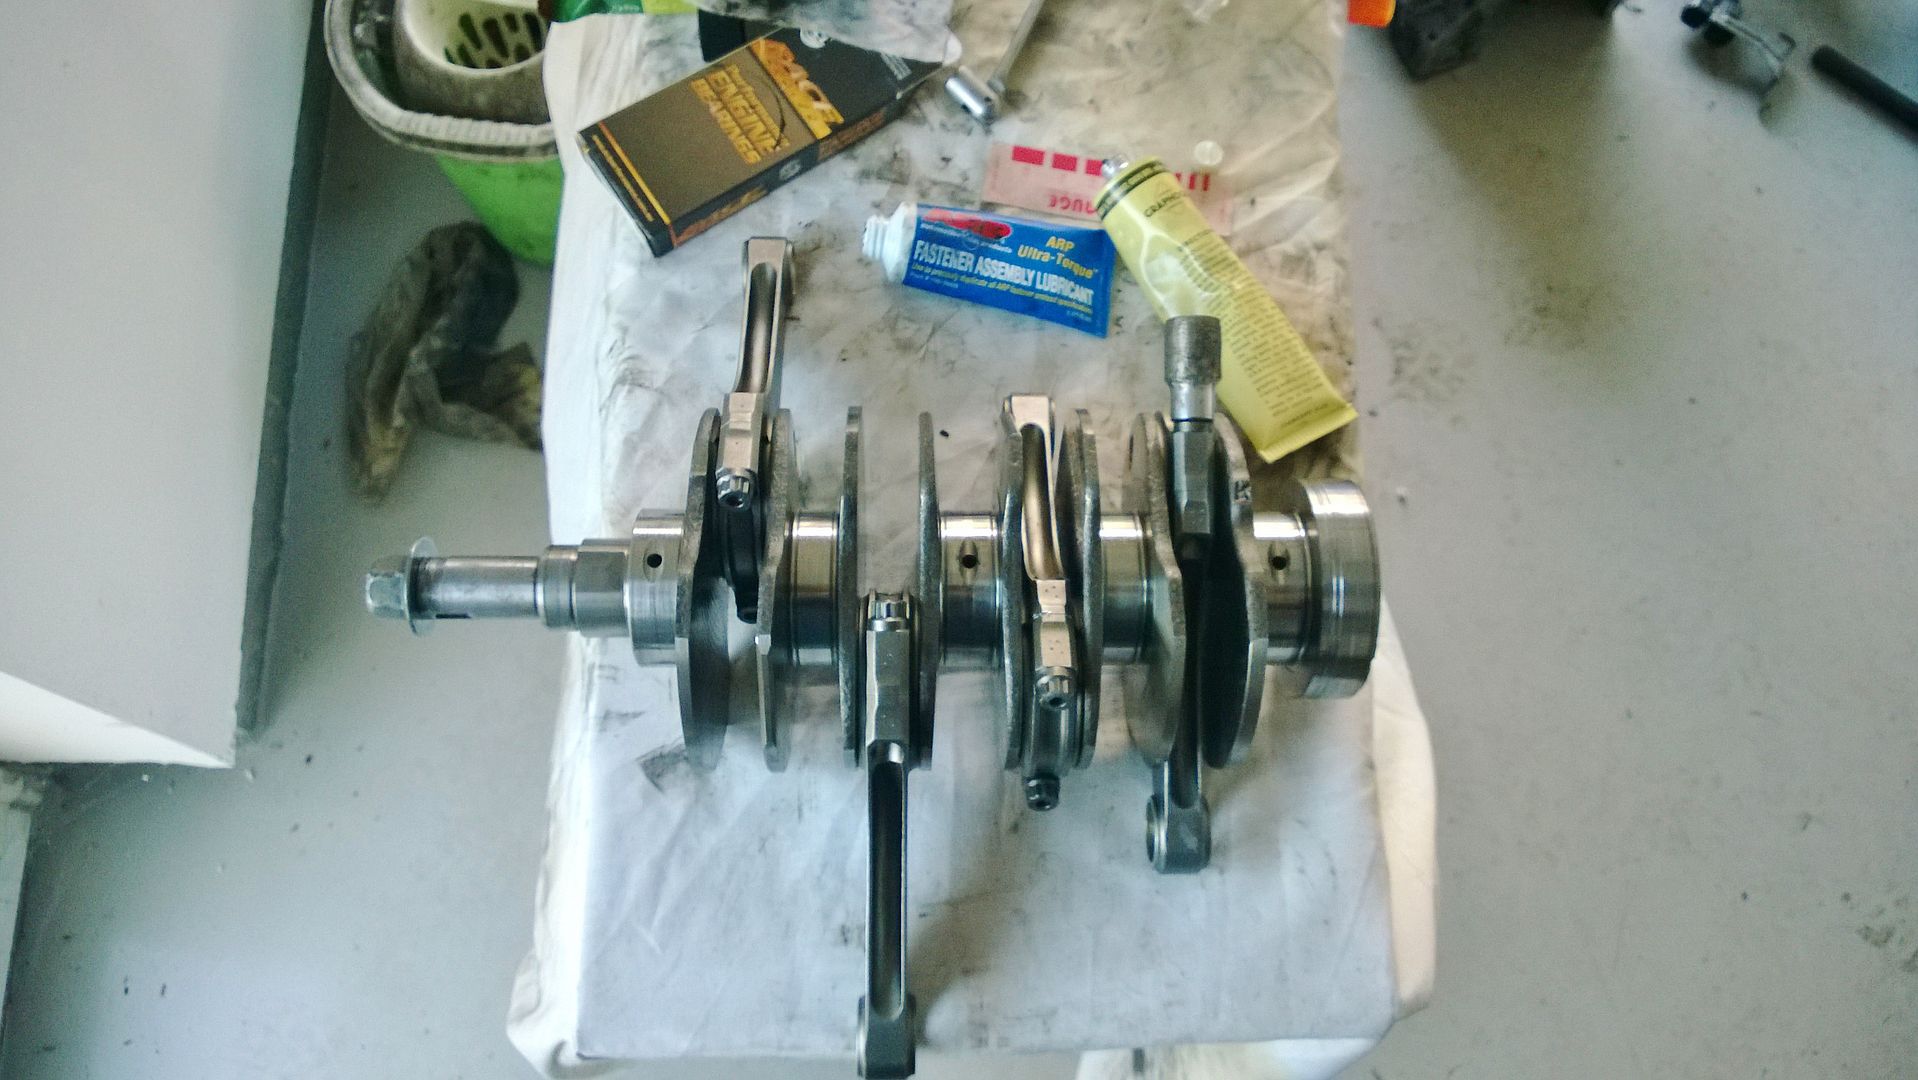
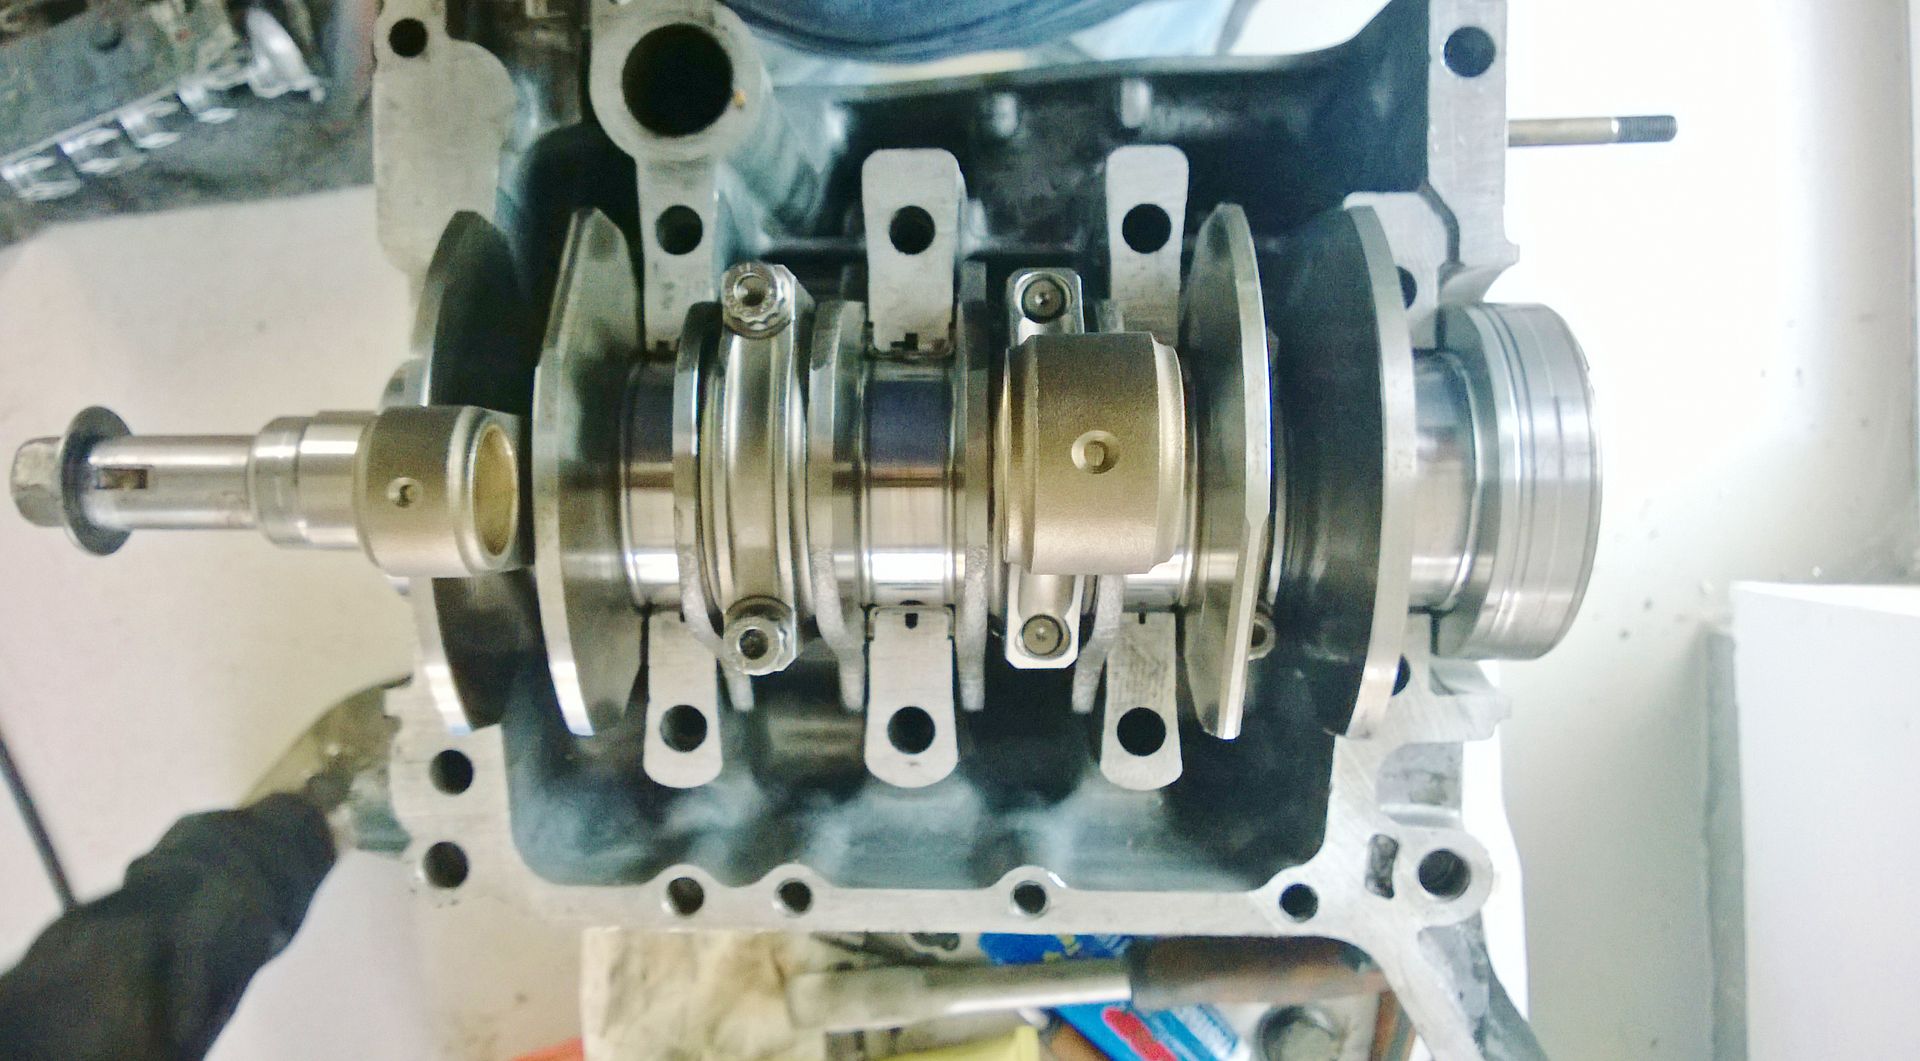
Crank assembled first, ARP Bolts torqued and platigauged, then checked for stretch, all within limits to lubed up with Graphogen paste, and assembled up using ARP Moly Lube.
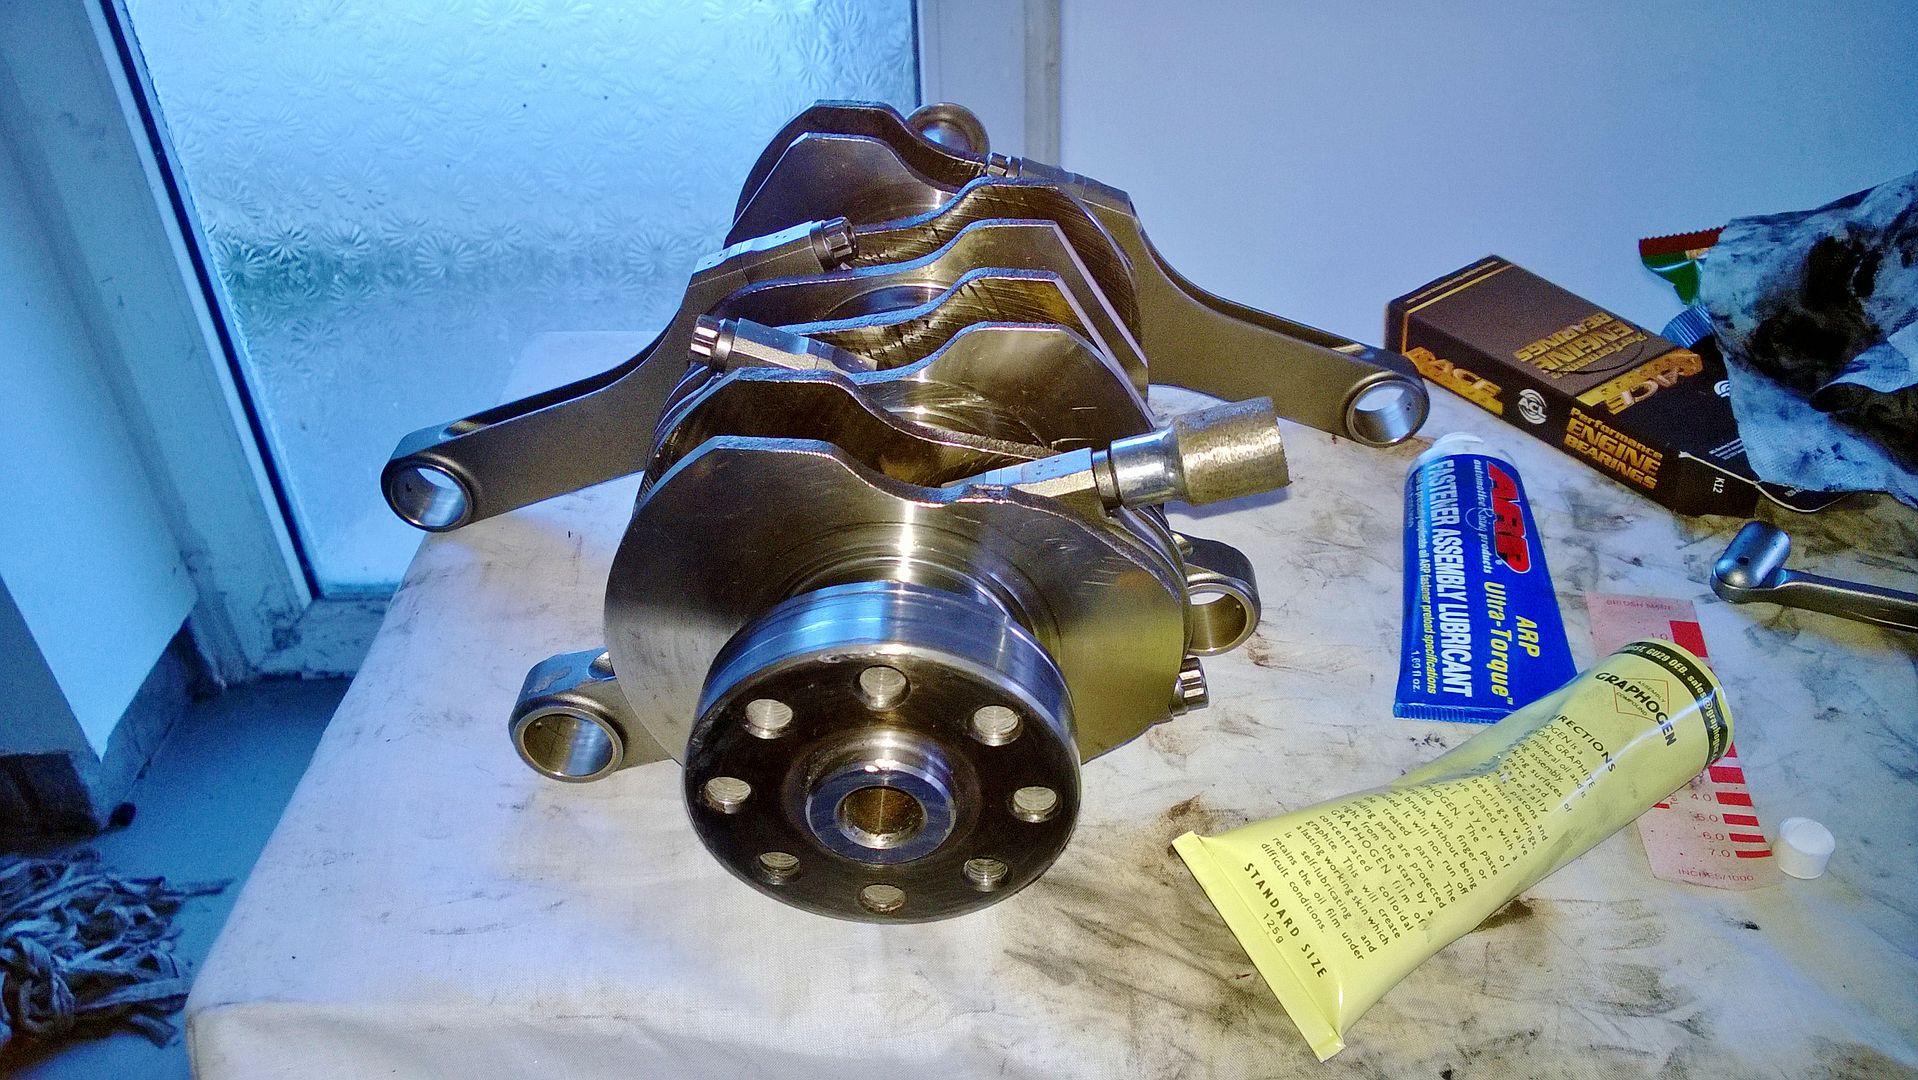
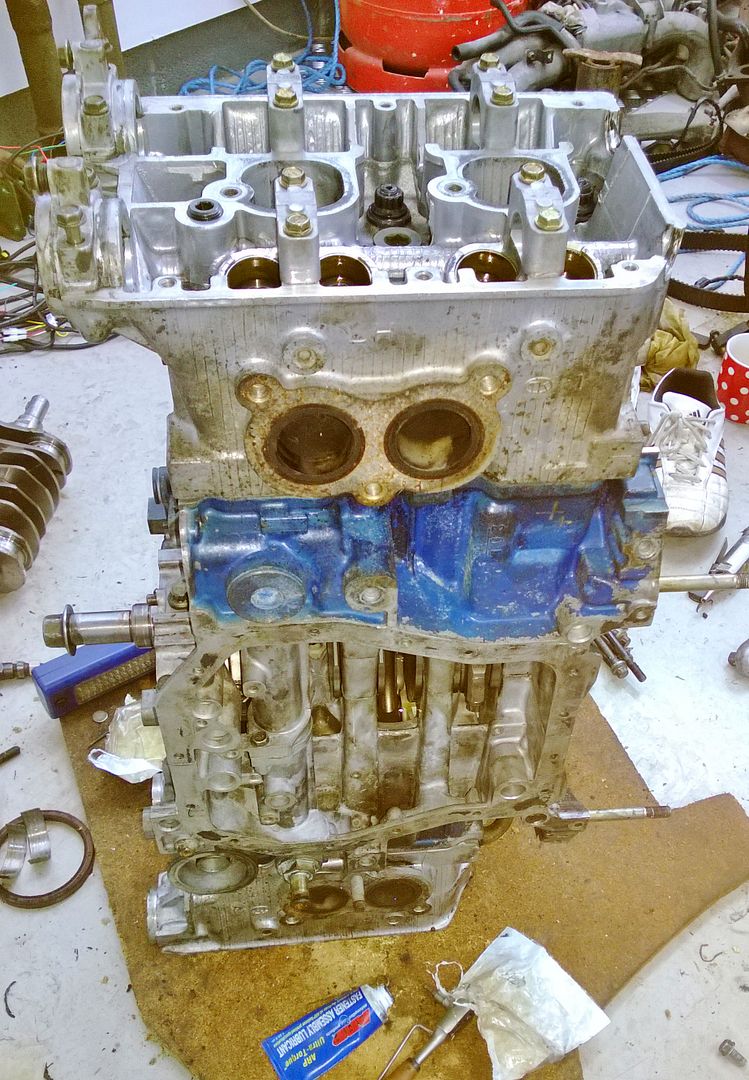
Then block assembled, all platigauged up and all bar the centre bearing journal were identical, the centre was a 1/4 thousandth greater clearance than the rest but all within spec. All bolts had new dowty washers, and fitted using ARP Moly Lube. New rubber seals for oil and water passages, and siliconed up the two halves, making sure under spread the bearings would not have had silicon near.
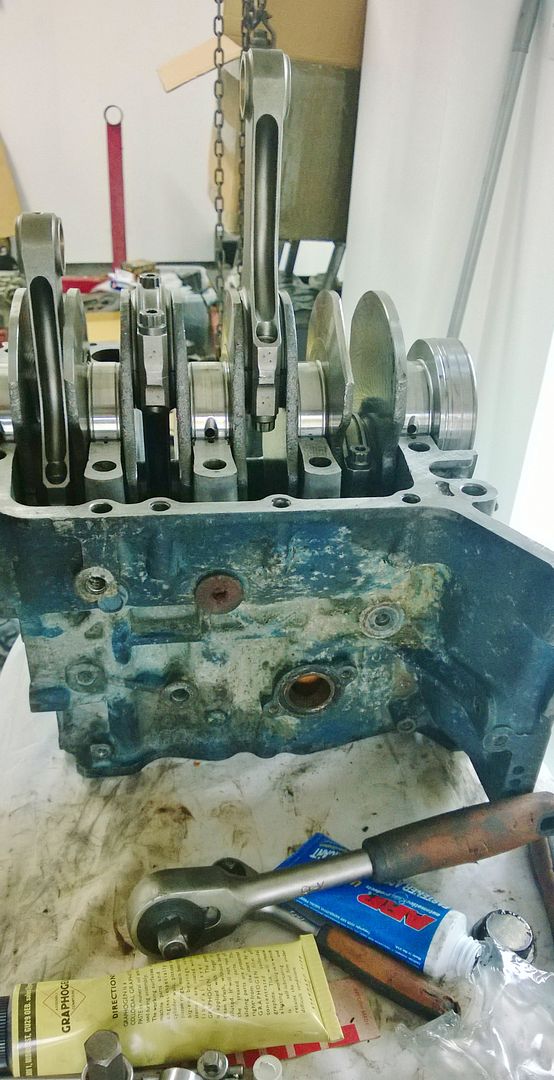


So tomorrow now I'll recheck torque, and then move onto the head install
Anyways here's my pics from today, all plastigauged to correct tolerances/clearances and then torqued down, then rechecked.
Prior to this there was a couple of marks on the crank that I had to polish off, using 1000grit paper, but sorted now
Crank assembled first, ARP Bolts torqued and platigauged, then checked for stretch, all within limits to lubed up with Graphogen paste, and assembled up using ARP Moly Lube.
Then block assembled, all platigauged up and all bar the centre bearing journal were identical, the centre was a 1/4 thousandth greater clearance than the rest but all within spec. All bolts had new dowty washers, and fitted using ARP Moly Lube. New rubber seals for oil and water passages, and siliconed up the two halves, making sure under spread the bearings would not have had silicon near.
So tomorrow now I'll recheck torque, and then move onto the head install

Scooby Regular
iTrader: (6)
Joined: Aug 2007
Posts: 2,260
Likes: 0
From: Llanelli with a spanner in my hand!
Onwards and upwards! It's a shame you couldn't get the block cleaned and remove that blue paint, but a quick mist with some high temp should tidy it up. You should have a long block by the end of tomorrow then?
I agree about the paint, have a can of engine blue enamel here

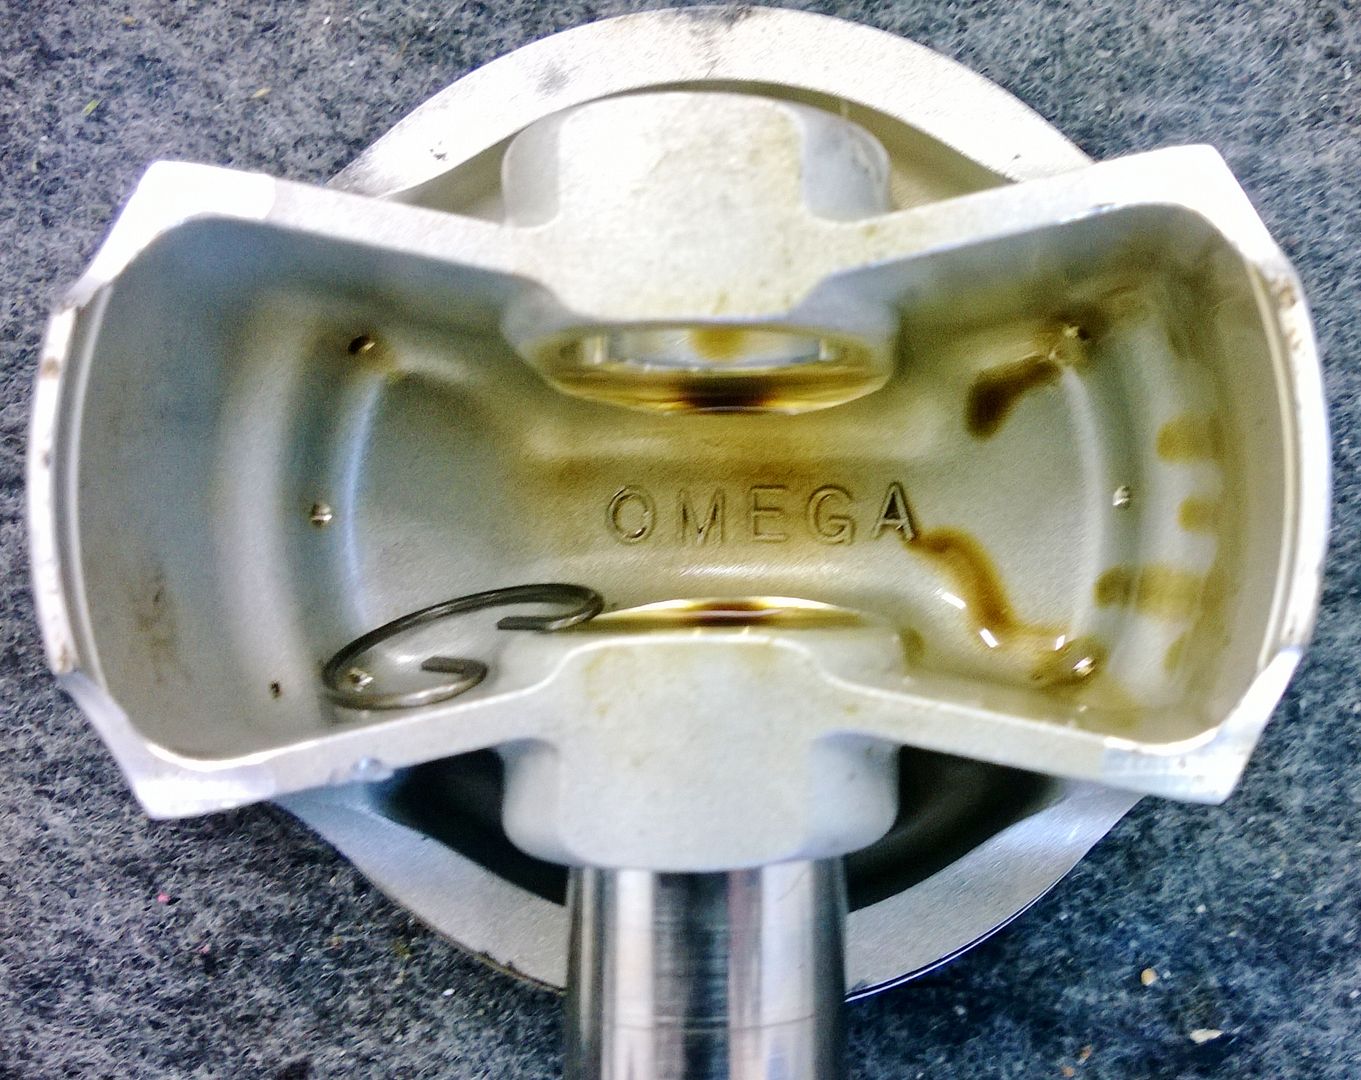
No didn't in the end as the machinist (who did the block and heads) said they were fine, and the rings are all in good nick and all within tolerances, so they will be going back in their own cylinders as I marked them all up.
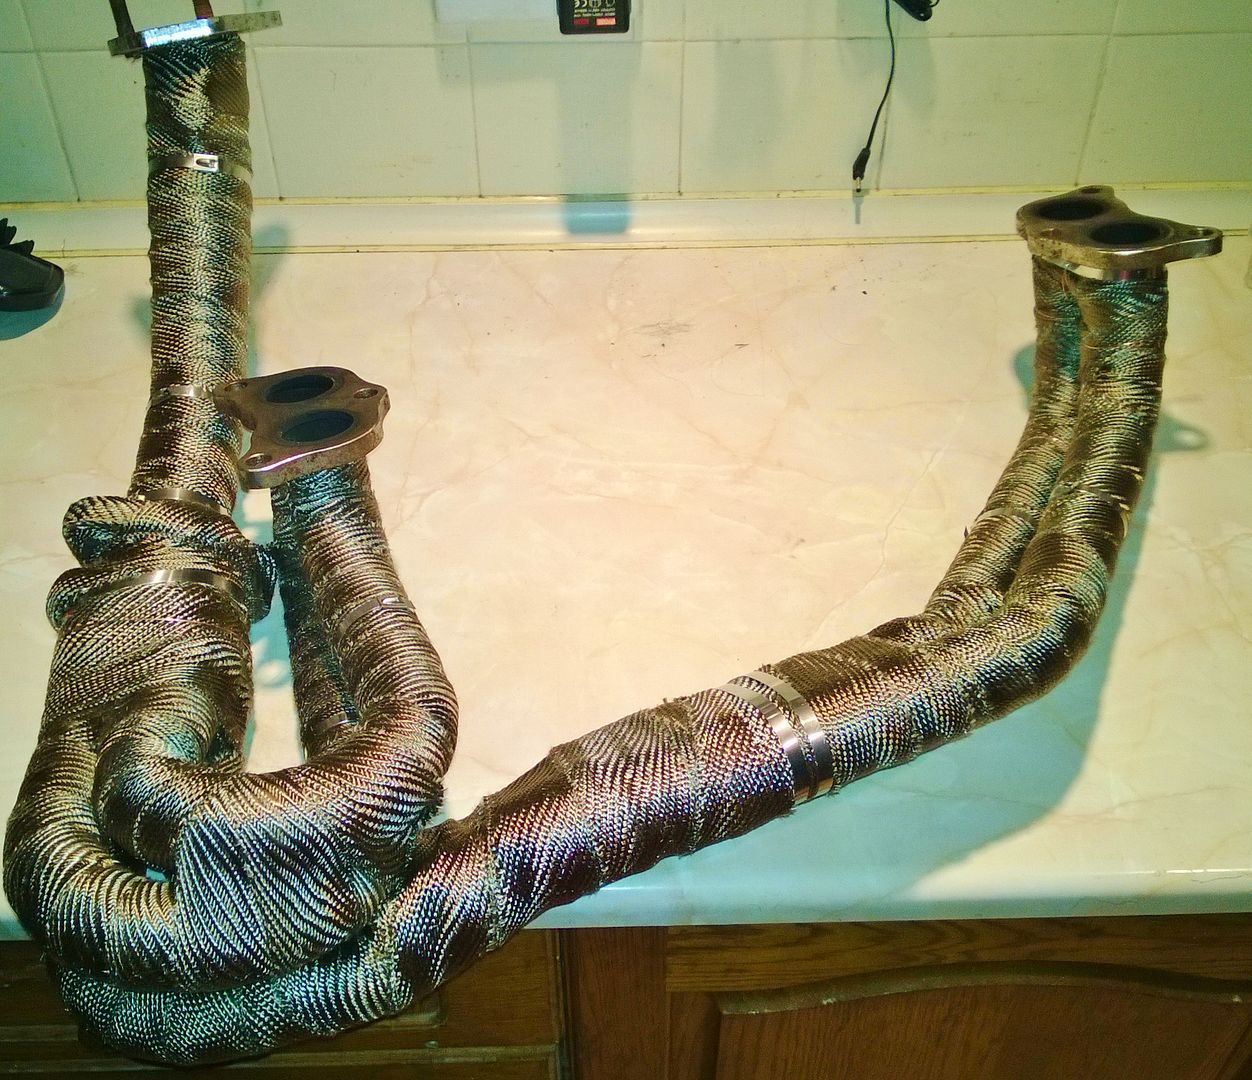
Recognise these?? They are your old one piece manifolds
Last edited by Jimbob; Sep 18, 2013 at 10:08 PM.
Yes they were my old 2 bolt flange ones on my 2ltr before I built my forged 2.5 then i went for a 3 bolt , nice wrapping of them jim they look great
Last edited by The Stitcher; Sep 18, 2013 at 10:43 PM.
But have to sort the studs out as most are missing, but have new ones.
Wonder how much they will change the sound, and spool??
Scooby Regular
Joined: Jun 2009
Posts: 50
Likes: 0
From: Merthyr Tydfil
Awesome work so wish I could do my scooby it's got a big end knock I'm gutted and it's been sitting on my drive for 4 weeks now its a 2002 WRX bugeye can anyone recommended a engine rebuilder in the South Wales area? Or any one fancy doing it? Any help would be great cheers
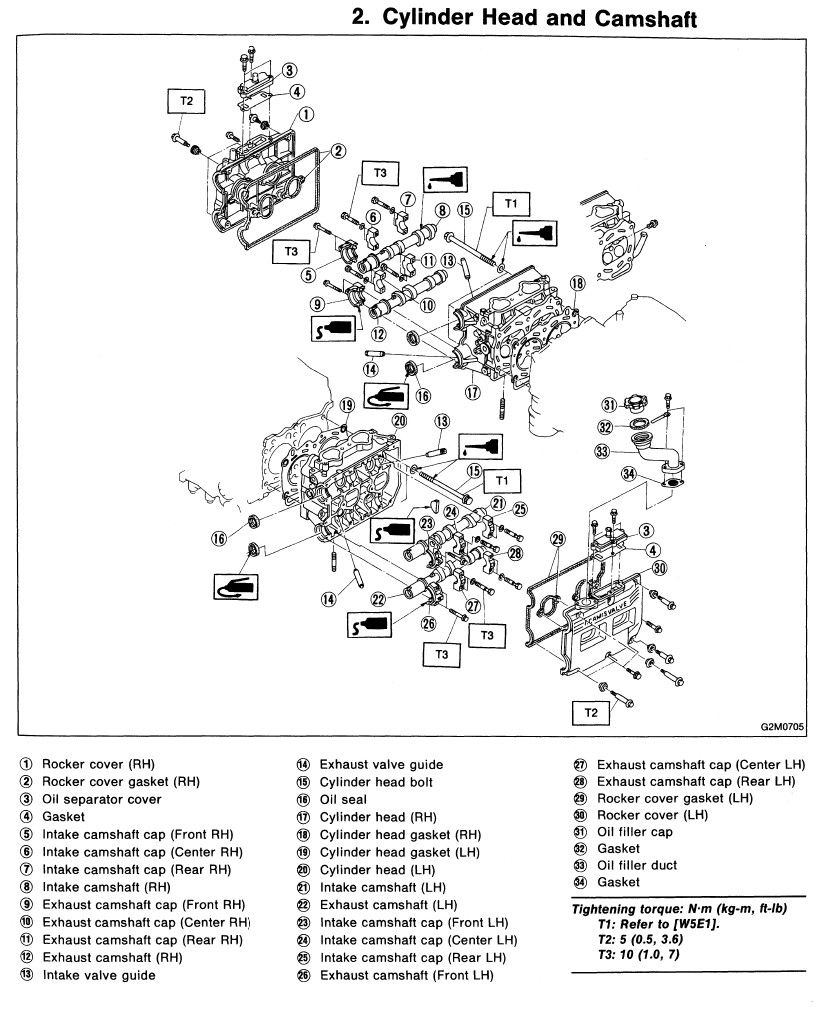
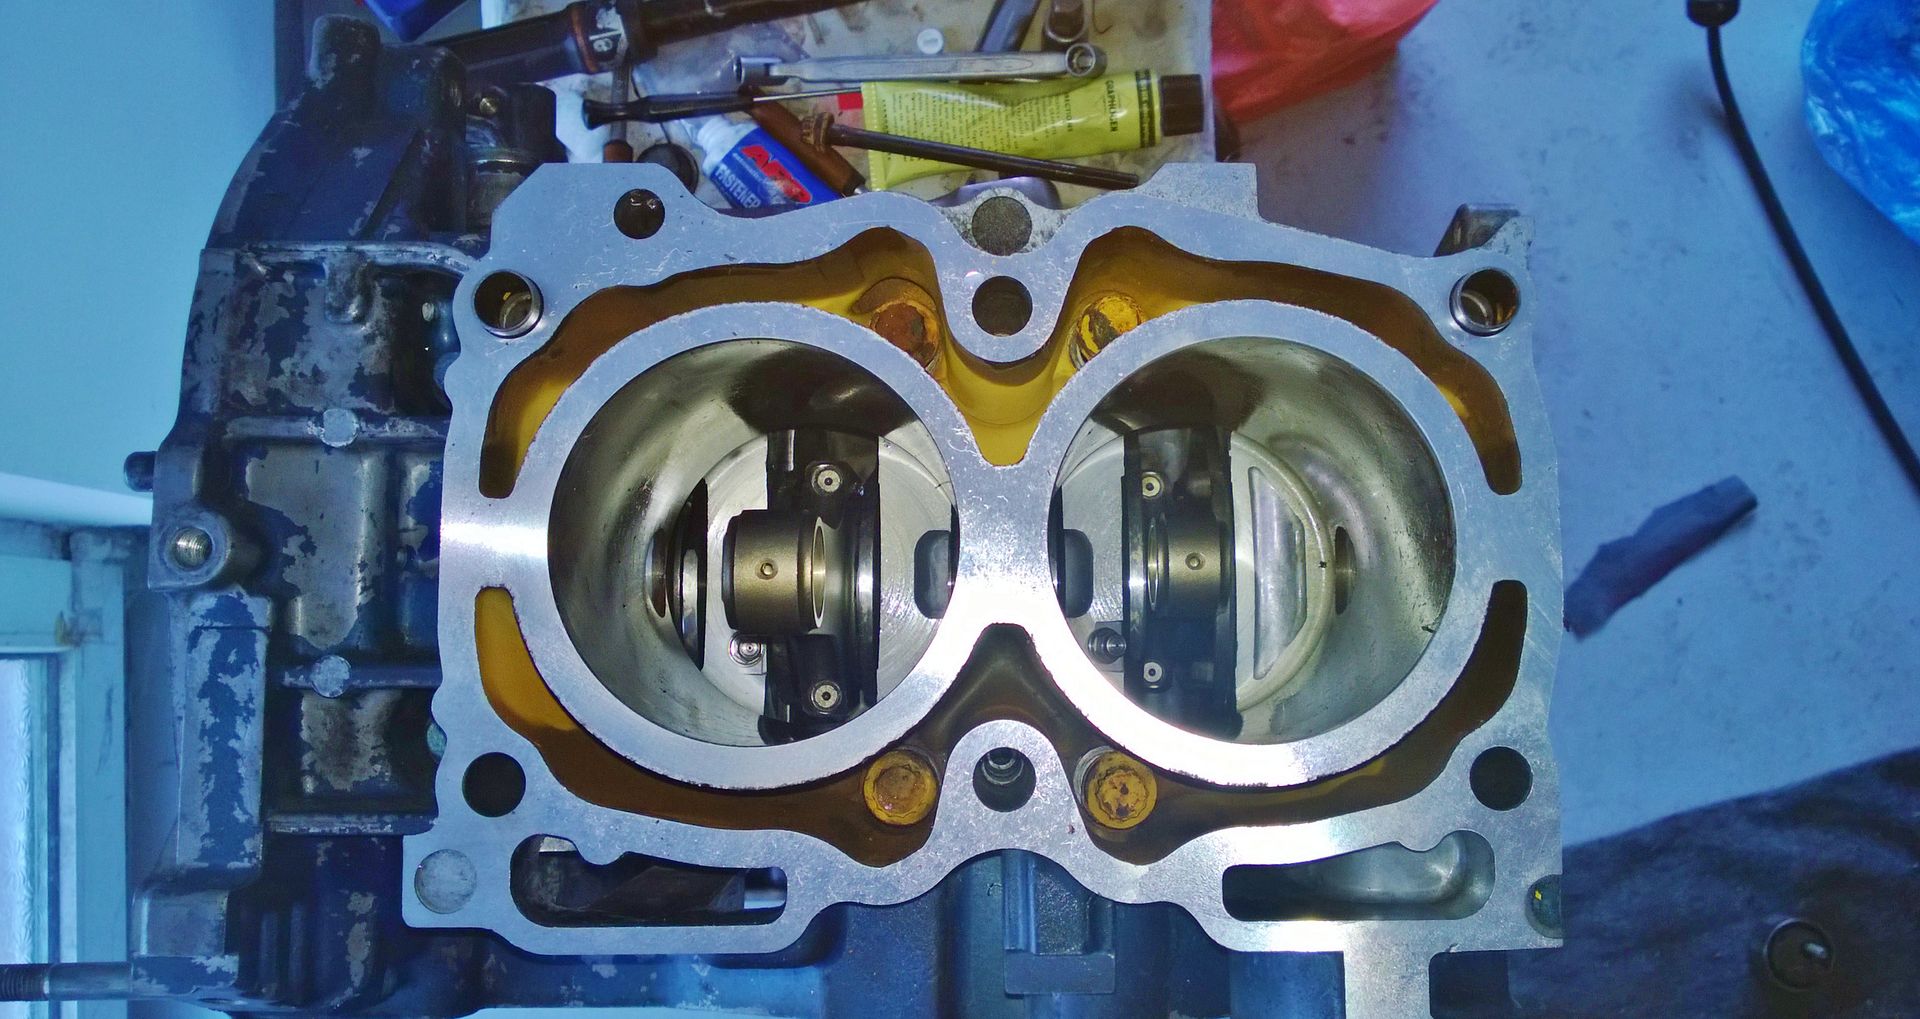
Right progress of today,took about an hour to do the gudgeon pins, as they were being a barsteward, but they are in now. All circlips are nicely in and checked to make sure there was spread, and they are in fully.

The head bolts were also fitted with ARP Moly Lube, and bottomed out by hand, and a 1/4 drive allen key on a rachet (found instructions on NASIOC where they stated that they needed to be bottomed out first), head gasket was then fitted over onto the cleaned face of the block, then head cleaned and placed over.


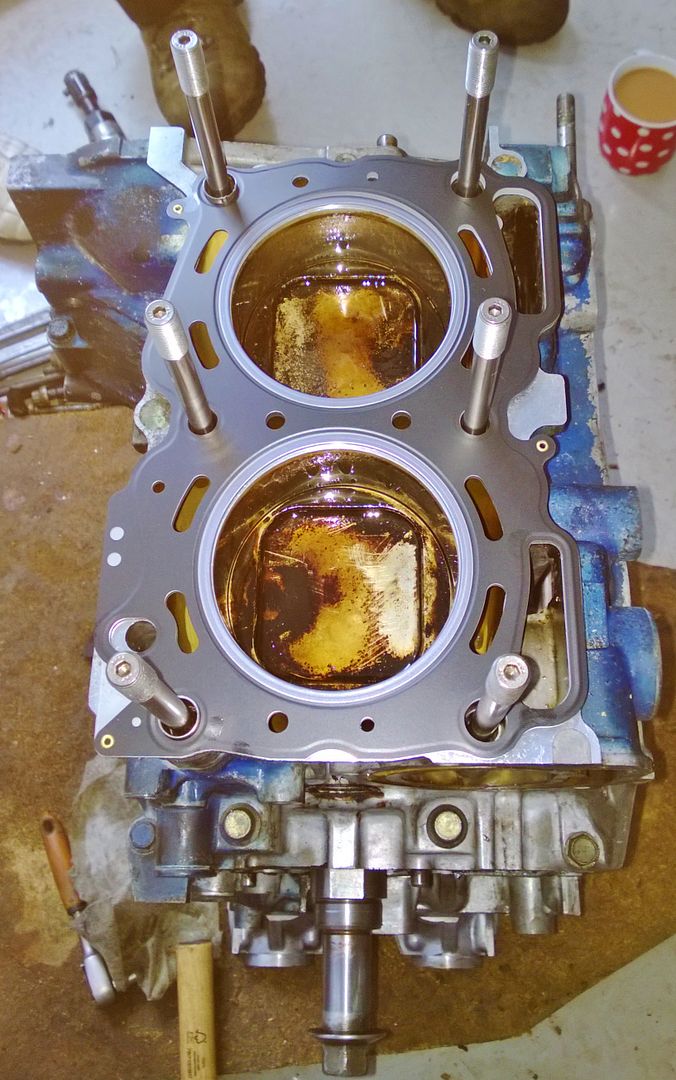
The next was a bit of a discussion, as ARP have initially listed 75ftlb with APR Moly Lube, then revised this to 90ftlb. BUT after a long look around on here and NASIOC and came to the conclusion that (from a LOT of threads) that 30lb ft in sequence, then 60ftlb in sequence, and then 90ftlb in sequence as per ARP sequence. BUT the inner 2 go to 95ftlb, this seemed to be the recommended procedure from multiple failures on the NASIOC site, so they are done. The whole procedure of slackening off is not done on the head studs, but tightening up in 3 equal phases, I have done enough reading around on the ARP Head Studs to take the common accepted methods from various makes and models, and they ALL say NOT To slacken off. As that procedure is for the standard stretch bolts, as you tighten them up they stretch (this will NOT give a correct torque figure), slackening them off will keep this stretch, and you can torque down correctly when the bolt is under its stretched condition. As the ARP studs don't stretch the same (at all), so require the different technique
Also the head studs will sit at slightly different levels due to the castings used, as each stud is bottomed out and the torqued down. The discrepancy with height, is just due to the depth of the castings, as Subaru never intended the standard bolts to bottom out in this manner, so that will explain the slightly differing thread heights. The main thing they suggested was that the studs were bottomed out, and that they were sitting straight (which mine were).

I will be going back tomorrow to finish the setup, but first job is to recheck the torque.
I am so glad I bought a tube of APR Moly Lube, as I've used it on all the case bolts, the head studs, the head stud washers, and the nuts, and makes it MUCH easier to use than a sachet. I also use Graphogen paste to help slide the gudgeon pins into place.
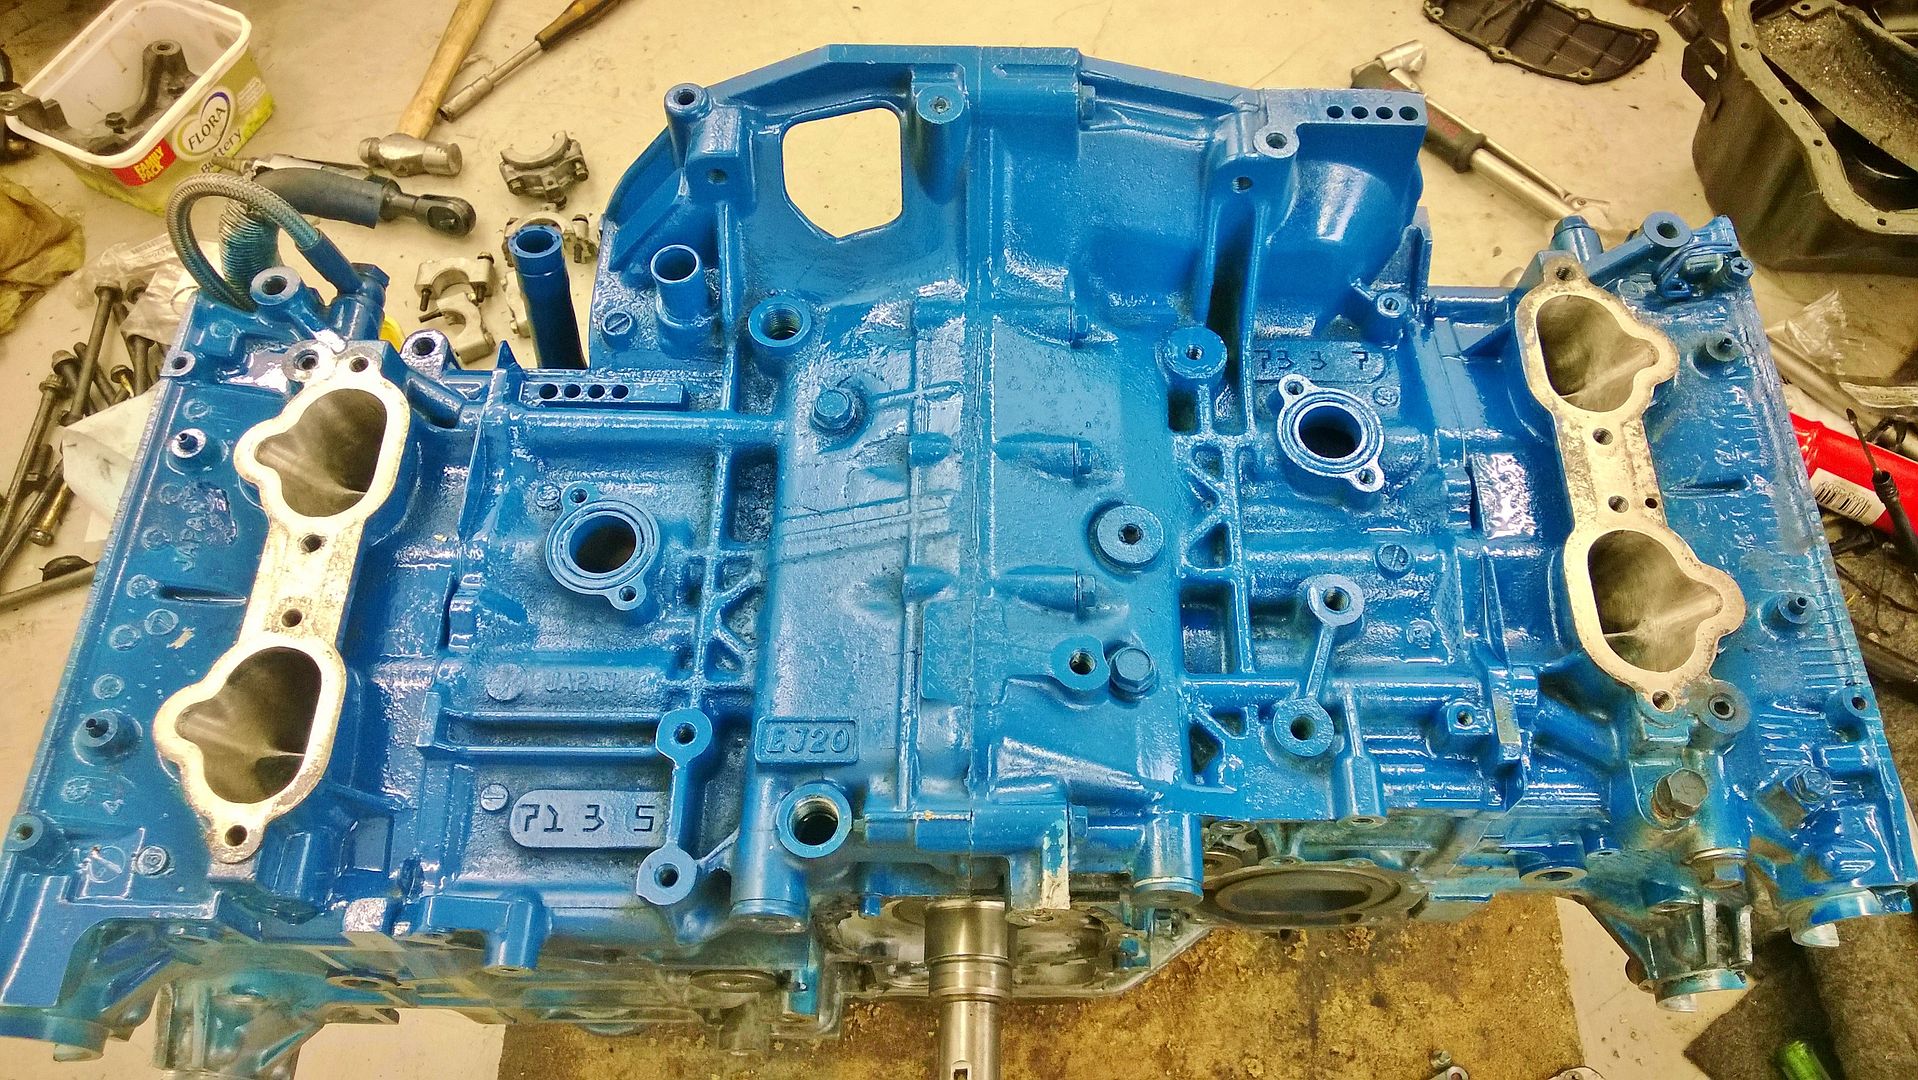
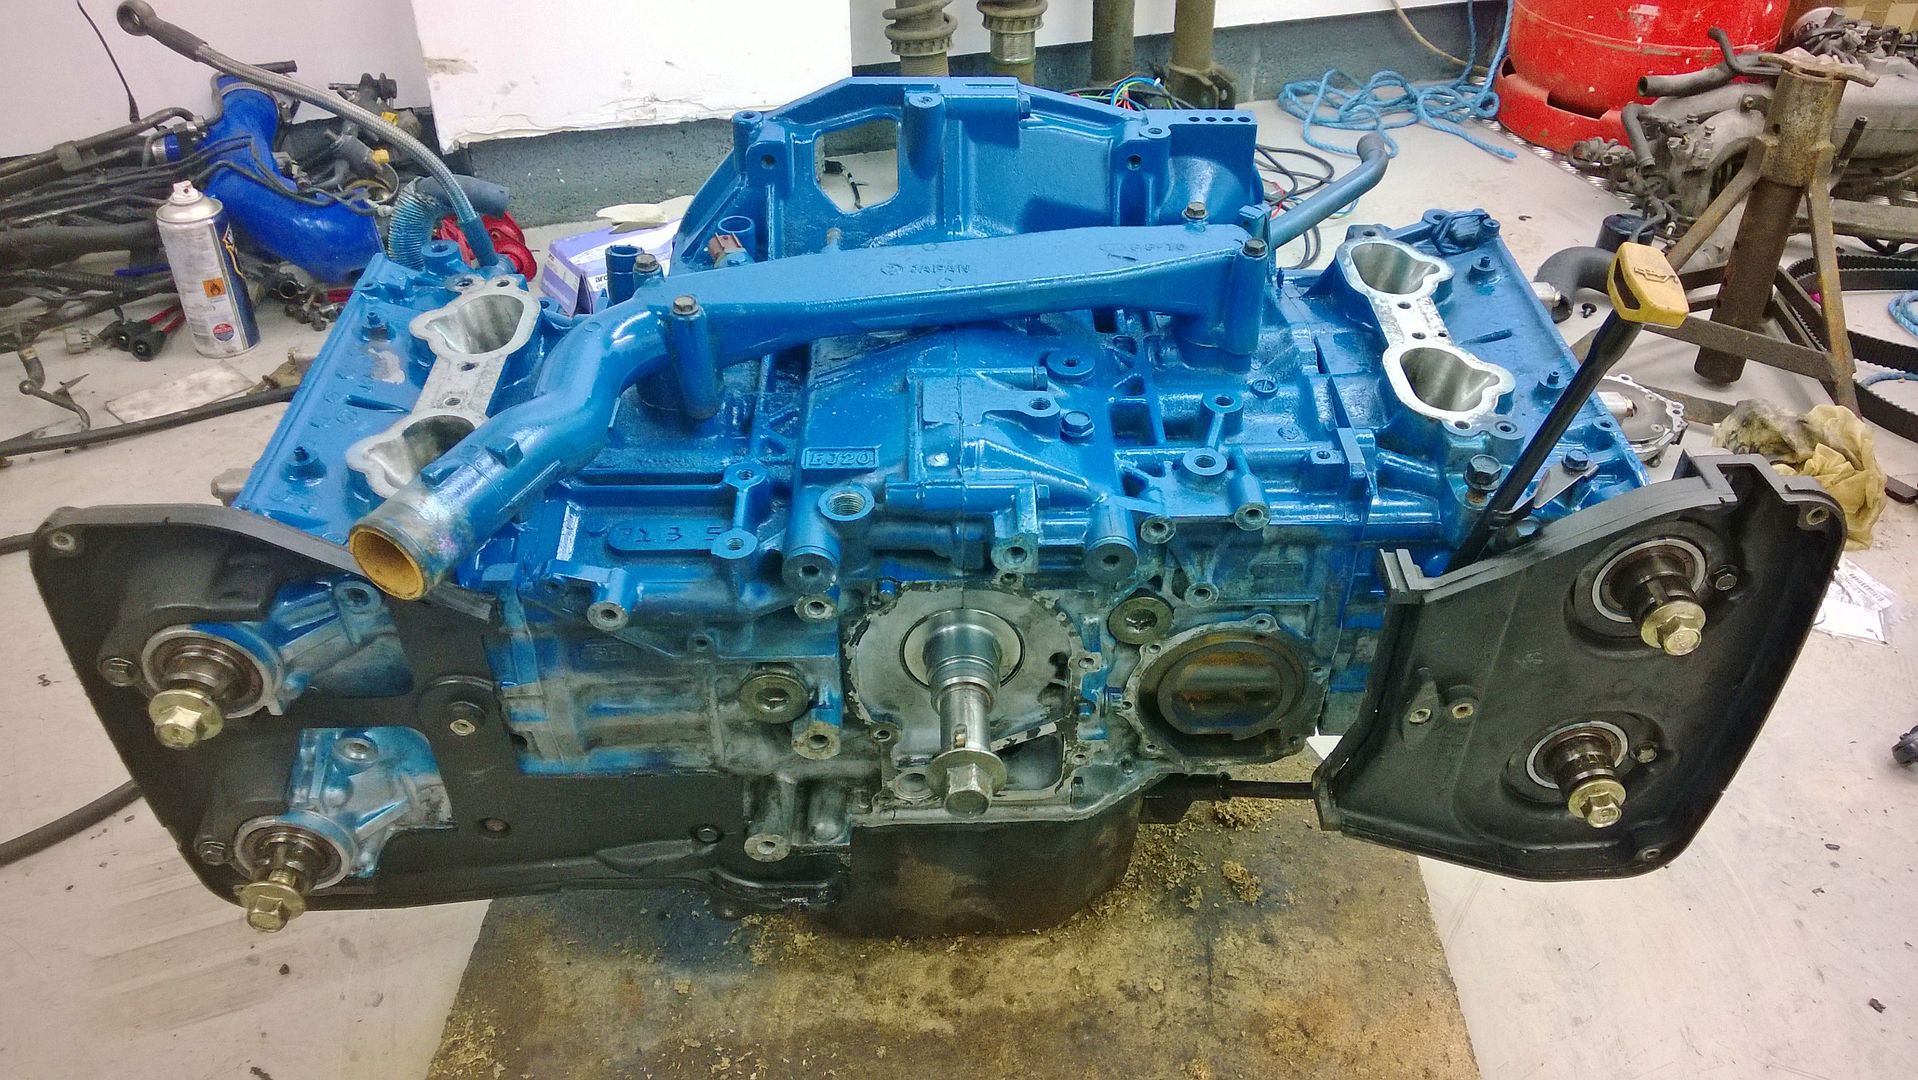
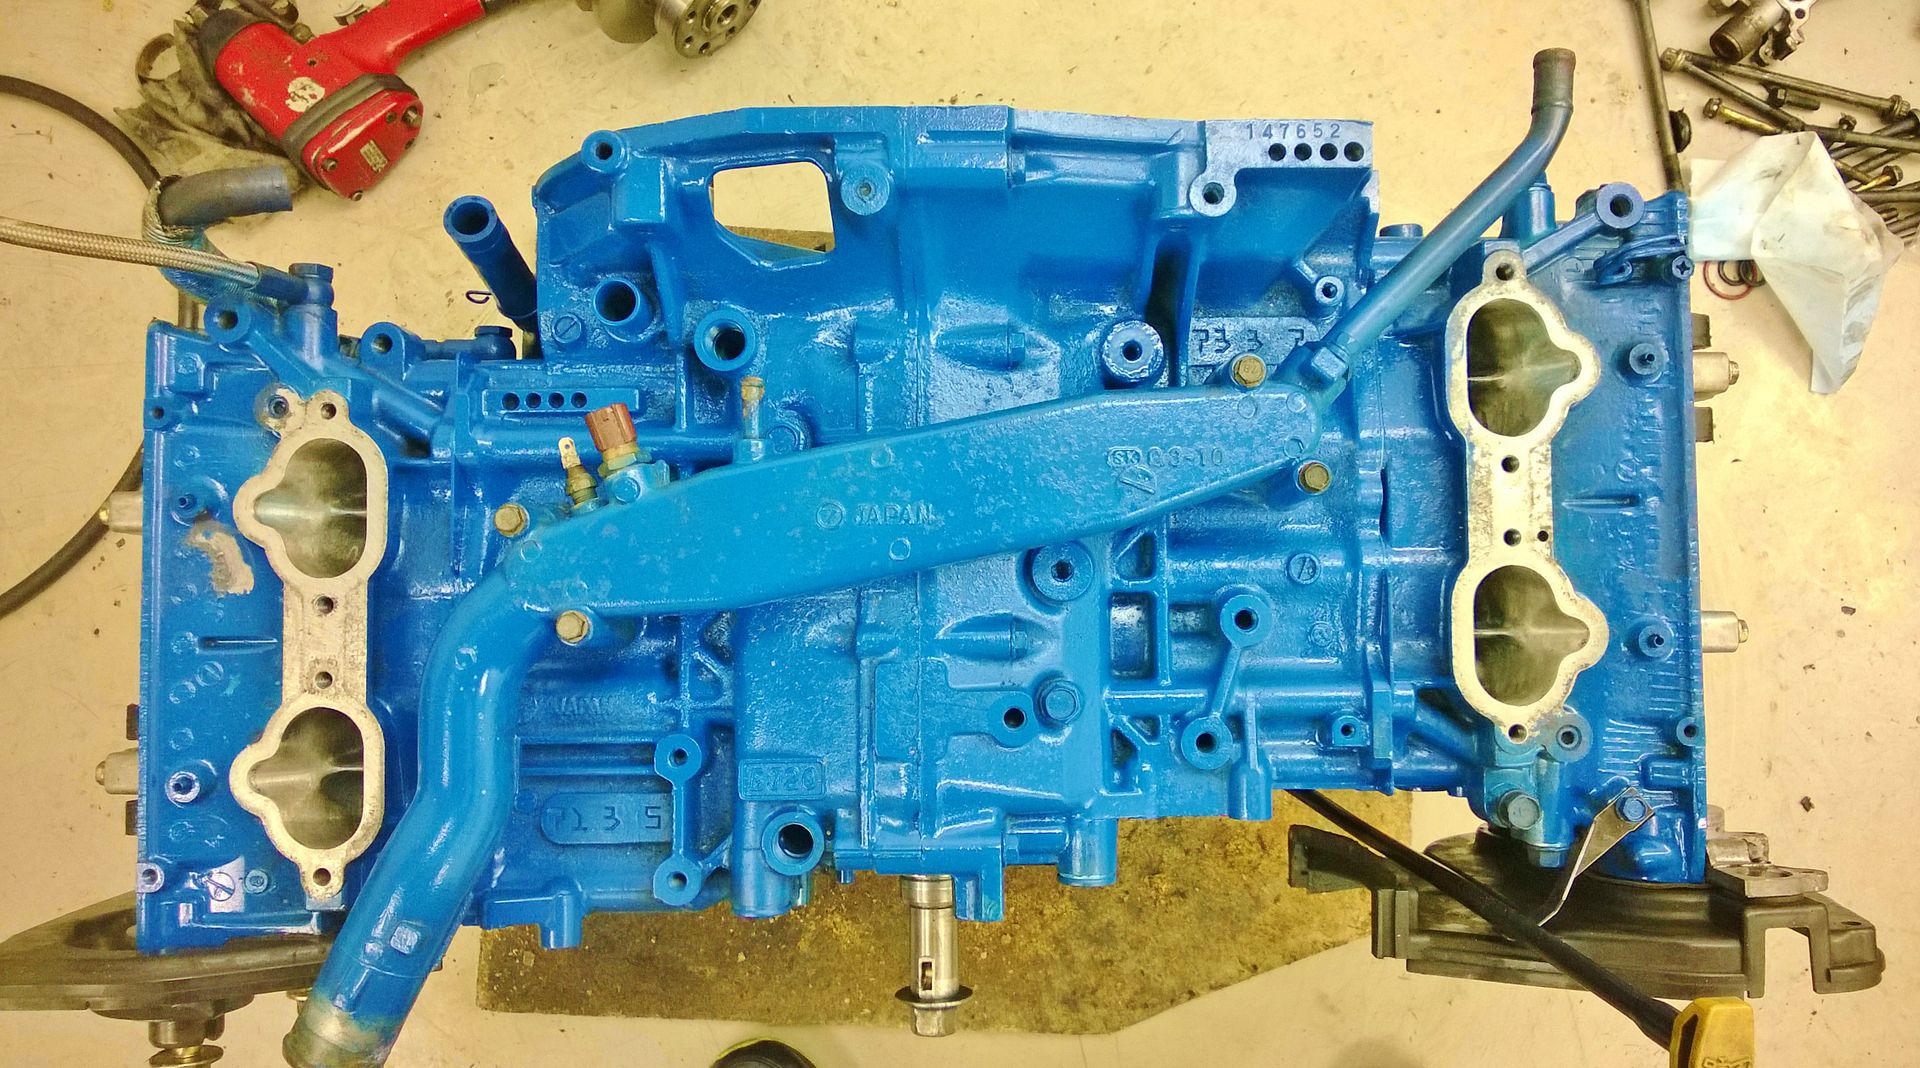
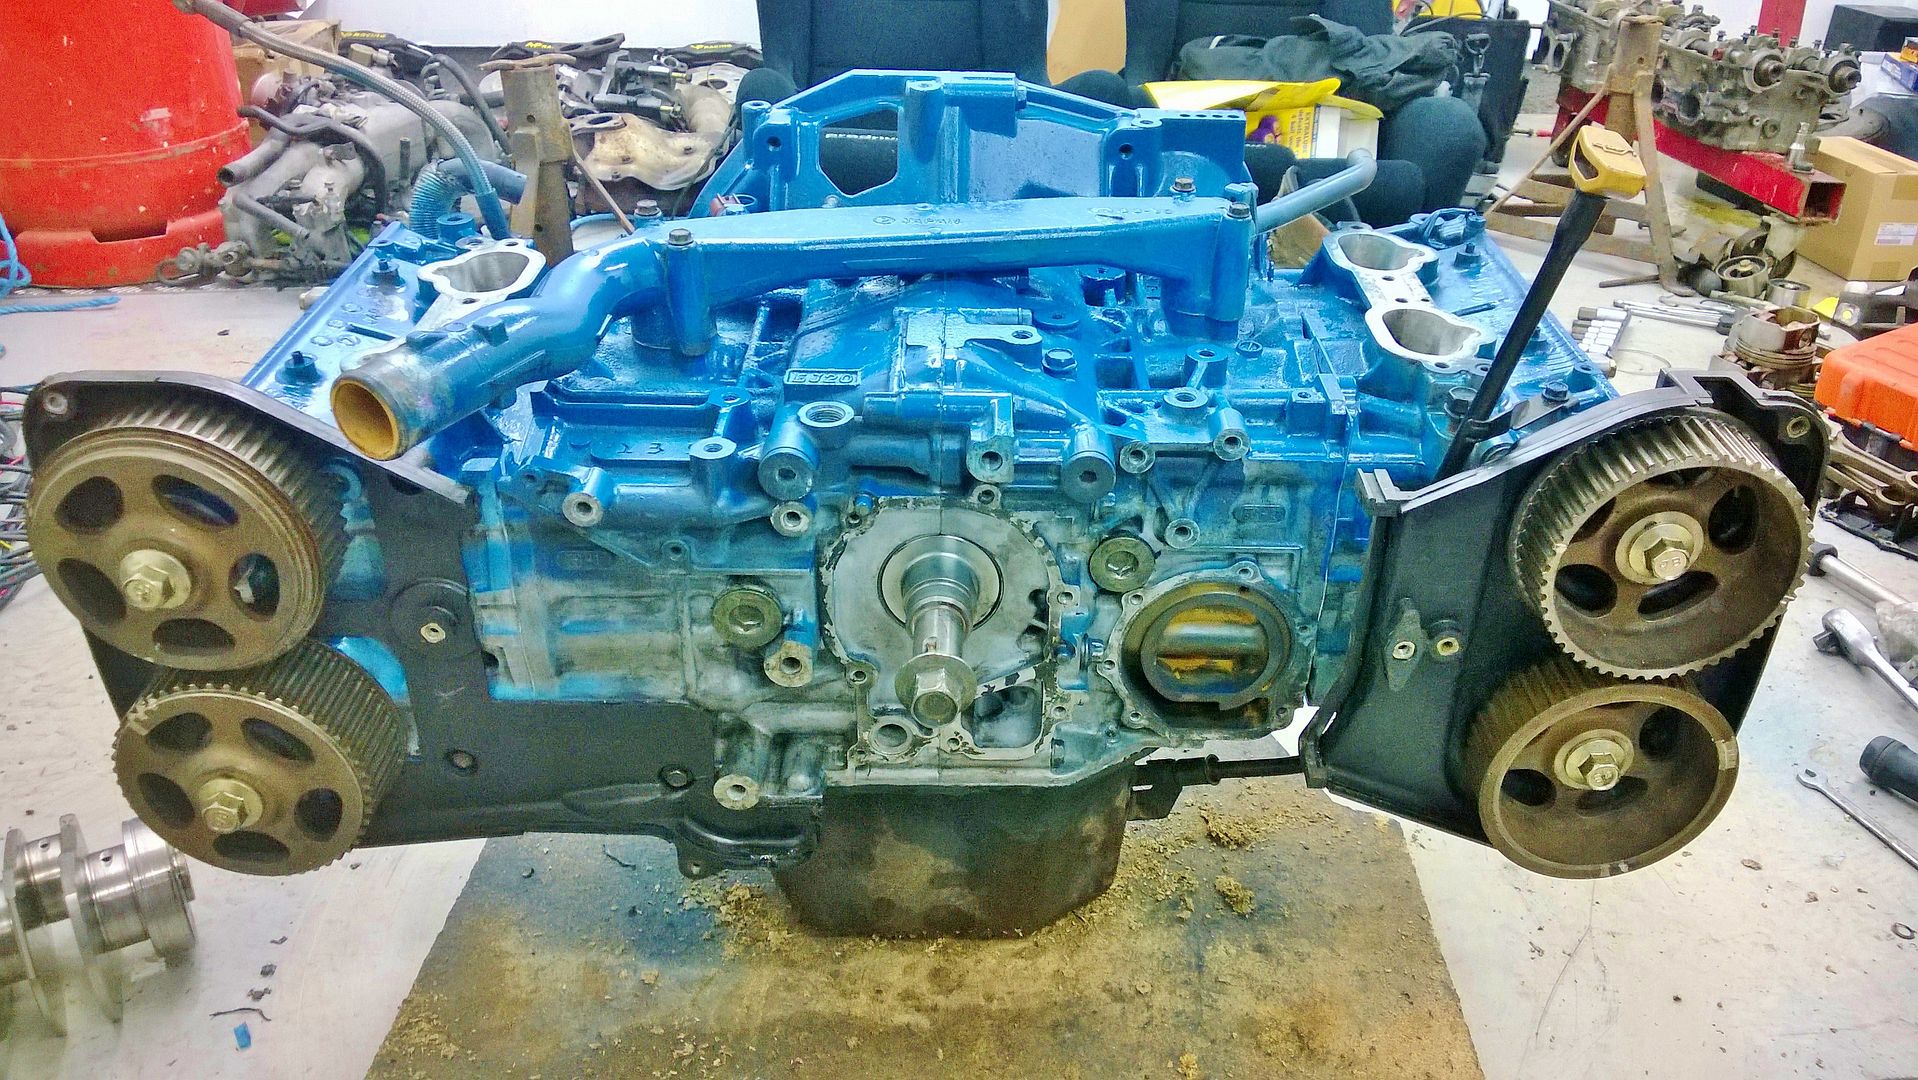
Added a quick spray of Halfords Engine Blue Enamel paint

Hopefully now my block will be dry tomorrow, and I can crack on and finish. My deadline of use for Rally Day is now gone, I could rush it to get it finished, but is it really worth it?? As 9 times out 10 you mess something up by rushing, and I'd rather take my time and do it right first time.
The head bolts were also fitted with ARP Moly Lube, and bottomed out by hand, and a 1/4 drive allen key on a rachet (found instructions on NASIOC where they stated that they needed to be bottomed out first), head gasket was then fitted over onto the cleaned face of the block, then head cleaned and placed over.
The next was a bit of a discussion, as ARP have initially listed 75ftlb with APR Moly Lube, then revised this to 90ftlb. BUT after a long look around on here and NASIOC and came to the conclusion that (from a LOT of threads) that 30lb ft in sequence, then 60ftlb in sequence, and then 90ftlb in sequence as per ARP sequence. BUT the inner 2 go to 95ftlb, this seemed to be the recommended procedure from multiple failures on the NASIOC site, so they are done. The whole procedure of slackening off is not done on the head studs, but tightening up in 3 equal phases, I have done enough reading around on the ARP Head Studs to take the common accepted methods from various makes and models, and they ALL say NOT To slacken off. As that procedure is for the standard stretch bolts, as you tighten them up they stretch (this will NOT give a correct torque figure), slackening them off will keep this stretch, and you can torque down correctly when the bolt is under its stretched condition. As the ARP studs don't stretch the same (at all), so require the different technique
Also the head studs will sit at slightly different levels due to the castings used, as each stud is bottomed out and the torqued down. The discrepancy with height, is just due to the depth of the castings, as Subaru never intended the standard bolts to bottom out in this manner, so that will explain the slightly differing thread heights. The main thing they suggested was that the studs were bottomed out, and that they were sitting straight (which mine were).
I will be going back tomorrow to finish the setup, but first job is to recheck the torque.
I am so glad I bought a tube of APR Moly Lube, as I've used it on all the case bolts, the head studs, the head stud washers, and the nuts, and makes it MUCH easier to use than a sachet. I also use Graphogen paste to help slide the gudgeon pins into place.
Added a quick spray of Halfords Engine Blue Enamel paint
Hopefully now my block will be dry tomorrow, and I can crack on and finish. My deadline of use for Rally Day is now gone, I could rush it to get it finished, but is it really worth it?? As 9 times out 10 you mess something up by rushing, and I'd rather take my time and do it right first time.
Looking good and well done on searching for the right ways to do things, I'm sure you will have a good build as you learn by other peoples mistakes
This tread will be good for others looking to do the same
Hope it all works out good for you and there is nothing better than turning the key to here it fire up and run
This tread will be good for others looking to do the same
Hope it all works out good for you and there is nothing better than turning the key to here it fire up and run
Scooby Regular
iTrader: (6)
Joined: Aug 2007
Posts: 2,260
Likes: 0
From: Llanelli with a spanner in my hand!
I was going to drop you a text JB, to see how you were getting on. As you say there's no point rushing it. are you painting the manifold to match the block?

Looking good and well done on searching for the right ways to do things, I'm sure you will have a good build as you learn by other peoples mistakes
This tread will be good for others looking to do the same
Hope it all works out good for you and there is nothing better than turning the key to here it fire up and run
This tread will be good for others looking to do the same
Hope it all works out good for you and there is nothing better than turning the key to here it fire up and run
I hope this will be of help to others, as I had to spend hours trawling through thread after thread after thread and many a different website to try and find info I could use. I am in no means saying that how I have done it is right, and only time will tell as to how she runs after, but taking the best info that I could find at the time I'll soon see if it is right or not in a costly way lol.
Yeah that was very interesting, and was only a comment in a thread on NASIOC that showed me. And it makes total sense now, as the standard bolts never bottom out there would be no need to ensure that the castings were identically deep. So when you bottom the stud out it will sit on the bottom of the casting, and as each is slightly different they will never sit flush. So unless you want to re-machine the heads to let them all sit at the same level (**** to say the least), then you have to accept there is a thread or two difference. Main point is that the nuts are torqued down properly.
But I'll be up Dylans tomorrow again to try and finish, tbh its been good having an extra set of eyes, as you know what it's like at times you can't see the tools for the tools lol. And esp when I can double check the correct method of doing things, but mainly to hold the block when torquing down to 90lbft lol.
Last edited by Jimbob; Sep 19, 2013 at 11:11 PM.
Didn't realise I had built another Scooby engine Rich, let alone 2-3 of them.
As for Dylan, I don't know anyone who would have done what he has, with lending his time. Everyone seems more interested in shouting as loudly as possible, and stamping their feet.
Anyways as I have said I am building this engine, no one else. And if it goes wrong I only have myself to blame, as I'm the only one who has done anything. Just wish more people on here were like Dylan and Redwards, as both have helped me a great deal, Rich when I first had my car, and Dylan now. I thought this is what a club was about with helping out? Not bitching as to who's car is better, or who has the bigest gripe with someone. I can't be asked with here if that's all you guys are gonna do.
I'm not going to comment further, and can I not have anymore off topic posts on my build thread please.
Last edited by Jimbob; Sep 20, 2013 at 03:10 PM.
Scooby Regular
Joined: Feb 2010
Posts: 955
Likes: 0
From: on top of a wet hill
Anyways as I have said I am building this engine, no one else. And if it goes wrong I only have myself to blame, as I'm the only one who has done anything. Just wish more people on here were like Dylan and Redwards, as both have helped me a great deal, Rich when I first had my car, and Dylan now. I thought this is what a club was about with helping out? Not bitching as to who's car is better, or who has the bigest gripe with someone.
Well said jb totaly agree with you
Well said jb totaly agree with you
No worries, but just wish people would have a look and read before jumping in feet first.
Anyways Photobucket is having "maintenance" so can't upload pics.
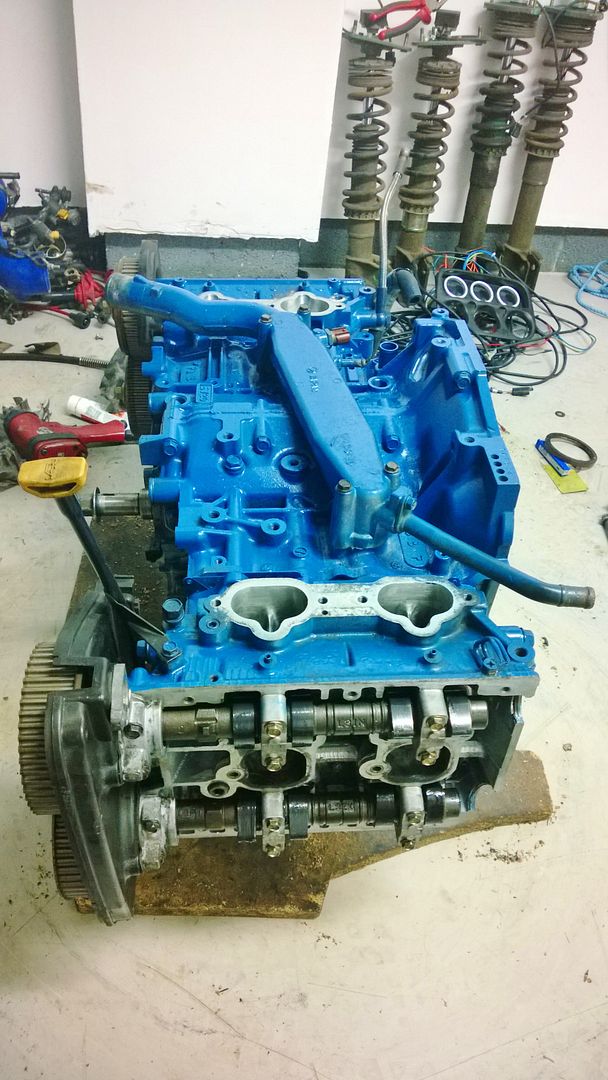
So basically I have re checked torque on the head studs and all were spot on, so fitted the sump baffle, and the pick up pipe with new O rings, fitted the sump again with a new O ring on the return. I have also cleaned off all the edges of the sump and its mating surface on the blocks and refitted that with new sealant.
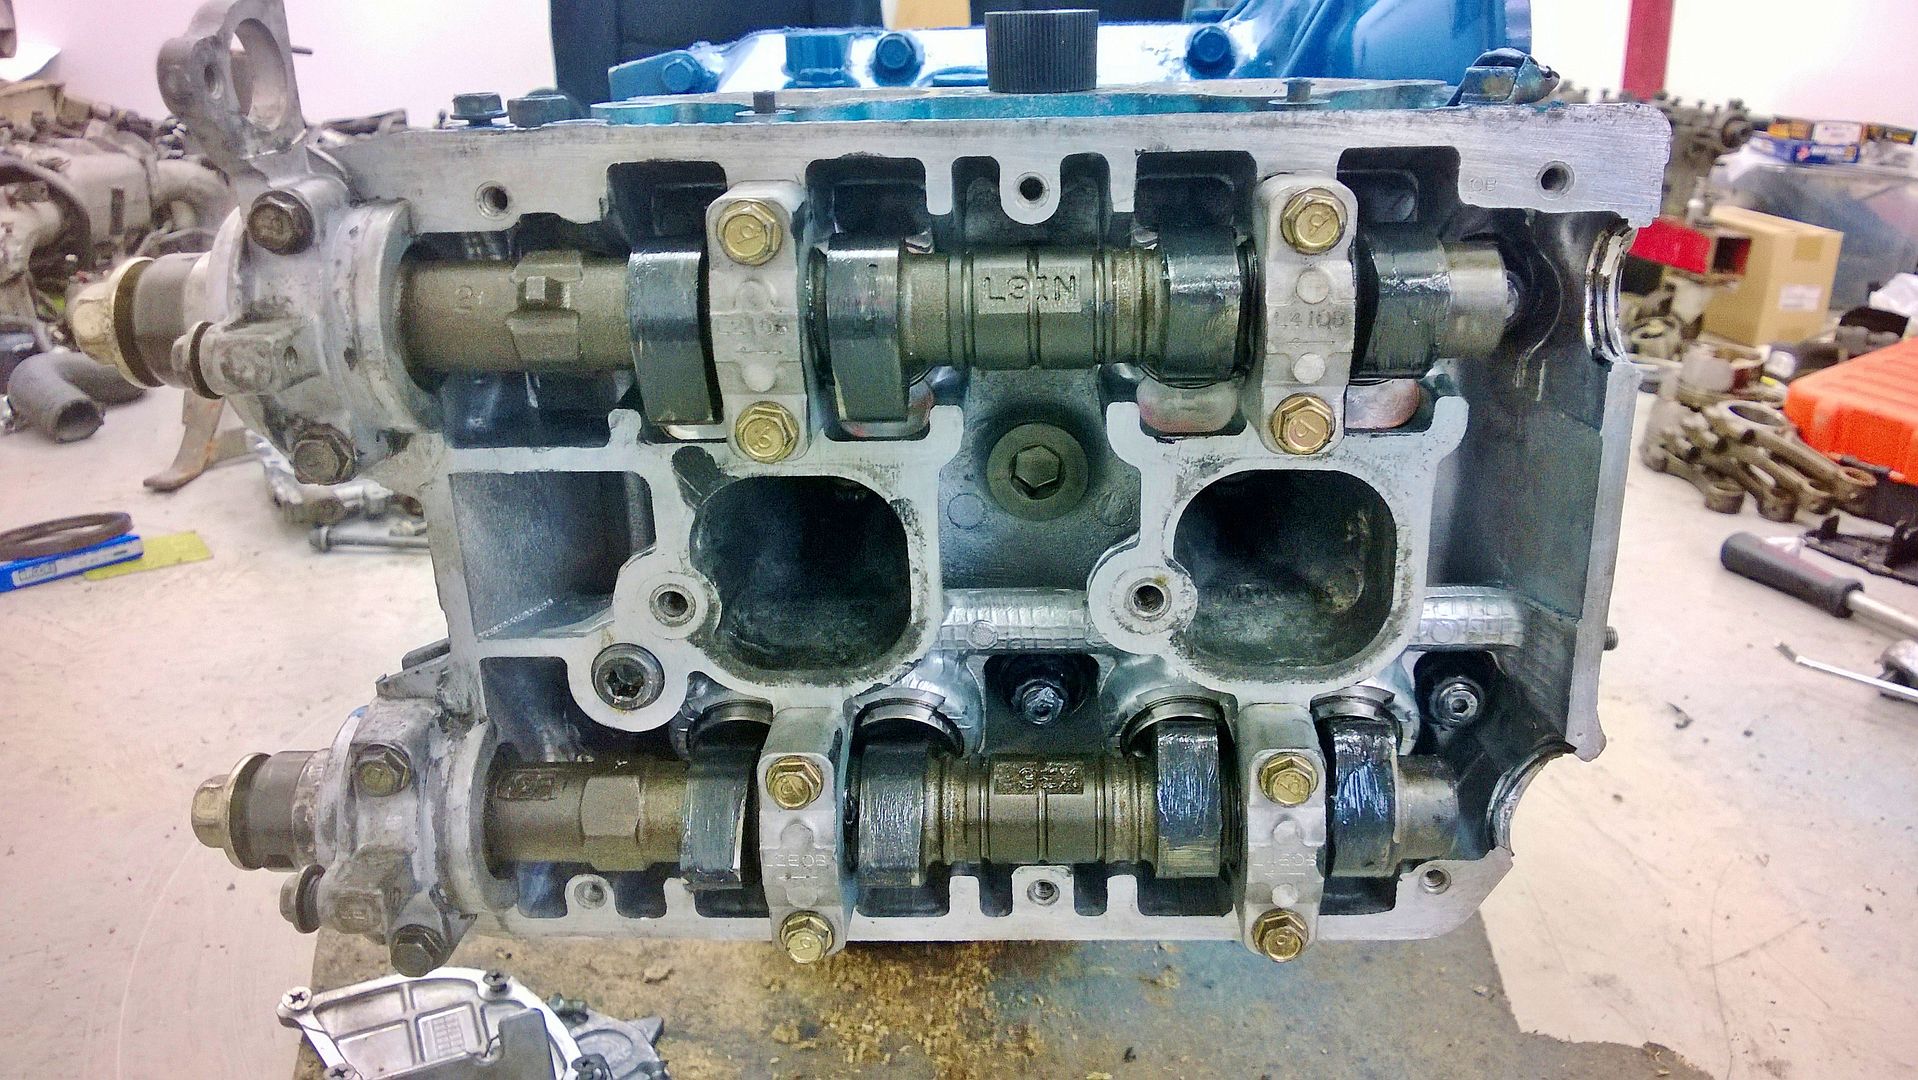
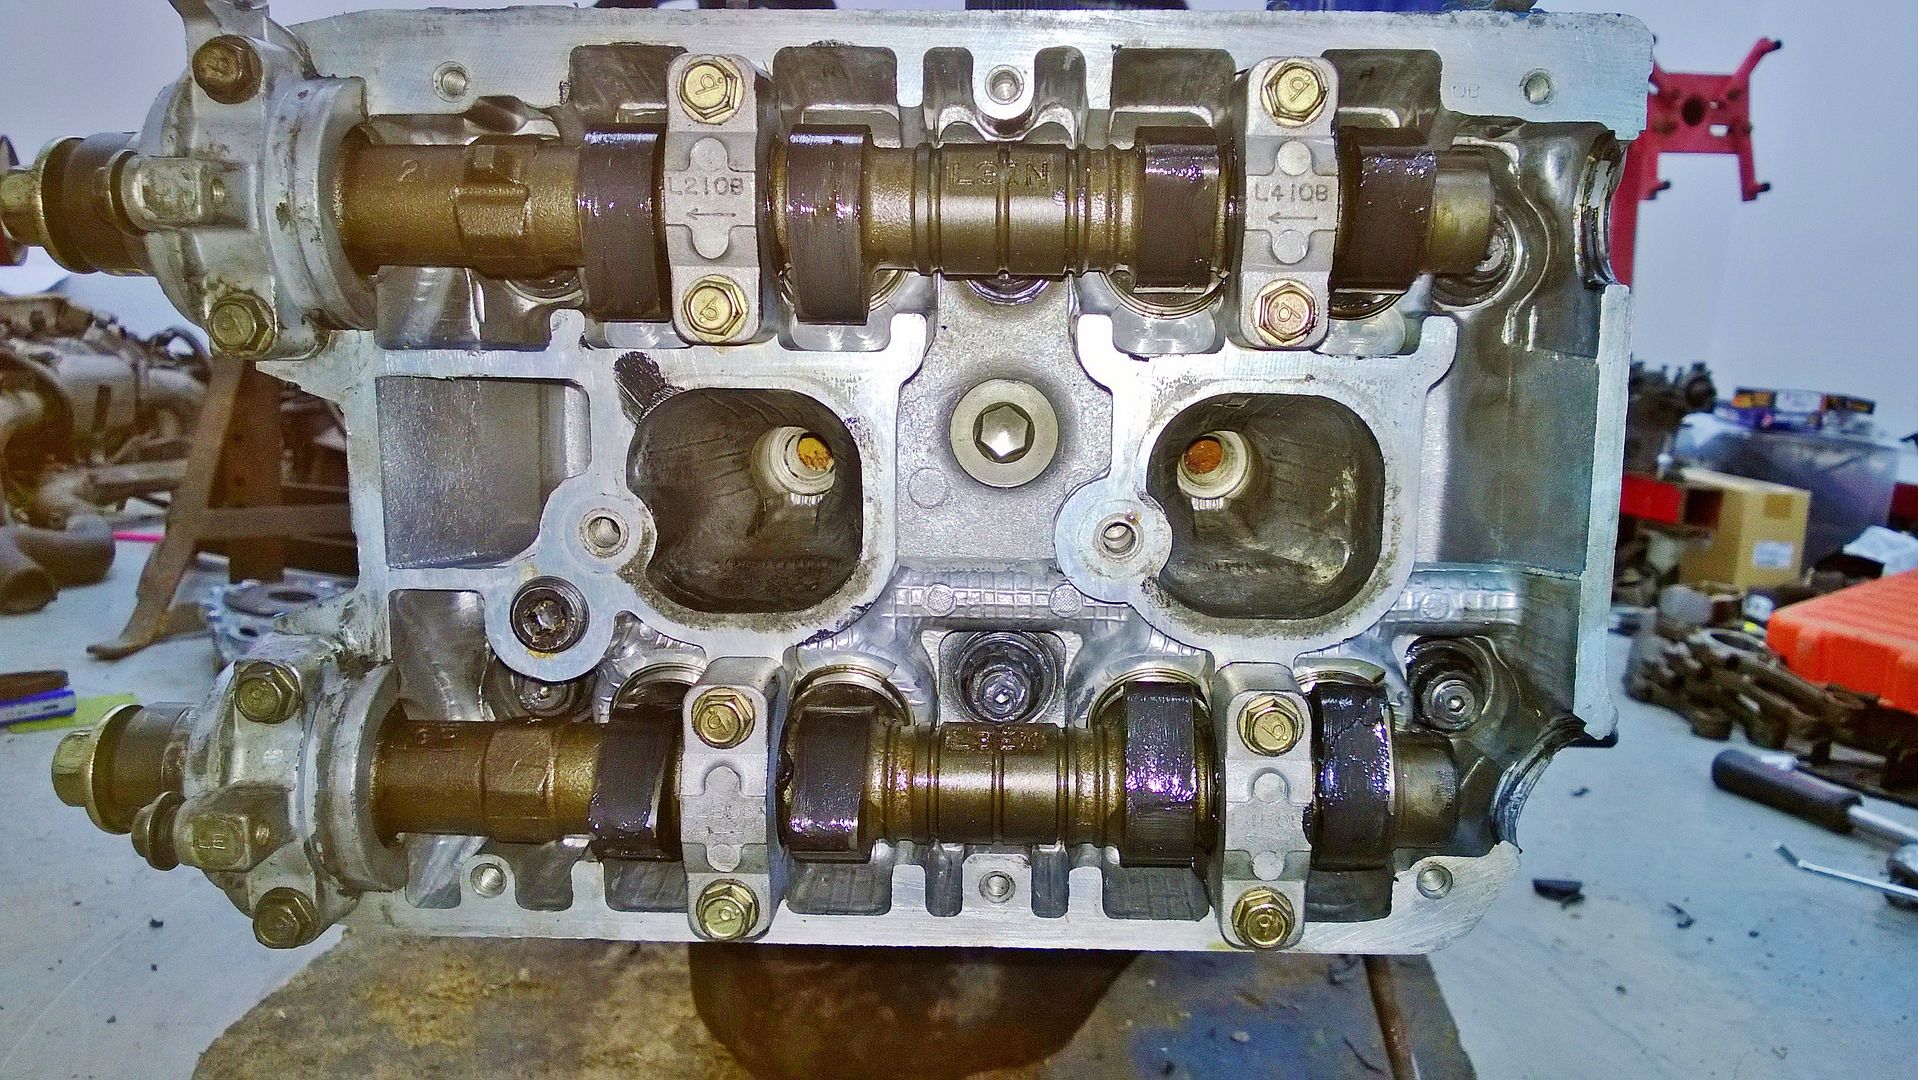
Then onto the cams, cleaned and popped in the lifters, and then coated all moving/touching parts with Graphogen Paste, and placed into the head, caps fitted but not torqued.
Did the same the other side, then temp fitted the cam wheels and the rear cambelt cover, shame my drivers side one is broken, but I have no other
Also gave the main water crossover pipe a lick of paint, removed the O rings, and cleaned them up, run of sealant around the O rings and tightened down.
Block is looking good, and I'm finally nearing the finishing straight, but a shame as I wanted my car to go to Rally Day, but hey ho. Better done right late, than done wrong early!!!
Will put up pics when PhotoBucket decides to work, but its Water pump, Oil pump, Cambelt, Exhaust and turbo. Oh nearly forgot flywheel lol.
Thats what I have left, and I am hoping and praying that I don't have any issues, after all the money and work I have done, just lucky that I haven't a garage bill also, as that would have been a killer!!!
Anyways Photobucket is having "maintenance" so can't upload pics.
So basically I have re checked torque on the head studs and all were spot on, so fitted the sump baffle, and the pick up pipe with new O rings, fitted the sump again with a new O ring on the return. I have also cleaned off all the edges of the sump and its mating surface on the blocks and refitted that with new sealant.
Then onto the cams, cleaned and popped in the lifters, and then coated all moving/touching parts with Graphogen Paste, and placed into the head, caps fitted but not torqued.
Did the same the other side, then temp fitted the cam wheels and the rear cambelt cover, shame my drivers side one is broken, but I have no other
Also gave the main water crossover pipe a lick of paint, removed the O rings, and cleaned them up, run of sealant around the O rings and tightened down.
Block is looking good, and I'm finally nearing the finishing straight, but a shame as I wanted my car to go to Rally Day, but hey ho. Better done right late, than done wrong early!!!
Will put up pics when PhotoBucket decides to work, but its Water pump, Oil pump, Cambelt, Exhaust and turbo. Oh nearly forgot flywheel lol.
Thats what I have left, and I am hoping and praying that I don't have any issues, after all the money and work I have done, just lucky that I haven't a garage bill also, as that would have been a killer!!!
Last edited by Jimbob; Sep 21, 2013 at 02:25 AM.


I hope that it just works as it should, that's the main concern. As no matter how much you try to make no mistakes, no errors, etc. Something can always raise it's ugly head, and cause a failure, which now the nearer I get to completion, the more this well concern builds. Natural I suppose, but I do NOT like it.
No progress today, just been sorting the stuff that I have been putting off all week whilst doing this.
So hopefully will be sorted Monday onwards.
Last edited by Jimbob; Sep 22, 2013 at 05:38 PM.