Jimbobs engine rebuild thread


More progress today.
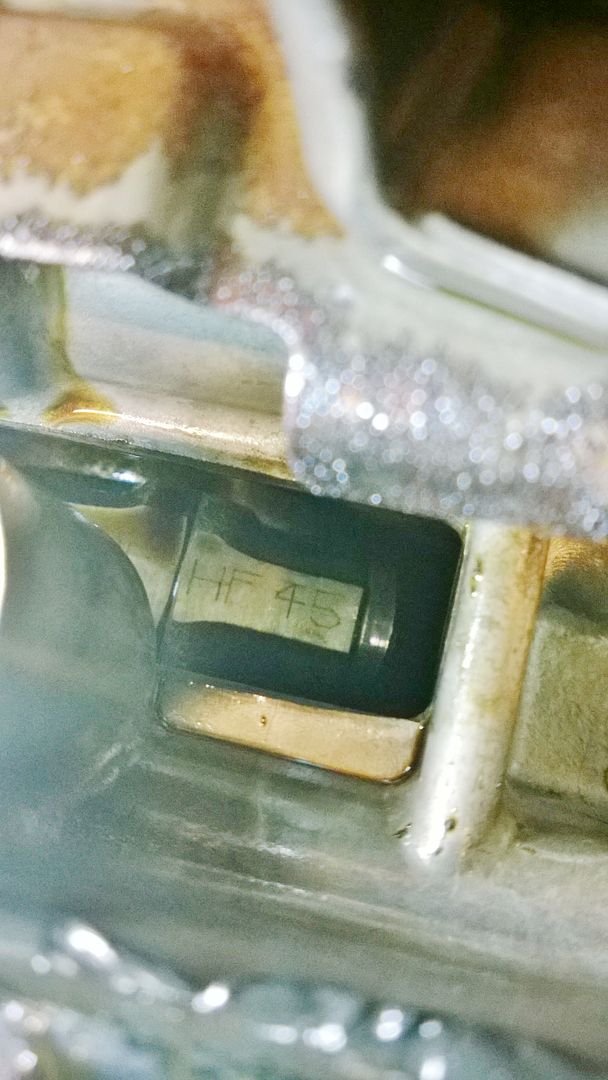
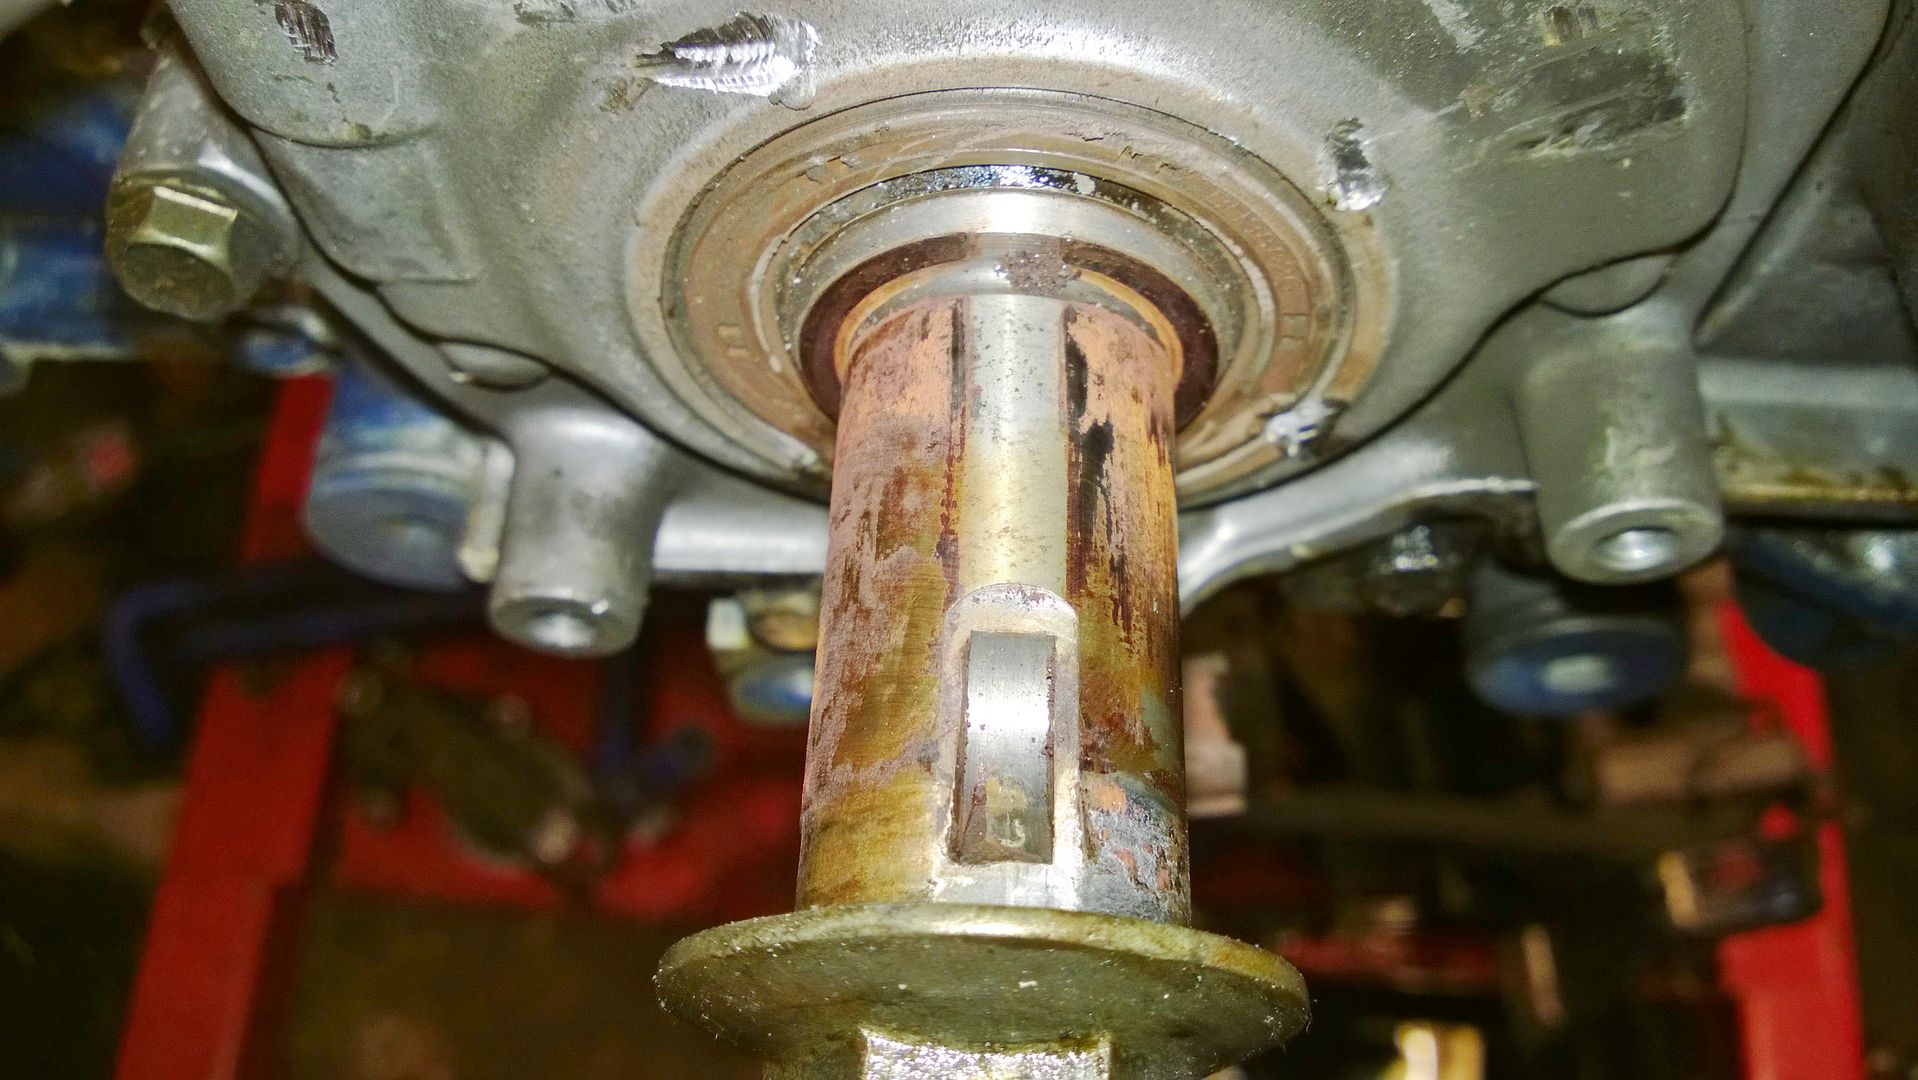
Dylan came over with a set of pullers (top man) so I could remove the crank pulley, as my efforts resulted in the damage to the oil pump case that you can see
Also got a set of metal cam wheels off him too , just need them cleaned up as they are a tad used lol.
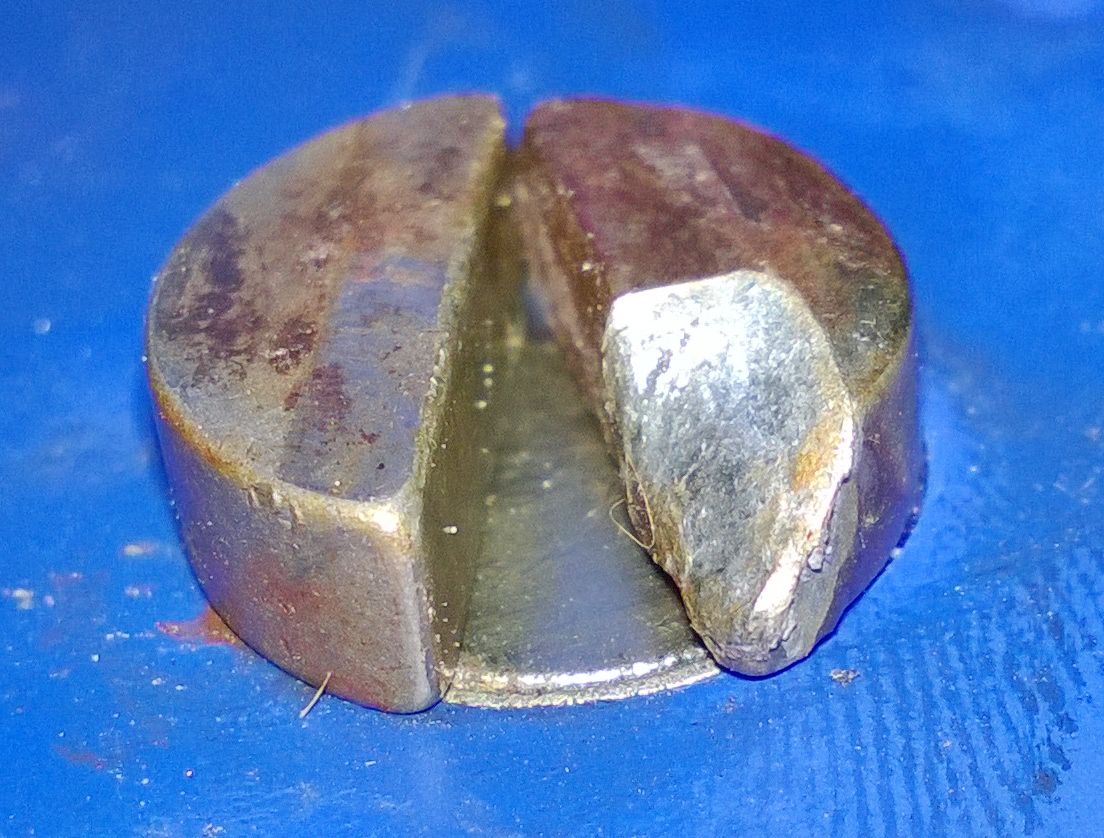
You can see close up damage to the woodruff key
Anyways sorted now.
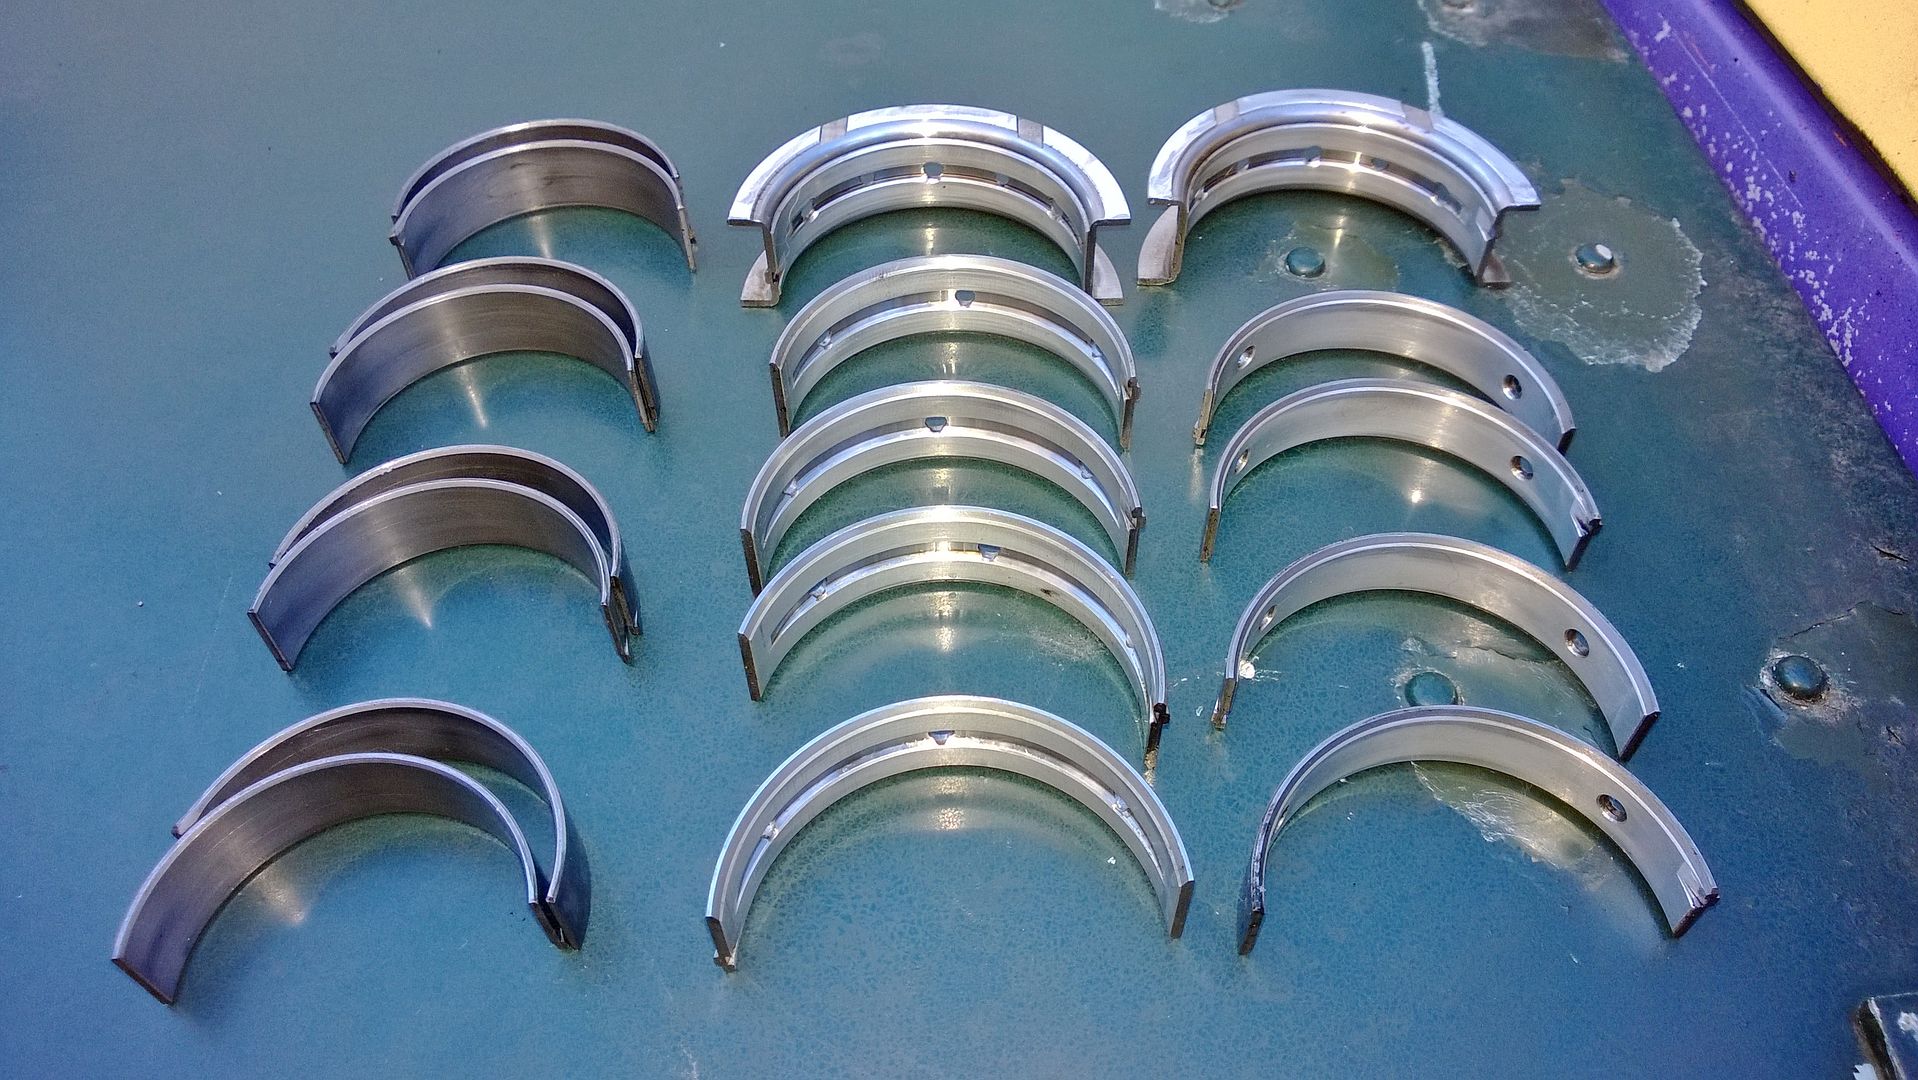
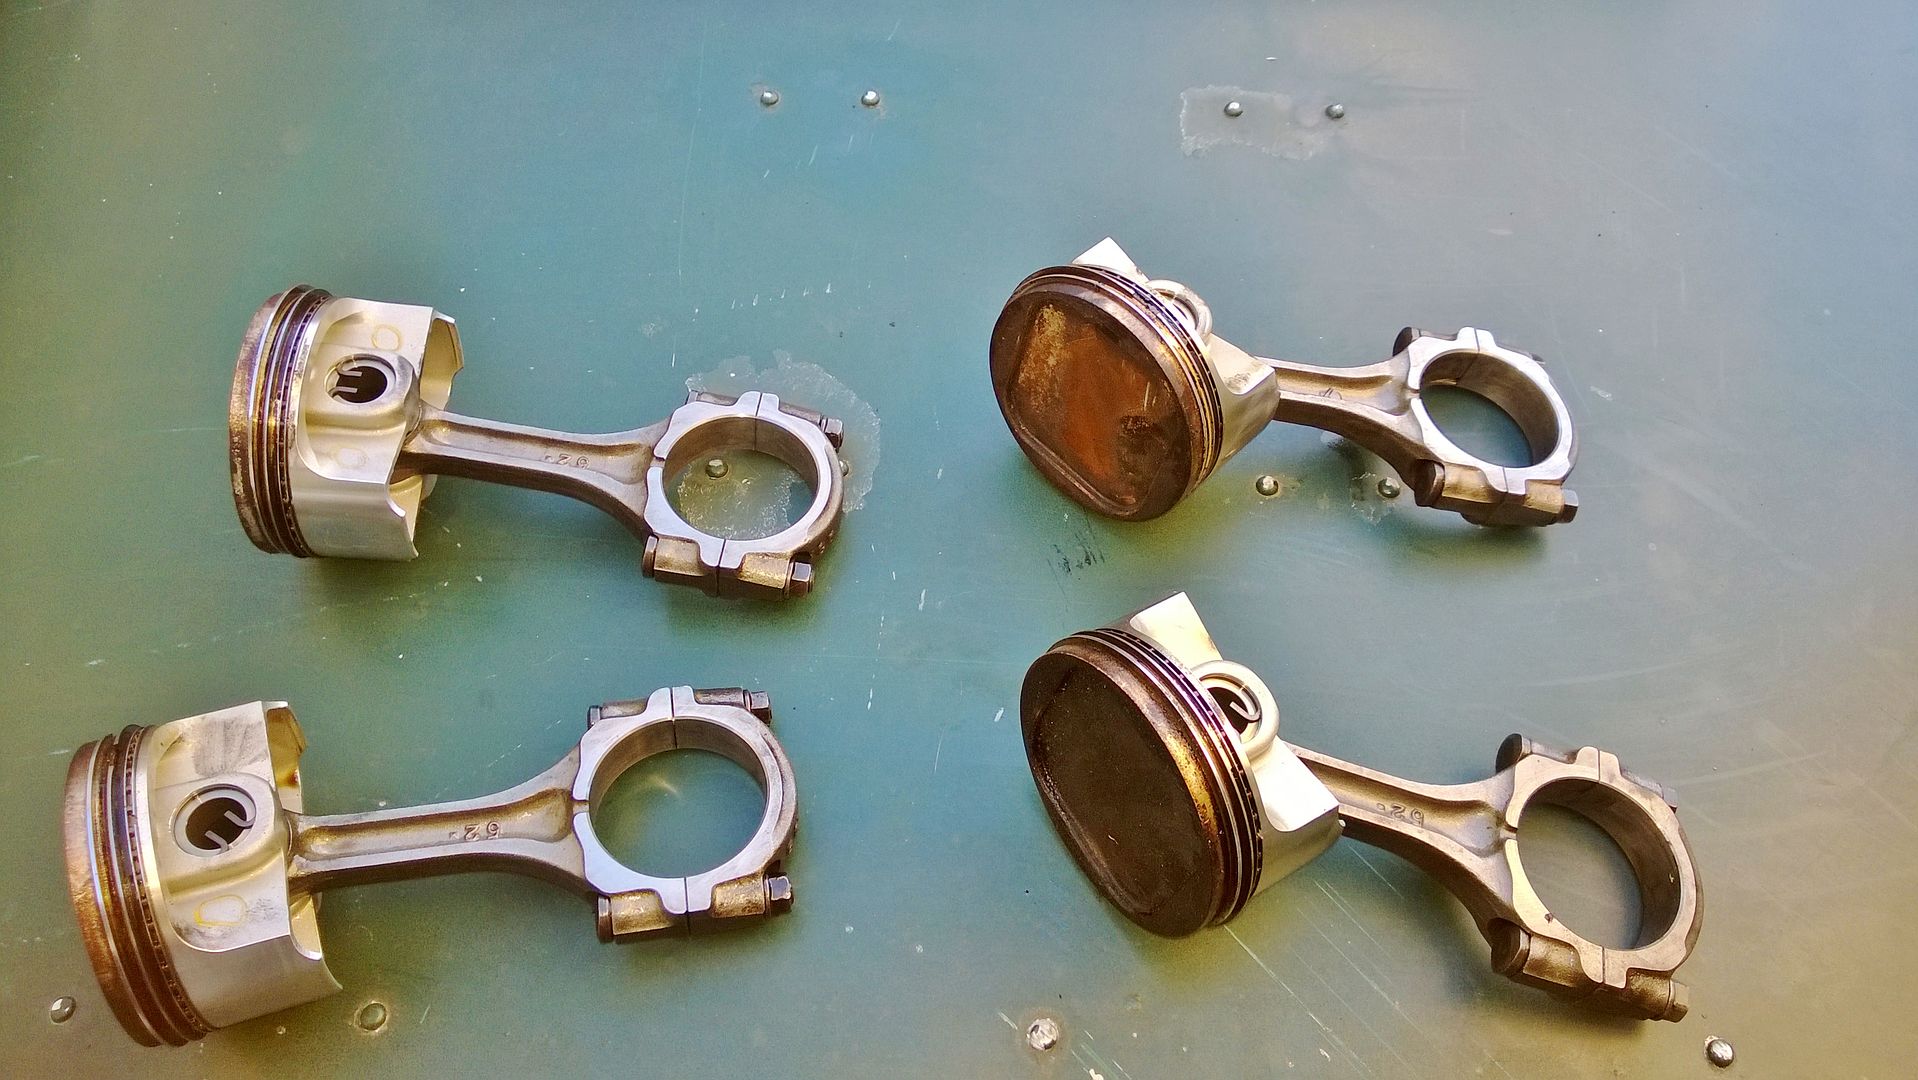
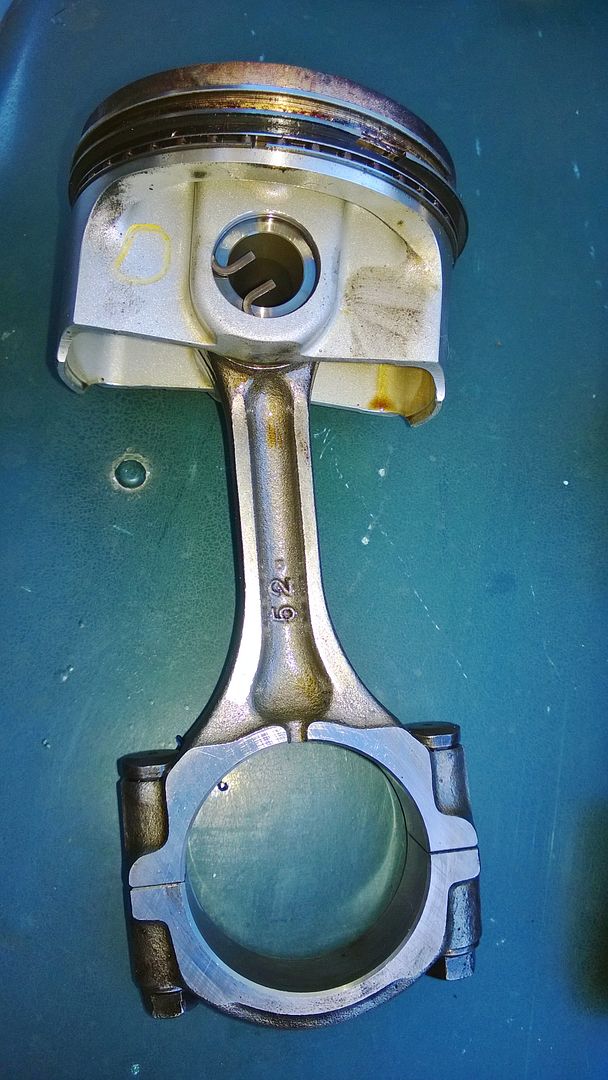
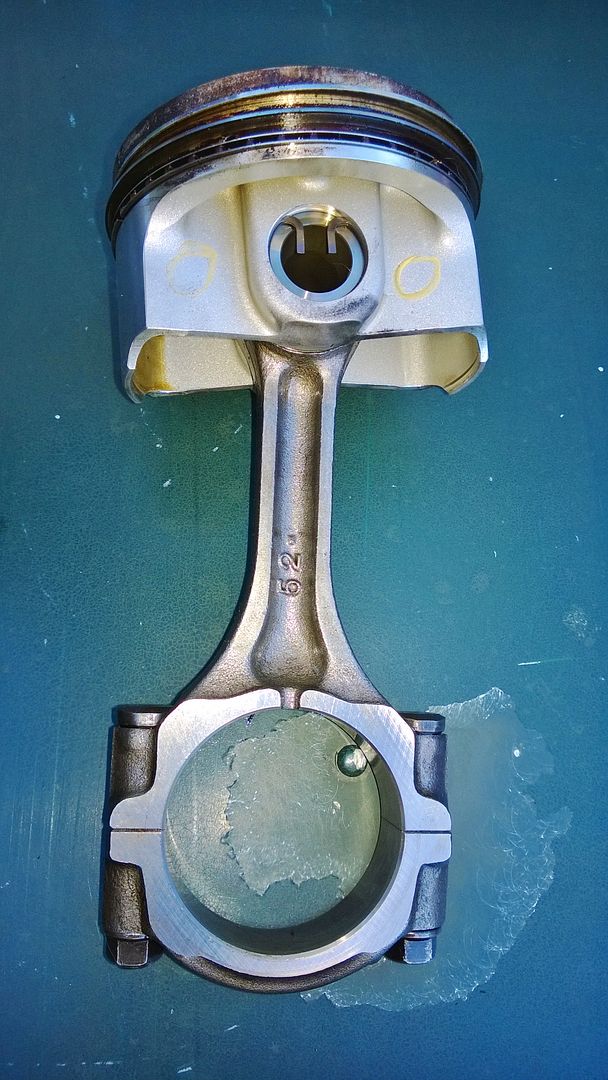
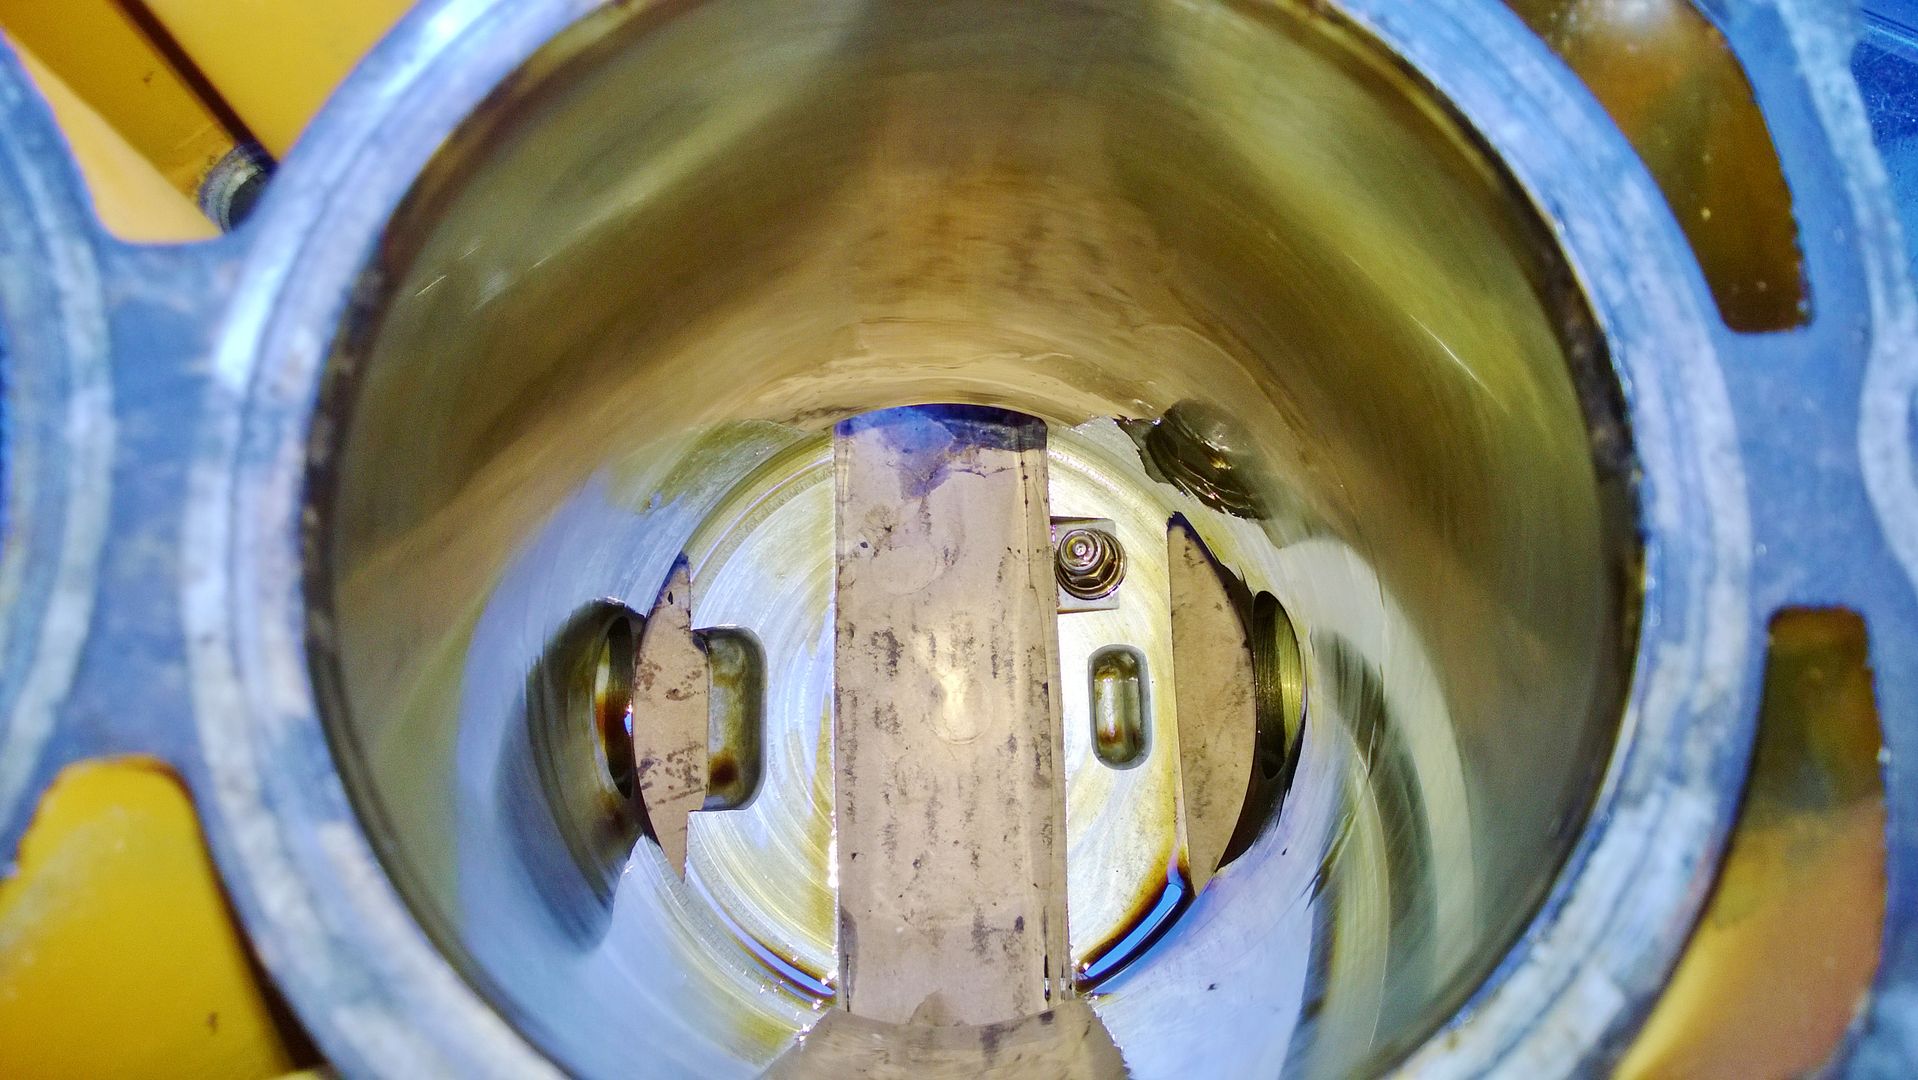
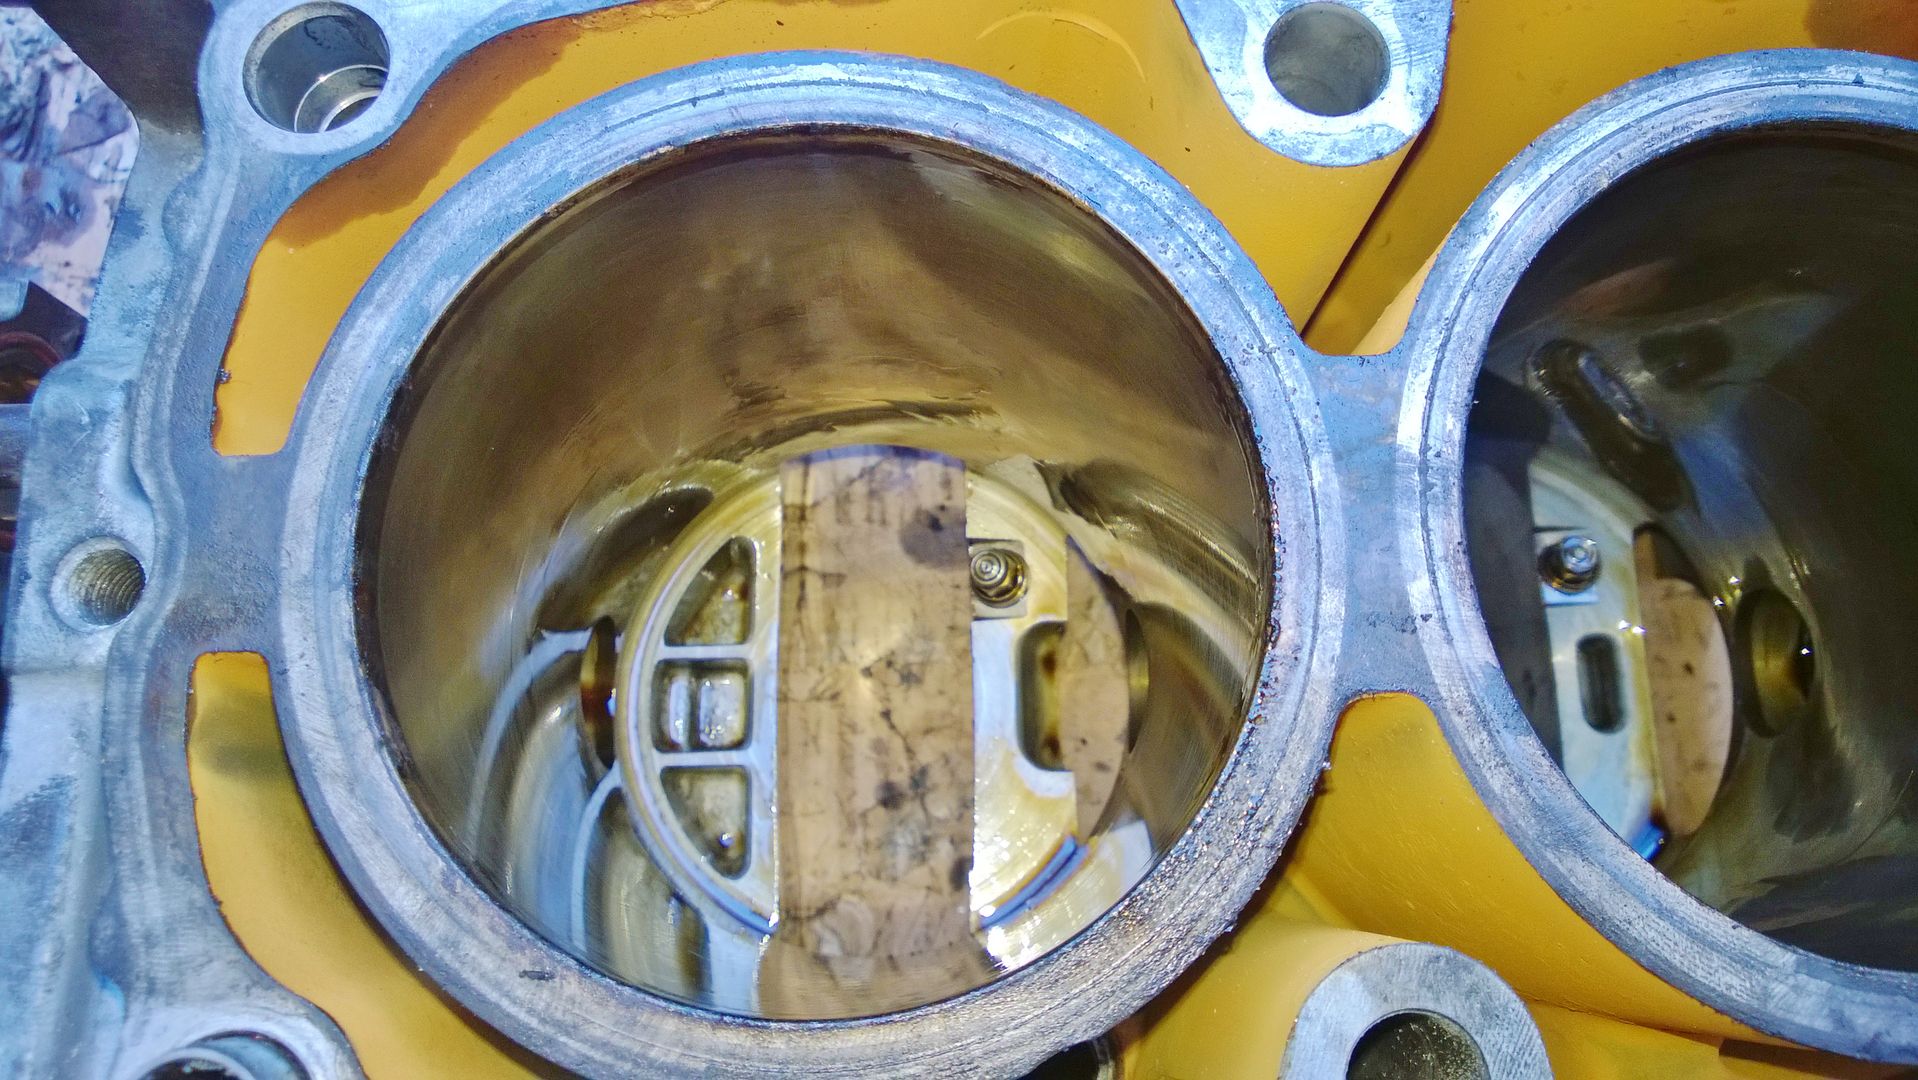
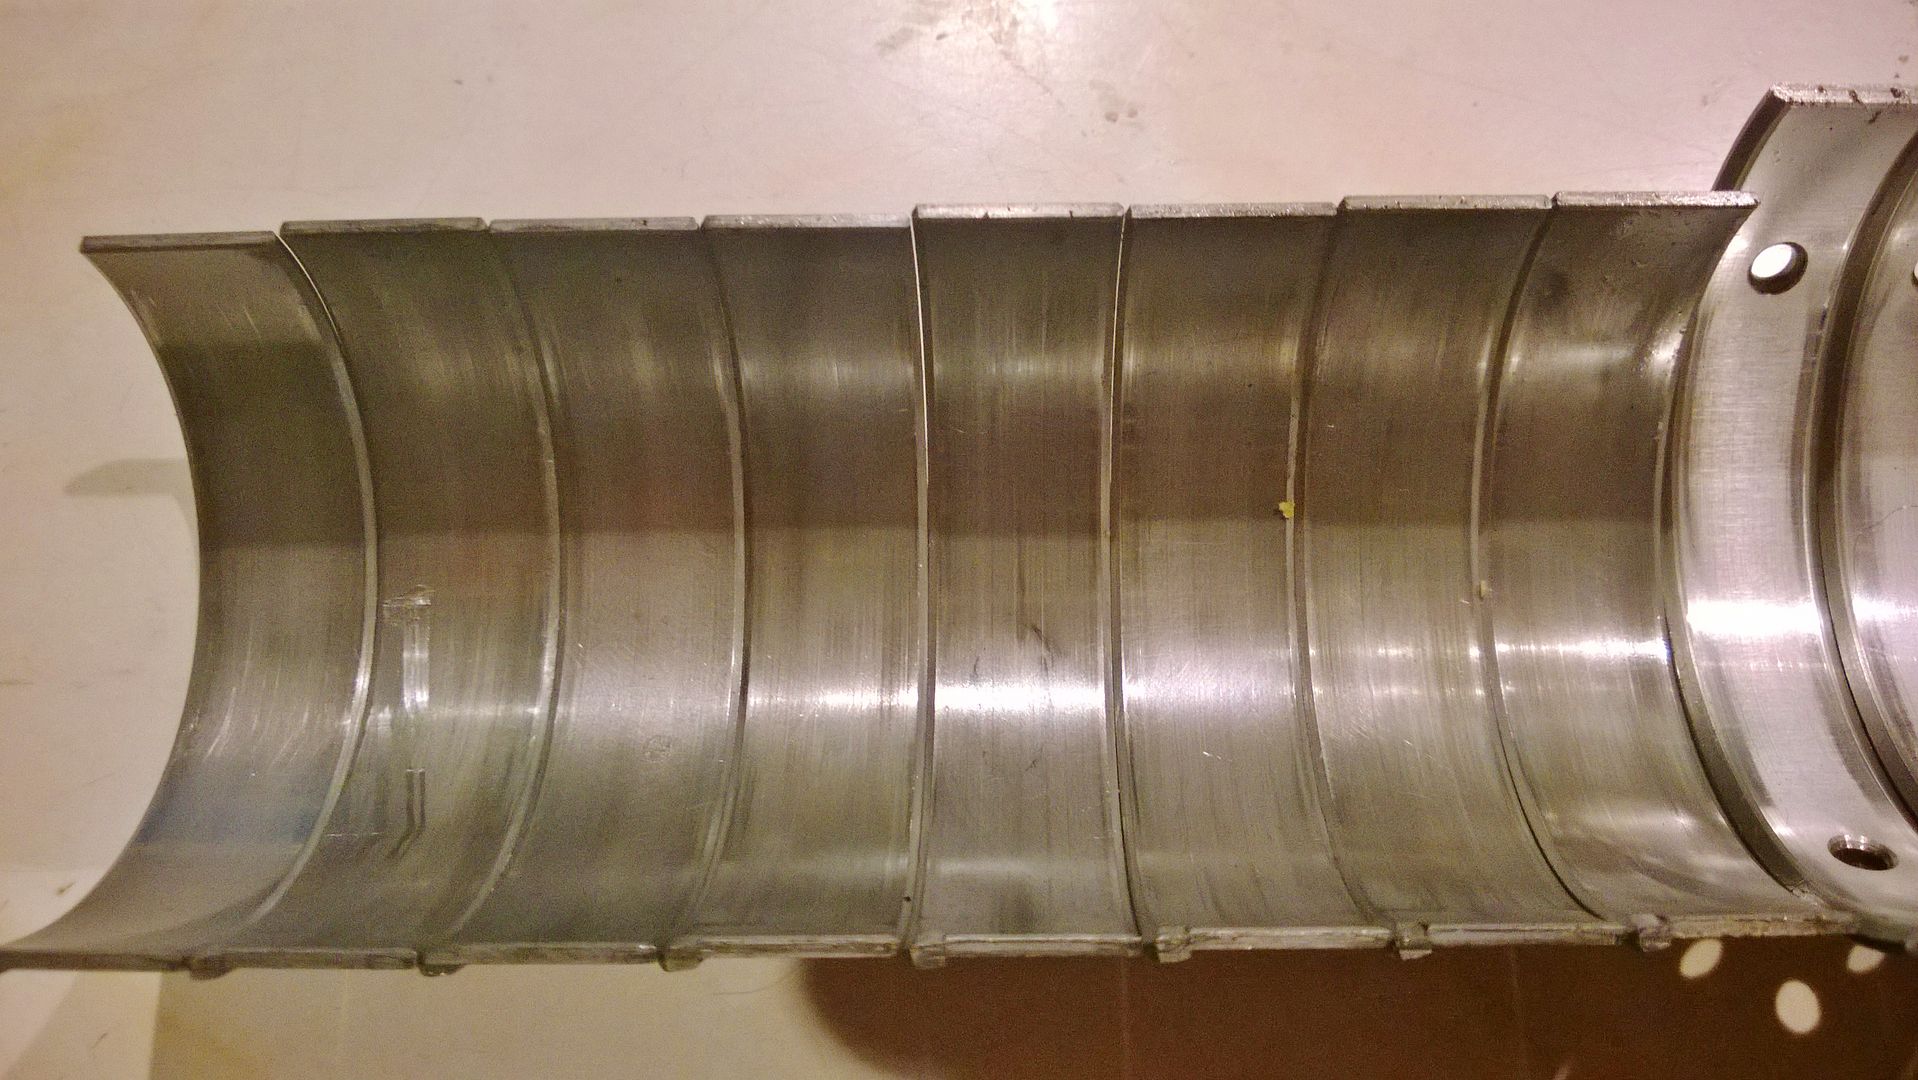
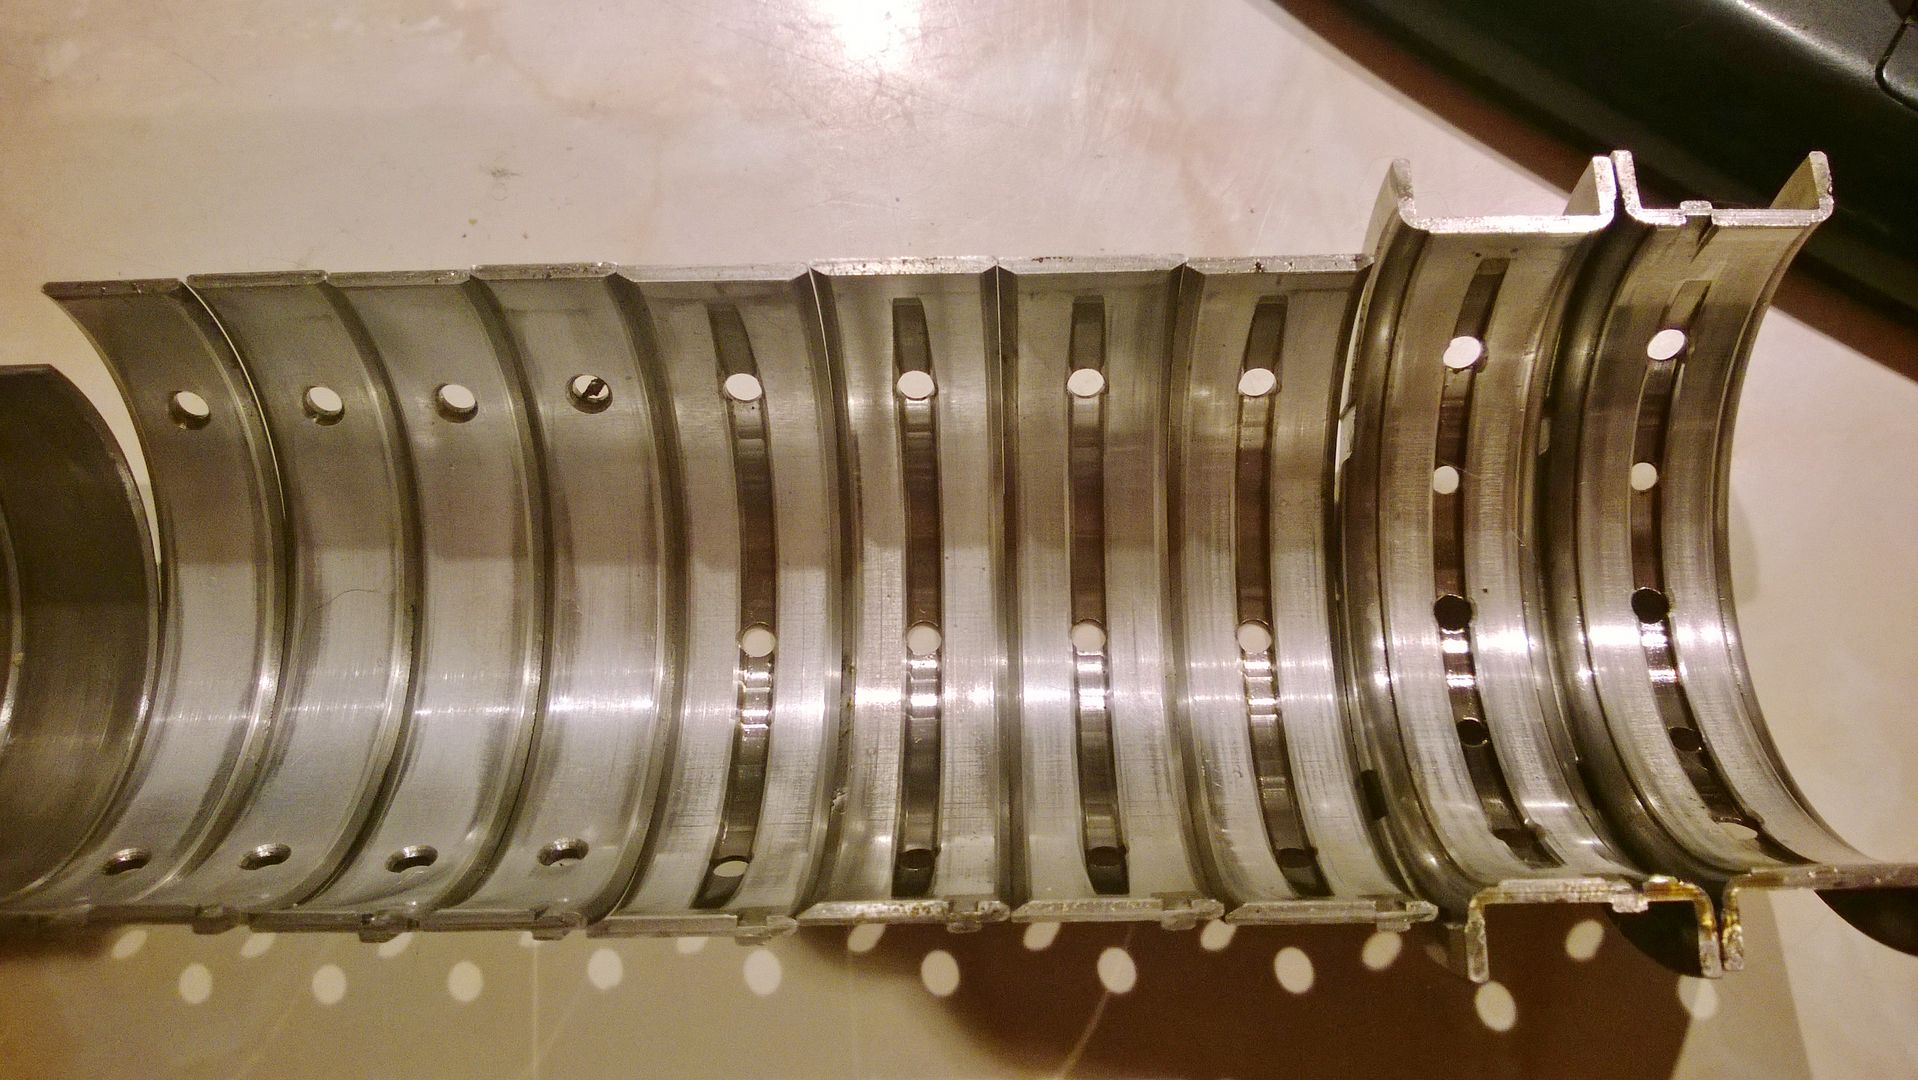
Anyways removed the pistons and my rods are standard, the bearings look good, but are being replaced anyways for ACL Race bearings.
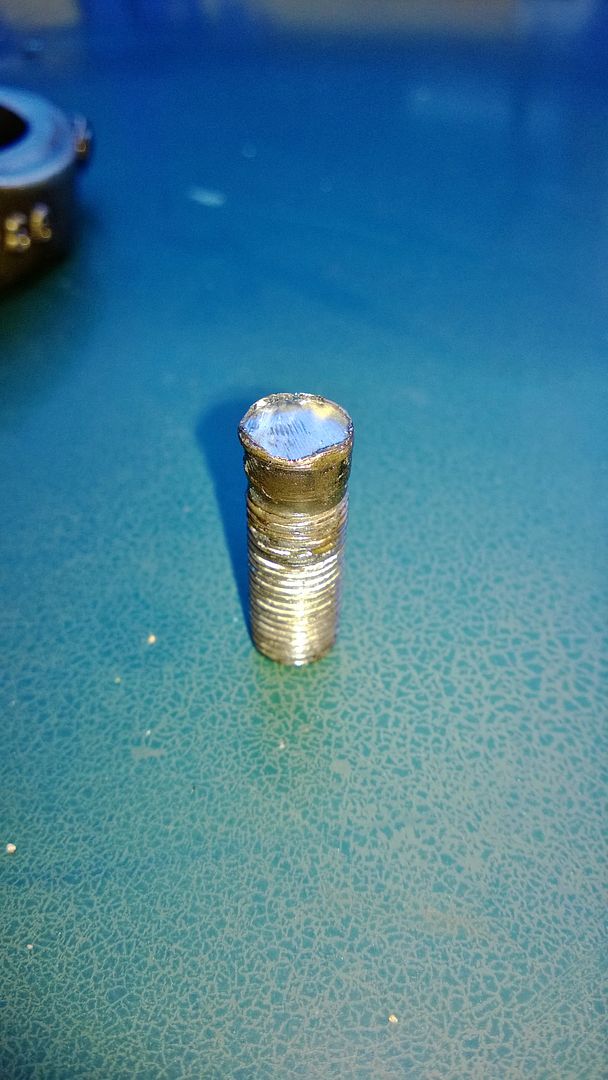
The bolt was a flywheel bolt thread-locked so tightly in I had to cut the head off to remove the flywheel. To be fair its the ONLY bolt to cause a problem.
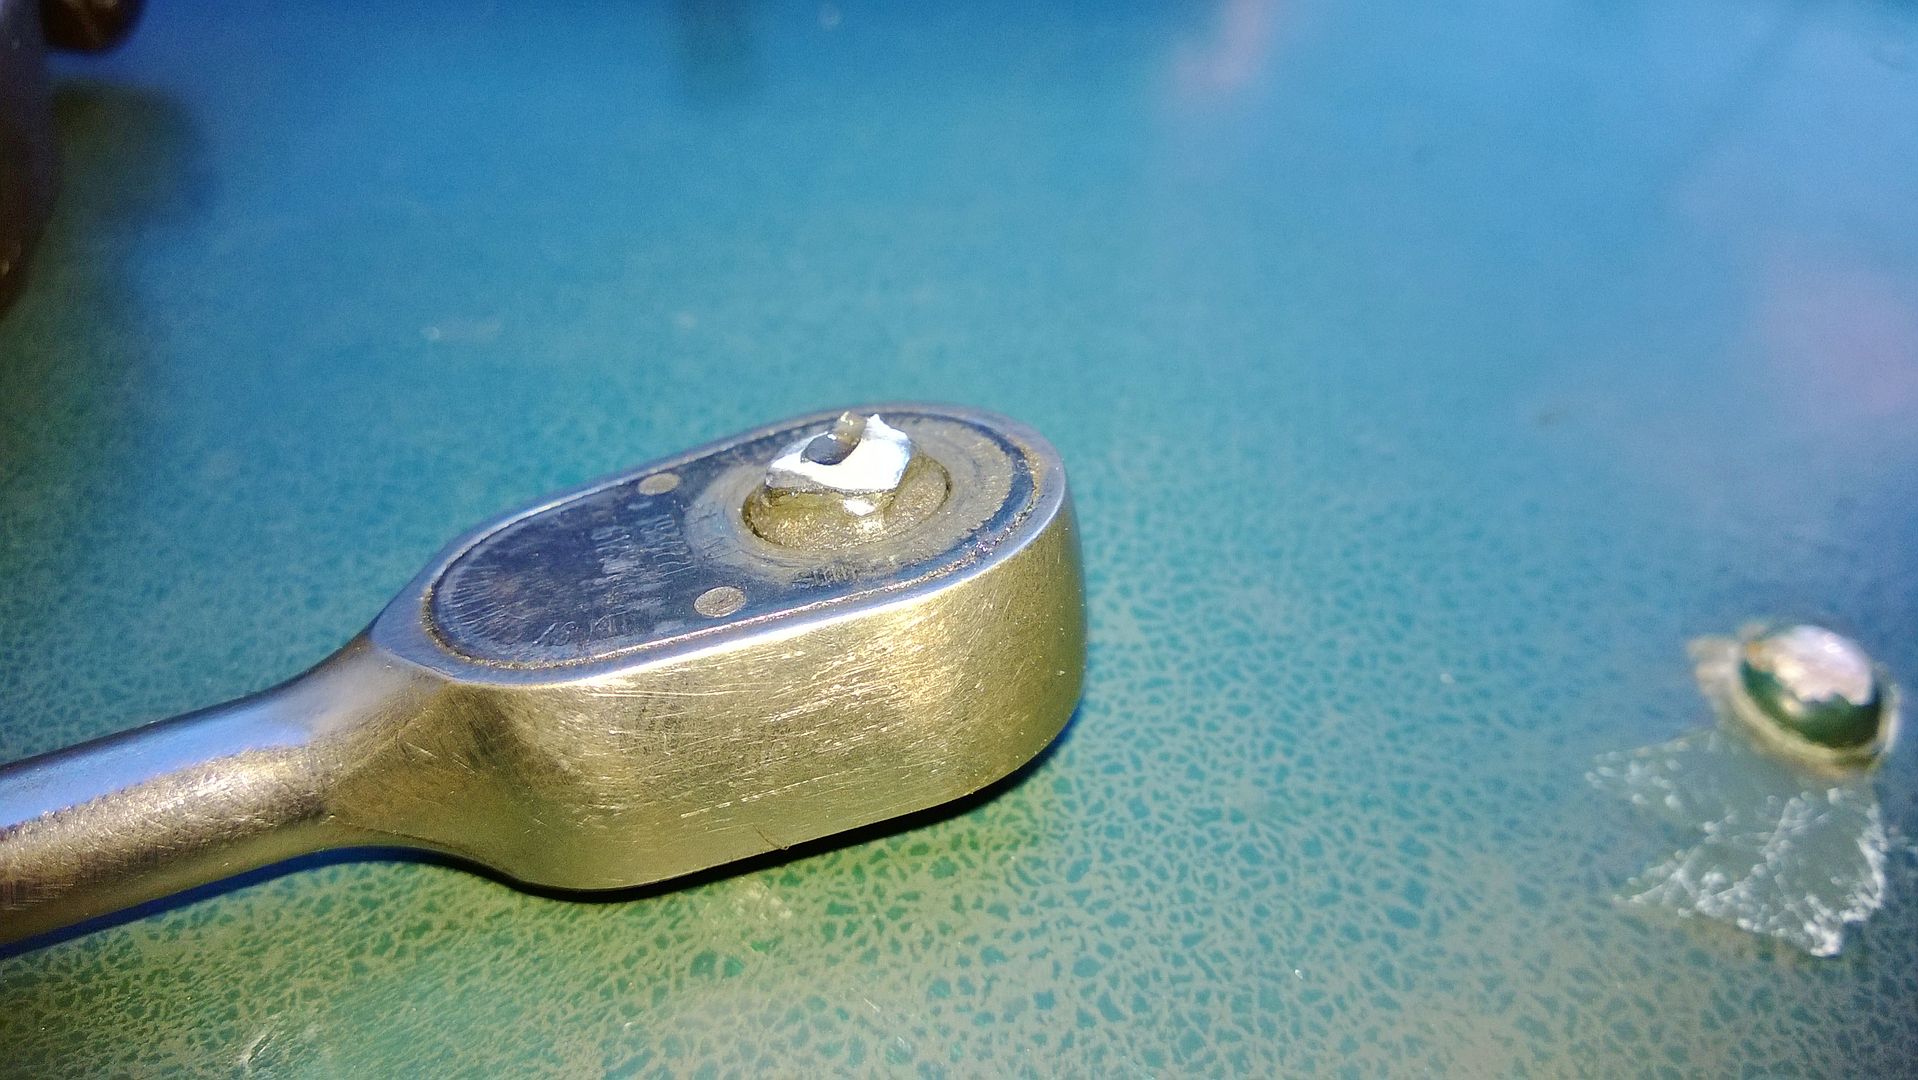
I also snapped my Snap-On 1/4 drive, along with my Halfords 1/4 drive, and I broke my Bosch drill, as I had tried to drill out the above bolt
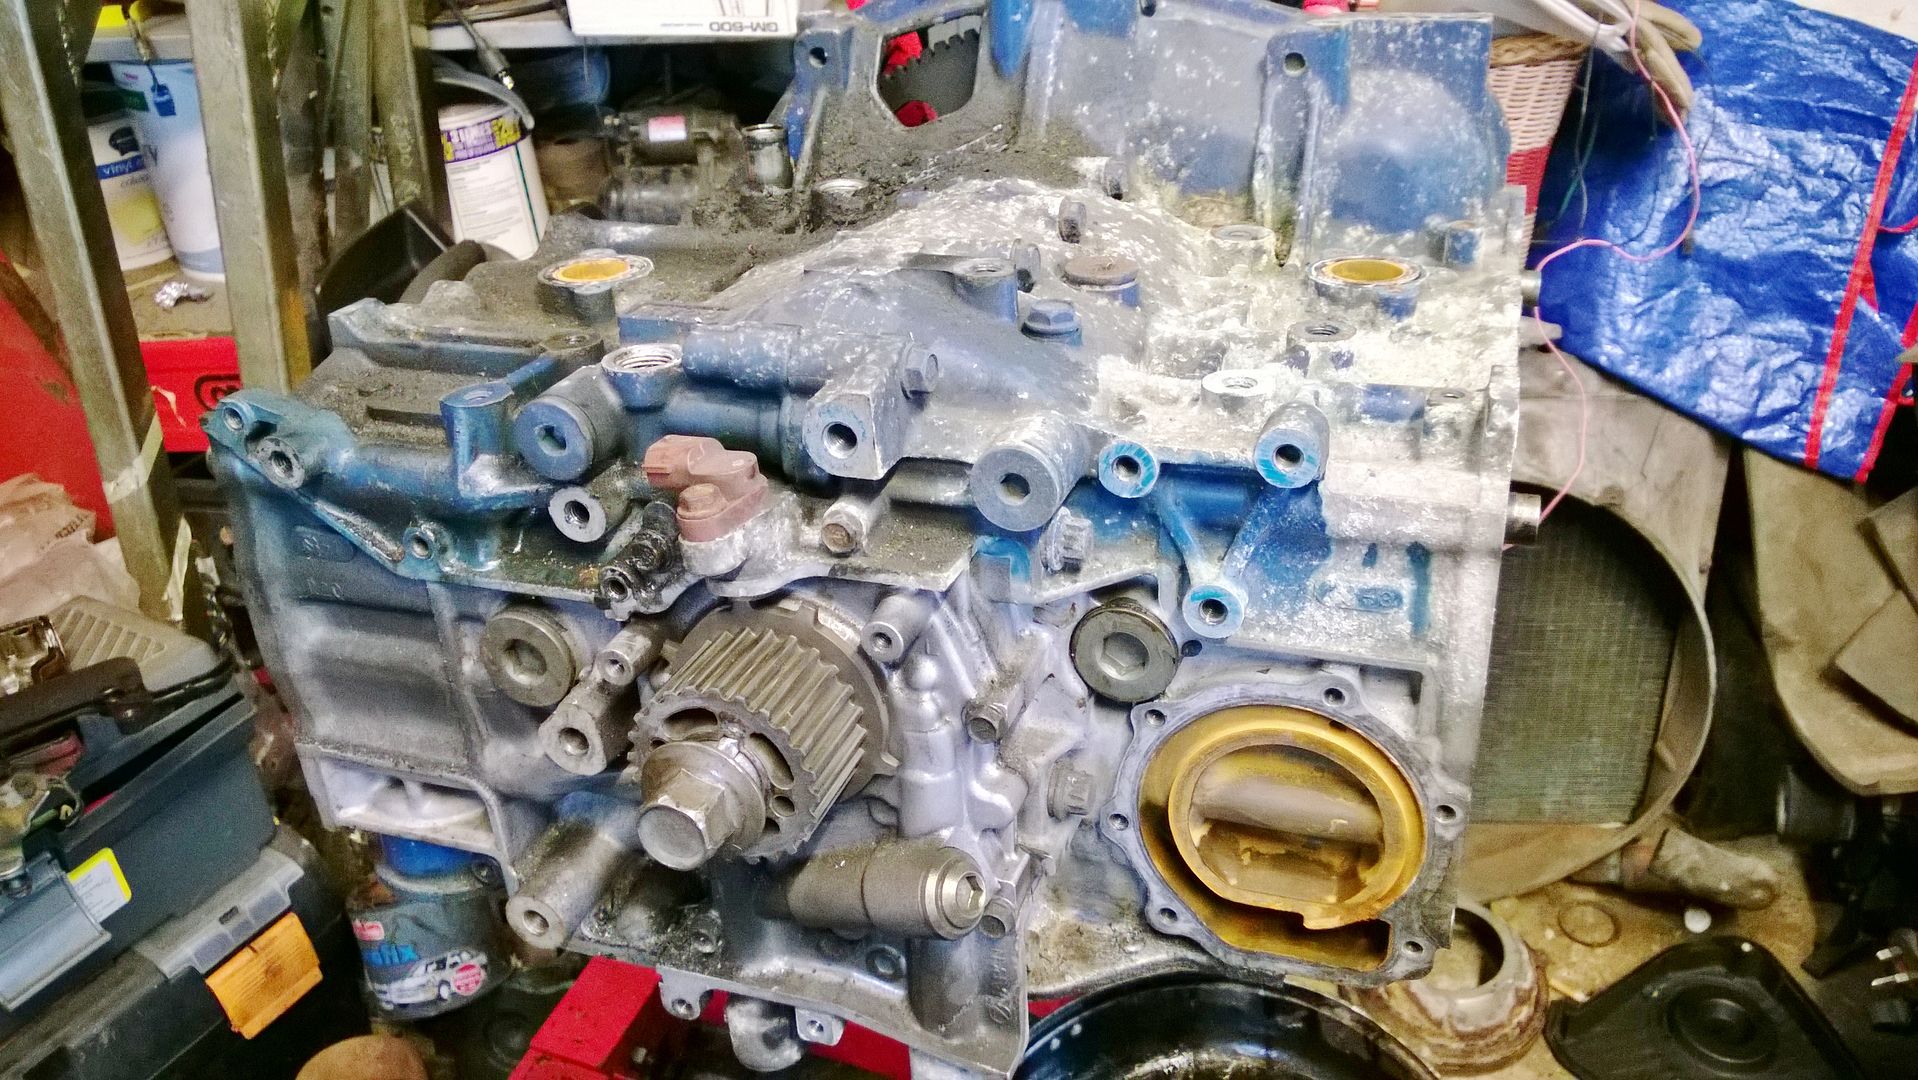
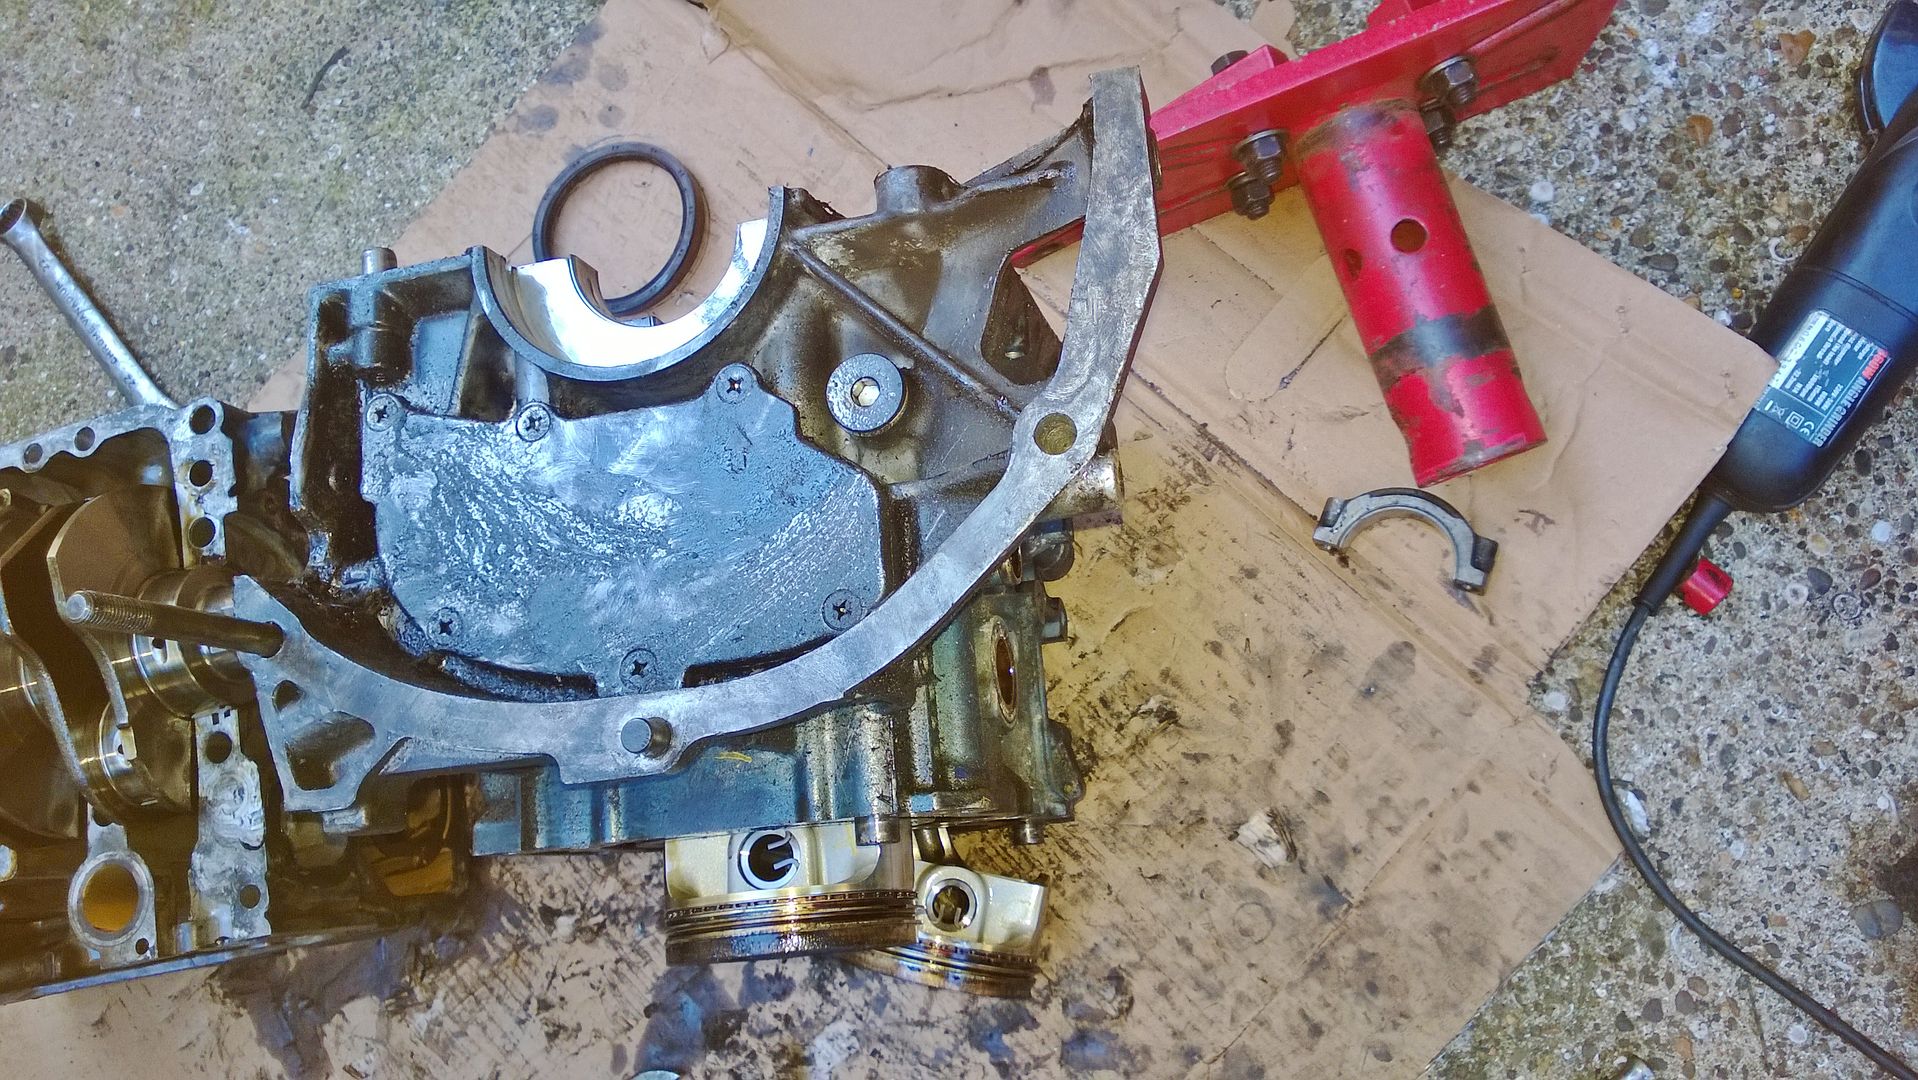
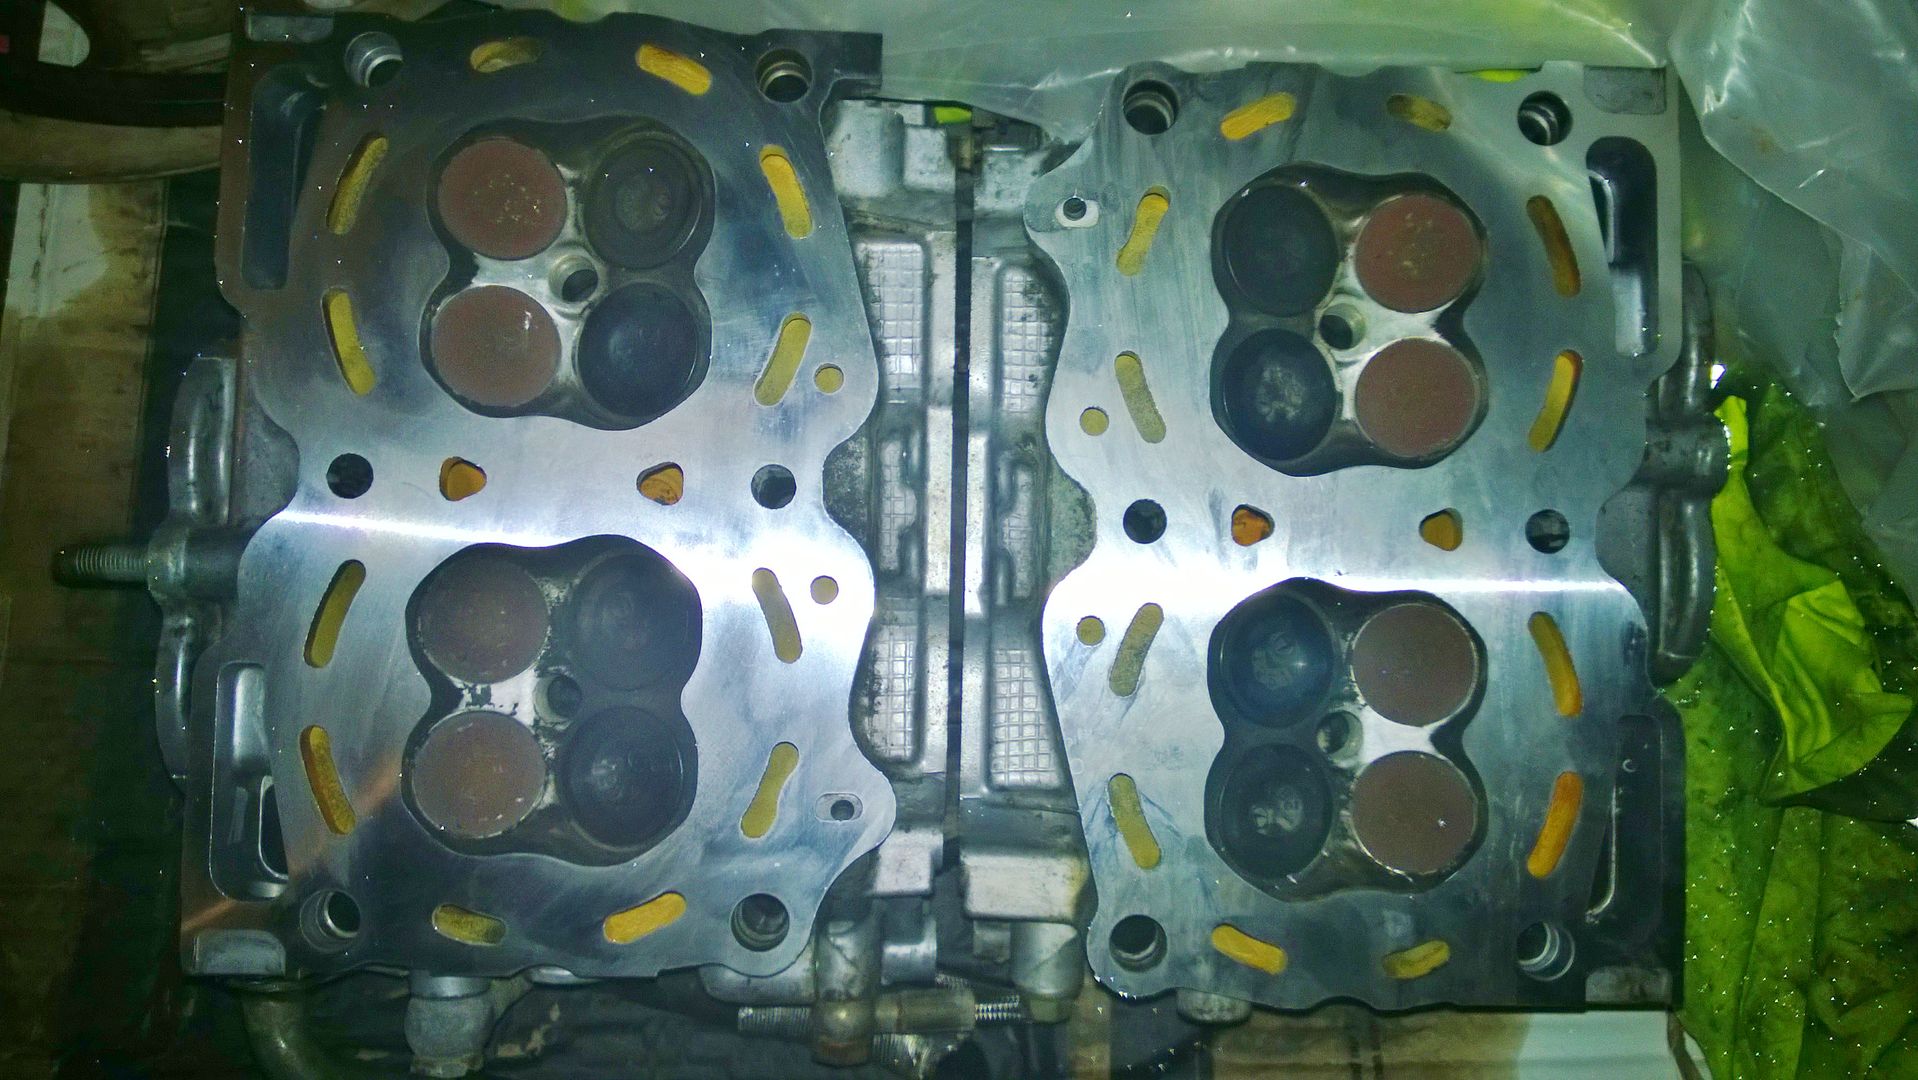
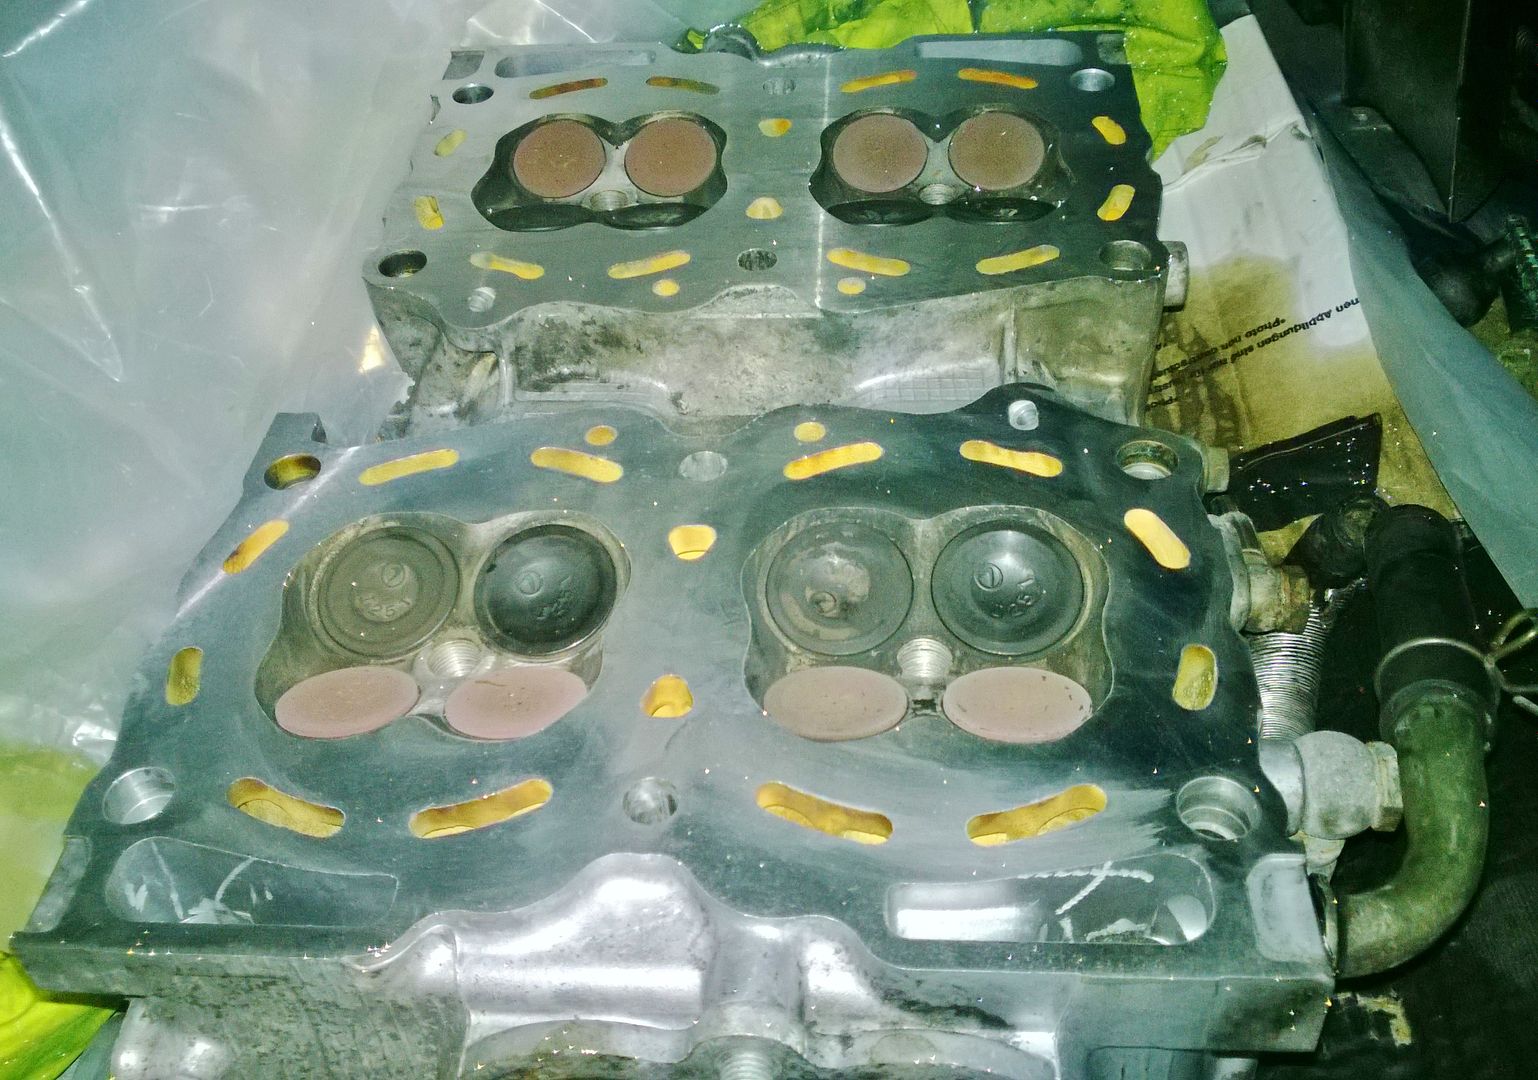
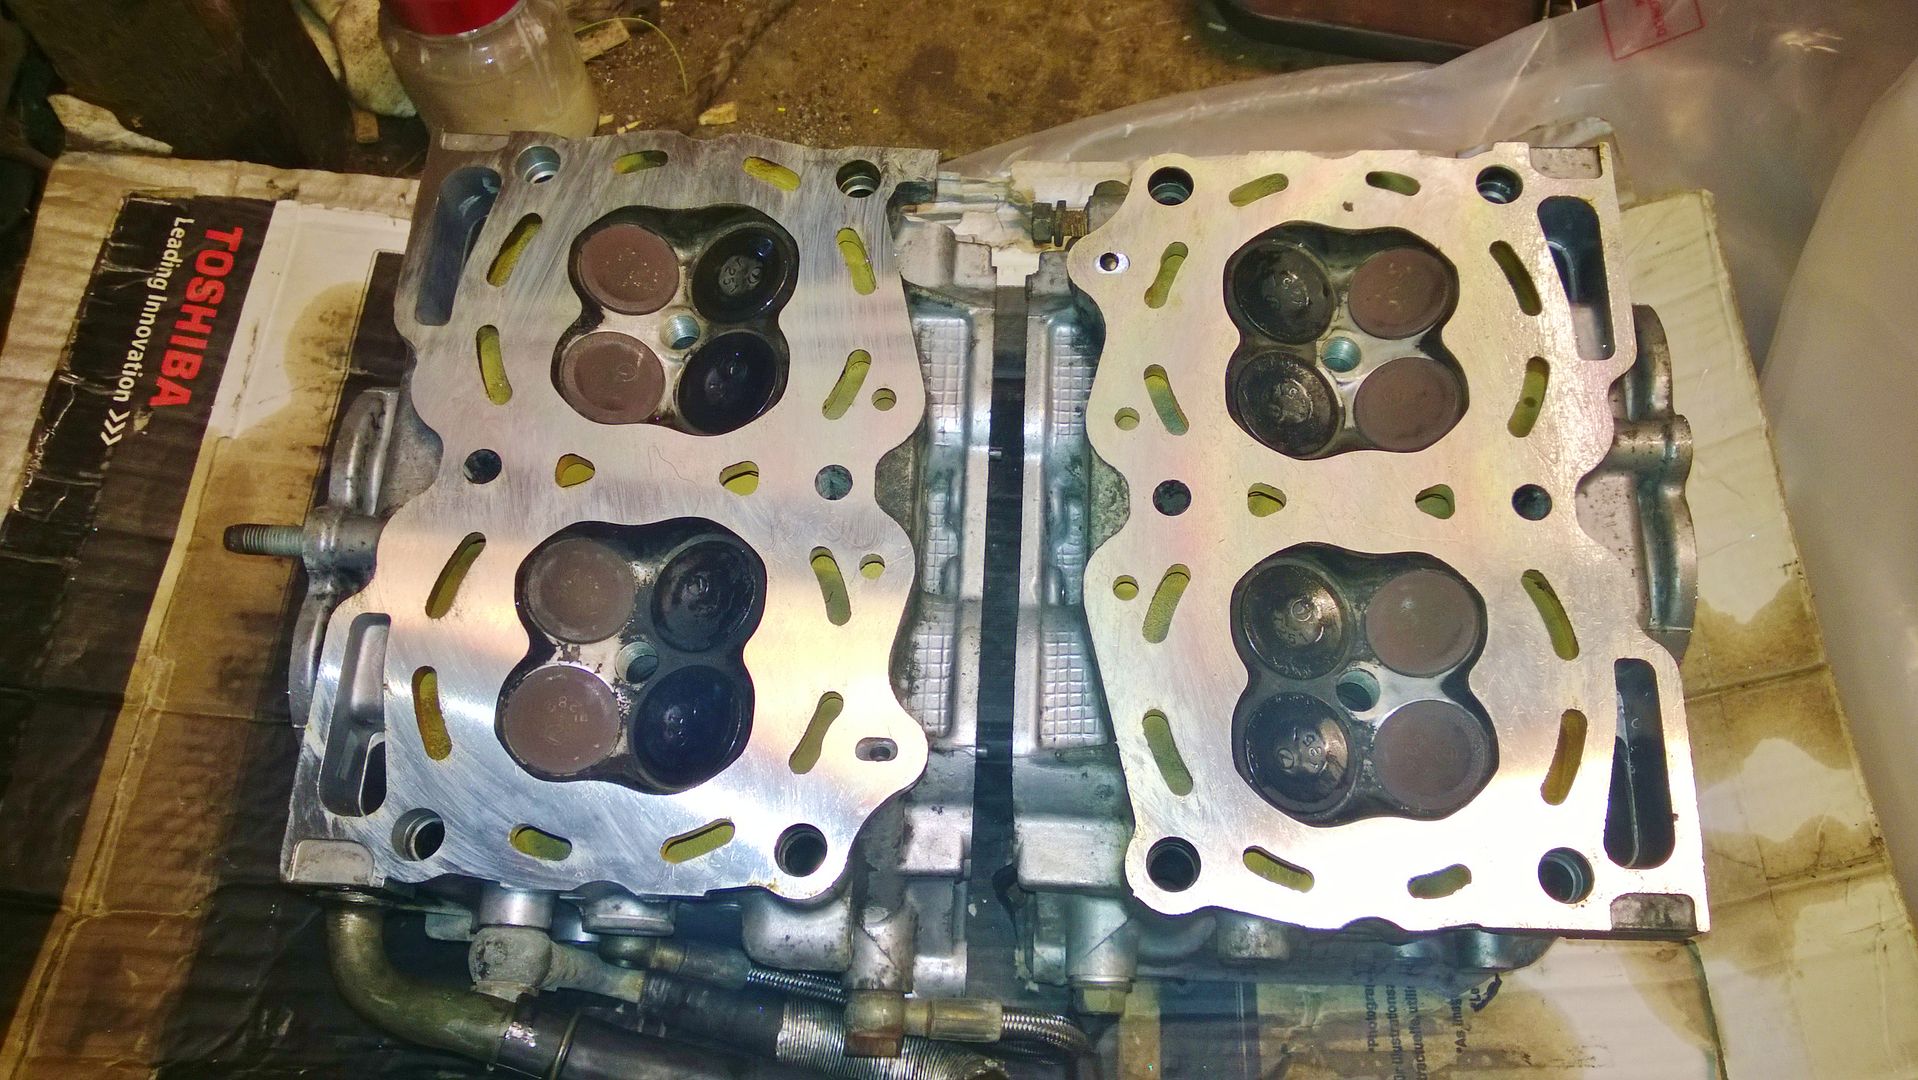
My heads have been skimmed and the guys done a great job, my block halves are with him now to also be refaced.
And lastly the bearings close up the damage to the one conrod shell is my fault after removing them, not done in situ.
The marks on the heads are dirty fingerprints etc, and I can tell you they are mirror finish.


Dylan came over with a set of pullers (top man) so I could remove the crank pulley, as my efforts resulted in the damage to the oil pump case that you can see
Also got a set of metal cam wheels off him too
, just need them cleaned up as they are a tad used lol.You can see close up damage to the woodruff key
Anyways sorted now.
Anyways removed the pistons and my rods are standard
, the bearings look good, but are being replaced anyways for ACL Race bearings.The bolt was a flywheel bolt thread-locked so tightly in I had to cut the head off to remove the flywheel. To be fair its the ONLY bolt to cause a problem.
I also snapped my Snap-On 1/4 drive, along with my Halfords 1/4 drive, and I broke my Bosch drill, as I had tried to drill out the above bolt
My heads have been skimmed and the guys done a great job, my block halves are with him now to also be refaced.
And lastly the bearings close up the damage to the one conrod shell is my fault after removing them, not done in situ.
The marks on the heads are dirty fingerprints etc, and I can tell you they are mirror finish.
Last edited by Jimbob; Sep 10, 2013 at 03:05 AM.

It's a learning curve, but atleast I know everything will be done correctly, and I can take pride in my own work. As now as long as this works, I've rebuilt everything on this car, not many can say that.
Its a utility vehicle after all lol. But nice to see someone doing their own work, as you know Rich.
It's a learning curve, but atleast I know everything will be done correctly, and I can take pride in my own work. As now as long as this works, I've rebuilt everything on this car, not many can say that.
It's a learning curve, but atleast I know everything will be done correctly, and I can take pride in my own work. As now as long as this works, I've rebuilt everything on this car, not many can say that.

Good progress mate
 now the fun begins making sure its built right and all to spec , best advice I can give is take your time check and check tolerance to make sure they are within spec and clean parts clean clean and if you think they are clean enough clean once more
 Hope it all goes well and do lots of searching threads for info
Have you got grafegen paste for bearings ? And cams ? As worth getting if not
I can
Good progress mate now the fun begins making sure its built right and all to spec , best advice I can give is take your time check and check tolerance to make sure they are within spec and clean parts clean clean and if you think they are clean enough clean once more
Hope it all goes well and do lots of searching threads for info
Have you got grafegen paste for bearings ? And cams ? As worth getting if not
Good progress mate
now the fun begins making sure its built right and all to spec , best advice I can give is take your time check and check tolerance to make sure they are within spec and clean parts clean clean and if you think they are clean enough clean once more Hope it all goes well and do lots of searching threads for info
Have you got grafegen paste for bearings ? And cams ? As worth getting if not
But Grefagen paste sounds a LOT easier lol.
I have ALWAYS wanted an Impreza, and no better way to get to the heart of it, than building your own.
I have one final announcement to make, but have to wait for their arrival first. Wasn't expecting it, but a certain someone has come up trumps, bent over backwards, and really really made my day!!
Just ordered some Grephogen paste, along with ACL Race bearings, rear crank oil seal, and Flywheel bolts.
Whats the best sealant for sealing the block halves, and the oil pump etc?? I do have Hylomar Blue here, which is awesome stuff, but not sure if its up to this job??
Whats the best sealant for sealing the block halves, and the oil pump etc?? I do have Hylomar Blue here, which is awesome stuff, but not sure if its up to this job??
The paste will stay on bearings better so you can turn by hand etc and will not run off like oil will but once mixed with the oil it will brake down but oil is ok , built mine with that paste on bearings and on cam lobes and was fine, just used oil on bores and pistons and that was mineral oil for running in engine,
Run happy at 454 bhp 462 torque at 1.5 bar
It can be a pig to prime pump in these engines but some are lucky
Used dercko sealant from advanced automotive had most my bits from there really
Run happy at 454 bhp 462 torque at 1.5 bar
It can be a pig to prime pump in these engines but some are lucky
Used dercko sealant from advanced automotive had most my bits from there really
Last edited by The Stitcher; Sep 10, 2013 at 09:46 PM.
The paste will stay on bearings better so you can turn by hand etc and will not run off like oil will but once mixed with the oil it will brake down but oil is ok , built mine with that paste on bearings and on cam lobes and was fine, just used oil on bores and pistons and that was mineral oil for running in engine,
Run happy at 454 bhp 462 torque at 1.5 bar
It can be a pig to prime pump in these engines but some are lucky
Used dercko sealant from advanced automotive had most my bits from there really
Run happy at 454 bhp 462 torque at 1.5 bar
It can be a pig to prime pump in these engines but some are lucky
Used dercko sealant from advanced automotive had most my bits from there really
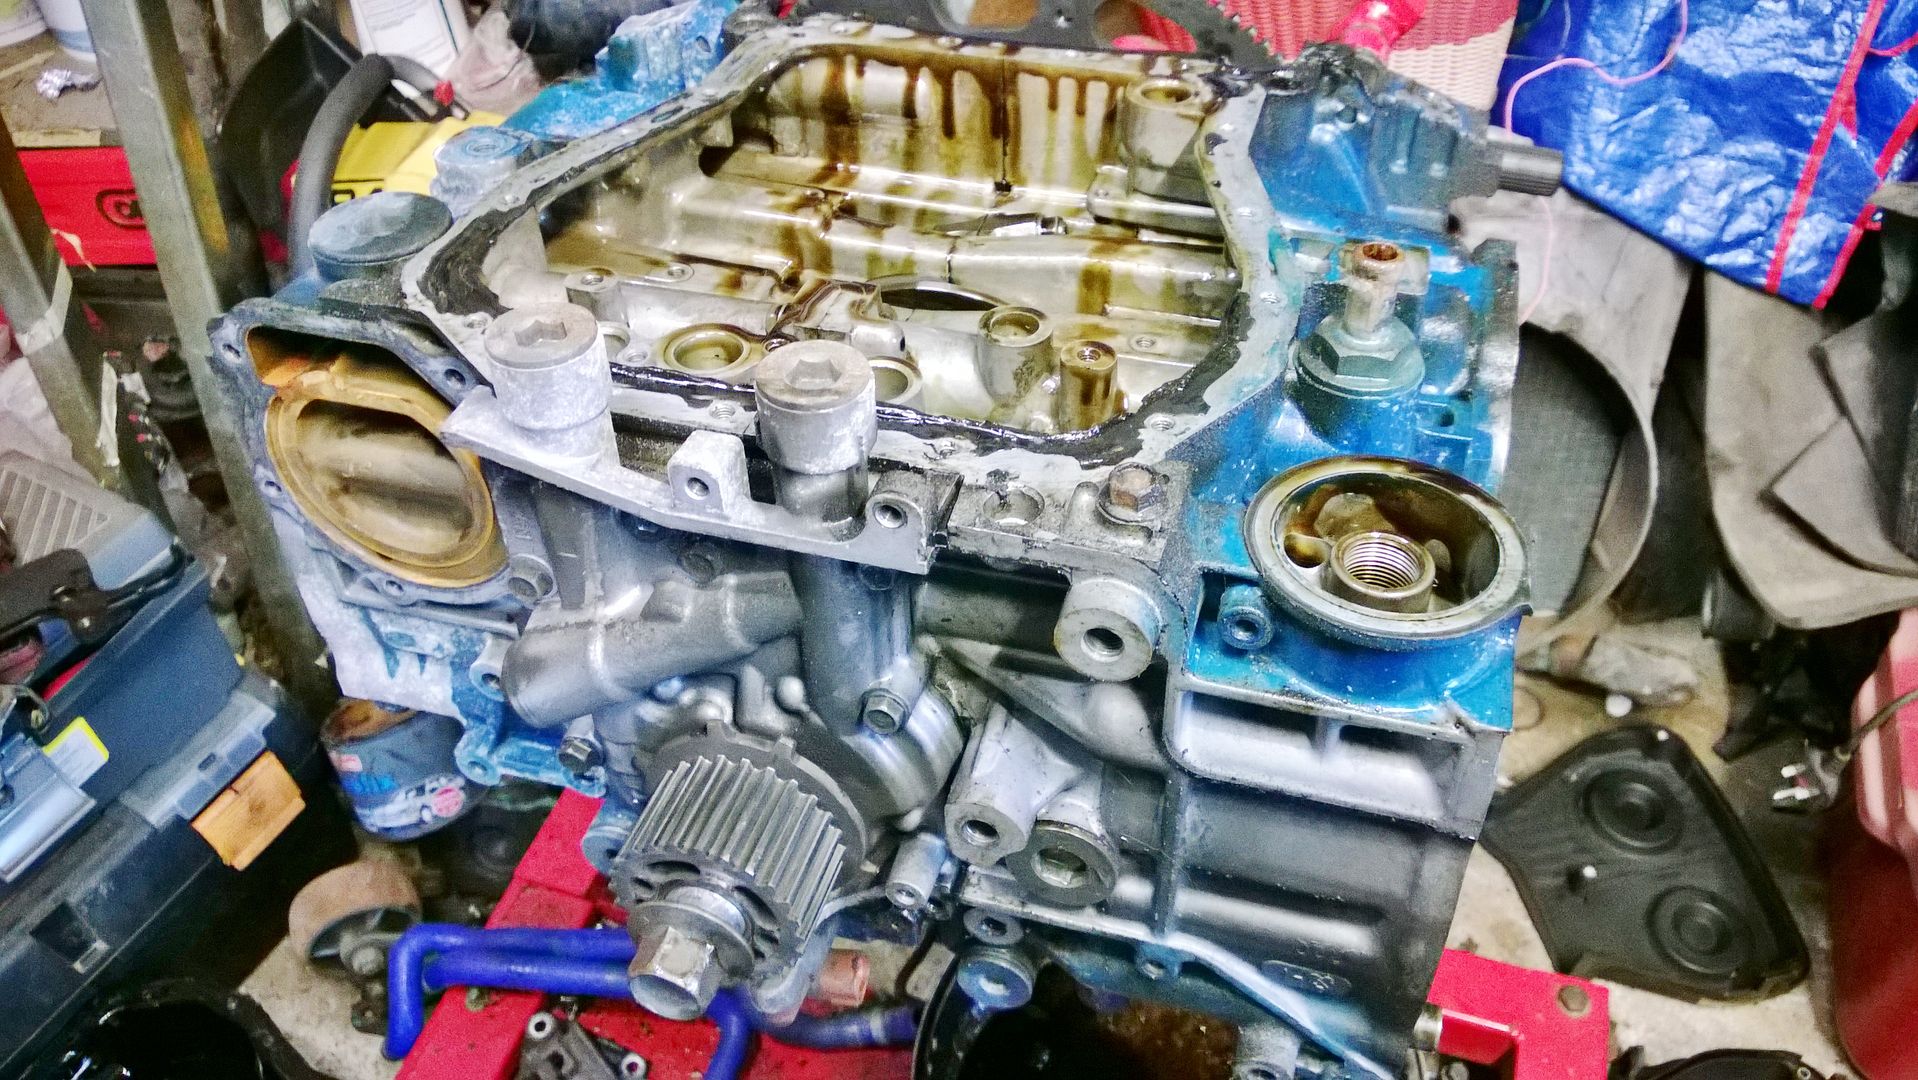
As for cleaning I have LOTS to do as the block came back with swarf on it, he didn't have chance to bung it into the parts cleaner. But pressure washer will sort that.
The clearances I'm a bit unsure of tbh, as I'm reusing the piston rings, and have ordered standard size rings etc. So will be all ears to the people in the know.
There are a few other things I need "help" with, like the torque settings for the ARP bolts on Forged API pistons, but best I speak to API about those.
Also the ARP head studs, they have an ARP torque setting, RogerClarke lists a Toque setting (not seen if its different), but from NASIOC I see that they run a little more than stated, so will need to speak to someone who knows from doing it. Also do I use the Factory toque settings for the bottom end or is there a "better" setup that I can use??
The list of questions are endless, but also makes the challenge that bit more appealing. As the more I do the more I learn
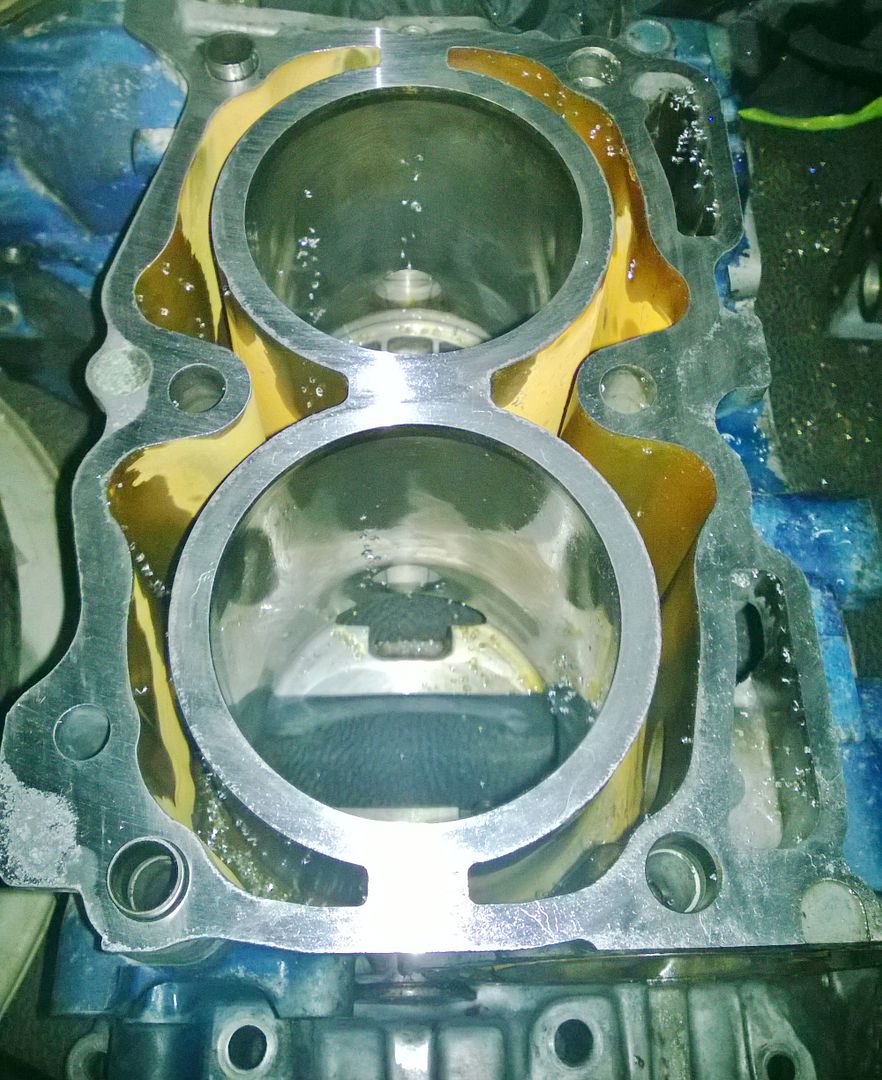
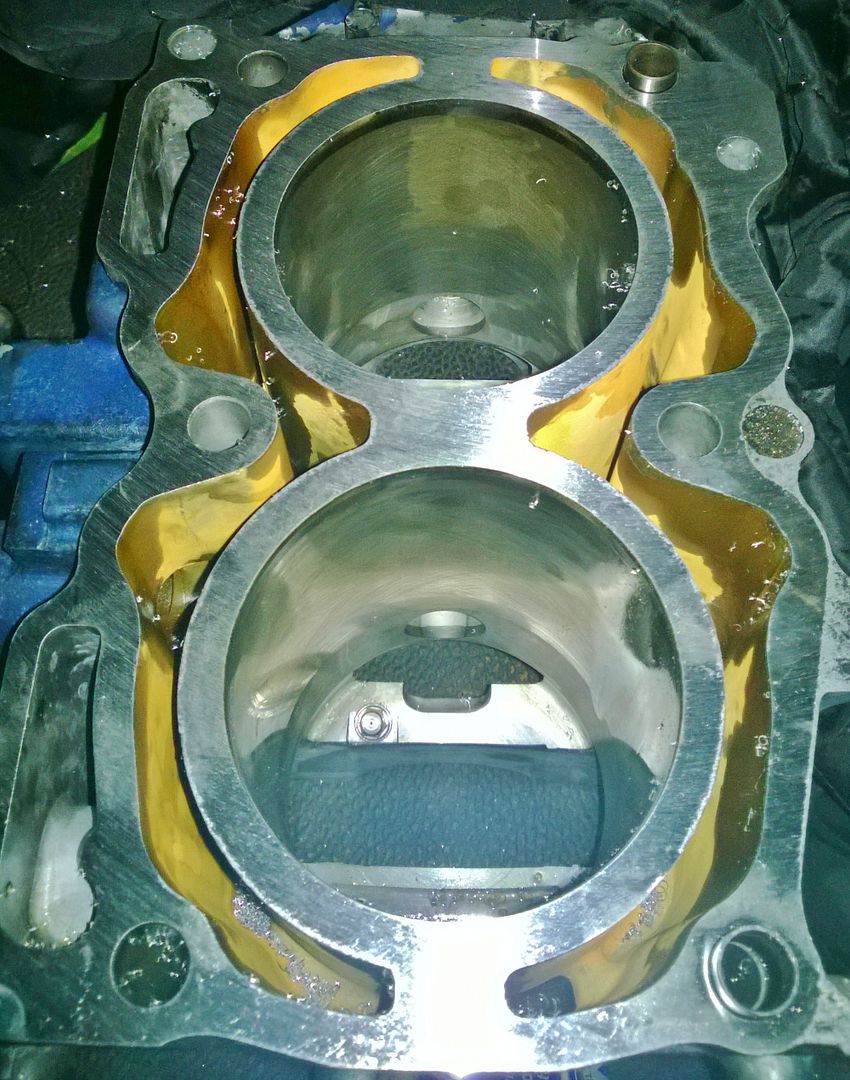
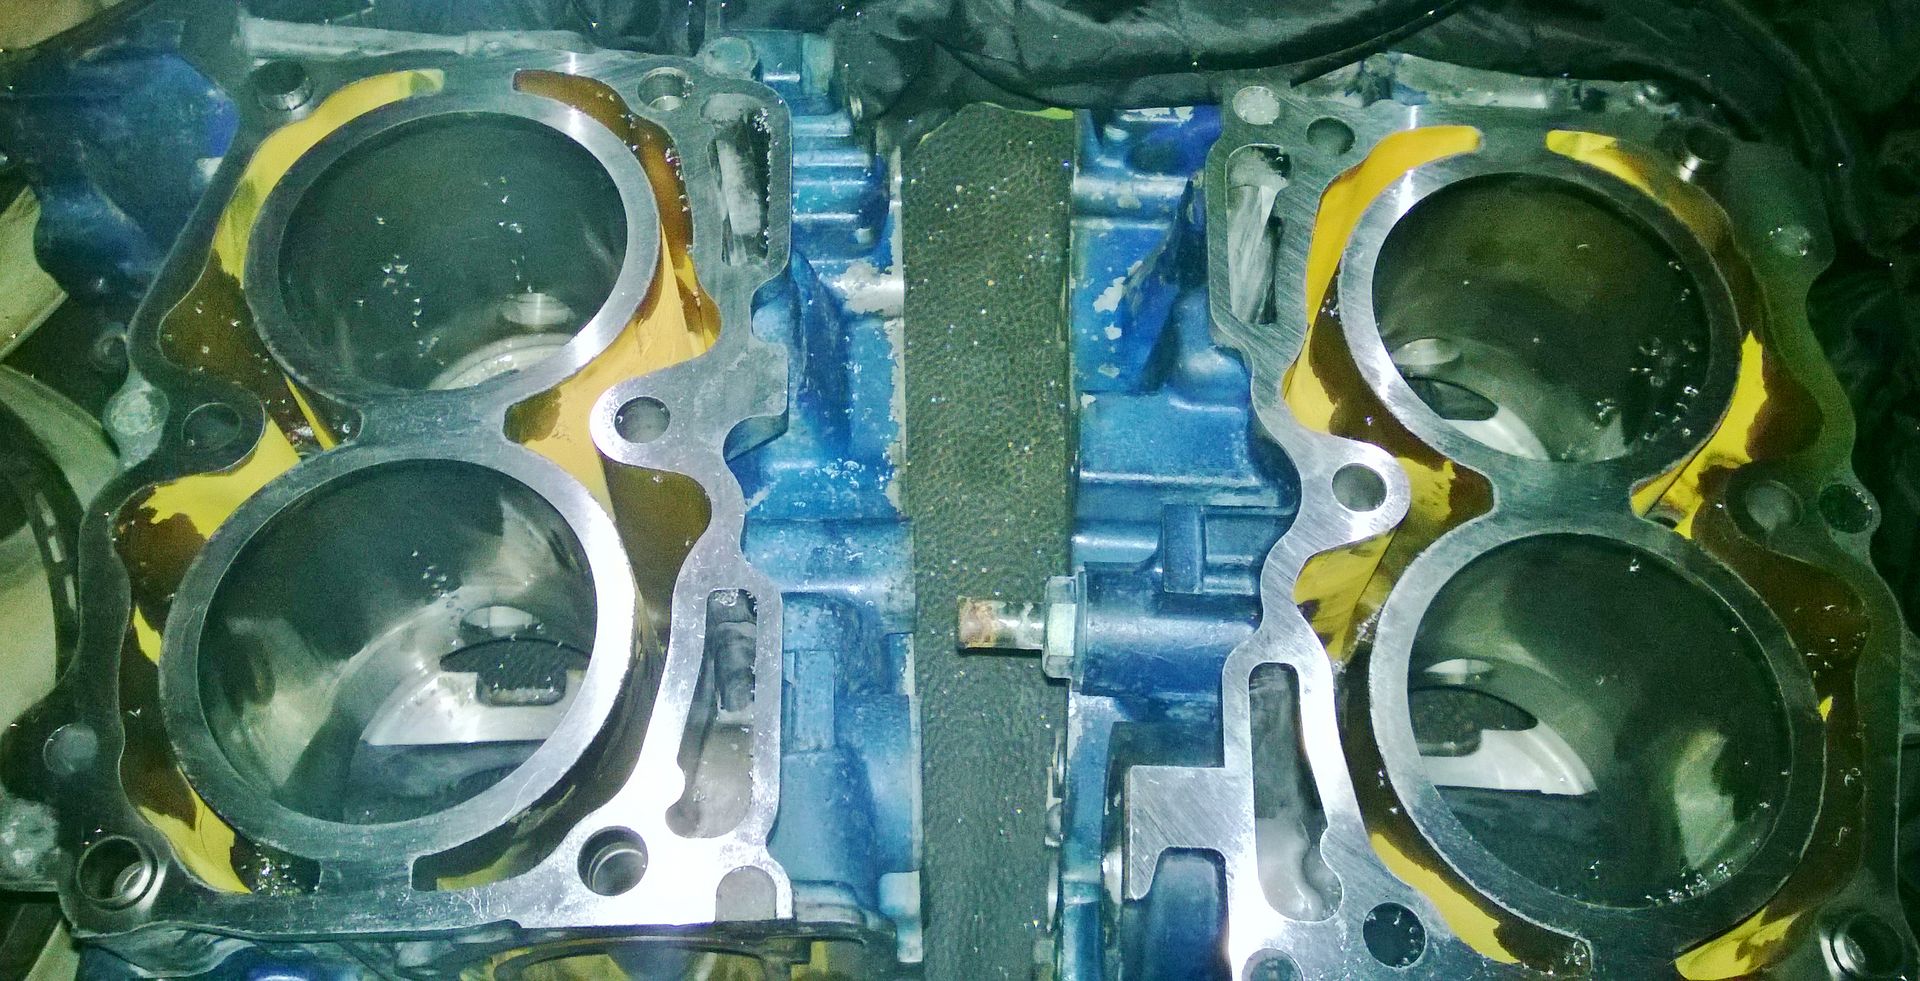
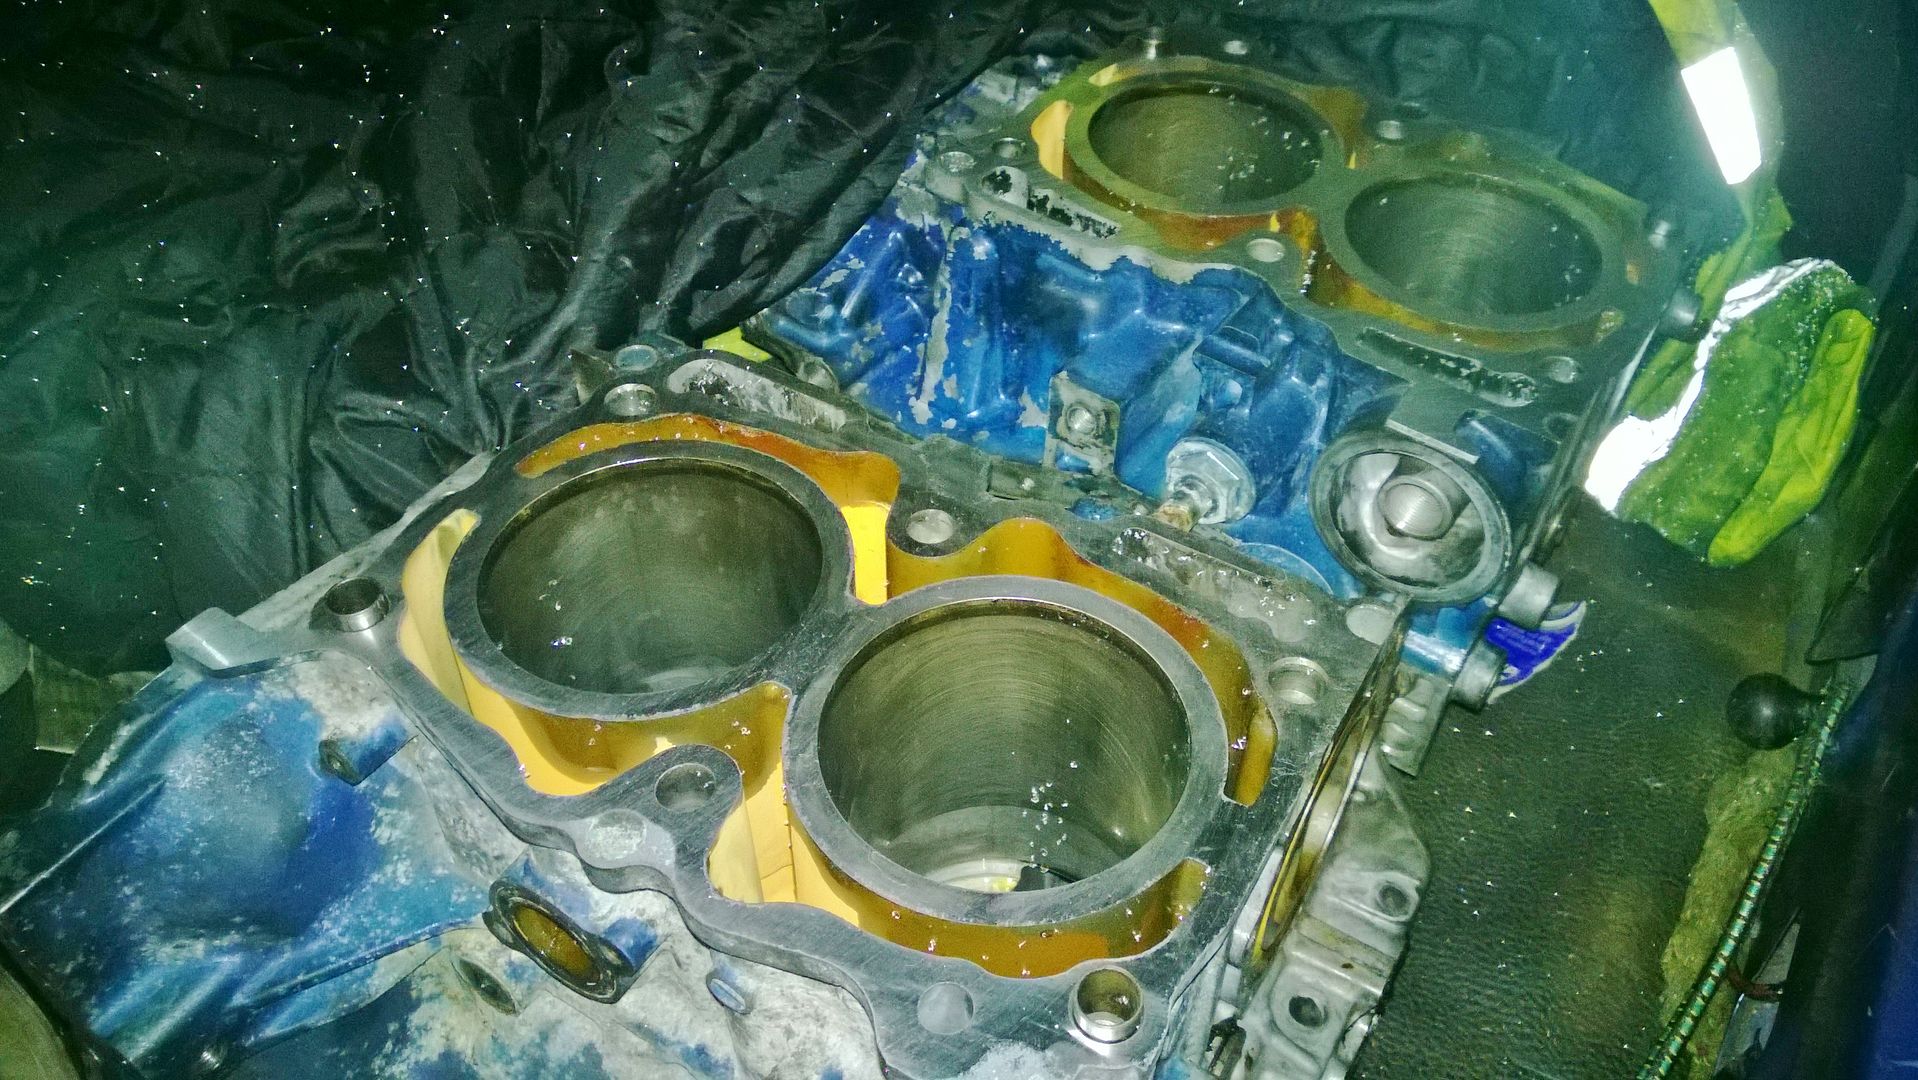
Anyhoo here are the pics for the block after some refacing, one was slightly more uneven than the other, but both done to match. There was a tiny tiny amount taken off, so a fraction of a thousandth of an inch, so he said that its so negligible that together with the heads will be within tolerances, he did say that if they went again that it would take it out of tolerance and that I would be better off getting a different block and heads to keep it within tolerance.

Well I have ordered ACL Race bearings, Graphogen paste, and new flywheel bolts from Advanced Automotive.
I have a surprise being delivered in the next few days.
As for tolerances, I was a bit worried about them, so many variables was making my head spin. So have spoken to a good mate of mine, and I am going to build the shortblock at his garage, under his supervision, so I learn how to do it, as I really don't want to have someone else doing it. But at the same time I know its done correctly, so I don't throw my money away doing it wrong.
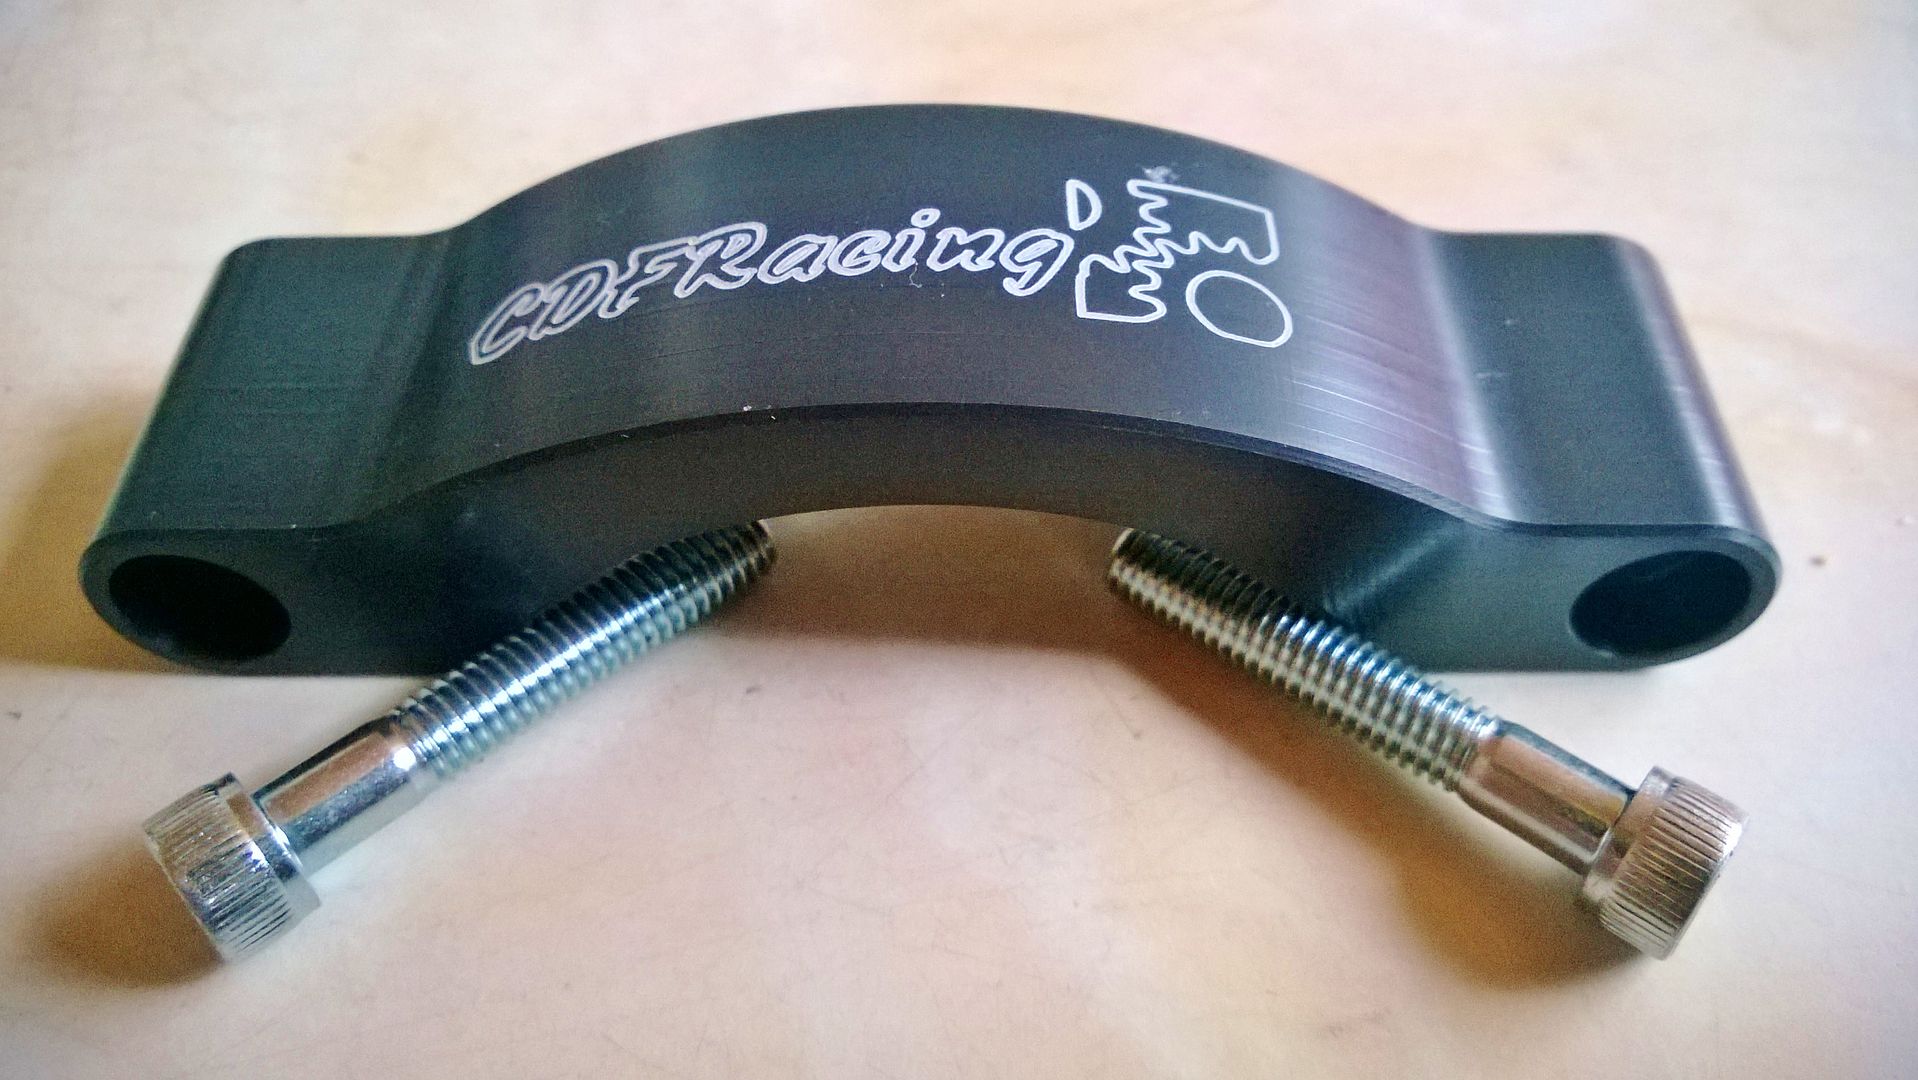
Also my CDF Racing Cambelt Guide arrived today
I have a surprise being delivered in the next few days.
As for tolerances, I was a bit worried about them, so many variables was making my head spin. So have spoken to a good mate of mine, and I am going to build the shortblock at his garage, under his supervision, so I learn how to do it, as I really don't want to have someone else doing it. But at the same time I know its done correctly, so I don't throw my money away doing it wrong.
Also my CDF Racing Cambelt Guide arrived today
Have cleaned out the block halves with a high pressure water gun, now after drying I've soaked a rag in used engine oil and liberally rubbed it lightly on to all mating surfaces, and journal/bearing places on the casing. I have also done the same to the heads.
Before fitting I will use a high pressure air line to check the head bolt holes, and everywhere else just in case.

Before fitting I will use a high pressure air line to check the head bolt holes, and everywhere else just in case.
Think this is turned into Jimbobs full engine rebuild, from what was supposed to be just a head gasket replace lol.
But atleast the old girl will be living on when many a car has been broken.
Anyhoo heres some more bits that arrived from Advanced Automotives, tbh their customer care is awesome, and I CANNOT praise them enough.
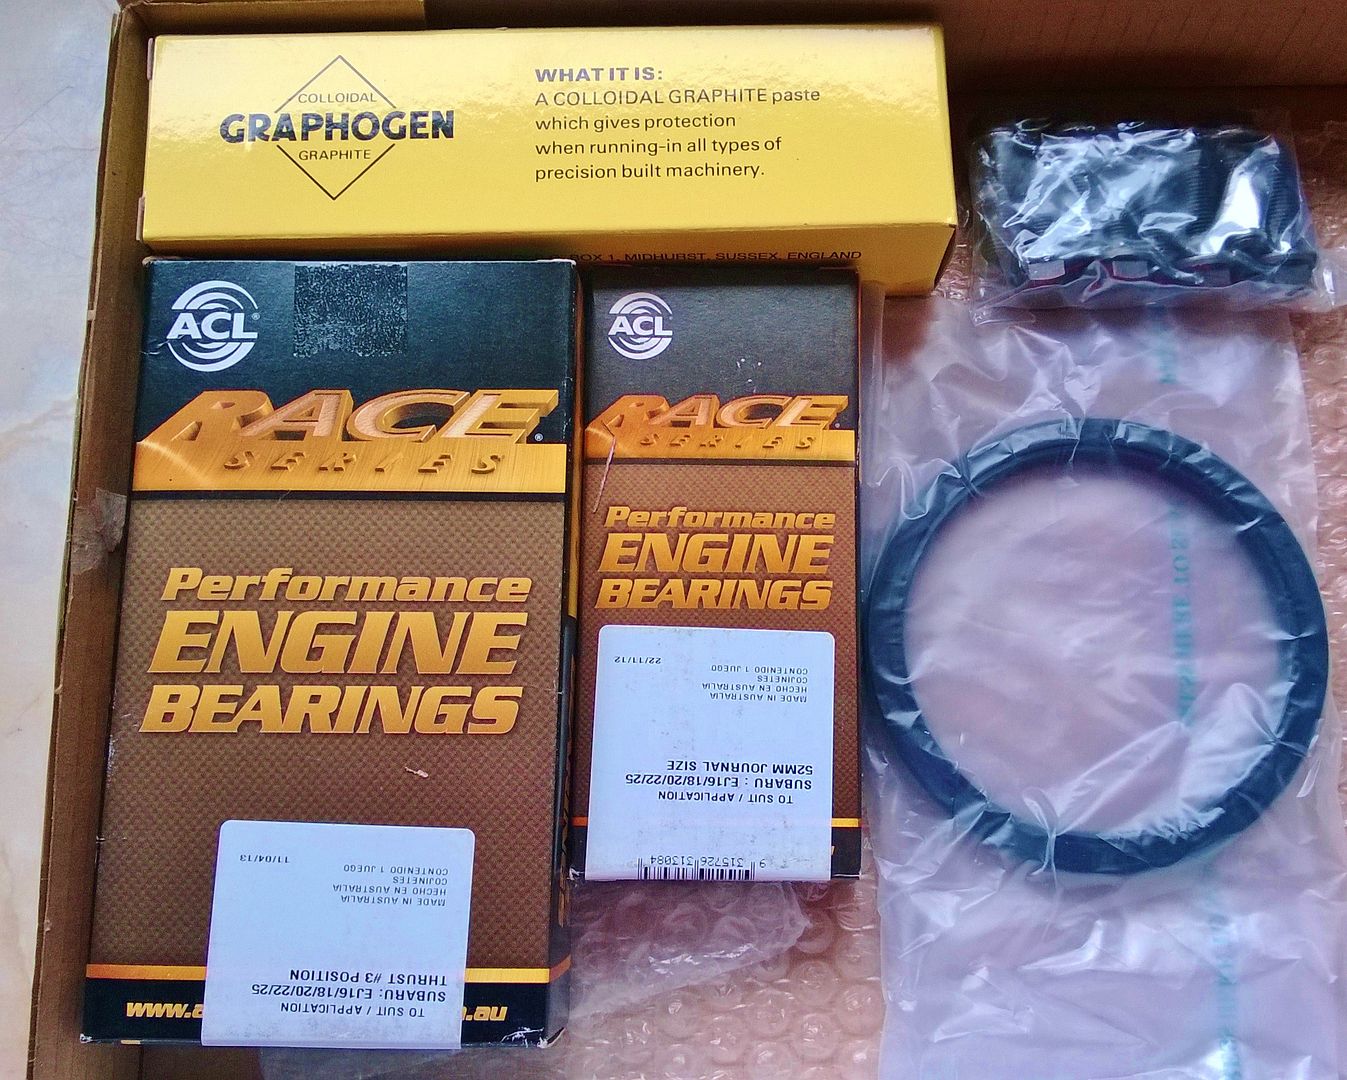
ACL bearings, flywheel bolts, crank seal, and Graphogen paste. Have also ordered the block half seals, dowty washers, and ARP Moly lube.
But atleast the old girl will be living on when many a car has been broken.
Anyhoo heres some more bits that arrived from Advanced Automotives, tbh their customer care is awesome, and I CANNOT praise them enough.
ACL bearings, flywheel bolts, crank seal, and Graphogen paste. Have also ordered the block half seals, dowty washers, and ARP Moly lube.
Best is yet to come massive thanks to a certain someone, will elaborate when "they" come
This thread deffo needs a name change lol.
massive thanks to a certain someone, will elaborate when "they" come This thread deffo needs a name change lol.
Last edited by Jimbob; Sep 13, 2013 at 01:56 AM.
MASSIVE thanks to Matty at MB Developments.
I bought my engine off him some 3 ish years ago, and was advertised as being fully forged semi closed deck, well only by this happening have I found out it wasn't. Well Matty obviously didn't know as you can't tell obviously without stripping it down, so when I contacted Matty just to say what I had found, and also having a slight grumble.
But Matty could have said "Ah well, it's 3 years ago dude, can't do anything!". But he didn't
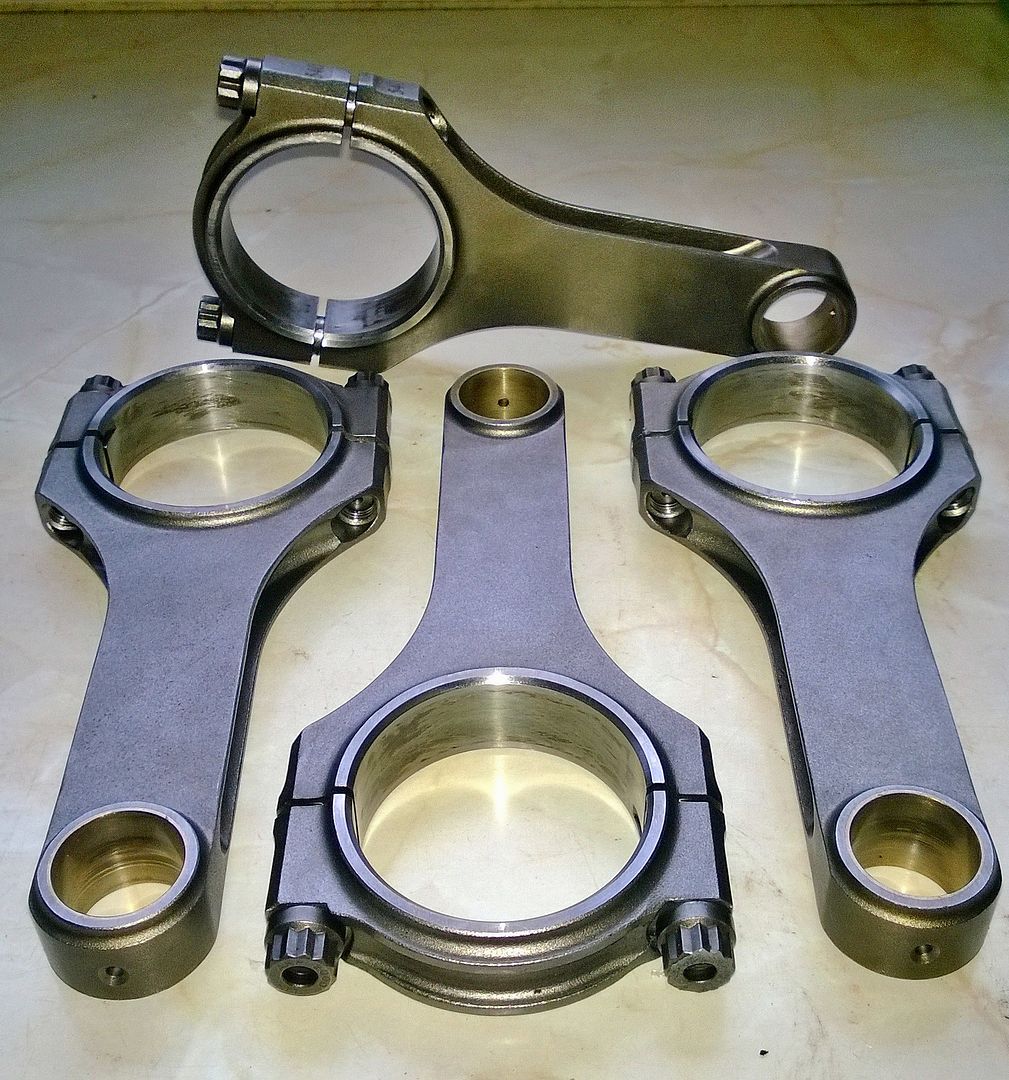
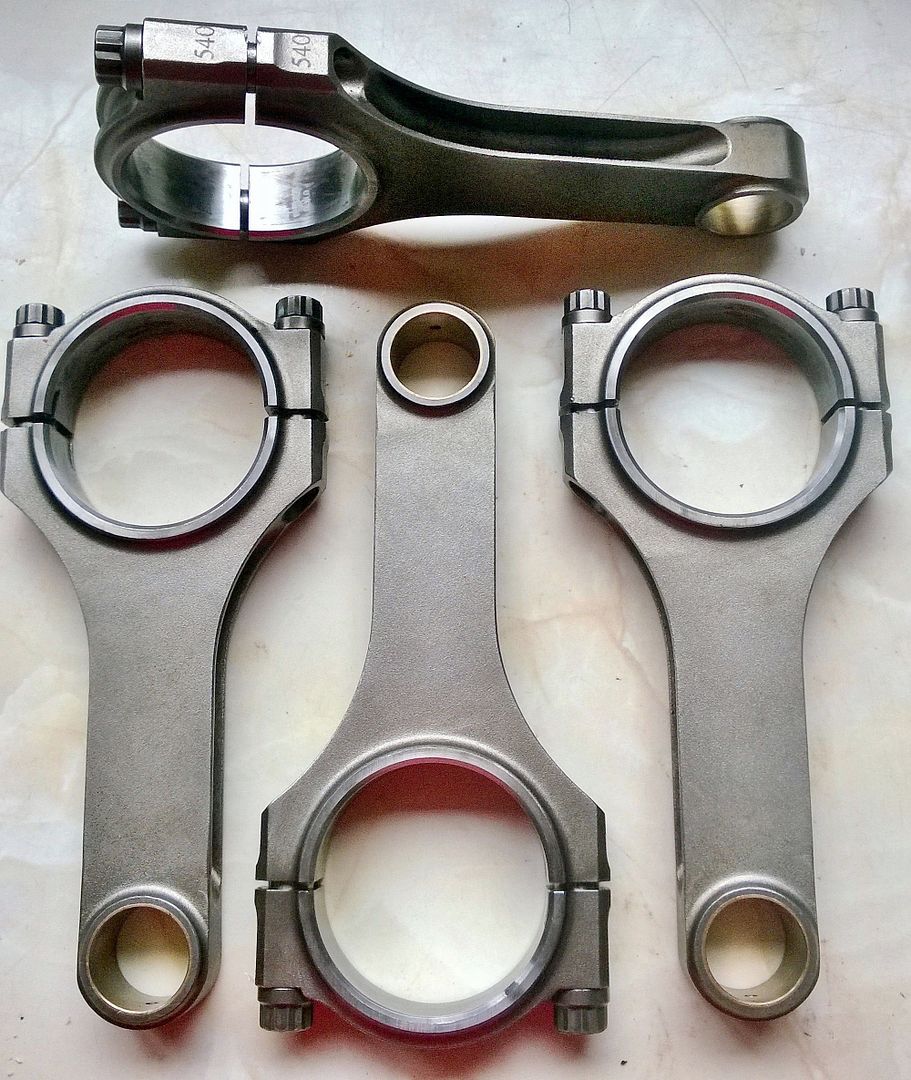
Gotta say he went out of his way to supply me these that he had in his workshop, they are API Rods and ARP Rods the 9000rpm ones
So I cannot say anything other than THANK YOU SO VERY VERY VERY MUCH, and that not many people in his position would have done anything, let alone what he has.
Just goes to prove how a genuinely decent guy he is, and can be trusted.
Again thanks Matty I have been over the moon since you said about these Rods.
SO my build has taken a big twist that I'm so so so so so happy with
I bought my engine off him some 3 ish years ago, and was advertised as being fully forged semi closed deck, well only by this happening have I found out it wasn't. Well Matty obviously didn't know as you can't tell obviously without stripping it down, so when I contacted Matty just to say what I had found, and also having a slight grumble.
But Matty could have said "Ah well, it's 3 years ago dude, can't do anything!". But he didn't
Gotta say he went out of his way to supply me these that he had in his workshop, they are API Rods and ARP Rods the 9000rpm ones
So I cannot say anything other than THANK YOU SO VERY VERY VERY MUCH, and that not many people in his position would have done anything, let alone what he has.
Just goes to prove how a genuinely decent guy he is, and can be trusted.
Again thanks Matty
I have been over the moon since you said about these Rods.SO my build has taken a big twist that I'm so so so so so happy with

Great work mate. Real inspiration. I'll be following this till completion.
Matty is a gentleman for sorting you out with those rods. He has helped me out a few times and his customer service is 2nd to none
Matty is a gentleman for sorting you out with those rods. He has helped me out a few times and his customer service is 2nd to none
Oh yes, have had a few things from him now, and never had any issues what so ever. Cannot fault the guy enough!!
And just for clarification I am NOT a mechanic, I am an enthusiastic amateur, who has liked taking things apart and putting them back together again. I know a spanner from a tappet adjuster, but claim to be a mechanic I do NOT. I just hope that I can learn enough from doing, so I can help myself and others save money, as there are many a Painter and Decorator masquerading as a master mechanic out there quick to claim a lot but do little. I just enjoy knowing I have learnt something, and that I have saved money, but mainly the smug satisfaction that I can turn and say "I built that!", with the help of people who are generous enough to lend me their knowledge, so I can learn and do it for myself.
I may as well say it's Dylan that is being my supervisor on this, as he has the time available for me, and is just going to be my "phone a friend" sort of thing. But my garage is a complete mess atm with Landy bits everywhere, so not really conducive to a decent job, as I'm forever losing tools in plain sight as there is far too much stuff there. Was fine with just the Landy bits, but with an Impreza engine looking as if it's exploded all over the place, it makes more sense to take the bits to Dylans, so that I can do it somewhere with a bit more working room, and where if I get a question, someone is behind me, instead of a phone call/text/pm away, where I have to explain where I'm at.
I will be doing the work myself, as I took it apart, I know how it goes back together. It's just the bearing tolerances that have me thinking, as you know Rich it's better to do it right first time. If anything goes wrong then it's my fault, but atleast if it does then I can start again (eventually), and I will know what to do, without help. Just with some backup right there for my ponderings, and questions, makes me much more confident to crack on.
All the builds I have done in the past have been on N/A cars where the tolerances aren't so much of an issue (to a certain extent), as you torque things to their correct values, and thats basically it. Where tolerances are greater, with the hardest thing being setting the timing on a quad cam V6. Where the porting and polishing of heads has been done with the aid of my mate who was studying Motor Sport Engineering in Swansea Institute, where he basically said "Rough here, smooth there, that will flow nicely and atomise the fuel better. Check the screen, I did a computer simulation." lol.
I know what certain people's reaction will be, but I couldn't give a monkeys. As I KNOW this will be right, as I am doing it. Even if I have to double check, and triple check everything first. I just want to crack on now, am chomping at the bit so to say.
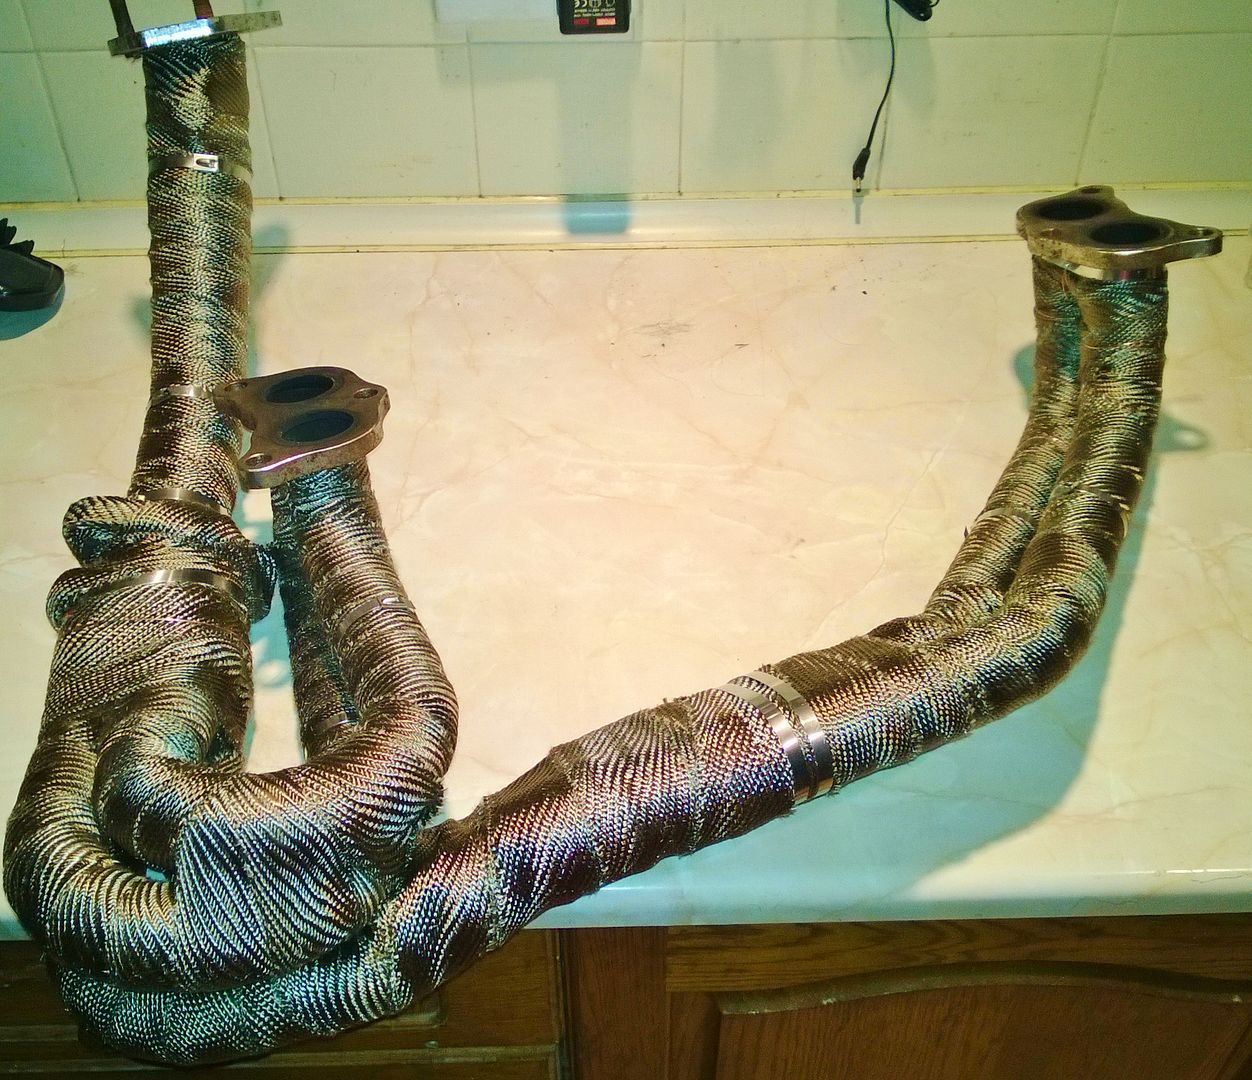
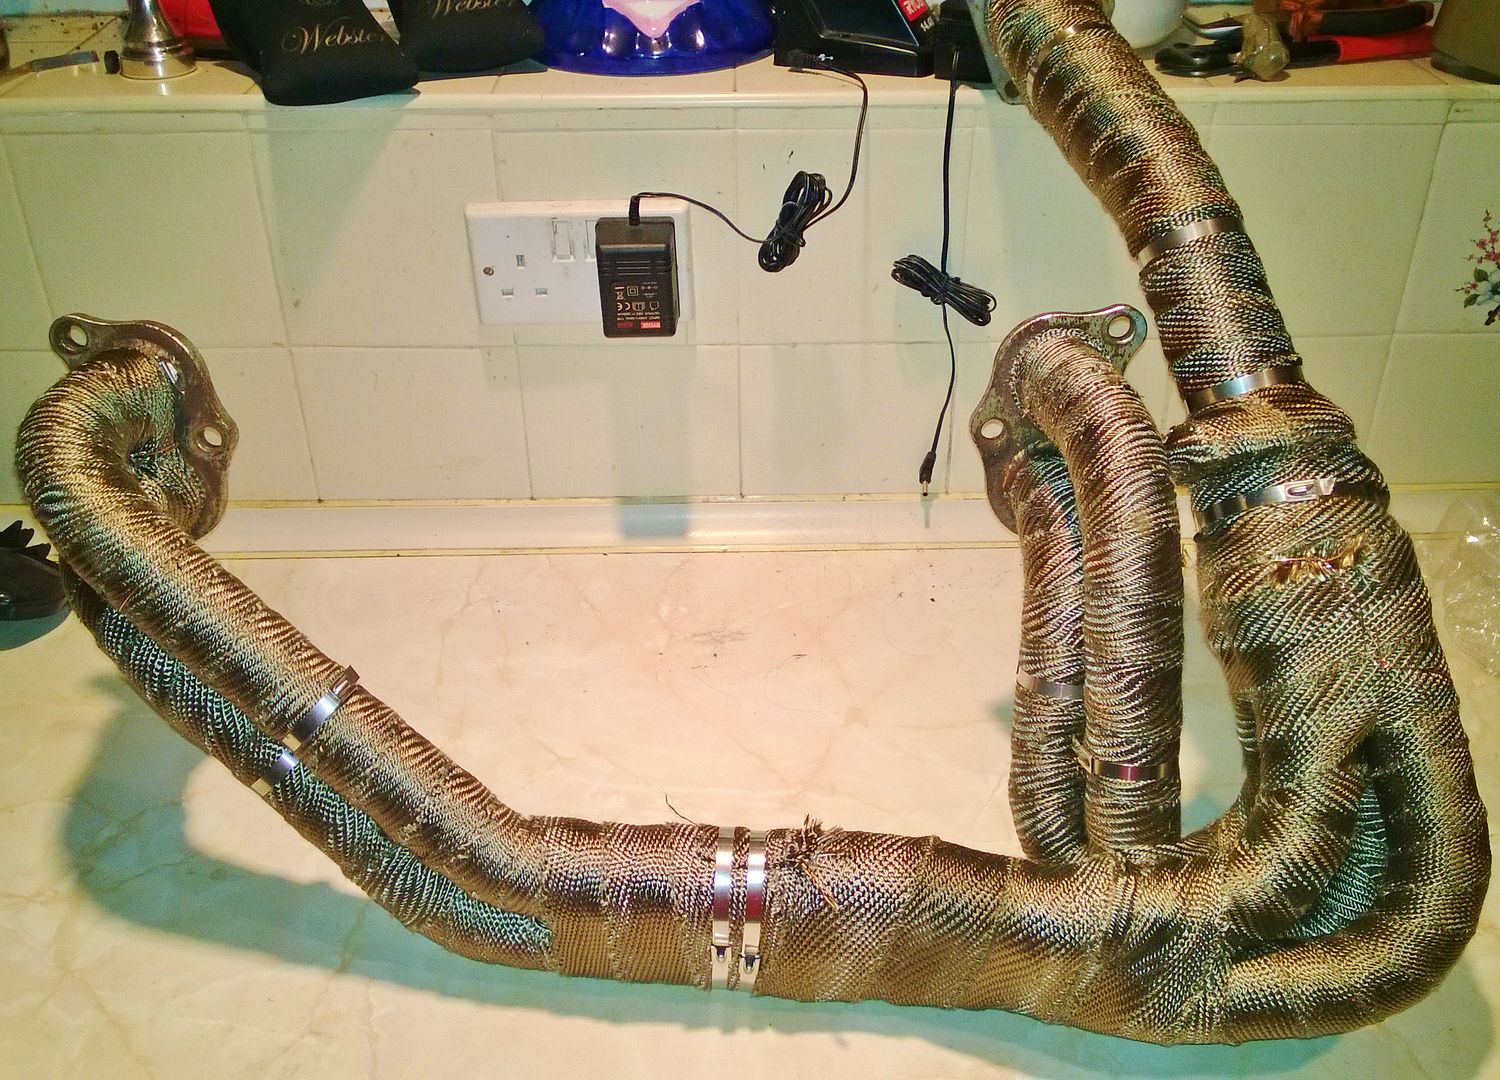
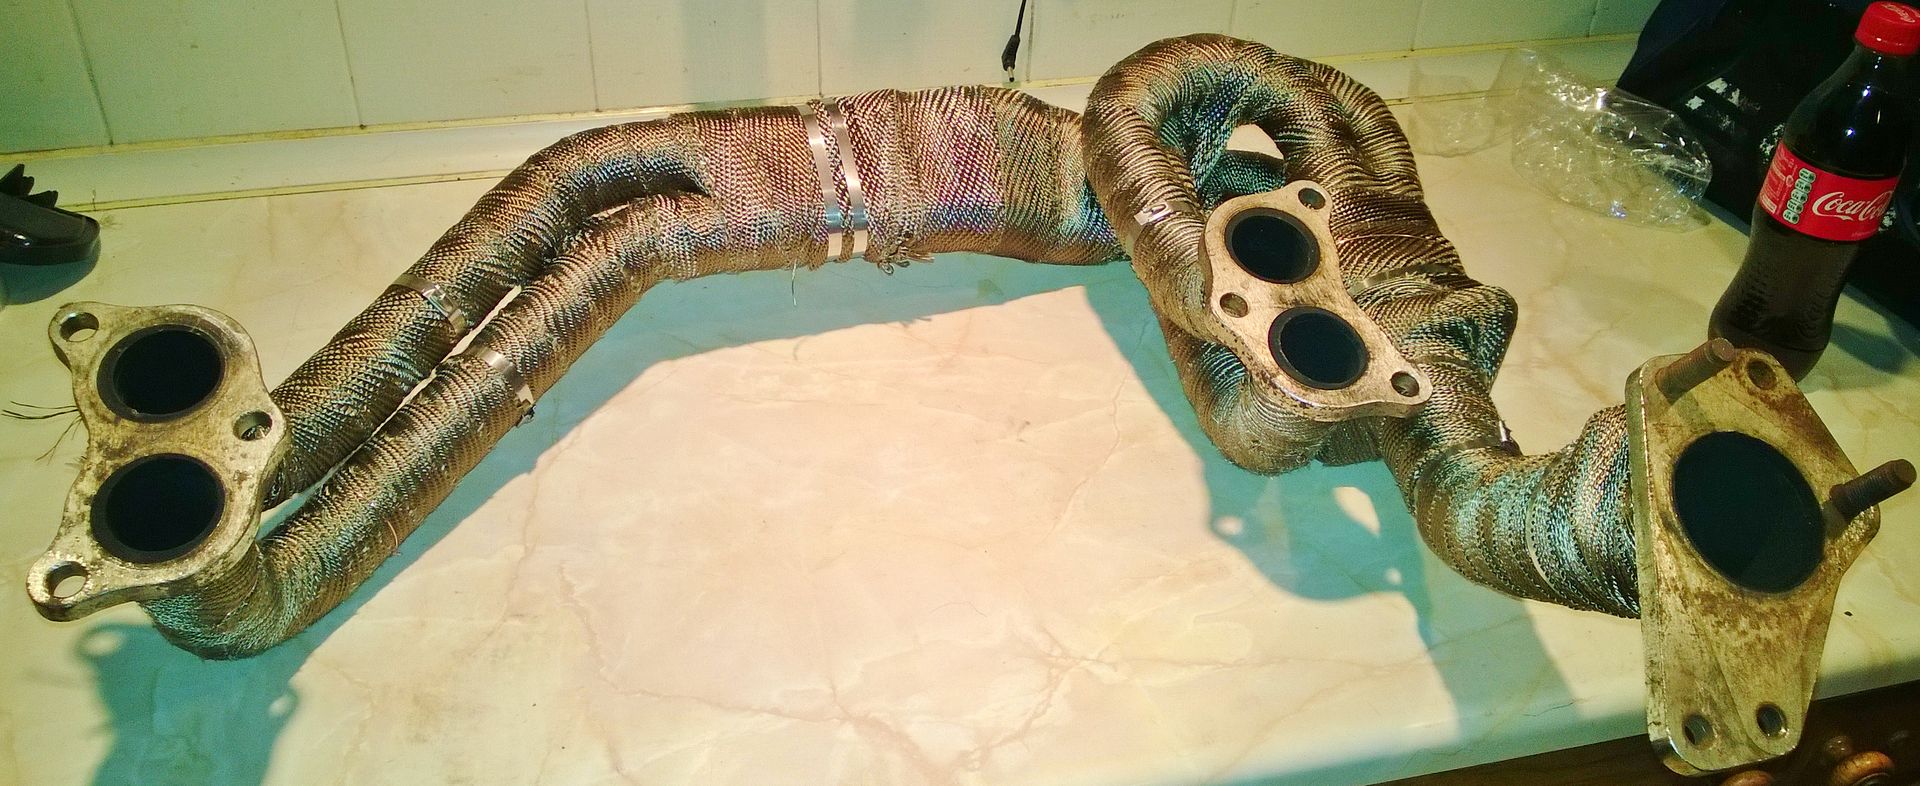
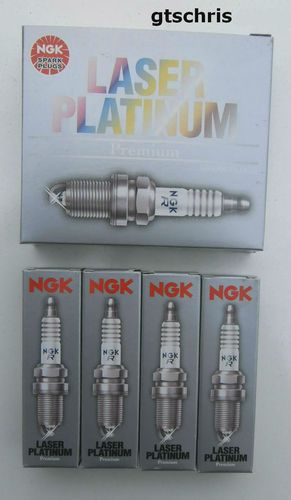
Have ordered PFR7B Lazer Platinum plugs, an Advanced Automotives Oil gauge adapter in PINK, and a Red Turbo blanket, as it makes more sense as the headers are wrapped


Cheers buddy, have everything over Dylans now, had a bit of a crappy evening tbh with a few problems on his and my side, so decided it would be better to do it all in one day, rather than a couple of hours tonight and then some tomorrow.
Also gives me chance to file the rods as there are some high points where they have been split, also there are a couple of marks on the crank that we will sort tomorrow. Nothing major but a little polish will sort. Stuff like this I would have missed tbh, so glad I have an extra pair of eyes. As any high points on the mating surfaces on the rods will mean the clearances will be a tiny tiny bit out so not worth the risk, so a clean and polish of all mating surfaces.
I'll be taking my manifolds and turbo up with me, so if all goes well tomorrow we'll have it all bolted together
Putting some info up so I can find it tomorrow, and for reference for myself.
Camshaft Caps = 20 N.m (2.0 kgf-m, 14.5 ft-lb)
Cam Cover Bolts = 10 N.m (1.0 kgf-m, 7.2 lb-ft)
Camshaft Timing Wheels = 98 N.m (10 kgf-m, 72.4 ft-lb)
Timing Belt Idlers = 39 N.m (4.0 kgf-m, 28.9 ft-lb)
Timing Belt Tensioner = 39 N.m (4.0 kgf-m, 28.9 ft-lb)
Timing Belt Covers = 5 N.m (0.5 kgf-m, 3.6 ft-lb)
Crankshaft Pulley = 157 N.m (16 kgf-m, 116 ft-lb
Oil Cooler Modine = 55 N.m (5.5 kgf-m, 40 ft-lb)
Inlet Manifold = 25 N.m (2.5 kgf-m, 18 ft-lb)
Exhaust Manifolds = 35 M.m (3.6 kgf-m, 26 ft-lb)
Water Pump = 12 N.m (1.2 kgf-m, 8.7 ft-lb) � Must be done diagonally and re-checked
Flywheel = 72 N.m (7.3 kgf-m, 52.8 lb-ft)
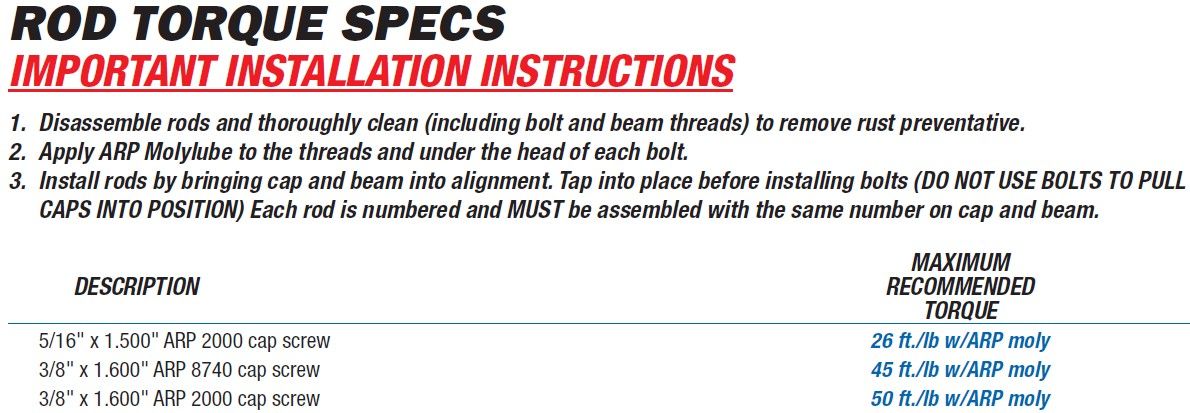
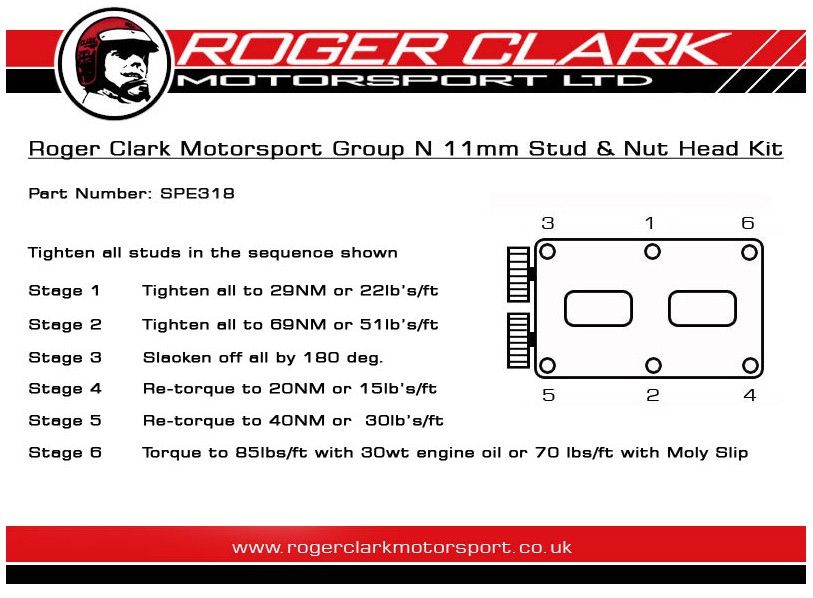
From what I have found this is how they use the ARP head studs on NASIOC.
Tighten to 36ft lbs in sequence, tighten to 65lbs in sequence, tighten to 90lbs in sequence, the inner 2 to 95ft lbs.
Roger Clarke Motorsport say.
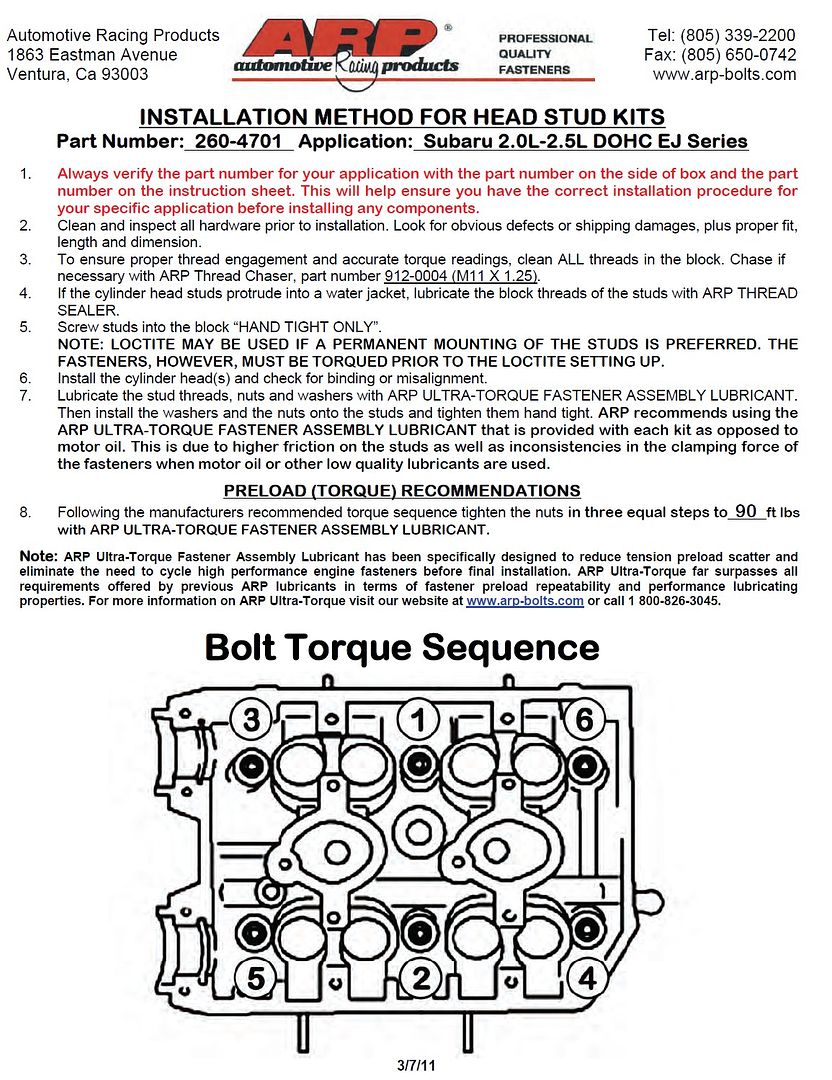
But then ARP have updated their instructions to say 90lbft.
Can't find instructions on Torque settings for the con-rod bolts, as they now use stretch, instead of a specified Stretch.
I have found from NASIOC that they always torque the ARP 2000 bolt to 50lb ft
Camshaft Caps = 20 N.m (2.0 kgf-m, 14.5 ft-lb)
Cam Cover Bolts = 10 N.m (1.0 kgf-m, 7.2 lb-ft)
Camshaft Timing Wheels = 98 N.m (10 kgf-m, 72.4 ft-lb)
Timing Belt Idlers = 39 N.m (4.0 kgf-m, 28.9 ft-lb)
Timing Belt Tensioner = 39 N.m (4.0 kgf-m, 28.9 ft-lb)
Timing Belt Covers = 5 N.m (0.5 kgf-m, 3.6 ft-lb)
Crankshaft Pulley = 157 N.m (16 kgf-m, 116 ft-lb
Oil Cooler Modine = 55 N.m (5.5 kgf-m, 40 ft-lb)
Inlet Manifold = 25 N.m (2.5 kgf-m, 18 ft-lb)
Exhaust Manifolds = 35 M.m (3.6 kgf-m, 26 ft-lb)
Water Pump = 12 N.m (1.2 kgf-m, 8.7 ft-lb) � Must be done diagonally and re-checked
Flywheel = 72 N.m (7.3 kgf-m, 52.8 lb-ft)
From what I have found this is how they use the ARP head studs on NASIOC.
Tighten to 36ft lbs in sequence, tighten to 65lbs in sequence, tighten to 90lbs in sequence, the inner 2 to 95ft lbs.
Roger Clarke Motorsport say.
But then ARP have updated their instructions to say 90lbft.
Can't find instructions on Torque settings for the con-rod bolts, as they now use stretch, instead of a specified Stretch.
I have found from NASIOC that they always torque the ARP 2000 bolt to 50lb ft