My HYDROtek project
 09 June 2013, 09:35 PM
#31

So finally made a start on the inlet manifold today that's going on the car, wasn't a bad way to spend a Sunday......
First up it was chemical stripped.....then etch prime.....few coats of high build primer and smoothed off the best I could....
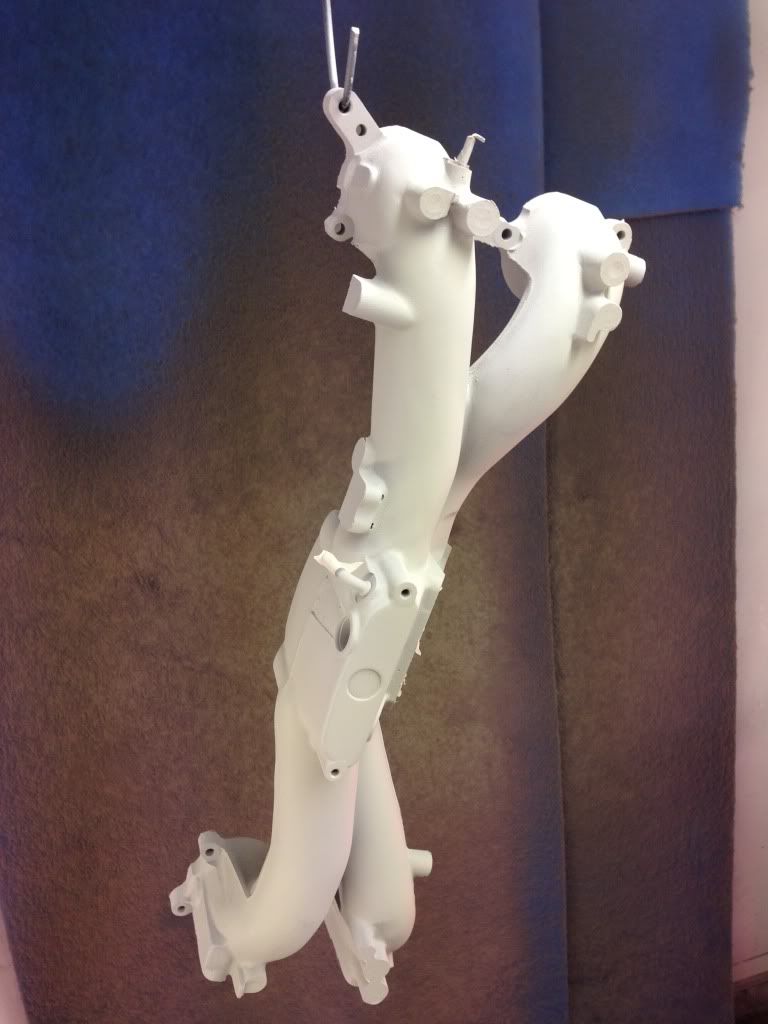
Then the base coat, this time round base black.....

Next up was to give it a few coats of pearlescent tinted with silver till I was happy .....

After a bake it was time to dip....carbon effect black weave then back in the booth to dry off....
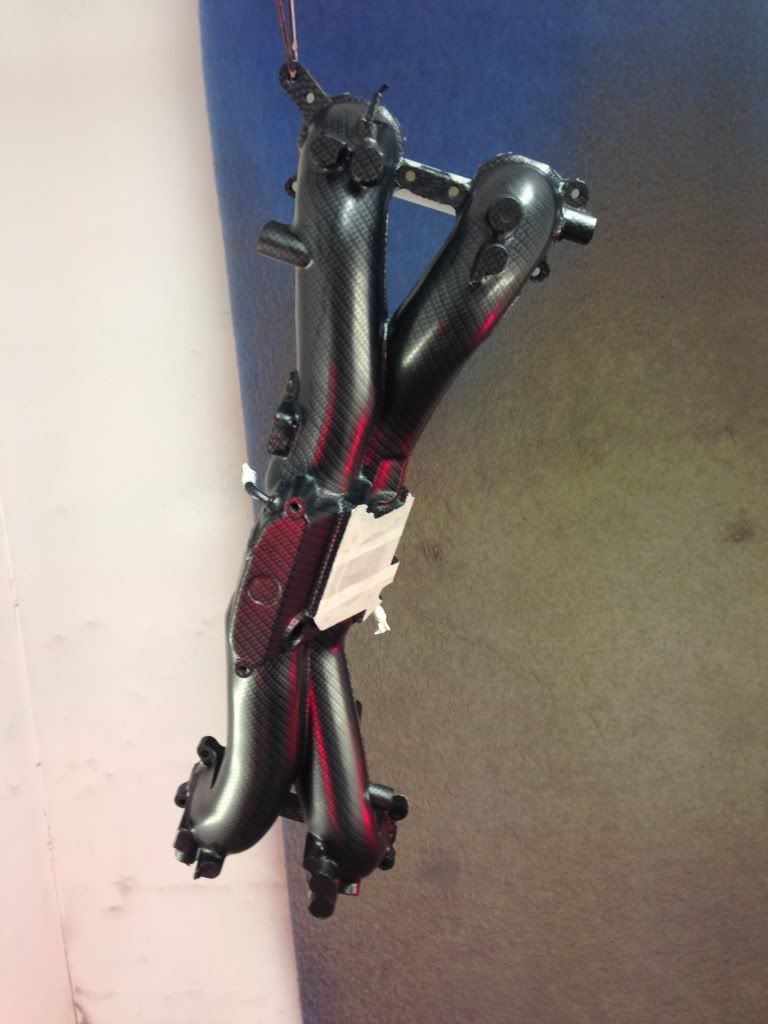
Once re masked and back in the booth for a high gloss clear finish, placed out side to show it's natural finish in day light....

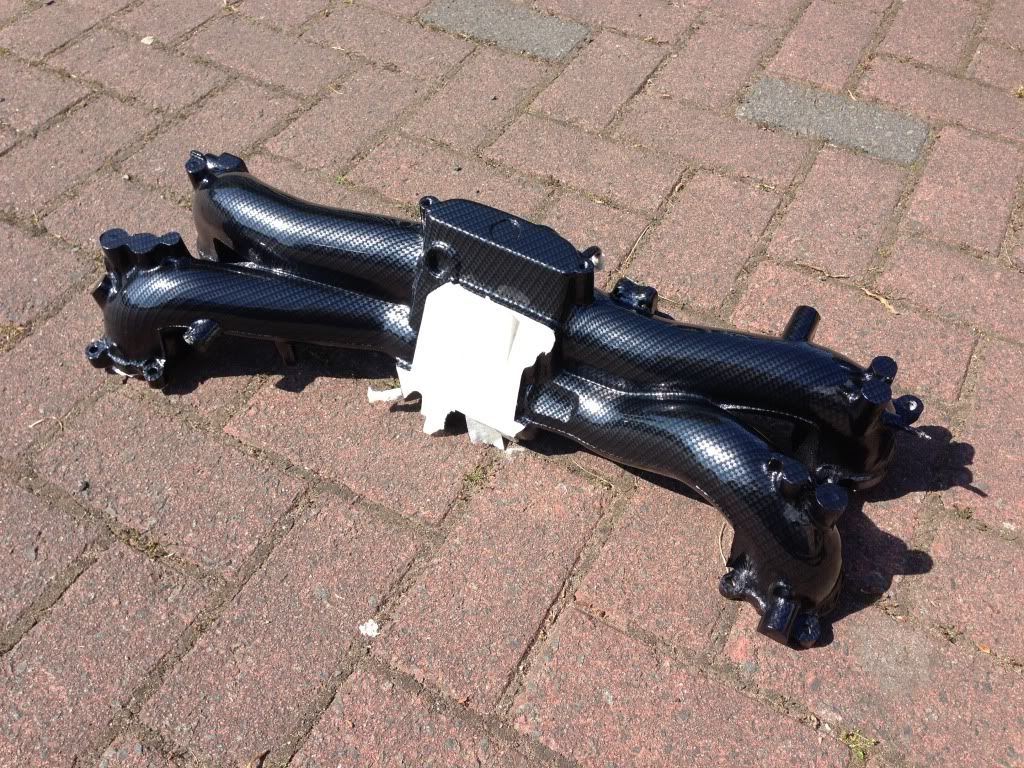
Next plan is to strip the main parts am going to do and get them done and the car usable again......
Stay tuned.....
First up it was chemical stripped.....then etch prime.....few coats of high build primer and smoothed off the best I could....
Then the base coat, this time round base black.....
Next up was to give it a few coats of pearlescent tinted with silver till I was happy .....
After a bake it was time to dip....carbon effect black weave then back in the booth to dry off....
Once re masked and back in the booth for a high gloss clear finish, placed out side to show it's natural finish in day light....
Next plan is to strip the main parts am going to do and get them done and the car usable again......
Stay tuned.....
 10 June 2013, 12:53 AM
#34

Very nice fella ! Did you roll or double dip the inlet ? It is the underside just as is after dip ? Am currently about to dip my washer bottle and will be rolling it rather than 2 dips (well hopefully ) carbon has come out very subtle too looks very tasteful mate ;-)
Dave
Dave
10 June 2013, 06:05 AM
#35
Dave i dipped it in 1 mate, the washer bottle is defiantly a roll as you would get massive pattern stretch, tbh I was going to do mine but feel if it turns out crap it's going to look crap in the engine bay, let me know how you get on 
Locky
Locky
 10 June 2013, 08:09 PM
#37
I'll keep you posted mate , just waiting on a few bits forum new tank set up and I'll be having a bash , managed to source a spare one on fleabay doing all goes **** up its not in my bay lol ;-) , I'm going for a Shaun naughty film on it so shouldn't be too hard to hide any imperfections , yours is going to look stunning with the subtle ness your going for , it's all in the detail mate keep us posted !
Dave
10 June 2013, 09:10 PM
#38
Yeh Dave the Shaun naughty patterns are really good......watch this space am going to use some on mine just keeping it simple tho, I think dipping the right parts it can be subtle and hopefully will work well if not then am going back to standard lol
just keeping it simple tho, I think dipping the right parts it can be subtle and hopefully will work well if not then am going back to standard lol
12 June 2013, 10:08 PM
#39
Ok so another day working on the demo car parts and top of the list were the brakes....
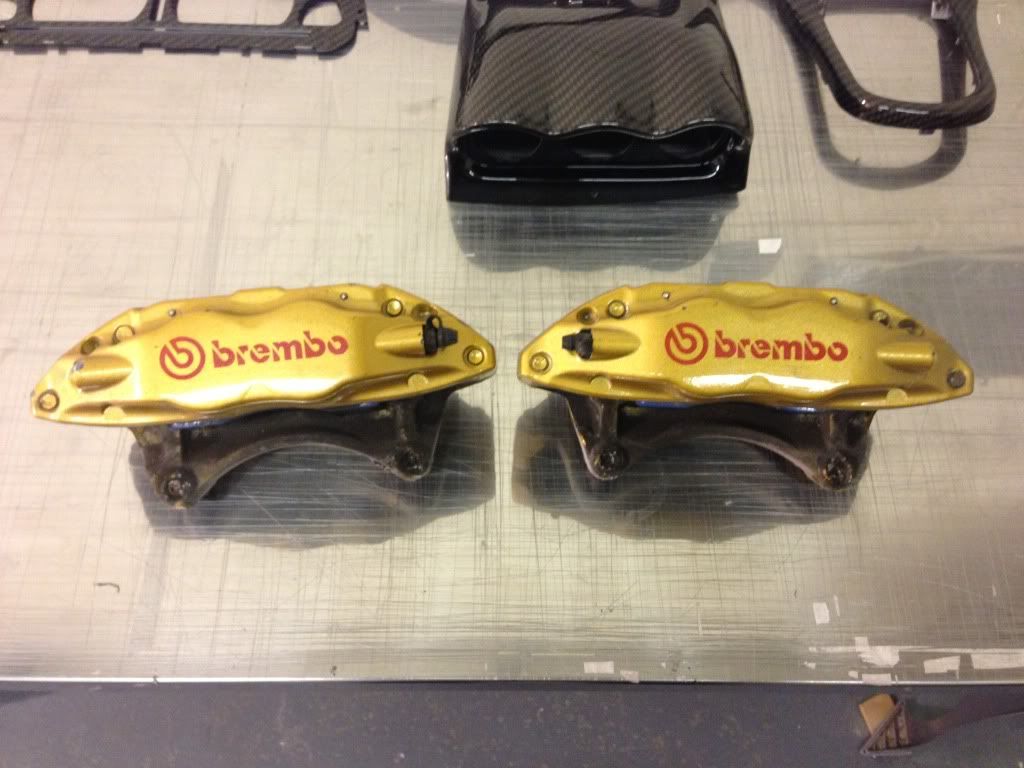
Not in to bad of condition to start...so once stripped off, cleaned up....rid corrosion spots/keyed......etch/painted/dipped and finished with new stickers and a high gloss they turned out looking like this...

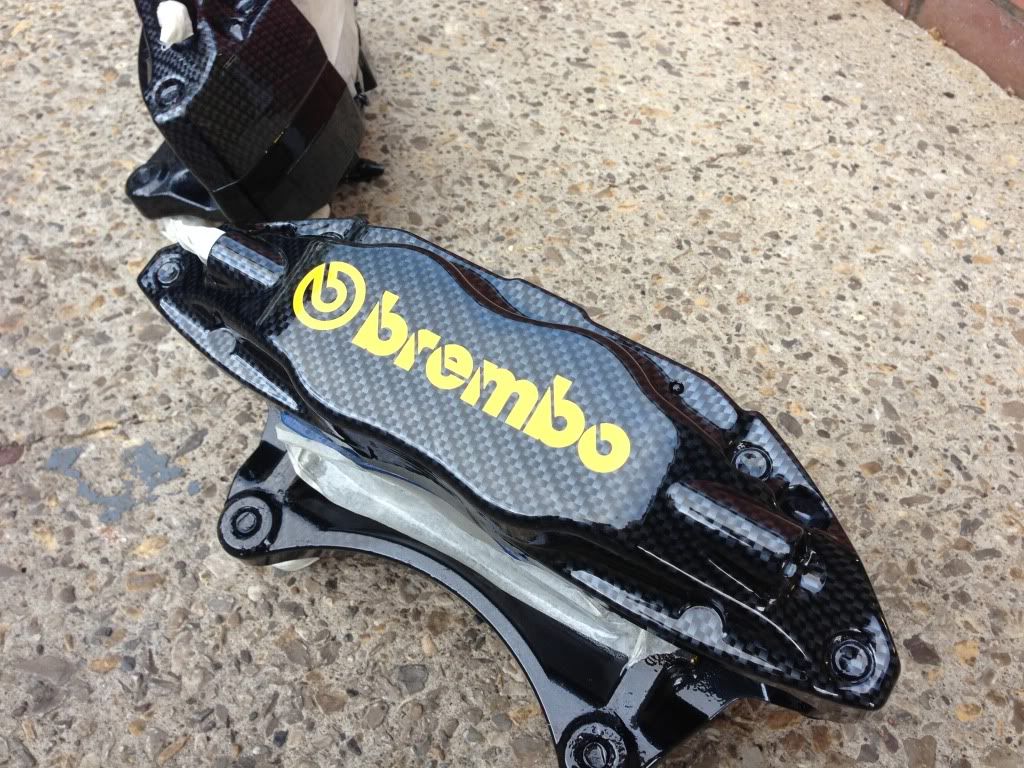
Must admit am well happy with the finish and should look good on project demo
Stay tuned.....
Not in to bad of condition to start...so once stripped off, cleaned up....rid corrosion spots/keyed......etch/painted/dipped and finished with new stickers and a high gloss they turned out looking like this...
Must admit am well happy with the finish and should look good on project demo
Stay tuned.....
14 June 2013, 11:29 PM
#43
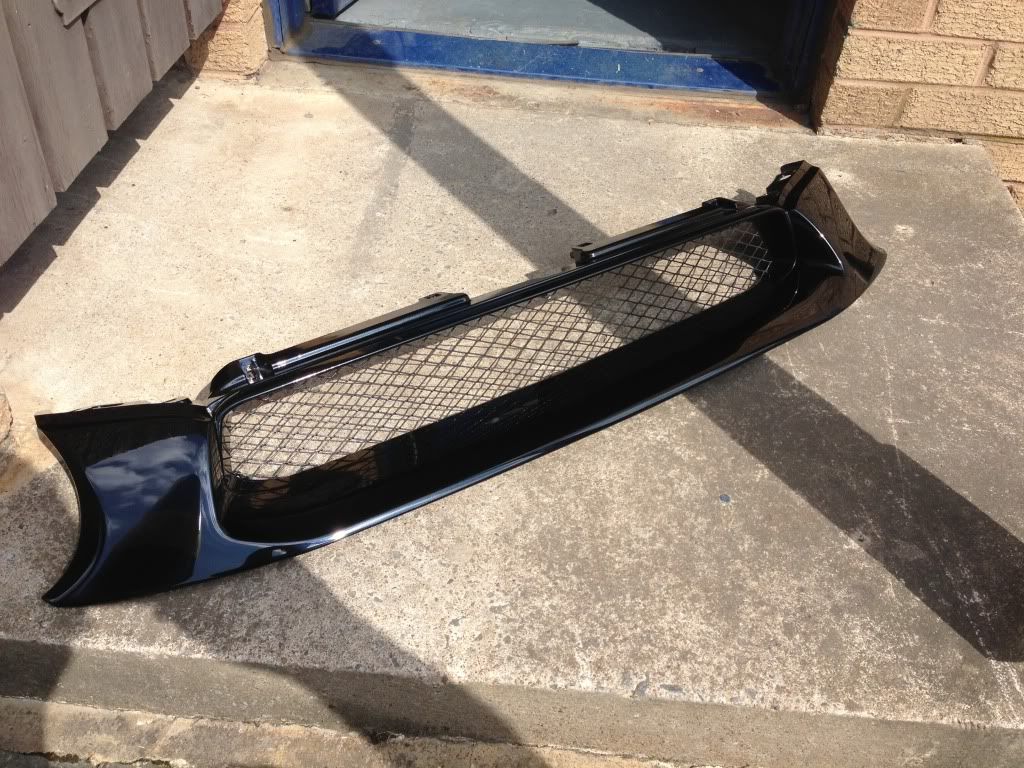
Today I finished off the hawk diffuser I had fitted to the car....it's safe to say they look lost off at the best of times and on a black car pretty much un noticeable ......so thought I'd bring it to life with a custom finish and the hydrotek colours.....
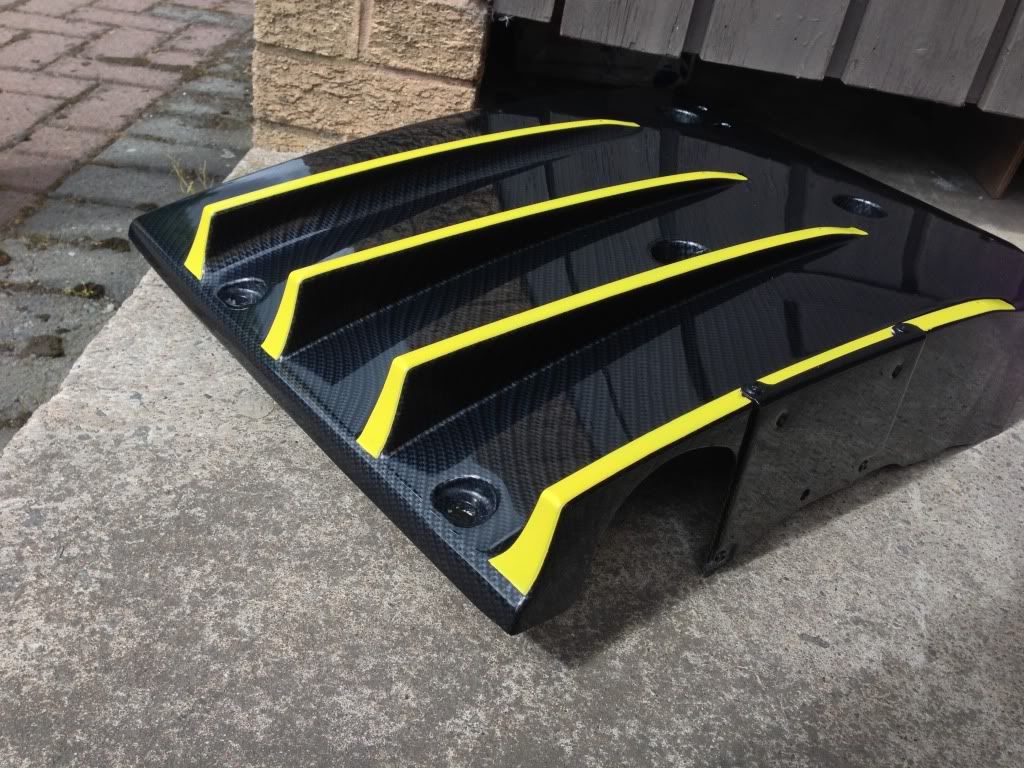
It's not a 100% but for wot it is and where it's going it will do for me...
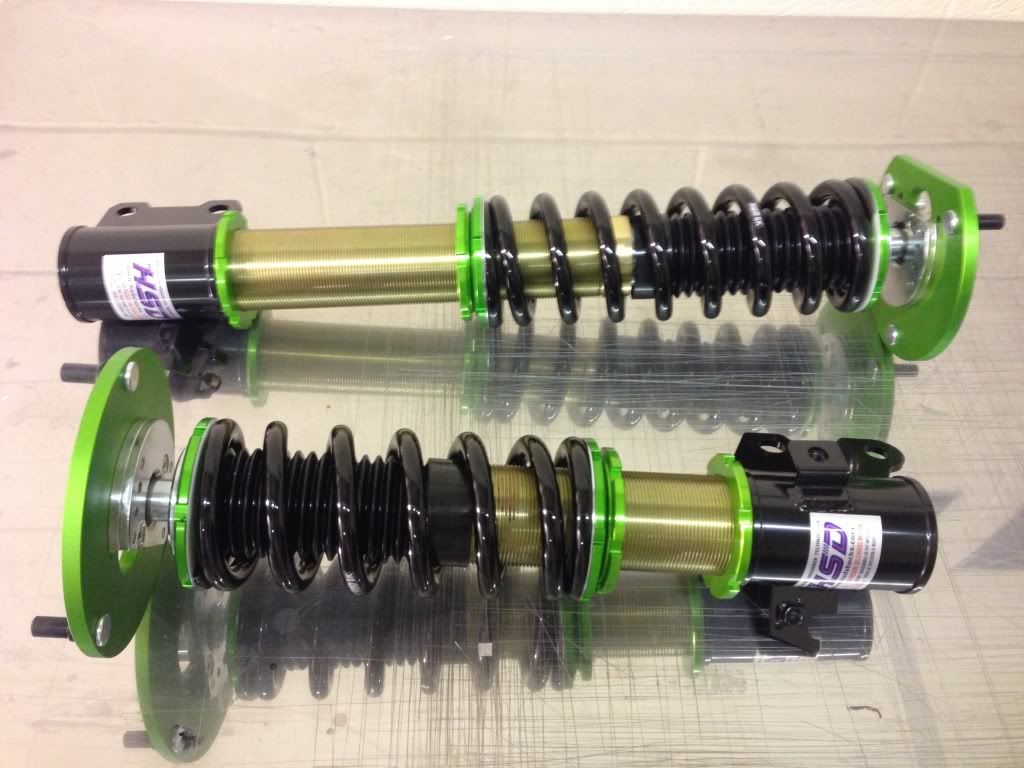
Also getting fitted are these HSD mono pro coilovers....I don't know to much about them but hear for a sub 1k they up there with the rest, they pretty much a track coilover but I was wanting to safe guard the body work and with adjustable rear top mount can give the car a nice stanced look for shows.....well it's always another option..
Stay tuned.....
It's not a 100% but for wot it is and where it's going it will do for me...
Also getting fitted are these HSD mono pro coilovers....I don't know to much about them but hear for a sub 1k they up there with the rest, they pretty much a track coilover but I was wanting to safe guard the body work and with adjustable rear top mount can give the car a nice stanced look for shows.....well it's always another option..
Stay tuned.....
Last edited by X70cky; 14 June 2013 at 11:31 PM.
20 June 2013, 06:46 AM
#44
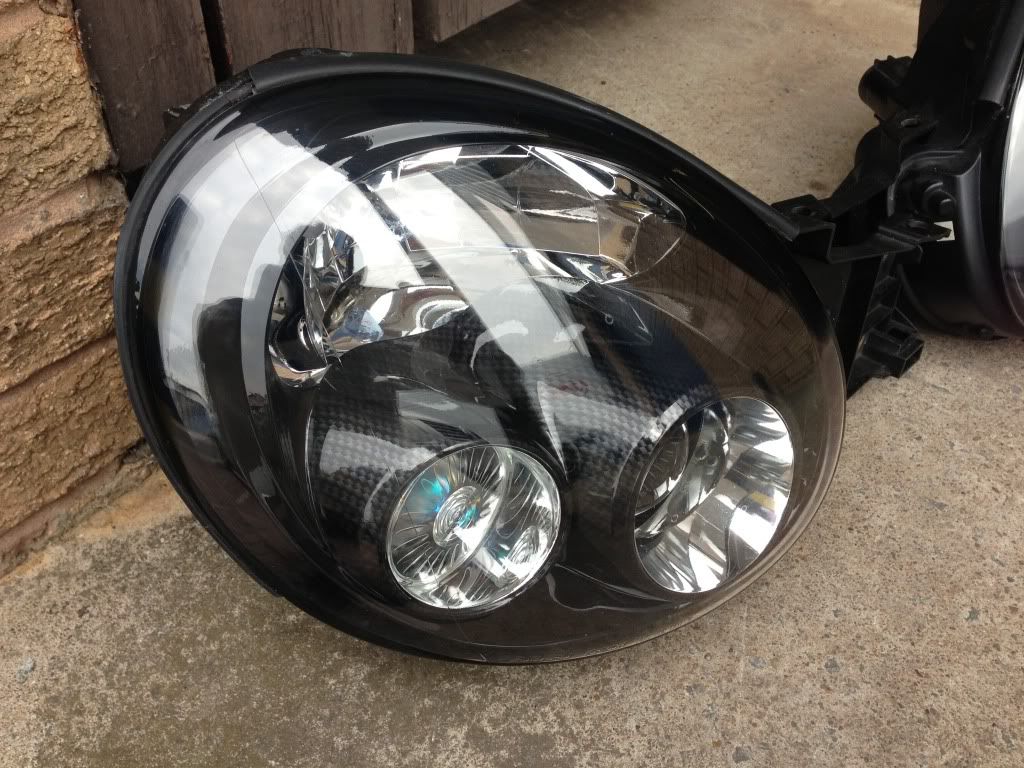
Ok time to bring the project up to date as its been a while......first up the lights, I managed to get hold of a set of JDM units as spare n repair parts......was thinking to convert to HID but with the NBO drawing ever closer and so much more to do it was just the insert mod this time and in the oven they went......

Once out they were painted black and I then set about masking the areas to be left, this was pretty time taking to get it right but I was want the light pods to get the custom look.....

Once done it was time to lay some pearl silver and give them a carbon look.....dipped and finished in high gloss....
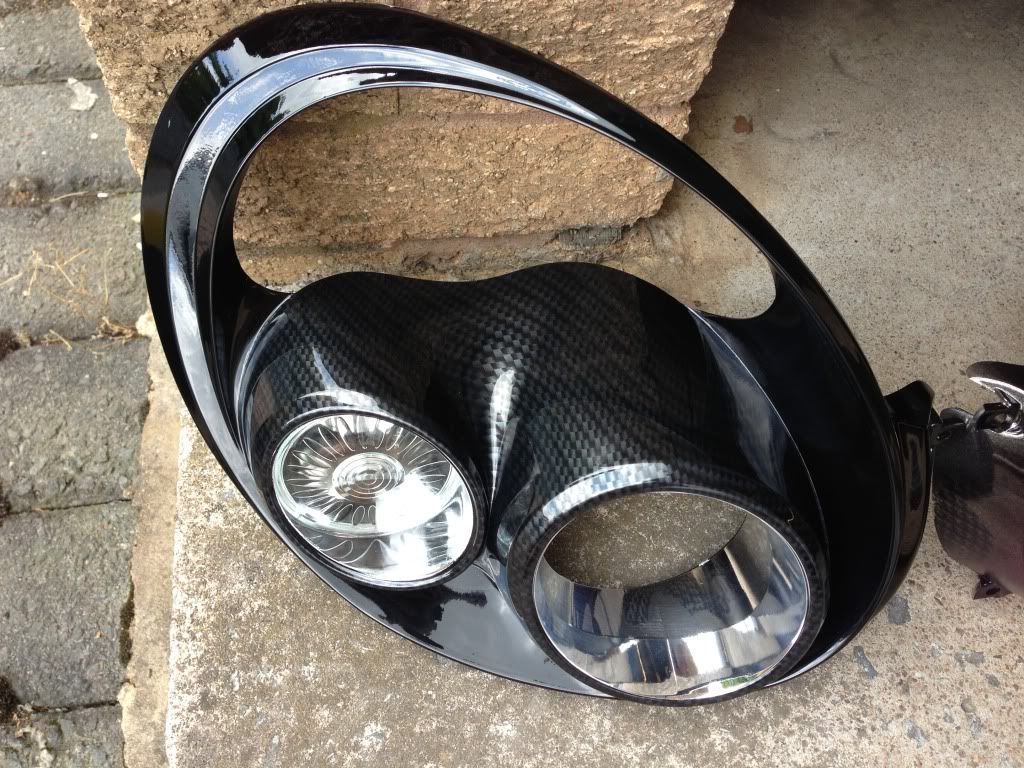
They very subtle but a LED side light should bring them alive.....I hope lol ...also going to give the lens a polish up,
Also the JDM grill got painted up, thought about doing something abit different to it but was in to minds so stuck with the matching colour and de badged....
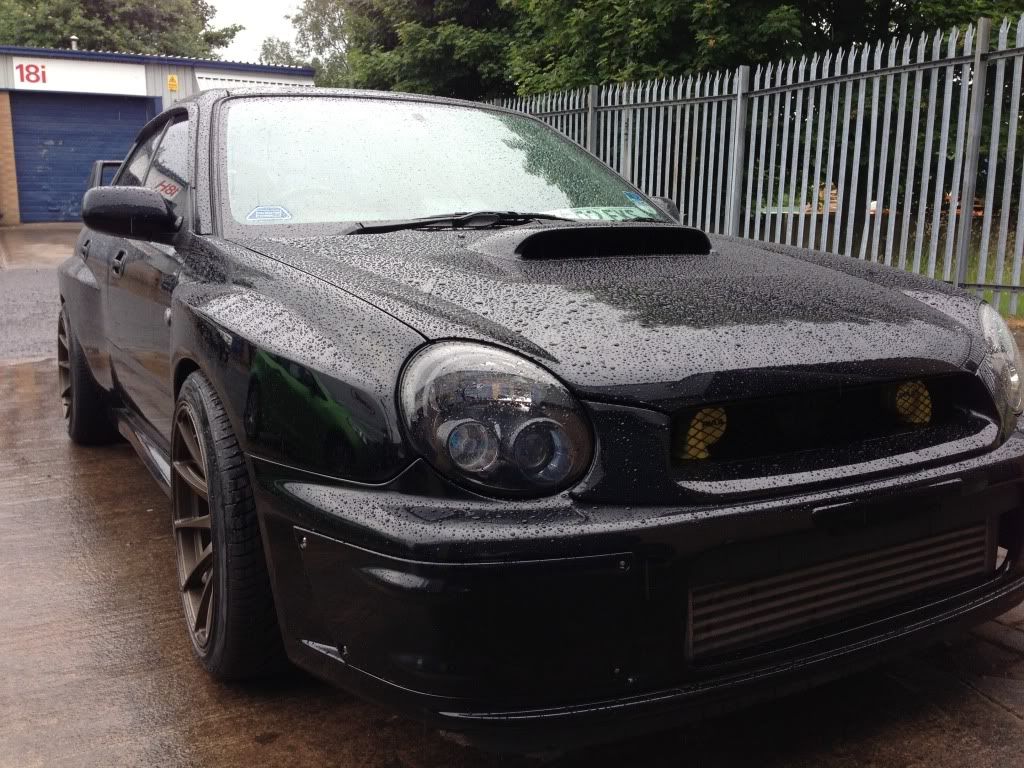
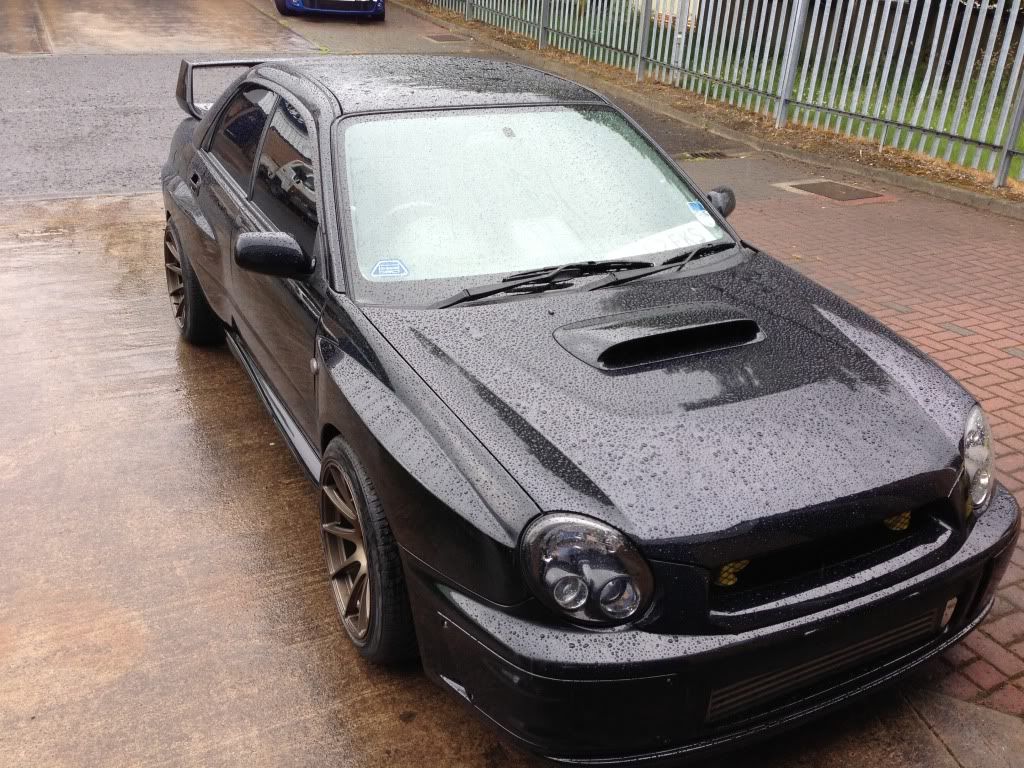
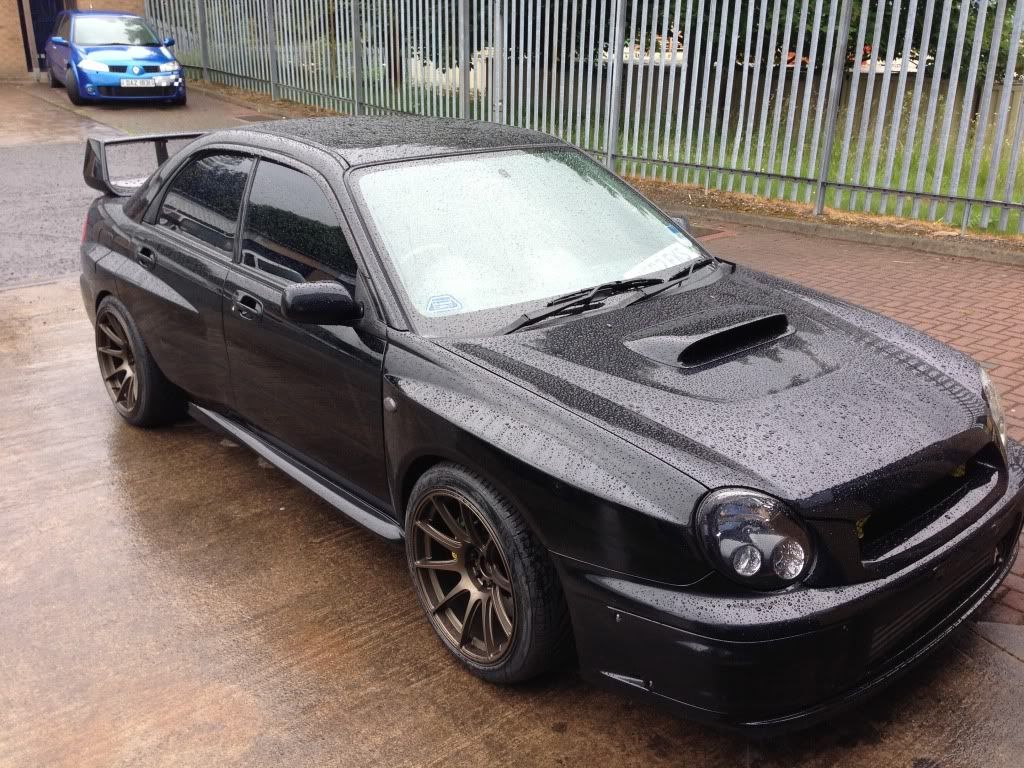
Down and Andy kindons HQ the ride height has been getting set and the brembos fitted along with the rear diffuser and the next lot of parts stripped to be dipped......I've decided not to slam it but to give it a slight nose heavy look with a even height from wheels to arches, this might change in the future but will give the coils time to set and see wot it's like on the roads and getting it on n off the drive ect.....few pictures of how it's sitting on the coils and wheels...

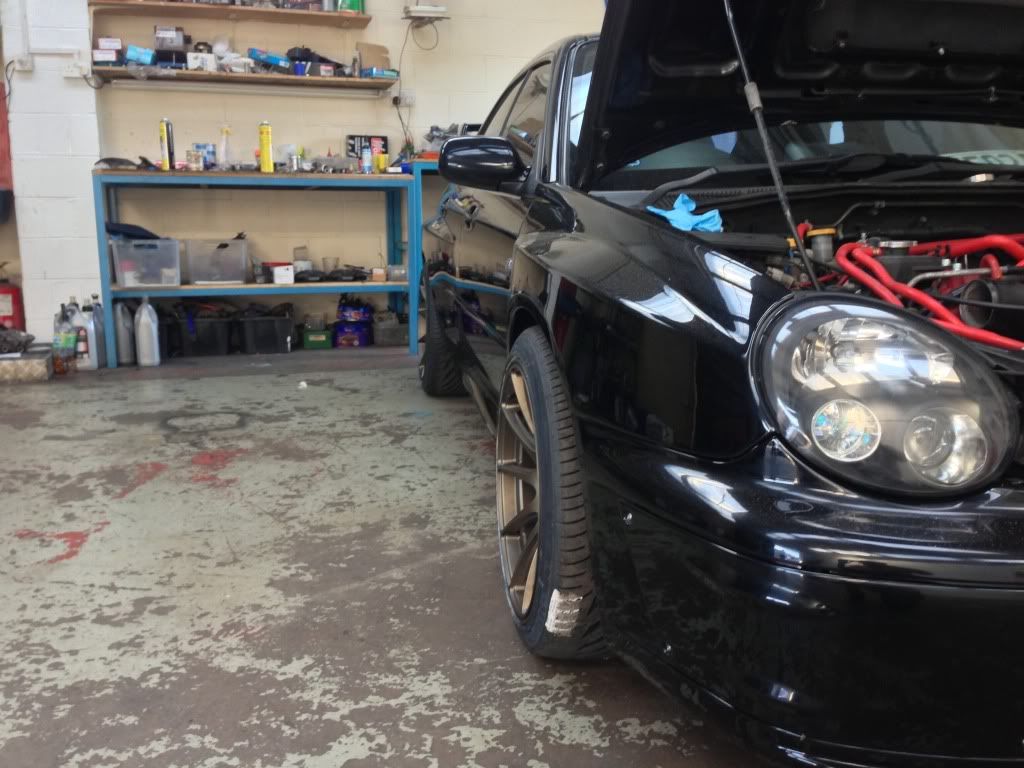
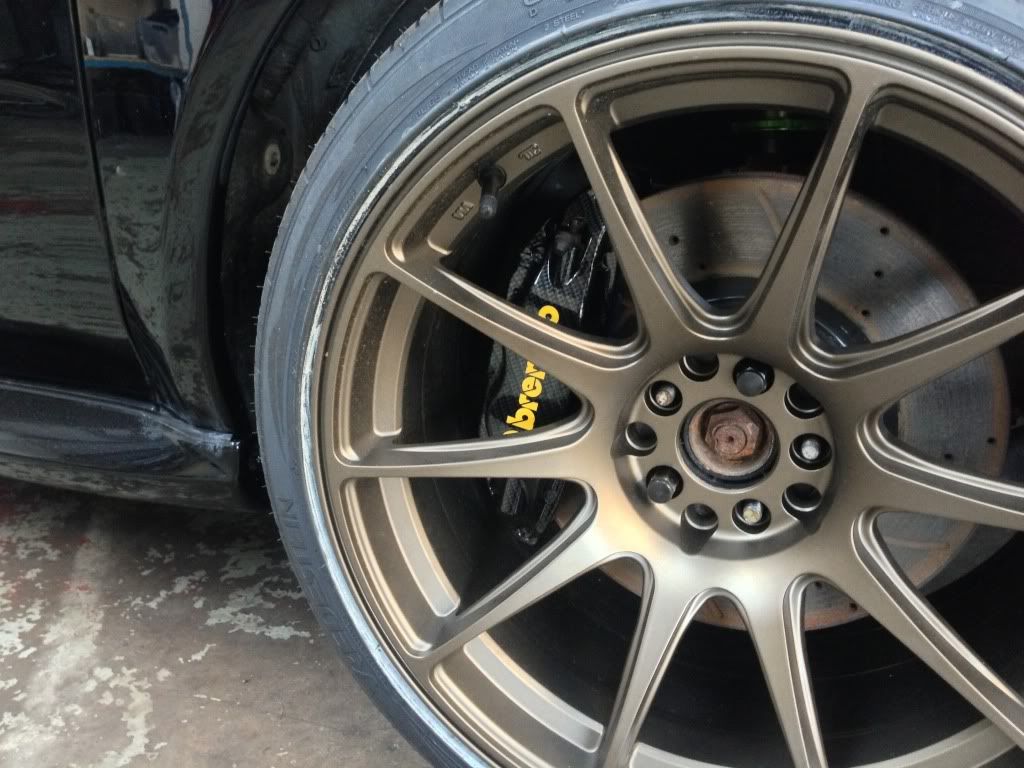
Looking at the brembos with these wheels and they got some much clearance they looking on the small side......hmmm future mod lol
Once out they were painted black and I then set about masking the areas to be left, this was pretty time taking to get it right but I was want the light pods to get the custom look.....
Once done it was time to lay some pearl silver and give them a carbon look.....dipped and finished in high gloss....
They very subtle but a LED side light should bring them alive.....I hope lol ...also going to give the lens a polish up,
Also the JDM grill got painted up, thought about doing something abit different to it but was in to minds so stuck with the matching colour and de badged....
Down and Andy kindons HQ the ride height has been getting set and the brembos fitted along with the rear diffuser and the next lot of parts stripped to be dipped......I've decided not to slam it but to give it a slight nose heavy look with a even height from wheels to arches, this might change in the future but will give the coils time to set and see wot it's like on the roads and getting it on n off the drive ect.....few pictures of how it's sitting on the coils and wheels...
Looking at the brembos with these wheels and they got some much clearance they looking on the small side......hmmm future mod lol

 20 June 2013, 02:57 PM
#47

Nice subtle body kit, and quality workmanship on everything, but... I just don't get the carbon everything - bodywork bits, yes, but brake calipers ? Doesn't make sense to me.
I can't imagine brake calipers made out of a block of carbon and therefore my head won't let me suspend the disbelief sort of thing.
Like I say good work, but this could be overdone- to my mind anyway
I can't imagine brake calipers made out of a block of carbon and therefore my head won't let me suspend the disbelief sort of thing.
Like I say good work, but this could be overdone- to my mind anyway

 20 June 2013, 09:44 PM
#49
I hear you lads and yeh I totally understand the carbon thing.....but tbh I class this as a painted/effect finish, it's not the fact it's carbon it's really just to give people an idea of wot parts can be done and to there taste I guess.......I've gone as subtle as I can with it without been to in your face for people to get the idea......and to be fair the likes of the calipers....light inserts ect look black from 3/4m away.....remember guys this is a demo car to showcase and I could of went down the WOOD! effect......something's work something's don't.......frayz I think the rear wheels need bringing out a touch and it really needs slamming ......but I like to lay the power down from time to time so it's set like this for now, it must be over 4 months since I've drove it 8-/
All that said its never going to be to every1s taste that's for sure ;0)
All that said its never going to be to every1s taste that's for sure ;0)
20 June 2013, 09:48 PM
#50
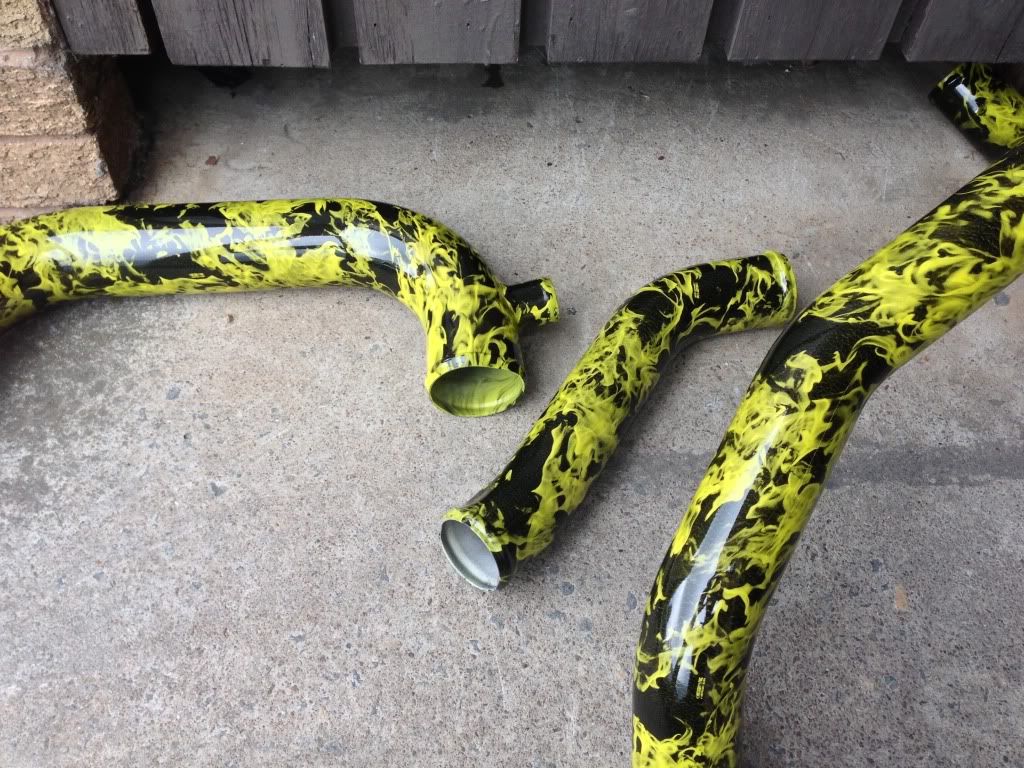
Ok today wasn't to bad but am not a 100% happy with the pipes......the black in the pattern doesn't seem to coat perfect? It lays flat dips well but the finish hmmm it's either an activator issue....it doesn't like to lay on the pure lesonal n silver I layed over the yellow....or the fact that on a pipe the pattern is stretching all the time to wrap around the shape? Any way they done and and will have to do for now, if I had the time to re do I think I would try to over come it by changing some of the above......
But the idea to inject some colour and effect in the engine bay
Also finished the lights of with a re-vamp of the lens to show off the effect...
Off till Monday now but the mind is ticking on the parts still left to be done....
Stay tuned....
But the idea to inject some colour and effect in the engine bay
Also finished the lights of with a re-vamp of the lens to show off the effect...
Off till Monday now but the mind is ticking on the parts still left to be done....
Stay tuned....
 20 June 2013, 11:15 PM
#52
Looks great mate , did you bring the pipes up to level a bit quick maybe before your rolled them ??? Just a thought , I had the same issues on an Intake pipe and it turns out I was just a little too quick on the uptake to get the pipe level ready for the rolling of the pattern , it looks a bit stretched to me ,
On a different note you have pm ;-)
On a different note you have pm ;-)
21 June 2013, 06:15 AM
#54
Due to there shape Dave you cannot roll these mate.....a straight pipe yeh but with these no way......even where the pattern has no reason to stretch there is still a slight fade in the black, it could easy be an activator issue and needing another brand to work with these Shaun naughty films........yeh John I can do pipes but like all 4d objects there is stretch and a join at some point on the underside......I tend to just fade paint them in to tidy up mate
28 June 2013, 06:56 AM
#55
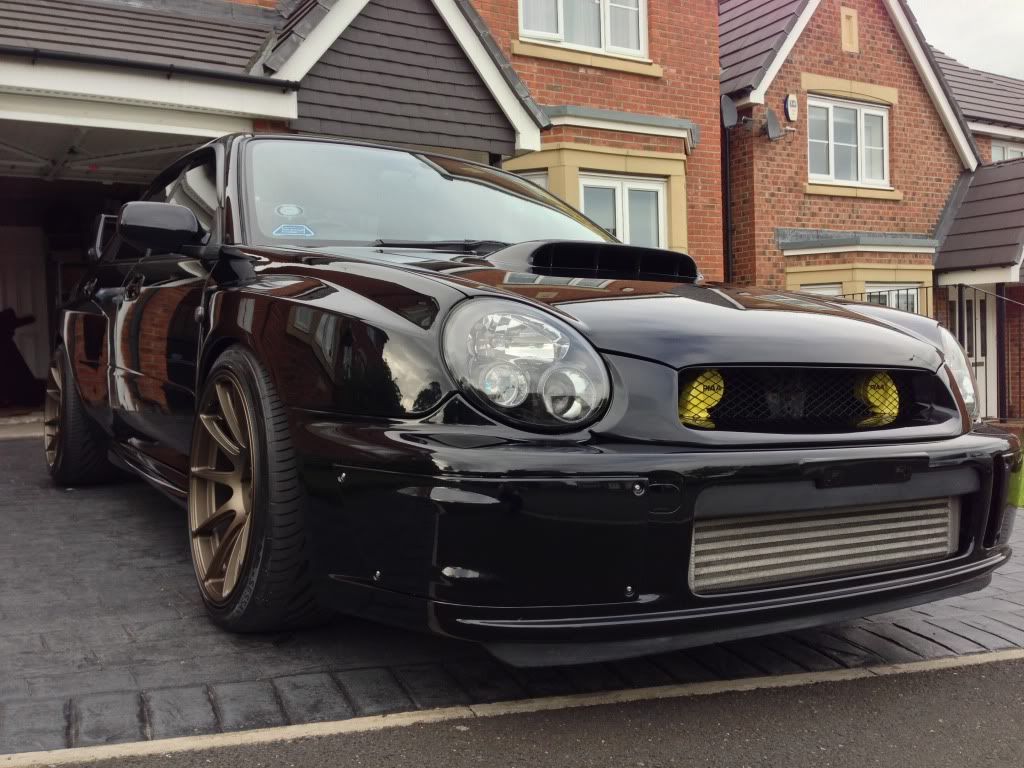
Ok looks like am working right up to Saturday to finish the engine bay.....few things to do and a **** up with an order  anyway after 4 months of not driving it I taxed it yesterday and took it back to hydro HQ.....few jobs that's been going on.......lowered more.....spacers to the rears.....wind visors fitted......piaa horns painted and new stickers.....new head unit and door speakers fitted.....also painted the centre caps and fitted custom badges.....like I said working on the engine bay still.....so a few pics of the car....

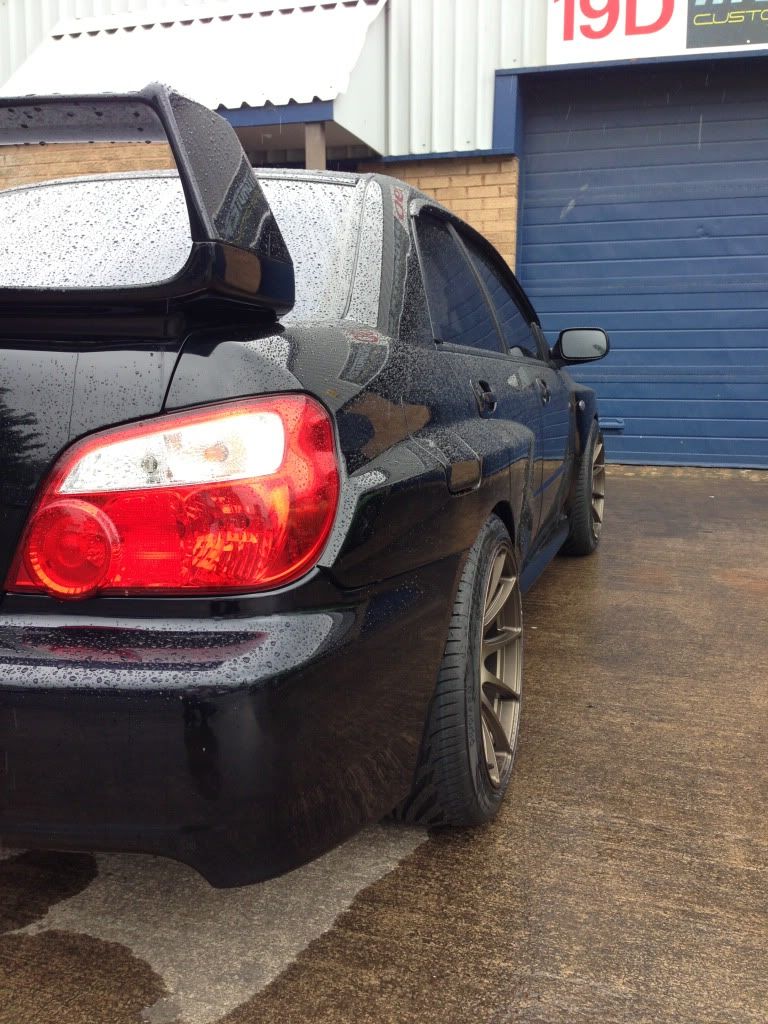

Roll on the NBO Sunday
anyway after 4 months of not driving it I taxed it yesterday and took it back to hydro HQ.....few jobs that's been going on.......lowered more.....spacers to the rears.....wind visors fitted......piaa horns painted and new stickers.....new head unit and door speakers fitted.....also painted the centre caps and fitted custom badges.....like I said working on the engine bay still.....so a few pics of the car....Roll on the NBO Sunday
Last edited by X70cky; 28 June 2013 at 07:00 AM.
30 June 2013, 05:24 AM
#59
Ok guys the car is done for now......I've done as much as I can to have it ready for today.....few things to change and correct but it's not far off wot I had in mind, if you don't like yellow !!! TUFF lol


Cheers for watching and the feed back guys locky
Cheers for watching and the feed back guys
locky
