Notices
Projects For Serious DIY Car Projects

My DIY widetrack track car build

Thread Tools
 
Search this Thread
 
Old 18 October 2013, 09:09 AM
  #91  
samben
Scooby Regular
 
samben's Avatar
 
Join Date: Mar 2012
Location: lincoln
Posts: 176
Likes: 0
Received 0 Likes on 0 Posts
Default

Looking good mate!

I'm wanting to. Go a similar route with my blob so il be watching with keen interest!
Old 21 October 2013, 07:18 PM
  #92  
super_ted
Scooby Regular
Thread Starter
iTrader: (30)
 
super_ted's Avatar
 
Join Date: Dec 2008
Location: Oxfordshire
Posts: 2,602
Likes: 0
Received 0 Likes on 0 Posts
Default

Thanks, i really need to update this soon!
Old 21 October 2013, 09:12 PM
  #93  
johnnybon
Scooby Regular
iTrader: (70)
 
johnnybon's Avatar
 
Join Date: Feb 2008
Location: london
Posts: 3,221
Likes: 0
Received 4 Likes on 3 Posts
Default

Just a quick reply to the validity to the cage msa wise the cage in the shell that I brought which had been raced and obviously scrutinered was about as useful as a chocolate fire guard not in construckion but in the way it was fitted problem is you only find these things out if you ever need to use them and then its could be to late I'm now having a full weld in cage similar to yours which by the way look great and will pass even the busiest scrutiner so you have no worries there keep it up it look great
Old 20 April 2014, 12:50 PM
  #94  
super_ted
Scooby Regular
Thread Starter
iTrader: (30)
 
super_ted's Avatar
 
Join Date: Dec 2008
Location: Oxfordshire
Posts: 2,602
Likes: 0
Received 0 Likes on 0 Posts
Default

Well overdue an update!!

Lack of updates have been due to me having to move out of the unit i had been renting and put the car in to storage.
I have since been building my own new unit in my so called 'spare' time. It's pretty much finished now, pics to follow.

While the shell has been in storage, i've been prepping and painting all the smaller parts ready to bolt on......
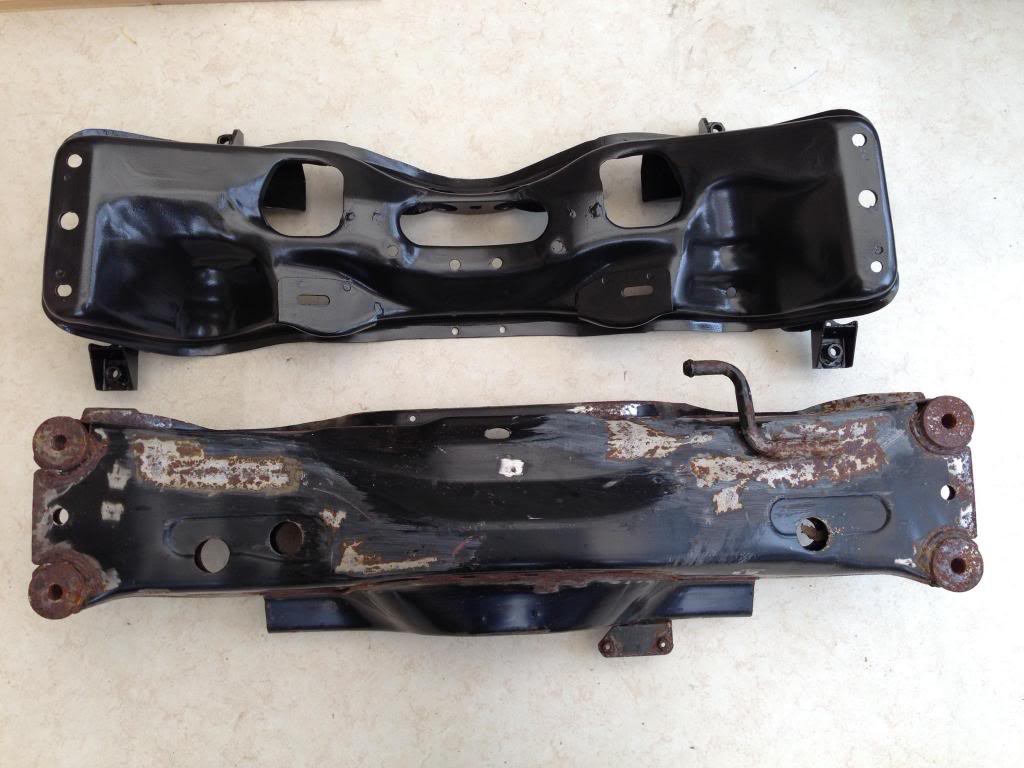
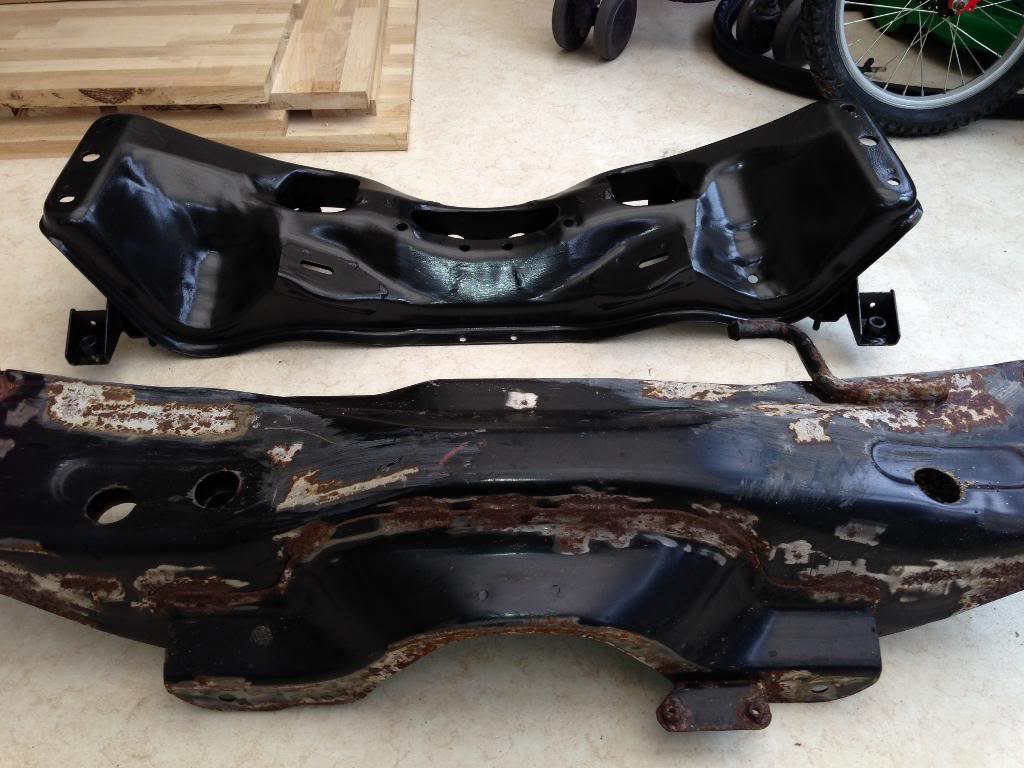
Name:  581CB335-BE5D-43F0-A671-8BBE15D704A4_zps8frvbwfn.jpg
Views: 0
Size:  85.1 KB
Name:  D1EB91CB-5B6A-4E04-832A-408347EF20B0_zpshcvke08a.jpg
Views: 0
Size:  98.6 KB

Before and after.

More updates to follow.
Old 20 April 2014, 06:14 PM
  #95  
JonMc
Scooby Senior
iTrader: (51)
 
JonMc's Avatar
 
Join Date: Nov 2005
Location: Wherever I park my car, that's my home
Posts: 20,491
Likes: 0
Received 2 Likes on 2 Posts
Default

Tidy job, looks so much better
Old 20 April 2014, 10:09 PM
  #96  
IanPaskin
Scooby Regular
 
IanPaskin's Avatar
 
Join Date: Jun 2012
Location: Bridgnorth
Posts: 324
Likes: 0
Received 0 Likes on 0 Posts
Default

Cradles look good, looking forward to some more updates....
Old 21 April 2014, 07:06 PM
  #97  
super_ted
Scooby Regular
Thread Starter
iTrader: (30)
 
super_ted's Avatar
 
Join Date: Dec 2008
Location: Oxfordshire
Posts: 2,602
Likes: 0
Received 0 Likes on 0 Posts
Default

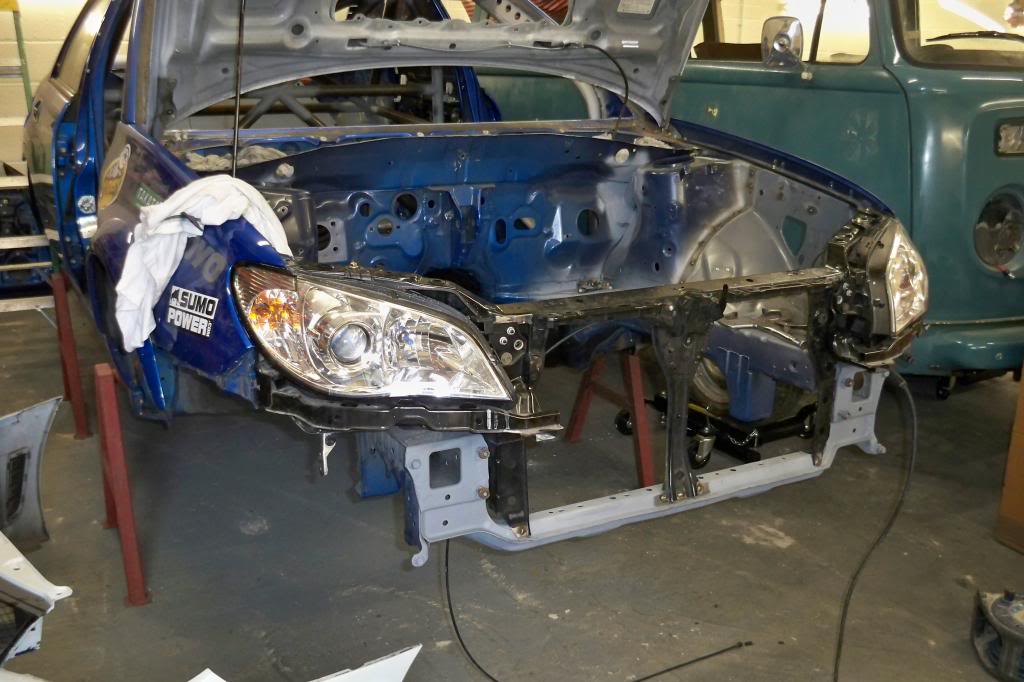
On Saturday i took a trip to see Matt at BM developments and cut out the inner wing sections that i needed from a hawk to face lift my shell.

Name:  5A66B830-0DA7-4E5F-8961-61D898ED6906_zpszaylvnnm.jpg
Views: 0
Size:  84.1 KB
Name:  A6A42882-3198-4059-8EA6-76ED1CDBE8BE_zpsi9k1merm.jpg
Views: 0
Size:  119.3 KB

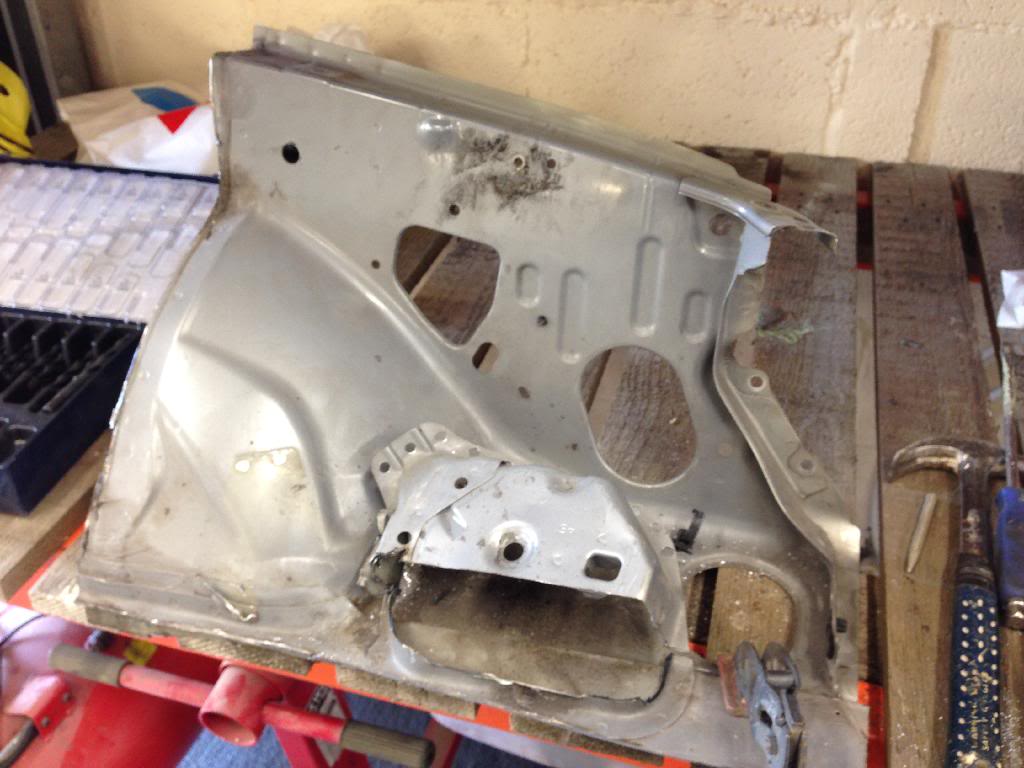
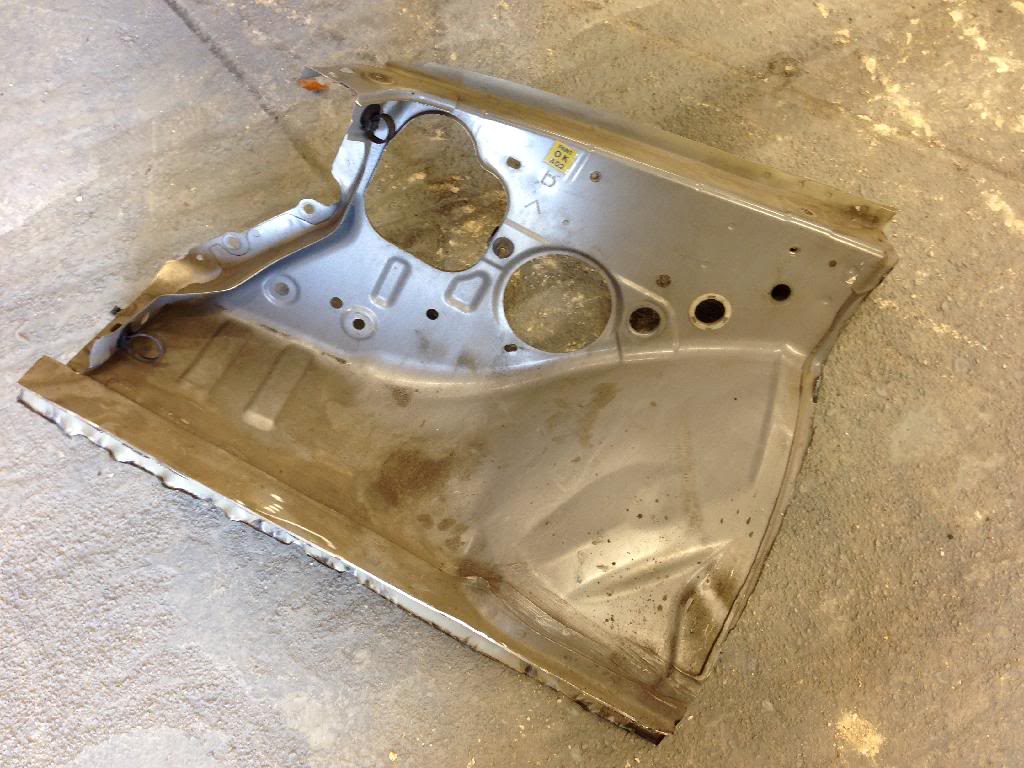
I had a few hours on it this afternoon, so drilled all the spot welds, removed any sections i didn't need and offered them up.

Name:  A3E43C16-384A-4496-895C-40821FA747E5_zpsyoahiwam.jpg
Views: 0
Size:  90.7 KB

Name:  068B3471-CED9-42F2-A433-188C6BBF5365_zpsr43qnspf.jpg
Views: 0
Size:  92.4 KB

Name:  95A330D0-87BE-4CBB-B680-763E8B72652A_zpswpmwm1um.jpg
Views: 0
Size:  111.1 KB

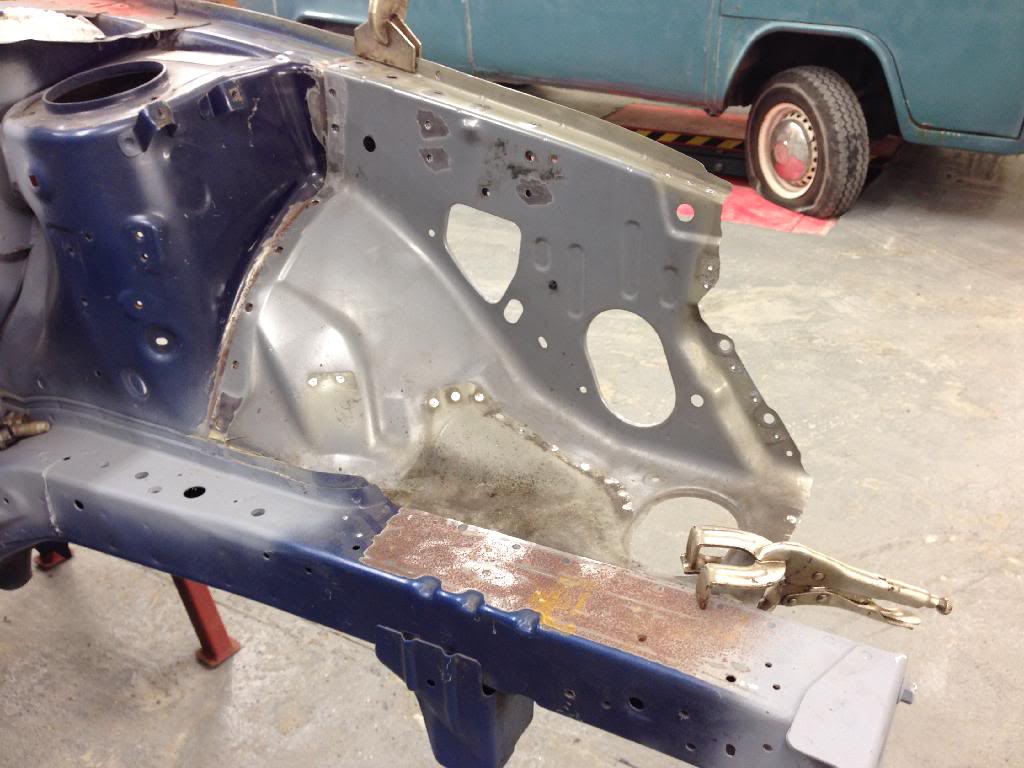
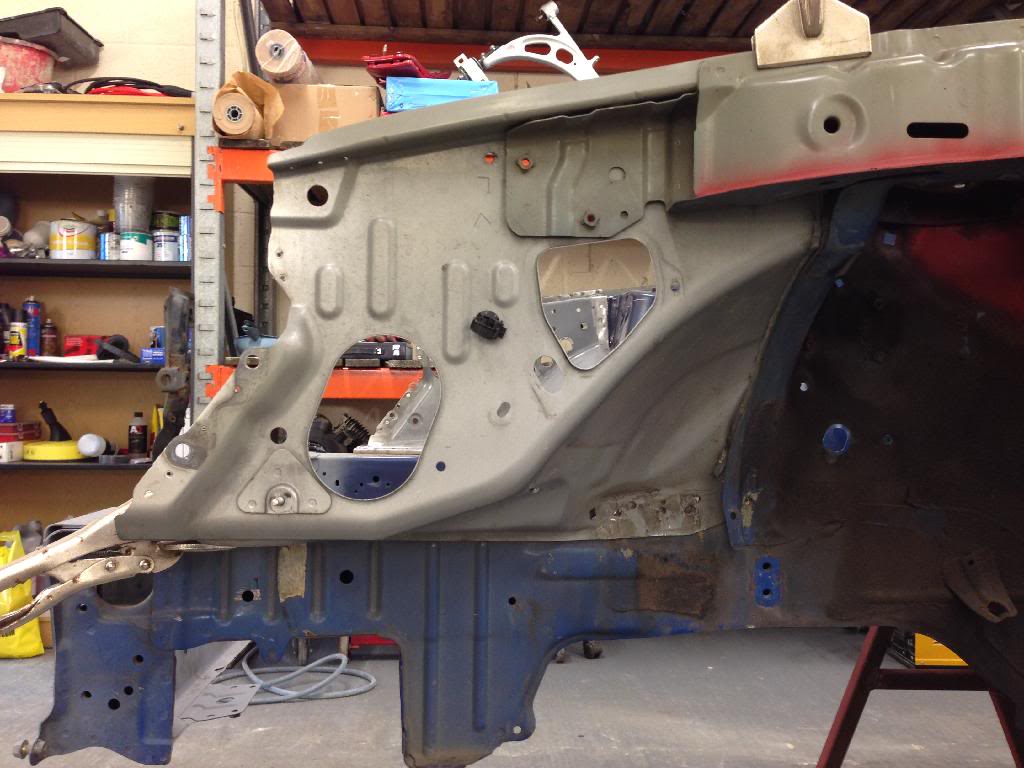
Next up is clean up the shell and spot weld the inner wings and slam panel in, check all lines up, then painting!
Old 23 April 2014, 03:02 PM
  #98  
SAM-UK300
Scooby Regular
iTrader: (8)
 
SAM-UK300's Avatar
 
Join Date: Sep 2013
Location: Hoddesdon, Hertfordshire
Posts: 1,174
Likes: 0
Received 1 Like on 1 Post
Default

Subscribed
Old 01 June 2014, 08:03 AM
  #99  
super_ted
Scooby Regular
Thread Starter
iTrader: (30)
 
super_ted's Avatar
 
Join Date: Dec 2008
Location: Oxfordshire
Posts: 2,602
Likes: 0
Received 0 Likes on 0 Posts
Default

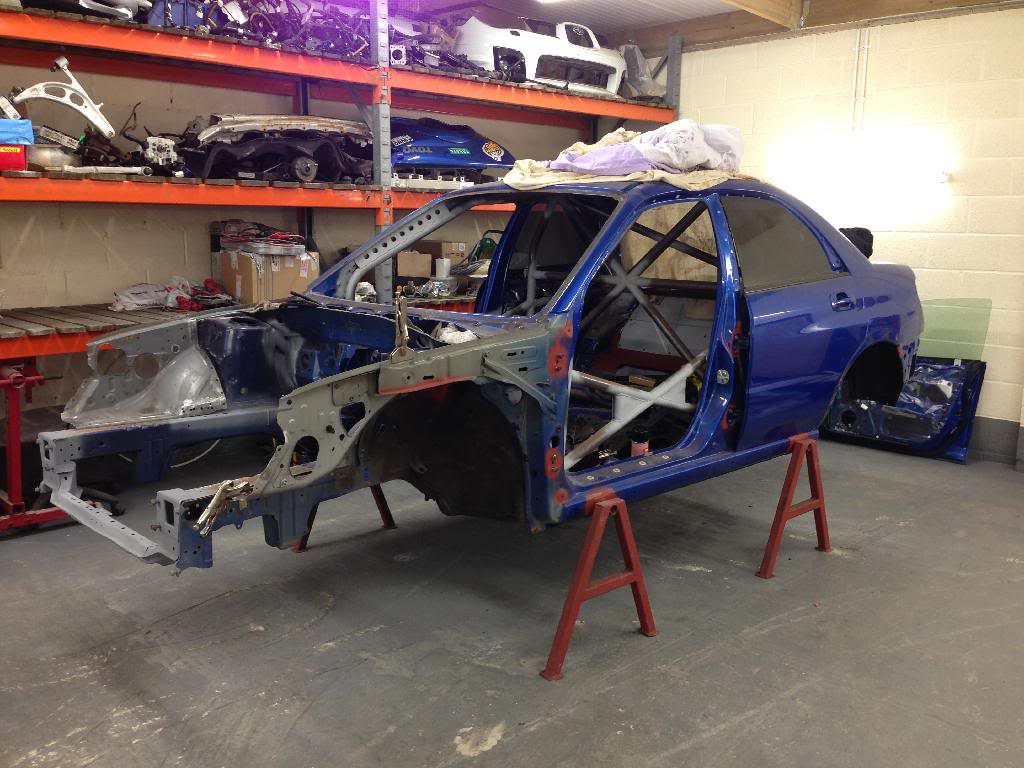
Had a few hours on it yesterday.

Tacked new panels in place then assembled the front end to check everything lined up correctly, Once happy i removed everything and welded.

Paint prep next.

Name:  100_1932_zpsc59f52a0.jpg
Views: 0
Size:  84.6 KB
Name:  100_1931_zps090d83e9.jpg
Views: 0
Size:  94.8 KB
Name:  100_1927_zps1268c478.jpg
Views: 0
Size:  90.4 KB

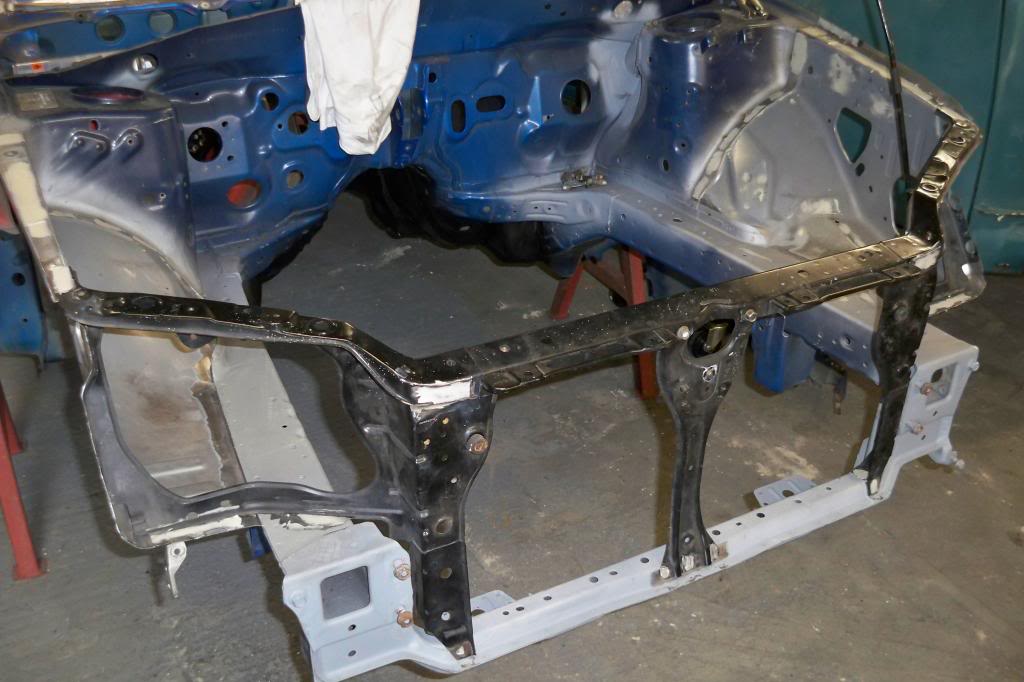
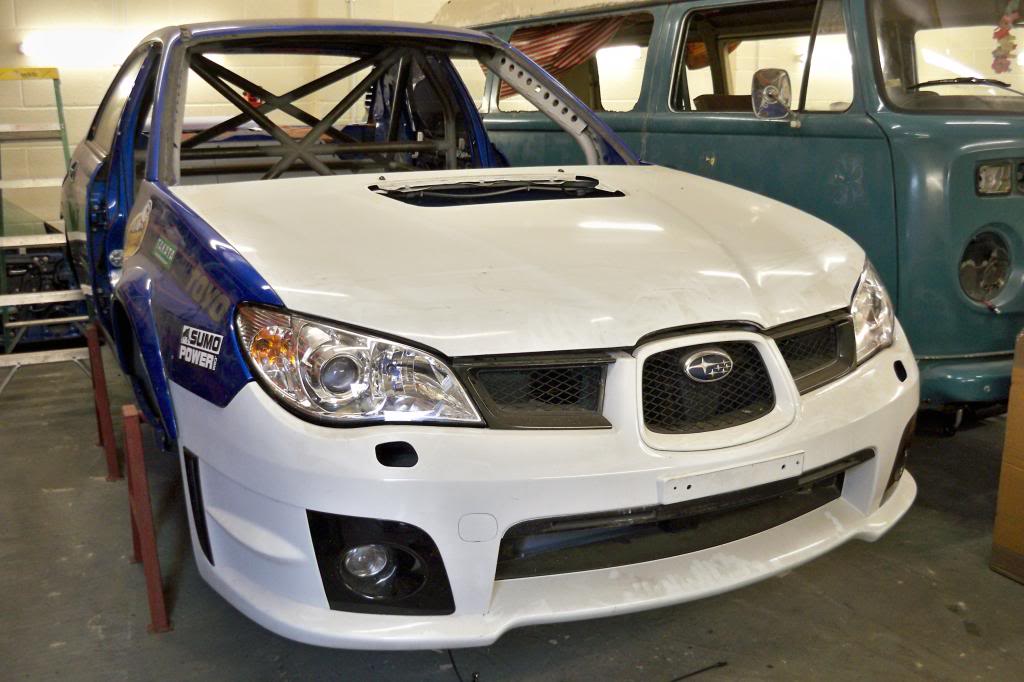
Items on my shopping list are aero catches for the bonnet, front bumper side brackets & quick release fixings. I'm tempted to put a FMIC on but worried about it maybe getting damaged easily on track in the event of an off?
Old 01 June 2014, 08:05 AM
  #100  
super_ted
Scooby Regular
Thread Starter
iTrader: (30)
 
super_ted's Avatar
 
Join Date: Dec 2008
Location: Oxfordshire
Posts: 2,602
Likes: 0
Received 0 Likes on 0 Posts
Default

Also unsure on what to do with headlight washer holes? Do the covers come separately?
Old 01 June 2014, 06:47 PM
  #101  
BritishTutorKSA
Scooby Newbie
 
BritishTutorKSA's Avatar
 
Join Date: Apr 2014
Location: KSA
Posts: 12
Likes: 0
Received 0 Likes on 0 Posts
Default

Wow! That is awesome! I admire your project. So, from this I gather that one needs to decrease the weight of the actual car first so that it can go faster before any added bhp to the original car then make it safe for racing with the cage. Good stuff! I hope to get the knowledge and desire to do similar oneday. Hope to see it completed in the best manner possible.
Old 07 June 2014, 08:35 PM
  #102  
Dibbles00
Scooby Regular
 
Dibbles00's Avatar
 
Join Date: Feb 2014
Location: Midlands
Posts: 209
Likes: 0
Received 0 Likes on 0 Posts
Default

Amazing work pal. Really good progress and the pics tell a thousand words.
Subscribed
Old 14 June 2014, 12:24 AM
  #103  
Billet
Scooby Regular
iTrader: (60)
 
Billet's Avatar
 
Join Date: Apr 2010
Location: West Mids
Posts: 2,567
Likes: 0
Received 0 Likes on 0 Posts
Default

Looking good mate!! :-)
Old 14 June 2014, 08:05 PM
  #104  
IanPaskin
Scooby Regular
 
IanPaskin's Avatar
 
Join Date: Jun 2012
Location: Bridgnorth
Posts: 324
Likes: 0
Received 0 Likes on 0 Posts
Default

Now the front ends built up it looks great,

is the vw yours too?
Old 17 June 2014, 08:04 PM
  #105  
super_ted
Scooby Regular
Thread Starter
iTrader: (30)
 
super_ted's Avatar
 
Join Date: Dec 2008
Location: Oxfordshire
Posts: 2,602
Likes: 0
Received 0 Likes on 0 Posts
Default

Cheers guys.

Yes the bay window is mine too.
Old 18 June 2014, 01:13 AM
  #106  
Mark10sti
Scooby Regular
iTrader: (2)
 
Mark10sti's Avatar
 
Join Date: Nov 2010
Posts: 774
Likes: 0
Received 0 Likes on 0 Posts
Default

Does the face lift conversion need the inner arches too
Old 18 June 2014, 08:39 PM
  #107  
super_ted
Scooby Regular
Thread Starter
iTrader: (30)
 
super_ted's Avatar
 
Join Date: Dec 2008
Location: Oxfordshire
Posts: 2,602
Likes: 0
Received 0 Likes on 0 Posts
Default

Yes they are slightly shorter. You can cut the blob ones down to suite but i thought it better to change the whole lot as it's easier to realign everything.

Last edited by super_ted; 18 June 2014 at 08:41 PM.
Old 03 July 2014, 11:04 AM
  #108  
Mark10sti
Scooby Regular
iTrader: (2)
 
Mark10sti's Avatar
 
Join Date: Nov 2010
Posts: 774
Likes: 0
Received 0 Likes on 0 Posts
Default

Do you know if this is the case for bugeye too as I have everything to convert but the inner wings
Old 05 July 2014, 10:11 PM
  #109  
super_ted
Scooby Regular
Thread Starter
iTrader: (30)
 
super_ted's Avatar
 
Join Date: Dec 2008
Location: Oxfordshire
Posts: 2,602
Likes: 0
Received 0 Likes on 0 Posts
Default

Originally Posted by Mark7wrx
Do you know if this is the case for bugeye too as I have everything to convert but the inner wings
I would imagine so.
Old 15 September 2014, 06:55 PM
  #110  
super_ted
Scooby Regular
Thread Starter
iTrader: (30)
 
super_ted's Avatar
 
Join Date: Dec 2008
Location: Oxfordshire
Posts: 2,602
Likes: 0
Received 0 Likes on 0 Posts
Default

Over due update,

Have been really busy setting up a new business which pretty much takes over your life so this has taken a back seat but trying to get back on it now.

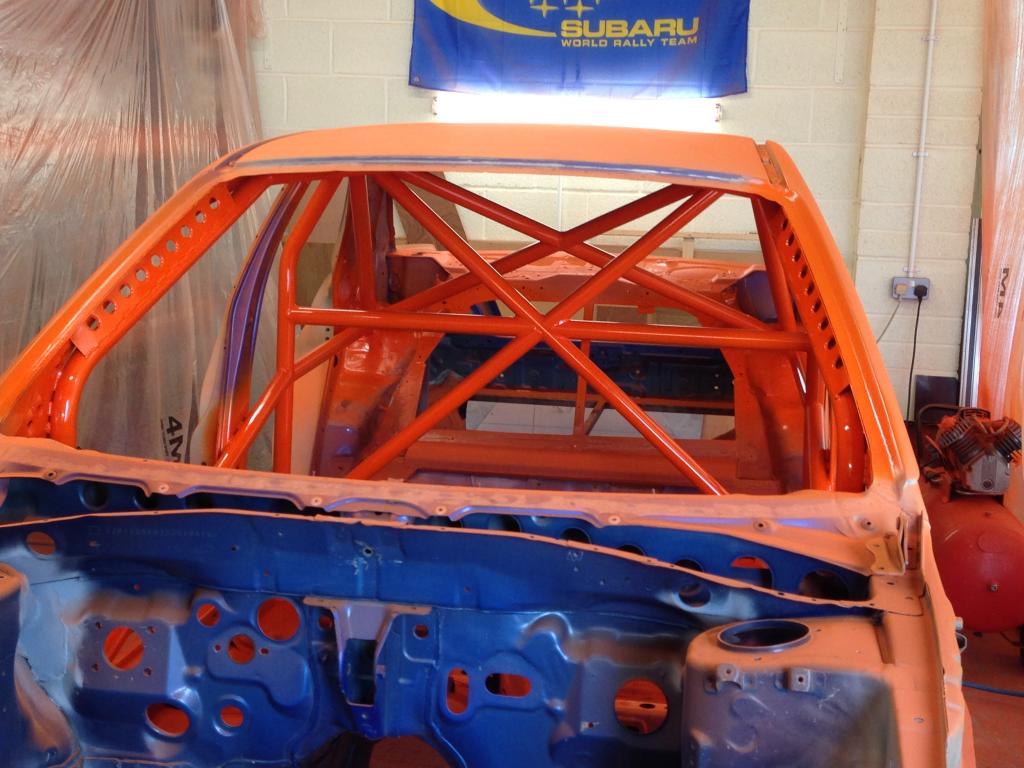
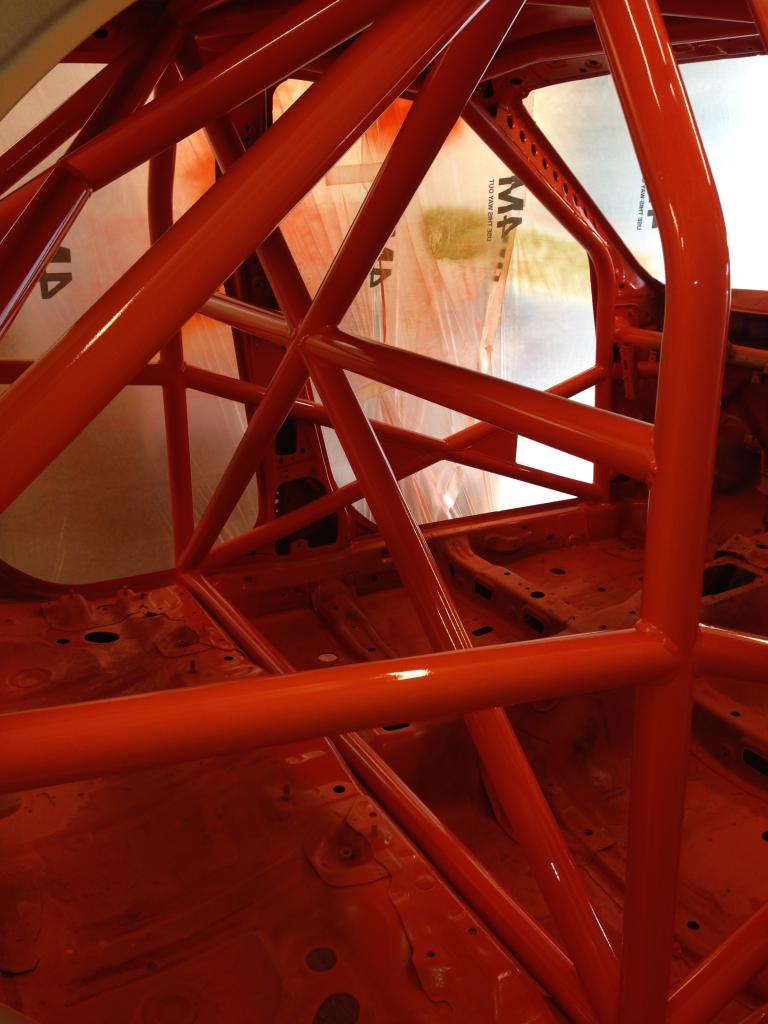
Anyway, the painting has begun. I sprayed the cage orange today. 4 coats of 2pak paint.

Name:  IMG_0332_zps2fa4c984-1.jpg
Views: 0
Size:  99.1 KB

Name:  IMG_0337_zpsad6282c6.jpg
Views: 0
Size:  106.0 KB
Name:  IMG_0333_zps927391e1.jpg
Views: 0
Size:  86.9 KB
Name:  IMG_0336_zps41f0d7da.jpg
Views: 0
Size:  78.5 KB

More paint updates to follow shortly.
Old 15 September 2014, 10:00 PM
  #111  
IanPaskin
Scooby Regular
 
IanPaskin's Avatar
 
Join Date: Jun 2012
Location: Bridgnorth
Posts: 324
Likes: 0
Received 0 Likes on 0 Posts
Default

Nice to see an update... like the colour of the cage, is the inside of the car going to be different colour then?
Old 16 September 2014, 08:37 AM
  #112  
BrownPantsRacing
Scooby Regular
iTrader: (6)
 
BrownPantsRacing's Avatar
 
Join Date: Oct 2010
Location: Herts & Bucks
Posts: 8,700
Received 128 Likes on 107 Posts
Default

Nice job!
Old 05 October 2014, 03:22 PM
  #113  
super_ted
Scooby Regular
Thread Starter
iTrader: (30)
 
super_ted's Avatar
 
Join Date: Dec 2008
Location: Oxfordshire
Posts: 2,602
Likes: 0
Received 0 Likes on 0 Posts
Default

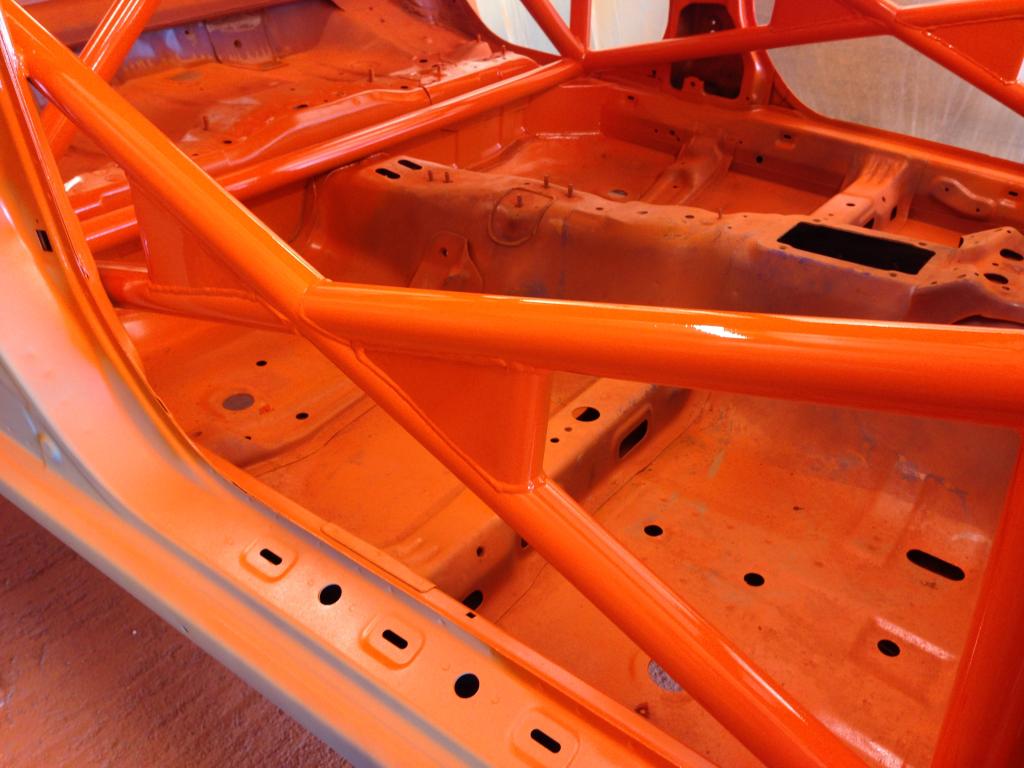
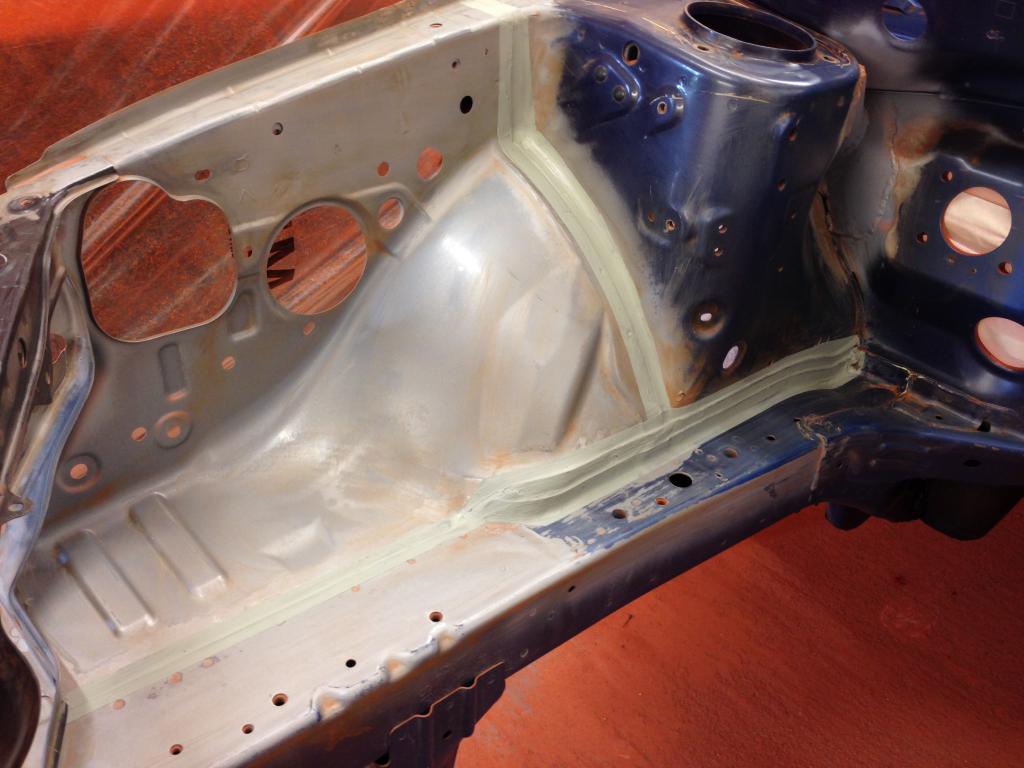
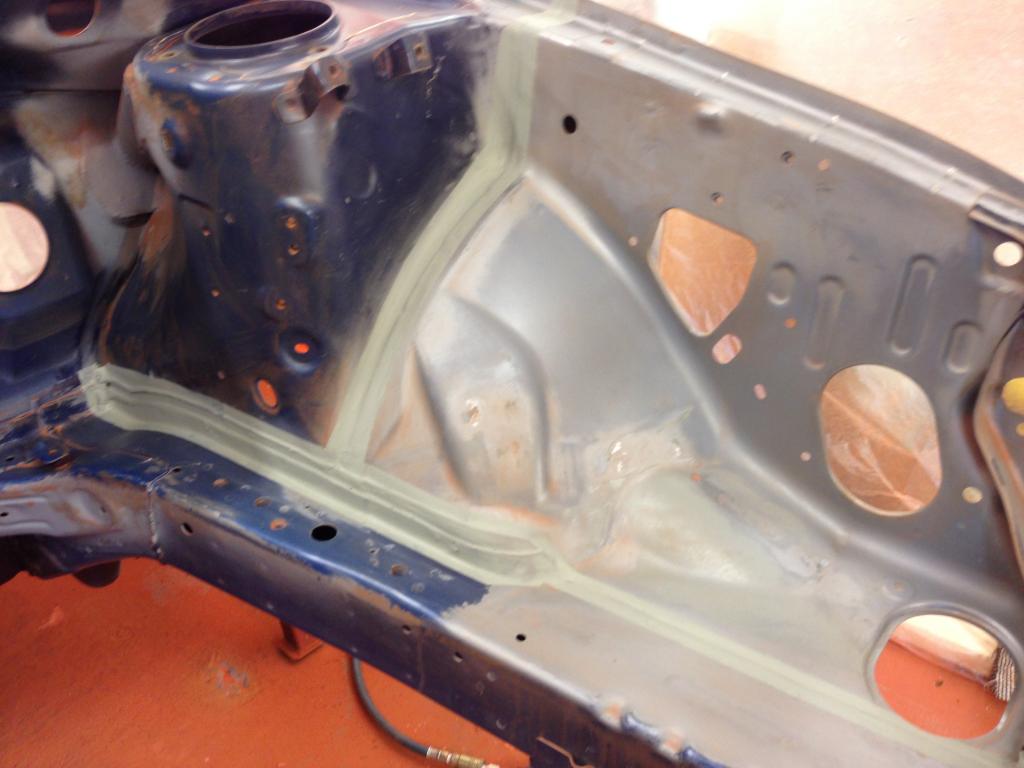
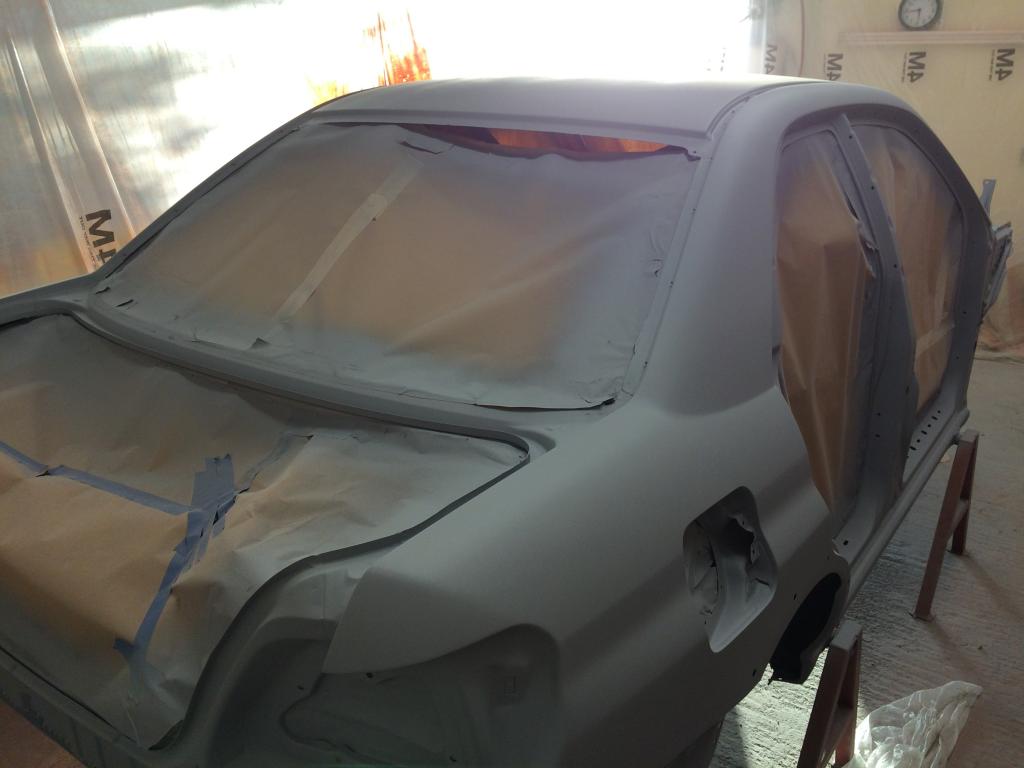
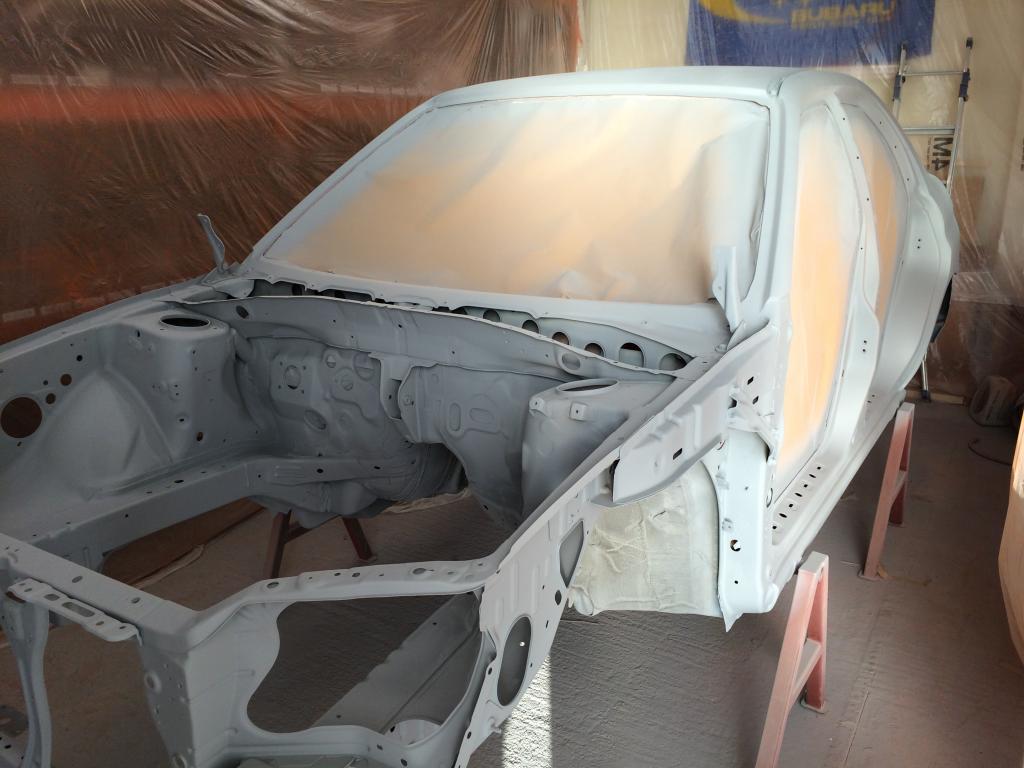
A little progress this week....Seam sealed the new inner wings, prep'd the shell and finally managed to get 2 coats of 2 oak primer on. Can't wait to get the paint stage out of the way, it's very time consuming.


Name:  IMG_0354_zps8f806648.jpg
Views: 0
Size:  83.5 KBName:  IMG_0355_zpse50c230e.jpg
Views: 0
Size:  69.5 KBName:  IMG_0006_zps62e83eca.jpg
Views: 0
Size:  55.7 KB
Name:  IMG_0008_zpsf3f47f78.jpg
Views: 0
Size:  81.3 KB
Old 28 October 2014, 09:33 PM
  #114  
DTVHSR
Scooby Regular
 
DTVHSR's Avatar
 
Join Date: May 2012
Location: Scotland
Posts: 168
Likes: 0
Received 0 Likes on 0 Posts
Default

Awesome build, can't wait to see this finished!
Old 29 October 2014, 06:33 PM
  #115  
b3nmw
Scooby Regular
 
b3nmw's Avatar
 
Join Date: Mar 2009
Location: sunny wales
Posts: 1,100
Likes: 0
Received 0 Likes on 0 Posts
Default

What colour is the car going to be m8?
Old 07 November 2014, 07:19 PM
  #116  
super_ted
Scooby Regular
Thread Starter
iTrader: (30)
 
super_ted's Avatar
 
Join Date: Dec 2008
Location: Oxfordshire
Posts: 2,602
Likes: 0
Received 0 Likes on 0 Posts
Default

Car is going a dark solid grey. Pictures soon, i promise.
Old 10 November 2014, 02:32 PM
  #117  
BrownPantsRacing
Scooby Regular
iTrader: (6)
 
BrownPantsRacing's Avatar
 
Join Date: Oct 2010
Location: Herts & Bucks
Posts: 8,700
Received 128 Likes on 107 Posts
Default

Something like this combo? GT3 grey/red.

Old 10 November 2014, 03:12 PM
  #118  
IanPaskin
Scooby Regular
 
IanPaskin's Avatar
 
Join Date: Jun 2012
Location: Bridgnorth
Posts: 324
Likes: 0
Received 0 Likes on 0 Posts
Default

Originally Posted by BrownPantsRacing
Something like this combo? GT3 grey/red.
+1 for the GT3 grey

Love that colour, the grey on mine is GT3 but black grey, I think that is blue grey which is lighter but for a full car would be nicer.

Last edited by IanPaskin; 10 November 2014 at 03:13 PM.
Old 10 November 2014, 06:15 PM
  #119  
super_ted
Scooby Regular
Thread Starter
iTrader: (30)
 
super_ted's Avatar
 
Join Date: Dec 2008
Location: Oxfordshire
Posts: 2,602
Likes: 0
Received 0 Likes on 0 Posts
Default

Yes like that but with orange rather than red.
Old 10 November 2014, 07:29 PM
  #120  
bioforger
Scooby Regular
iTrader: (1)
 
bioforger's Avatar
 
Join Date: Jan 2002
Location: Pig Hill, Wiltsh1te
Posts: 16,995
Received 5 Likes on 5 Posts
Default

cmon get a lick on... lick, nevermind


Quick Reply: My DIY widetrack track car build


All times are GMT +1. The time now is 09:55 AM.