1994 Version Sti RA.... Restoration Project.
 07 January 2014, 10:38 PM
#1051


I just read through this thread. AMAZING WORK! I hope to take what I learned here and apply it to my 05 WRX Wagon when the time comes. I really enjoy the fact that you refurbished the original parts instead of just buying new everything, even just buying all new bolts makes this sort of project seem prohibitively expensive.
 refurbising was always my main goal as you will have read earlier it was important in my vision to maintain the integritory of the car as much as possible apart from a few upgrades, but your correct there regarding costs as I simply could not afford to just replace everything for new, I dread to imagine how much all those fixings would cost alone.
 Hopefully the thread will give you good guidance when the time comes to start on your wagon

 07 January 2014, 10:45 PM
#1052
Scooby Regular

And again, I simply lost track on time catching up the thread. Excellent job and superb result. Congrats!
Some older pictures start to fail what is a pity for me, at least on my computer.
I took some ideas for some restoring I am doing on mine, hope you don't mind :P
Keep up the good work and keep us posted.
cheers
Some older pictures start to fail what is a pity for me, at least on my computer.
I took some ideas for some restoring I am doing on mine, hope you don't mind :P
Keep up the good work and keep us posted.
cheers
10 January 2014, 05:12 PM
#1053
And again, I simply lost track on time catching up the thread. Excellent job and superb result. Congrats!
Some older pictures start to fail what is a pity for me, at least on my computer.
I took some ideas for some restoring I am doing on mine, hope you don't mind :P
Keep up the good work and keep us posted.
cheers
Some older pictures start to fail what is a pity for me, at least on my computer.
I took some ideas for some restoring I am doing on mine, hope you don't mind :P
Keep up the good work and keep us posted.
cheers
I struggled to find info on some areas that's why I decided to do a full thread with nothing missed out
11 January 2014, 05:09 PM
#1054
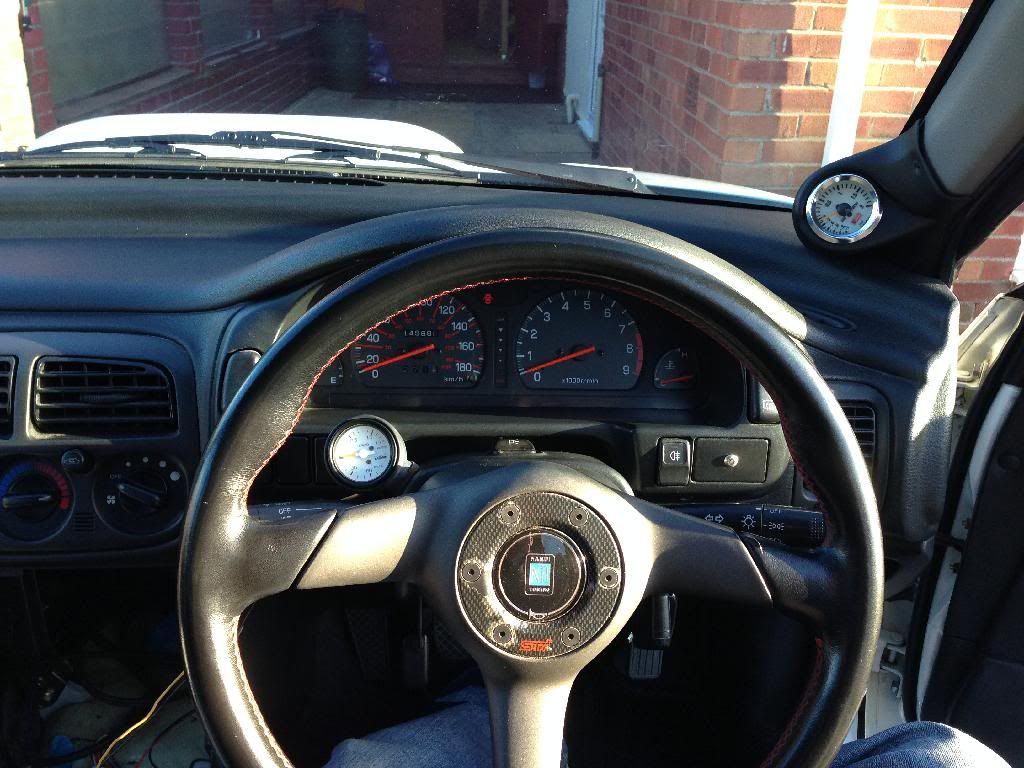
I managed to get out and get a couple of miles on the car today, good to warm everything up and get the wheels turning at last......
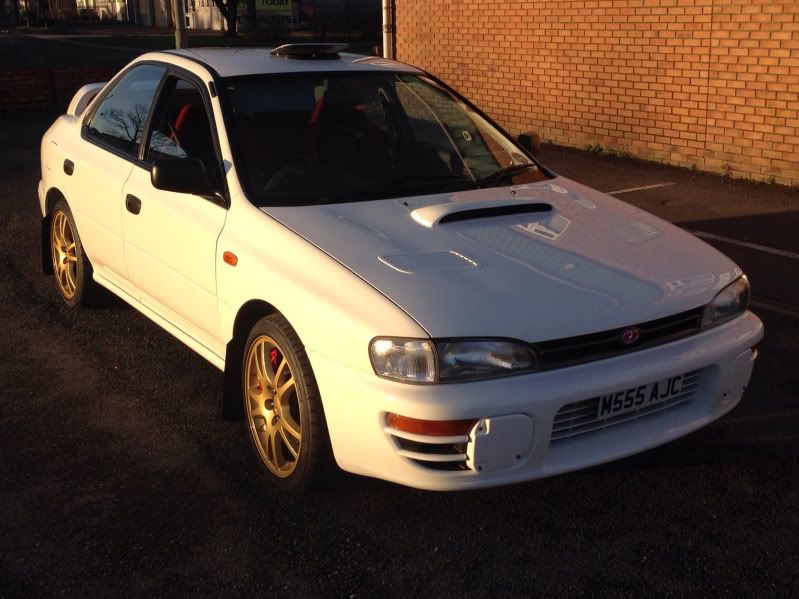
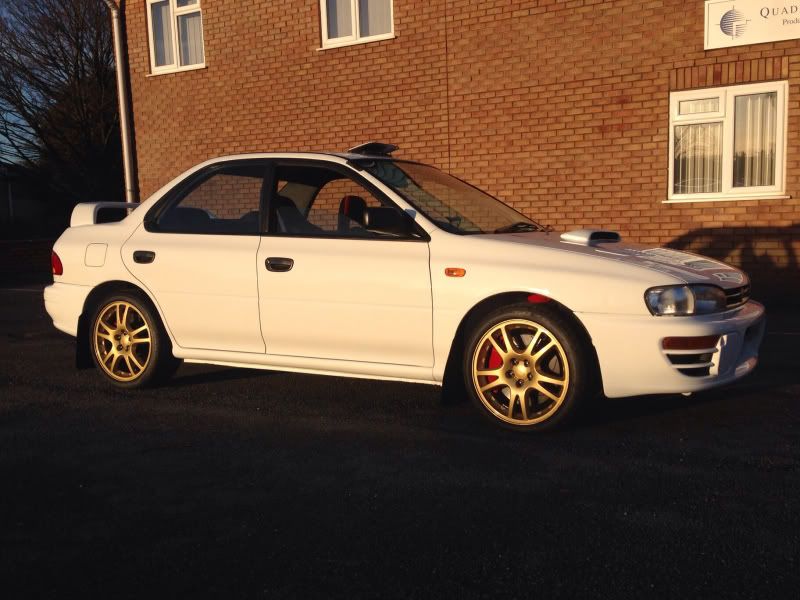
I'm still in two minds if the car could be a little lower, maybe the P1 Spring group buy maybe worth a closer look or similar.
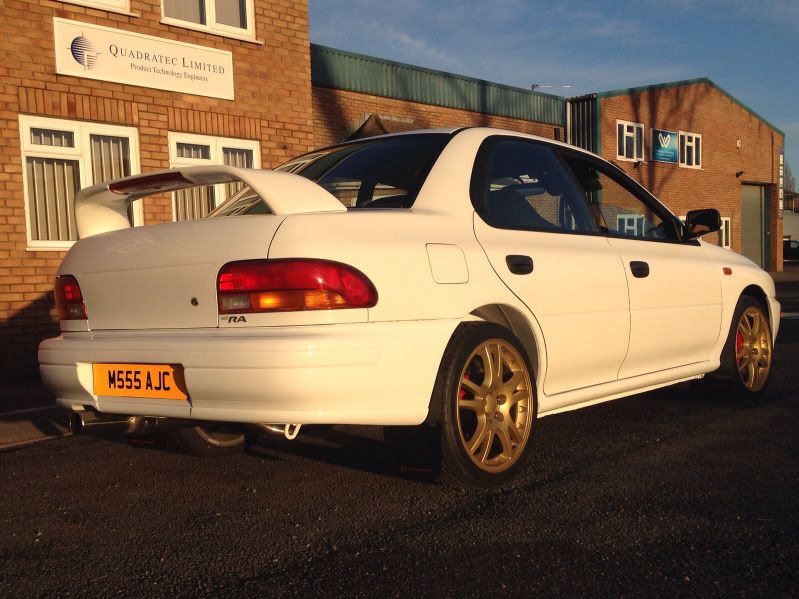
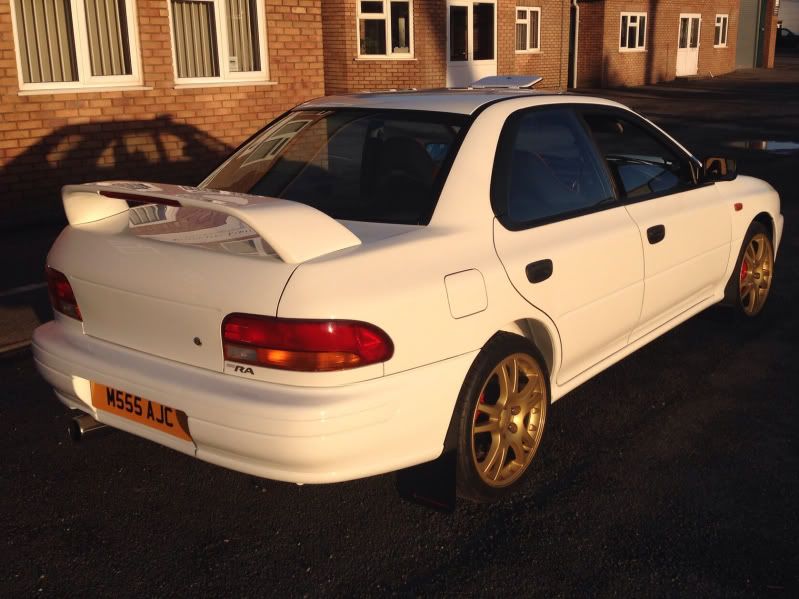
Great to get out
I'm still in two minds if the car could be a little lower, maybe the P1 Spring group buy maybe worth a closer look or similar.
Great to get out
 11 January 2014, 05:38 PM
#1056
Scooby Regular
iTrader: (6)

Join Date: Jul 2013
Location: Colchester
Posts: 665
Likes: 0
Received 0 Likes
on
0 Posts
Looking great :-) but yes agree a slight drop would make it even better. I usually don't like impreza's too low but somehow it seems more right on an RA!
 12 January 2014, 02:49 PM
#1059
Scooby Regular

Join Date: Apr 2012
Location: Maidstone
Posts: 53
Likes: 0
Received 0 Likes
on
0 Posts
 An inch would make a massive difference to the stance...
Looking stunning Si, have you got much more to iron out?.
12 January 2014, 09:09 PM
#1061
Gauges need fitting.
Head unit speakers and small amp.
Dent man.
Clay Bar and Detail.
Also some over spray on the glass so that needs a clay bar or machine clean.
Decals, fog covers, wing badges and maybe the boot badge.
Plus general tinkering
17 January 2014, 09:34 PM
#1062
I had the fidgets this evening and felt I needed to do something on the car, the weathers a nightmare so I have failed to roll the car out and make a start but tonight I decided to unpack a few things ready.... I'm hopeful that tomorrow is going to dry and I can get the centre console apart and look at starting to get the gauges fitted.
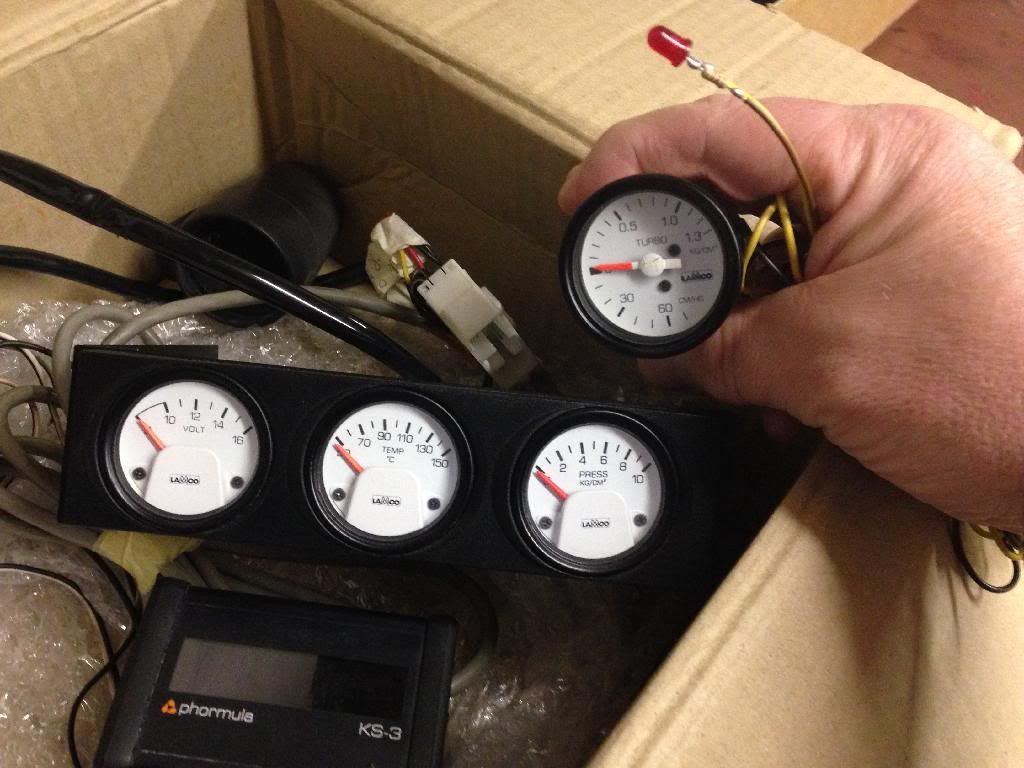

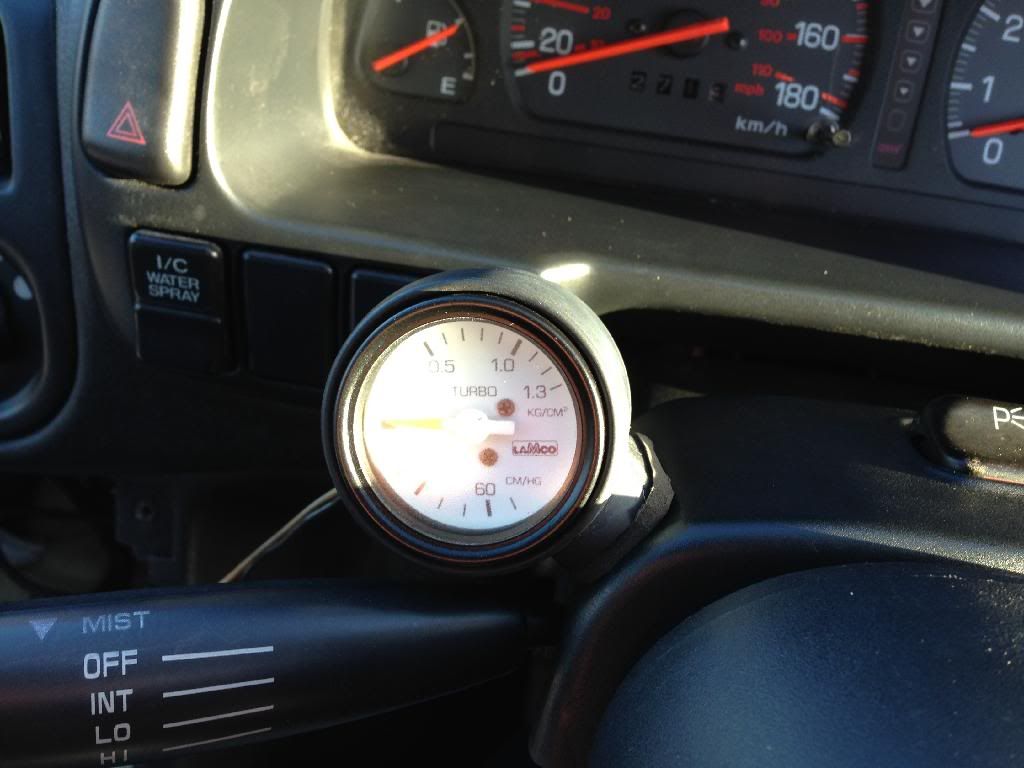
Wires ! Not comfortable for me but I'll have a go, the intention is to fit the dials and drop the wires into the footwell then I'll get the wires into the engine bay and cable tie them up ready for Ace to plumb them in. Also I have a Knock sensor that I will fit in the same way plus I'll have to construct a bracket to mount that on and find the best place to house it.
Any idea what that red LED is for ? It's connected the the boost gauge wiring.
18 January 2014, 12:53 PM
#1063
Scooby Regular
iTrader: (41)
Join Date: Nov 2003
Location: in the woods...........555 Wagon Sqn
Posts: 13,347
Received 55 Likes
on
42 Posts
Could be a high boost threshold warning...is there anything that can be adjusted on that gauge Si?
Pony connections everywhere too...get the soldering iron and shrink wrap out
Pony connections everywhere too...get the soldering iron and shrink wrap out
18 January 2014, 05:12 PM
#1064
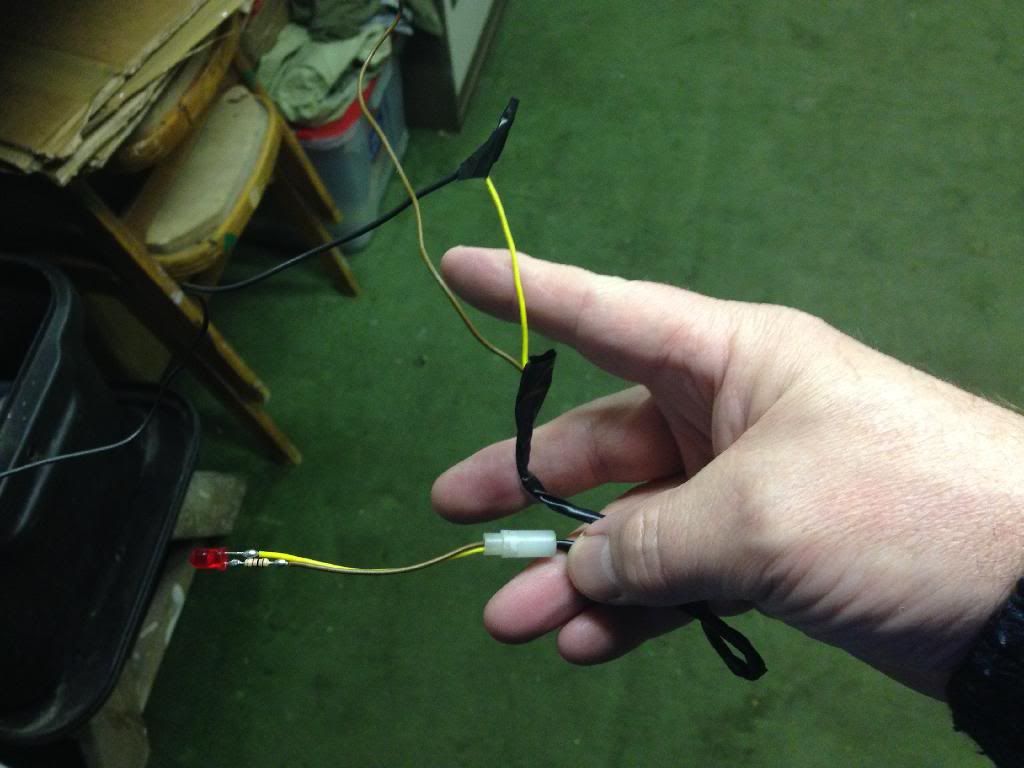
There is no adjustment on the gauge and that led is on the far end of the cable... whatever it is it's aftermarket and I don't think anything to do with the set up so I've cut it off to save some weight
18 January 2014, 05:39 PM
#1065
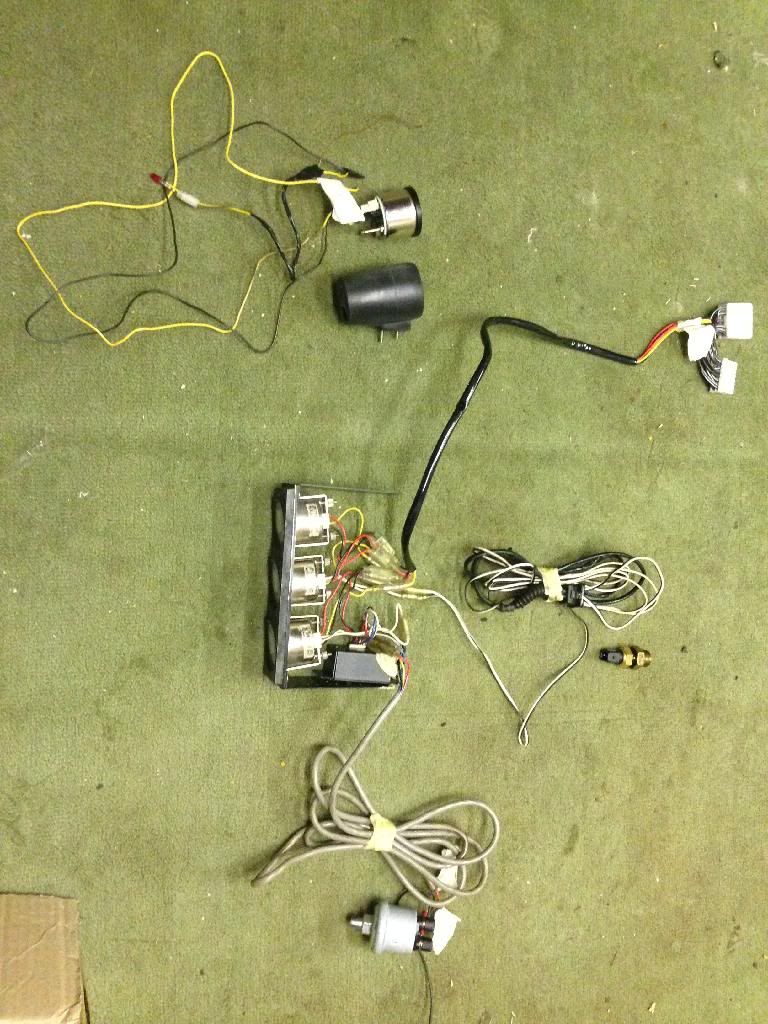
I had another hour on this today to get a feel for it and see which was the best direction to take....
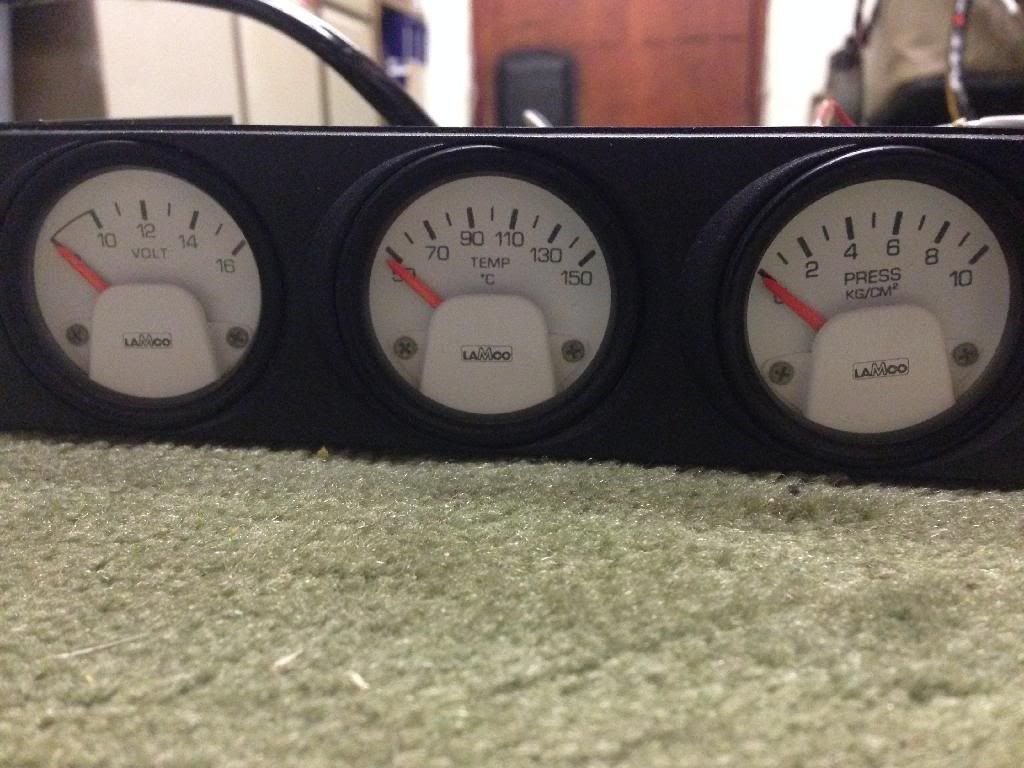
firstly removed the head unit and fixed the gauges in the top slot.
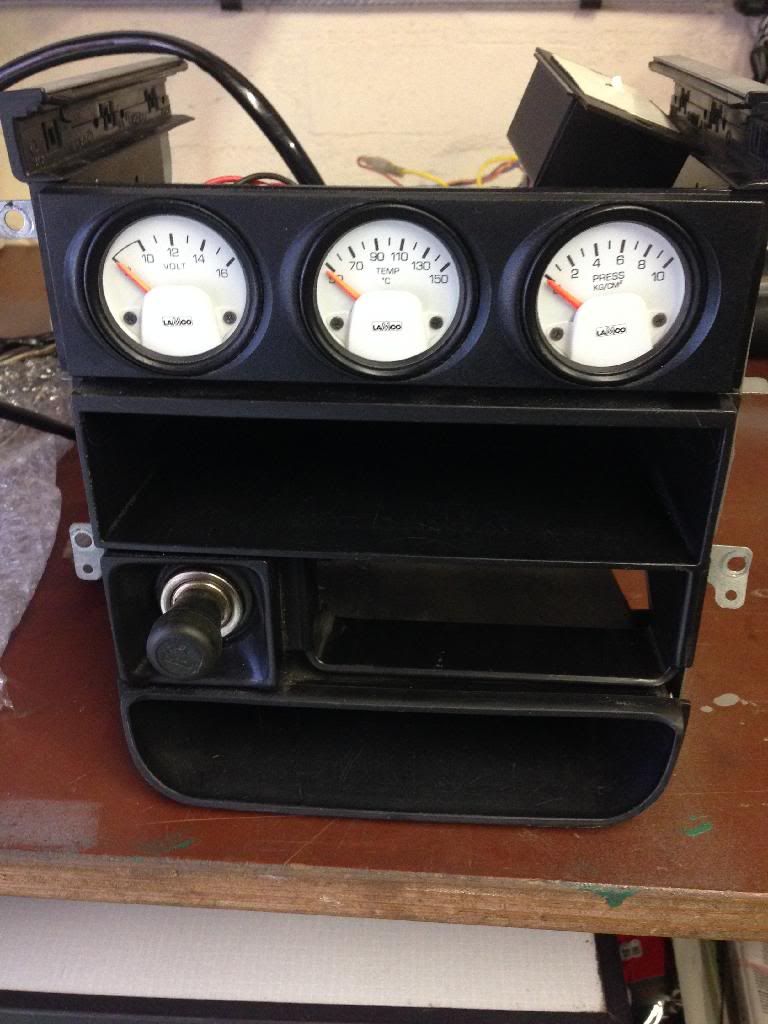
Dropped the head unit back in then to get a feel for fitment... the tray will no go in the unit has to be srewed directly in, I do have a new unit this one will do for set up.

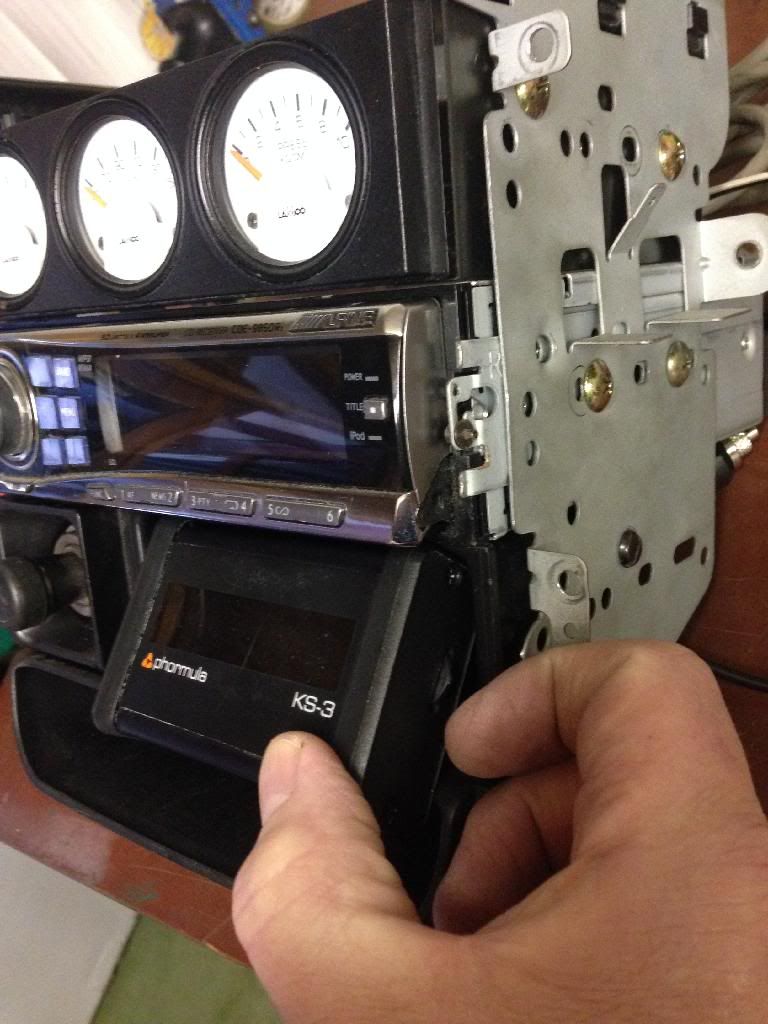
I'm going to mount the KS-3 knocklink in place of the ashtray, it's out of direct light down there plus I can make a false back plate and the wiring will be as out of sight as I can make it.
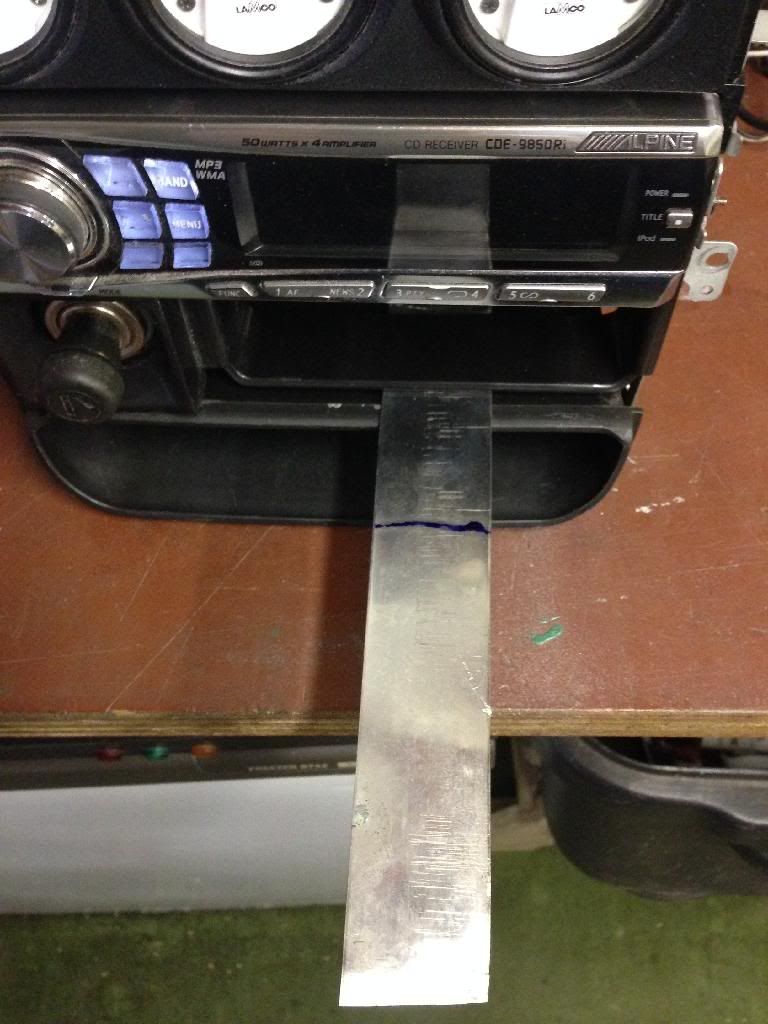
I have a short length of stainless strip to shape in order to mount to link on.
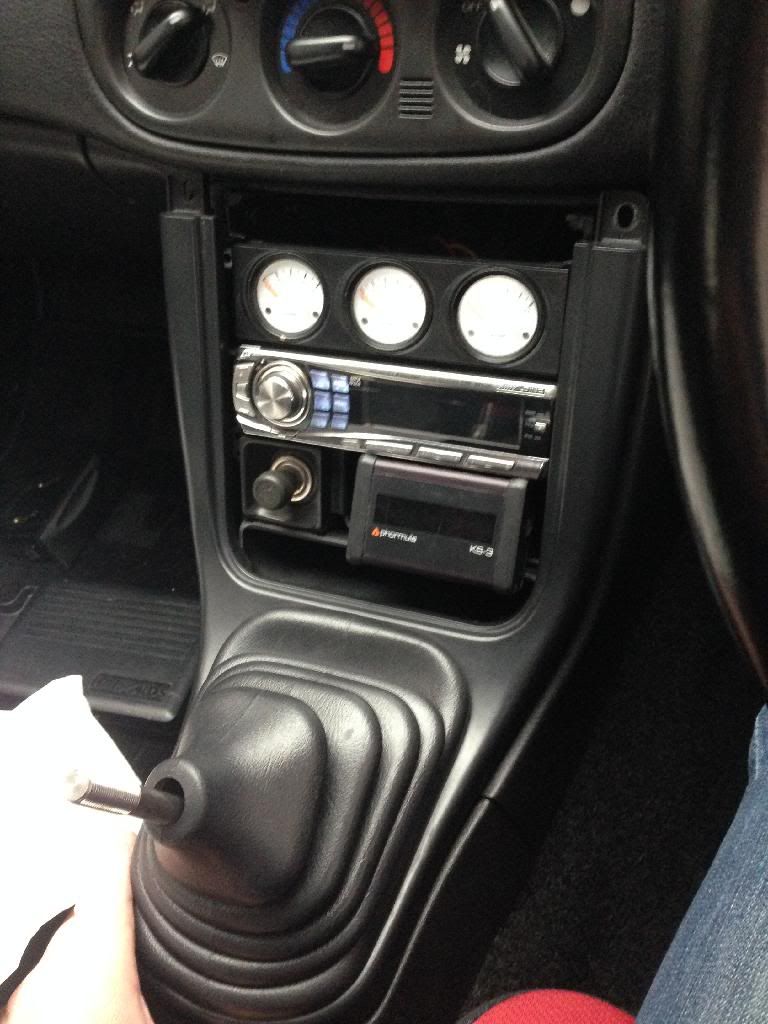
As a rough fit this is how it will look when done, the good thing I noticed immediatly is down there angled correctly it's out of direct light and there is no direct reflection off the screen.
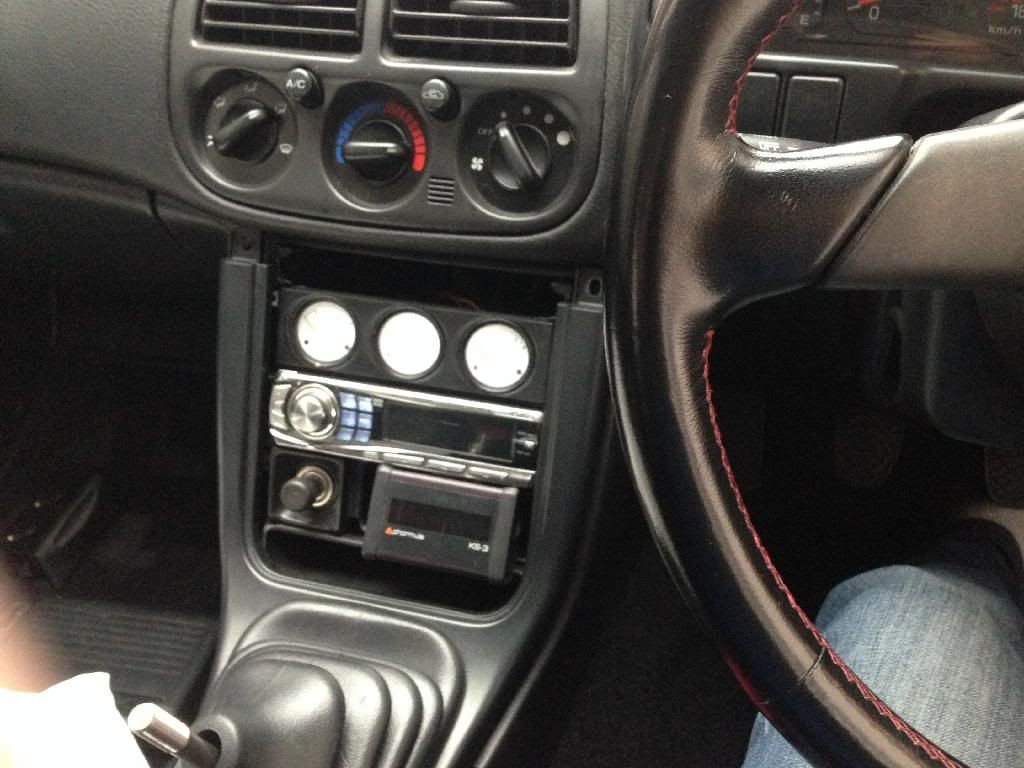
Next task will be to cut into the lighter socket wires and splice a double socket in there which will allow me to run the KS-3 plus a sat nav cable out of sight.
Edited to add I phoned Phormula a while back to see if they could give me a price on fitting a new face on the unit as there are some marks on it and they kindly sent me a replacement screen and fitting instructions free of charge... great customer service.
firstly removed the head unit and fixed the gauges in the top slot.
Dropped the head unit back in then to get a feel for fitment... the tray will no go in the unit has to be srewed directly in, I do have a new unit this one will do for set up.
I'm going to mount the KS-3 knocklink in place of the ashtray, it's out of direct light down there plus I can make a false back plate and the wiring will be as out of sight as I can make it.
I have a short length of stainless strip to shape in order to mount to link on.
As a rough fit this is how it will look when done, the good thing I noticed immediatly is down there angled correctly it's out of direct light and there is no direct reflection off the screen.
Next task will be to cut into the lighter socket wires and splice a double socket in there which will allow me to run the KS-3 plus a sat nav cable out of sight.
Edited to add I phoned Phormula a while back to see if they could give me a price on fitting a new face on the unit as there are some marks on it and they kindly sent me a replacement screen and fitting instructions free of charge... great customer service.
Last edited by Silver Scooby Sport; 18 January 2014 at 05:51 PM.
18 January 2014, 06:10 PM
#1067
Scooby Regular
iTrader: (100)
Join Date: Oct 2008
Location: Planet Earth
Posts: 13,684
Likes: 0
Received 0 Likes
on
0 Posts
It's been a while since I've had a look at your thread Simon and the car is looking fantastic I must say, I just wish I had your attention to detail and patience.
The one thing I forgot to ask you when I saw you at the meet on Wednesday was where did you get your Rally Armor flaps from? I've ditched the idea of the carbon fibre flaps I've got and I'm looking to get a set of either red or black Rally Armor flaps.
The one thing I forgot to ask you when I saw you at the meet on Wednesday was where did you get your Rally Armor flaps from? I've ditched the idea of the carbon fibre flaps I've got and I'm looking to get a set of either red or black Rally Armor flaps.
18 January 2014, 07:33 PM
#1074
I was very lucky with them they found me from a local owner who was changing his car so they would not fit the new one, old school oem for sure and a bonus that they are white faced.
Dead right Jon and thanks matey, always handy to have some extra info as well.
18 January 2014, 08:02 PM
#1075


 19 January 2014, 05:06 PM
#1080
I've had another little go today, trial fitting of the boost gauge... It's not quite at the right angle so I'll drop a few washers behind the one fixing to try and angle it out a little.
Micky the fog switch is on the right hand side mate !! Lol

I also managed to take the car out after the road dried and covered a small local loop, with the car being in so many parts recently it takes time just to build the confidence up to make sure all is well so I covered the local loop a couple of times then back home and checked under the bonnet and climbed under the car for a good check around... Pleased to say all is well. There is one thing that I need to check on and it's a small clunking noise from the rear passenger side wheel area when on full lock to the left when pulling on my driveway, I'm not sure if that's normal in regards diff noise? The trouble is they are all new noises to learn about
Micky the fog switch is on the right hand side mate !! Lol
I also managed to take the car out after the road dried and covered a small local loop, with the car being in so many parts recently it takes time just to build the confidence up to make sure all is well so I covered the local loop a couple of times then back home and checked under the bonnet and climbed under the car for a good check around... Pleased to say all is well. There is one thing that I need to check on and it's a small clunking noise from the rear passenger side wheel area when on full lock to the left when pulling on my driveway, I'm not sure if that's normal in regards diff noise? The trouble is they are all new noises to learn about
Last edited by Silver Scooby Sport; 19 January 2014 at 05:08 PM.