Notices
Projects For Serious DIY Car Projects

Turbo 2000 refresh

Thread Tools
 
Search this Thread
 
Old 04 November 2009, 08:53 AM
  #61  
Tidgy
Scooby Regular
 
Tidgy's Avatar
 
Join Date: Sep 2004
Location: Notts
Posts: 23,118
Received 150 Likes on 115 Posts
Default

i hate to mention it, but you;ve sprayed the bumpers the wrong colour,,,,,,,,,,,,,,, lol
Old 04 November 2009, 09:21 AM
  #62  
BLU
Scooby Regular
Thread Starter
iTrader: (27)
 
BLU's Avatar
 
Join Date: May 2008
Location: Welsh Northland
Posts: 4,832
Received 2 Likes on 2 Posts
Default

Originally Posted by Tidgy
i hate to mention it, but you;ve sprayed the bumpers the wrong colour,,,,,,,,,,,,,,, lol
Old 05 November 2009, 09:03 AM
  #63  
fastmike
Scooby Regular
iTrader: (4)
 
fastmike's Avatar
 
Join Date: Jul 2009
Location: Romford
Posts: 724
Likes: 0
Received 0 Likes on 0 Posts
Default

looking good mate
Old 19 November 2009, 09:14 PM
  #64  
bioforger
Scooby Regular
iTrader: (1)
 
bioforger's Avatar
 
Join Date: Jan 2002
Location: Pig Hill, Wiltsh1te
Posts: 16,995
Received 5 Likes on 5 Posts
Default

cmon this should be done by now surely
Old 03 February 2010, 04:35 PM
  #65  
BLU
Scooby Regular
Thread Starter
iTrader: (27)
 
BLU's Avatar
 
Join Date: May 2008
Location: Welsh Northland
Posts: 4,832
Received 2 Likes on 2 Posts
Default

Well hello again. Its been 3 months since i did owt to my poor scooby so thought it was about time I pulled my finger out and do a bit!!

Not a big update but it is an update nonetheless!

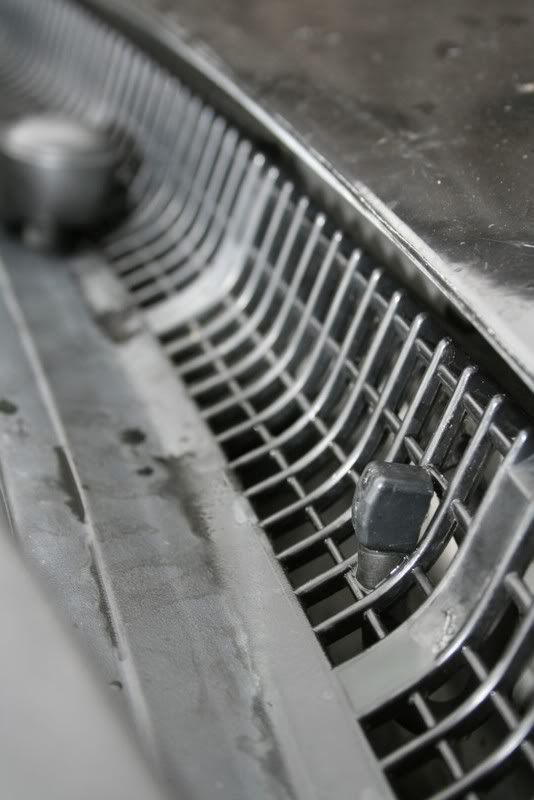
I have removed the vents and welded up the washer jet holes and skimmed them. Was hoping to have got more done but its been taking the filler an hour to go off between coats as its so cold, grrr

Anyway pics (only two as i got carried away and forgot to take any lol )


Stonechip holes filled


Have been humming and harring over wether to lose the scoop but decided the scoop is staying as it just wouldn't be a scooby without one!!

Hoping to get her stripped down and up on stands and ready for sealer/primer early next week!!
Old 03 February 2010, 04:48 PM
  #66  
beef-on-the-bone
Scooby Regular
iTrader: (5)
 
beef-on-the-bone's Avatar
 
Join Date: Jun 2006
Location: newquay
Posts: 6,880
Likes: 0
Received 0 Likes on 0 Posts
Default

been missing this!!

best get back on it now eh??
Old 03 February 2010, 04:54 PM
  #67  
BLU
Scooby Regular
Thread Starter
iTrader: (27)
 
BLU's Avatar
 
Join Date: May 2008
Location: Welsh Northland
Posts: 4,832
Received 2 Likes on 2 Posts
Default

Originally Posted by beef-on-the-bone
best get back on it now eh??
Not half

You should have seen the layer of dust on it meh
Old 03 February 2010, 05:04 PM
  #68  
beef-on-the-bone
Scooby Regular
iTrader: (5)
 
beef-on-the-bone's Avatar
 
Join Date: Jun 2006
Location: newquay
Posts: 6,880
Likes: 0
Received 0 Likes on 0 Posts
Default

easy done though, especially in this weather
Old 04 February 2010, 10:45 AM
  #69  
V4JDMSTi
Scooby Regular
iTrader: (2)
 
V4JDMSTi's Avatar
 
Join Date: Jan 2005
Location: Essex
Posts: 12,706
Likes: 0
Received 1 Like on 1 Post
Default

So what are you going to do for washer jets?
Old 04 February 2010, 10:56 AM
  #70  
trails
Scooby Regular
iTrader: (41)
 
trails's Avatar
 
Join Date: Nov 2003
Location: in the woods...........555 Wagon Sqn
Posts: 13,347
Received 55 Likes on 42 Posts
Default

Originally Posted by mneame
So what are you going to do for washer jets?
same as mine perhaps; change them and hide them?


Last edited by trails; 04 February 2010 at 10:59 AM. Reason: read the post properly this time!
Old 04 February 2010, 11:20 AM
  #71  
BLU
Scooby Regular
Thread Starter
iTrader: (27)
 
BLU's Avatar
 
Join Date: May 2008
Location: Welsh Northland
Posts: 4,832
Received 2 Likes on 2 Posts
Default

Originally Posted by mneame
So what are you going to do for washer jets?
Hiding them on the scuttle panel like trails has or on the wiper arm itself!

Filler finally dried!! And flatted off!!


and primed


I have removed the brakelight from the bootspoiler and filled in the hole with 2 layers of fibreglass. Just needs the top skimming with some filler when the glass finally goes off, in about a year at this rate!!

Old 09 February 2010, 04:10 PM
  #72  
BLU
Scooby Regular
Thread Starter
iTrader: (27)
 
BLU's Avatar
 
Join Date: May 2008
Location: Welsh Northland
Posts: 4,832
Received 2 Likes on 2 Posts
Default

Right, finally got the doors off today;


Removed the wings and bonnet too.

Jacked her up, removed wheels and placed her on axle stands. Followed by some masking up. Novel use for the bubble wrap the house builder left in my garage!! saving money ftw


My scoobynet sticker is still there!!

Old 09 February 2010, 06:46 PM
  #73  
Silver Scooby Sport
Moderator
Support Scoobynet!
Support Scoobynet!
iTrader: (15)
 
Silver Scooby Sport's Avatar
 
Join Date: Sep 2002
Location: South Wales
Posts: 13,846
Likes: 0
Received 3 Likes on 3 Posts
Default

I've not seen this thread before great work I have to say

That's the first time I have seen the relocation of the washer jets and filling the bonnet holes, very clean looking I have to say well done
Old 09 February 2010, 10:56 PM
  #74  
beef-on-the-bone
Scooby Regular
iTrader: (5)
 
beef-on-the-bone's Avatar
 
Join Date: Jun 2006
Location: newquay
Posts: 6,880
Likes: 0
Received 0 Likes on 0 Posts
Default

really looking forward to seeing this done
Old 09 February 2010, 11:23 PM
  #75  
joey_turbo
Scooby Regular
iTrader: (26)
 
joey_turbo's Avatar
 
Join Date: Apr 2006
Location: Essex
Posts: 6,547
Received 9 Likes on 6 Posts
Default

Still a a great thread.
Whats the reason for removing the spoiler brake light?
Old 10 February 2010, 10:36 AM
  #76  
BLU
Scooby Regular
Thread Starter
iTrader: (27)
 
BLU's Avatar
 
Join Date: May 2008
Location: Welsh Northland
Posts: 4,832
Received 2 Likes on 2 Posts
Default

Originally Posted by joey_turbo
Still a a great thread.
Whats the reason for removing the spoiler brake light?
Because its not needed and I wanted a smooth, clean lookin spoiler, that looks factory. (and a one off )
Old 10 February 2010, 12:06 PM
  #77  
joey_turbo
Scooby Regular
iTrader: (26)
 
joey_turbo's Avatar
 
Join Date: Apr 2006
Location: Essex
Posts: 6,547
Received 9 Likes on 6 Posts
Default

Isn't there some sort of rule about a 3rd brake light though? Thought they were a requirement on vehicles, although I always thought it was from 1997 anyway.
Old 10 February 2010, 12:15 PM
  #78  
trails
Scooby Regular
iTrader: (41)
 
trails's Avatar
 
Join Date: Nov 2003
Location: in the woods...........555 Wagon Sqn
Posts: 13,347
Received 55 Likes on 42 Posts
Default

Originally Posted by joey_turbo
Isn't there some sort of rule about a 3rd brake light though? Thought they were a requirement on vehicles, although I always thought it was from 1997 anyway.
not sure if there is any legislation but it's certainly a more relaxing experience when the car in front has a centre\third brake light
Old 10 February 2010, 12:35 PM
  #79  
joey_turbo
Scooby Regular
iTrader: (26)
 
joey_turbo's Avatar
 
Join Date: Apr 2006
Location: Essex
Posts: 6,547
Received 9 Likes on 6 Posts
Default

Most of the time, its the only brake light that works on some of the bangers I see.

Anyway, here is some info I found, but it is Wikipedia, so not gospel: Automotive lighting - Wikipedia, the free encyclopedia

But it says from 1998 onwards anyway.
Old 12 March 2010, 02:23 PM
  #80  
BLU
Scooby Regular
Thread Starter
iTrader: (27)
 
BLU's Avatar
 
Join Date: May 2008
Location: Welsh Northland
Posts: 4,832
Received 2 Likes on 2 Posts
Default

Originally Posted by joey_turbo
Most of the time, its the only brake light that works on some of the bangers I see.

Anyway, here is some info I found, but it is Wikipedia, so not gospel: Automotive lighting - Wikipedia, the free encyclopedia

But it says from 1998 onwards anyway.
I'm alright then as I have a 97 model

I have a new toy as well as a suction feed gun (for primer etc) and a gravity fed gun (for topcat/laquer) Hopefully should see some progress over the next couple of weeks


Old 12 March 2010, 06:20 PM
  #81  
beef-on-the-bone
Scooby Regular
iTrader: (5)
 
beef-on-the-bone's Avatar
 
Join Date: Jun 2006
Location: newquay
Posts: 6,880
Likes: 0
Received 0 Likes on 0 Posts
Default

good man, get a shift on!!!
Old 15 March 2010, 10:33 AM
  #82  
Midnight Runner
Scooby Regular
 
Midnight Runner's Avatar
 
Join Date: Dec 2007
Location: North Wales/Chester
Posts: 795
Likes: 0
Received 0 Likes on 0 Posts
Default

Hey mate this is coming along really well. Can't believe how much hard work has been involved, but you're doing a proper job! The new bumpers are looking cool too. Now get a move on!
Old 15 March 2010, 07:58 PM
  #83  
bioforger
Scooby Regular
iTrader: (1)
 
bioforger's Avatar
 
Join Date: Jan 2002
Location: Pig Hill, Wiltsh1te
Posts: 16,995
Received 5 Likes on 5 Posts
Default

yea chop chop
Old 23 March 2010, 10:18 AM
  #84  
BLU
Scooby Regular
Thread Starter
iTrader: (27)
 
BLU's Avatar
 
Join Date: May 2008
Location: Welsh Northland
Posts: 4,832
Received 2 Likes on 2 Posts
Default

Still no paint, want it to warm up a couple of ° first.

In other news I'm quite chuffed with my latest purchase for the interior...

Old 23 March 2010, 12:02 PM
  #85  
DJ_Jon
911 C4 pilot
iTrader: (7)
 
DJ_Jon's Avatar
 
Join Date: Jan 2007
Location: In an Air Cooled Porsche
Posts: 3,578
Likes: 0
Received 0 Likes on 0 Posts
Default

Nice set of RB5 seats, got a full interior myself recently, shame I've just sold the car!
Old 24 March 2010, 02:41 PM
  #86  
magneel1
Scooby Regular
iTrader: (18)
 
magneel1's Avatar
 
Join Date: Jan 2010
Location: London
Posts: 1,179
Likes: 0
Received 0 Likes on 0 Posts
Default

Very Nice Work..
Well done, looking very good.
Old 24 March 2010, 03:02 PM
  #87  
zippy!
Scooby Regular
iTrader: (1)
 
zippy!'s Avatar
 
Join Date: May 2009
Location: nowhere fancy
Posts: 1,758
Likes: 0
Received 0 Likes on 0 Posts
Default

well done mate great job on the front bumper it takes ***** to chop your motor up and have a go yourself not many people would have the confidence!
Old 25 March 2010, 02:33 PM
  #88  
BLU
Scooby Regular
Thread Starter
iTrader: (27)
 
BLU's Avatar
 
Join Date: May 2008
Location: Welsh Northland
Posts: 4,832
Received 2 Likes on 2 Posts
Default

Originally Posted by DJ_Jon
Nice set of RB5 seats, got a full interior myself recently, shame I've just sold the car!
Originally Posted by magneel1
Very Nice Work..
Well done, looking very good.
Cheers
Originally Posted by zippy!
well done mate great job on the front bumper it takes ***** to chop your motor up and have a go yourself not many people would have the confidence!
Must admit I had to take a deep breath before cutting the bumper, once it was done though there was no going back and I'm made up with the result

Paint is getting ordered today (completely different to what I had originally planned for and hopefully unique to a Scooby [still blue btw]!!) and hopefully will start painting late on next week, can't wait!

Last edited by BLU; 25 March 2010 at 02:36 PM.
Old 25 March 2010, 06:52 PM
  #89  
beef-on-the-bone
Scooby Regular
iTrader: (5)
 
beef-on-the-bone's Avatar
 
Join Date: Jun 2006
Location: newquay
Posts: 6,880
Likes: 0
Received 0 Likes on 0 Posts
Default

no sneaky peeks?!?!
Old 26 March 2010, 09:55 AM
  #90  
BLU
Scooby Regular
Thread Starter
iTrader: (27)
 
BLU's Avatar
 
Join Date: May 2008
Location: Welsh Northland
Posts: 4,832
Received 2 Likes on 2 Posts
Default

Originally Posted by beef-on-the-bone
no sneaky peeks?!?!
Now don't be impatient mr beef, I may give you a taster when the tin of paint is here but until then I'll keep you guessing


Quick Reply: Turbo 2000 refresh


All times are GMT +1. The time now is 02:49 PM.