
Time Attack Pro car - 2008


Scooby Regular
Joined: May 2004
Posts: 11,341
Likes: 1
Ha! Fair enough. What a lot of work!
Please work harder, we are all sitting at our PC's with coffee and biscuits waiting impatiently for the next photos!

March is not far away...
(please, you know I'm kidding!)
Please work harder, we are all sitting at our PC's with coffee and biscuits waiting impatiently for the next photos!
March is not far away...
(please, you know I'm kidding!)

Thread Starter
Former Sponsor
Joined: Jul 2005
Posts: 2,859
Likes: 0
From: Wellingborough, Northamptonshire
It's not that much work graham, not for someone that's used to it. I would hate to have gone the plastic bung route, and then everytime I looked in the car, wished I had done it properly.
March really isn't far away!
March really isn't far away!


Thread Starter
Former Sponsor
Joined: Jul 2005
Posts: 2,859
Likes: 0
From: Wellingborough, Northamptonshire
The Neil at Eclipse Motor bodies is ready and waiting for the shell so they can get started. We're going to be working hard this week to get it sorted. Many long nights ahead.

Subaru Tuning Specialist
Joined: Jun 2002
Posts: 6,654
Likes: 1
From: 7.74 @179 mph 1/4 mile - road legal
Looking excellent so far guys 
What are you doing for doors Paul ?
Also interested to know if you are raising or dropping the engine/box ? One option being good for CoG the other for driveshaft alignment at lower ride height, as ever a compromise either way.
What are you doing for doors Paul ?
Also interested to know if you are raising or dropping the engine/box ? One option being good for CoG the other for driveshaft alignment at lower ride height, as ever a compromise either way.
Thread Starter
Former Sponsor
Joined: Jul 2005
Posts: 2,859
Likes: 0
From: Wellingborough, Northamptonshire
With the amount we are lowering the car, there is no point in lowering the engine, we almost have to raise it.
Doors will carbon/kevlar with frames and plastic windows.
Doors will carbon/kevlar with frames and plastic windows.

Thread Starter
Former Sponsor
Joined: Jul 2005
Posts: 2,859
Likes: 0
From: Wellingborough, Northamptonshire
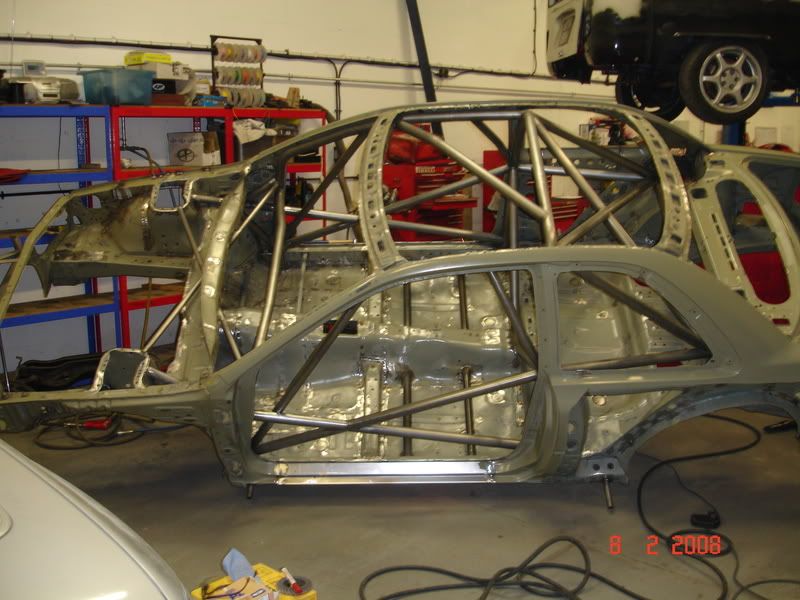
No major progress today, we have been cleaning the roll cage tubes and areas around the various welds. Then I decided to tidy up a load of the seam welding welds with the TIG torch, even though the shell has no seam sealer (devils own anti weld technology) it's still difficult to remove the paint along the seam, right up to the join. I will invest in the proper tool in future. Although I have to say that this time around I invested in a great new tool, my new MIG welder, a small kempi MinarcMig 180, which for this sort of work is the dogs. You can run a continuous weld on 0.7mm thick steel without blowing a hole. Unfortunately even a little paint still screws with you!
Big push tomorrow evening as I have a little help.
Yes, 3kg saving on rear.
Big push tomorrow evening as I have a little help.
Yes, 3kg saving on rear.
Last edited by ZEN Performance; Feb 5, 2008 at 01:54 AM.

Thread Starter
Former Sponsor
Joined: Jul 2005
Posts: 2,859
Likes: 0
From: Wellingborough, Northamptonshire
") And I broke my nails too!
And I broke my nails too!

Hi Paul,
Thanks for the mention of my efforts, and thanks for the coments on my neat welding. The little MIG welder is fantastic piece of kit, very controlable. Every where I could I have TIG'ed the cage to ensure good penetration and a neat finish.
We had another late one on Friday, filling more holes and more holes!!
Sills went on also after receiving a FAX earlier in the day I fabricated in thin sheet a pair of sills which I think complete the look of the side profile of the car.
We also patched one side's front wheel arch inner skin to tidy up. Boot inner also has a flange on th rear which was tricky.
Here is a picture of the car rotated to 45 degrees to make life a little easier.
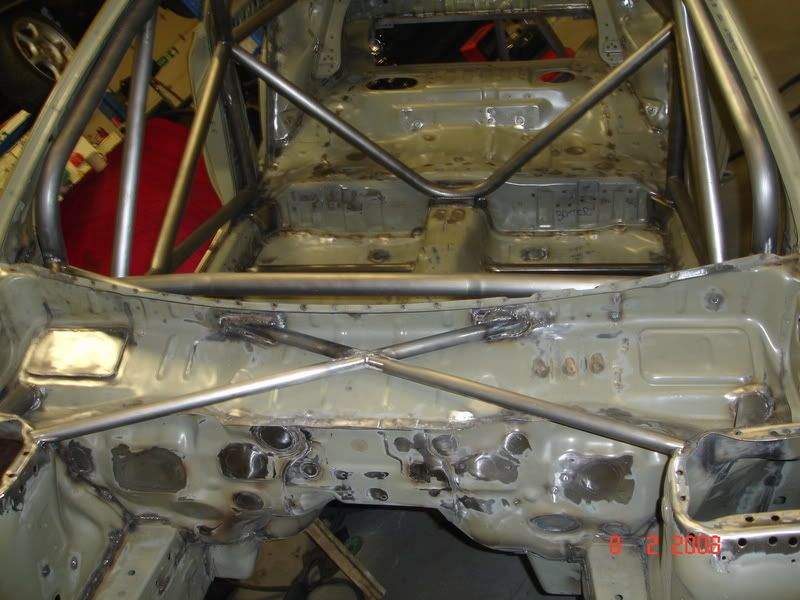
here's a pic of the fire wall, engine bay side.
Hans.
Thanks for the mention of my efforts, and thanks for the coments on my neat welding. The little MIG welder is fantastic piece of kit, very controlable. Every where I could I have TIG'ed the cage to ensure good penetration and a neat finish.
We had another late one on Friday, filling more holes and more holes!!
Sills went on also after receiving a FAX earlier in the day I fabricated in thin sheet a pair of sills which I think complete the look of the side profile of the car.
We also patched one side's front wheel arch inner skin to tidy up. Boot inner also has a flange on th rear which was tricky.
Here is a picture of the car rotated to 45 degrees to make life a little easier.
here's a pic of the fire wall, engine bay side.
Hans.
Thread Starter
Former Sponsor
Joined: Jul 2005
Posts: 2,859
Likes: 0
From: Wellingborough, Northamptonshire
Okay quite a big update as although I haven't posted any pics for a while, things have been progressing, albeit slower than I had hoped.
First of all, the drivers seat layout, showing the floor mounted Tilton pedal box assembly, and the drivers seat. We've pushed the seat as far back as possible, which isn't that far unfortunately, as the roll cage stops play. I would have preffered to used a later style cage with the layed back main hoop, but there isn't a kit, and it's not "approved" if you put the later, more up to date cage in an earlier car (stupid I know).

Here you can see how far back we did manage to get the seat, which is also as low as possible (and lower means further forward due to pesky cage bar!)

A close up of the pedal box, it's now clear to see what the the box section cross bars are for, raising the pedals for a bette position, the WRC steering column will run between the clutch and brake pedals.

We are obviously trying to make the car as light as possible, this little lot had to go!

Hans hard at work welding in the plating for the offside inner arch.

This is the flange that Hans very skillfully put in to mount the removable boot floor too. When finished this, along with the surrounding flanges will be perforated with fixing holes, and we can insert the boot floor of our choice, giving flexibility should we decide to put in a large fuel tank or re route the exhausts.

A closer shot of one of Hans' fantastic sill formings.

The completed offside inner arch as done by Hans

My effort on the nearside. Although I did the cut and shut on both sides, this one benefiting from the experience of doing the other!

Now with added filler on the weld. If doing this again I would lool to get some sheet laser cut to remake part of the inner arch area.

Guess what, not enough clearance at the rear! But not for long.

Mocking up the new inner arch.

Getting the first half in place.

Completed inner arch from, not entirely welded in place yet.


With the arch mods in place, you can begin to see how low the car is going to sit. Bearing in mind the lowest part of the car is about the depth of the sill lower again.

Wideness...

Lowness. Plus you can also see very clearly a big chunk missing off the corner of the shell.

It's been a long day, as the timestamps on the pics will testify! It only remains for me to say a big hello to a few Time Attack competitors that have been keeping a close eye on this thread, you know who you are!
First of all, the drivers seat layout, showing the floor mounted Tilton pedal box assembly, and the drivers seat. We've pushed the seat as far back as possible, which isn't that far unfortunately, as the roll cage stops play. I would have preffered to used a later style cage with the layed back main hoop, but there isn't a kit, and it's not "approved" if you put the later, more up to date cage in an earlier car (stupid I know).
Here you can see how far back we did manage to get the seat, which is also as low as possible (and lower means further forward due to pesky cage bar!)
A close up of the pedal box, it's now clear to see what the the box section cross bars are for, raising the pedals for a bette position, the WRC steering column will run between the clutch and brake pedals.
We are obviously trying to make the car as light as possible, this little lot had to go!
Hans hard at work welding in the plating for the offside inner arch.
This is the flange that Hans very skillfully put in to mount the removable boot floor too. When finished this, along with the surrounding flanges will be perforated with fixing holes, and we can insert the boot floor of our choice, giving flexibility should we decide to put in a large fuel tank or re route the exhausts.
A closer shot of one of Hans' fantastic sill formings.
The completed offside inner arch as done by Hans
My effort on the nearside. Although I did the cut and shut on both sides, this one benefiting from the experience of doing the other!
Now with added filler on the weld. If doing this again I would lool to get some sheet laser cut to remake part of the inner arch area.
Guess what, not enough clearance at the rear! But not for long.
Mocking up the new inner arch.
Getting the first half in place.
Completed inner arch from, not entirely welded in place yet.
With the arch mods in place, you can begin to see how low the car is going to sit. Bearing in mind the lowest part of the car is about the depth of the sill lower again.
Wideness...
Lowness. Plus you can also see very clearly a big chunk missing off the corner of the shell.
It's been a long day, as the timestamps on the pics will testify! It only remains for me to say a big hello to a few Time Attack competitors that have been keeping a close eye on this thread, you know who you are!
Last edited by ZEN Performance; Feb 11, 2008 at 12:22 AM.

Scooby Regular
Joined: Nov 2001
Posts: 15,239
Likes: 1
From: Leeds - It was 562.4bhp@28psi on Optimax, How much closer to 600 with race fuel and a bigger turbo?
Quality..Hans thats some welding, but the nice thing is you look to keep the HAZ so small.. one day I might master that, rather than chasing holes

Looking good paul.. lets just hope the chassis and engine are at least as good as last year

David


Thread Starter
Former Sponsor
Joined: Jul 2005
Posts: 2,859
Likes: 0
From: Wellingborough, Northamptonshire
There is a plan for driveshaft clearance, that's coming soon.
The front strut tops were taken out before we received the shell, so we will be fabricating some new ones to take the WRC topmounts that sit on the top of the turret rather than below.
We very nearly went with a double wishbone design, which I have outlined and know is easily possibly. However the time constraints mean it's not really practical to do, mainly due to having to find other rear uprights and messing about with the pickups. So *this time* we are sticking with struts, the next TA car we build will almost certainly be double wishbone.
I would say we are currently a week behind, but I think (hope) that some of the things we are doing here are things that Neil at EMB was thinking he would have to do.
Paul
Thread Starter
Former Sponsor
Joined: Jul 2005
Posts: 2,859
Likes: 0
From: Wellingborough, Northamptonshire

Scooby Regular
Joined: Nov 2001
Posts: 15,239
Likes: 1
From: Leeds - It was 562.4bhp@28psi on Optimax, How much closer to 600 with race fuel and a bigger turbo?
I have to say I am really enjoying reading this and cant wait to see it, for ***** sake though hurry up and update it!!