
Project Slow Evolution


LOL, hope it was a little man in japan that did put them on, and not the random subaru "big" bastid man in japan that puts some of the other stuff on, and over tightens them 


Thread Starter
Scooby Regular
iTrader: (2)
Joined: Dec 2002
Posts: 1,197
Likes: 1
From: All over the place, trying to stop putting the miles on!
Steven i think i saw the 'big bastid' man in the street in Tokyo a few months ago, stuck out miles above everyone else
He must do a roaring trade in overtightening stuff for everyone.
He must do a roaring trade in overtightening stuff for everyone.


Mr. Big Bastid was obviously involved in the building of my car, the first time I realised this was at the time my rear diff need its oil changing, there we were, at the old Scoobysport, trying to undo the drain plug, first it wouldn't move with a 1/2 inch ratchet, then a 1m long breaker bar failed to dit, as did the rattle gun, until finally we cracked it...using the weight of the car, lowered down on a 4 post lift with a 3m long scaffold pole  that shifted the bugger
that shifted the bugger


Former Sponsor
iTrader: (234)
Joined: Jan 2003
Posts: 14,406
Likes: 0
From: Over 500ft/lbs of torque @ just 1.1bar
Excellent thread 
Did you get those syncros inc in the kit?
I think we just used OE ones in mine
Did you get those syncros inc in the kit?
I think we just used OE ones in mine
Last edited by Aztec Performance Ltd; Feb 10, 2006 at 02:43 PM.
Thread Starter
Scooby Regular
iTrader: (2)
Joined: Dec 2002
Posts: 1,197
Likes: 1
From: All over the place, trying to stop putting the miles on!
Hi Bob
Glad you like the thread, thought it was about time i did one.
We reused all the stock syncros in my box, thats what the PPG kit uses, only difference is it uses a 4th gear syncro on 3rd so you need to get a new one.
The outer toothed part of the syncro assembly is actually machined onto the cogs so thats new, but the baulk rings and hubs all come from the standard box. Im sure you can see whats what from the photos in the thread.
Oh and after listening to your straight cut kit at the Pod that what made me go for the helical one
Next will be the box fitting part of the thread when i finally get home and stop working!
Dan.
Next will be the box fitting part of the thread when i finally get home and stop working!
Thread Starter
Scooby Regular
iTrader: (2)
Joined: Dec 2002
Posts: 1,197
Likes: 1
From: All over the place, trying to stop putting the miles on!
Trouble is even when i am working iv'e still got this internet thing showing me lots of lovley bits i could buy to put on the car.
I can feel my pockets emptying again
The only thing thats really stopping me spending far too much is the lack of space to work on the car and somewhere to keep it if it was off the road for more than a day.
I can feel my pockets emptying again
The only thing thats really stopping me spending far too much is the lack of space to work on the car and somewhere to keep it if it was off the road for more than a day.


 It's stopped me buying stuff though
Quality thread this, super read and quite inspirational tbh,
Danny, i know this may open a can of worms for you - sorry, but what oil will you be running in the new box? Do you get any recommendations for anything different or is it ok to use the standard grade for this rebuild and gearset?
Cheers and sorry again for asking
Danny, i know this may open a can of worms for you - sorry, but what oil will you be running in the new box? Do you get any recommendations for anything different or is it ok to use the standard grade for this rebuild and gearset?
Cheers and sorry again for asking
Thread Starter
Scooby Regular
iTrader: (2)
Joined: Dec 2002
Posts: 1,197
Likes: 1
From: All over the place, trying to stop putting the miles on!
I have been running Castrol syntrax 75w-90 in my current box with great results and have noticed no real difference between the old Syntrax branded stuff and the new Driveline syntrax branded stuff.
(I have been driving on it long enough to have had a couple of routine gbox oil changes)
As the syncro's are a standard subaru item and the new front diff is a helical one not a plated LSD then i will be sticking with the same oil.
ALready have 4L sat in the garage waiting
(I have been driving on it long enough to have had a couple of routine gbox oil changes)
As the syncro's are a standard subaru item and the new front diff is a helical one not a plated LSD then i will be sticking with the same oil.
ALready have 4L sat in the garage waiting


Thread Starter
Scooby Regular
iTrader: (2)
Joined: Dec 2002
Posts: 1,197
Likes: 1
From: All over the place, trying to stop putting the miles on!
You know you wanna keep it
But if you do get rid and go to the dark side just make sure your mate dosn't blow his RA up in the meantime
But if you do get rid and go to the dark side just make sure your mate dosn't blow his RA up in the meantime
Originally Posted by Danny Boy
You know you wanna keep it
But if you do get rid and go to the dark side just make sure your mate dosn't blow his RA up in the meantime
But if you do get rid and go to the dark side just make sure your mate dosn't blow his RA up in the meantime
Thread Starter
Scooby Regular
iTrader: (2)
Joined: Dec 2002
Posts: 1,197
Likes: 1
From: All over the place, trying to stop putting the miles on!
Gearbox clutch and flywheel fitted yesterday and
IT WORKS!!! 
Arms very tired after having them above my head all day working on the car.
Will post pics later when i have some time.
IT WORKS!!!
Arms very tired after having them above my head all day working on the car.
Will post pics later when i have some time.
Thread Starter
Scooby Regular
iTrader: (2)
Joined: Dec 2002
Posts: 1,197
Likes: 1
From: All over the place, trying to stop putting the miles on!
After finally finding some time to do this box swap and scheduling a slot with my local friendly mechanic i started at 8am, drove the car onto the ramps and prepared for my first gearbox change, im sure this wont be the last time
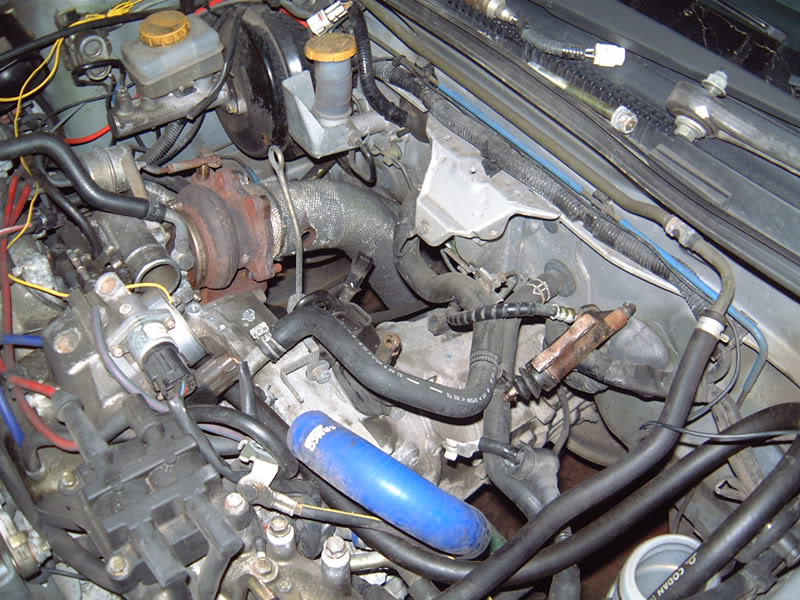
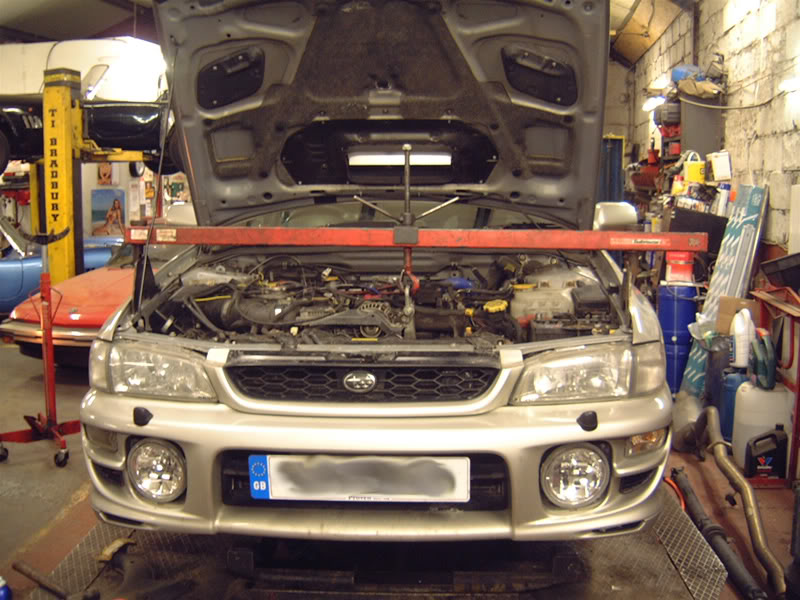
First port of call is to remove the TMIC, turbo heatshield and the bolts from around the top of the Downpipe.
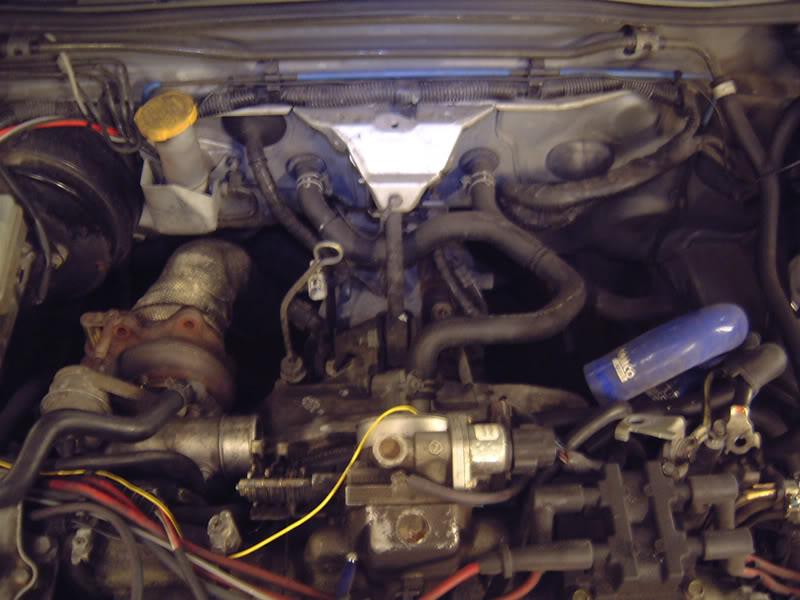
Next remove the top gearbox/engine stay, then the battery negative lead from the bolt that goes to the starter motor bolt, the positive lead to the starter motor and the cable to the starter solenoid and finally the starter motor itself. Also undo the speedo cables, gearbox earth lead, cable to knock link sensor (if you have one), remove the lambda sensor from the downpipe and the reverse and neutral switch cables from the gearbox. Then unbolt the clutch slave cylnder from the gearbox housing and remove the return spring and put it in a safe place.
Once all that is removed it should look something like this.
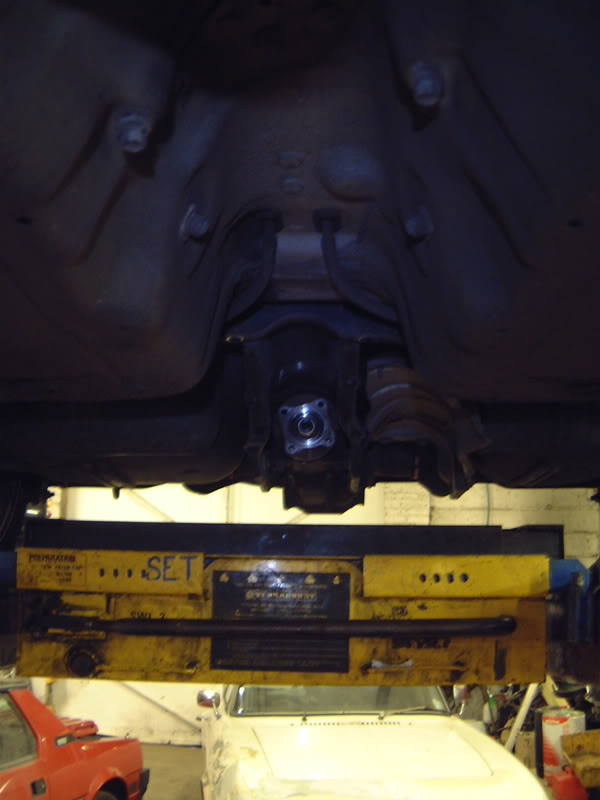
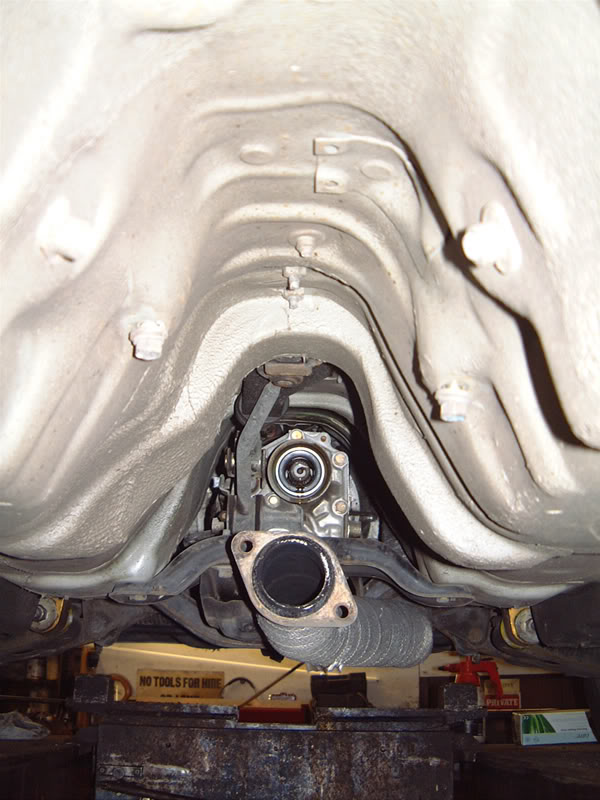
With all that off its time to delve underneath the car
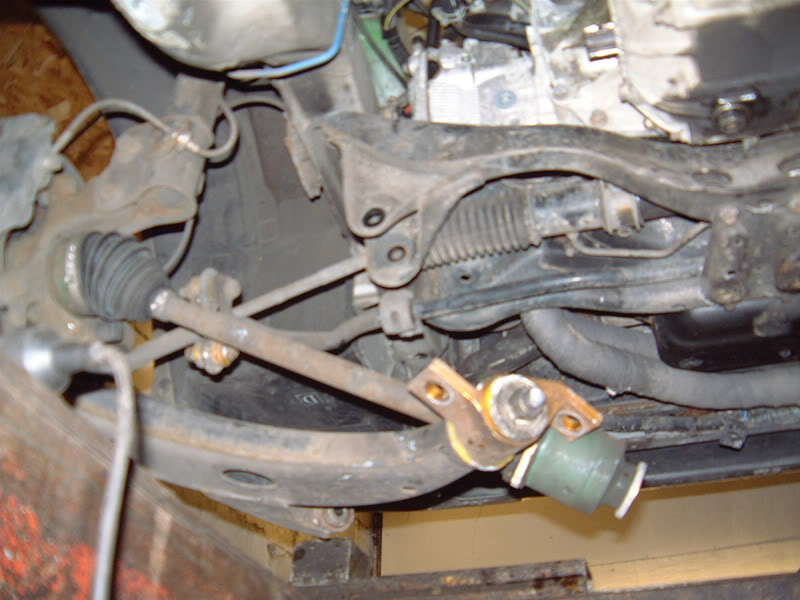
Remove the centre exhaust section and back box (as i was using ramps this was easy enough to do in one go) then remove the cover plate which protects the end of the prop shaft going into the rear diff (6 M10 Bolts).
With this removed you can access the bolts that hold the prop shaft to the rear diff. Remove these (you will need to have all four wheels of the car off the ground/ramp to rotate the prop shaft easily to access all four bolts) then undo the two bolts holding the centre prop shaft bearing to the body, you can then slide the prop out of the back of the gearbox and remove. Watch out for oil leaking from the box where you have removed the prop.
The underside of the car should then look like this:
Then remove the downpipe from the turbo, i played the usual game of one of the nuts seizing but as i was in a proper workshop a quick blast with the oxy acetalyne torch soon loosened it
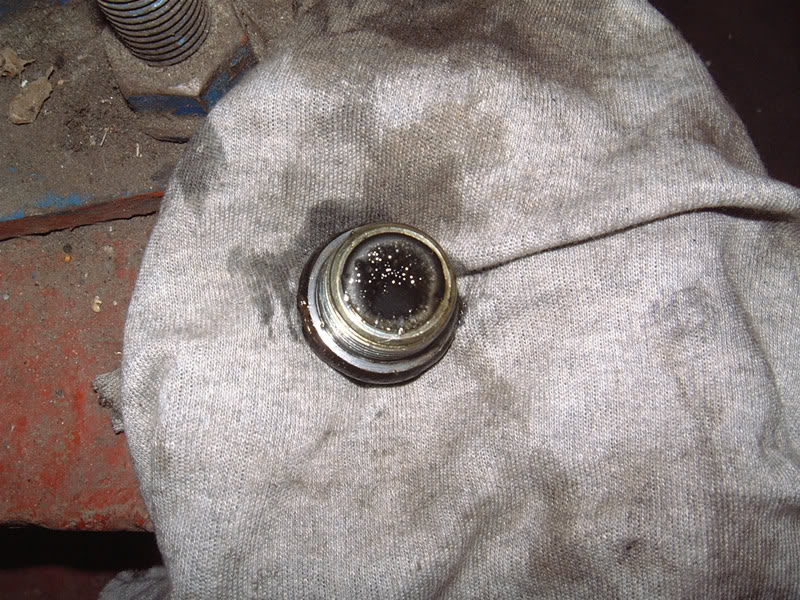
Then drain the oil from the box.
Sump plug from the old box didn't look to bad atall, the usual small filings from daily wear and tear but no big lumps of metal
First port of call is to remove the TMIC, turbo heatshield and the bolts from around the top of the Downpipe.
Next remove the top gearbox/engine stay, then the battery negative lead from the bolt that goes to the starter motor bolt, the positive lead to the starter motor and the cable to the starter solenoid and finally the starter motor itself. Also undo the speedo cables, gearbox earth lead, cable to knock link sensor (if you have one), remove the lambda sensor from the downpipe and the reverse and neutral switch cables from the gearbox. Then unbolt the clutch slave cylnder from the gearbox housing and remove the return spring and put it in a safe place.
Once all that is removed it should look something like this.
With all that off its time to delve underneath the car
Remove the centre exhaust section and back box (as i was using ramps this was easy enough to do in one go) then remove the cover plate which protects the end of the prop shaft going into the rear diff (6 M10 Bolts).
With this removed you can access the bolts that hold the prop shaft to the rear diff. Remove these (you will need to have all four wheels of the car off the ground/ramp to rotate the prop shaft easily to access all four bolts) then undo the two bolts holding the centre prop shaft bearing to the body, you can then slide the prop out of the back of the gearbox and remove. Watch out for oil leaking from the box where you have removed the prop.
The underside of the car should then look like this:
Then remove the downpipe from the turbo, i played the usual game of one of the nuts seizing but as i was in a proper workshop a quick blast with the oxy acetalyne torch soon loosened it
Then drain the oil from the box.
Sump plug from the old box didn't look to bad atall, the usual small filings from daily wear and tear but no big lumps of metal
Last edited by Danny Boy; Mar 2, 2006 at 11:17 PM.
Thread Starter
Scooby Regular
iTrader: (2)
Joined: Dec 2002
Posts: 1,197
Likes: 1
From: All over the place, trying to stop putting the miles on!
Next thing to do is remove the drive shaft from the box, first drift out the roll pins that secure the inner CV joint to the stub shaft on the box. Then split the bottom ball joint on the suspension. My ball joints were pretty well stuck in the wishbones, i couldn't find the correct tool for persuading them to move and i didn't fancy using the brummie screwdriver to get them off
So i resorted to removing the inner bolts on the bottom wishbone.
This then gives you the room to slide the shafts off the box.
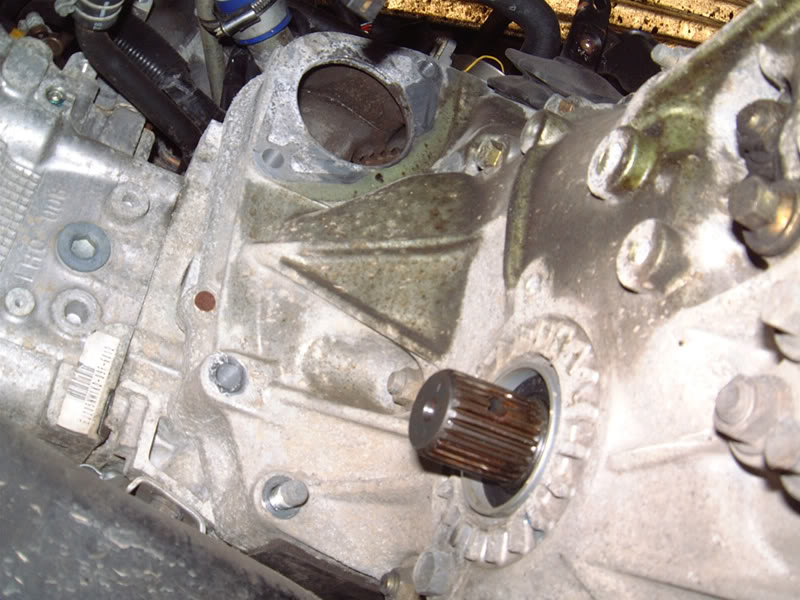
Next job is to remove the clutch fork pivot.
This is accessed by removing a threaded plug with a 10mm allen key.
(Visable just below and to the right of the starter motor hole)
You then need a M6 bolt which screws into the end of the clutch fork pivot, you can then slide out the pivot with a pair of pliers, this releases the fork from the clutch release bearing enabling the removal of the box.
Once you are at this point its time to support the front of the engine as if you dont when you remove the box the whole engine will flop forward on its mounts and getting the box back in will be a right bitch!
Once the engine is supported, then support the box with a jack etc and remove the rest of the bellhousing bolts and the rear gearbox mounting cradle and separate the two parts of the gear linkage at the gearbox end, there is no need to remove anything from inside the car to so this.
The next bit is a right PITA, actually sepearting the box from the engine, as mine has never been seperated it has been together for almost 7 years and the dowls had welded themselfs into the block and gearbox casing, again applying some strategic heat from the (gas axe)TM and some brute force from Mr tyre lever sorted this problem.
A bit of grinding and a generous ammount of copperslip should make it a bit easier on a return visit.
So i resorted to removing the inner bolts on the bottom wishbone.
This then gives you the room to slide the shafts off the box.
Next job is to remove the clutch fork pivot.
This is accessed by removing a threaded plug with a 10mm allen key.
(Visable just below and to the right of the starter motor hole)
You then need a M6 bolt which screws into the end of the clutch fork pivot, you can then slide out the pivot with a pair of pliers, this releases the fork from the clutch release bearing enabling the removal of the box.
Once you are at this point its time to support the front of the engine as if you dont when you remove the box the whole engine will flop forward on its mounts and getting the box back in will be a right bitch!
Once the engine is supported, then support the box with a jack etc and remove the rest of the bellhousing bolts and the rear gearbox mounting cradle and separate the two parts of the gear linkage at the gearbox end, there is no need to remove anything from inside the car to so this.
The next bit is a right PITA, actually sepearting the box from the engine, as mine has never been seperated it has been together for almost 7 years and the dowls had welded themselfs into the block and gearbox casing, again applying some strategic heat from the (gas axe)TM
and some brute force from Mr tyre lever sorted this problem. A bit of grinding and a generous ammount of copperslip should make it a bit easier on a return visit.
Last edited by Danny Boy; Mar 3, 2006 at 08:32 AM.