
Project Slow Evolution


Thread Starter
Scooby Regular
iTrader: (2)
Joined: Dec 2002
Posts: 1,197
Likes: 1
From: All over the place, trying to stop putting the miles on!
Didn't get out whilst i was there, load in, Gig and load out on the same day.
First time i have been to the O2 though and i really liked it.
Just the small problem of the height of the building though, in that the top seat at the side is at 36m high, it's higher than some stadiums! hence the big banana of PA trying to poke some audio up to the top seats, you need a lot of speakers for that building.
Thread Starter
Scooby Regular
iTrader: (2)
Joined: Dec 2002
Posts: 1,197
Likes: 1
From: All over the place, trying to stop putting the miles on!
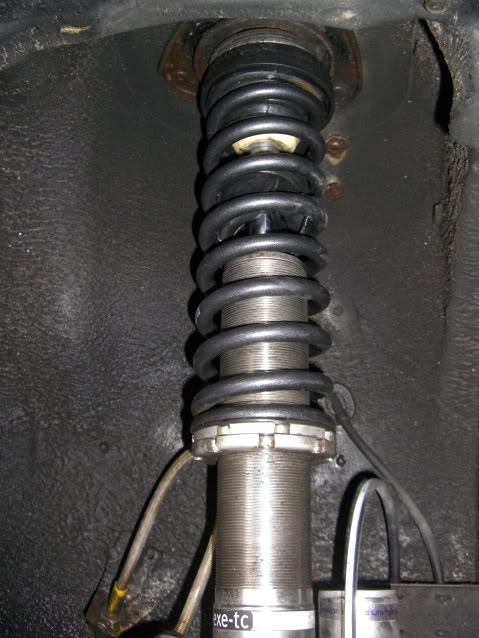
I was giving a mate a hand today to service his missus car before the MOT next week and we finished early so i thought i would do a few bits to mine as well. Had all the wheels off and just checked over the Exe-Tc struts to see how they are faring after 4.5 months on the car. All in all not bad, just needed a little clean whilst i was in there and a good spray over with some WD to hopefully help the dirt not stick to them so much.
I was a little dissappointed to find this on the off side front strut
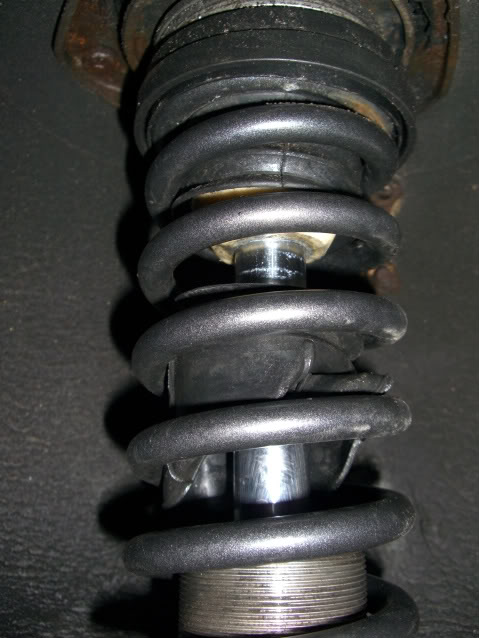
its only the internal dirt gaiter that has come apart, its not a biggie but none the less disappointing to see after such a short period of time.
Whilst i was under the car i also removed the whiteline diff carrier support bushes that i put in before and now all the nasty noises in the cabin have gone. These bushes do contribute severely to added NVH in the cabin, i can put up with quite a lot but these had to go.
Interestingly whilst i was road testing after today's fiddling i was going along a country back road near here (which is de restricted national speed limit) doing about 40-50 mph just checking out what seeing if i had cured the NVH issues and there was a woman walking her dog along the side of the road.
I slowed down and made sure i gave her as wide a berth as possible, as i drive past she has a look of thunder on her face and gets out her phone and takes a picture of my car! Now she didn't look the type to be appreciating Japanese cars so i can only assume she wants to do something else with that photo. Just waiting for the complaint to roll in Hopefully if she does try anything on the local coppers will be sensible about it and tell her where to go. I suppose i could always pull the ecu log file and prove my speed anyway!
I was a little dissappointed to find this on the off side front strut
its only the internal dirt gaiter that has come apart, its not a biggie but none the less disappointing to see after such a short period of time.
Whilst i was under the car i also removed the whiteline diff carrier support bushes that i put in before and now all the nasty noises in the cabin have gone. These bushes do contribute severely to added NVH in the cabin, i can put up with quite a lot but these had to go.
Interestingly whilst i was road testing after today's fiddling i was going along a country back road near here (which is de restricted national speed limit) doing about 40-50 mph just checking out what seeing if i had cured the NVH issues and there was a woman walking her dog along the side of the road.
I slowed down and made sure i gave her as wide a berth as possible, as i drive past she has a look of thunder on her face and gets out her phone and takes a picture of my car! Now she didn't look the type to be appreciating Japanese cars so i can only assume she wants to do something else with that photo. Just waiting for the complaint to roll in
Hopefully if she does try anything on the local coppers will be sensible about it and tell her where to go. I suppose i could always pull the ecu log file and prove my speed anyway!
Thread Starter
Scooby Regular
iTrader: (2)
Joined: Dec 2002
Posts: 1,197
Likes: 1
From: All over the place, trying to stop putting the miles on!
On Thursday i had one of those days that you just cant predict.
One phone call offering a bargain that could not be refused.
So i have ended up with another project that will hopefully not take too long to complete.
This one is RWD has 5cyl, 2.9L and a turbo, but can only fit three people in it and is a bit lardy to boot.
Pics to follow as soon as i have uploaded them
Thread Starter
Scooby Regular
iTrader: (2)
Joined: Dec 2002
Posts: 1,197
Likes: 1
From: All over the place, trying to stop putting the miles on!
Here she is, 1999 Sprinter 310D only 250,000 miles, just run in 
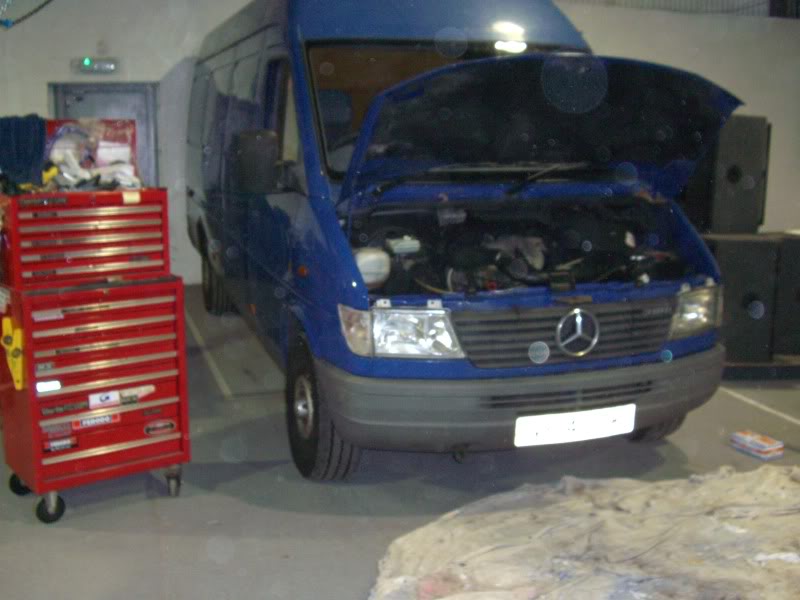
Only bad point is that it needs a new head gasket but for the price i payed you can't complain and once its back up and running it will be an invaluable asset to my company. Not to mention damned use full for all those trips to the DIY store.
First thing was to leave her overnight so the engine was stone cold and push to the back of the unit out of the way just in case this takes longer than anticipated. (Famous Last words )
)
I decided maybe unwisely that we were going to attempt this with the engine in place, time will tell if that was a good decision or not.
Let the strip down commence!!
Damned FMIC is bigger than the scoob one!
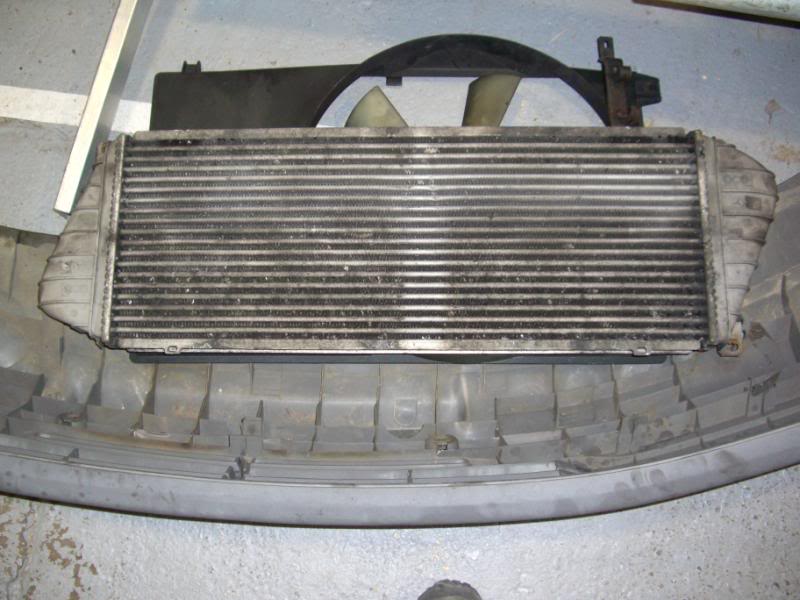
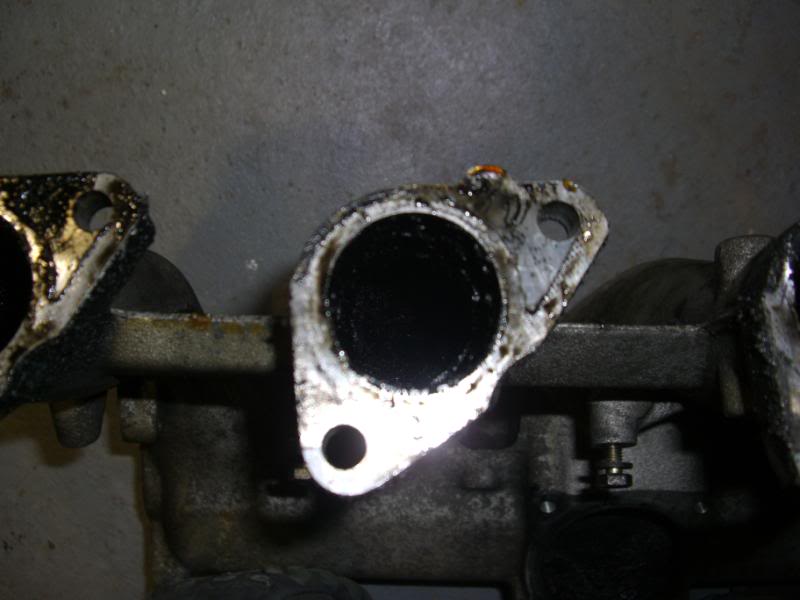
Got all the front end off including Rad, FMIC, IC pipes, Air Box, heat shields etc then onto the inlet manifold. Had to take the EGR valve off it first so you can reach the bolts that bolt it to the head. But once that is done it come's off reasonably easily as all the diesel injection pipes and electrics run under the inlet so they can stay in place.
Ended up like this:
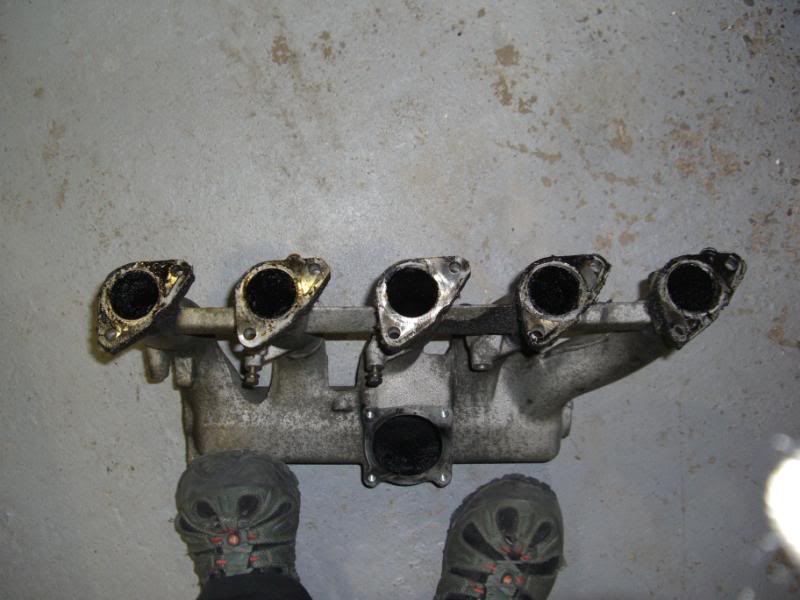
Boy there is a lot of crap inside this manifold!
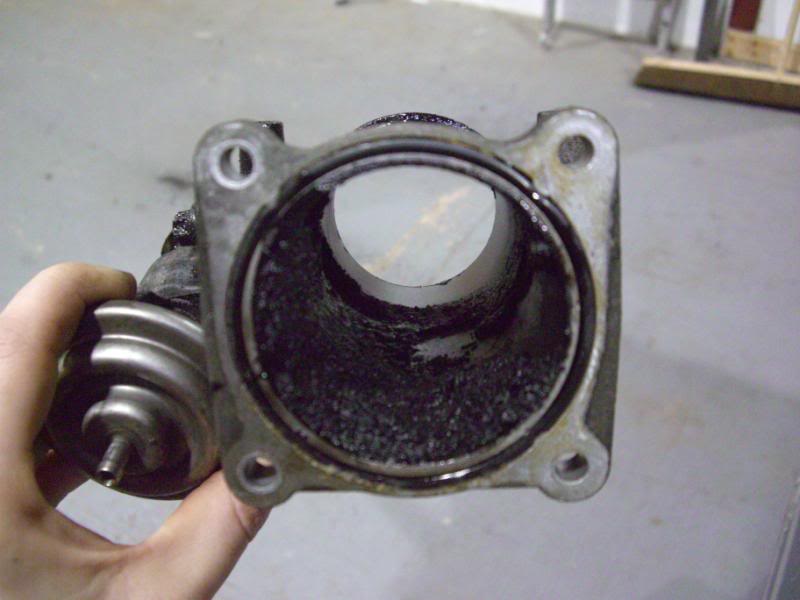
EGR body:
Inlet Manifold:

Only bad point is that it needs a new head gasket but for the price i payed you can't complain and once its back up and running it will be an invaluable asset to my company. Not to mention damned use full for all those trips to the DIY store.
First thing was to leave her overnight so the engine was stone cold and push to the back of the unit out of the way just in case this takes longer than anticipated. (Famous Last words
)I decided maybe unwisely that we were going to attempt this with the engine in place, time will tell if that was a good decision or not.
Let the strip down commence!!
Damned FMIC is bigger than the scoob one!
Got all the front end off including Rad, FMIC, IC pipes, Air Box, heat shields etc then onto the inlet manifold. Had to take the EGR valve off it first so you can reach the bolts that bolt it to the head. But once that is done it come's off reasonably easily as all the diesel injection pipes and electrics run under the inlet so they can stay in place.
Ended up like this:
Boy there is a lot of crap inside this manifold!
EGR body:
Inlet Manifold:

The old school needle lift injectors... i know them well
I work for a mercedes-benz dealership and i see that stuff in the manifold every day, they suffer with carbon build up and we have replaced engines before now due to excessive chuffing causing bad carbon.
Good luck with the head gasket
Cheers
matt
I work for a mercedes-benz dealership and i see that stuff in the manifold every day, they suffer with carbon build up and we have replaced engines before now due to excessive chuffing causing bad carbon.
Good luck with the head gasket
Cheers
matt
Thread Starter
Scooby Regular
iTrader: (2)
Joined: Dec 2002
Posts: 1,197
Likes: 1
From: All over the place, trying to stop putting the miles on!
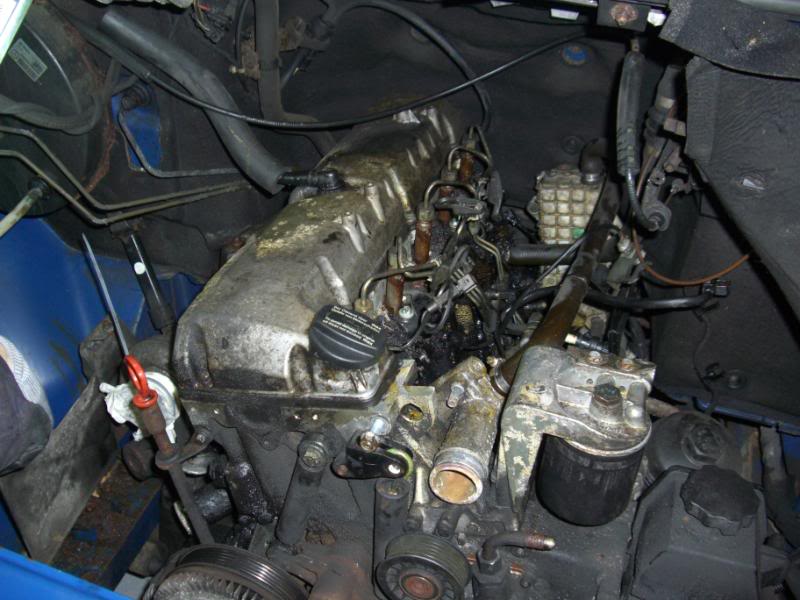
So got the cam cover off, all looks well up there.
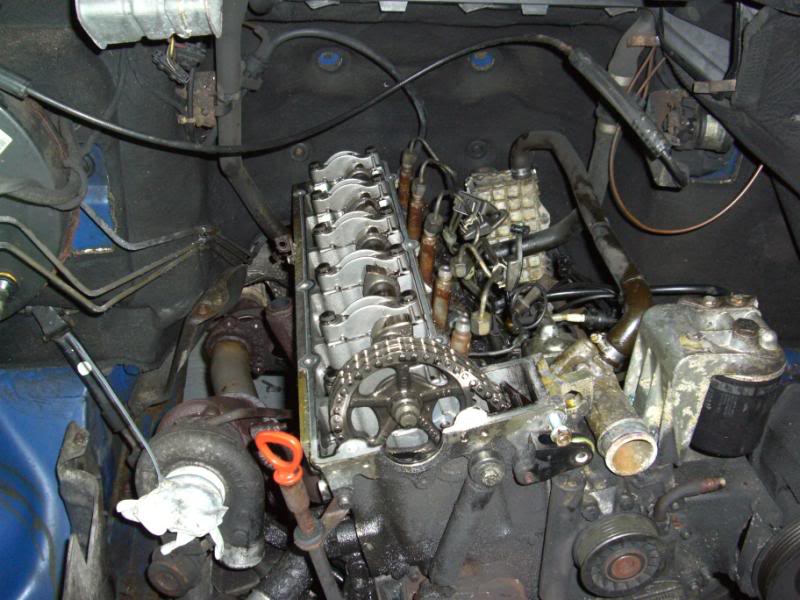
Turn the engine to TDC, mark up the cam wheel, cable tie it to the timing chain, release the tensioner on the side of the timing case and off with the cam wheel.
Undo the cam caps 1,2,3 & 6 first then 4 & 5 a bit at a time as these are over the cyl that are on cam at TDC.
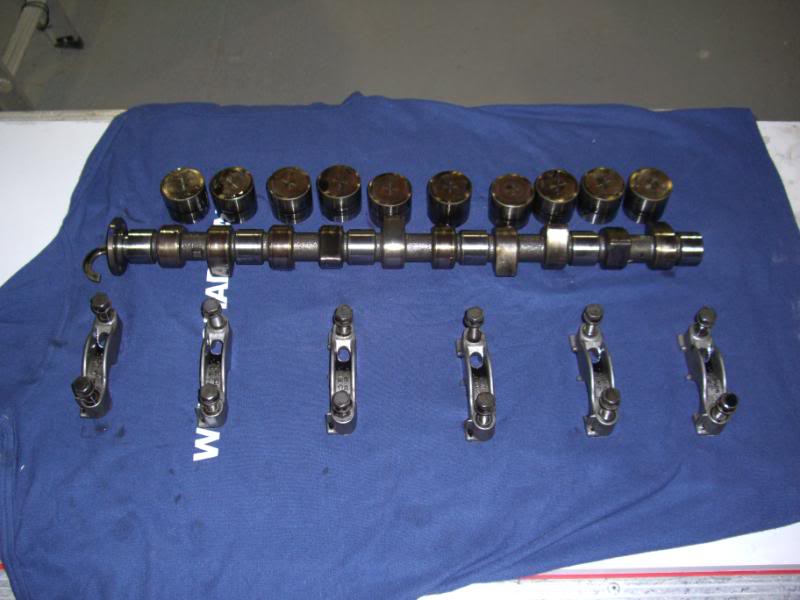
Whip the cam shaft out and the buckets and lay out to one side making sure that your clumsy business partner does not knock over the case that they are all on!
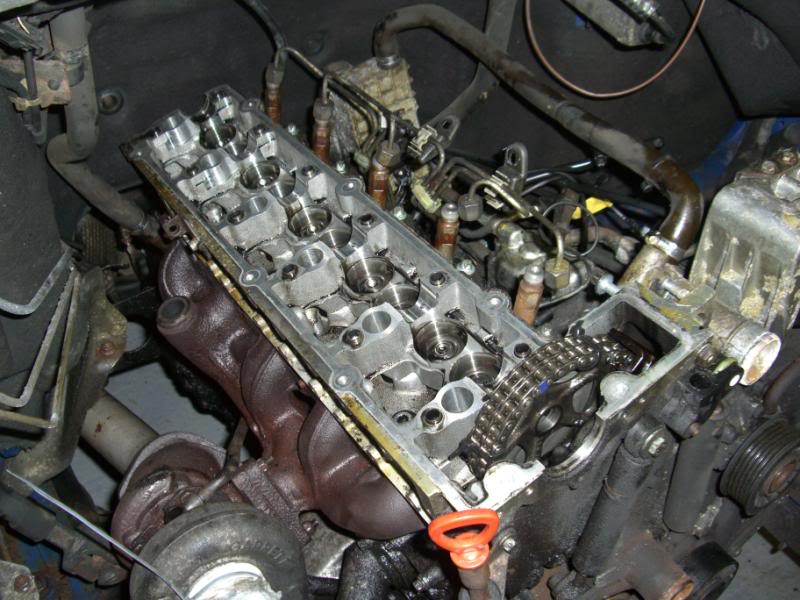
Then it was time to start the fun and games and try and get the turbo off.
The bolts came off the bottom end of the down pipe with not too much swearing but all the bolts around the turbo were welded tight through the heat cycling and i don't have an oxy set to try and heat them up to get them off so the only option was to soak the lot in plus gas and try and take the turbo, manifold and downpipe off in one go.
We succeeded but it took a good few hours.
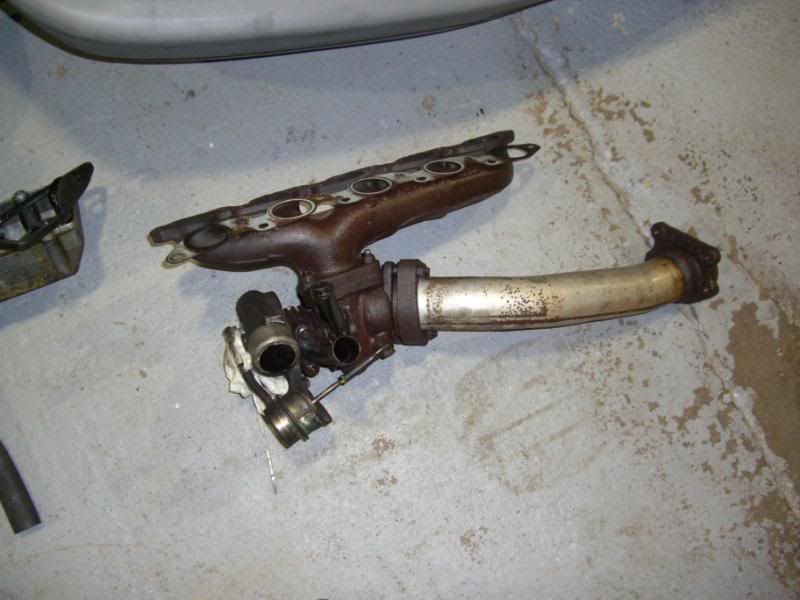
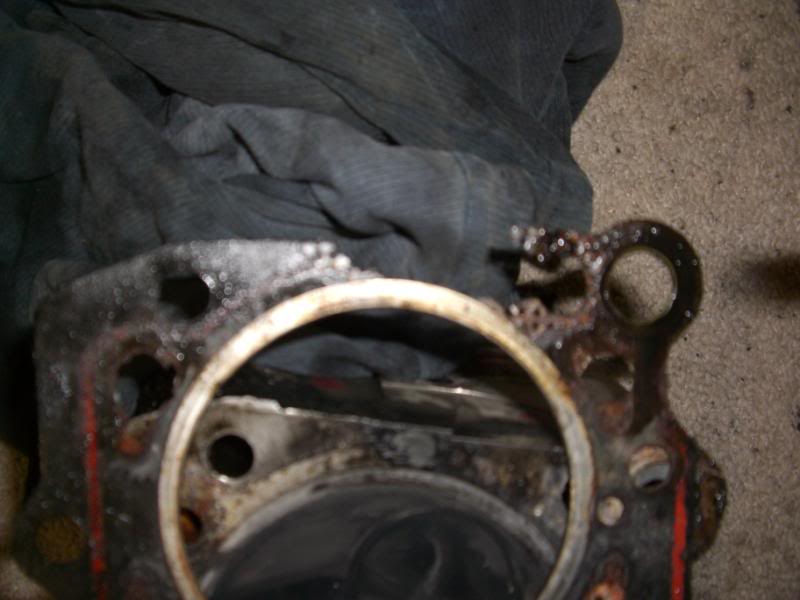
The exhaust manifold gasket reveals where the the head gasket has gone.
Sprinter engines up to the 2000 MY model have a habit of splitting the HG between one of the oil ways and the combustion chamber of Cyl 1. But this one seems to have gone on Cyl 1&5, interesting Hopefully it has not damaged much more whilst it has been at it.
Turn the engine to TDC, mark up the cam wheel, cable tie it to the timing chain, release the tensioner on the side of the timing case and off with the cam wheel.
Undo the cam caps 1,2,3 & 6 first then 4 & 5 a bit at a time as these are over the cyl that are on cam at TDC.
Whip the cam shaft out and the buckets and lay out to one side making sure that your clumsy business partner does not knock over the case that they are all on!
Then it was time to start the fun and games and try and get the turbo off.
The bolts came off the bottom end of the down pipe with not too much swearing but all the bolts around the turbo were welded tight through the heat cycling and i don't have an oxy set to try and heat them up to get them off so the only option was to soak the lot in plus gas and try and take the turbo, manifold and downpipe off in one go.
We succeeded but it took a good few hours.
The exhaust manifold gasket reveals where the the head gasket has gone.
Sprinter engines up to the 2000 MY model have a habit of splitting the HG between one of the oil ways and the combustion chamber of Cyl 1. But this one seems to have gone on Cyl 1&5, interesting
Hopefully it has not damaged much more whilst it has been at it.
Thread Starter
Scooby Regular
iTrader: (2)
Joined: Dec 2002
Posts: 1,197
Likes: 1
From: All over the place, trying to stop putting the miles on!
Then the fun really began, i started to slacken off the head bolts all 22 of them! and one stripped all the splines off completely about half way through the sequence and another at the start of the sequence seemed to crack and slacken but would then just spin. Much drilling later and re sharpening of drill bits, (note to self, need some new decent drill bits, mine are shot  ) we had drilled off the head of the offending head bolt but could still not get the spinner out so we just went and tried to lift the head and low and behold it came off!
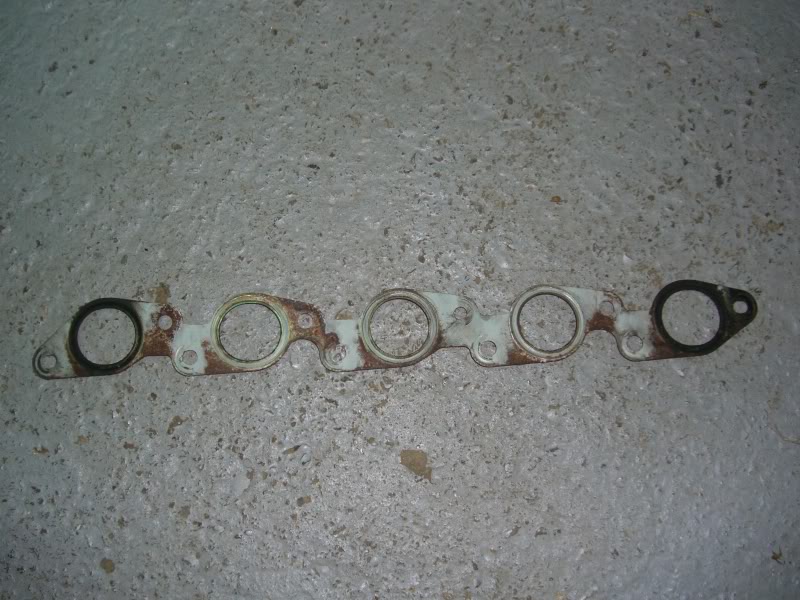
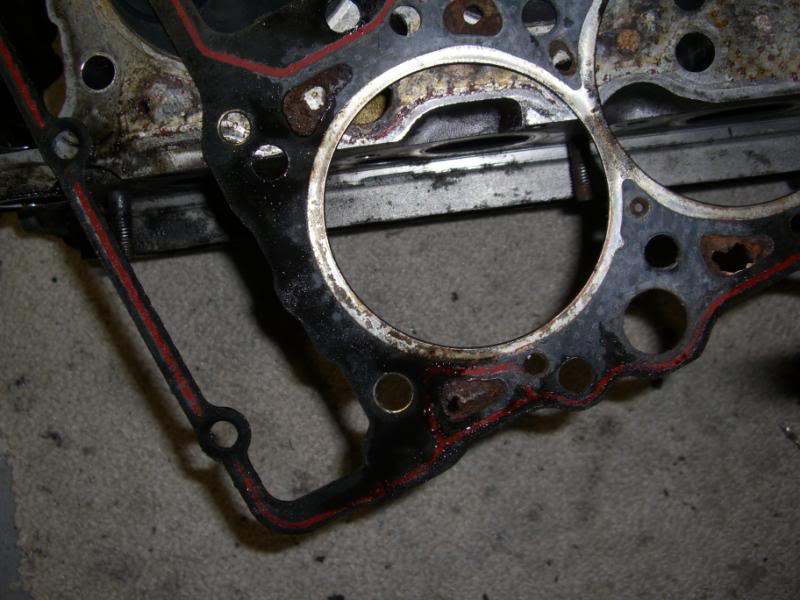
It appears that one head bolt at the back of the engine has sheared and has been like that for a long time. This had led to the gasket going on cyl 5 and combustion gasses and water escaping the back of the block.
Cyl 5 HG or what's left of it
) we had drilled off the head of the offending head bolt but could still not get the spinner out so we just went and tried to lift the head and low and behold it came off!It appears that one head bolt at the back of the engine has sheared and has been like that for a long time. This had led to the gasket going on cyl 5 and combustion gasses and water escaping the back of the block.
Cyl 5 HG or what's left of it
Thread Starter
Scooby Regular
iTrader: (2)
Joined: Dec 2002
Posts: 1,197
Likes: 1
From: All over the place, trying to stop putting the miles on!
Cheers P1, thanks for the encouragement.
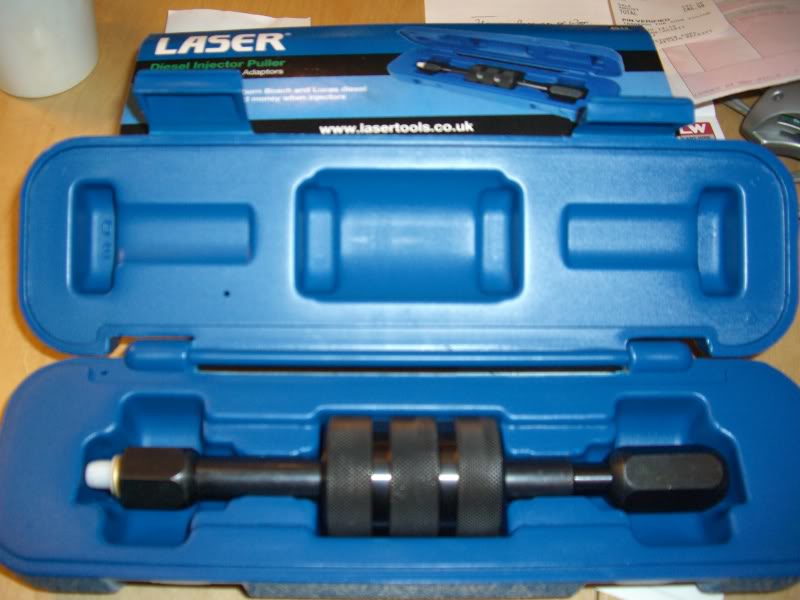
you wouldn't happen to know where i could get an injector puller from? as one of them is stuck like a right bastid and refuses so come out.
Dan.
you wouldn't happen to know where i could get an injector puller from? as one of them is stuck like a right bastid and refuses so come out.
Dan.
whoooo.... we use a mercedes slide hammer puller and when that dont work (which is most the time) we use a hydraulic puller.
You may be able to get similar pullers to this in excahnge mart or the likes.
You may be able to get similar pullers to this in excahnge mart or the likes.
Thread Starter
Scooby Regular
iTrader: (2)
Joined: Dec 2002
Posts: 1,197
Likes: 1
From: All over the place, trying to stop putting the miles on!
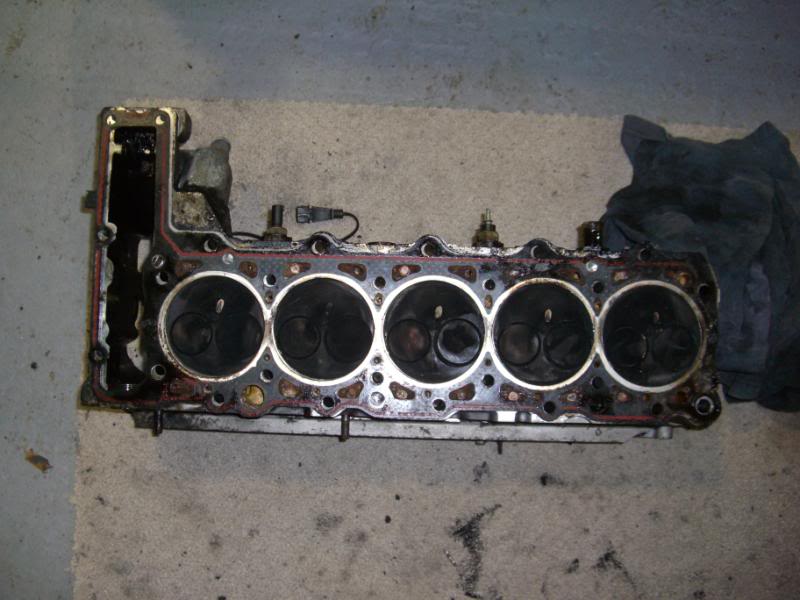
Cyl 1 head gasket gone too
Head in cleaning process

You can see in the above picture the one injector that was stuck.
Matt was right a slide hammer was just the ticket to get this out.
Found one in machine mart, they are cheaper online but when you include the postage and the fact that MM has it now, the 8 quid difference in cost can be lived with. For ref 1999 Sprinter injector is M14*1.5 at the top fuel union.
New Tools
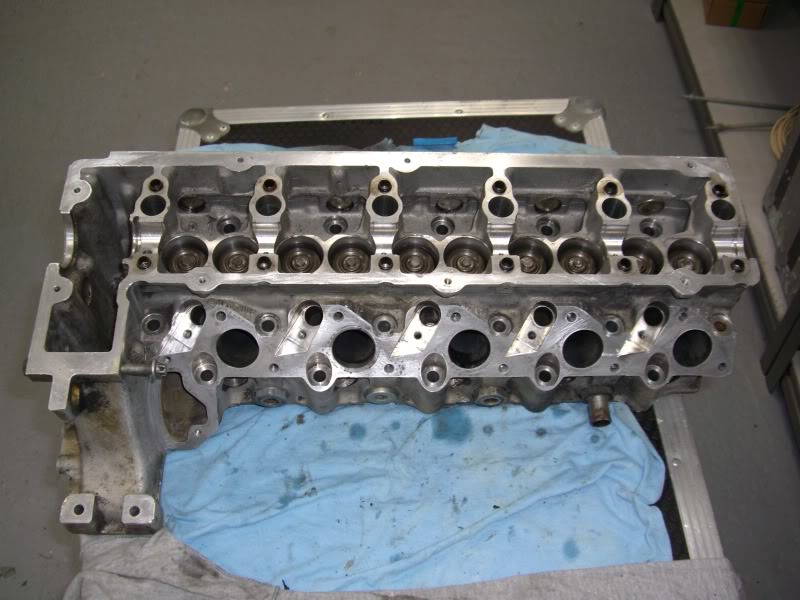
Now everything is stripped the next job is to get the head to the machine shop tomorrow morning to get it checked over and no doubt skimmed.
They are also going to have to re-tap the Glow plug threads and get out one snapped exhaust manifold stud.
Shopping list:
Head Machining
Complete Head gasket kit.
Set of Head Bolts
Set of Glow Plugs
Maybe one injector
Gasket Scraper
Matt do you have an email able manual on how to put those injectors back together as in my efforts to get it out i twisted the stuck one the wrong way and it all came apart")
Head in cleaning process
You can see in the above picture the one injector that was stuck.
Matt was right a slide hammer was just the ticket to get this out.
Found one in machine mart, they are cheaper online but when you include the postage and the fact that MM has it now, the 8 quid difference in cost can be lived with. For ref 1999 Sprinter injector is M14*1.5 at the top fuel union.
New Tools
Now everything is stripped the next job is to get the head to the machine shop tomorrow morning to get it checked over and no doubt skimmed.
They are also going to have to re-tap the Glow plug threads and get out one snapped exhaust manifold stud.
Shopping list:
Head Machining
Complete Head gasket kit.
Set of Head Bolts
Set of Glow Plugs
Maybe one injector
Gasket Scraper
Matt do you have an email able manual on how to put those injectors back together as in my efforts to get it out i twisted the stuck one the wrong way and it all came apart
We use mercedes benz on-line for all data and is password locked iam affraid and is done threw there system.. so i cant get you any information as such and there are no workshop manuals anymore.
I will help you where i can if you post up your problems etc...
Reference the glow plugs, we take off heads weekly due to snapped glow plugs the engine needs to be boiling to make it a little easier when removing glow plugs.
Just as a reference when we change a set of glow plugs we advise changing the glow plug relay at the same time.. always fit ne relay last ..FYI
Thread Starter
Scooby Regular
iTrader: (2)
Joined: Dec 2002
Posts: 1,197
Likes: 1
From: All over the place, trying to stop putting the miles on!
Thanks for the offer of help Matt.
I have decided to have the engine out to build it back up plus everything is covered in sh1te that needs cleaning off and i want to have a closer look at the coolant pipes that go across the back of the block as they have been getting combustion gasses across them where the gasket failed and i bet they will be on their way to perishing.
The head is at the engineering shop now so, waiting on a phone call.
Last edited by Danny Boy; Feb 2, 2010 at 10:29 AM.
Thread Starter
Scooby Regular
iTrader: (2)
Joined: Dec 2002
Posts: 1,197
Likes: 1
From: All over the place, trying to stop putting the miles on!
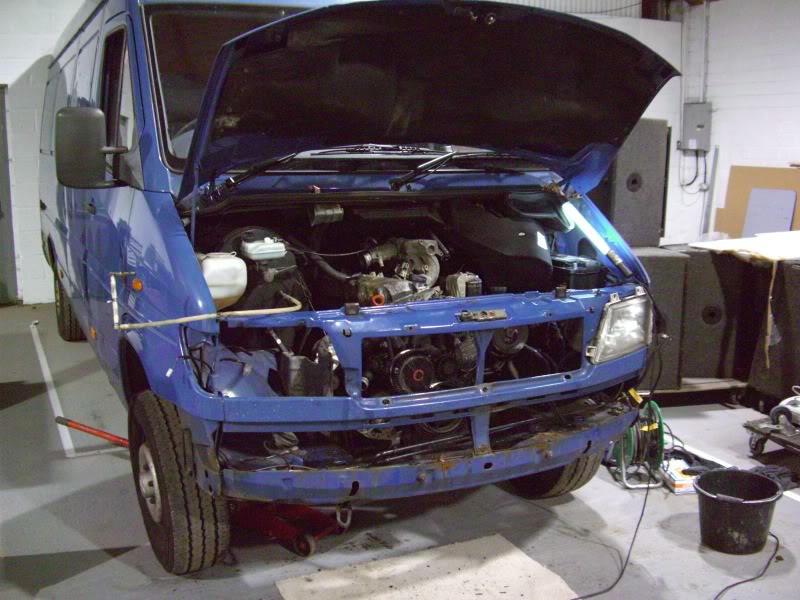
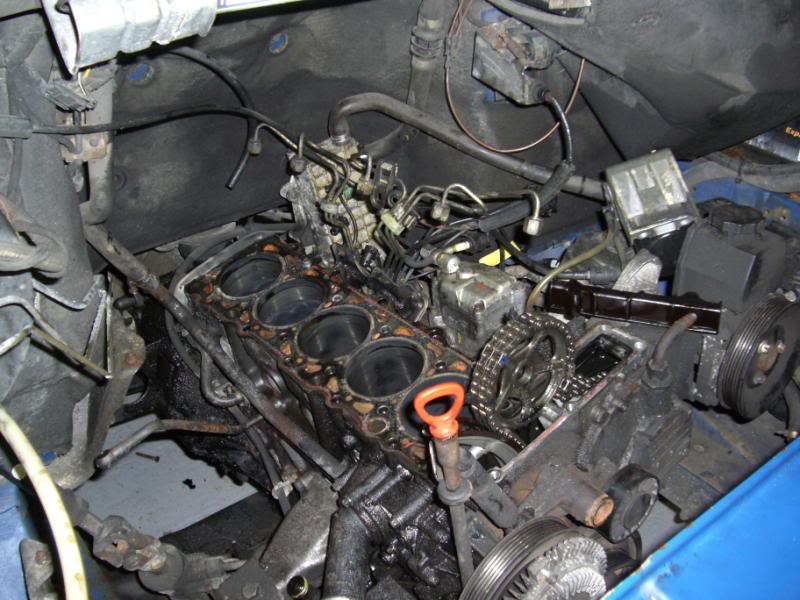
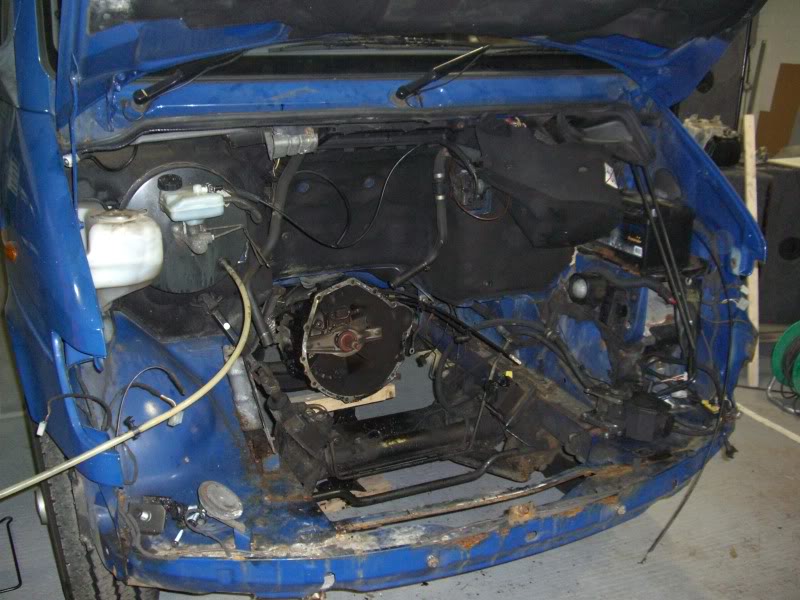
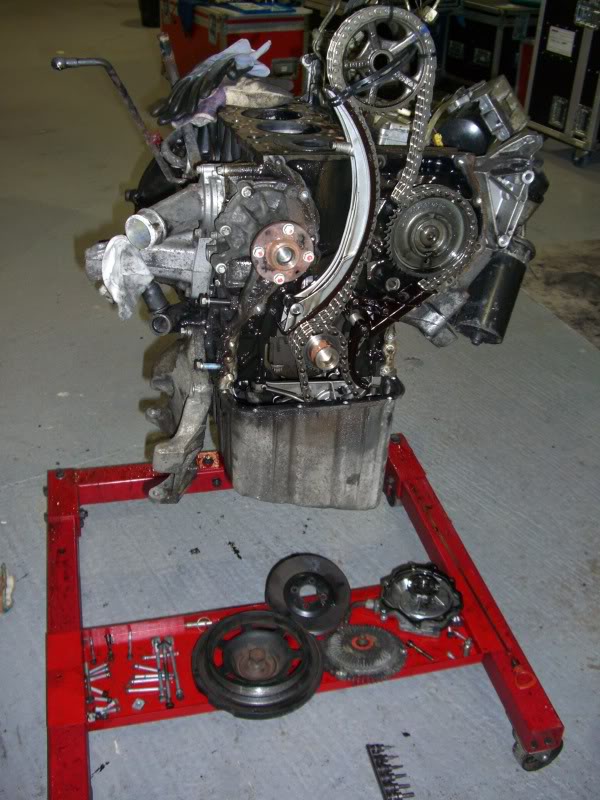
In the end i decided that it would be easier to pull the engine and work on rebuilding it on the stand rather than in the van so the front of the van currently looks like this.
Then we had some bad news, the head is cracked from the inlet port of cyl1 through to somewhere, i didn't get the full message as it was relayed by someone else but the upshot of it is the original head is scrap. **** !
Then we had some bad news, the head is cracked from the inlet port of cyl1 through to somewhere, i didn't get the full message as it was relayed by someone else but the upshot of it is the original head is scrap. **** !
Thread Starter
Scooby Regular
iTrader: (2)
Joined: Dec 2002
Posts: 1,197
Likes: 1
From: All over the place, trying to stop putting the miles on!
Had to have a few days break from doing this as i had to go to work for a while
Whilst i was away my business partner scoured the local breakers for a new head and the only thing we could turn up for reasonable money was a head with valves and buckets and cam caps but no cam shaft. It had been pressure tested and had a very light skim already. Fortunately it had been tested at the same place we took our to so at least we know that bit has been done properly.
Having seen the state of the head when it got to us and having been told that it was actually removed from an engine the breakers were building for a customer who ran out of funds then i would never trust them to build an engine for me. Covered in rubbish!
I have got a few things done over this weekend though.
Old head on the right, new (SH) head on the left complete with an extra exhaust manifold.
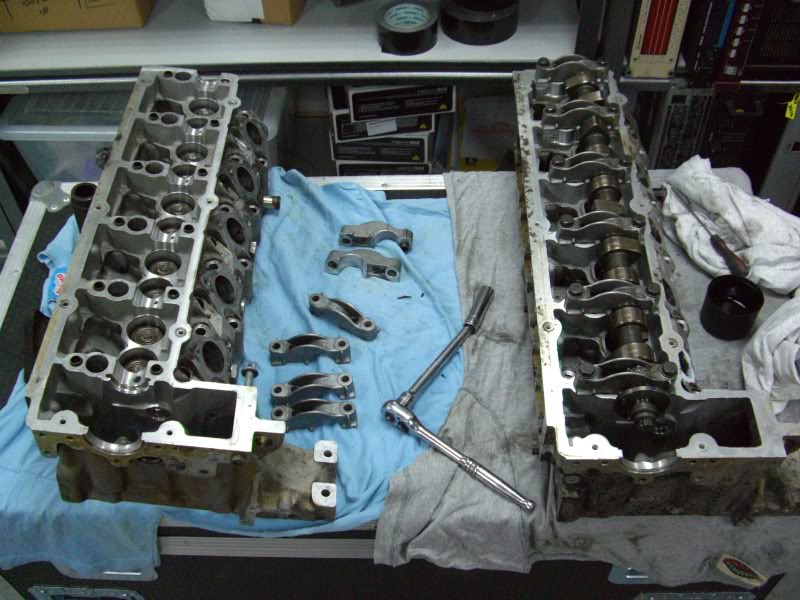
I dummy built back up the cam in the old head to test how easily it turned with all the cam caps done up to spec (18ftlb) then did the same in the new head. The new head seems a bit tighter but the shaft still turns easily by hand, no binding. This was my major concern about reusing the old camshaft as the bearing surfaces are machined into the head.
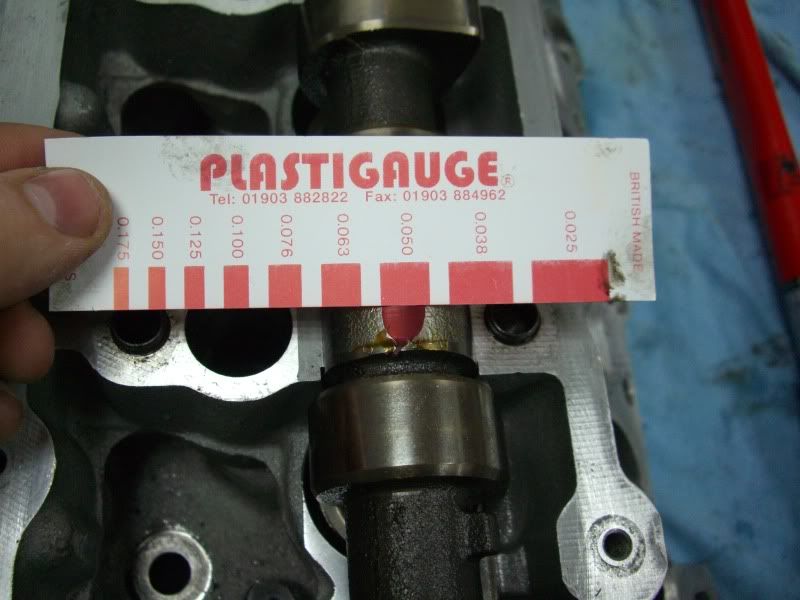
The plasti guage has been ordered and the cam bearing clearances will be checked this week, all being well i can start to put the head back on the block soon
According to the book i have here cam clearances should be in between 0.050mm to 0.081mm.
Last job for today was to clean up all the mating surfaces and test all the threads to make sure everything is ok.
Whilst i was away my business partner scoured the local breakers for a new head and the only thing we could turn up for reasonable money was a head with valves and buckets and cam caps but no cam shaft. It had been pressure tested and had a very light skim already. Fortunately it had been tested at the same place we took our to so at least we know that bit has been done properly.
Having seen the state of the head when it got to us and having been told that it was actually removed from an engine the breakers were building for a customer who ran out of funds then i would never trust them to build an engine for me. Covered in rubbish!
I have got a few things done over this weekend though.
Old head on the right, new (SH) head on the left complete with an extra exhaust manifold.
I dummy built back up the cam in the old head to test how easily it turned with all the cam caps done up to spec (18ftlb) then did the same in the new head. The new head seems a bit tighter but the shaft still turns easily by hand, no binding. This was my major concern about reusing the old camshaft as the bearing surfaces are machined into the head.
The plasti guage has been ordered and the cam bearing clearances will be checked this week, all being well i can start to put the head back on the block soon
According to the book i have here cam clearances should be in between 0.050mm to 0.081mm.
Last job for today was to clean up all the mating surfaces and test all the threads to make sure everything is ok.
Thread Starter
Scooby Regular
iTrader: (2)
Joined: Dec 2002
Posts: 1,197
Likes: 1
From: All over the place, trying to stop putting the miles on!
I have a couple of other silly questions as the Peter Russek manual i have that covers the OM601/602 engine only covers the injection system on the 601.
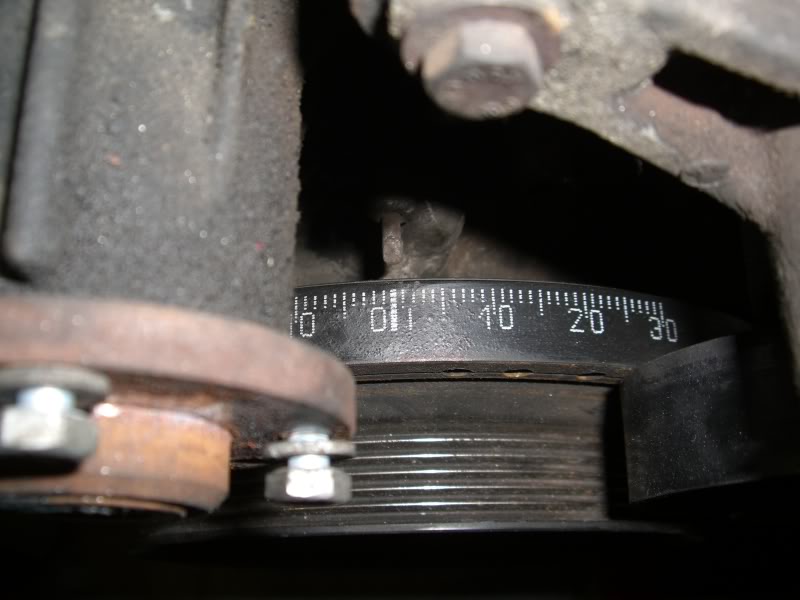
The first question is regarding the injection pump timing as i had to have the timing cover off the engine due to a silly accident with a bolt falling down it, i'm now not convinced that the chain has not jumped a tooth somewhere.
There are TDC marks on the crank pulley and the the cam shaft but nothing i can see on the injection pump. I have just counted the teeth on the cam sprocket and the injection pump sprocket and both have 38 so run at a 1.1 ratio. I'm hoping there for that as long as both the woodruf key holes line up between the cam shaft and the injection pump that the timing is right.
Am i heading in the right direction??
Crank TDC
Injection Pump Sprocket
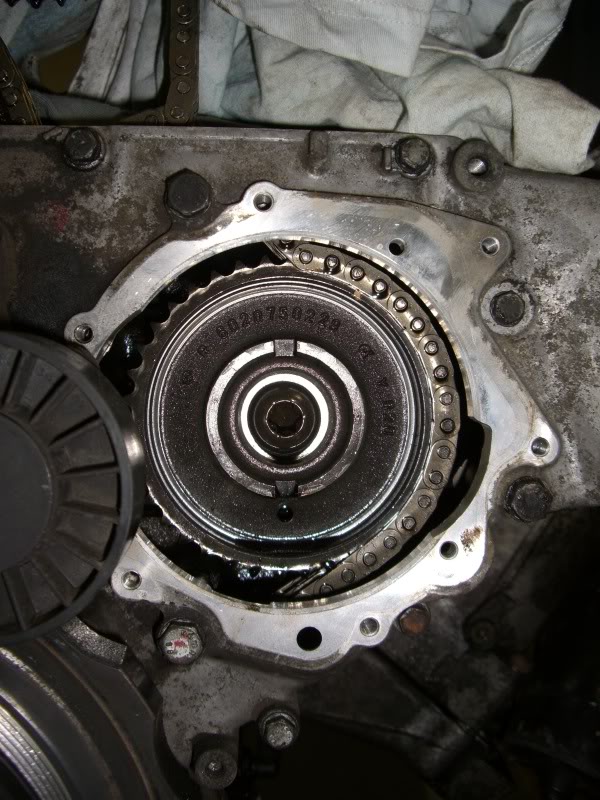
When pulled back into its correct position the cam sprocket also has the woodruff key hole facing directly downwards.
Timing cover has been put pack with Loctite sealant and threadlock on the bolts so hopefully no oil leaks there.
The first question is regarding the injection pump timing as i had to have the timing cover off the engine due to a silly accident with a bolt falling down it, i'm now not convinced that the chain has not jumped a tooth somewhere.
There are TDC marks on the crank pulley and the the cam shaft but nothing i can see on the injection pump. I have just counted the teeth on the cam sprocket and the injection pump sprocket and both have 38 so run at a 1.1 ratio. I'm hoping there for that as long as both the woodruf key holes line up between the cam shaft and the injection pump that the timing is right.
Am i heading in the right direction??
Crank TDC
Injection Pump Sprocket
When pulled back into its correct position the cam sprocket also has the woodruff key hole facing directly downwards.
Timing cover has been put pack with Loctite sealant and threadlock on the bolts so hopefully no oil leaks there.
Thread Starter
Scooby Regular
iTrader: (2)
Joined: Dec 2002
Posts: 1,197
Likes: 1
From: All over the place, trying to stop putting the miles on!
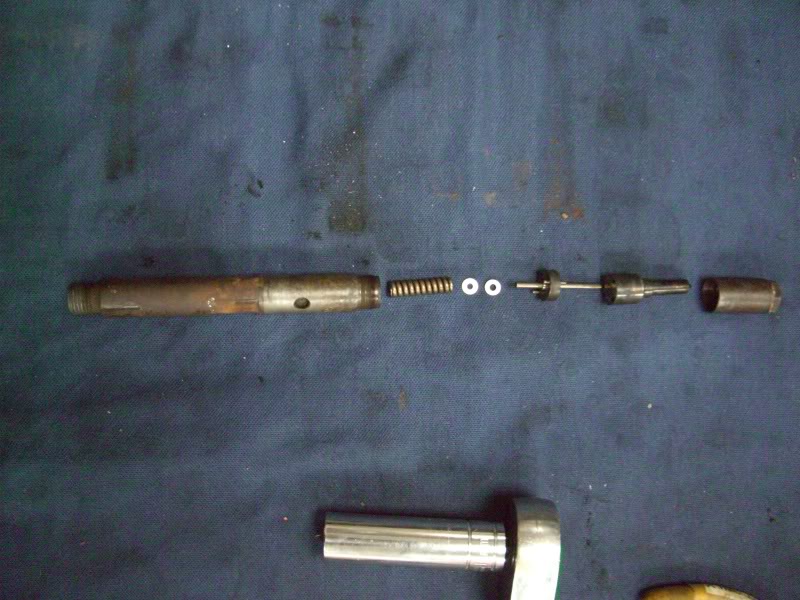
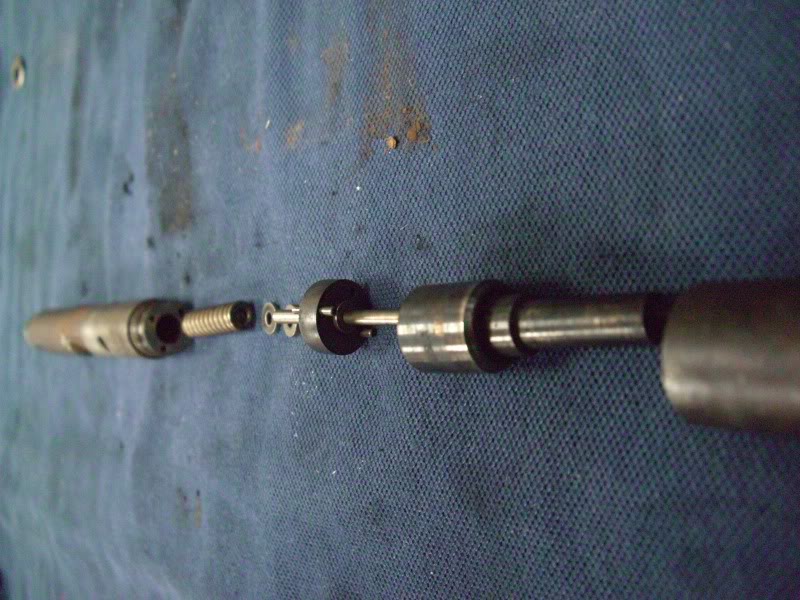
The Second silly question involves the injector that was stuck and then came apart (oops) whilst trying to remove it. I have laid it out how i think it came apart / should go back together.
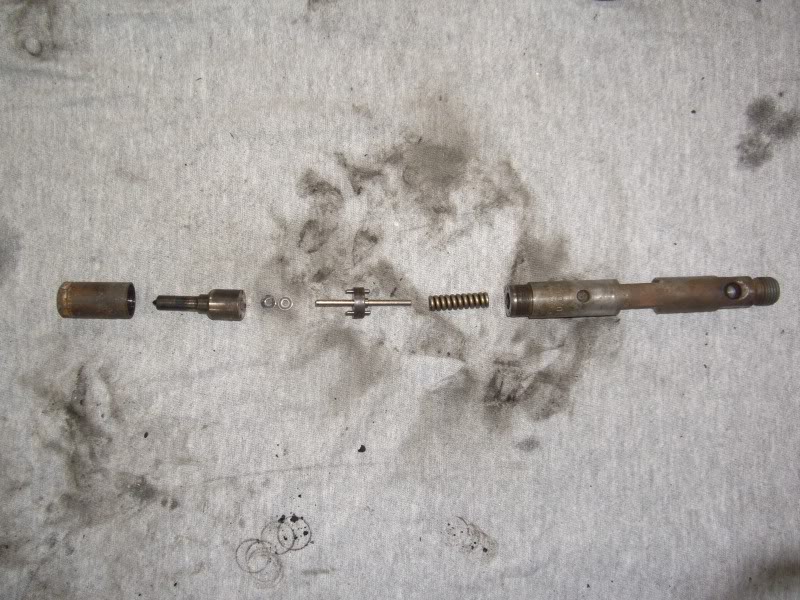

The only things i cant remember for sure is which side the two shims went on and which way round the middle assembly of the plunger with the disc on went.
The only things i cant remember for sure is which side the two shims went on and which way round the middle assembly of the plunger with the disc on went.
Danny only just seen this sorry..lol
The timing looks right to me matey, and the needle lift injector looks ok apart from the washer/spacer iam unsure if there in the right place ? one way to find out and thts to build it and fit to engine, it wont run right if its the wrong way around ?
The timing looks right to me matey, and the needle lift injector looks ok apart from the washer/spacer iam unsure if there in the right place ? one way to find out and thts to build it and fit to engine, it wont run right if its the wrong way around ?
Thread Starter
Scooby Regular
iTrader: (2)
Joined: Dec 2002
Posts: 1,197
Likes: 1
From: All over the place, trying to stop putting the miles on!
Thanks for the help Matt. 
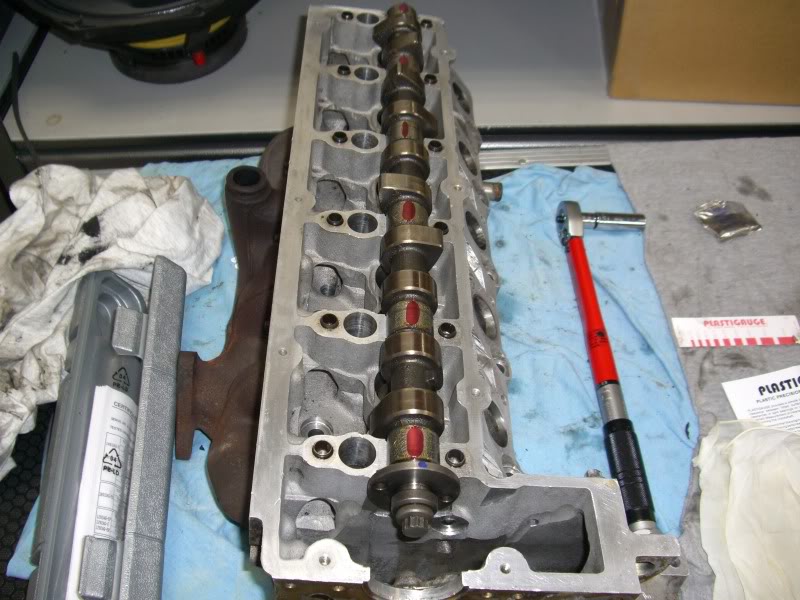
The head is a goer, 5 out of 6 bearings all within spec, bearing 4 is 0.01mm over size so i'm going to go with it anyway. As its a pressure fed bearing hopefully the oil will take up some of the slack.
I put the head casting back on the block today and torqued up the head bolts, this time they are all in one piece!
Some more pics to upload tomorrow.
Thread Starter
Scooby Regular
iTrader: (2)
Joined: Dec 2002
Posts: 1,197
Likes: 1
From: All over the place, trying to stop putting the miles on!
Plasti gauge on cam shaft.
New Head Gasket on the block after cleaning up the mating face with a bit of wet & dry.

Head on and new bolt set going in.

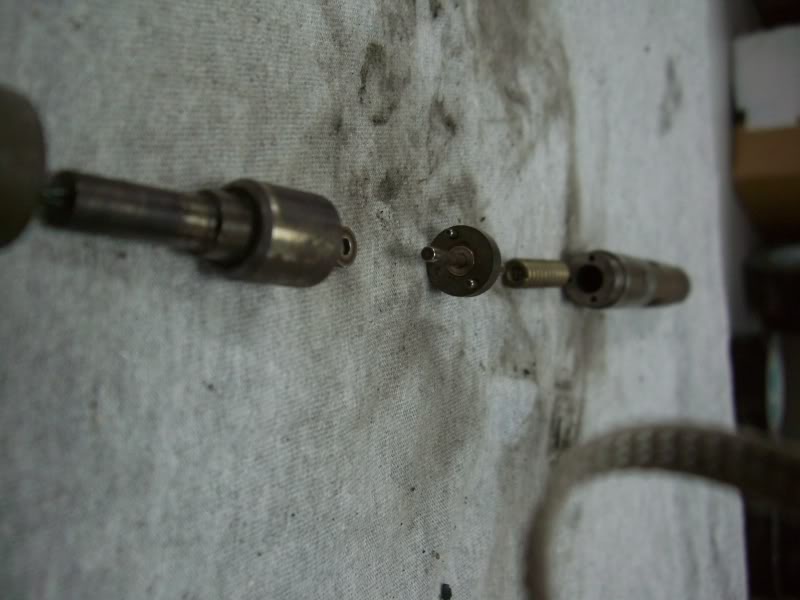
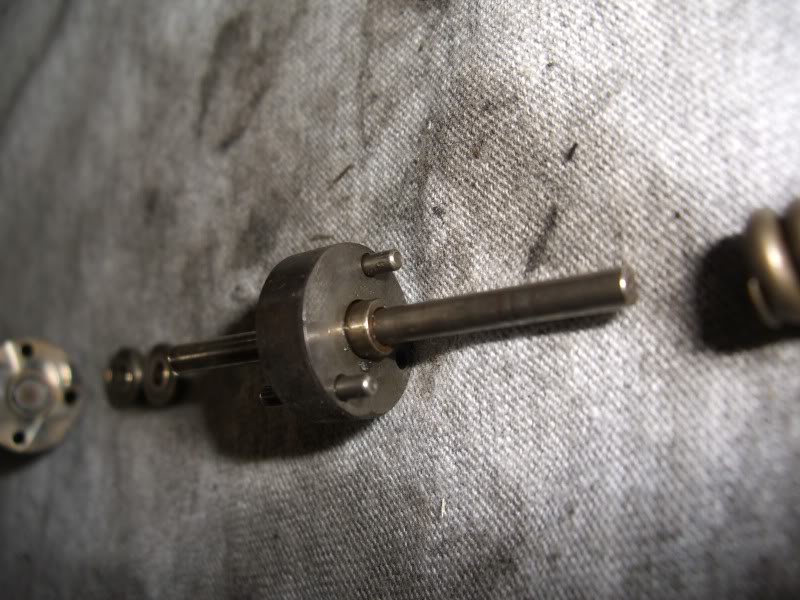
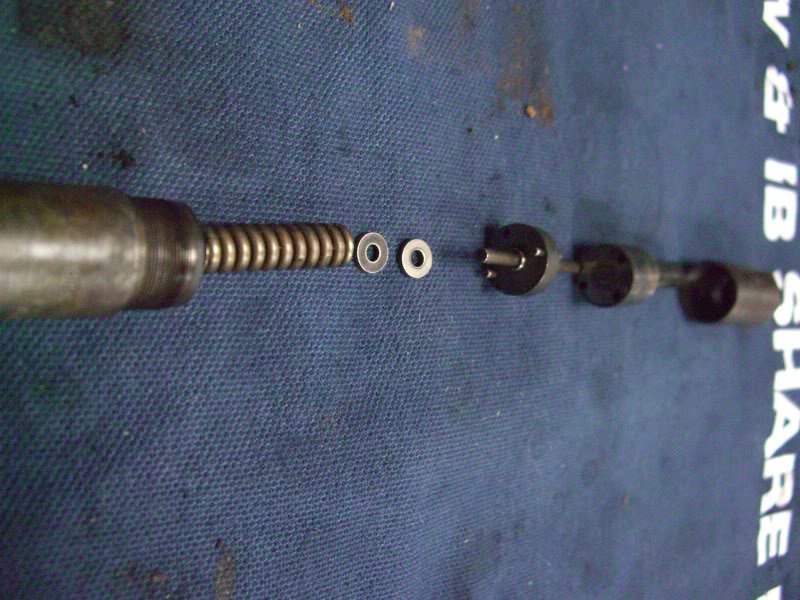
I took apart one other injector to check out the way it is assembled then re took the pics so you can see which way they go back together. We were 95% of the way there
Correct placement of parts for re assembly.
New seals on the ends then back in the head along with the cam shaft and the rest of the ancillaries.

New Head Gasket on the block after cleaning up the mating face with a bit of wet & dry.
Head on and new bolt set going in.
I took apart one other injector to check out the way it is assembled then re took the pics so you can see which way they go back together. We were 95% of the way there
Correct placement of parts for re assembly.
New seals on the ends then back in the head along with the cam shaft and the rest of the ancillaries.
Last edited by Danny Boy; Feb 28, 2010 at 12:17 PM.
Thread Starter
Scooby Regular
iTrader: (2)
Joined: Dec 2002
Posts: 1,197
Likes: 1
From: All over the place, trying to stop putting the miles on!
Then came the interesting bit, setting up the timing.
At this point i had to enlist some help. It turns out that a friend of a friend works at the local Main Mercedes Dealership, Result!
So he was recruited for an evening s tuition in sprinter engines.
As it turns out the injection pump sprocket has no timing marks on it because you do not set the timing up there. When putting the timing chain back on it is just an idler and as long as the cam and crank are in sync then that is all you need to do on that end. It took me a couple of goes to get the cam and crank in sync as my timing marks had jumped i can tell you if you are even one tooth out on the cam wheel it will lock the engine up !
Once the cam chain is on you then need to remove the injection pump completely. Don't worry about the sprocket as it is supported on its own bearing in the timing housing. Now depending on where your injector with a wire on it is depends on where you have to set the crank to set the start of injection point. On my engine i have the sensor injector on cyl 1, this means that i need to set the crank to 10 deg before TDC.
You then set the injection pump by hand to 11'Oclock when looking at it directly and put the pump back in. There is a splined collar that mates the injection pump to the sprocket in the timing case.
Then its back on with all the fuel lines and electrics on that side of the engine.
I forgot to take pics of this bit as it was quite late in the evening and i was doing some proper learning at the time
I have to do another van soon so ill get some pics of the injection setup on that one then to make this complete.
As it stands now, ready to fit back in the engine bay next week,
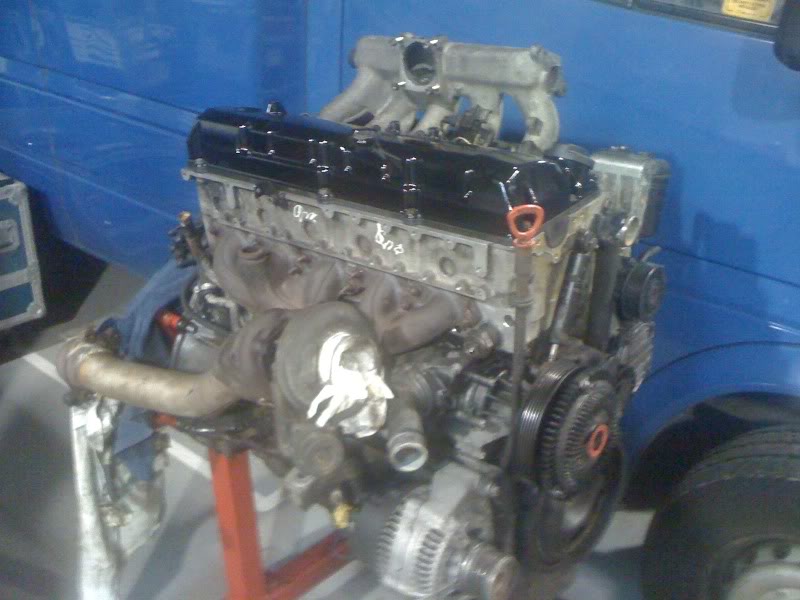
i have left the EGR system off till we get it back in the van so there is a bit more room to work around the top end and i could not resist spraying up the cam cover, we will see how long the finish lasts
At this point i had to enlist some help. It turns out that a friend of a friend works at the local Main Mercedes Dealership, Result!
So he was recruited for an evening s tuition in sprinter engines.
As it turns out the injection pump sprocket has no timing marks on it because you do not set the timing up there. When putting the timing chain back on it is just an idler and as long as the cam and crank are in sync then that is all you need to do on that end. It took me a couple of goes to get the cam and crank in sync as my timing marks had jumped i can tell you if you are even one tooth out on the cam wheel it will lock the engine up !
Once the cam chain is on you then need to remove the injection pump completely. Don't worry about the sprocket as it is supported on its own bearing in the timing housing. Now depending on where your injector with a wire on it is depends on where you have to set the crank to set the start of injection point. On my engine i have the sensor injector on cyl 1, this means that i need to set the crank to 10 deg before TDC.
You then set the injection pump by hand to 11'Oclock when looking at it directly and put the pump back in. There is a splined collar that mates the injection pump to the sprocket in the timing case.
Then its back on with all the fuel lines and electrics on that side of the engine.
I forgot to take pics of this bit as it was quite late in the evening and i was doing some proper learning at the time
I have to do another van soon so ill get some pics of the injection setup on that one then to make this complete.
As it stands now, ready to fit back in the engine bay next week,
i have left the EGR system off till we get it back in the van so there is a bit more room to work around the top end and i could not resist spraying up the cam cover, we will see how long the finish lasts
Thread Starter
Scooby Regular
iTrader: (2)
Joined: Dec 2002
Posts: 1,197
Likes: 1
From: All over the place, trying to stop putting the miles on!
New Clutch because it would be rude not to whilst it was out
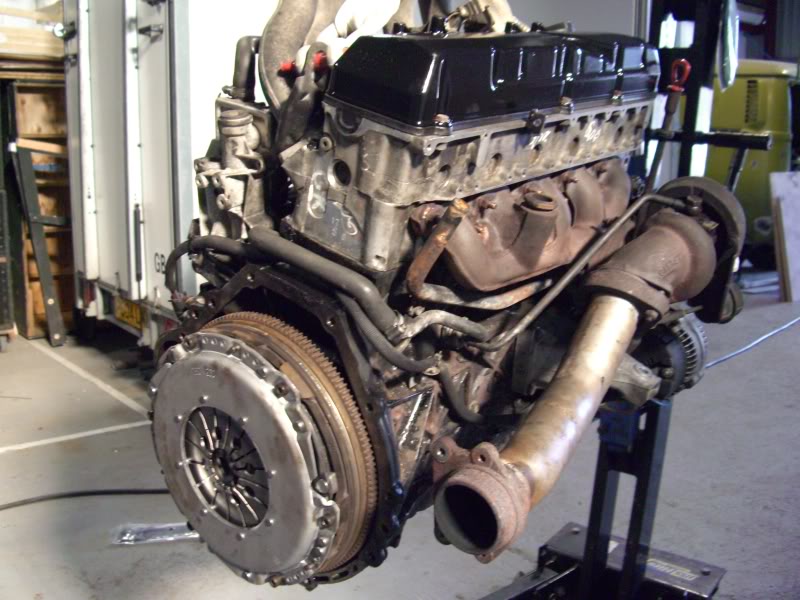
On its way back in
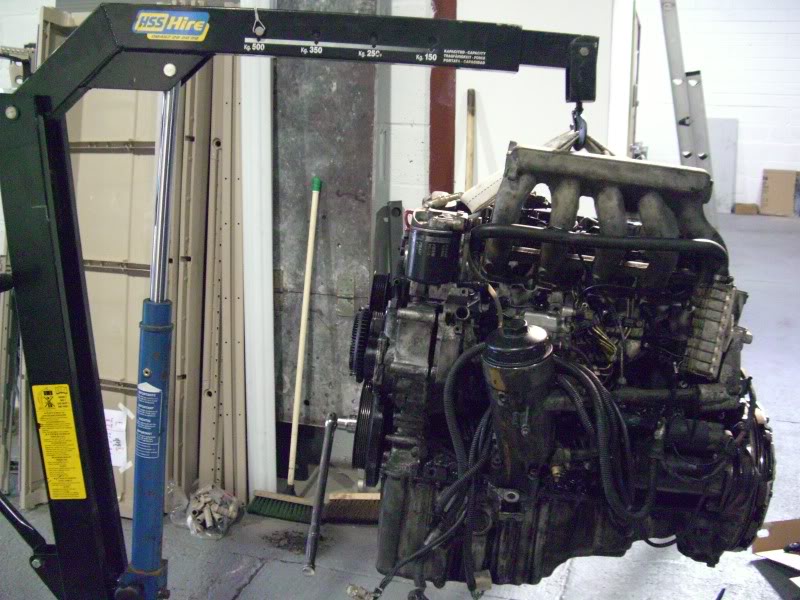
I have since found out that my next door neighbor has an engine crane so no more money going to HSS again
Back at home ready for testing
She took some starting and i really thought i had c0cked up the injection timing yesterday as it refused to start but tried to catch at exactly the same point each revolution. We had killed the battery trying so put it on charge and so went home a bit dejected.
Tried again this morning and it caught and spluttered into life although sounding very rough, 15 mins later with a bit of bleeding off of injector unions to get the rest of the trapped air out she was running as sweet as a nut and i had the biggest grin ever on my face
The coolant system is now all flushed and new coolant put in, fluids all topped up.
Now onto all the niggley jobs before she is put to work for the next year.
Oh and back to Subaru's now........
well until next month when the other van needs doing too
On its way back in
I have since found out that my next door neighbor has an engine crane so no more money going to HSS again
Back at home ready for testing
She took some starting and i really thought i had c0cked up the injection timing yesterday as it refused to start but tried to catch at exactly the same point each revolution. We had killed the battery trying so put it on charge and so went home a bit dejected.
Tried again this morning and it caught and spluttered into life although sounding very rough, 15 mins later with a bit of bleeding off of injector unions to get the rest of the trapped air out she was running as sweet as a nut
and i had the biggest grin ever on my faceThe coolant system is now all flushed and new coolant put in, fluids all topped up.
Now onto all the niggley jobs before she is put to work for the next year.
Oh and back to Subaru's now........
well until next month when the other van needs doing too
Thread Starter
Scooby Regular
iTrader: (2)
Joined: Dec 2002
Posts: 1,197
Likes: 1
From: All over the place, trying to stop putting the miles on!
Still not plucked up the courage to start the other vans Head gasket, it seems to be holding together for now so i'm going to leave it.
I have decided though it was about time the impreza had some TLC to its paint work, considering i don't think i have ever polished this car in 8 years of ownership
I have spent a day at it so far, im only half way through and my hands hurt, giving up for the evening now but the results are quite good.
Wing done, door 8 years of dirt
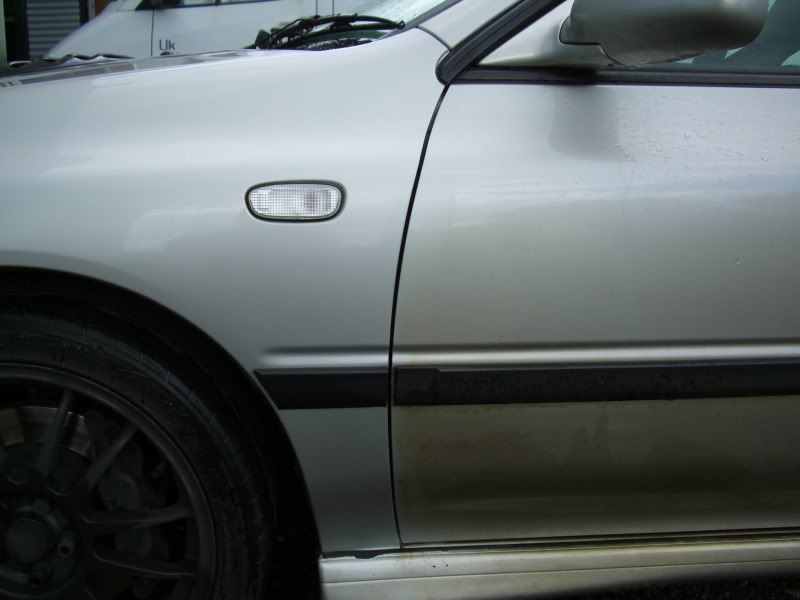
Looks like it has been sat in a pub all of its life with that gold tinge.
I have decided though it was about time the impreza had some TLC to its paint work, considering i don't think i have ever polished this car in 8 years of ownership
I have spent a day at it so far, im only half way through and my hands hurt, giving up for the evening now but the results are quite good.
Wing done, door 8 years of dirt
Looks like it has been sat in a pub all of its life with that gold tinge.
Thread Starter
Scooby Regular
iTrader: (2)
Joined: Dec 2002
Posts: 1,197
Likes: 1
From: All over the place, trying to stop putting the miles on!
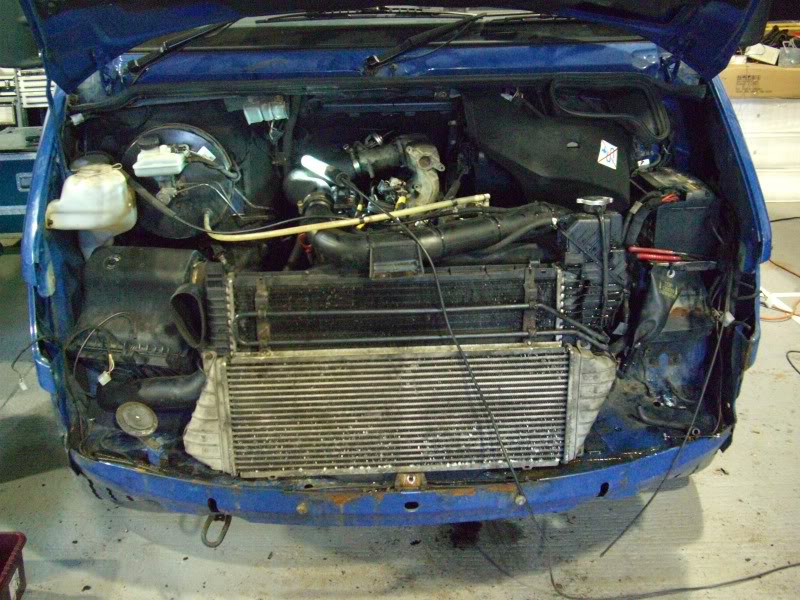
Well its that time of year that the car needs a service, its only done 6k miles since this time last year when the Exe-tc went on so now is a good time before it goes in for its MOT next week.
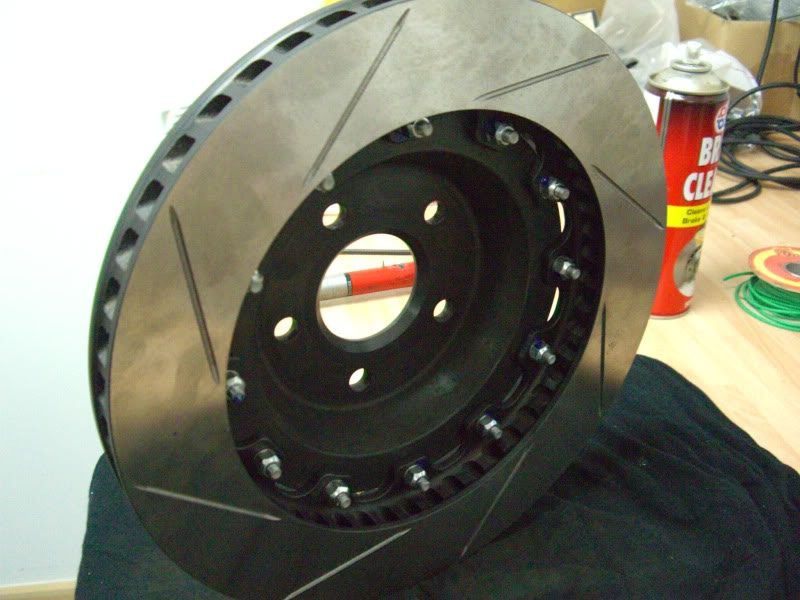
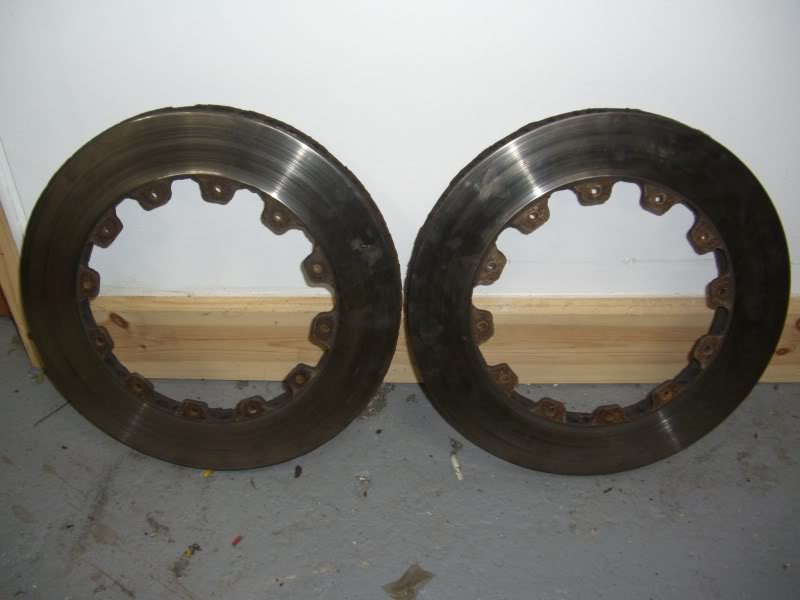
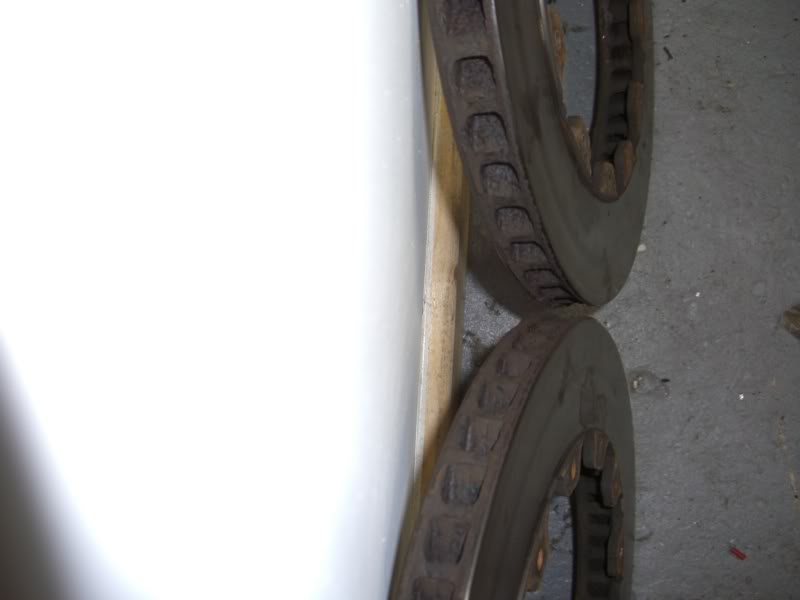
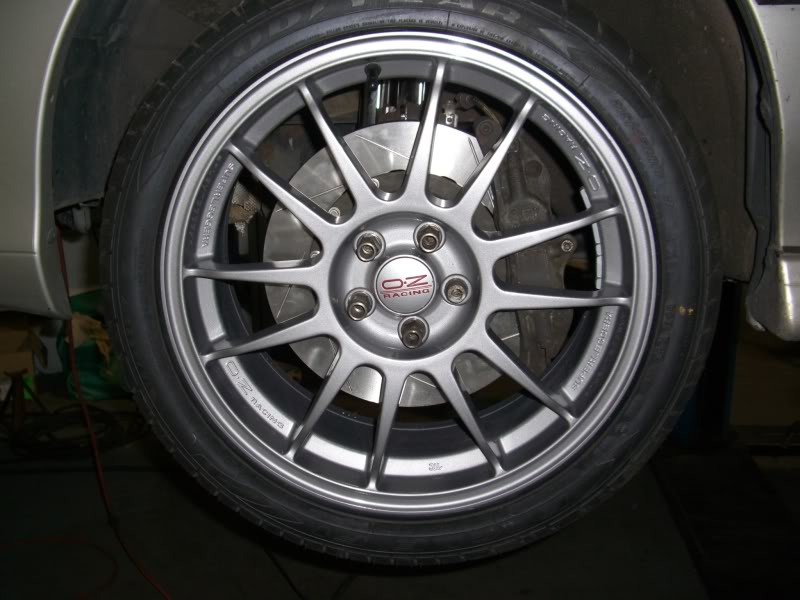
The main thing that needed doing was the front brake discs,
nice new ones sourced by David at API, this i quite an odd sized disc now 304*28mm with a strange PCD built specifically to fit under OEM 16 inch wheels and i can state they do fit but there is NO space left.
I have been recommended to upgrade to the 330mm set up with the 4 pot caliper but i still have a good set of R888's on my 16 inch rims so want to keep a set of brakes that are compatible with that.
Nice new discs and retaining bolts, did my best to clean up a years brake dust from the bells, that stuff is a b1tch to get off even with nasty cleaning products.
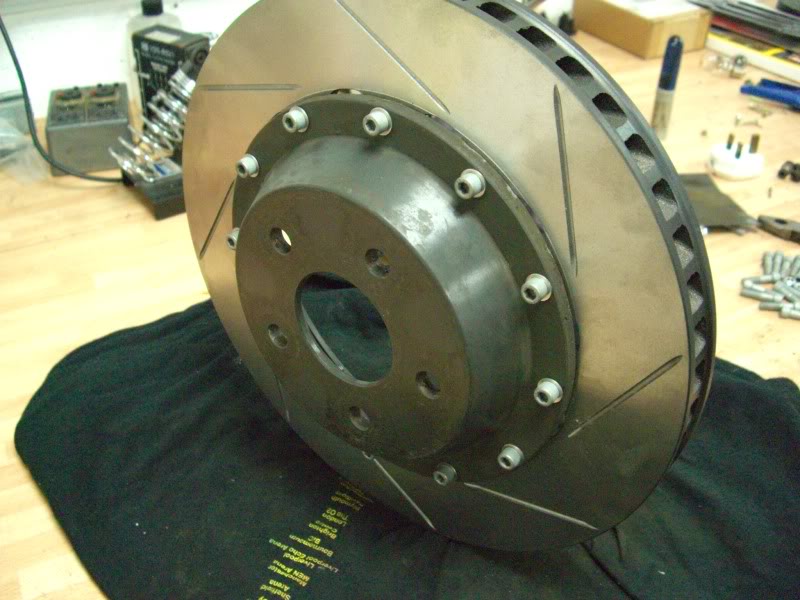
What was left of the old discs, i just checked and they have only done 30k miles over a few years mind you so not that bad. Did someone say where have the grooves gone? oops
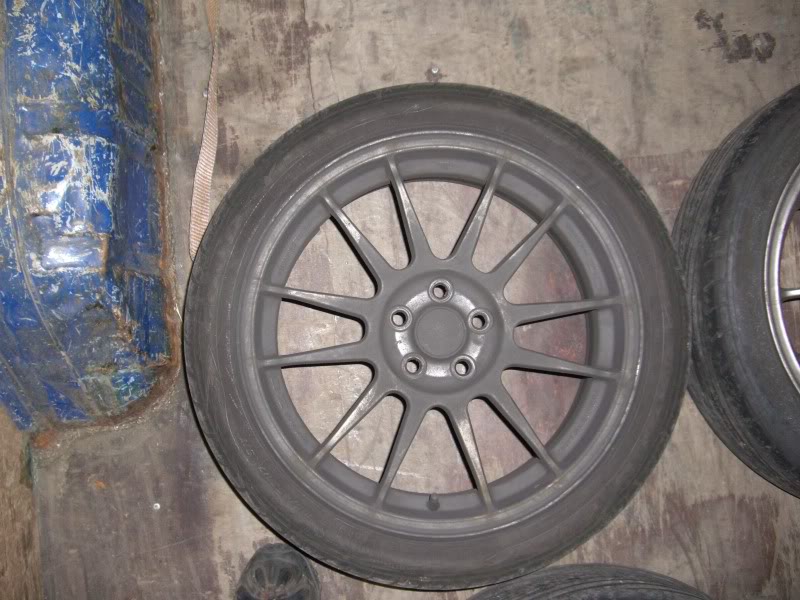
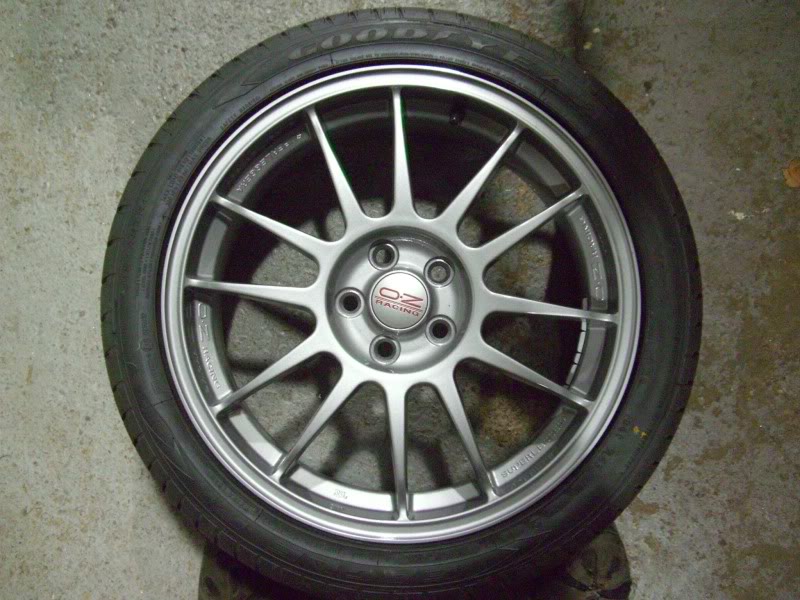
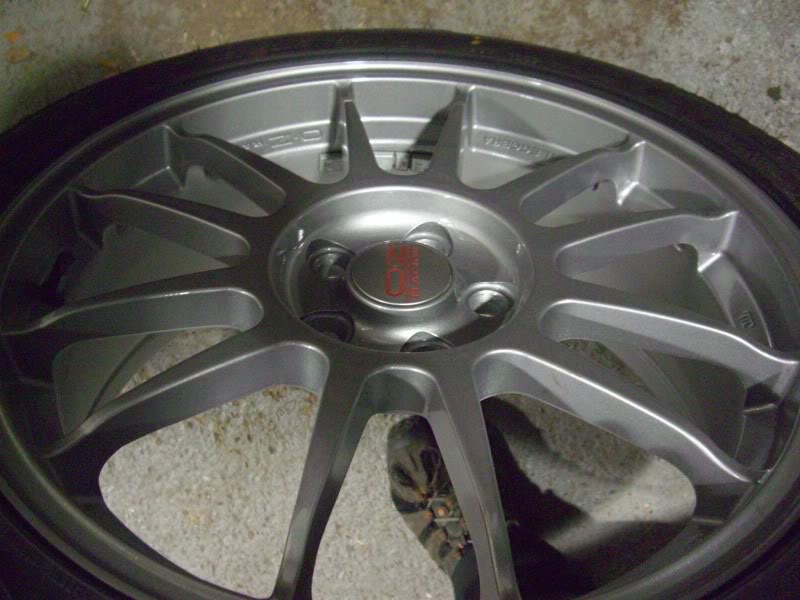
I have also had my road wheels refurbed as many years of brake dust have eaten away the paint, they were blasted right back to the metal then refinished in the original colour. Got them done by a local firm in Brum,
(The Alloy Wheel Doctor, Kingshurst, Birmingham)
fast and friendly service and cheap too
They also fitted a new set of boots whilst they were at it.
Before
After
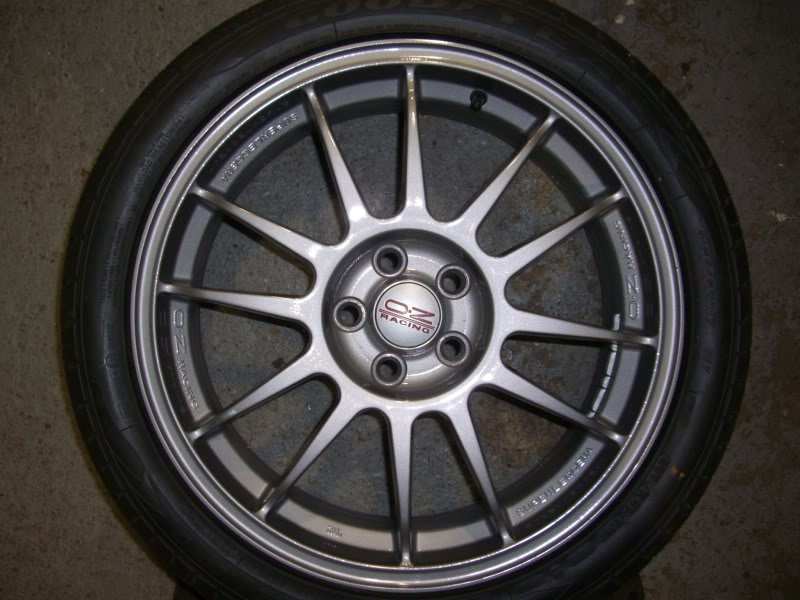
It wont look this clean for long so i thought a little pic of it all put back together
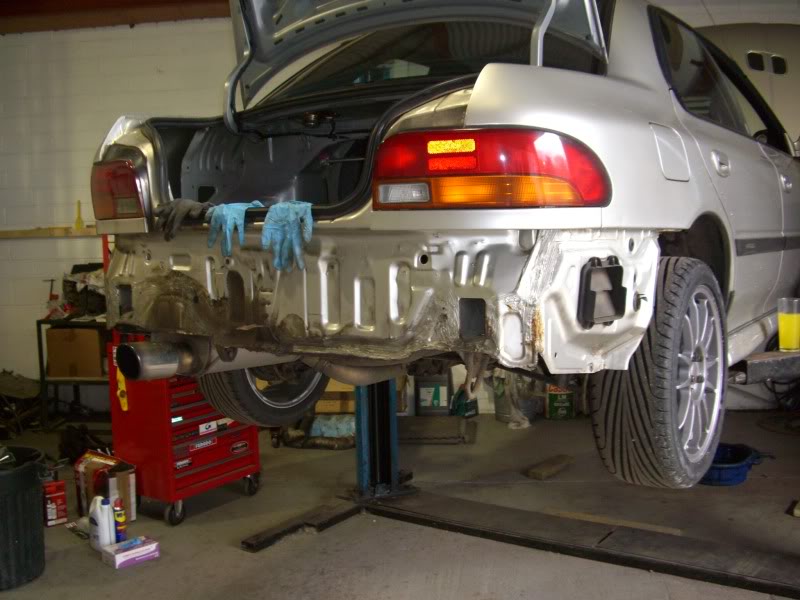
The other job that needed doing was the number plate lights, both were corroded solid so it was easier to just get new ones, wouldn't be surprised if there are a few classic scoobs out there now that need this doing.
Best way to do it is pull the rear bumper off.
New and Old ones.

Fitting
Then the big oh Bugger moment of the day, went to remove the thermostat to finish dropping all the coolant out of the system to replace it and the bolt sheared off in the water pump housing!
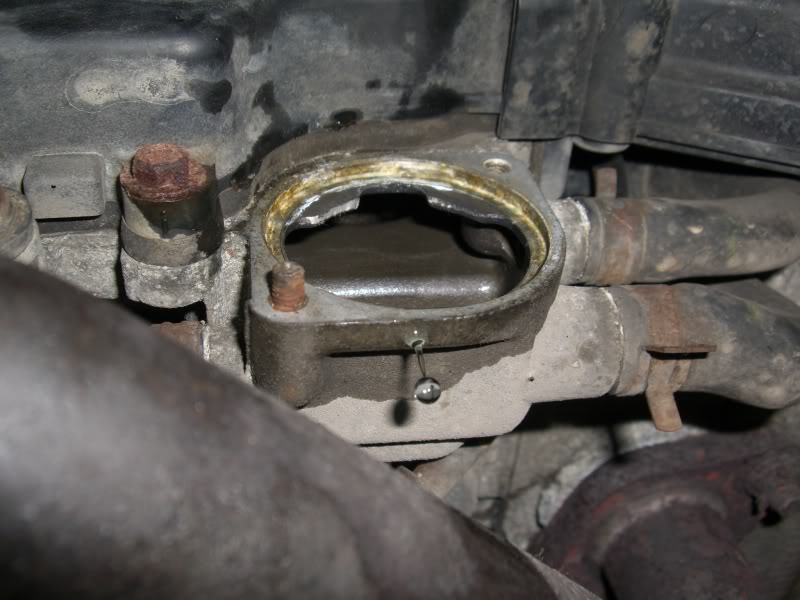
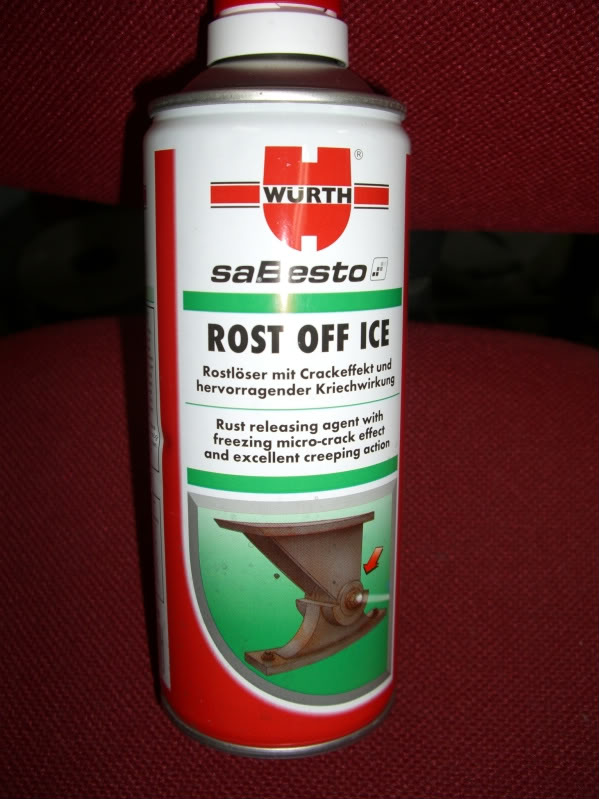
I thought my day was over and i was going to have to ring the missus to ferry me home but i managed to file some flats onto the left over stub and used some of this trick stuff to loosen it and it finally came out, Phew....
Next little bit to do is the exhaust manifold, i have picked up a second hand GT spec 3bolt set and am just going about trying to source a smaller up pipe as the one that comes with it is massive! I don't think my little MD304 would appreciate that so something with a little smaller diameter is on the cards. If your reading this harvey, PM me back!
The main thing that needed doing was the front brake discs,
nice new ones sourced by David at API, this i quite an odd sized disc now 304*28mm with a strange PCD built specifically to fit under OEM 16 inch wheels and i can state they do fit but there is NO space left.
I have been recommended to upgrade to the 330mm set up with the 4 pot caliper but i still have a good set of R888's on my 16 inch rims so want to keep a set of brakes that are compatible with that.
Nice new discs and retaining bolts, did my best to clean up a years brake dust from the bells, that stuff is a b1tch to get off even with nasty cleaning products.
What was left of the old discs, i just checked and they have only done 30k miles over a few years mind you so not that bad. Did someone say where have the grooves gone?
oops I have also had my road wheels refurbed as many years of brake dust have eaten away the paint, they were blasted right back to the metal then refinished in the original colour. Got them done by a local firm in Brum,
(The Alloy Wheel Doctor, Kingshurst, Birmingham)
fast and friendly service and cheap too
They also fitted a new set of boots whilst they were at it.
Before
After
It wont look this clean for long so i thought a little pic of it all put back together
The other job that needed doing was the number plate lights, both were corroded solid so it was easier to just get new ones, wouldn't be surprised if there are a few classic scoobs out there now that need this doing.
Best way to do it is pull the rear bumper off.
New and Old ones.
Fitting
Then the big oh Bugger moment of the day, went to remove the thermostat to finish dropping all the coolant out of the system to replace it and the bolt sheared off in the water pump housing!
I thought my day was over and i was going to have to ring the missus to ferry me home but i managed to file some flats onto the left over stub and used some of this trick stuff to loosen it and it finally came out, Phew....
Next little bit to do is the exhaust manifold, i have picked up a second hand GT spec 3bolt set and am just going about trying to source a smaller up pipe as the one that comes with it is massive! I don't think my little MD304 would appreciate that so something with a little smaller diameter is on the cards. If your reading this harvey, PM me back!
Thread Starter
Scooby Regular
iTrader: (2)
Joined: Dec 2002
Posts: 1,197
Likes: 1
From: All over the place, trying to stop putting the miles on!
Another 6 months have passed, the van is still running despite having a penchant for eating alternators and i even cleaned the scoob today! Iron-X wheel cleaner rocks!
Must finish off wrapping my GT spec headers and finally get them on the car.
Must finish off wrapping my GT spec headers and finally get them on the car.