
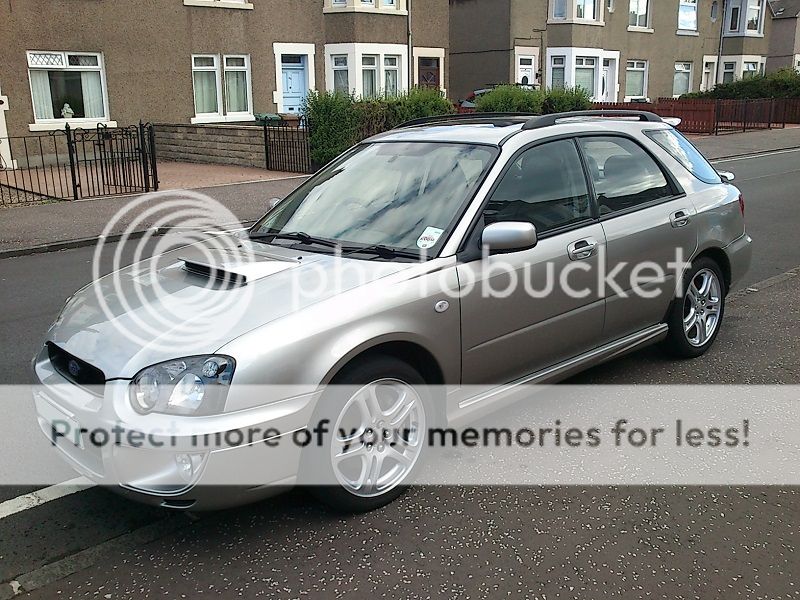
For the love of WRX (wagon!)

Thread Starter
Scooby Regular
iTrader: (2)
Joined: Mar 2014
Posts: 753
Likes: 0
From: Mancunian in Edinburgh
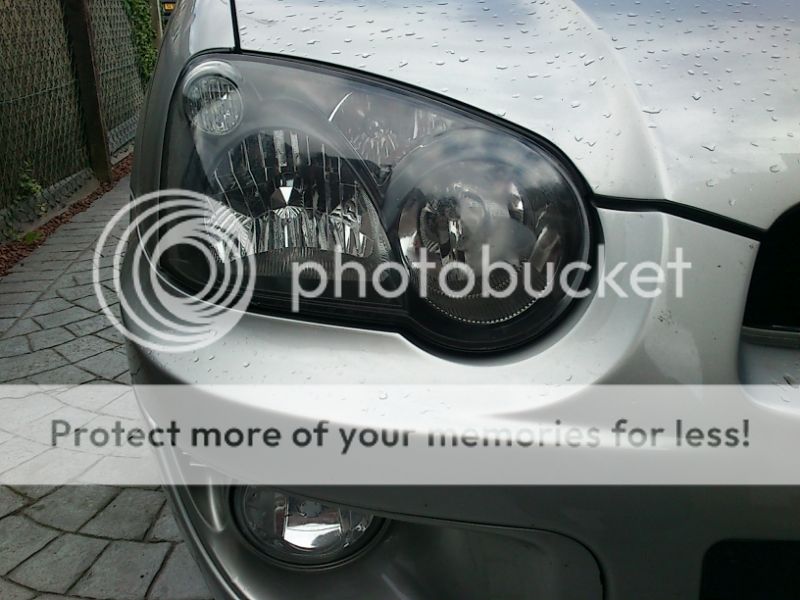
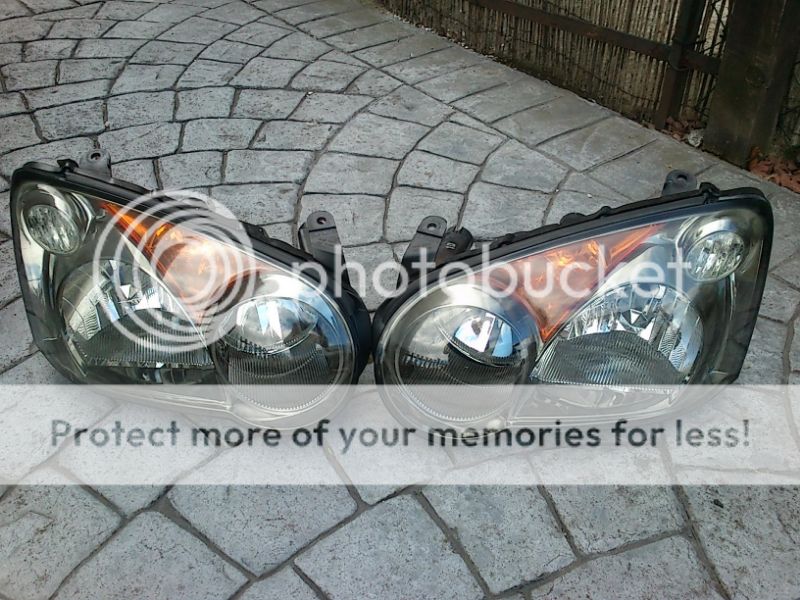
I've decided to go for a black on grey look for the wagon so the starting point was to get the headlamps blacked-out and de-tangoed.
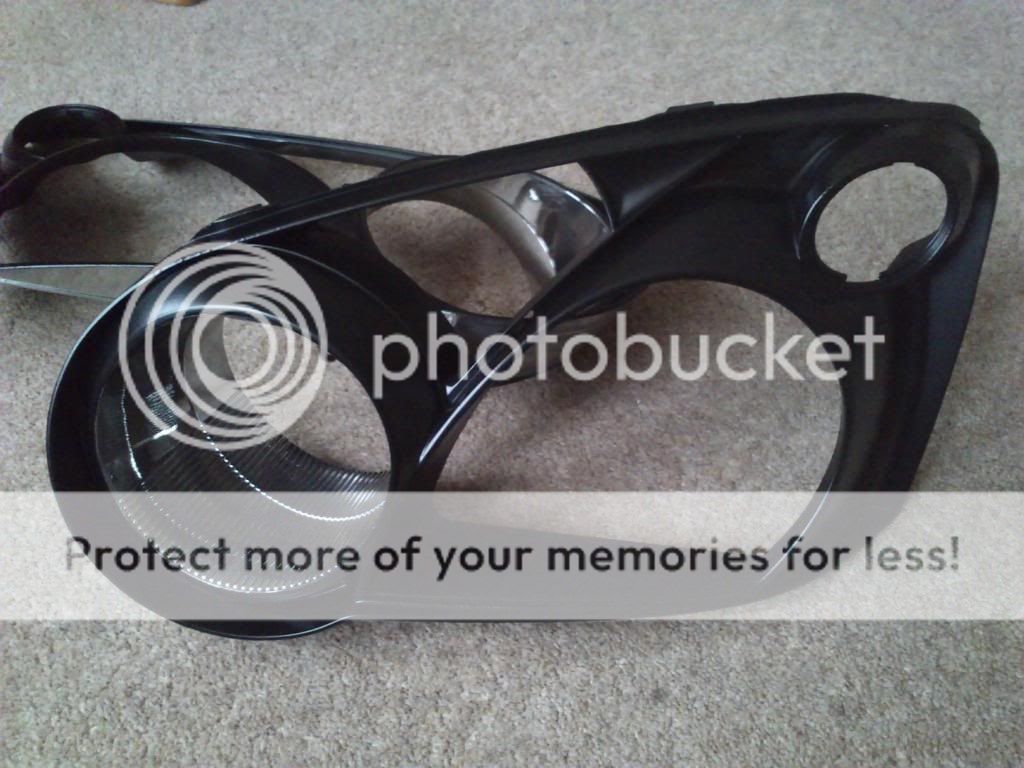
Decided to leave the reflector walls for the main beam unpainted so as not to lose any beam on dark nights!
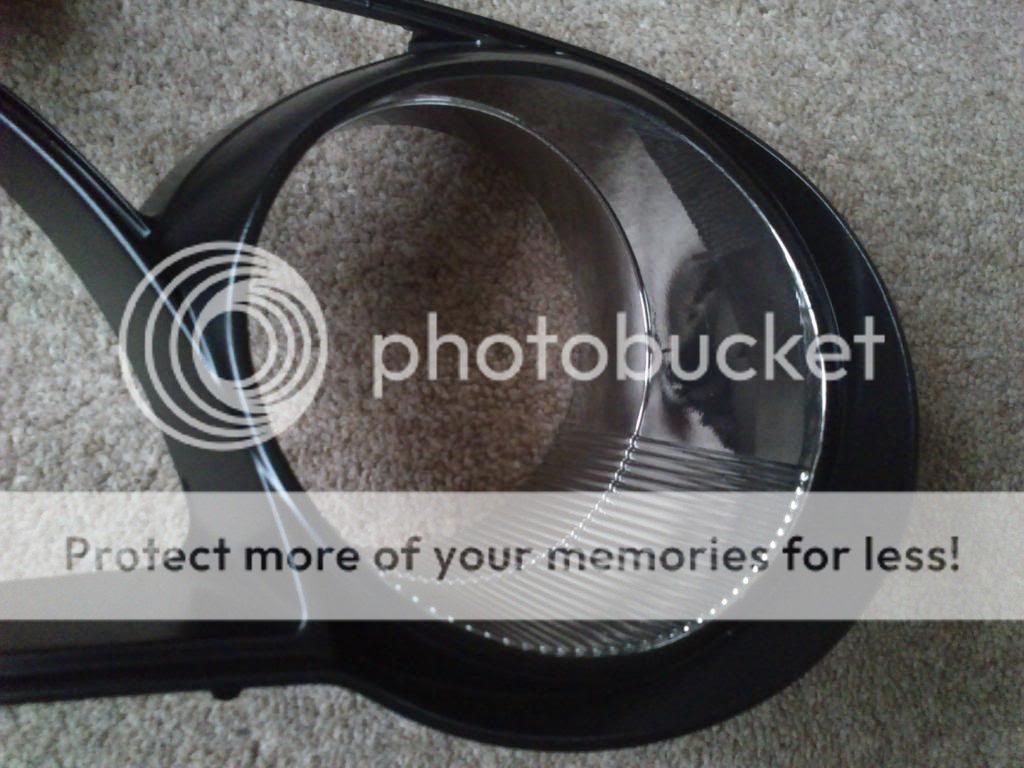
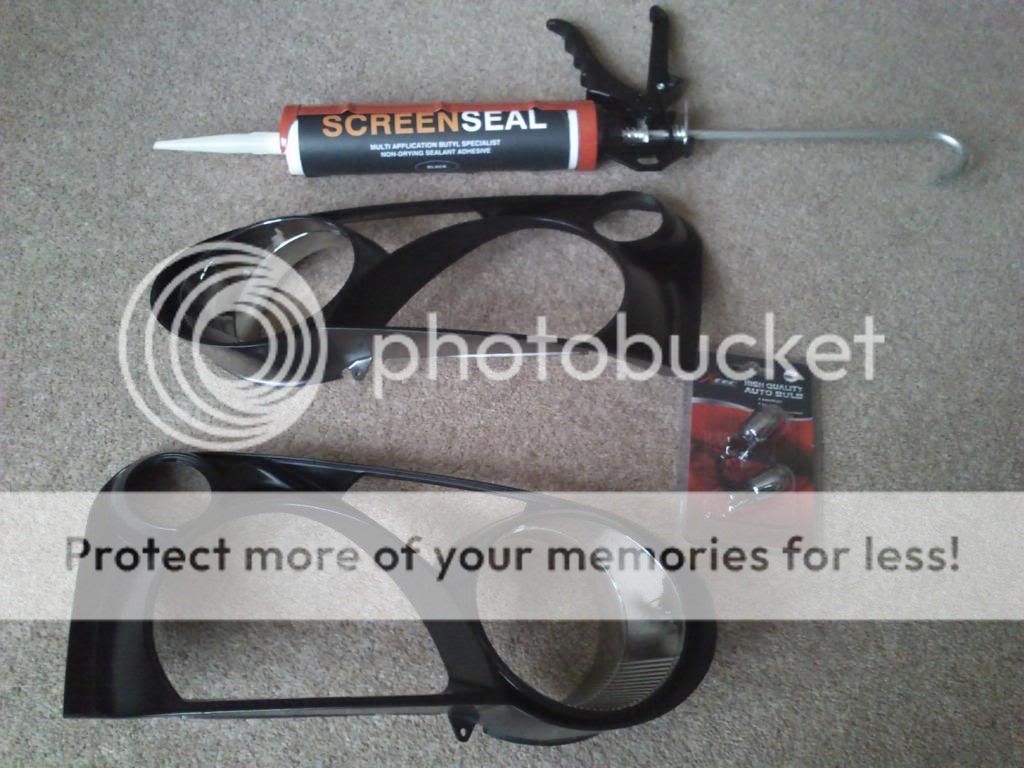
Used black window seal to re-assemble the headlight units and chrome bulbs for the indicators
Comparison left to right, glad those indicators have finally gone!
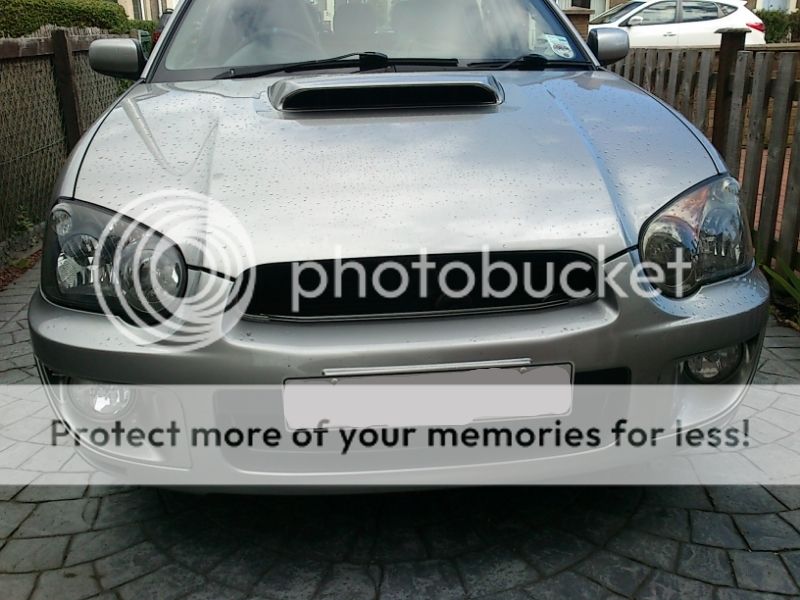
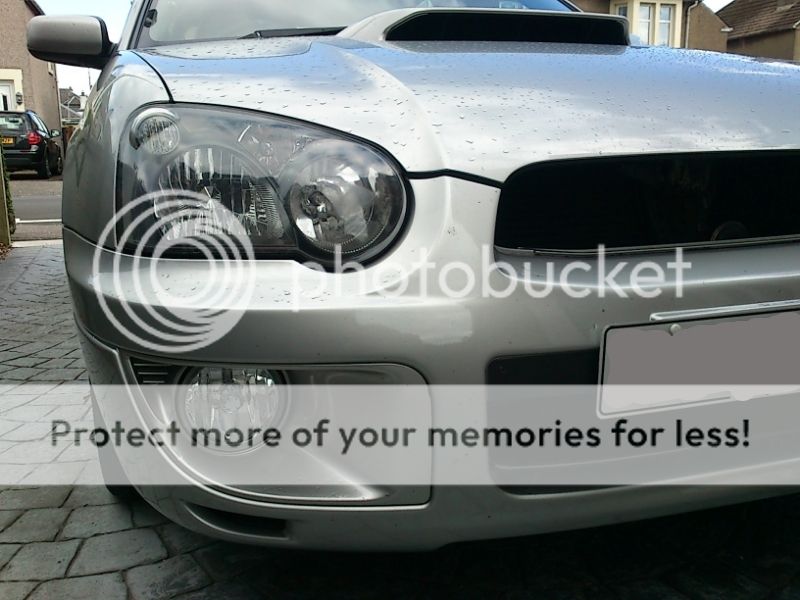
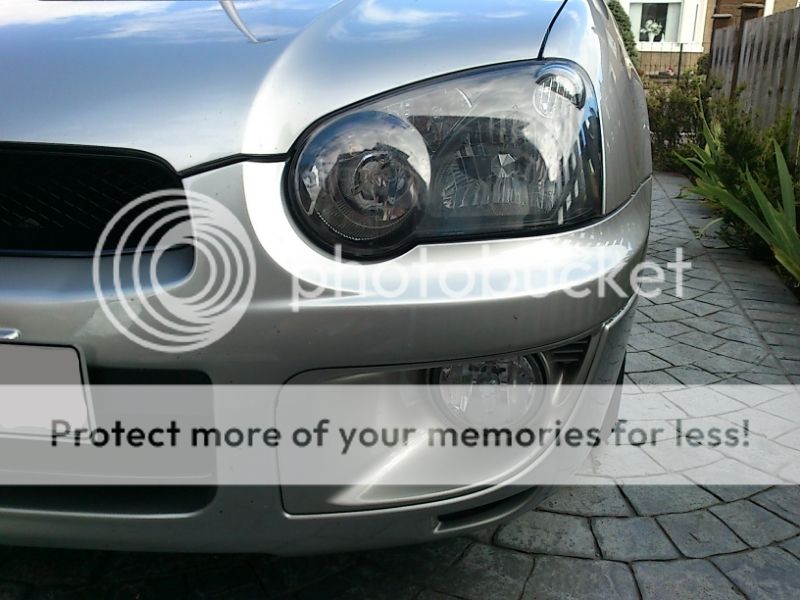
Finished job really suits the crystal grey paint, love it!
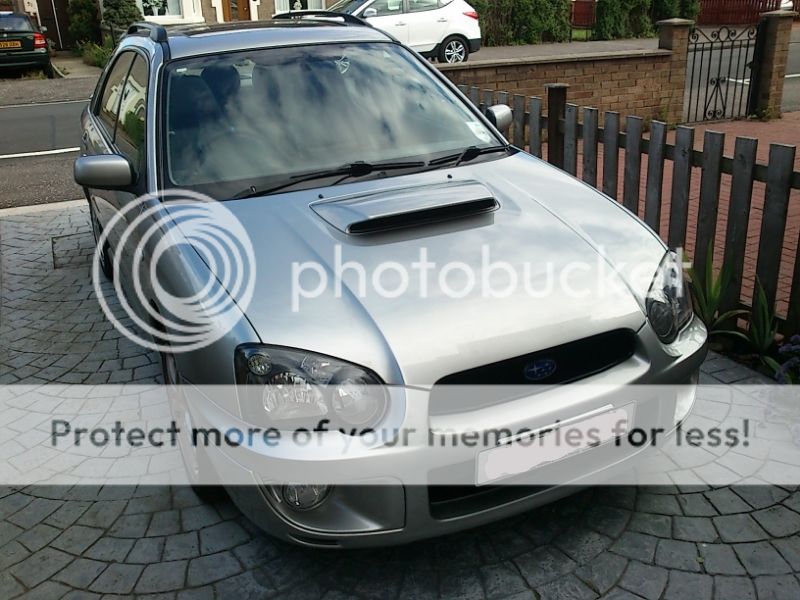
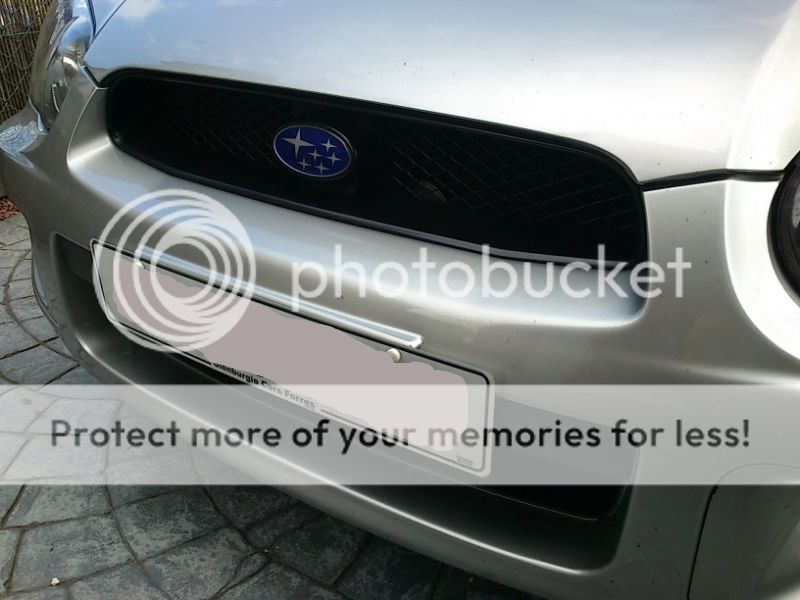
Also painted the grille surround black and replaced the old badge with a blue version
The original headlights that were professionally polished so are as new are now forsale, PM me if interested.
Decided to leave the reflector walls for the main beam unpainted so as not to lose any beam on dark nights!
Used black window seal to re-assemble the headlight units and chrome bulbs for the indicators
Comparison left to right, glad those indicators have finally gone!
Finished job really suits the crystal grey paint, love it!
Also painted the grille surround black and replaced the old badge with a blue version
The original headlights that were professionally polished so are as new are now forsale, PM me if interested.
Thread Starter
Scooby Regular
iTrader: (2)
Joined: Mar 2014
Posts: 753
Likes: 0
From: Mancunian in Edinburgh
20mm rear ARB from a 2003 Sti fitted (same as fitted to GB270) with powerflex bushes.
comparison (17mm top)
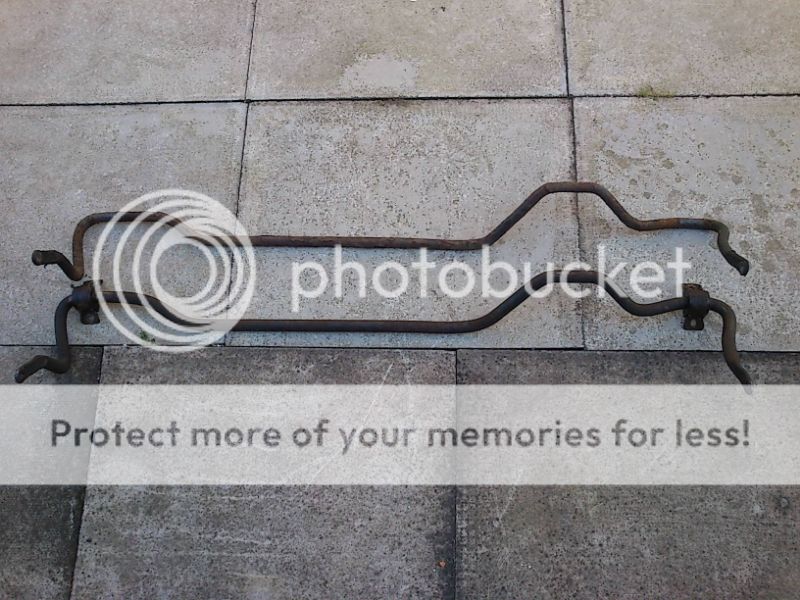
Whiteline rear droplinks fitted as well
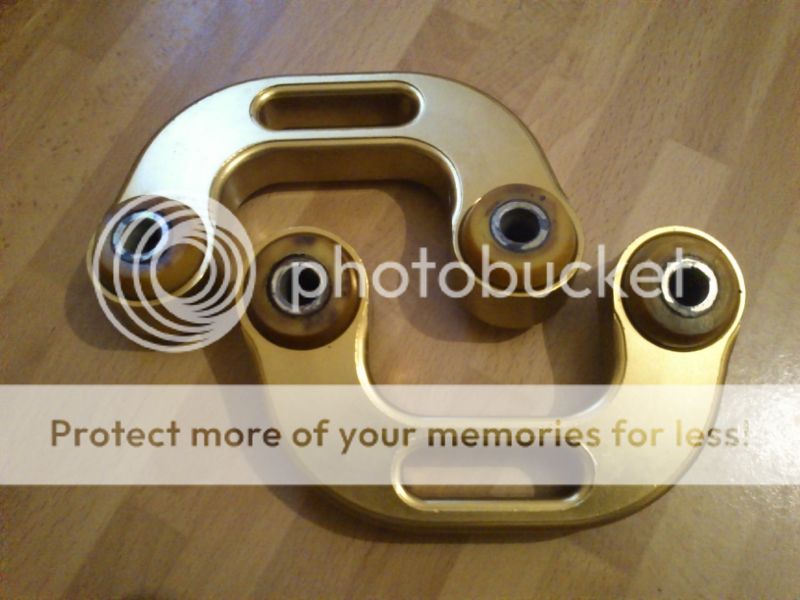
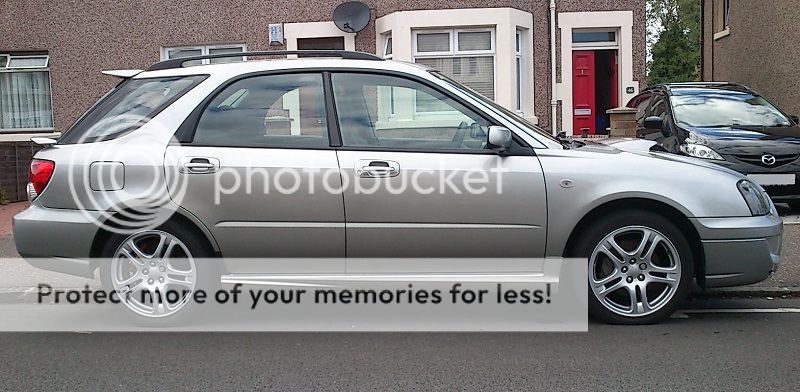
GB270 wagon side skirts fitted. I beleive these are unique to the Hawk wagon as the GB270 saloon has normal STi twisties without the extension on the leading edge
comparison (17mm top)
Whiteline rear droplinks fitted as well
GB270 wagon side skirts fitted. I beleive these are unique to the Hawk wagon as the GB270 saloon has normal STi twisties without the extension on the leading edge
Last edited by modrich; Jul 15, 2014 at 09:31 PM.
Thread Starter
Scooby Regular
iTrader: (2)
Joined: Mar 2014
Posts: 753
Likes: 0
From: Mancunian in Edinburgh

Scooby Newbie
Joined: Jun 2014
Posts: 10
Likes: 0
From: Warrington
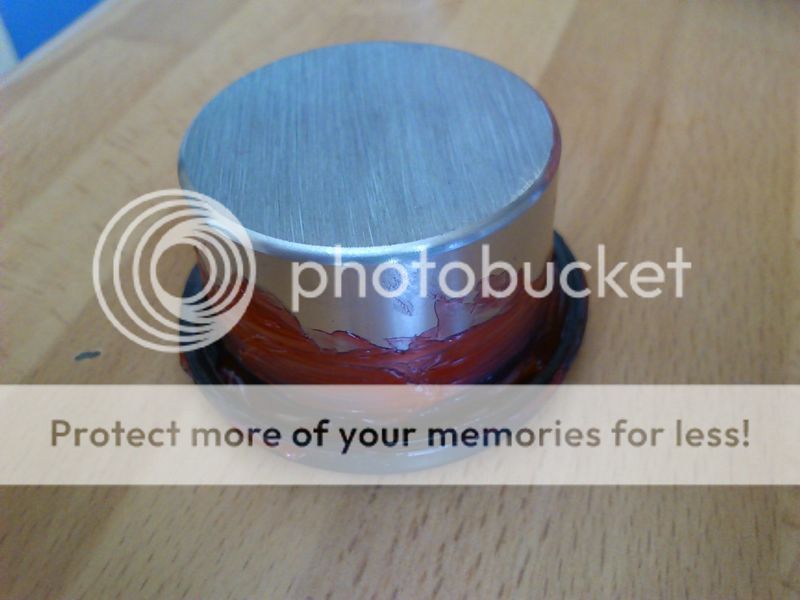
pre heat oven to 75c and leave in for 5-10 mins, best part is that they are heated evenly unlike using a heater or gun

Thread Starter
Scooby Regular
iTrader: (2)
Joined: Mar 2014
Posts: 753
Likes: 0
From: Mancunian in Edinburgh
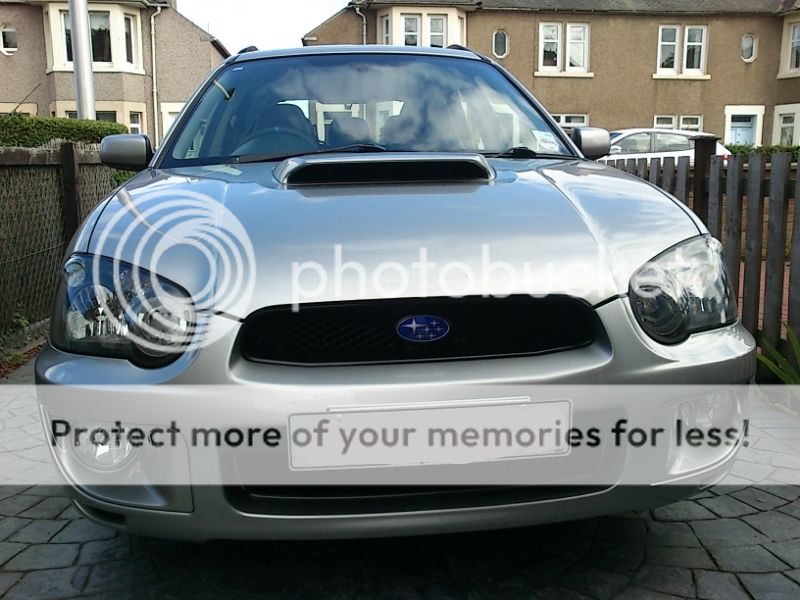
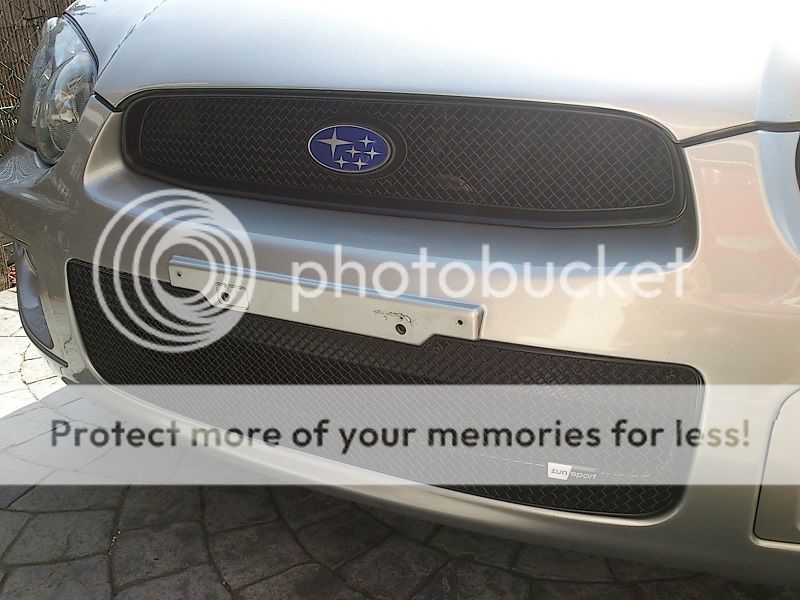
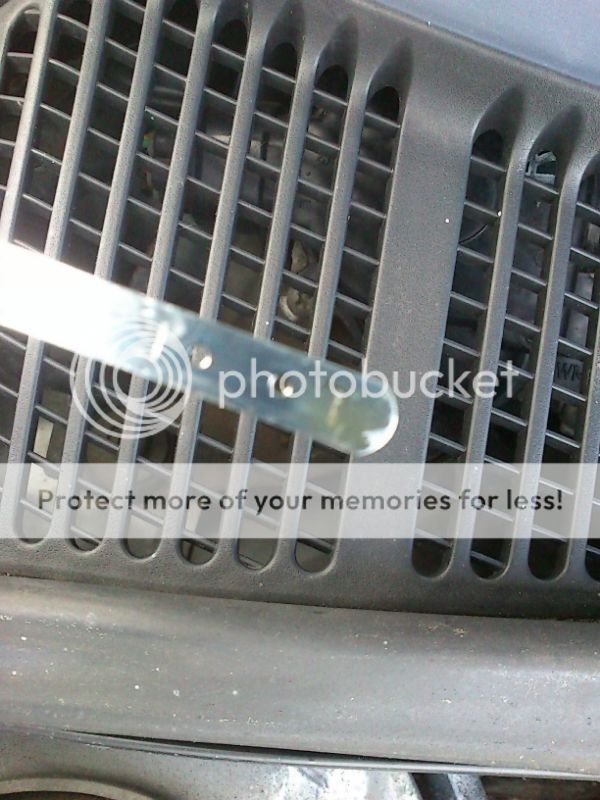
Zunsport grilles arrived at the weekend thanks to Ved's discount thread:
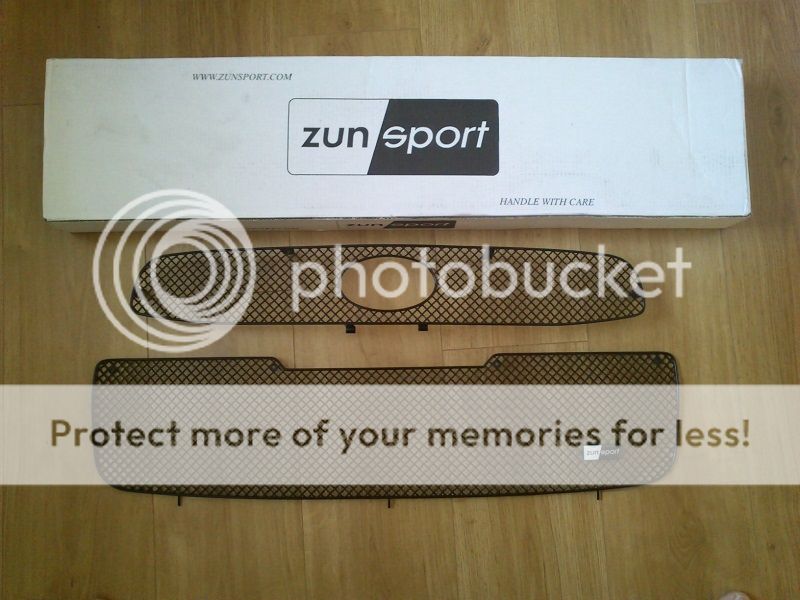
Finishes off the black-out theme for the front nicely
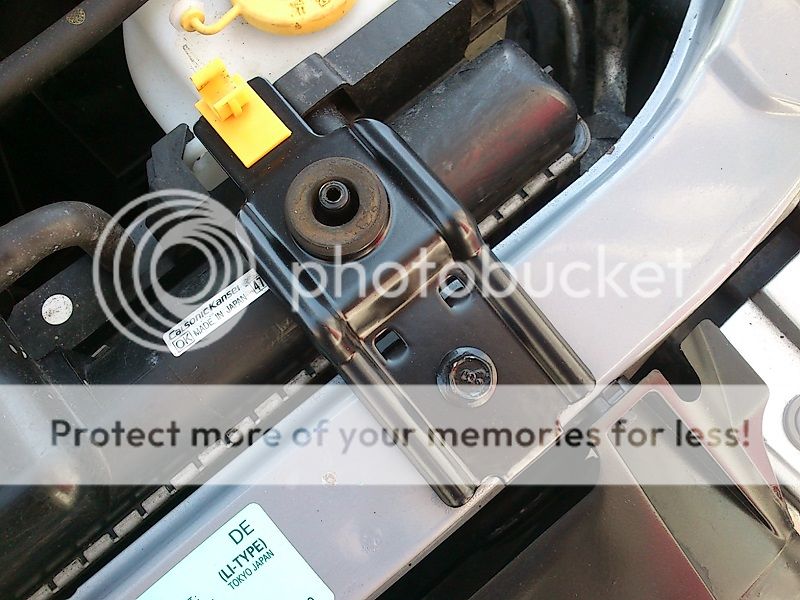
Rad brackets and battery clamp fresh from the powder coaters
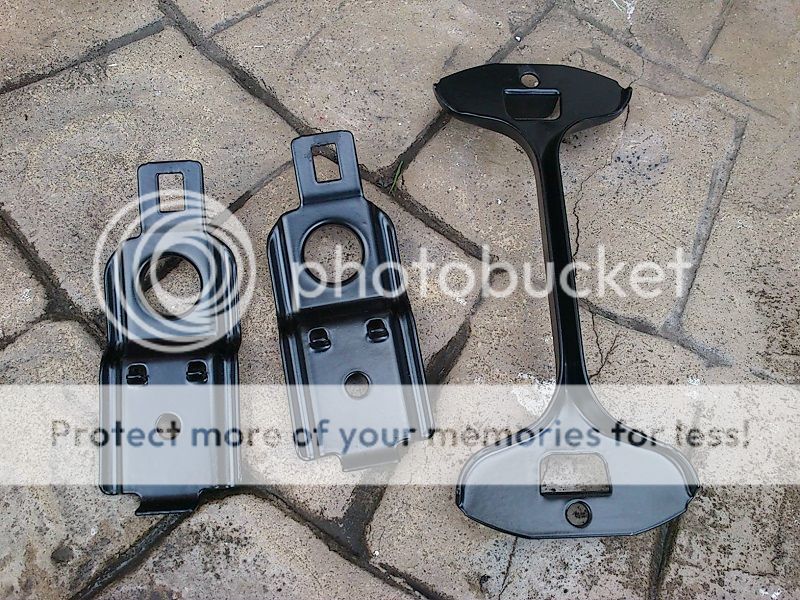
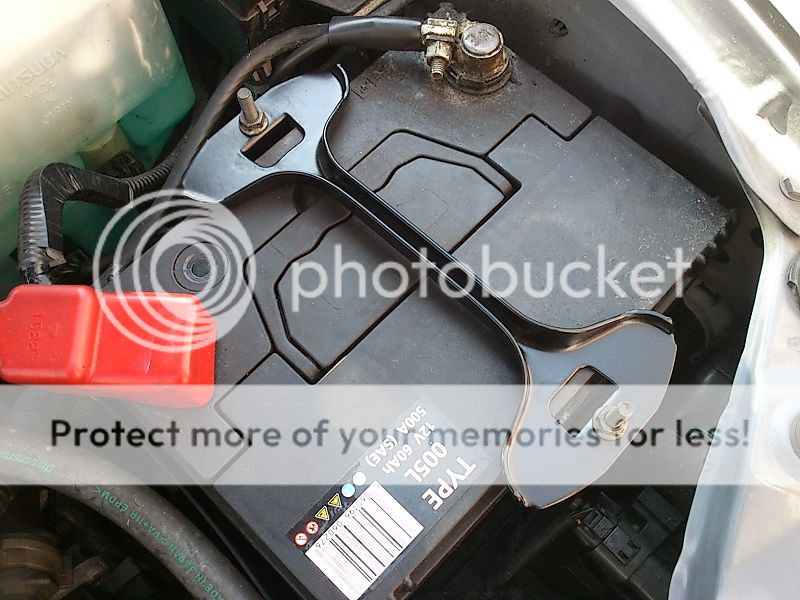
Rust is slowly becoming a thing of the past under the bonnet (tatty looking header tank is still to do at some point)
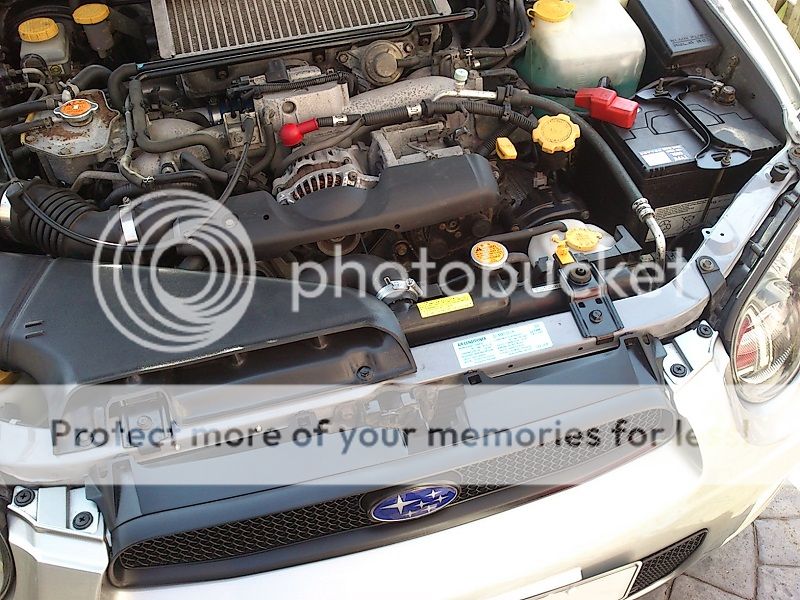
Also checked the gearbox oil level just to check that the dealer who I bought the car from had done his job, needed a little topping-up
easiest gearbox top-up I've ever done! Dipstick tube is where the fresh oil goes...

Finishes off the black-out theme for the front nicely
Rad brackets and battery clamp fresh from the powder coaters
Rust is slowly becoming a thing of the past under the bonnet (tatty looking header tank is still to do at some point)
Also checked the gearbox oil level just to check that the dealer who I bought the car from had done his job, needed a little topping-up
easiest gearbox top-up I've ever done! Dipstick tube is where the fresh oil goes...
Last edited by modrich; Jul 15, 2014 at 09:29 PM.

Scooby Regular
Joined: Apr 2014
Posts: 128
Likes: 0
From: West Midlands
Is that some sort of pump that comes with the triple QX or something else? Looks like a soap pumper!
Really like how this is coming together, and is giving me some inspiration for my own wagon My engine bay needs a serious clean up.
How does the rear ARB feel? Another upgrade I'm planning
Really like how this is coming together, and is giving me some inspiration for my own wagon
My engine bay needs a serious clean up.How does the rear ARB feel? Another upgrade I'm planning
Thread Starter
Scooby Regular
iTrader: (2)
Joined: Mar 2014
Posts: 753
Likes: 0
From: Mancunian in Edinburgh
Thanks mate, yeah it's a little hand pump specifically for topping up transmission fluids, used it loads on previous cars as most fill plugs are on the side of the gear box and you can't just pour the fluid in.
The rear ARB hasn't made a massive difference but you can definitely feel the rear gripping a little more and improving turn-in. Worth it for what it cost!
The rear ARB hasn't made a massive difference but you can definitely feel the rear gripping a little more and improving turn-in. Worth it for what it cost!
Thread Starter
Scooby Regular
iTrader: (2)
Joined: Mar 2014
Posts: 753
Likes: 0
From: Mancunian in Edinburgh
Went for 20mm as that's what the GB270 wagon has and didn't want to go too aggressive without uprating the front. I'm happy with how it drives so I think I'll stick with this set-up. Going to replace the front drop links when I do the brakes, probably just use 'heavy duty' items as apposed to 'uprated ones'.

Scooby Regular
Joined: Apr 2003
Posts: 3,985
Likes: 0
From: North East Riviera
This is coming along nicely mate.. I'm currently debating whether to keep hold of my current car or sell it and have something with a wee bit less money tied up in it as a toy.
I loved my Classic Wagons but since they're almost impossible to find in low mileage, rust free condition, I'd been thinking about Newage STi instead and had discounted Newage WRX wagons.. but seeing this thread has possibly thrown a WRX shaped spanner in the works if I decide to return to the fold.
Cheers,
Grant
Thread Starter
Scooby Regular
iTrader: (2)
Joined: Mar 2014
Posts: 753
Likes: 0
From: Mancunian in Edinburgh
Thanks Grant! The Impreza is a tough car to choose as there's so many versions. I decided rather than going for the most powerful/hardcore/expensive (as I normally do) I'd try something that was maybe under powered, softer (and more practical!) and see if it floated by boat, and so far I'm loving the Wagon.
Also, each car I own I learn a new set of skills, this time round being brake calliper rebuilds! More on which later...
Also, each car I own I learn a new set of skills, this time round being brake calliper rebuilds! More on which later...
Thread Starter
Scooby Regular
iTrader: (2)
Joined: Mar 2014
Posts: 753
Likes: 0
From: Mancunian in Edinburgh
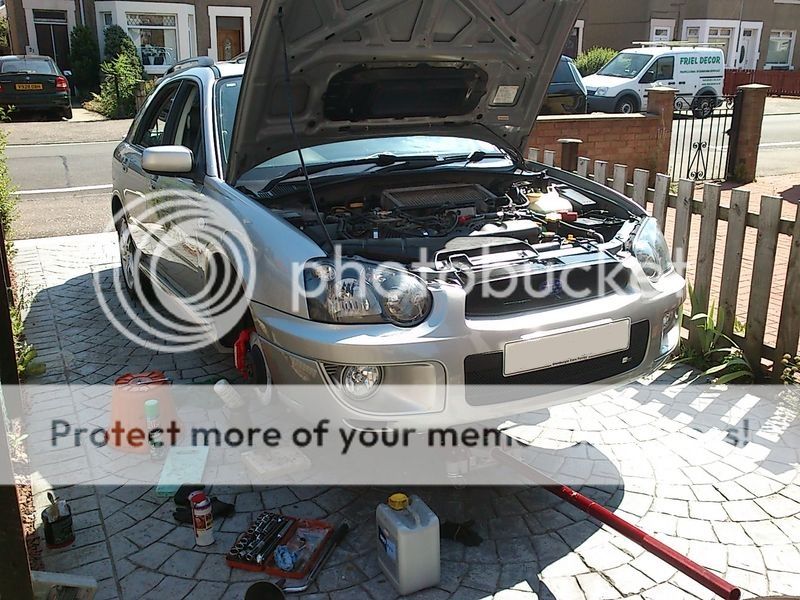
Next job was to get the brakes sorted.
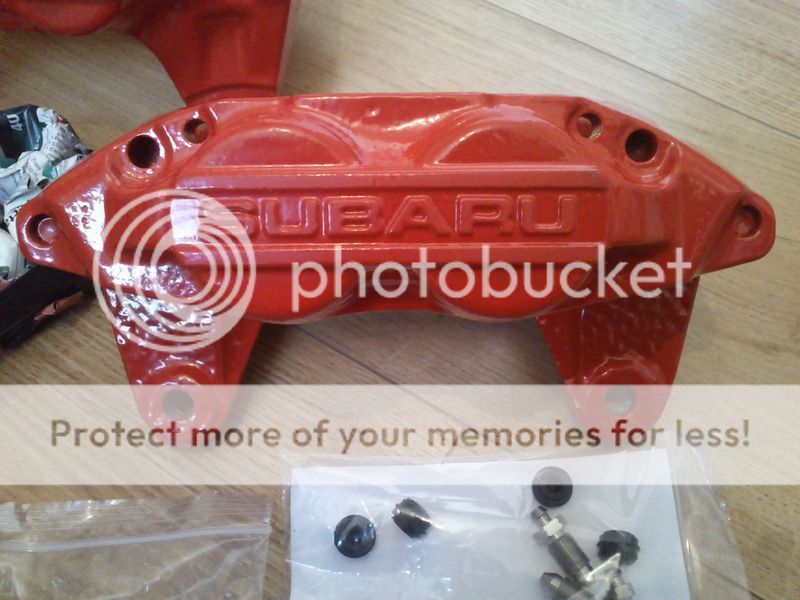
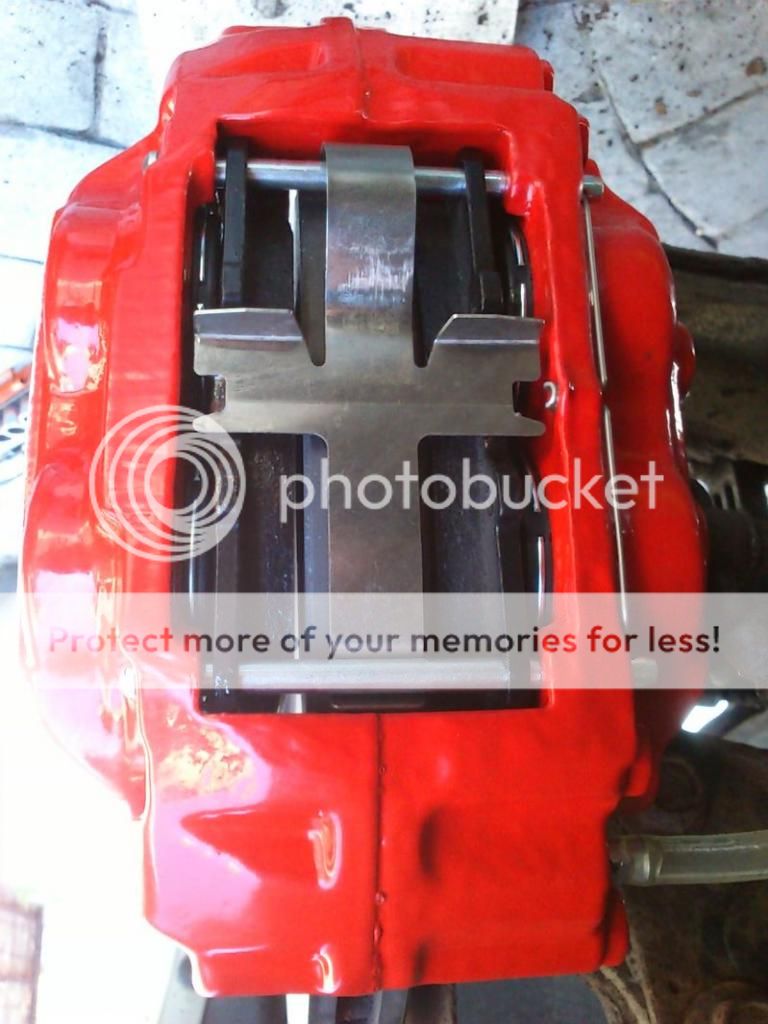
Got hold of some original Subaru 4 pot calipers in good nick, stripped them down and had them powder coated RAL3020 Traffic Red. Ordered stainless pistons/seals/front and rear kevlar pads from Godspeed, and new stainless bleed nipples and pad fitting kit from Brakes International.
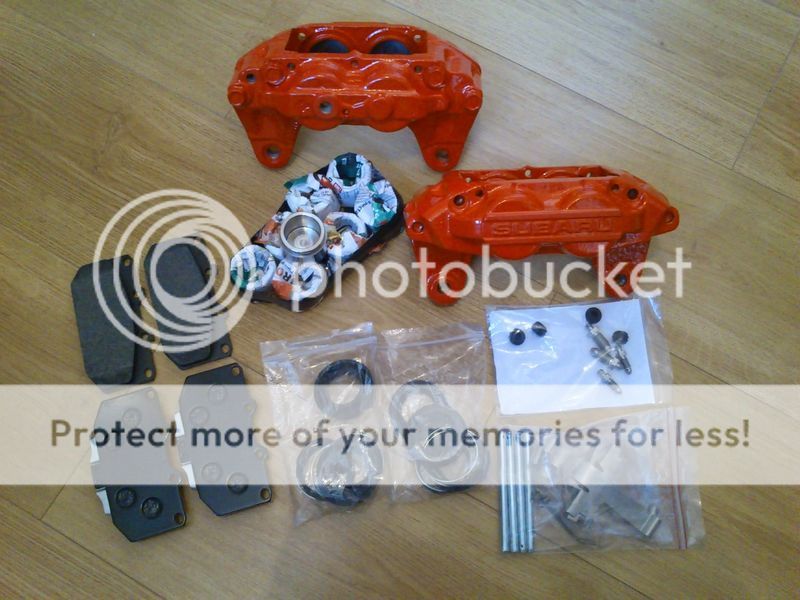
Very impressed with the quality of Pentland Powder Coatings work...
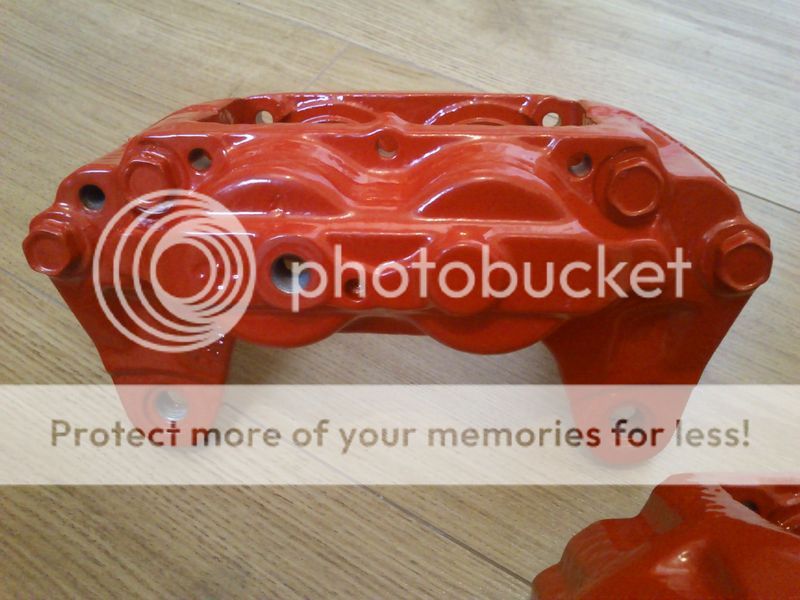
They even treated the cast iron casting with corrosion inhibitor before painting so piston bores should be rust free and along with stainless pistons I should never have siezed pistons again!
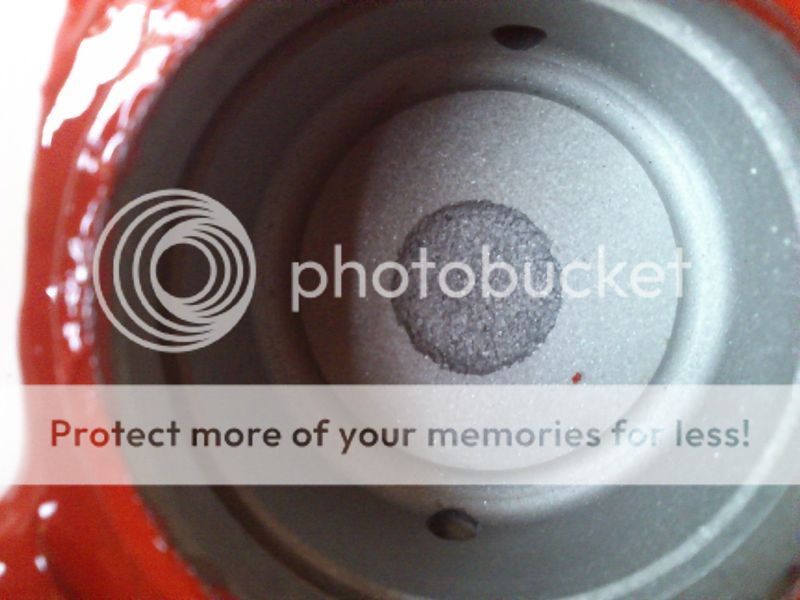
New seals fitted...
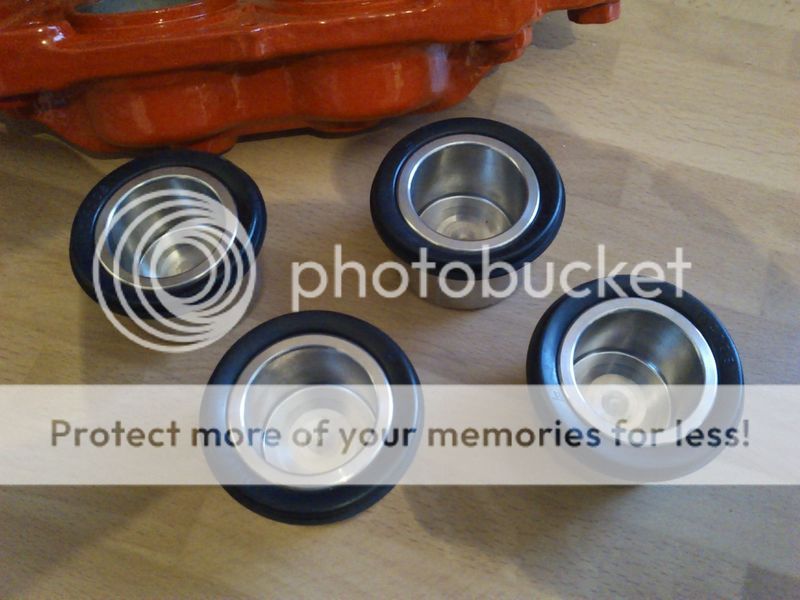
Red rubber grease applied to pistons...
...and bore and seals...
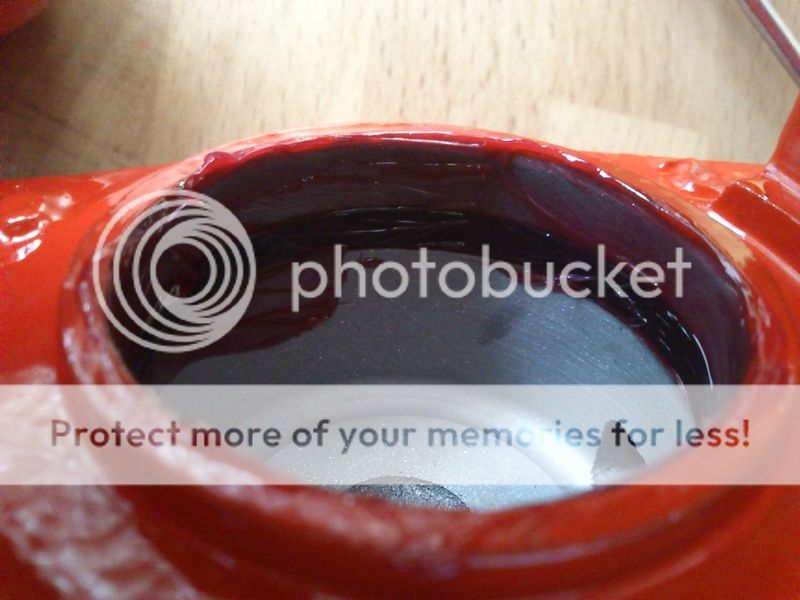
...to help the pistons slide home
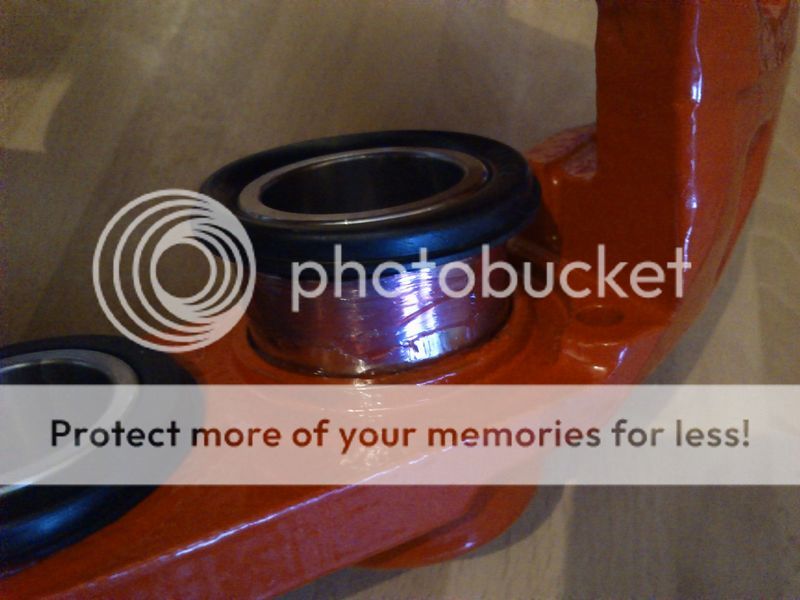
Completed! I also hand painted the letting as I was advised the stickers don't really work with raised lettering...
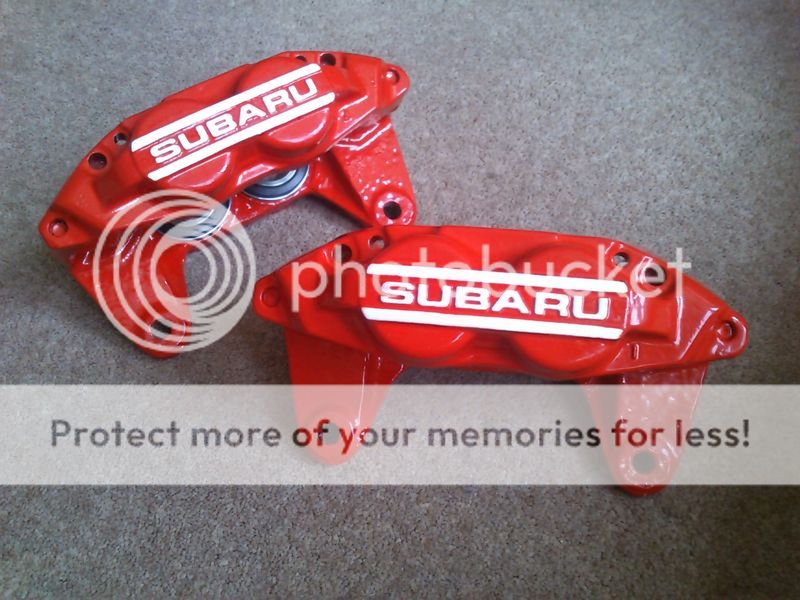
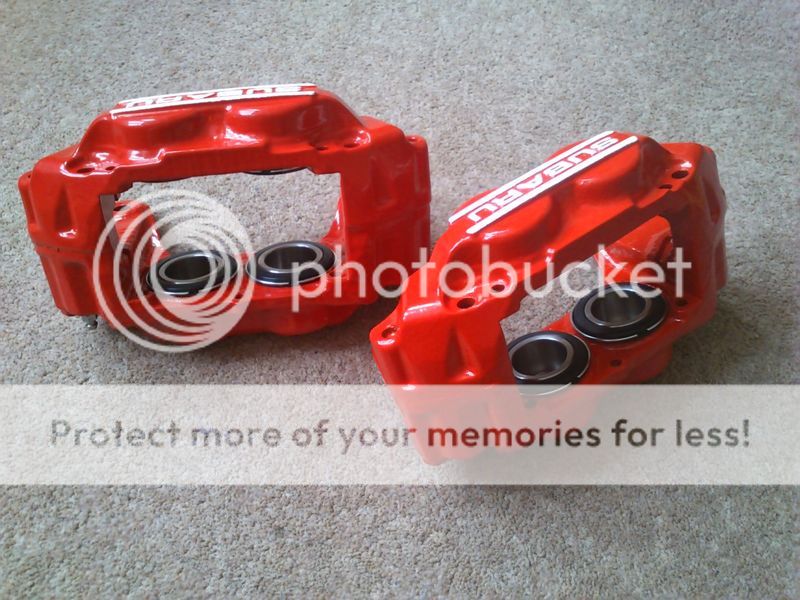
Oh and the new stainless bleed nipples fitted.
Getting these fitted over the weekend.
BTW one of my future jobs will be fitting Prodrive blue lowering springs, I've been in touch with an ex Prodrive engineer who can get these made up, see my post here for details: https://www.scoobynet.com/suspension...l#post11479810
Got hold of some original Subaru 4 pot calipers in good nick, stripped them down and had them powder coated RAL3020 Traffic Red. Ordered stainless pistons/seals/front and rear kevlar pads from Godspeed, and new stainless bleed nipples and pad fitting kit from Brakes International.
Very impressed with the quality of Pentland Powder Coatings work...
They even treated the cast iron casting with corrosion inhibitor before painting so piston bores should be rust free and along with stainless pistons I should never have siezed pistons again!
New seals fitted...
Red rubber grease applied to pistons...
...and bore and seals...
...to help the pistons slide home
Completed! I also hand painted the letting as I was advised the stickers don't really work with raised lettering...
Oh and the new stainless bleed nipples fitted.
Getting these fitted over the weekend.
BTW one of my future jobs will be fitting Prodrive blue lowering springs, I've been in touch with an ex Prodrive engineer who can get these made up, see my post here for details: https://www.scoobynet.com/suspension...l#post11479810

Thread Starter
Scooby Regular
iTrader: (2)
Joined: Mar 2014
Posts: 753
Likes: 0
From: Mancunian in Edinburgh
Thread Starter
Scooby Regular
iTrader: (2)
Joined: Mar 2014
Posts: 753
Likes: 0
From: Mancunian in Edinburgh
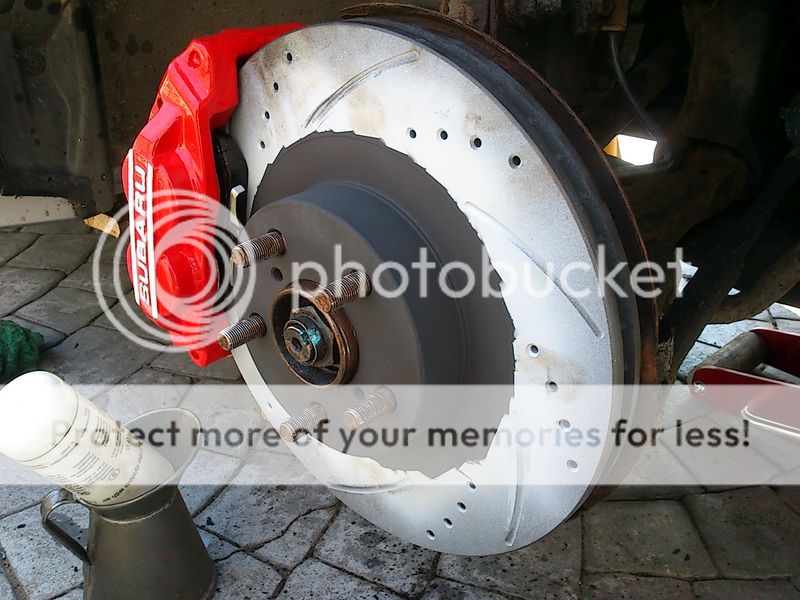
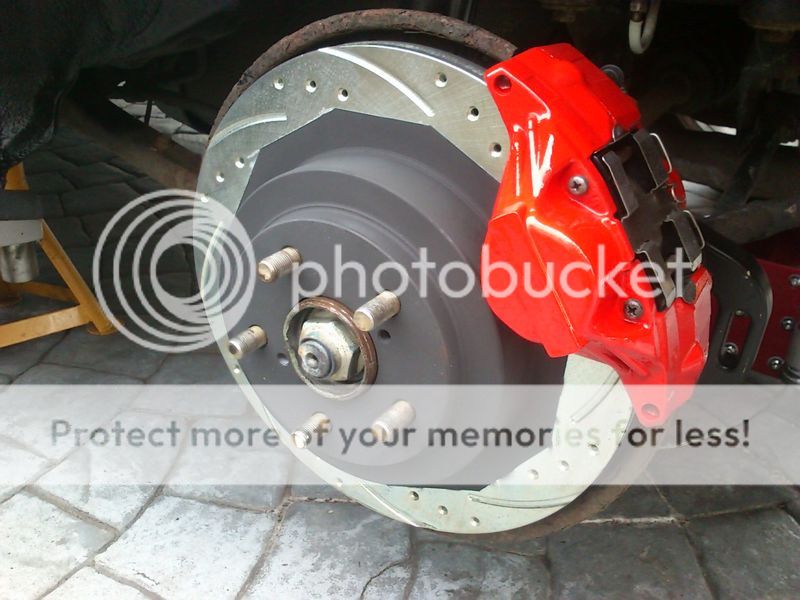
So on with fitting the brakes.
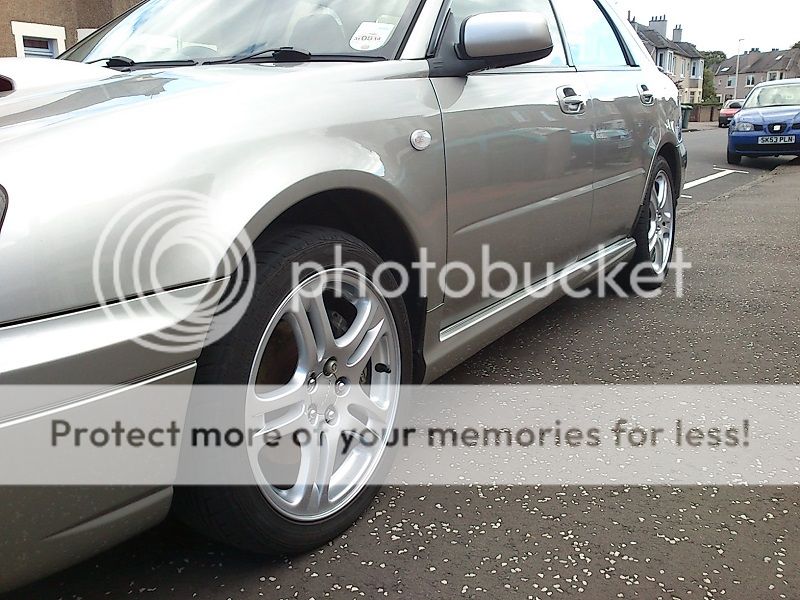
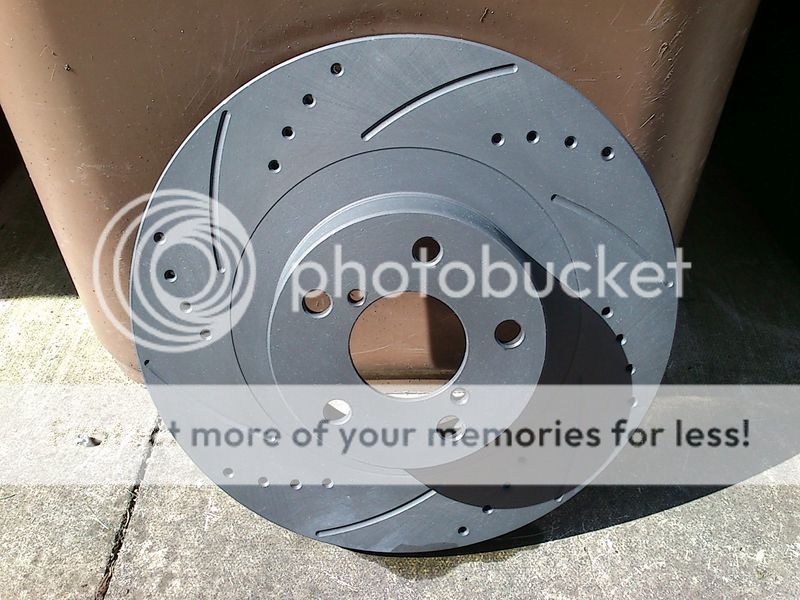
Fronts are brembo drilled/grooved/heated treated discs so have a matt grey finish instead of bright metal. I wanted to make sure that I wasn't going to end up with rusty disc bells so de-greased the discs (in the bath!) etch primed and finished with high temp black paint.
Did the fronts first...
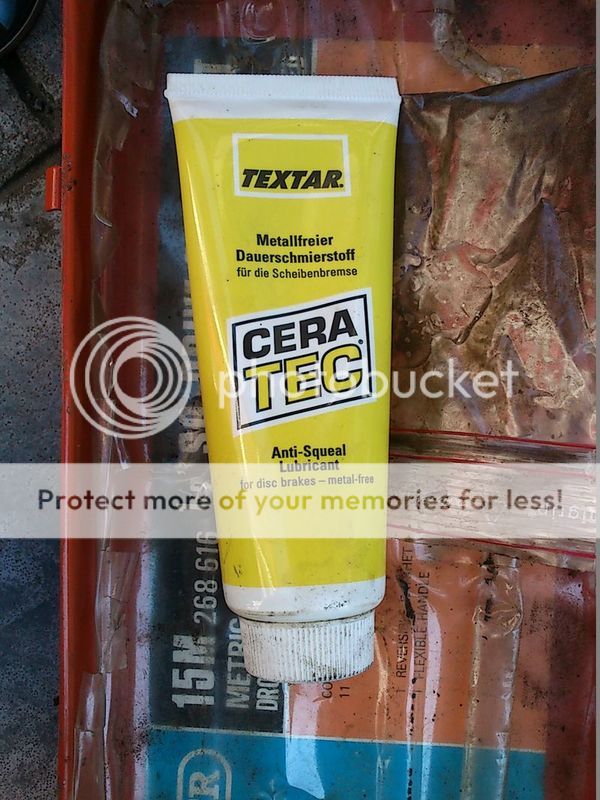
I used CeraTec anti-squeal lubricant instead of copper slip on the back of the pads.
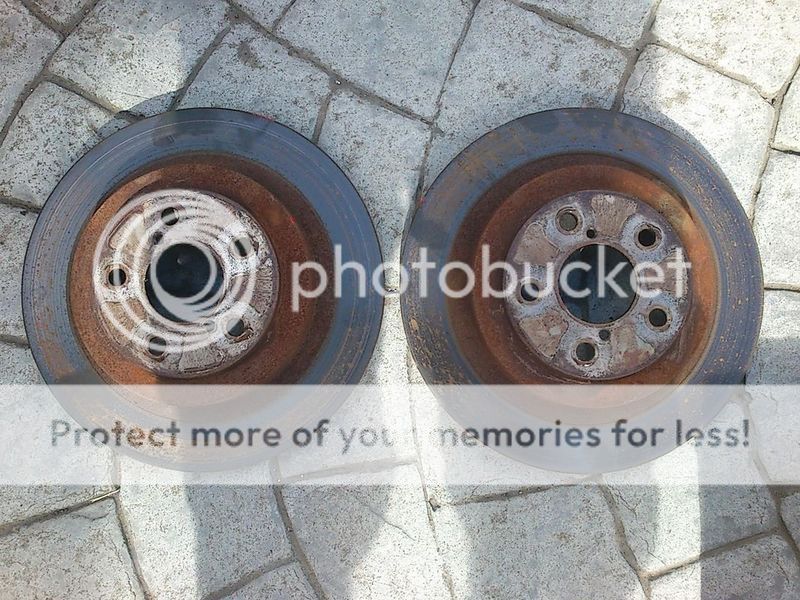
old brakes...
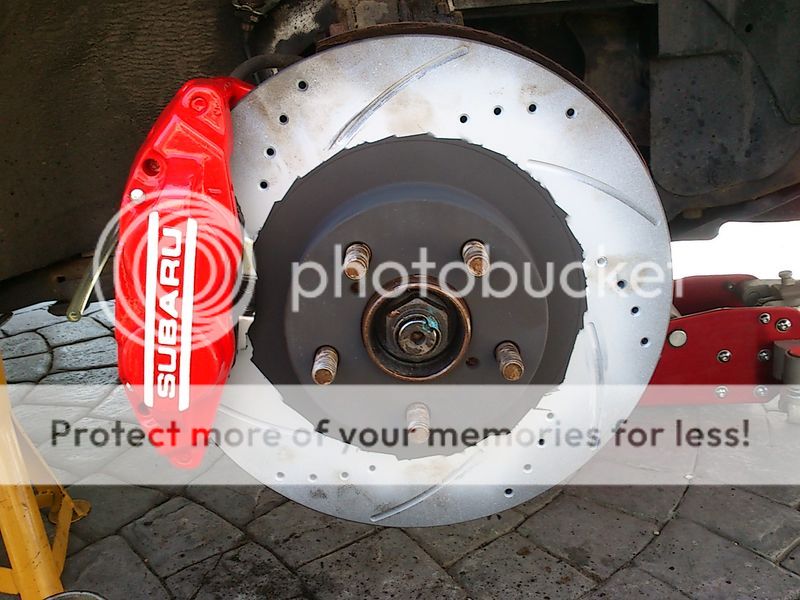
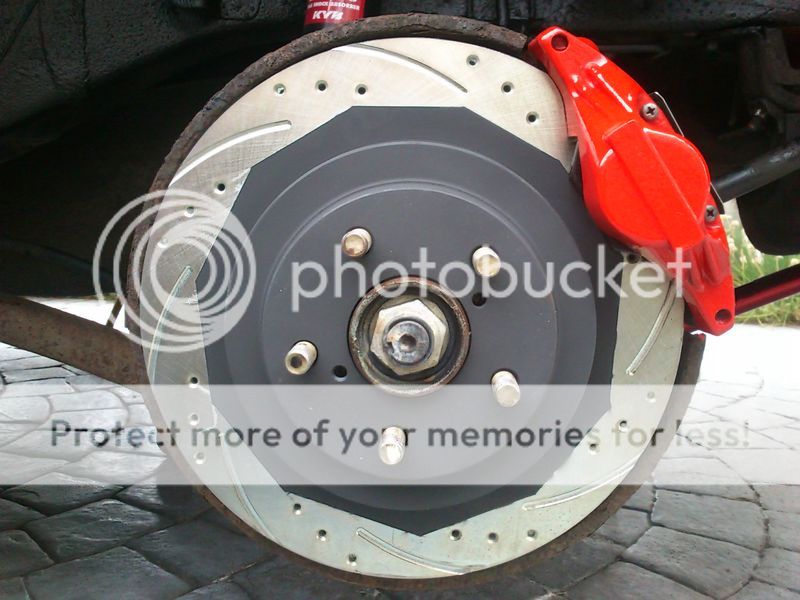
New discs/pads/calipers fitted...
New pad fitting kit...
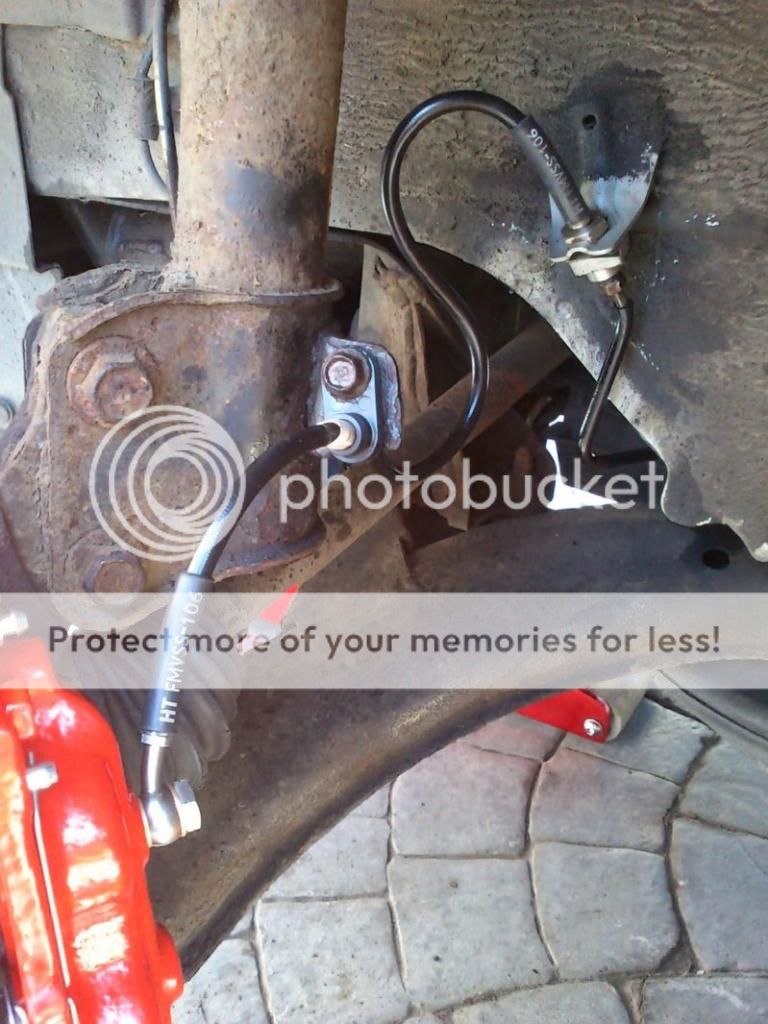
Hose Technik braided hoses...
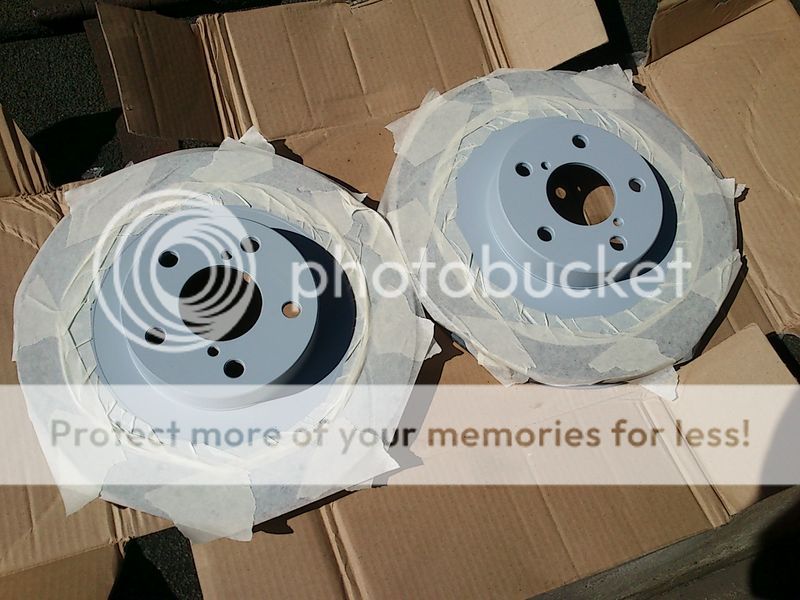
Did the same with the rear discs, etch primed the centres then a few coats of hi-temp black paint

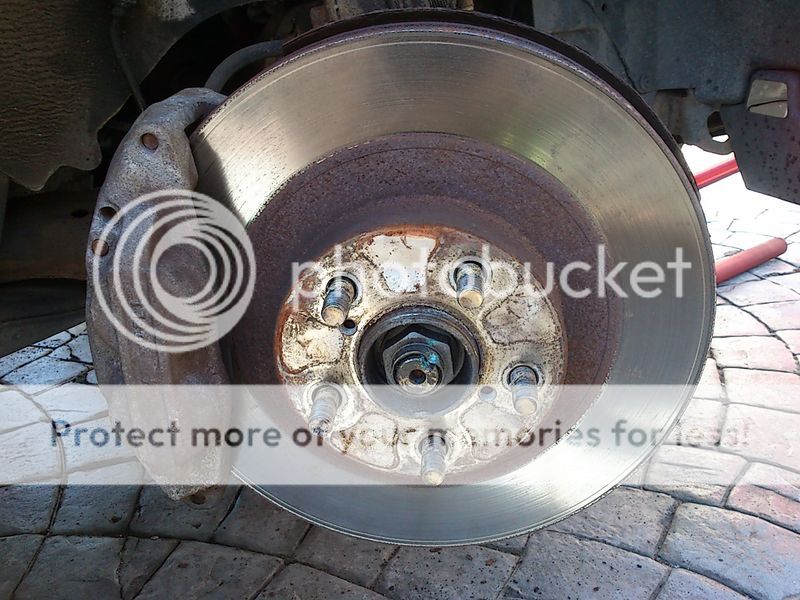
Old discs pretty ugly but hardly worn...
Gave the handbrake mechanism a clean and spray with copper grease...
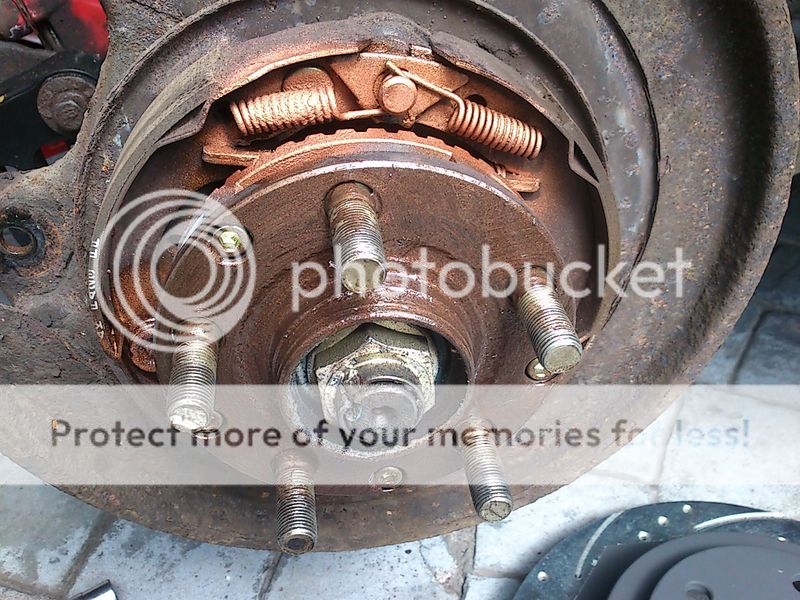
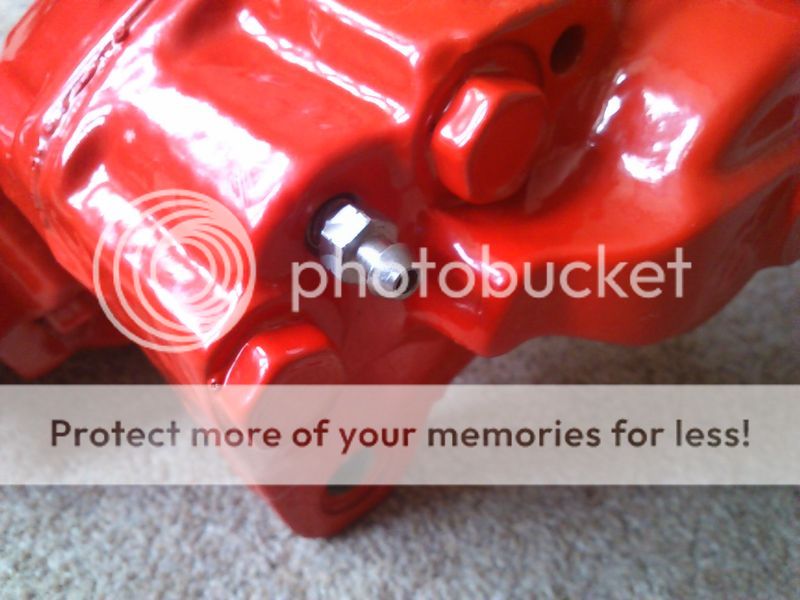
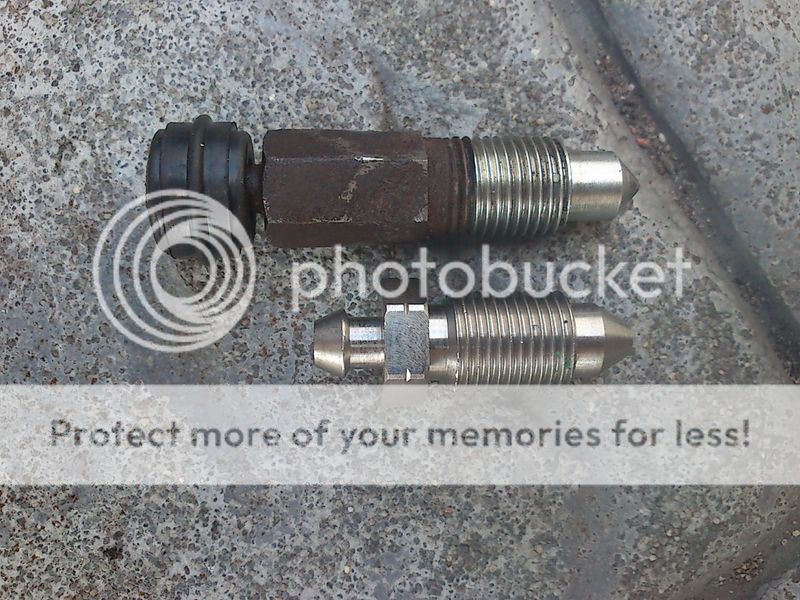
I screwed in the new stainless steel bleed nipple for the caliper and realised that the nut wasn't long enough to give proper access with a spanner
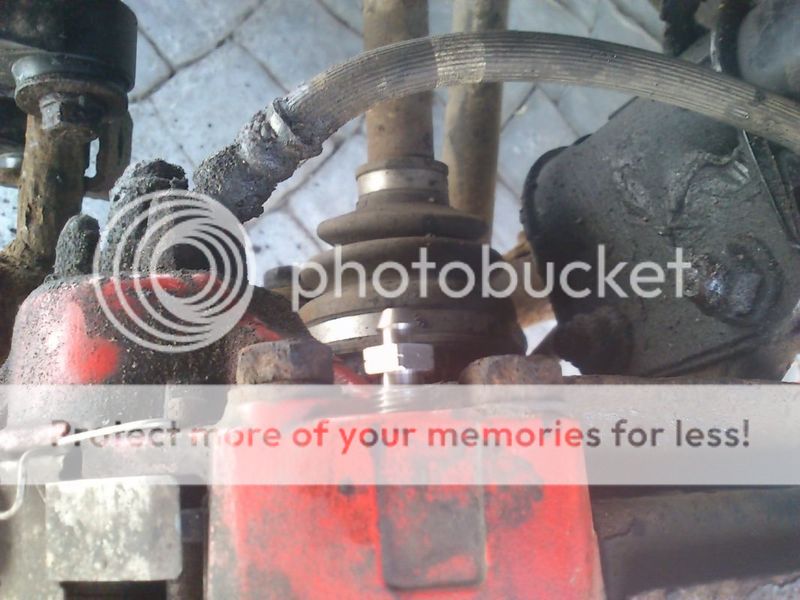
So decided to clean-up and refit original nipples, note the extended nut section to clear the caliper bolts
Discs fitted and calipers cleaned and painted with matching hi-temp paint to the fronts. Also have fresh caliper stickers ready to fit once the paint is dry.
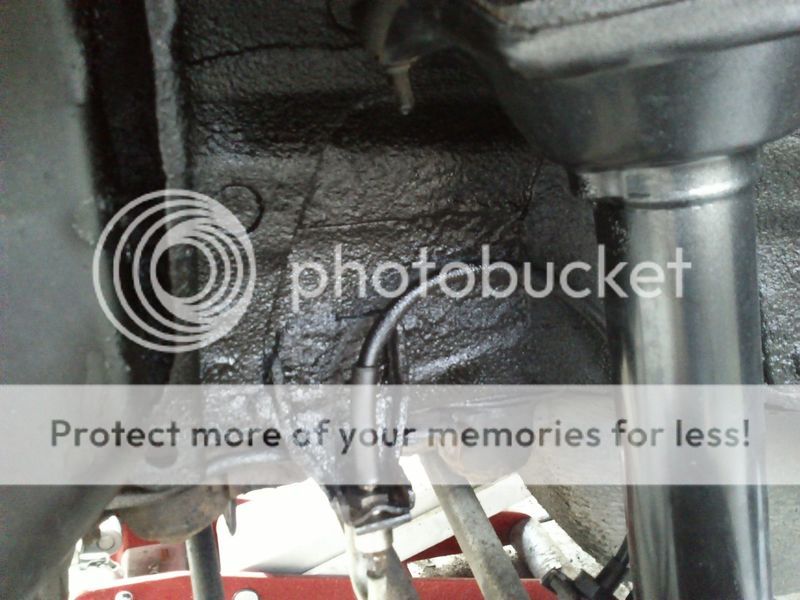
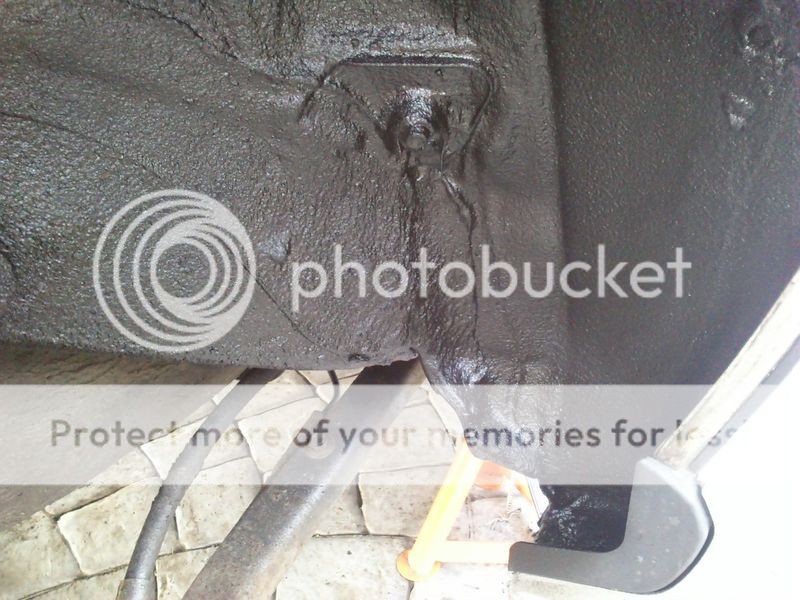
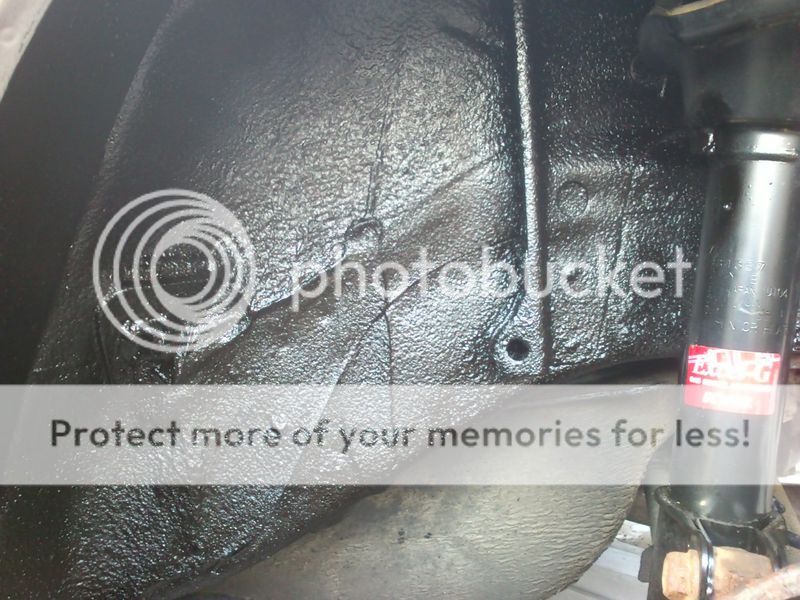
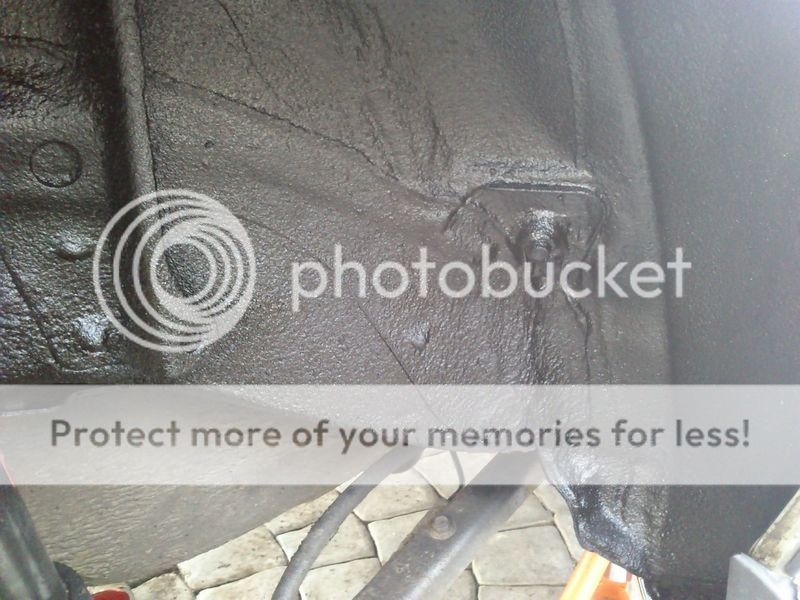
At the same time as degreasing and cleaning the rear calipers I took the opportunity to thoroughly jet out the wheel arches and sort-out the flaking underbody sealant which seems a common problem on Imprezas.
New Holts underbody sealant sprayed on, looks so much tidier under there now...
Then spent the rest of the day bleeding the brake lines with all four wheels off the ground. Took quite a while to get all the air out and I still think they need more bleeding as the pedal still feels a bit too soft for my liking. Pedal feel has improved after bedding in the brakes but still not happy with the pedal feel. Hopefully a few days of driving around will have dislodged any air pockets and make bleeding next time around a bit easier.
Fronts are brembo drilled/grooved/heated treated discs so have a matt grey finish instead of bright metal. I wanted to make sure that I wasn't going to end up with rusty disc bells so de-greased the discs (in the bath!) etch primed and finished with high temp black paint.
Did the fronts first...
I used CeraTec anti-squeal lubricant instead of copper slip on the back of the pads.
old brakes...
New discs/pads/calipers fitted...
New pad fitting kit...
Hose Technik braided hoses...
Did the same with the rear discs, etch primed the centres then a few coats of hi-temp black paint
Old discs pretty ugly but hardly worn...
Gave the handbrake mechanism a clean and spray with copper grease...
I screwed in the new stainless steel bleed nipple for the caliper and realised that the nut wasn't long enough to give proper access with a spanner
So decided to clean-up and refit original nipples, note the extended nut section to clear the caliper bolts
Discs fitted and calipers cleaned and painted with matching hi-temp paint to the fronts. Also have fresh caliper stickers ready to fit once the paint is dry.
At the same time as degreasing and cleaning the rear calipers I took the opportunity to thoroughly jet out the wheel arches and sort-out the flaking underbody sealant which seems a common problem on Imprezas.
New Holts underbody sealant sprayed on, looks so much tidier under there now...
Then spent the rest of the day bleeding the brake lines with all four wheels off the ground. Took quite a while to get all the air out and I still think they need more bleeding as the pedal still feels a bit too soft for my liking. Pedal feel has improved after bedding in the brakes but still not happy with the pedal feel. Hopefully a few days of driving around will have dislodged any air pockets and make bleeding next time around a bit easier.
Thread Starter
Scooby Regular
iTrader: (2)
Joined: Mar 2014
Posts: 753
Likes: 0
From: Mancunian in Edinburgh

Yes, and my geo is out at the front as I'm getting tyre wear on both inner and outer edges of the front tyres. Hopefully get all this sorted when I fit the Prodrive/PCA Dynamics lowering springs. Peter at PCA Dynamics (ex Prodrive engineer who designed most of the Prodrive kit for Scoobies) told me that Prodrive lowering springs fix the outer wear problem as this is caused by the geometry altering so much when the WRX corners. The inner wear is caused by the toe being out. I normally get the geo set-up fairly soon after getting a new car but have been holding off for the springs.
See my group buy thread here on these springs: https://www.scoobynet.com/suspension...l#post11479810
These springs come with specific Prodrive geo settings.
Thread Starter
Scooby Regular
iTrader: (2)
Joined: Mar 2014
Posts: 753
Likes: 0
From: Mancunian in Edinburgh
Whoever moved my other thread to the group by section has locked me out coz I'm not an SN member...thanks for that!
https://www.scoobynet.com/suspension...l#post11479810
Any chance of moving it back
https://www.scoobynet.com/suspension...l#post11479810
Any chance of moving it back
Thread Starter
Scooby Regular
iTrader: (2)
Joined: Mar 2014
Posts: 753
Likes: 0
From: Mancunian in Edinburgh
Yeah good advice, if only the person that sold them to me had thought of that! I'm sure Godspeed have some sort of rig set-up with compressed air or something to do the same.


Thread Starter
Scooby Regular
iTrader: (2)
Joined: Mar 2014
Posts: 753
Likes: 0
From: Mancunian in Edinburgh
My wagon has near perfect paint bar some stone chips. I've just ordered a clay cloth to use before I use a sealer to make sure it stays that way! It's interior, engine bay and mechanicals I'm concentrating on. The steering wheel cost �105+�10 return delivery which is an amazing price considering the skills involved. I asked Jack to thicken the steering wheel up (not sure how he does it because it's not just foam padding) and re-covering with perforated leather to your design. You can choose any colour or combination of up to 3 colours for the stitching (I had a steering wheel done on my old M3 with the 'M' tri-colours, looked amazing). If you're not local to Oxford then I recommend getting a spare steering wheel (I still have mine) if he can't supply one as it takes about 2 weeks to complete.
Cheers

�105 plus post? That's a bargain. I'll be getting that done I reckon.
Mine needs a lot of work, picked it up cheap, so I'm not too bothered and new what it needed. Bodywork is battered, needs a visit from a dent fix man, as only one mark on hatck has damaged the paint. The back bumper needs painting, it had damaged wheels, bent suspension faded headlights, all sorts. Only the engine is good, only 86k miles with full history.
I'm going for saloon STI front wings and bumper so I can fit alloy front wishbones, bigger turbo, decat, FMIC and maybe scoopless bonnet, as I picked one up cheap.
Thread Starter
Scooby Regular
iTrader: (2)
Joined: Mar 2014
Posts: 753
Likes: 0
From: Mancunian in Edinburgh
Sounds like you've got your work cutout mate. STi front wings look cool on a wagon, pity the rears can't be done to match, can wide track extensions be made to fit?
I can highly recommend getting the steering wheel done BTW, probably the best mod you can do for �100!
I can highly recommend getting the steering wheel done BTW, probably the best mod you can do for �100!
Last edited by modrich; Aug 17, 2014 at 09:10 PM.