
storm kit project


Thread Starter
Scooby Regular
Joined: Oct 2005
Posts: 157
Likes: 0
Well I know the storm kit is not very 'liked' by this comunity. i remember it being called a gastly kit and stuff like like that on this same foram.
I respect the fact that some people think its chavy, but i'm not sticking it on any one elses car other than mine, and i hapen to think its very nice.
I bought the kit off ebay last october, just after i bought my car, and only today I started the process of fitting it.
After unpacking i noticed that the top grill had not been cut out, i think this is because if it had been cut out the top bit of the grill would have broken in transit.
also i noticed that there wernt enough wire mesh and the wire mesh that was provided seemed quite cheap ali ones, so i don't think i'll be using these.
i removed my origanal front bumper and offered up the new one and straight away i knew that i would have to make metal brakets to make it fit.
also i noticed that my car has been in an accident as the radiator is a bit bowed and the left hand side brake cooler ducting is missing. The brake cooler ducting i will fabricate from metal. I also noticed that the indicator units will not fit in the provided holes in the storm kit.
I think working a few hours a day it will probabily take me to the end of june before this kit is ready to paint.
I will post some pics later on this week.

Originally Posted by riosingh
Well I know the storm kit is not very 'liked' by this comunity. i remember it being called a gastly kit and stuff like like that on this same foram.
I respect the fact that some people think its chavy, but i'm not sticking it on any one elses car other than mine, and i hapen to think its very nice.
I bought the kit off ebay last october, just after i bought my car, and only today I started the process of fitting it.
After unpacking i noticed that the top grill had not been cut out, i think this is because if it had been cut out the top bit of the grill would have broken in transit.
also i noticed that there wernt enough wire mesh and the wire mesh that was provided seemed quite cheap ali ones, so i don't think i'll be using these.
i removed my origanal front bumper and offered up the new one and straight away i knew that i would have to make metal brakets to make it fit.
also i noticed that my car has been in an accident as the radiator is a bit bowed and the left hand side brake cooler ducting is missing. The brake cooler ducting i will fabricate from metal. I also noticed that the indicator units will not fit in the provided holes in the storm kit.
I think working a few hours a day it will probabily take me to the end of june before this kit is ready to paint.
I will post some pics later on this week.
I respect the fact that some people think its chavy, but i'm not sticking it on any one elses car other than mine, and i hapen to think its very nice.
I bought the kit off ebay last october, just after i bought my car, and only today I started the process of fitting it.
After unpacking i noticed that the top grill had not been cut out, i think this is because if it had been cut out the top bit of the grill would have broken in transit.
also i noticed that there wernt enough wire mesh and the wire mesh that was provided seemed quite cheap ali ones, so i don't think i'll be using these.
i removed my origanal front bumper and offered up the new one and straight away i knew that i would have to make metal brakets to make it fit.
also i noticed that my car has been in an accident as the radiator is a bit bowed and the left hand side brake cooler ducting is missing. The brake cooler ducting i will fabricate from metal. I also noticed that the indicator units will not fit in the provided holes in the storm kit.
I think working a few hours a day it will probabily take me to the end of june before this kit is ready to paint.
I will post some pics later on this week.
Thread Starter
Scooby Regular
Joined: Oct 2005
Posts: 157
Likes: 0
today the rear bumper was removed and the new one was offered up I think this will be muck easyer than the front one.
side arches also offered up looks like rear right arch goes over the fuel filler .
.
side arches also offered up looks like rear right arch goes over the fuel filler
.


Thread Starter
Scooby Regular
Joined: Oct 2005
Posts: 157
Likes: 0
Originally Posted by ABW
motorbike fuel cap needed 

now the origanal fuel filler will have to be cut out, then a plate welded in its place, and some how the fuel filler pipe will have to be extended to stick out of this thingy.


It's mainly the holes and cut-out's that i don't like of the front and rear bumpers, but the general idea of the kit is very good. Very touring car-like IMHO.
How have you done the rear arches? Have you cut out the old arches etc?
How have you done the rear arches? Have you cut out the old arches etc?
Trending Topics
Thread Starter
Scooby Regular
Joined: Oct 2005
Posts: 157
Likes: 0
Originally Posted by drb5
How have you done the rear arches? Have you cut out the old arches etc?
Thread Starter
Scooby Regular
Joined: Oct 2005
Posts: 157
Likes: 0
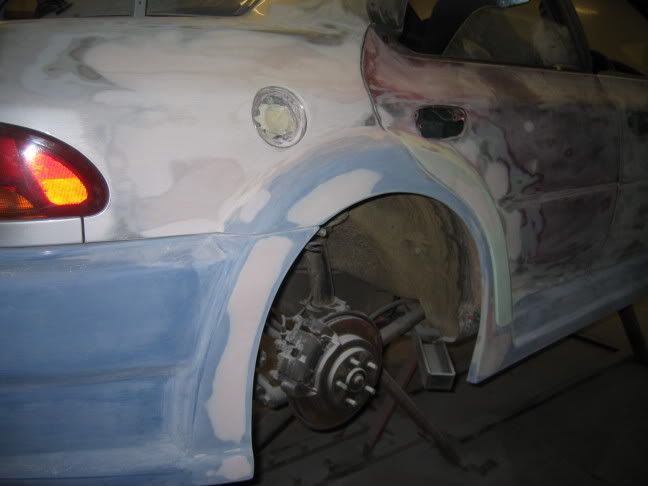
on the rear of the kit the diference between saloons and wagons becomes evedent. theres a gap of two inches between the bottom of the rear arch and the side skirt,(will have to be bodyfillered). and rear door arch overlaps rear door handle.
front and rear bumpers are on, as are left side arches and skirt.
I thank the lord for my cousin Harry, without him this would be such a bodge job. If I had to do this by my self the rear bumper would be on the front and the front on the rear.
Also is there any one out there with experence of sticking storm kits on wagons? Any tips you can give with hinesight wuold realy apreciated.
Originally Posted by riosingh
no the rear arches are bonded on top of the old arches and then blended in with body filler. but i think i will also pop rivit.
Thread Starter
Scooby Regular
Joined: Oct 2005
Posts: 157
Likes: 0
Originally Posted by ABW
I'd cut the rear arches out if i were you so you can space the wheels out . standard offset wheels need at least 35mm at the rear .
We cut out the rear arches to allow the wheel to travel under the new arch . wheel spacers bolt onto your rear hub and then the wheel bolts onto them as I said we used 35mm each side to sit the wheel out to fill the arch .pm me I'll give you details of suppliers . I've got pictures on disc somewhere I'll dig them out and post them up for you.
Originally Posted by riosingh
ok, it know looks like there is nothing i can do to make the rear door archs fit to the door. wagon doors must be really different from saloon.
Thread Starter
Scooby Regular
Joined: Oct 2005
Posts: 157
Likes: 0
seeing i needed 97 indicators i just ordered crystal pack from flat4 and morlights from .org they are fitted and look nice. pre facelift bonnet closes, but doesent look that good. want to buy the sebon one which looks like the Batmobile. need to speak to the wife before i can buy it.(i think its 700 od quid from j.w.)
edit digital camera is buggered turns on and stuff but when i'm pressing the button to take a picture it turns off, put new batries and everything but to no avail. but have taken normal pics got to 30pics 6 more and i can get it developed.
edit digital camera is buggered turns on and stuff but when i'm pressing the button to take a picture it turns off, put new batries and everything but to no avail. but have taken normal pics got to 30pics 6 more and i can get it developed.
Last edited by riosingh; Jun 19, 2006 at 05:48 PM.
Thread Starter
Scooby Regular
Joined: Oct 2005
Posts: 157
Likes: 0
put wheels on I realy do need spacers. looks like i need at least 40mm on rear. rang extremescoobies, the bigest they do is 25mm. does any one know of any one else that might stock them?
Last edited by riosingh; Jun 26, 2006 at 06:04 PM.

BANNED
Joined: Mar 2006
Posts: 78
Likes: 0
From: www.ladsoc.co.uk
40 mm spacers...
Best off getting some different wheels with a better offset, ie; Golf fitment, and then use a smaller spacer if neccesary, or split rims made to the correct offset.
I'm sure Darren at APW will know exactly what the best set-up would be for this kit...
Neil...
Best off getting some different wheels with a better offset, ie; Golf fitment, and then use a smaller spacer if neccesary, or split rims made to the correct offset.
I'm sure Darren at APW will know exactly what the best set-up would be for this kit...
Neil...
Thread Starter
Scooby Regular
Joined: Oct 2005
Posts: 157
Likes: 0
mate i bought some new rims in the last midland wheel group buy. only put them on for the first time today. the wheels are like 2 and a half inches in side the arch.
well was just waiting for a reply from darren.
well was just waiting for a reply from darren.

Thread Starter
Scooby Regular
Joined: Oct 2005
Posts: 157
Likes: 0
well i do have photos but my computer with a scanner keeps asking for a driver every time i put the flash disk in so i could put them all an floppys but thats just a pain in the **** and i cant find the driver for my scanner.
so to get to the point i went to an internet cafe and the kid behind the counter wanted 50p per photo to scan them and put them on MY flas disk. but after some batering he did 25 photos for 2.50 but he did them them two at a time....
so here they are
so to get to the point i went to an internet cafe and the kid behind the counter wanted 50p per photo to scan them and put them on MY flas disk. but after some batering he did 25 photos for 2.50 but he did them them two at a time....
so here they are

Scooby Regular
Joined: Jan 2006
Posts: 860
Likes: 0
From: Birmingham
I have to say that I admire the amountof work your putting into that. I'll be interest to see the finished project.
Reckon you need an Sti top rear spoiler and an Sti 8 bonnet scoop to go with the blown up look of the arches!!
What colour you going for?
Reckon you need an Sti top rear spoiler and an Sti 8 bonnet scoop to go with the blown up look of the arches!!
What colour you going for?


Thread Starter
Scooby Regular
Joined: Oct 2005
Posts: 157
Likes: 0
Originally Posted by Mangel
Reckon you need an Sti top rear spoiler and an Sti 8 bonnet scoop to go with the blown up look of the arches!!
What colour you going for?
What colour you going for?
i will be puting sti top and waist spoilers. but i wish something crayzier was available like an escort cosworth one.
going to stick with the silver, mostly because i'm not creative enough to think of a nice couour. i was going to do electric blue but i know 5 other people with electric blue cars all in my area.(although the're all newage.)
Last edited by riosingh; Jul 12, 2006 at 11:51 AM.
Scooby Regular
Joined: Jan 2006
Posts: 860
Likes: 0
From: Birmingham
Why not go for a sa silver and stick a flip laquer over the top, it will pick up the extra curves alot betta!!!
Sti spoiler top and waist will look just fine, I know you gone full bodykit but it doesn't look OTT which it would with any more spoilerage!!
I take it those are the wheels your keeping on, I went anthracite on mine and it made a mega difference.
Will post pick below
Sti spoiler top and waist will look just fine, I know you gone full bodykit but it doesn't look OTT which it would with any more spoilerage!!
I take it those are the wheels your keeping on, I went anthracite on mine and it made a mega difference.
Will post pick below