
Project 500


I have selling off many part of my car recently. This is to make way for the next stage of developments
My goal is 500bhp and 470lbft.
The engine spec is as follows.
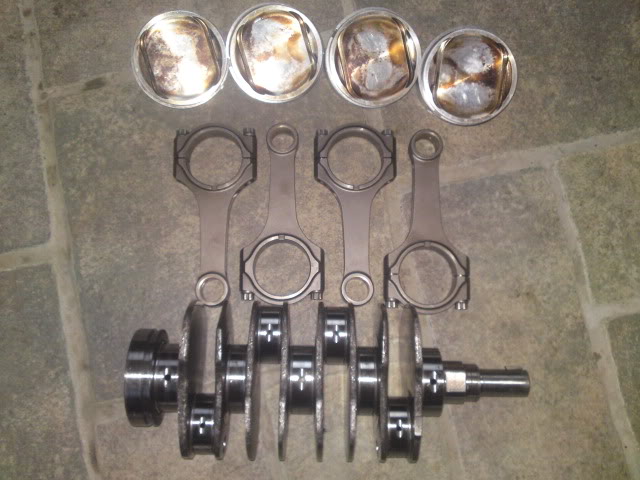
2.0CDB machined to take the later crank
EJ257 crank
Longer Rods
Lateral custom pistons (crank, rods pistons from lateral = Stroker)
ALC bearings
New oil modine
7**cc injectors
headers
lift pump
Bosch 044 fuel pump
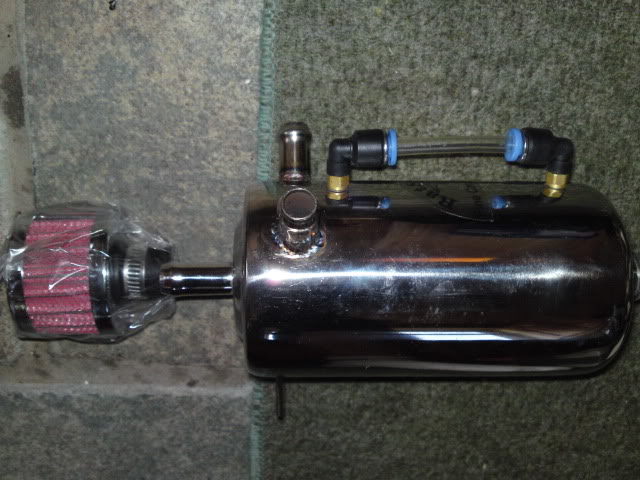
swirl pot
catch can
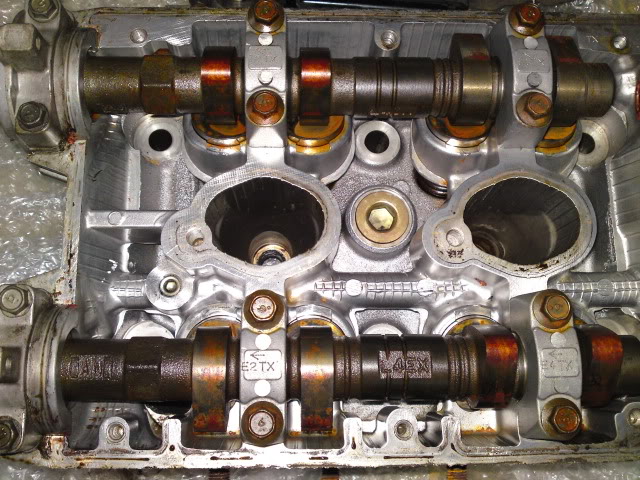
STi3 heads
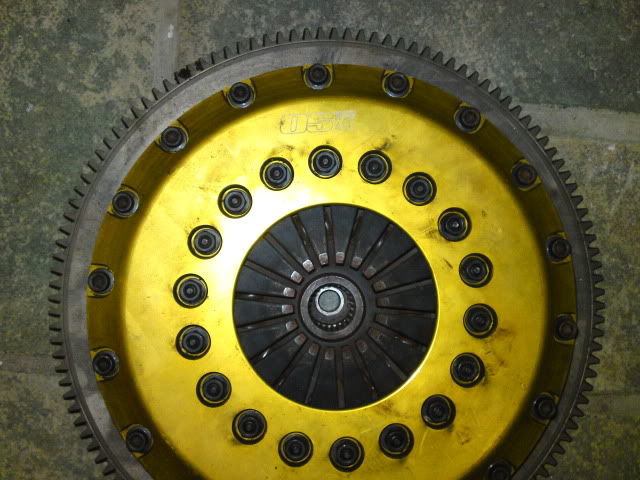
twin plate exedy racing clutch
undicided turbo (MD321V, S206 maybe)
rotated IM
HKS FMIC
Baffled sump
Zero sport thermostat
SX or fuel labs FPR
Parallel fuel rails
Because its going to have much more power than original I want it to look a bit more aggressive too. So, I also plan on doing a wide body conversion to the car, keeping it 4 door. I am not trying to make this a 22b replica but i do love the look of the arches on them.
Due to the cost of the project it is going to take me sometime to complete so please have patience and I will update it as and when required.
My goal is 500bhp and 470lbft.
The engine spec is as follows.
2.0CDB machined to take the later crank
EJ257 crank
Longer Rods
Lateral custom pistons (crank, rods pistons from lateral = Stroker)
ALC bearings
New oil modine
7**cc injectors
headers
lift pump
Bosch 044 fuel pump
swirl pot
catch can
STi3 heads
twin plate exedy racing clutch
undicided turbo (MD321V, S206 maybe)
rotated IM
HKS FMIC
Baffled sump
Zero sport thermostat
SX or fuel labs FPR
Parallel fuel rails
Because its going to have much more power than original I want it to look a bit more aggressive too. So, I also plan on doing a wide body conversion to the car, keeping it 4 door. I am not trying to make this a 22b replica but i do love the look of the arches on them.
Due to the cost of the project it is going to take me sometime to complete so please have patience and I will update it as and when required.
I have declaired my car SORN so I can remove all the parts I no longer need and so i can work on it.
It was my daily driver so I have bought myself a little van.
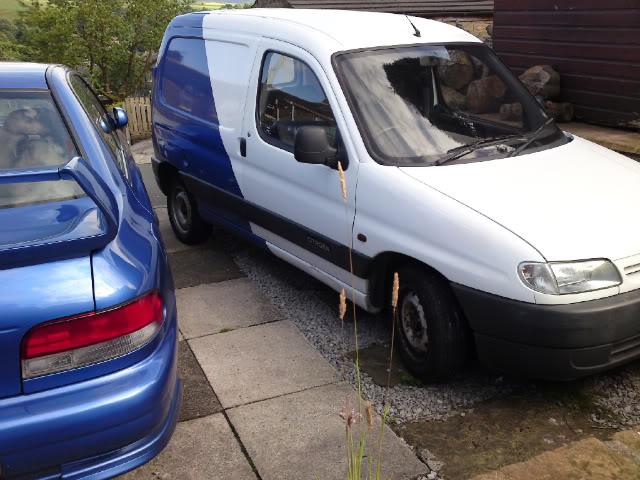
I think Andy must have seen me tearing up the quater in this and changed his paint scheme the very next day! Rapid citreon power.
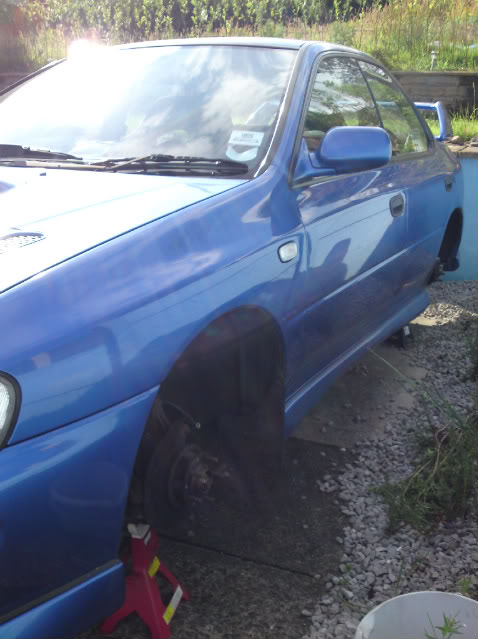
My car is now on axle stands and a little less under the bonnet!
It was my daily driver so I have bought myself a little van.
I think Andy must have seen me tearing up the quater in this and changed his paint scheme the very next day! Rapid citreon power.
My car is now on axle stands and a little less under the bonnet!
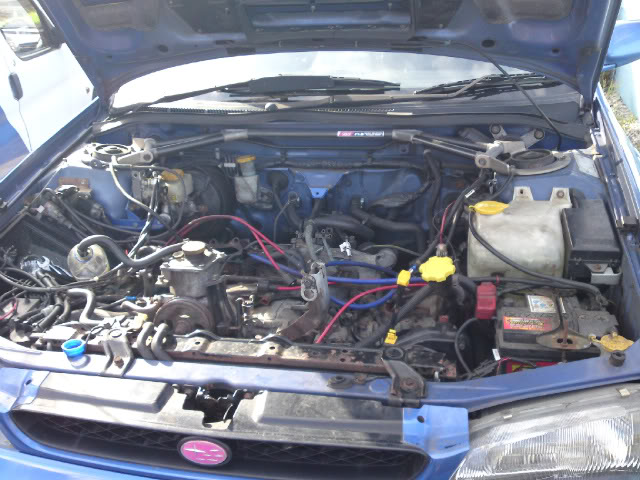
I bought an knackered engine, suspected piston (#4) failure.
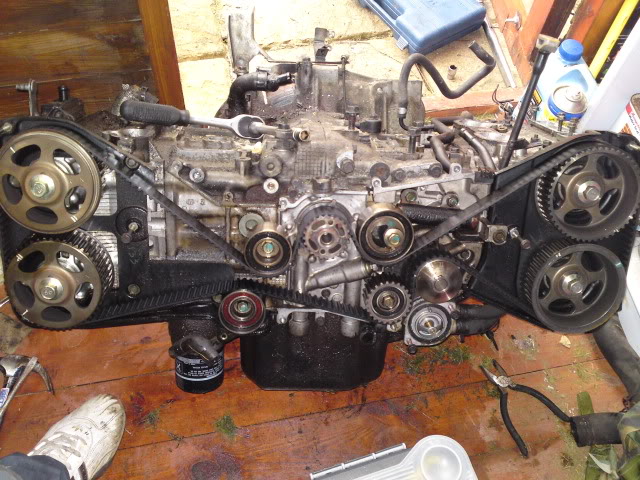
Started stripping the engine
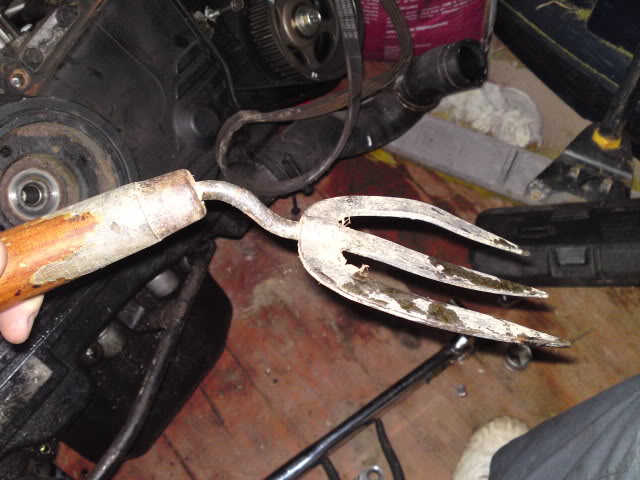
I struggled a little to remove the crank pully. I did look at buying the service tools from subaru - camshaft sprocket wrench but this was �48.53
I improvised a little and managed to get it undun.
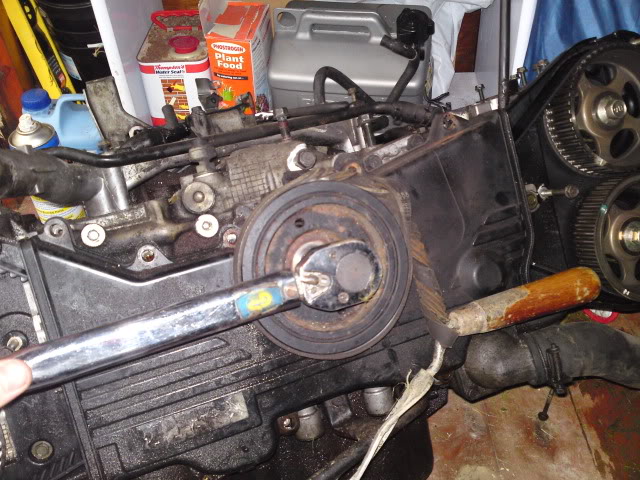
Buggered my fork though :S
Started stripping the engine
I struggled a little to remove the crank pully. I did look at buying the service tools from subaru - camshaft sprocket wrench but this was �48.53
I improvised a little and managed to get it undun.
Buggered my fork though :S
I did realise after that it might be easier to have immobilise the flywheel but this was another challenge in itself! the crankshaft stopper subaru ST costs �68.19!!
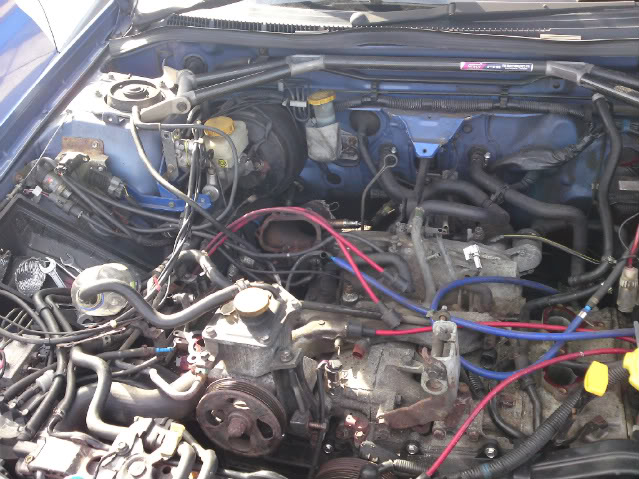
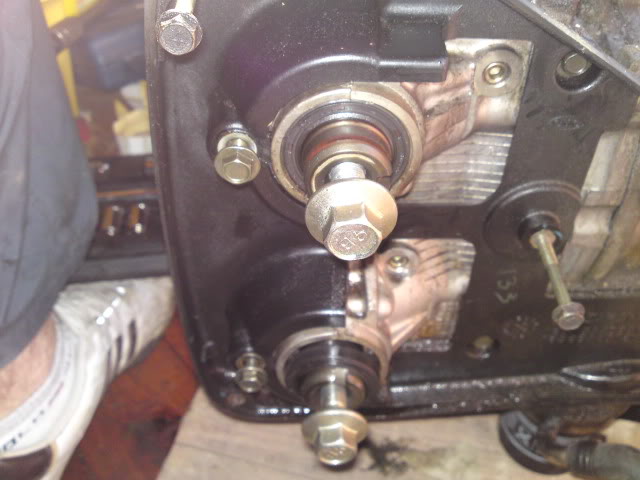
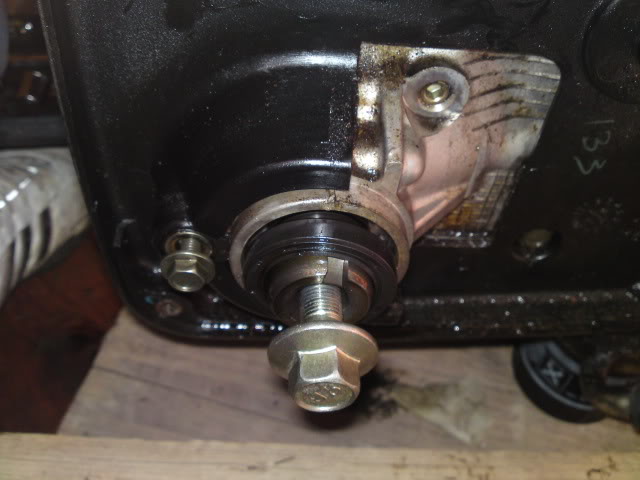
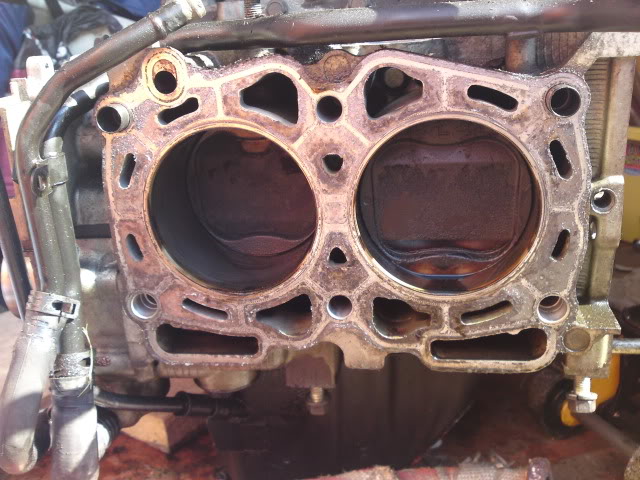
I got to work on removeing the heads,
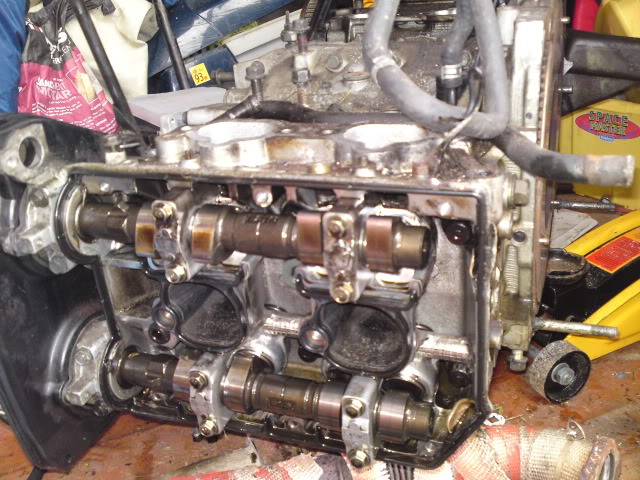
I used the cam belt and mole grips on the cam wheels so I could remove them. I then niticed that one of the cam shaft seals had come away. I don't know what implications this would have had...?
I got to work on removeing the heads,
I used the cam belt and mole grips on the cam wheels so I could remove them. I then niticed that one of the cam shaft seals had come away. I don't know what implications this would have had...?
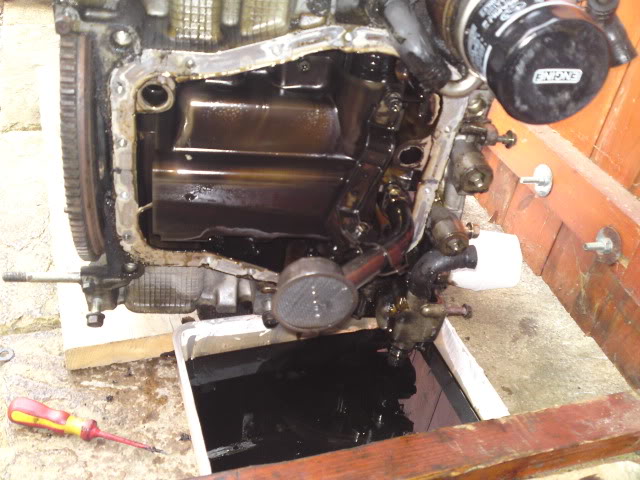
I have never stripped an engine down before so I was good to see. Especially when I removed the sump. I knew about the oil surge issues a subaru can have once setup correct on some track tires but having seen the pickup and inside of a sump first hand I understand that bit more.
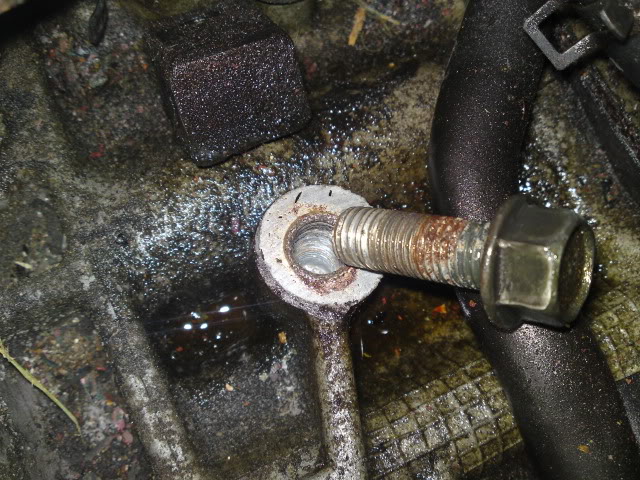
When removing one of the bolts from the top of the block I instantly knew it had been cross threaded. I reckon this is how it left the factory!!
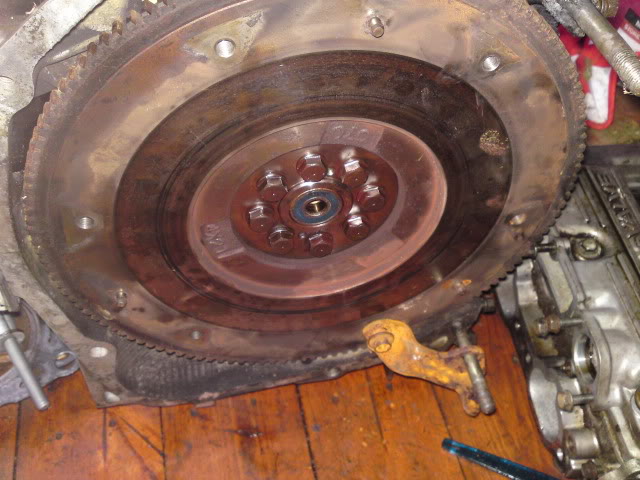
Next it was time to tackle the flywheel. I found that the turbo/up pipe bracket to the bell housing is perfect tool.
When removing one of the bolts from the top of the block I instantly knew it had been cross threaded. I reckon this is how it left the factory!!
Next it was time to tackle the flywheel. I found that the turbo/up pipe bracket to the bell housing is perfect tool.
when I remove the flywheel I found some debris in the bell housing...
I have since been told that the gearbox was hungry ans ingested the inspection cover.
After removing the heads, the pistons look ok. Maybe the rings are shot? Will see when I get them out.

I have since been told that the gearbox was hungry ans ingested the inspection cover.
After removing the heads, the pistons look ok. Maybe the rings are shot? Will see when I get them out.
Trending Topics
I have been buying a few items in anticipation.
Got some STi3 heads. These have the most aggressive cams as stock

Also got a nice looking catch can
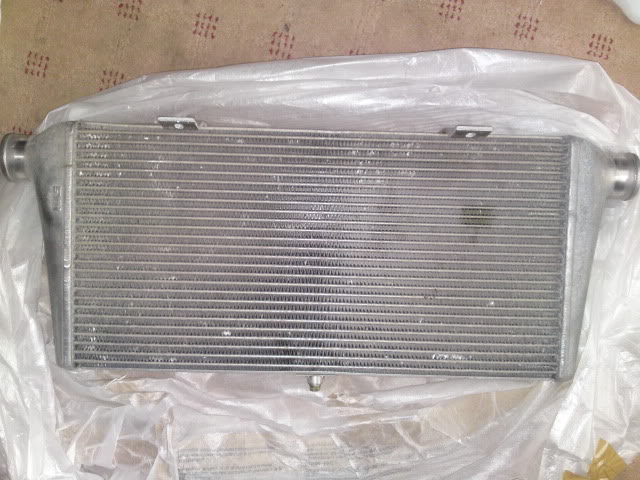
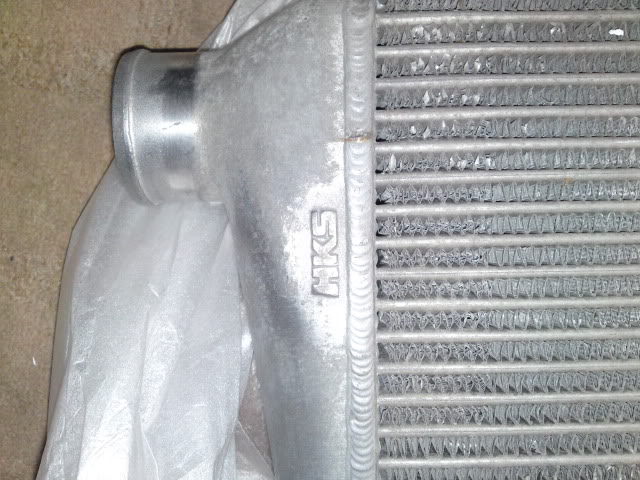
Got a HKS front mount with pipework for a rotated inlet manifold
I did order a full set of brembo's but think the seller was a scammer :@
Got some STi3 heads. These have the most aggressive cams as stock
Also got a nice looking catch can
Got a HKS front mount with pipework for a rotated inlet manifold
I did order a full set of brembo's but think the seller was a scammer :@
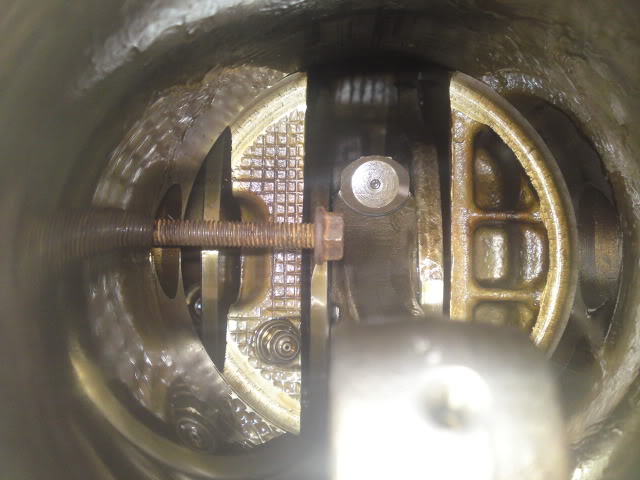
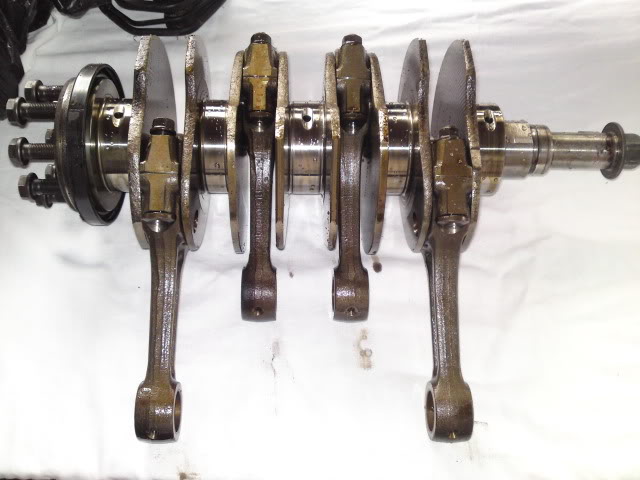
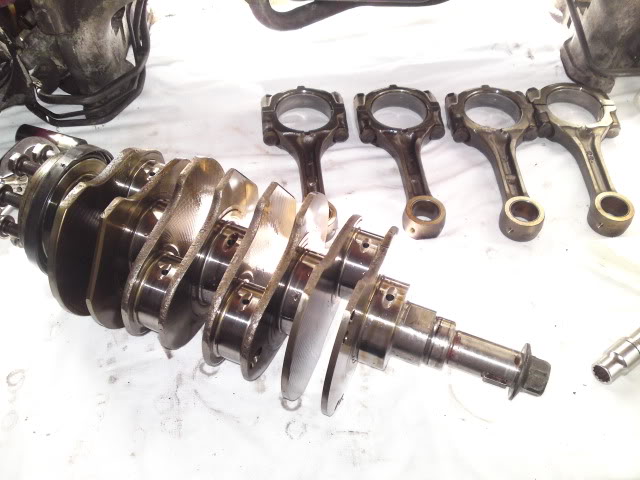
I set about removing the pistons today.
To remove the gudgeon pins I used one of the battery things. I fed it throught the access hole and "pushed" the pin on the other side of the block out.
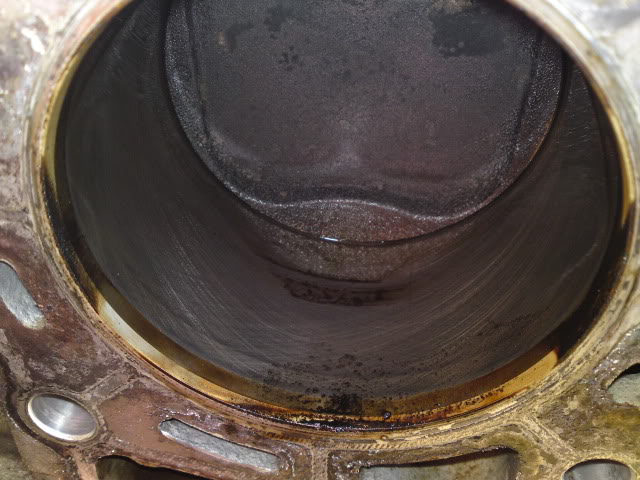
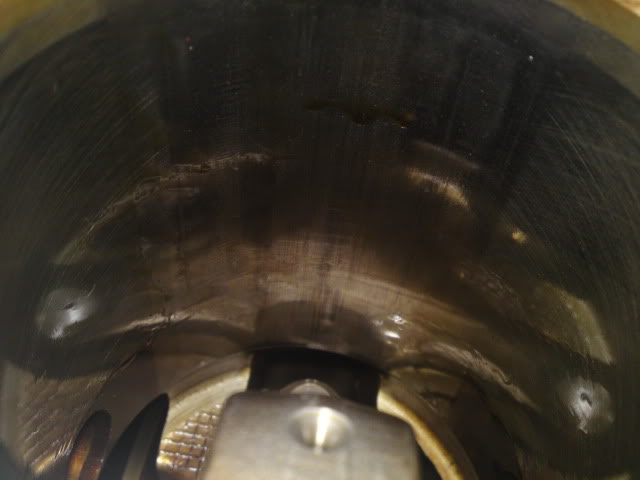
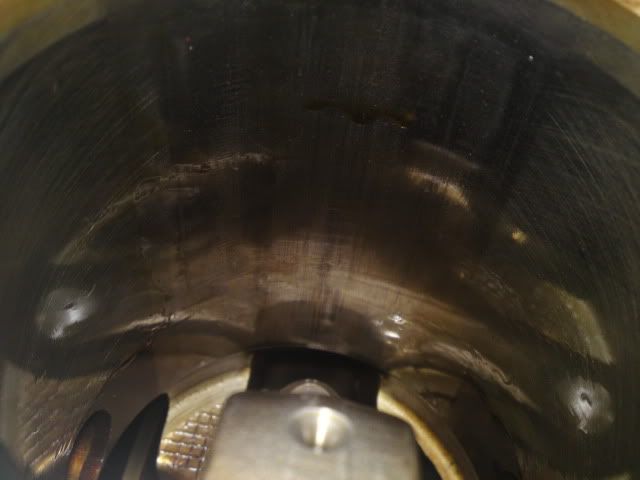
Piston 4 was first. This was the cylinder that I assume was low on compression.
You can see form the pictures why....
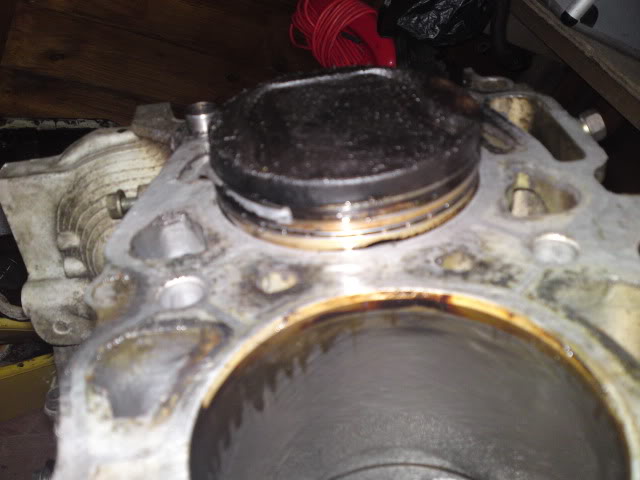
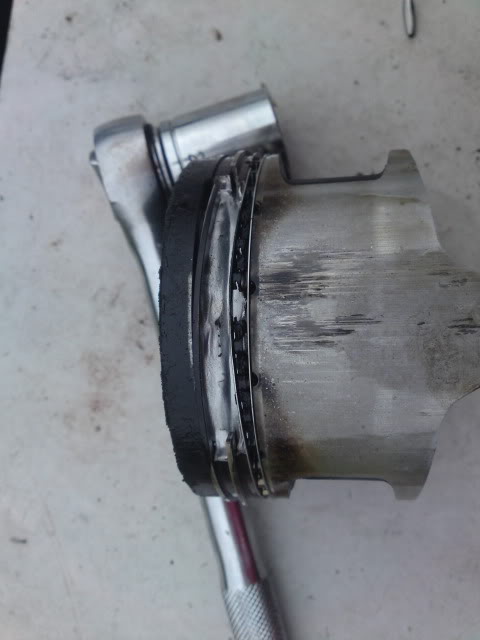
The bore looks like it has had a slight scrape. Hopefully its nothing that cant be sorted.
I then removed the rest of the pistons. Because the engine wasattached to a stand I couldn't use the improved tool to push the pin out. I put the rod through the pin and then stuck the bolt on the end of it. I could then "pull" the gudgeon pin out
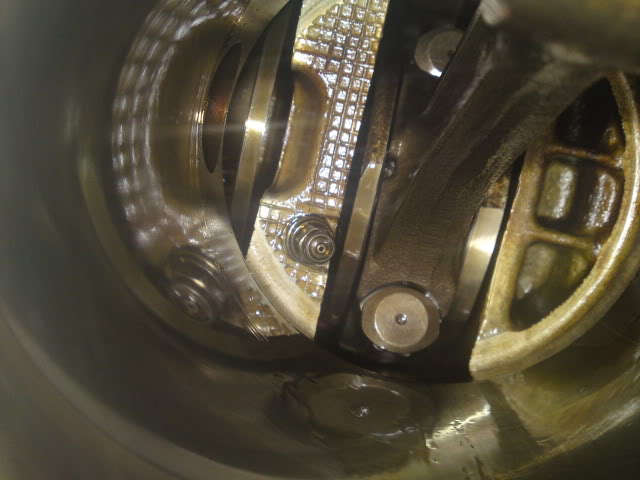
I found out the the block has underpiston oil squirters too. I didn't know these were on EJ20's I thought they were just on the EJ22T
To remove the gudgeon pins I used one of the battery things. I fed it throught the access hole and "pushed" the pin on the other side of the block out.
Piston 4 was first. This was the cylinder that I assume was low on compression.
You can see form the pictures why....
The bore looks like it has had a slight scrape. Hopefully its nothing that cant be sorted.
I then removed the rest of the pistons. Because the engine wasattached to a stand I couldn't use the improved tool to push the pin out. I put the rod through the pin and then stuck the bolt on the end of it. I could then "pull" the gudgeon pin out
I found out the the block has underpiston oil squirters too. I didn't know these were on EJ20's I thought they were just on the EJ22T
Tim has kindly pointed out that "All the closed deck EJ20 blocks have oil squirters, on the EJ22T CDB it's only the US Legacy versions that have squirters, the 22b blocks don't "
Cheers
Cheers

what gearbox are you using mike ? seen as though i can see all the effort your putting into the alternator i have a i starter here i have reconed which you can have as i,m going 6 speed now

Thanks Neil, thats a generous offer.
I have sold the PPG box now and i'm putting a 6sp MY07 box in
I did read yesterday that the 5sp and 6sp starter motors were the same part number. Weired because I know you have to swap the starter if using a 6speed flywheel/clutch.
I have sold the PPG box now and i'm putting a 6sp MY07 box in
I did read yesterday that the 5sp and 6sp starter motors were the same part number. Weired because I know you have to swap the starter if using a 6speed flywheel/clutch.
Got down to splitting the engine. This wasn't as difficult as I thought it was going to be.
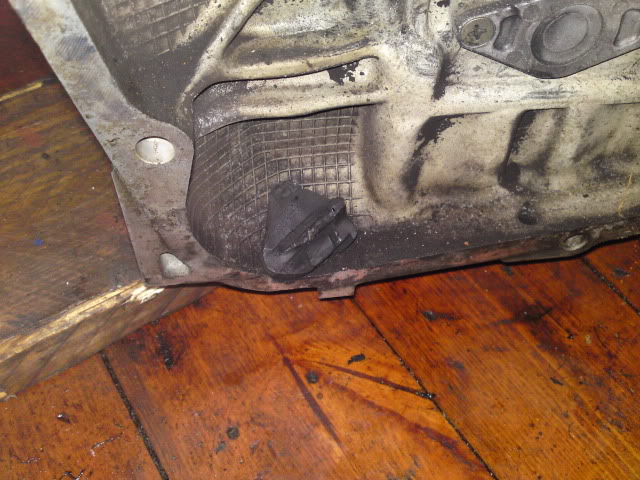
There were a few sneaky bolts that could easilty be missed, one in the bell housing (was covered in crap so difficult to spot) and another another small one in the sump area.

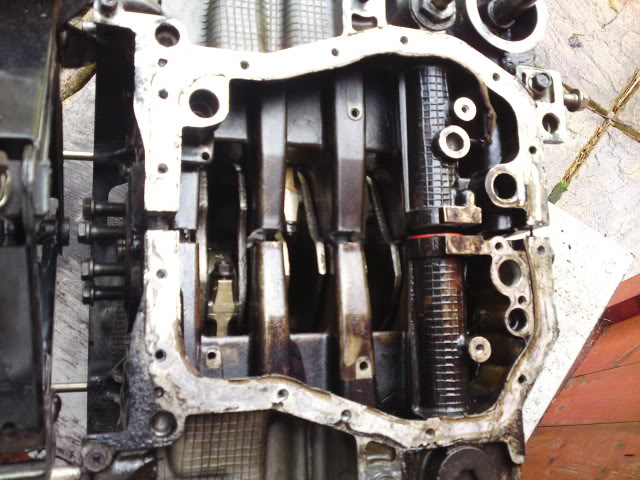
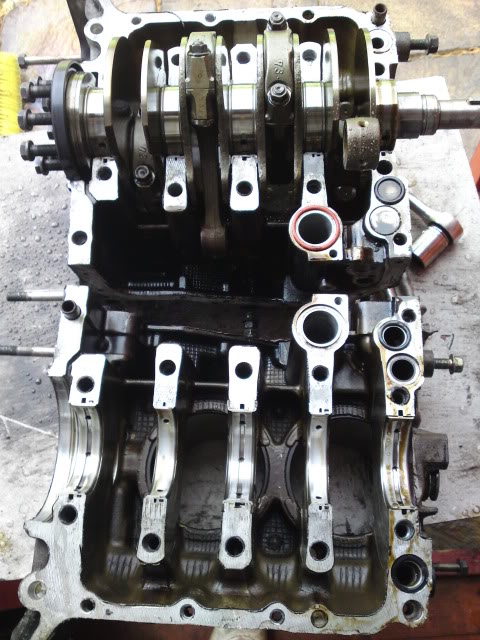
All the bearing look in good shape crank is unmarked.
Obviously one of the pistons is scrap but what about the rest of the internals?
Is this worth selling on, or whould I just weigh it in?
There were a few sneaky bolts that could easilty be missed, one in the bell housing (was covered in crap so difficult to spot) and another another small one in the sump area.
All the bearing look in good shape crank is unmarked.
Obviously one of the pistons is scrap but what about the rest of the internals?
Is this worth selling on, or whould I just weigh it in?
.

 I'll keep quiet!

I haven't updated in a while so here goes.
Most of the drivetrain is out now. I have sold the PPG pox to a gut in Sweden. It cost �220 to ship - if anyone wants the details of the courier just give me a shout.
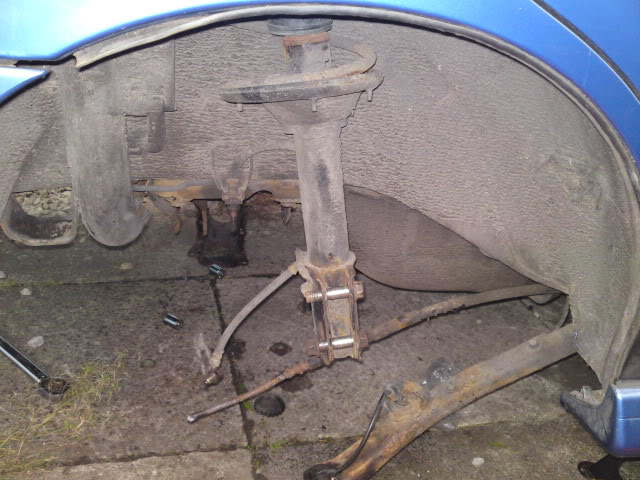
Not a great deal of progress to the car itself as it took me a whole day to remove one hub!! Every nut/bolt I came too didn't want to budge. I broke 2 ratchets (2/3" drive) and have a bruise the size of a fist on the back of my arm where the creeper decided to bite me
I ended up taking the hub, drive shaft, and lateral arms off as one. I think I will try and source some uprated STi link arms. The bushes have seized on the bolt and I really cant be @rsed with all the messing about when I would probbly uprate them in the future anyway.
How its looking now

Most of the drivetrain is out now. I have sold the PPG pox to a gut in Sweden. It cost �220 to ship - if anyone wants the details of the courier just give me a shout.
Not a great deal of progress to the car itself as it took me a whole day to remove one hub!! Every nut/bolt I came too didn't want to budge. I broke 2 ratchets (2/3" drive) and have a bruise the size of a fist on the back of my arm where the creeper decided to bite me
I ended up taking the hub, drive shaft, and lateral arms off as one. I think I will try and source some uprated STi link arms. The bushes have seized on the bolt and I really cant be @rsed with all the messing about when I would probbly uprate them in the future anyway.
How its looking now
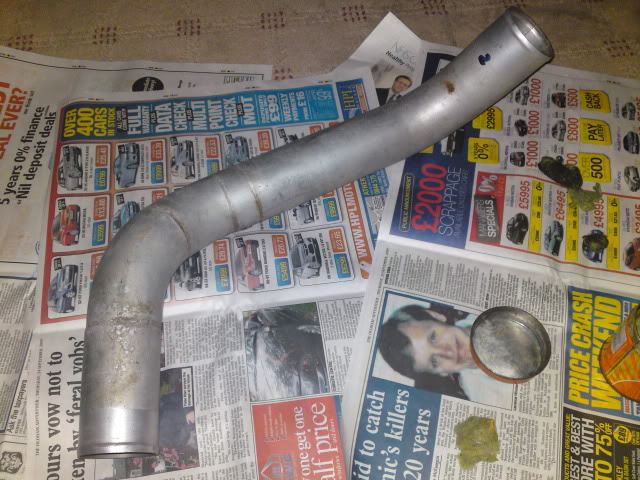
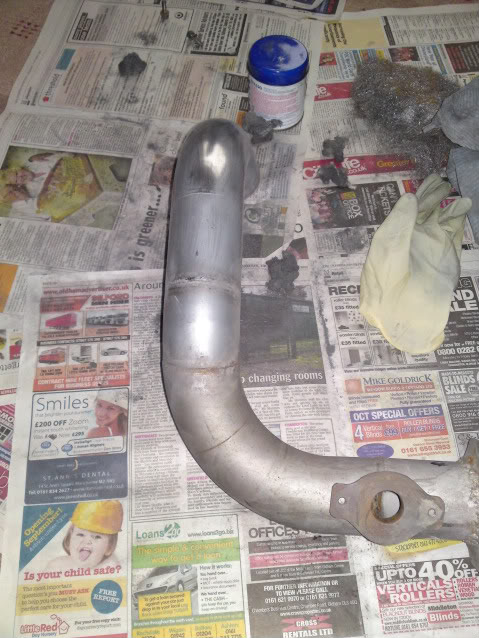
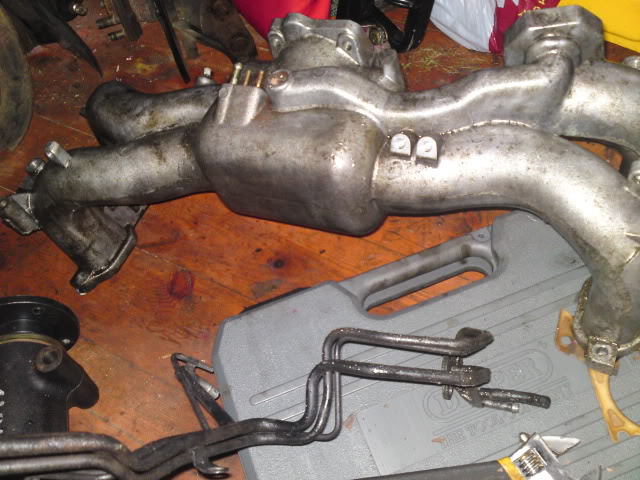
other jobs i have been doing is just tarting a few bits up. All the intercooler pipework was in need of a clean up. I have also been cleaning up the inlet manifolds I have. My phase 1.5 that I will be putting back on the car and a spare phase 1 IM that I am cleanig up.
IC pipework pics aren't really that great
I few thinks I have been buying -
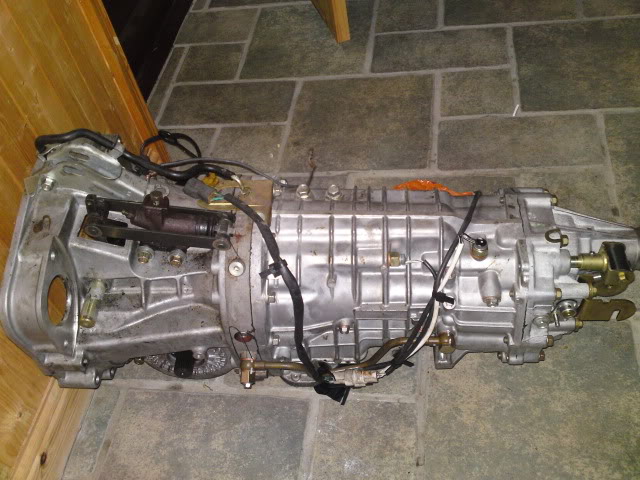
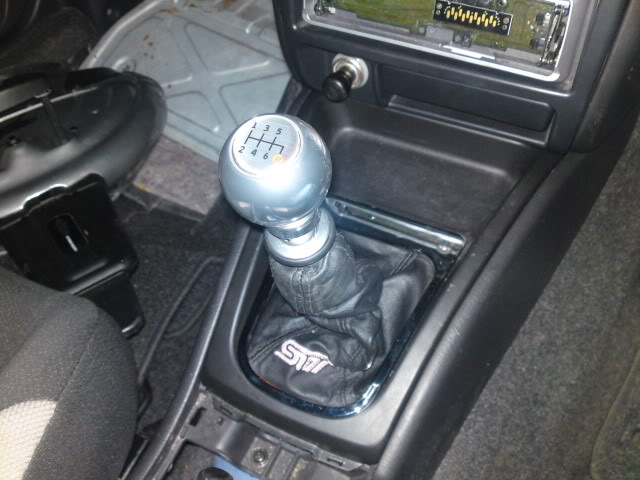
MY07 UK DCCD 6speed gearbox
os geiken twin plate clutch
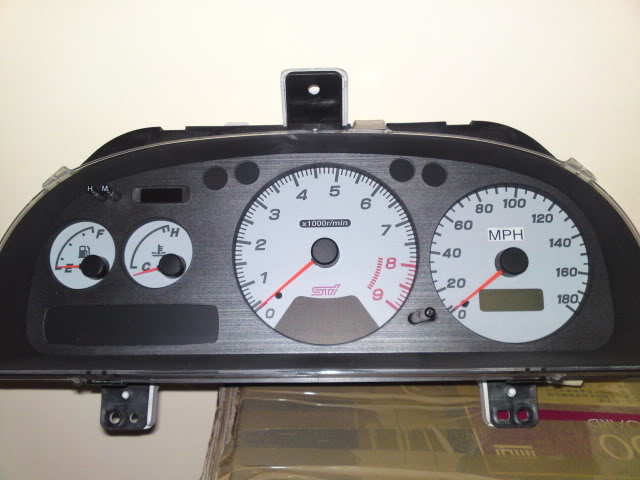
some v4 STi clocks
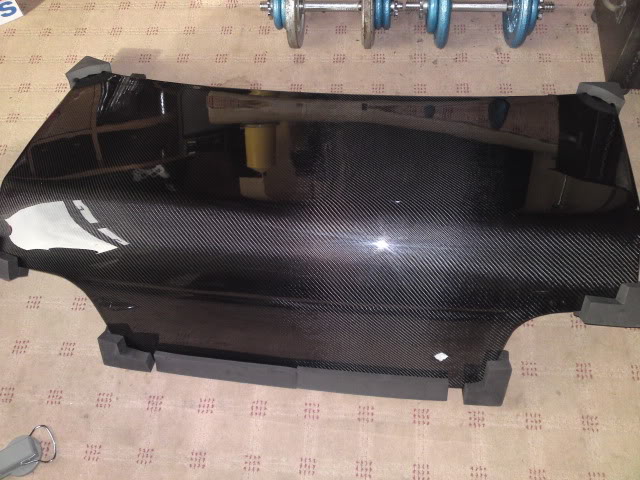
Carbon bootlid
IC pipework pics aren't really that great
I few thinks I have been buying -
MY07 UK DCCD 6speed gearbox
os geiken twin plate clutch
some v4 STi clocks
Carbon bootlid
great project and great thread fella  will be watching with intrest, have you thought about how you will run the dccd ?? or you just leaving it ? as i have a dccd 6 speed box too but not sure how to go about it as they say newtronics controler would be the best keep up the good work
will be watching with intrest, have you thought about how you will run the dccd ?? or you just leaving it ? as i have a dccd 6 speed box too but not sure how to go about it as they say newtronics controler would be the best keep up the good work
I will be getting a neetronics controller for it.
Getting it from Cotcomp Home - they are not too far away from me and its the only place I will take my car too. They are UK distributors for neetronics and will be fitting it myself.
Getting it from Cotcomp Home - they are not too far away from me and its the only place I will take my car too. They are UK distributors for neetronics and will be fitting it myself.
I have decided to remove the ABS system on my car. A number of issues has brought me to this decision.
1, I have a DCCD box and have heard/read under certain conditions DCCD and ABS don't get along
2, the hubs I have are off a newage STi that didnt have ABS (I presume it must have been the spec c?)
3, wouldn't mind the weight saving
So on to the next update.
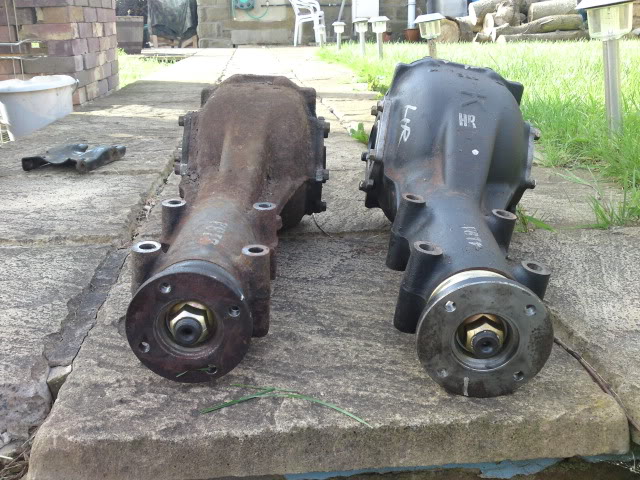
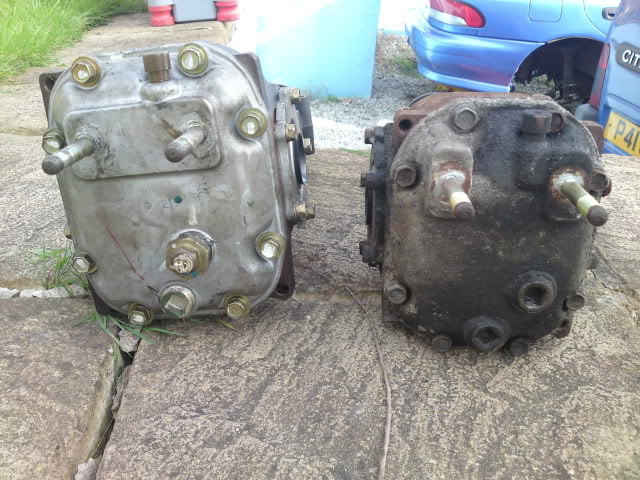
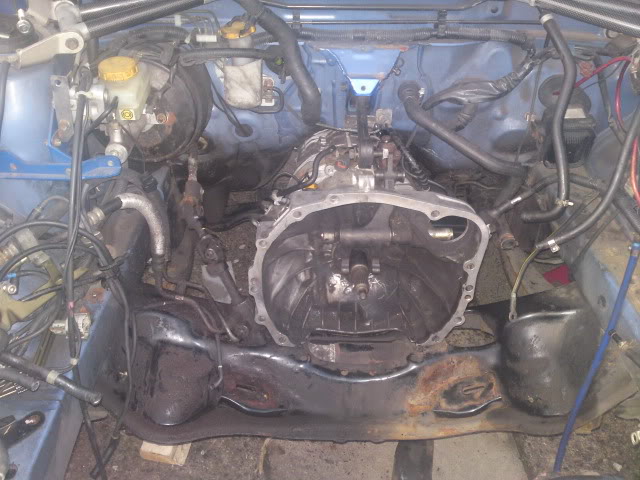
I have now removed all the driveshafts and hubs with rear lateral link arms gone also. Rear diff gone and replaced with the R180. Now got the gearbox in (I had a mate help me with it but he dropped it - good job I had my head in the way to stop it hitting the ground!) Prop in but im a bush and bolt short from the prop support bracket
R160 vs R180
Box in
1, I have a DCCD box and have heard/read under certain conditions DCCD and ABS don't get along
2, the hubs I have are off a newage STi that didnt have ABS (I presume it must have been the spec c?)
3, wouldn't mind the weight saving
So on to the next update.
I have now removed all the driveshafts and hubs with rear lateral link arms gone also. Rear diff gone and replaced with the R180. Now got the gearbox in (I had a mate help me with it but he dropped it - good job I had my head in the way to stop it hitting the ground!) Prop in but im a bush and bolt short from the prop support bracket
R160 vs R180
Box in
Update time.
I haven't really been able to spend much time on the car recently - I have had other jobs on as well as working full time (on shifts) and doing a masters course part time - so i have been spending some more money
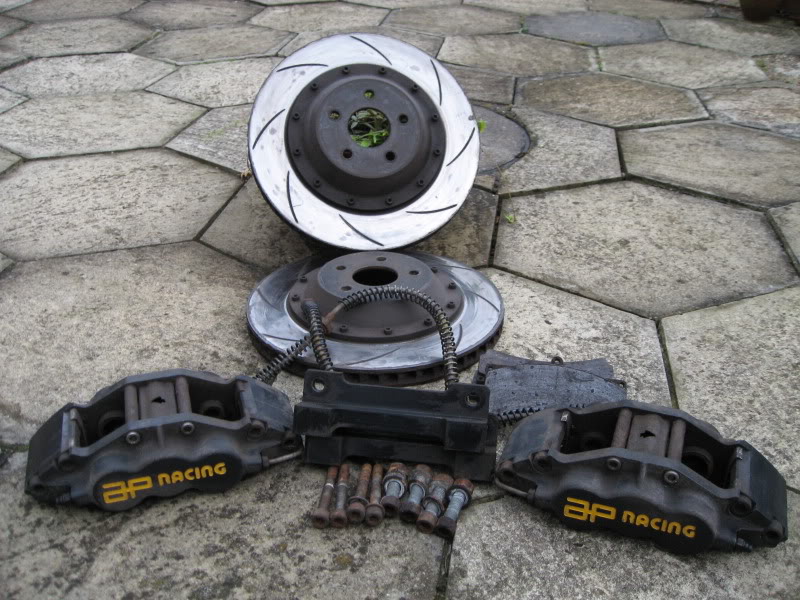
I have got the front brakes - AP racing calipers with 330mm disks so that I can run 17" on the track.
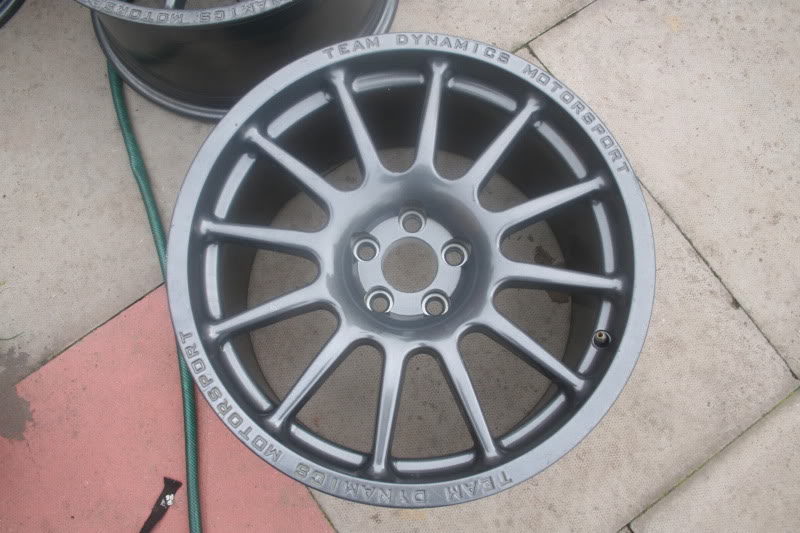
I have got my hands on some pro race 1.2's. These are 17x9" so I can run decent width tyres and fill the wide arches nicely. The offset i am unclear about ATM. I am told they are ET40 from the seller but in the same centance he has told me that TD say they are ET23. There are only 3 of them so i will get another one made up.
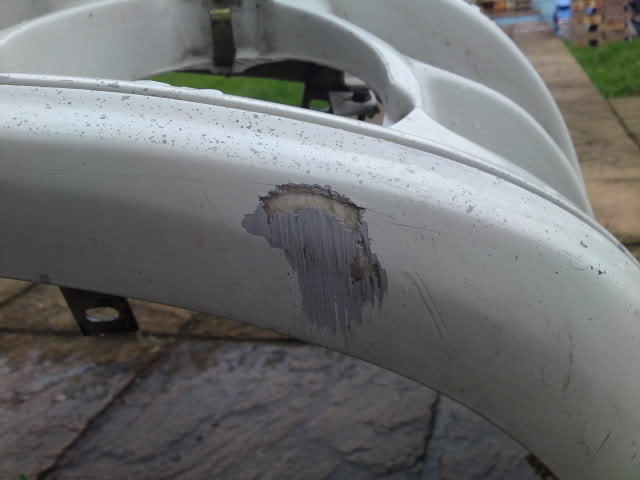
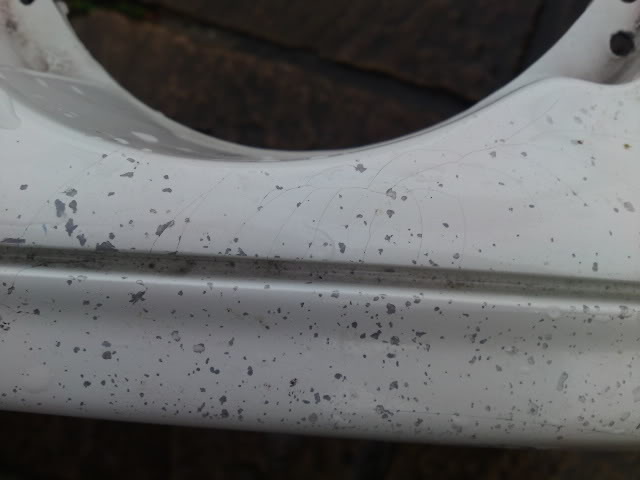
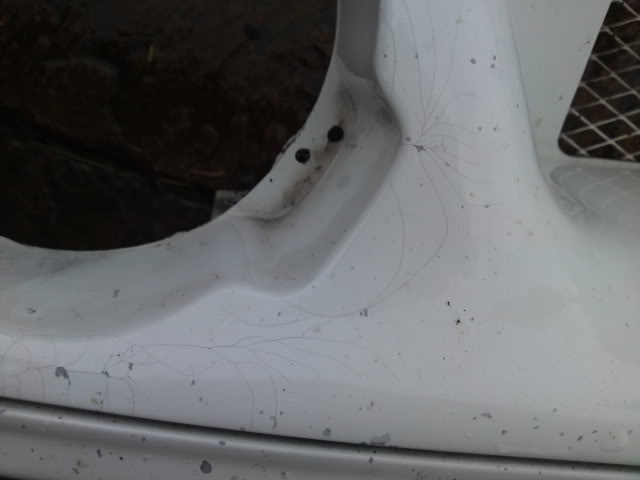
I have got a 22b replica bumper. It has taken a knowck on the under side and has seen better days. I am going to do some work on this to bring it back to a decent condition.
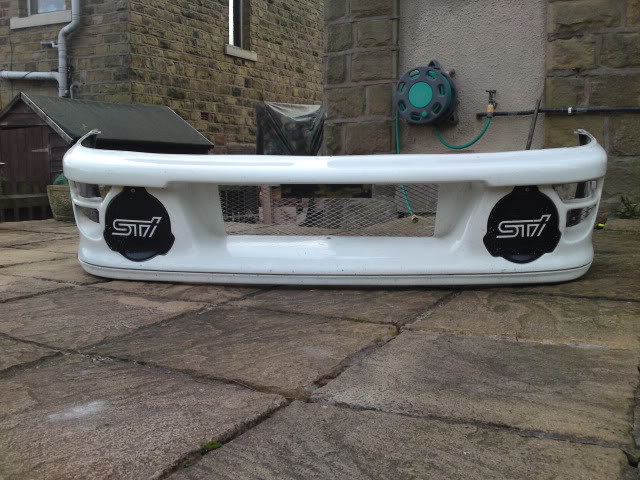
some pics of the damage/cracks in the gel coat/stonechips
I haven't really been able to spend much time on the car recently - I have had other jobs on as well as working full time (on shifts) and doing a masters course part time - so i have been spending some more money
I have got the front brakes - AP racing calipers with 330mm disks so that I can run 17" on the track.
I have got my hands on some pro race 1.2's. These are 17x9" so I can run decent width tyres and fill the wide arches nicely. The offset i am unclear about ATM. I am told they are ET40 from the seller but in the same centance he has told me that TD say they are ET23. There are only 3 of them so i will get another one made up.
I have got a 22b replica bumper. It has taken a knowck on the under side and has seen better days. I am going to do some work on this to bring it back to a decent condition.
some pics of the damage/cracks in the gel coat/stonechips
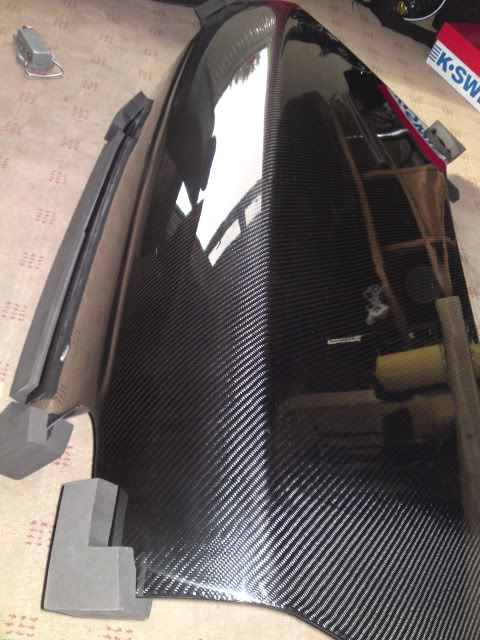
I never managed to resolve the carbon boot fit so have put a standard one on for now with a low level spoiler.
the car looking a bit sorry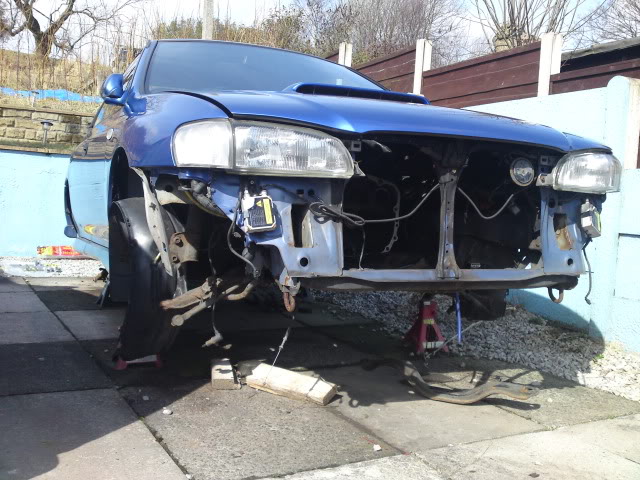
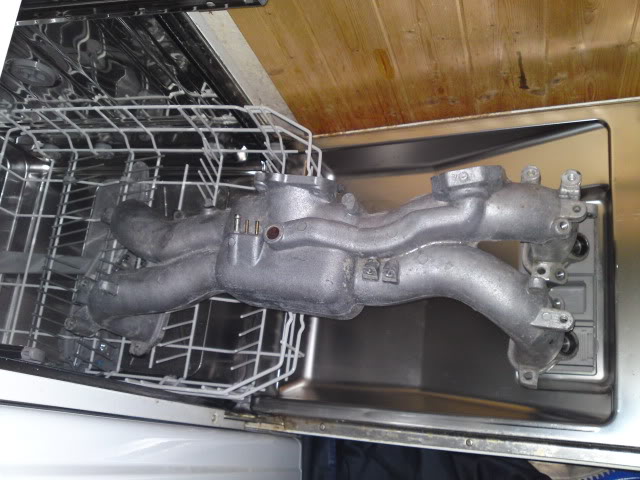
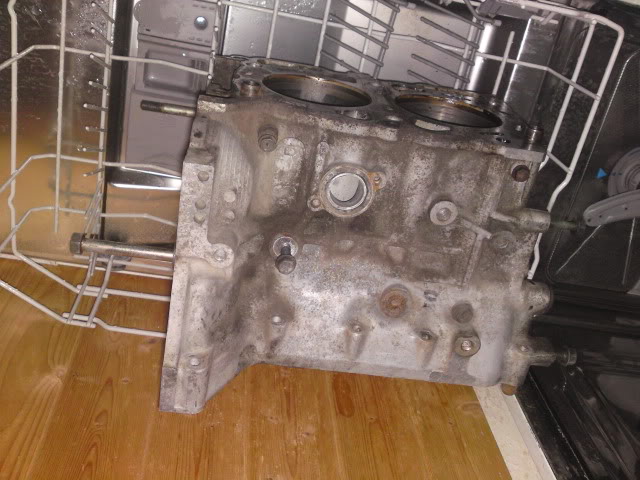
I did start cleaning the block with a steam cleaner. This was taking a very long time. I stuck the block in the dishwasher to try to speed the cleaning process up

Been buying a few more goodies.
2.1 Stroker kit
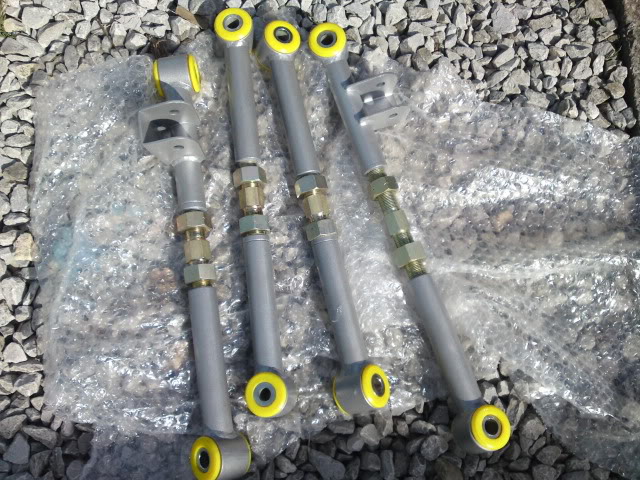
Whiteline fully adjustable rear control arms
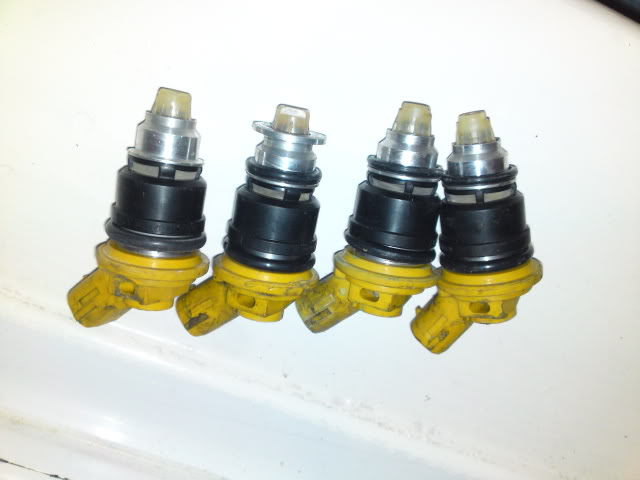
Lateral modified injectors
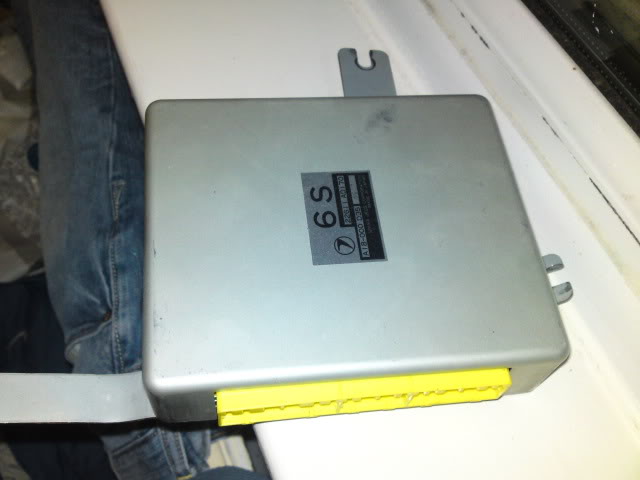
what.......a standard ecu?? nope, simtek with LC and AL
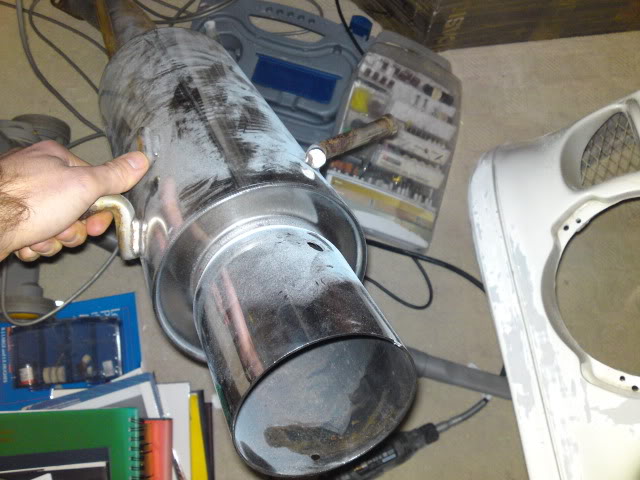
HKS 3" back box.....i think this might be a little too loud for my (or the neighbours) liking.
the car looking a bit sorry
I did start cleaning the block with a steam cleaner. This was taking a very long time. I stuck the block in the dishwasher to try to speed the cleaning process up
Been buying a few more goodies.
2.1 Stroker kit
Whiteline fully adjustable rear control arms
Lateral modified injectors
what.......a standard ecu?? nope, simtek with LC and AL
HKS 3" back box.....i think this might be a little too loud for my (or the neighbours) liking.
I haven't touched that car for quite some time. I made a start on removing the ABS.
Pump and stock bias valve
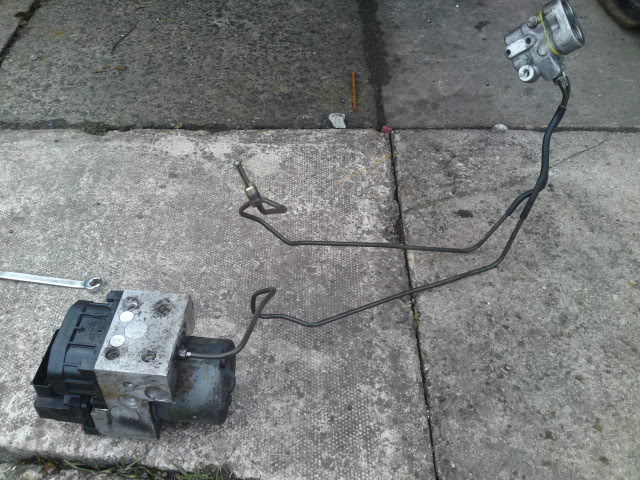
left with the pipes
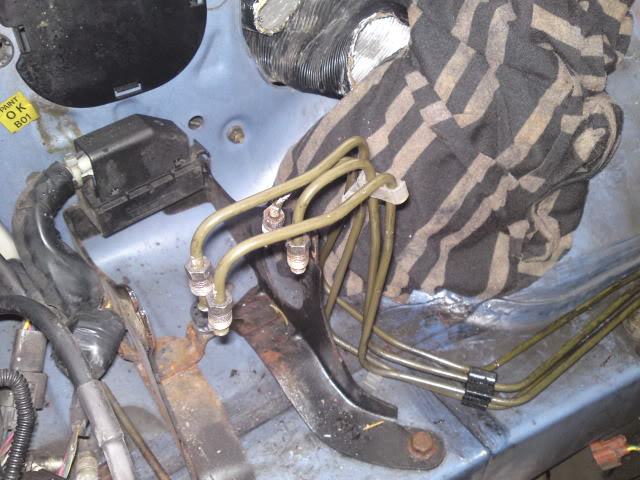
Of course 2 of the fittings were not releasing without a fight. Thanks to Andrew Carr, the fight was over as he lent me his brake spanners. More on the ABS later.
I moved to the rear of the car today hoping to get it built up. I binned the old RCA so I couldn't adjust the whiteline ones to stock setup. They fitted easily enough. I htought I would try and put the braided brake hose that have been sitting in the shed for 2 years. I had been avoiding it becuase I couldn't get the old ones off. Now armed with my dedicated spanners I was hoping it wouldn't be an issue. The offside released without too much effort. The nearside twisted the brake pipe clean off.
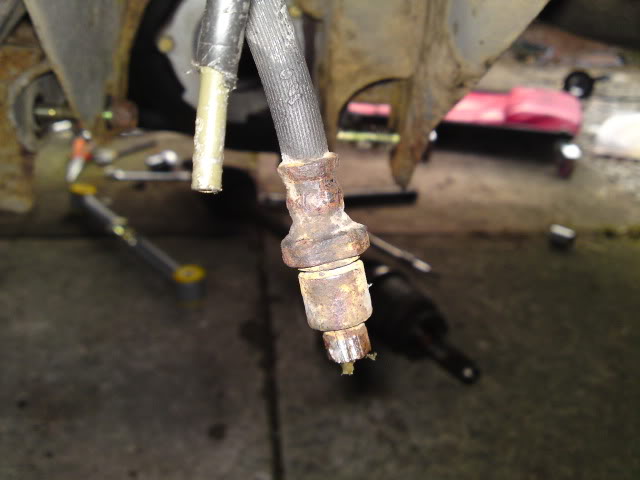
I had to shorted the pipe slightly and put a new flare on it. Because its shorter it has to be routed slightly different.
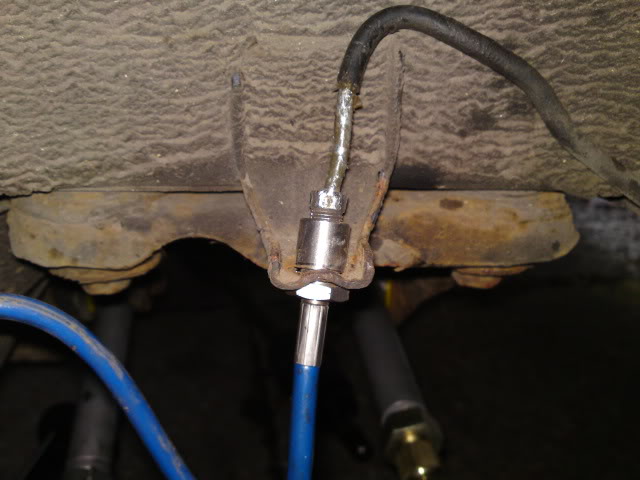
Thanks once again to Andrew for lending me his flairing kit.
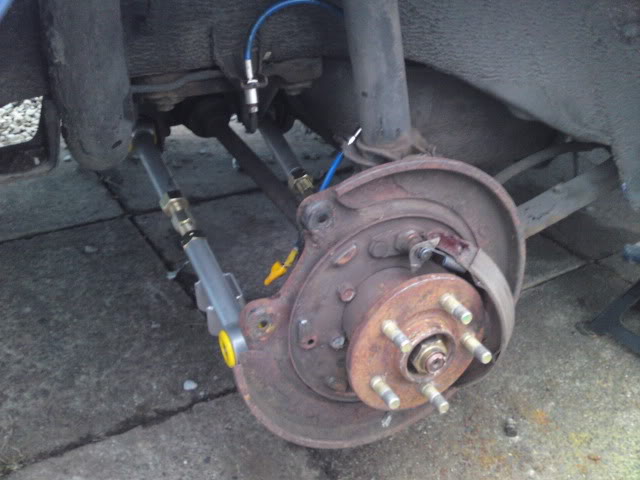
I dont have the long bolt that secures the RCAs to the hub because i had to cut the old ones. the hubs and driveshafts are on/in
Also had a little bit of time to make a start on restoring the bumper.
There is evidence of previous repair.
A lot of the crack are around the fog light area.
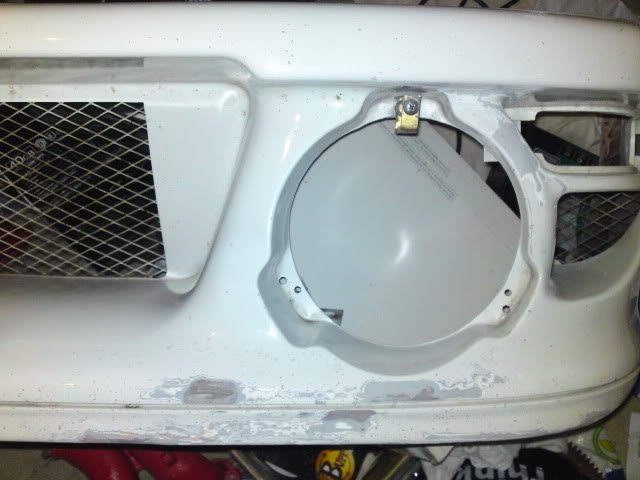
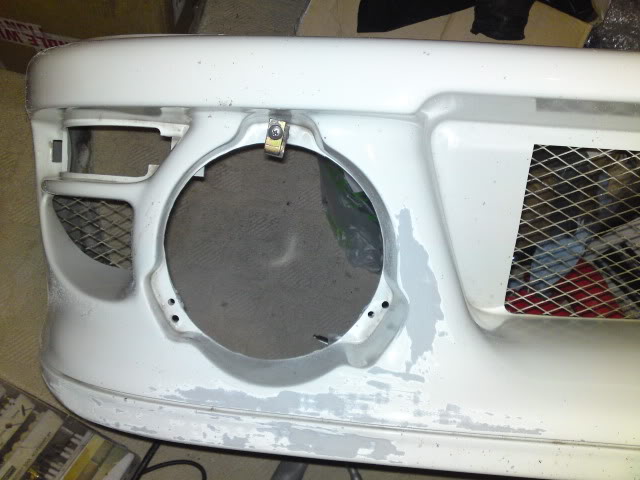
I will hopefully get some gel coat resin this week and get cracking.
Pump and stock bias valve
left with the pipes
Of course 2 of the fittings were not releasing without a fight. Thanks to Andrew Carr, the fight was over as he lent me his brake spanners. More on the ABS later.
I moved to the rear of the car today hoping to get it built up. I binned the old RCA so I couldn't adjust the whiteline ones to stock setup. They fitted easily enough. I htought I would try and put the braided brake hose that have been sitting in the shed for 2 years. I had been avoiding it becuase I couldn't get the old ones off. Now armed with my dedicated spanners I was hoping it wouldn't be an issue. The offside released without too much effort. The nearside twisted the brake pipe clean off.
I had to shorted the pipe slightly and put a new flare on it. Because its shorter it has to be routed slightly different.
Thanks once again to Andrew for lending me his flairing kit.
I dont have the long bolt that secures the RCAs to the hub because i had to cut the old ones. the hubs and driveshafts are on/in
Also had a little bit of time to make a start on restoring the bumper.
There is evidence of previous repair.
A lot of the crack are around the fog light area.
I will hopefully get some gel coat resin this week and get cracking.