20G wagon project started at last!
 02 November 2008, 04:36 PM
#1
Scooby Regular
Thread Starter
Join Date: Dec 2006
Location: Oxford- the shire
Posts: 1,281
Likes: 0
Received 0 Likes
on
0 Posts
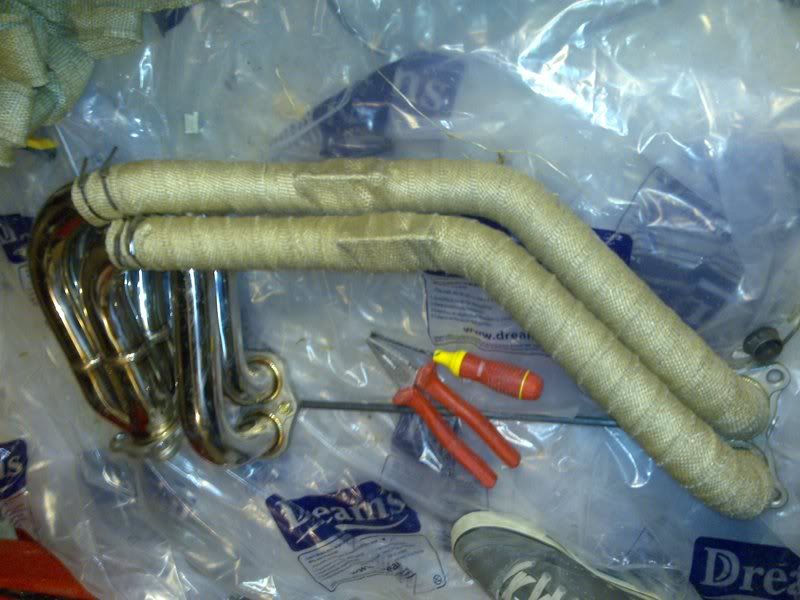
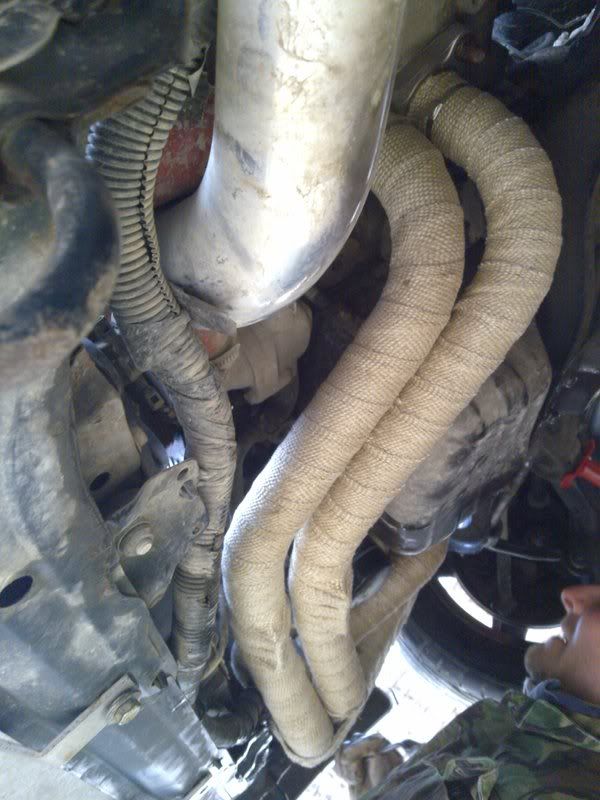
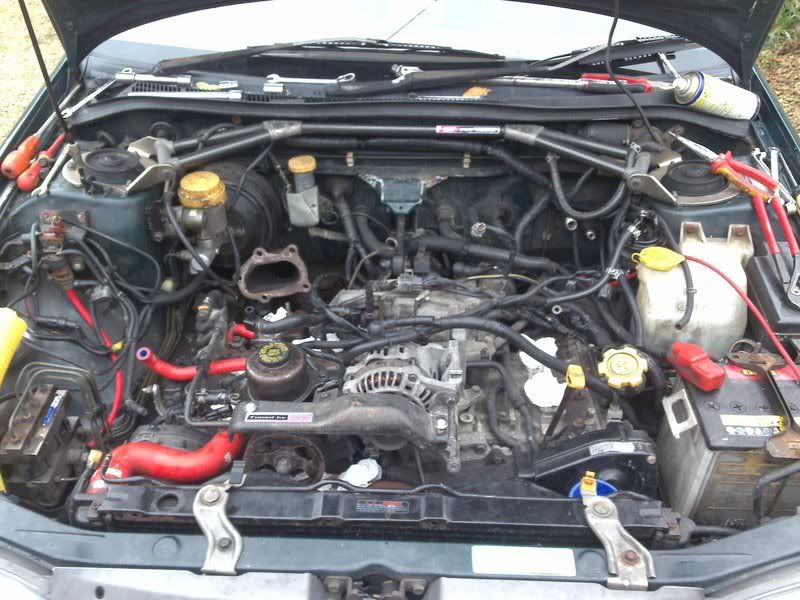
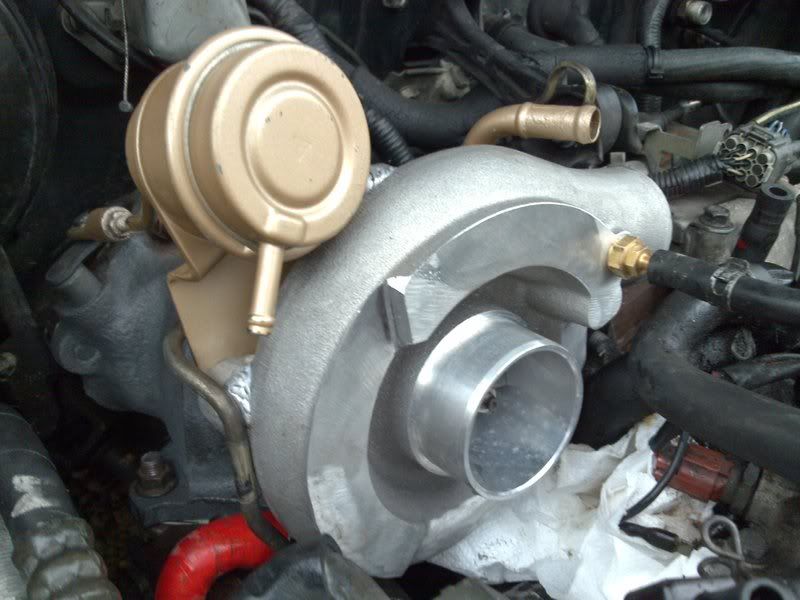
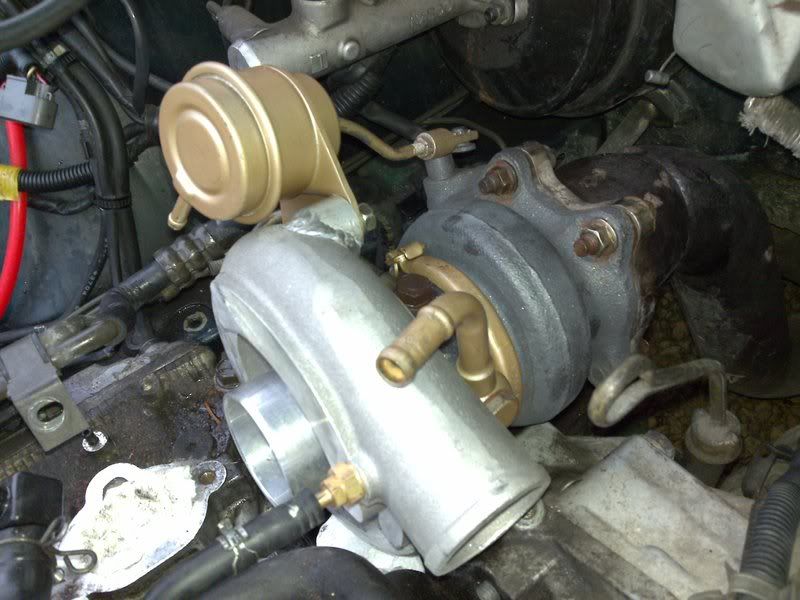
Been a long time coming, my wagon started off a 220ps auto, i converted to a sti v2, (my mates v2 saloon was the donor, just the front wishbones and alloy bonnet left to do), last winter, running around 300+ bhp on a td05 16g.
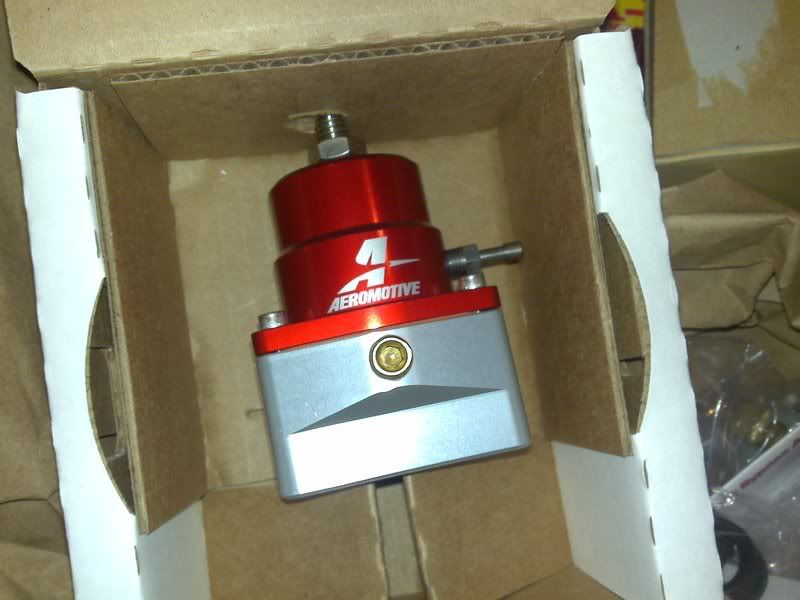
Just bought a 20g from Andy Forrest, ss headers from API, 550cc nismo injectors, Aeromotive fuel reg, parallel fuel rails, Clutch coming next week, with 4 new oe coil packs, i have two gearboxes, (will prob need them).
Will do a manifold refurb while its off.
Well anyway it started today, will be a long time before its finished, but it will be in Bob Rawles hands on the 29th Nov!
A couple of pics,
the car(ignore the wrx sticker, its gone now )
)
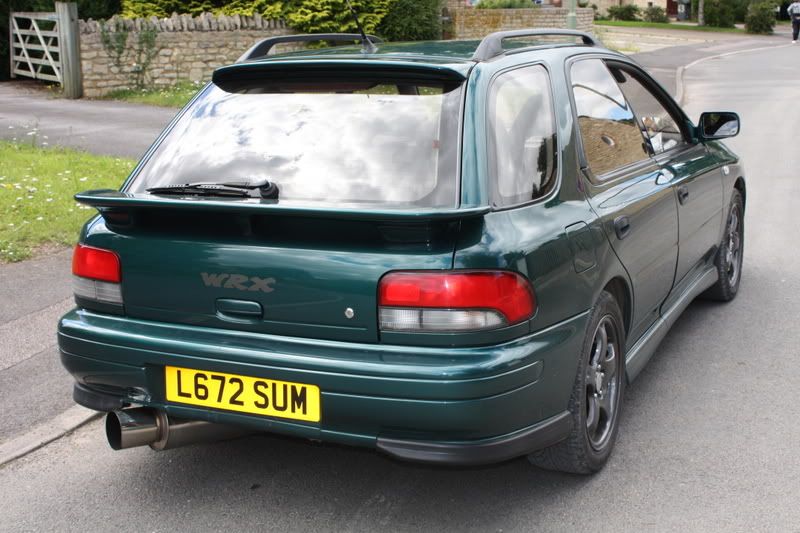
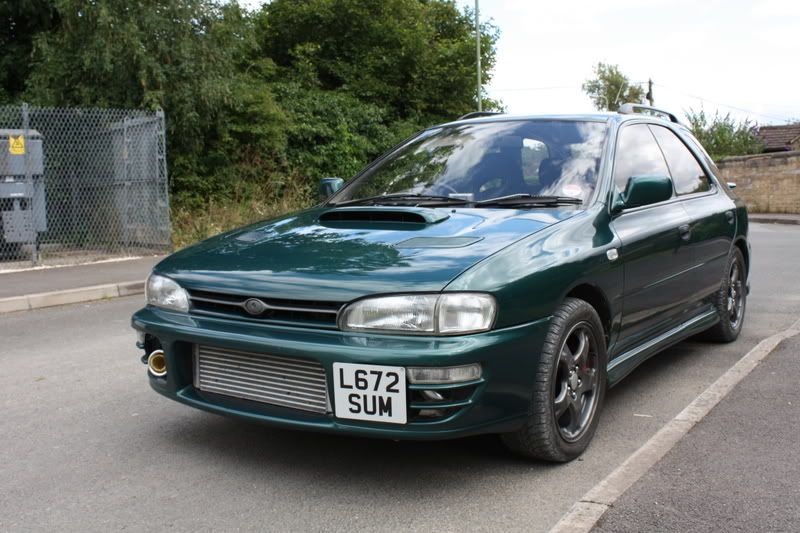
Original state!
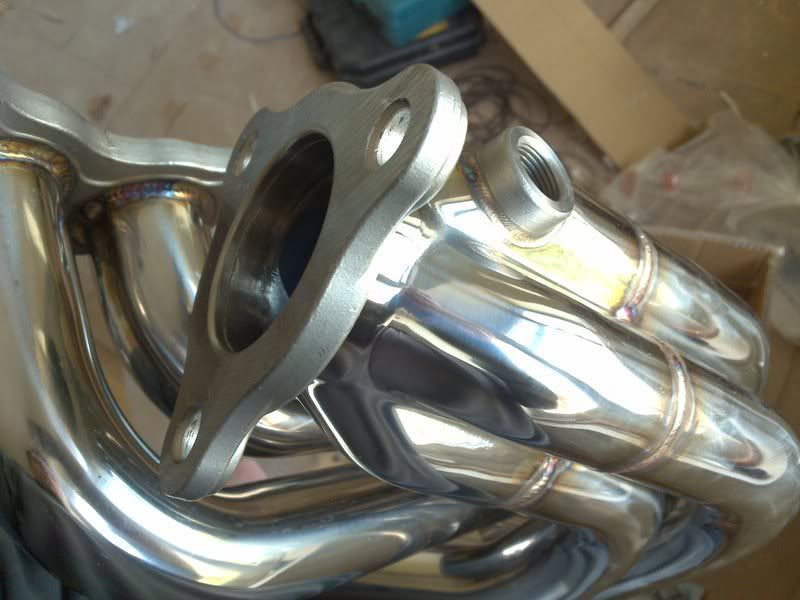
These headers do look loveley in the flesh, and are ported and flowed loveley too!
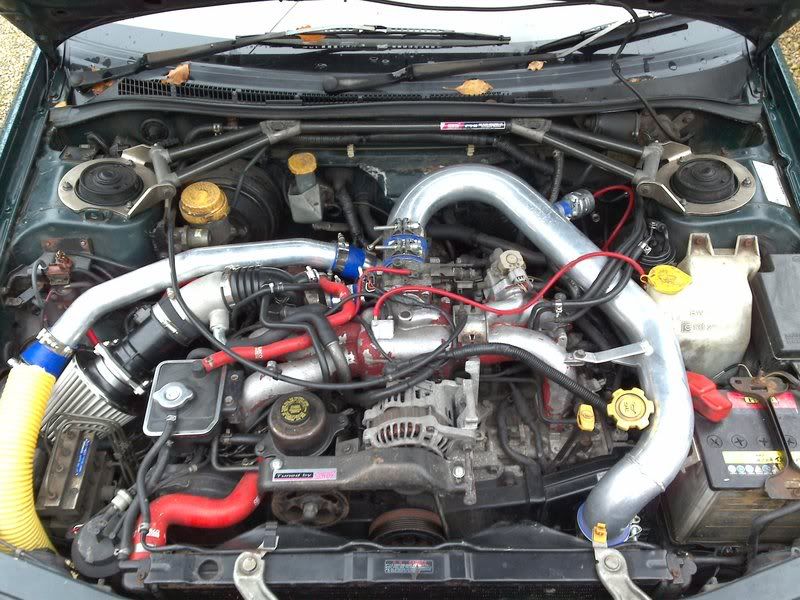
On!
car stripped
20G!
Just bought a 20g from Andy Forrest, ss headers from API, 550cc nismo injectors, Aeromotive fuel reg, parallel fuel rails, Clutch coming next week, with 4 new oe coil packs, i have two gearboxes, (will prob need them).
Will do a manifold refurb while its off.
Well anyway it started today, will be a long time before its finished, but it will be in Bob Rawles hands on the 29th Nov!
A couple of pics,
the car(ignore the wrx sticker, its gone now
)Original state!
These headers do look loveley in the flesh, and are ported and flowed loveley too!
On!
car stripped
20G!
Last edited by samcowrx; 02 November 2008 at 04:38 PM.
 02 November 2008, 04:47 PM
#2
Scooby Regular
Thread Starter
Join Date: Dec 2006
Location: Oxford- the shire
Posts: 1,281
Likes: 0
Received 0 Likes
on
0 Posts
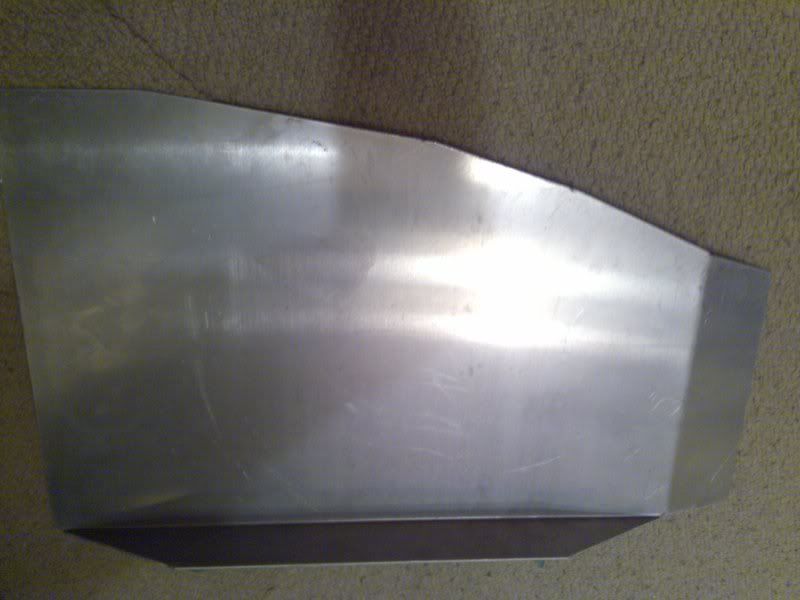
I am going to do an induction heat shield, (let me know if anyone wants a basic one cut out that you will have to modify specifically for your car, as i have a few spare!), ABS removal, carbon canister removal, lightened flywheel, inlet manifold insulators, quality clutch, new gapped 7b plugs, 4 new proxes T1-R's, tracking, sorting the 90 degree inlet to the front entry 20g, the list is longer, but as you lot know its hard to remember, so i have just started to write it all down!
03 November 2008, 09:58 PM
#3
Scooby Regular
Thread Starter
Join Date: Dec 2006
Location: Oxford- the shire
Posts: 1,281
Likes: 0
Received 0 Likes
on
0 Posts
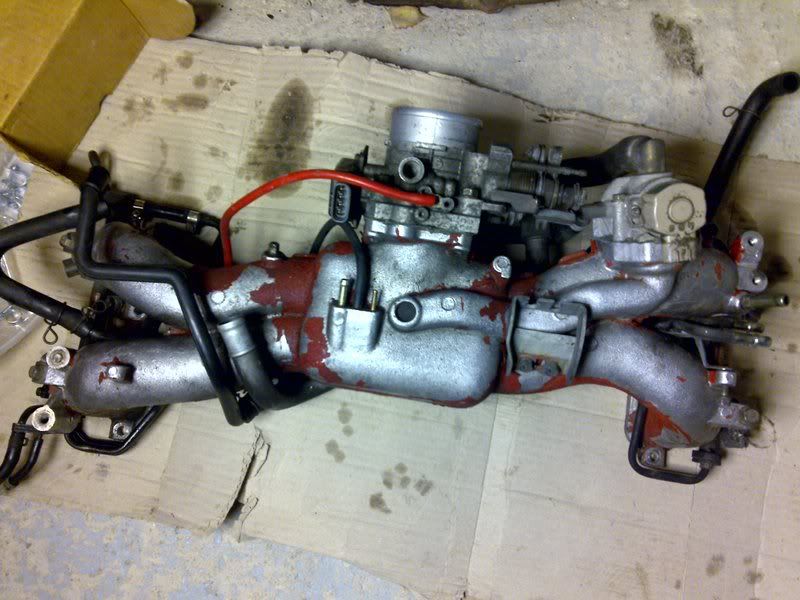
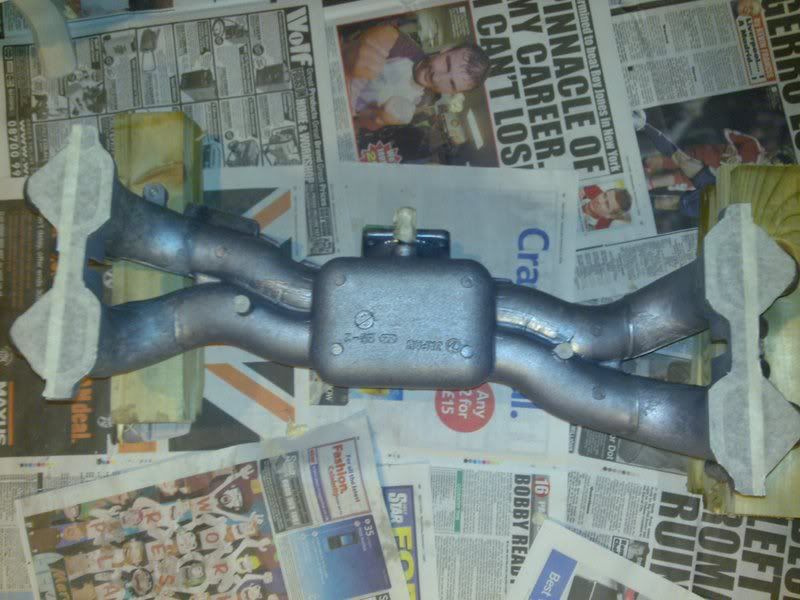
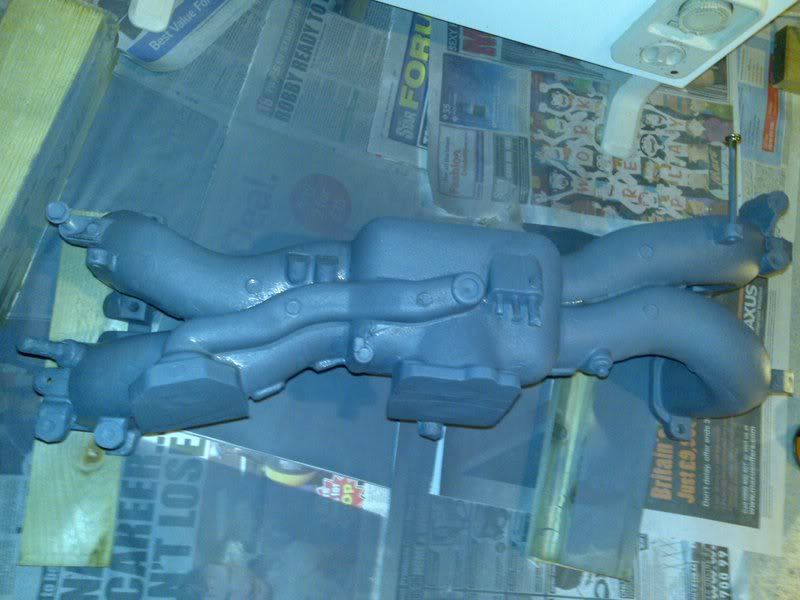
Stripped the inlet manifold last night and put it in the dishwasher tonight with the ok from the missus!, spray time tomorrow and parallel fuel mod.
03 November 2008, 10:17 PM
#4
Scooby Regular
iTrader: (7)
Join Date: Sep 2007
Location: Scottish Borders
Posts: 139
Likes: 0
Received 0 Likes
on
0 Posts
Top quality, i'm in the middle of doing this very thing (minus the 20g unfortunately).
What are you doing the parallel fuel rails setup with?
I'll take one of your air filter boxes if your wanting rid?
cheers, Dave
What are you doing the parallel fuel rails setup with?
I'll take one of your air filter boxes if your wanting rid?
cheers, Dave
 04 November 2008, 12:53 PM
#6
Scooby Regular
iTrader: (41)
Join Date: Nov 2003
Location: in the woods...........555 Wagon Sqn
Posts: 13,347
Received 55 Likes
on
42 Posts
It does look good, is the 20g going on the standard bottom end while you are building your 2.1? I'm running similar spec on a standard bottom end with an AFP 18g...its fun 
There's a project thread here which my be of interest...I must update it though https://www.scoobynet.com/projects-4...-fettle-9.html
There's a project thread here which my be of interest...I must update it though
https://www.scoobynet.com/projects-4...-fettle-9.html
04 November 2008, 07:49 PM
#7
Scooby Regular
Thread Starter
Join Date: Dec 2006
Location: Oxford- the shire
Posts: 1,281
Likes: 0
Received 0 Likes
on
0 Posts
Hi bigdaveallen, i am waiting for my aeromtive fpr kit to turn up, will see what parts come in the kit, too see if i will go full out for the braided parallel setup, or the other cheaper alternative which i already have all the parts for.
Which air box are you after?, i already had a fmic and an HKS SPF induction kit, so the oe air stuff went ages ago, but i might have what you want laying around?
53WRX, my ABS is going, luckily the father inlaw has all the brake line working kit, so can do a proper job, i have the master cylinder and servo off the sti2 donor which i will use in favour of the old abs stuff.
Trails, the 20g is going on the standard open deck sti2 full engine for the time being, i thought i would have this tinker before my 2.1 is complete, time to money to fun ratio, bolting this 20g to my sti2 engine is more fun at the moment than watching the money pit of a forged engine being built, i do have another sti2 ra cdb engine in my garage as a back up, plus a spare gearbox!
A couple of pics
v2 inlet manifold waiting for stripping
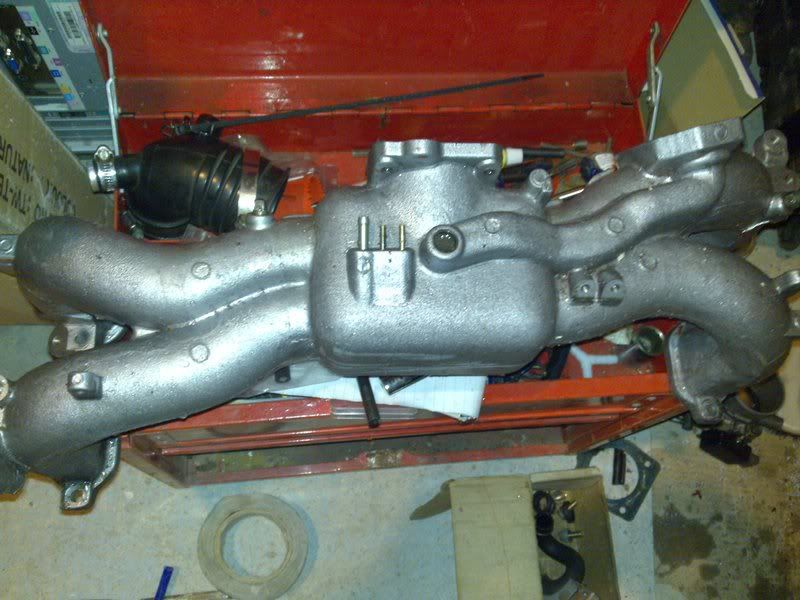
v2 inlet manifold, fresh from the dishwasher!
And the start of my induction shield, need to get rid of the abs first!
Which air box are you after?, i already had a fmic and an HKS SPF induction kit, so the oe air stuff went ages ago, but i might have what you want laying around?
53WRX, my ABS is going, luckily the father inlaw has all the brake line working kit, so can do a proper job, i have the master cylinder and servo off the sti2 donor which i will use in favour of the old abs stuff.
Trails, the 20g is going on the standard open deck sti2 full engine for the time being, i thought i would have this tinker before my 2.1 is complete, time to money to fun ratio, bolting this 20g to my sti2 engine is more fun at the moment than watching the money pit of a forged engine being built, i do have another sti2 ra cdb engine in my garage as a back up, plus a spare gearbox!
A couple of pics
v2 inlet manifold waiting for stripping
v2 inlet manifold, fresh from the dishwasher!
And the start of my induction shield, need to get rid of the abs first!
Trending Topics
04 November 2008, 10:17 PM
#9
Scooby Regular
iTrader: (41)
Join Date: Nov 2003
Location: in the woods...........555 Wagon Sqn
Posts: 13,347
Received 55 Likes
on
42 Posts
Of course Sam; there are two bolts to each rail leg, you willwill need to remove the inner trim that runs around the edge of the roof lining to access. Its a bit of a pita but worth taking it all off rather than putting stretch marks in the plastic from stressing it. You then need to pop the remaining external trim off, by gently sliding it off the fasteners. You should be able to remove them and reuse all the fasteners. The rail delete trim just pops back onto the fasteners. There are some pics in my thread that will help. The hardest part is sourcing the trim delete, new they are ridiculous money...I got mine from JGM when he broke his old wagon but all non-turbo variants (with the exception of the Sport), came without roof bars.
I'll be watching how you get on with your induction shield, its on my list of outstanding jobs...its a long list
Ian
I'll be watching how you get on with your induction shield, its on my list of outstanding jobs...its a long list
Ian
04 November 2008, 10:22 PM
#10
Scooby Regular
Thread Starter
Join Date: Dec 2006
Location: Oxford- the shire
Posts: 1,281
Likes: 0
Received 0 Likes
on
0 Posts
cheers mate, just read your thread, awesome, i dont think i could stretch to the cost of doing that to my car as much as i would love too! (she wouldnt love it though!)
With regards to the trim deletes for the roof, i will get searching.
I am doing this car as a hobby, i have been working on it two years now and there is a group of us tinkering with our scoobs which is helpful, although my mate is opting for the 700bhp route at the moment and that is stupid money will be a serious car at santa pod next year though!
05 November 2008, 09:37 AM
#12
Scooby Regular
iTrader: (41)
Join Date: Nov 2003
Location: in the woods...........555 Wagon Sqn
Posts: 13,347
Received 55 Likes
on
42 Posts
cheers mate, just read your thread, awesome, i dont think i could stretch to the cost of doing that to my car as much as i would love too! (she wouldnt love it though!)
With regards to the trim deletes for the roof, i will get searching.
I am doing this car as a hobby, i have been working on it two years now and there is a group of us tinkering with our scoobs which is helpful, although my mate is opting for the 700bhp route at the moment and that is stupid money will be a serious car at santa pod next year though!
With regards to the trim deletes for the roof, i will get searching.
I am doing this car as a hobby, i have been working on it two years now and there is a group of us tinkering with our scoobs which is helpful, although my mate is opting for the 700bhp route at the moment and that is stupid money will be a serious car at santa pod next year though!
 My wagon is totally DIY with the exception of mapping and geometry by Mocom...if you are lucky\careful you can pick up most stuff second hand so it can (like mine), be carried out on a budget
700bhp...thats gonna take a serious chunk of money to build and maintain

 05 November 2008, 09:48 PM
#14
Scooby Regular
Thread Starter
Join Date: Dec 2006
Location: Oxford- the shire
Posts: 1,281
Likes: 0
Received 0 Likes
on
0 Posts
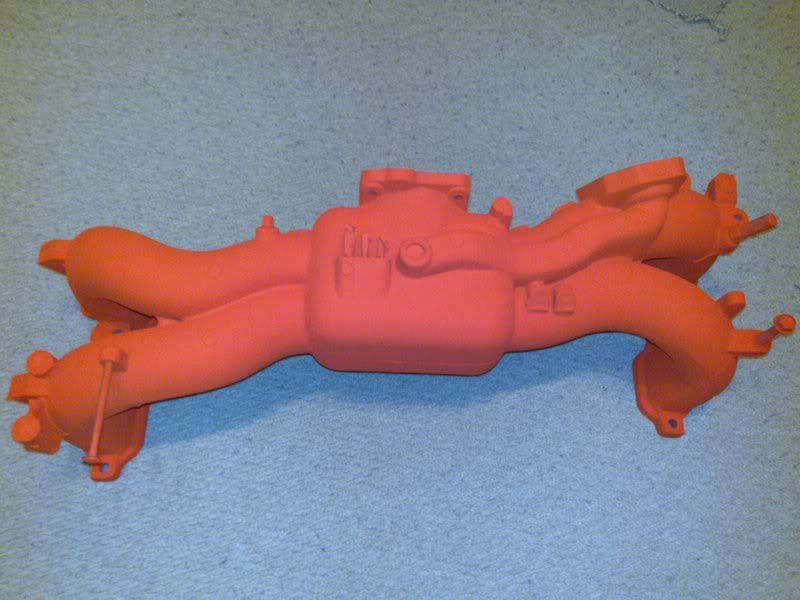
Just masked off the inlet, etched and sprayed it, bright red!, looks good, cant get good pics of it for some reason!, will pick up the new gaskets from subaru tomorrow.
Would anyone give me a quick run down of the abs removal?, the servo on my car has got two pipes out, could i use this one to tee into the brake lines for front and rear, with a bias controller on the rears?, or is it easier/better to use the servo off the sti2 with four pipes coming out of it?, if i need to remove the servo from the master cylinder is there anything to watch out for? etc etc
cheers
06 November 2008, 10:34 PM
#16
Scooby Regular
iTrader: (7)
Join Date: Sep 2007
Location: Scottish Borders
Posts: 139
Likes: 0
Received 0 Likes
on
0 Posts
Here's a photo of what i've done mine this week. I wouldn't have went this route but as dad sent me over the fuel line most of the fittings i thought why not.

I have a K&N induction kit and still have my abs . If you had anything that would make a rough suround then i'd be happy to pay whatever you think its worth (within reason ).
I have a K&N induction kit and still have my abs . If you had anything that would make a rough suround then i'd be happy to pay whatever you think its worth (within reason
).
06 November 2008, 11:06 PM
#17
Scooby Regular
Thread Starter
Join Date: Dec 2006
Location: Oxford- the shire
Posts: 1,281
Likes: 0
Received 0 Likes
on
0 Posts
That looks really nice dave!, i do have like i said, some basic shields that need to be trimmed for the specific car, the template of them does fit facelift and pre facelift classics.
Could anyone help me out with advice or pics on the abs removal please?, do i need to change my servo with 2 lines out for one with the 4 lines out? is that a hard job taking it off the master cylinder? I do do have the stuff off an sti2, but just wondering if its possible or good enough to retain the braking gear that is already on my car?
Could anyone help me out with advice or pics on the abs removal please?, do i need to change my servo with 2 lines out for one with the 4 lines out? is that a hard job taking it off the master cylinder? I do do have the stuff off an sti2, but just wondering if its possible or good enough to retain the braking gear that is already on my car?


 09 November 2008, 12:36 AM
#22
Scooby Regular
Thread Starter
Join Date: Dec 2006
Location: Oxford- the shire
Posts: 1,281
Likes: 0
Received 0 Likes
on
0 Posts
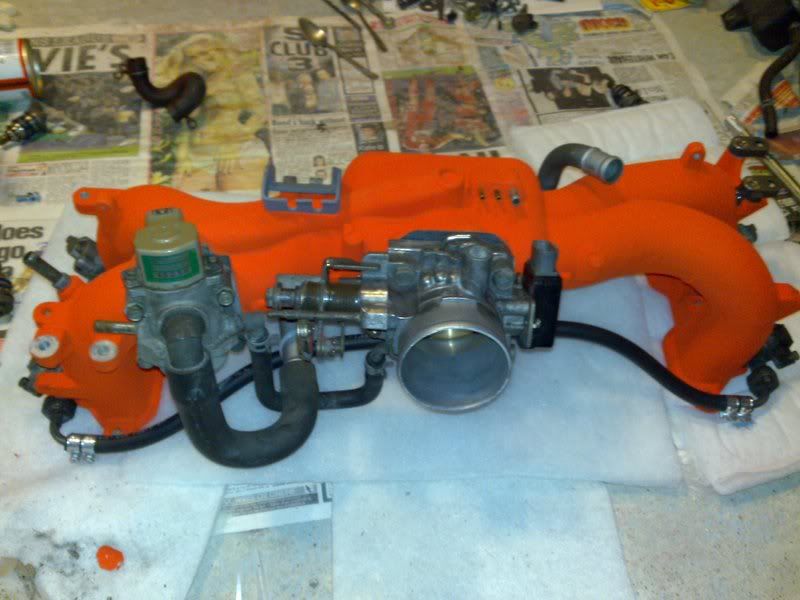
Hopefully this FPR will be up to the job!
masking is a bit tedious!
3k etch primer
this paint is just not photogenic for some reason, must be the flourescant lighting methinks?
rails and hoses half done
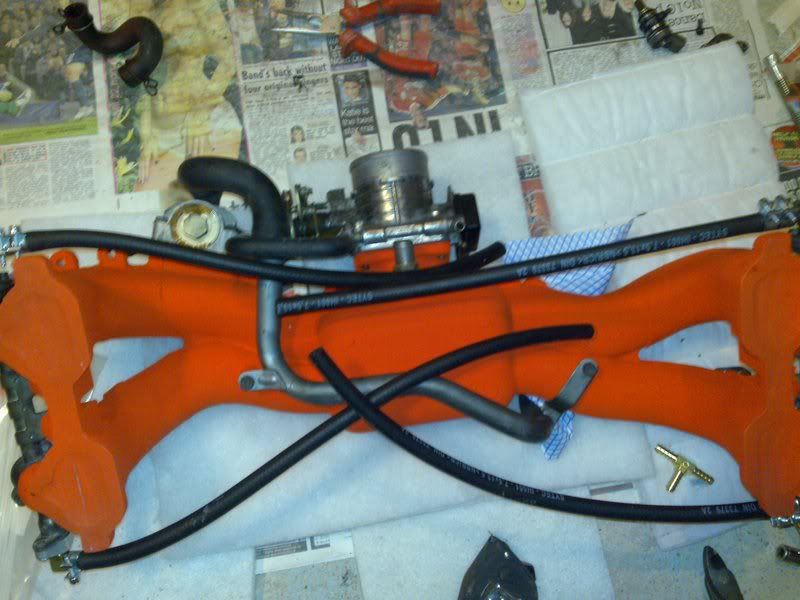
took me a while to get to this stage, was just not happy with the original hose clips, settled for these crimp ones instead on the t's

what this valve type thing just under the tb screwed into the IM?,
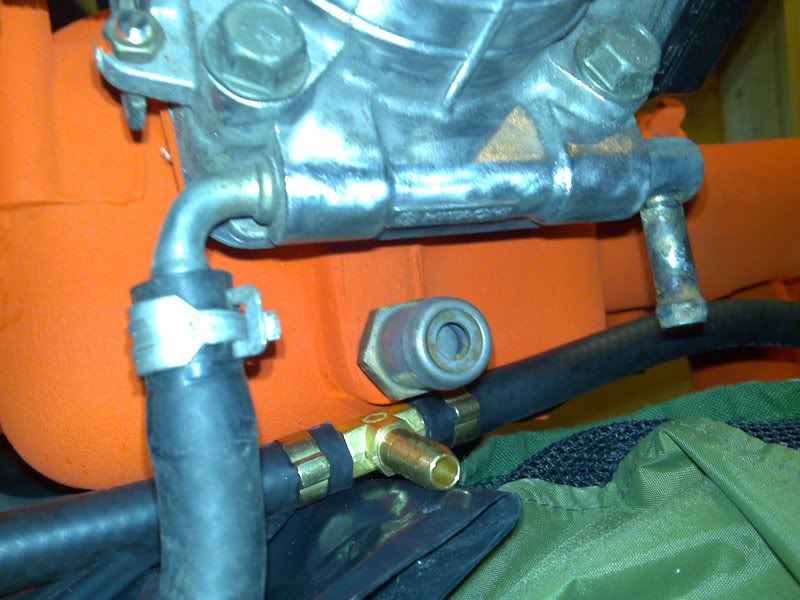
seems to be part of the breather system, i am fitting a catch can and ridding of as many breather pipes etc with little filters etc, i have seen some people take this valve out and bung it, what are my options, and what is the best thing to do?
cheers
masking is a bit tedious!
3k etch primer
this paint is just not photogenic for some reason, must be the flourescant lighting methinks?
rails and hoses half done
took me a while to get to this stage, was just not happy with the original hose clips, settled for these crimp ones instead on the t's
what this valve type thing just under the tb screwed into the IM?,
seems to be part of the breather system, i am fitting a catch can and ridding of as many breather pipes etc with little filters etc, i have seen some people take this valve out and bung it, what are my options, and what is the best thing to do?
cheers
 09 November 2008, 10:24 AM
#24
Scooby Regular

That's looking good so far - keep up the good work! The valve there under the TB is the PCV valve. Allows crankcase gases to be drawn directly into the inlet manifold to be burnt off while the car is off boost. Soon as you get a boost condition, the valve shuts tight so you don't lose any boost and the gases are diverted into the inlet pipe instead to be drawn through the turbo and intercooler.
I still run a closed, 'green' breather system, in basic terms I have a sealed catch tank intercepting the crankcase breather outlet which then tees off to both the standard breather inlets. The system works the same as usual, but cleans the oil vapours out of the gas.
I still run a closed, 'green' breather system, in basic terms I have a sealed catch tank intercepting the crankcase breather outlet which then tees off to both the standard breather inlets. The system works the same as usual, but cleans the oil vapours out of the gas.
09 November 2008, 11:32 AM
#25
Scooby Regular
Thread Starter
Join Date: Dec 2006
Location: Oxford- the shire
Posts: 1,281
Likes: 0
Received 0 Likes
on
0 Posts
thanks silent, i will do the same green breather system, does that mean you leave the PCV as it is? i dont necessarily need to connect anything to it if i am using a catch can?, or is it easier to blank it off completely?
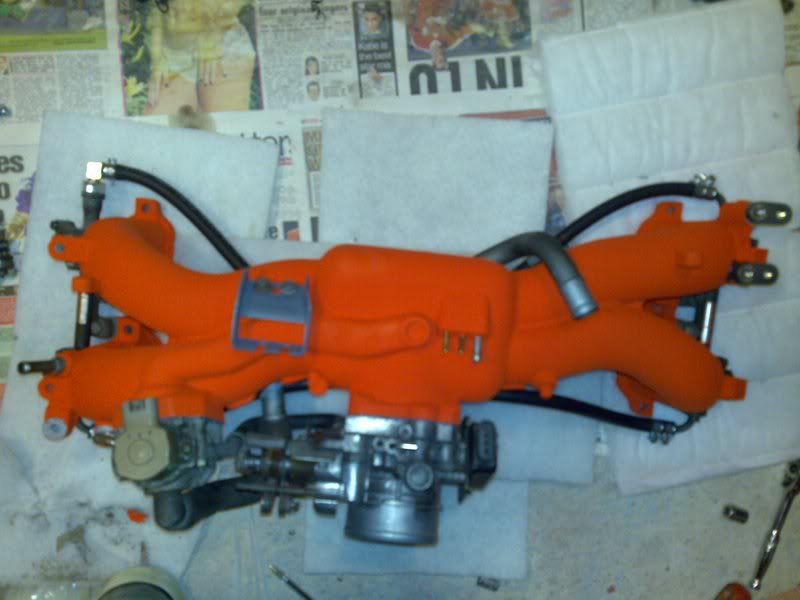
Note the carl davey coolant header tank insulators on the IM!
Note the carl davey coolant header tank insulators on the IM!
12 November 2008, 09:46 PM
#28
Scooby Regular
Thread Starter
Join Date: Dec 2006
Location: Oxford- the shire
Posts: 1,281
Likes: 0
Received 0 Likes
on
0 Posts
On hold at the moment, waiting for a few bits to arrive, should be back on it tomorrow hopefully, and saturday is the big day putting the car back together with fpr, manifold insulators, new coilpacks and catch can.