
building my 97 impreza into a 2.5 race machine

Thread Starter
Scooby Senior
iTrader: (12)
Joined: Apr 2006
Posts: 4,067
Likes: 0
From: south wales rhondda
right just thought i would do this thread as i have been wanting to do this for awhile so her it goes 
i have had the car for 4 and half years now and have done work all work my self exept the mapping ect.. and a few weeks ago was on my way to go on a run and the bottom end went
the car is a my 97 catalunya and its number 172 of 200 made for the uk
it was almost standard when i bought it and looked like this
[IMG] [/IMG]
then when i got my hands on it i turned it in to this
[IMG] [/IMG]
[IMG]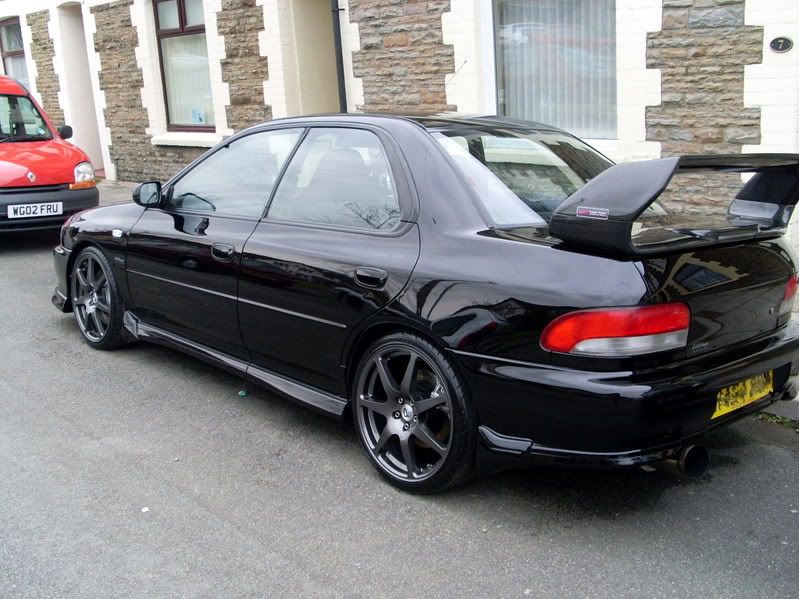 [/IMG]
i was pushing the standard internals to the limits tho as this was the spec of it before it went
Apexi avcr boost controller
Apexi power fc and commander mapped by Jolly Green Monster running 1.4 bar boost
Apexi turbo timer
rather large front mount intercooler
Baileys ventura dump valve
Jap inovations down pipe de cat with heat wrap
Magnex centre section de cat
Afterburner vortex back box jap style
gruppy s style stainless steal headers
andy forrester 20 gram turbo
z32 nissan maf
550 injectors
Walbro 225 fuel pump
fuel lab pressure regulator
Blitz sus filter
Roger Clarke lightweight alloy pulley's
Blue samco silicon hose's
alloy race radiator
Sytec braided fuel hose's
Braided hose's
Crome fuse box/battery cover/air intake pipe/oil cap
spec r alternator and pulley cover
19 row oil cooler
mocal sandwich plate with thermostat
forge motorsport crome header tank
blitz 1.3bar rad cap
Hks oil catch tank
ngk laser platinum pfr7b sparkplugs
Mobile 1 15:50 oil full syntheticExedy organic fast road clutch
Exedy lightweight race flywheel 5.75kg
Exedy thrust bearings
Silkolene pro full synthetic gearbox oil
Dot 5.1 clutch fluid
alcon prodrive front calipers with 330 prodrive vented disks with prodrive pads
Godspeed rear 190 grooved vented disc with Subaru 2 pot caliper's
Goodridge braided brake hoses front and rear
Kevlar rear brake pad's
Dot 5.1 brake fluid
Suspension Modifications:
cusco zero 1 coilovers with pillowball mounts
Front and rear alloy strut brace's
cusco h brace
whiteline drop links front and alloy rear with nylon bushes
Whiteline sway bar bushes front and rear
whiteline uprated gearbox bushes
Whiteline anti-lift kit
sti group n spec engine mounts
sti group n spec gearbox mount
sti group n dog bone gearbox mount
alloy lower arms
Wheels/Tires Modifications:
18" prodrive pfff reps in gunmetal
toyo T1S 215/35/18
prodrive center caps
sti dust caps
Interior/Exterior Modifications:
Black internal front crystal head lamp's
Bootlid been de-badged
Carbon fibre sti 6 spoiler
Carbon fibre bonnet from Scoobyworld
carbon fiber vortex genorator custom fit
Crystal sidelight's/indicator's/fog's
99 front bumper
seibon p1 carbon splitter
Sti mud catcher's
22B style front grill
sti rear lights
Sti 8 front and rear seat's
Momo steering wheel
Momo gear ****
Momo pedal's
double pillar pod with auto gauge oil temp/oil press
sony cd player
kenwood speakers 6X9 in rear shelf
kenwood front speakes
and here it is
[IMG] [/IMG]
[IMG] [/IMG]
i have sold my carbon bonnet and a original one is back in place but will be fitting 22 b side vents and rcm reverse scoop or similar
i have started stripping the engine already and have got a 2.5 block ready to build so i will be posting up my progress as i go along as my money is tight as my other half is pregnant so this build will take me some time 
will post some pics of whats been stripped asap and any help and advice along the way would be great
will be selling some parts soon to fund new parts for the 2.5 as i need a crank bearings and pistons ect...
i have had the car for 4 and half years now and have done work all work my self exept the mapping ect.. and a few weeks ago was on my way to go on a run and the bottom end went
the car is a my 97 catalunya and its number 172 of 200 made for the uk
it was almost standard when i bought it and looked like this
[IMG]
[/IMG]then when i got my hands on it i turned it in to this
[IMG]
[/IMG][IMG]
[/IMG]i was pushing the standard internals to the limits tho as this was the spec of it before it went
Apexi avcr boost controller
Apexi power fc and commander mapped by Jolly Green Monster running 1.4 bar boost
Apexi turbo timer
rather large front mount intercooler
Baileys ventura dump valve
Jap inovations down pipe de cat with heat wrap
Magnex centre section de cat
Afterburner vortex back box jap style
gruppy s style stainless steal headers
andy forrester 20 gram turbo
z32 nissan maf
550 injectors
Walbro 225 fuel pump
fuel lab pressure regulator
Blitz sus filter
Roger Clarke lightweight alloy pulley's
Blue samco silicon hose's
alloy race radiator
Sytec braided fuel hose's
Braided hose's
Crome fuse box/battery cover/air intake pipe/oil cap
spec r alternator and pulley cover
19 row oil cooler
mocal sandwich plate with thermostat
forge motorsport crome header tank
blitz 1.3bar rad cap
Hks oil catch tank
ngk laser platinum pfr7b sparkplugs
Mobile 1 15:50 oil full syntheticExedy organic fast road clutch
Exedy lightweight race flywheel 5.75kg
Exedy thrust bearings
Silkolene pro full synthetic gearbox oil
Dot 5.1 clutch fluid
alcon prodrive front calipers with 330 prodrive vented disks with prodrive pads
Godspeed rear 190 grooved vented disc with Subaru 2 pot caliper's
Goodridge braided brake hoses front and rear
Kevlar rear brake pad's
Dot 5.1 brake fluid
Suspension Modifications:
cusco zero 1 coilovers with pillowball mounts
Front and rear alloy strut brace's
cusco h brace
whiteline drop links front and alloy rear with nylon bushes
Whiteline sway bar bushes front and rear
whiteline uprated gearbox bushes
Whiteline anti-lift kit
sti group n spec engine mounts
sti group n spec gearbox mount
sti group n dog bone gearbox mount
alloy lower arms
Wheels/Tires Modifications:
18" prodrive pfff reps in gunmetal
toyo T1S 215/35/18
prodrive center caps
sti dust caps
Interior/Exterior Modifications:
Black internal front crystal head lamp's
Bootlid been de-badged
Carbon fibre sti 6 spoiler
Carbon fibre bonnet from Scoobyworld
carbon fiber vortex genorator custom fit
Crystal sidelight's/indicator's/fog's
99 front bumper
seibon p1 carbon splitter
Sti mud catcher's
22B style front grill
sti rear lights
Sti 8 front and rear seat's
Momo steering wheel
Momo gear ****
Momo pedal's
double pillar pod with auto gauge oil temp/oil press
sony cd player
kenwood speakers 6X9 in rear shelf
kenwood front speakes
and here it is
[IMG]
[/IMG][IMG]
[/IMG]i have sold my carbon bonnet and a original one is back in place but will be fitting 22 b side vents and rcm reverse scoop or similar
i have started stripping the engine already and have got a 2.5 block ready to build
so i will be posting up my progress as i go along as my money is tight as my other half is pregnant so this build will take me some time will post some pics of whats been stripped asap and any help and advice along the way would be great
will be selling some parts soon to fund new parts for the 2.5 as i need a crank bearings and pistons ect...
Last edited by The Stitcher; May 8, 2009 at 07:27 PM. Reason: add text


Thread Starter
Scooby Senior
iTrader: (12)
Joined: Apr 2006
Posts: 4,067
Likes: 0
From: south wales rhondda
Thread Starter
Scooby Senior
iTrader: (12)
Joined: Apr 2006
Posts: 4,067
Likes: 0
From: south wales rhondda
started stripping some parts of now and started with all the shiney bits first
first to take off was the inter cooler pipes, then the battery , washer bottle then on to the air filter
[IMG] [/IMG]
then i removed the expansion tank and the alternator plus the air con pump,
and have disconected the fuel lines and put the pressure reg to the side for now.
when i rebuild the engine i shall be reversing the manifold to run shorter pipes for less lag as i think the manifold i have can just be turned around and just mods to alternator ect need to be done ,
here is what it looks like and how far i have got so will have another hour down my second home later
[IMG] [/IMG]
[IMG] [/IMG]
first to take off was the inter cooler pipes, then the battery , washer bottle then on to the air filter
[IMG]
[/IMG]then i removed the expansion tank and the alternator plus the air con pump,
and have disconected the fuel lines and put the pressure reg to the side for now.
when i rebuild the engine i shall be reversing the manifold to run shorter pipes for less lag as i think the manifold i have can just be turned around and just mods to alternator ect need to be done ,
here is what it looks like and how far i have got so will have another hour down my second home later
[IMG]
[/IMG][IMG]
[/IMG]
Trending Topics

Thread Starter
Scooby Senior
iTrader: (12)
Joined: Apr 2006
Posts: 4,067
Likes: 0
From: south wales rhondda
right guys been down the garage for an hour and managed to get the turbo off ready for sale , also got the alloy rad off and soaked in the prosess as i had a bit of a blonde moment and had the front end jacked up and pulled the bottom hose off while under it
 lets hope i dont have many more of those
 any how managed to get a few other parts off and will get pics and better info on whats off but as it is at the mo im a little wet and very dirty
so will sort it 2morow
Thread Starter
Scooby Senior
iTrader: (12)
Joined: Apr 2006
Posts: 4,067
Likes: 0
From: south wales rhondda
been having internet probs all yestarday and tonight but managed to get it back on for five dont know how long for tho will get pics up as soon as i get this internet sorted and then an up date
Thread Starter
Scooby Senior
iTrader: (12)
Joined: Apr 2006
Posts: 4,067
Likes: 0
From: south wales rhondda
here are some pics and info of where i have got to so far
got the car jacked up and got bottom hose off rad and disconnected fans then pulled rad out in one
i also removed turbo ready for sale and removed coil pack ect..
[IMG] [/IMG]
[IMG] [/IMG
[/IMG
and some pics of my rad
[IMG] [/IMG]
[IMG] [/IMG]
when i get an hour soon i will be removing my injectors and headers and those will be for sale plus undoing the gearbox ect... then wont be far off getting it out
got the car jacked up and got bottom hose off rad and disconnected fans then pulled rad out in one
i also removed turbo ready for sale and removed coil pack ect..
[IMG]
[/IMG][IMG]
[/IMGand some pics of my rad
[IMG]
[/IMG][IMG]
[/IMG]when i get an hour soon i will be removing my injectors and headers and those will be for sale plus undoing the gearbox ect... then wont be far off getting it out
Last edited by The Stitcher; Mar 7, 2009 at 11:06 PM.
Lee check this out
Carl Davey, specialist Subaru Impreza parts supply
Carl offers some very good products so it's worth a look at for you at this stage.
Carl Davey, specialist Subaru Impreza parts supply
Carl offers some very good products so it's worth a look at for you at this stage.
Thread Starter
Scooby Senior
iTrader: (12)
Joined: Apr 2006
Posts: 4,067
Likes: 0
From: south wales rhondda
Lee check this out
Carl Davey, specialist Subaru Impreza parts supply
Carl offers some very good products so it's worth a look at for you at this stage.
Carl Davey, specialist Subaru Impreza parts supply
Carl offers some very good products so it's worth a look at for you at this stage.
been away all weekend so will get back to it sometime this week
Anytime Lee.... Parallel fuel rails are a must so get that budgeted in, if it's to complex for you with the fittings and the fixing tools talk with Dean as Andy arranged for his to be done on his build.
Thread Starter
Scooby Senior
iTrader: (12)
Joined: Apr 2006
Posts: 4,067
Likes: 0
From: south wales rhondda
Right guys, heres how far i have got..
monday night went down the garage to have a crack at the car, and couldnt believe how easy it was to get the engine out, took around 2 and half hours, and that was my first time off removing an impreza engine...
I removed coolant pipes at the rear of engine, and disconnected the engine wiring plugs each side, removed starter motor, and then removed the pin off the clutch arm with a m6 bolt, removed power steering off engine and put to side, also removed the exhaust headers for easier lift out, and undone all bell housing bolts, and undone engine mount bolts.Then the engine was ready for lifting...
[IMG] [/IMG]
[IMG] [/IMG]
[IMG] [/IMG]
[IMG] [/IMG]
[IMG] [/IMG]
[IMG] [/IMG]
[IMG] [/IMG]
Look all gone...just like that
[IMG] [/IMG]
[IMG] [/IMG]
Engine was now out, and before i could put it on the engine stand to work on, i had too take the clutch and the fly wheel off, and also the front pulley, so i done this by lowering the engine down to the floor, then from the flywheel side i undone the clutch, then was left with the flywheel and the front pulley to undo...
So i first put a spanner between one of the bolts on the rear of the engine and the flywheel, this stopped the movement of it rotating so i could undo the front pulley, which most people have trouble with, undone the flywheel this way too and it worked a treat..then all that was left was to bolt the engine stand to the back, then lift it on to its holder...and job done..
[IMG] [/IMG]
[IMG] [/IMG]
[IMG] [/IMG]
[IMG] [/IMG]
[IMG] [/IMG]
This is how i have left it now, and will be looking forward to start to strip the engine down, and seeing what damage i have done, will keep you all posted as soon as i start working on it, but will be leaving it a couple of days as i have other things to do..
monday night went down the garage to have a crack at the car, and couldnt believe how easy it was to get the engine out, took around 2 and half hours, and that was my first time off removing an impreza engine...
I removed coolant pipes at the rear of engine, and disconnected the engine wiring plugs each side, removed starter motor, and then removed the pin off the clutch arm with a m6 bolt, removed power steering off engine and put to side, also removed the exhaust headers for easier lift out, and undone all bell housing bolts, and undone engine mount bolts.Then the engine was ready for lifting...
[IMG]
[/IMG][IMG]
[/IMG][IMG]
[/IMG][IMG]
[/IMG][IMG]
[/IMG][IMG]
[/IMG][IMG]
[/IMG]Look all gone...just like that
[IMG]
[/IMG][IMG]
[/IMG]Engine was now out, and before i could put it on the engine stand to work on, i had too take the clutch and the fly wheel off, and also the front pulley, so i done this by lowering the engine down to the floor, then from the flywheel side i undone the clutch, then was left with the flywheel and the front pulley to undo...
So i first put a spanner between one of the bolts on the rear of the engine and the flywheel, this stopped the movement of it rotating so i could undo the front pulley, which most people have trouble with, undone the flywheel this way too and it worked a treat..then all that was left was to bolt the engine stand to the back, then lift it on to its holder...and job done..
[IMG]
[/IMG][IMG]
[/IMG][IMG]
[/IMG][IMG]
[/IMG][IMG]
[/IMG]This is how i have left it now, and will be looking forward to start to strip the engine down, and seeing what damage i have done, will keep you all posted as soon as i start working on it, but will be leaving it a couple of days as i have other things to do..
Thread Starter
Scooby Senior
iTrader: (12)
Joined: Apr 2006
Posts: 4,067
Likes: 0
From: south wales rhondda
hi kev, will be going for a 6 speed box eventually, but its gonna cost me an arm and a leg to build this engine at the moment, but before i put the engine back in, i will have to get the 6 speed box first me thinks..as by the time i finish with this build it should be running some serious power..

Thread Starter
Scooby Senior
iTrader: (12)
Joined: Apr 2006
Posts: 4,067
Likes: 0
From: south wales rhondda


Former Sponsor
iTrader: (4)
Joined: Jan 2001
Posts: 16,548
Likes: 2
From: ECU Mapping - www.JollyGreenMonster.co.uk
seen a few sets supposivly from sti3/4 that aren't.. just make sure the shims are under the buckets ..
Simon
Thread Starter
Scooby Senior
iTrader: (12)
Joined: Apr 2006
Posts: 4,067
Likes: 0
From: south wales rhondda

Thread Starter
Scooby Senior
iTrader: (12)
Joined: Apr 2006
Posts: 4,067
Likes: 0
From: south wales rhondda